Introduzione

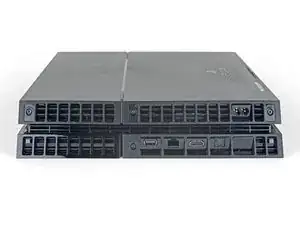
Segui questa guida per sostituire la scheda madre della PlayStation 4.

La scheda madre e il lettore ottico sono associati (paired), rimpiazzare solo la scheda madre causerà il malfunzionamento del lettore ottico. Accertati di aver collegato la scheda madre al lettore ottico associato e di aver rimpiazzato entrambi.

Scollega la PS4 dal cavo di alimentazione prima di iniziare a smontare la PS4.

  1. XODFiLajUW1pXiQT
    XODFiLajUW1pXiQT
    Z15kif4HQcDYPxVU
    ujUlbGSNrlqRlycV
    • Prima di iniziare, assicurati che la PS4 non sia collegata alla corrente.

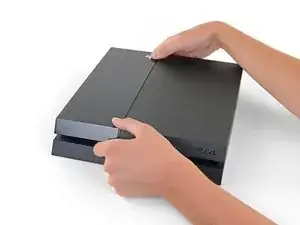
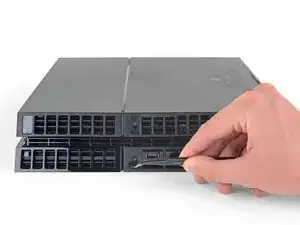
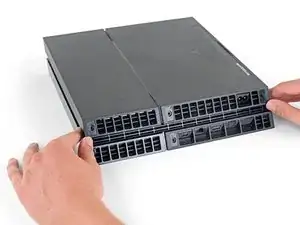
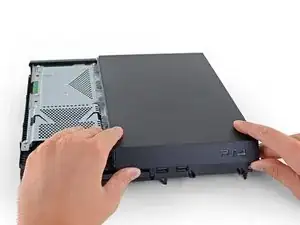
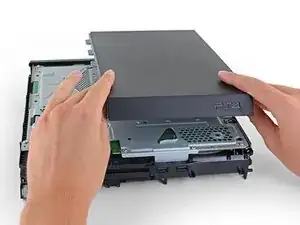
    • Afferra la PS4 con entrambe le mani seguendo la fessura nella copertura superiore.

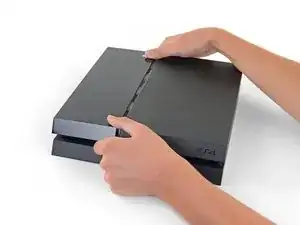
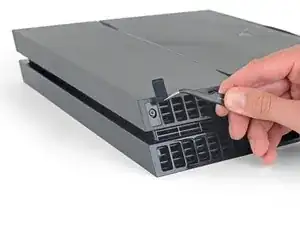
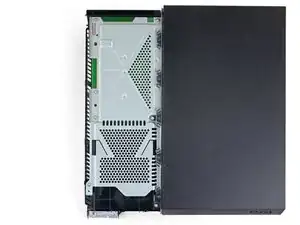
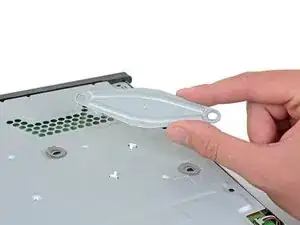
    • Spingi la parte della copertura superiore con la finitura lucida con i tuoi pollici finchè non scatta verso l'esterno.

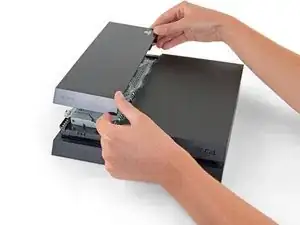
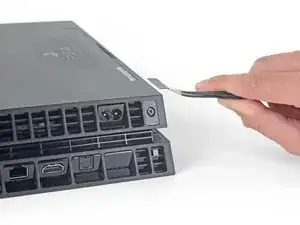
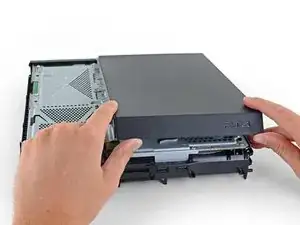
    • Alza la copertura lucida per rimuoverla dalla PS4.

    I have a CUH-1102A version of this PS4.

    Would this teardown work for it?

    Cary B -

  2. 4jG4MsFWDV6TOc4K
    4jG4MsFWDV6TOc4K
    RTxxNkPWMlPqEFCE
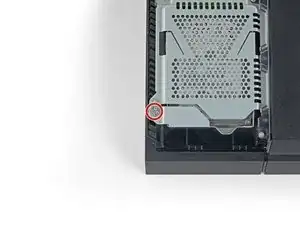
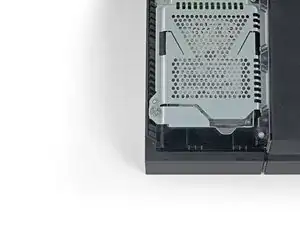
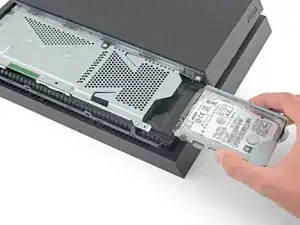
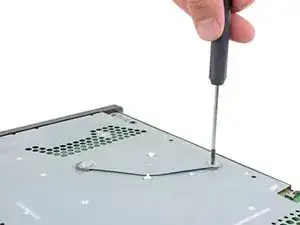
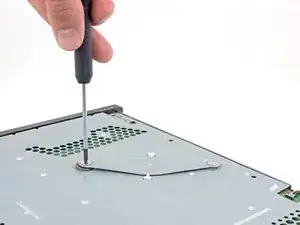
    • Usa un cacciavite a croce Phillips per rimuovere la vite da 6,5 ​​mm che fissa la staffa del disco rigido al case.

  3. cVNDJIs1PHwFiv1K
    cVNDJIs1PHwFiv1K
    bZq6BRMigBrWhATA
    p3SAR2gJw22qmID5
    • Estrai la staffa del disco rigido dal contenitore.

    • Fai attenzione a non far cadere il disco rigido. I componenti interni sono fragili e possono essere danneggiati da urti violenti.

    Can these take an SSD?

    Cary B -

  4. 21LJYnUT534diPkY
    • Rovescia la PS4 disponendola con il retro rivolto verso di te.

  5. kywHHmkOcswPFDjm
    kywHHmkOcswPFDjm
    g3p1nmGqDLvNYlwD
    HVJTWJOoL6cUcoBS
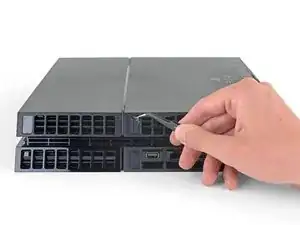
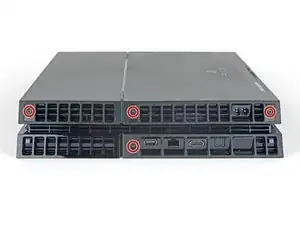
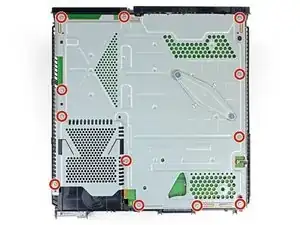
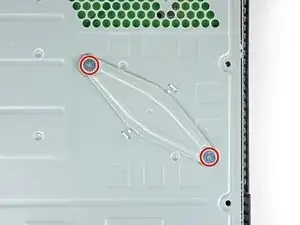
    • Usa le pinzette per rimuovere i due adesivi al centro del retro della PS4 per esporre due viti della scocca.

  6. QGDNpTn4LrZHSr2F
    QGDNpTn4LrZHSr2F
    MLVk3bQRWjJpjhKh
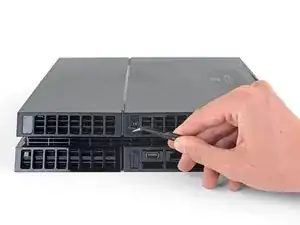
    • Usa delle pinzette per rimuovere con delicatezza le cover delle viti che trovi in ciascuno dei due angoli, esponendo altre due viti.

    What If my PS4 doesn't have the two screws on the side

    Michael Jimenez -

    I should imagine that plastic cover will come off?

    How did you go?

    Cary B -

  7. EoWfJjtMRGNijIDA
    EoWfJjtMRGNijIDA
    kPwQlcOBVwv2PxuA
    • Rimuovi le 4 viti Torx Security da 7.2mm dal retro della PS4.

    I only have two screws, those in the middle of the console.

    Oscar Martinez -

    Have you removed the plastic covers mentioned in the previous step? That will expose the other two screws.

    Sam Omiotek -

    same, here. there are only the middle screws, no covers or screws on the sides. and it sits pretty tight

    Johannes Müller -

    turns out 12XX models are different. Look at this for reference: https://www.youtube.com/watch?v=Hpr0z0ve...

    Johannes Müller -

    This video guide is very useful, thank you. The disc drive itself is different than this ifixit guide too

    UnitedShoes -

    Yes there is slight variations between the first models, and the second gen and on models. I have an original and only has the two screws in the middle, removal of the cover remains the same.

    Mary Westphal -

  8. kbpHqgpXdtdVifwo
    kbpHqgpXdtdVifwo
    gtKNupdgQ44yDPVf
    • Solleva la scocca inferiore con le mani e rimuovila.

    • La scocca inferiore è bloccata in posizione da clip di plastica. Può rivelarsi necessario applicare una forza apprezzabile per rimuoverla.

    sur la version 2 de l ps4 fat il n'y a que les 2 vis du milieu. Comment défaire le boîtier ?

    nlvolle -

  9. coGRVtdMr6vYQIWw
    coGRVtdMr6vYQIWw
    BGP5HaSrJNavVLaN
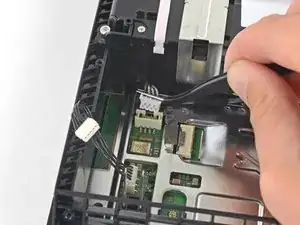
    • Usa delle pinzette per estrarre, sollevandolo, il cavo dell'alimentatore e disconnettere l'alimentatore dalla scheda madre.

    • Se il connettore non si stacca, utilizza con delicatezza uno spudger per scollegarlo.

    This part looks dangerous. There should be a flag/warning not to destroy that cable yes?

    Shawn -

    I second Shawn's comment. That cable seems to be very fragile, and one of the wires snapped on mine while removing the cable. It wouldn't have bothered me so much, if it wasn't a pain to find a replacement for it.

    Matt Gaia -

    The tweezers used here, do not cut it. Not enough grip.

    I had to use a set of needle nose pliers to remove this.

    Cary B -

    Power supply connection stuck. I don't want to damage it

    Nick Alex -

    What you need to do here is be patient. Do not pull the wires. Get some fine nosed pliers, wiggle the white connector from left to right in small movements and edge it out slowly. You can also use your nails one finger at each edge of the white connector to do this.

    David Harkness -

    Its really hard but i managed it with both of the tweezers/pincers at the same time


    1. Keep in mind to pull not too hard on the wires and make step 2 and 3 simultaneously!

    2. the straigt and wider tweezer to pull the white connector itself
    (top and bottom grip)
    3. the small and angled tweezer to pull the wires carefully
    (as shown on the picture above)

    dinkelberg01 -

    Another option, is to remove the screws holding it down, leave the cable in place and lift it out carefully, revealing the other end of the connection. The hidden side of the connection wire is easier to get a handle on.

    Mary Westphal -

    I concur with David, some patience and a lot of wiggling did it for me despite the stubbornness of the connection. Does seem like this one varies a lot in how difficult it is to remove.

    hazelrat -

    My connector wouldn't budge no matter how much I wiggled it. I solved it by lifting the power supply out and disconnect the connector at the other end (mainboard end)

    _I_ -

  10. QuWBy6PULou5kCNl
    QuWBy6PULou5kCNl
    hgyBH31OKmXWCda6
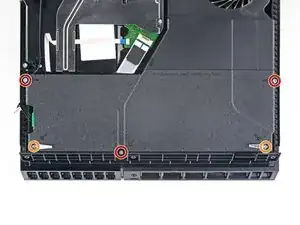
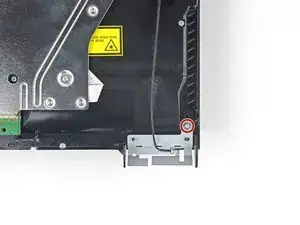
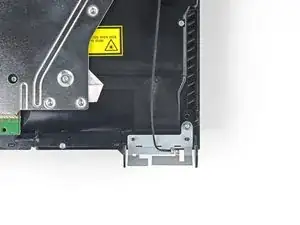
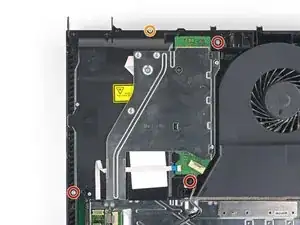
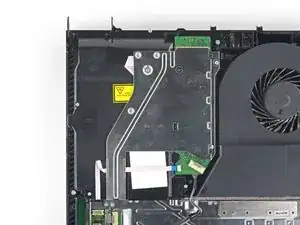
    • Rimuovi le tre viti Torx security da 9,7 mm.

    • Rimuovi le due viti a croce Phillips da 41 mm e le staffe.

  11. SpnmPM4gMehIdDX3
    SpnmPM4gMehIdDX3
    RarAwfBCLQdtutfe
    jVDy11JFDXQsv43q
    • Solleva l'alimentatore e rimuovilo dalla PS4.

    • L'alimentatore è tenuto ben fermo da delle sporgenze sul lato sinistro. Potrebbero essere necessari diversi tentativi per rimuoverlo del tutto.

    • Durante il riassemblaggio, assicurati che le sporgenze siano allineate, poi premi l'alimentatore fino a rimetterlo al suo posto.

    How do you remove the battery wires? I’ve personally been wiggling it to no effect, is there a certain way i have to pull it out, and should i pull it out of the power supply or the console?

    Tubby -

    Retirar en vertical, derecho hacia arriba. Sino puedes doblar uno de los tornillos largos

    FabianCampos -

  12. EcgmyieGDdcMElOU
    EcgmyieGDdcMElOU
    oES1wXquYuIymPTQ
    • Usa la punta di uno spudger per disconnettere il cavo dell'antenna dalla scheda madre.

    dumb question but I’m very new to this. when reconnecting the wifi antenna, does it just click back on? I'm hesitant to try this procedure if I need to solder anything since I have zero experience.

    cliodhna -

    Yup! Hold it in place and press straight down on top of it with your finger or a spudger. If you have any other cable/connector questions see this guide.

    Sam Omiotek -

    Heads up, you might have a black philips screw above the power connector. It fixes the motherboard and EMI shield on if you're dealing with an 1100 model.

    Dzmitry -

  13. MCxbfUY6UaKrmKCQ
    MCxbfUY6UaKrmKCQ
    TVMGZOKQUI53asHY
    62BX2LGhKLgvIJmY
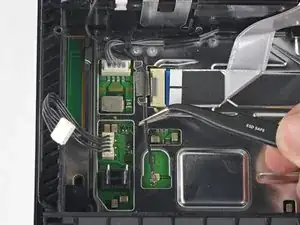
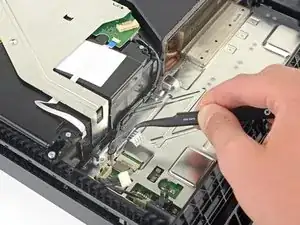
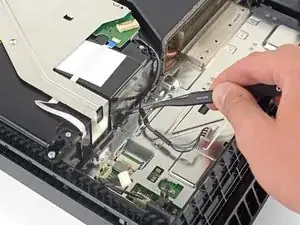
    • Afferra il cavo dell'antenna con le pinzette o le dita e spostalo fuori dalle guide dei cavi.

  14. UPXA4VifbGFrvlIj
    UPXA4VifbGFrvlIj
    nXPq5UZ6AQwMh4aU
    M33e21yyIJ6ZAGlc
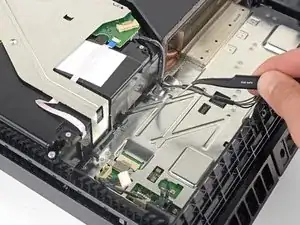
    • Usa le pinzette o le dita per sfilare il cavo dell'antenna da sotto il cavo del drive ottico.

  15. MIQAcQeKr1eTTVwf
    MIQAcQeKr1eTTVwf
    NxEPgJZruCIGLEhI
    • Rimuovi la vite Torx security da 9,7 mm che tiene ferma l'antenna.

    This does not work on the newer 12 series

    raseemhassan123 -

    Thank you! I thought I was insane. I've been trying to figure out where the hell this thing goes and the seat for it is like an inch from the corner. It's driving me mental trying to figure out how to put this back on

    Leo Halliwell -

  16. GUboTTDfFRGvEiF1
    GUboTTDfFRGvEiF1
    LiMR2mf1HehdEOsR
    • Rimuovi l'antenna Wi-Fi.

    When I’m connected to wifi it does good for awhile then it disconnects from the wifi and I can’t use the controller. I have to turn the game off and disconnect power source. Do you think the wifi antenna could be the problem or doin have another situation.

    Jay Pax -

    I would check the antenna connection to the motherboard, if it's properly seated I don't think it's the problem.

    hazelrat -

  17. UtJl22epDDxnDmXK
    UtJl22epDDxnDmXK
    EApjrGivEtJ2BSL2
    BdKvel4uAd3DTKJf
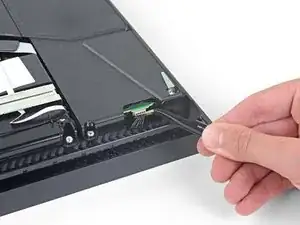
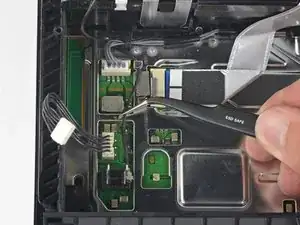
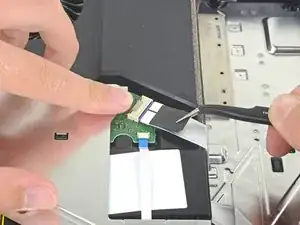
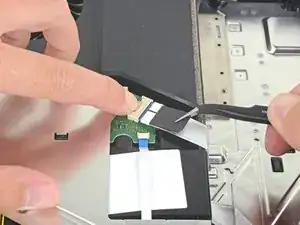
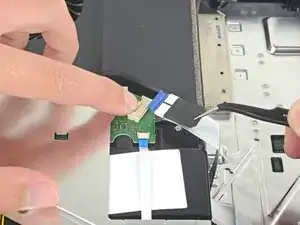
    • Con un'unghia premi sulla leva di rilascio del cavo a nastro in cima al lettore ottico.

    • Usa le dita o le pinzette per disconnettere il cavo a nastro, tirando la linguetta nera.

    • Non devi premere la leva di rilascio quando reinserisci il cavo. Un click segnala la corretta riconnessione del cavo.

    Please note that the younger generations of PS4 have a different setup of connectors to the driver, its sometimes 3 of these as presented but with different sizes and no pad to press down. However, dont be alarmed, just use the pair of tweezers and gently pull them off the connectors of the motherboard. Grab on tight on the blue area of the ribbon cable and pull gently! They tend to sit tight so take some time and patience on this.

    Mathias Kopp -

    Thank you!!!

    Nick Bymolt -

  18. 1LvBVqmqpBYstDEE
    1LvBVqmqpBYstDEE
    iTpPFQ2FtODogYS2
    GpRFwcaYGWPInGpL
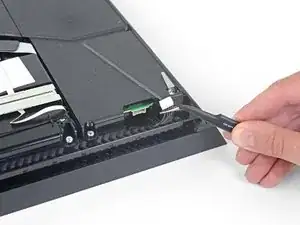
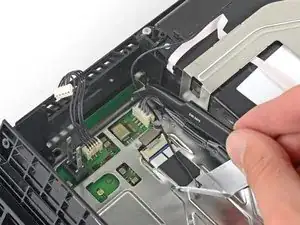
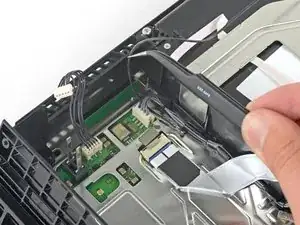
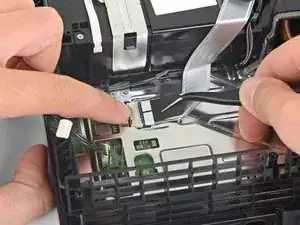
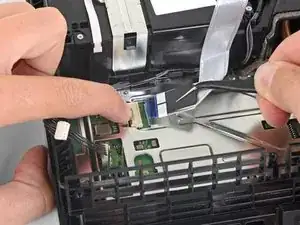
    • Usa le unghie per tenere premuta la leva di rilascio del cavo a nastro connesso alla scheda madre.

    • Usa le dita o le pinzette per disconnettere il cavo a nastro tirando la linguetta nera.

    • Metti da parte il cavo a nastro per il riassemblaggio.

    • Non devi premere la leva di rilascio quando reinserisci il cavo. Un click segnala la corretta riconnessione del cavo.

    bei mir ist das leider defekt Plastikteil abgebrochen wie kann ich das ersetzen

    kevin pospiech -

    Is it possible to buy the white port for ps4? My one seems to be damaged so won't hold the ribbon cable.

    dorszes -

    This may be a difficult fix, as the white port seems to be integrated into the motherboard. You could try simply holding the ribbon cable down with electrical tape, if it's just a fitting issue?

    hazelrat -

  19. TeTMAoimw4tWu3an
    TeTMAoimw4tWu3an
    Z4EVnPGtququsxGP
    • Usa le dita o le pinzette per disconnettere il cavo del lettore ottico dalla scheda madre.

  20. VHP4L4gyrtPc5nC1
    VHP4L4gyrtPc5nC1
    1B43RCFxNHTSVdLf
    bLYmLS4WOufOyEwM
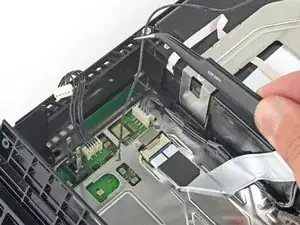
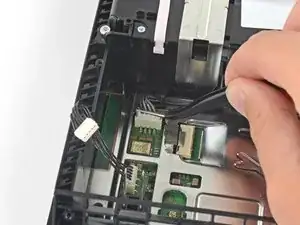
    • Usa le dita o le pinzette per rimuovere il cavo del lettore ottico dalle guide che lo tengono fermo.

  21. roUPxyMotoTmVYpU
    roUPxyMotoTmVYpU
    JbWvkobm2uRPxtZQ
    • Rimuovi le quattro viti che tengono fermo il lettore ottico.

    • Tre viti Torx da 9,7 mm

    • Una vite a croce Phillips da 6,2 mm

  22. 6O3MEDhAAGCqpqRa
    6O3MEDhAAGCqpqRa
    GxXAvyXwtYHZISCU
    • Solleva il lettore ottico fino a rimuoverlo dalla PS4.

  23. kPI1VHvEPfPPBORI
    kPI1VHvEPfPPBORI
    m4kAwQ1mj2a3NCyY
    • Rimuovi le due viti Torx da 9,7 mm che tengono ferma la scocca superiore.

  24. GL32Tp1yyqTGWPe2
    GL32Tp1yyqTGWPe2
    1W3k5Y1O3SiJFIoY
    16H6rMkNPl2j5QOS
    • Solleva la scocca superiore e sfilala spingendola indietro per rimuoverla dalla PS4.

    • La scocca superiore è fissata da delle clip di plastica sul lato frontale. Per separare la scocca dalle clip è necessaria una certa forza .

    “Significant force” is a bit of an understatement. It’s like it’s superglued together..

    Wouter Rietberg -

    You absolutely should not need a lot of force for this. In the picture above, press upward using the left thumb from under the outer lip of the cover. You may need to pull it slightly toward you as well. Once that half is lifted, the right-hand side is still firmly attached. Keeping the left-hand side of the top separated, flip the unit over. Along the right-hand side, press the outside lip with your thumb about 2 thumb-widths down from the corner. There is a tab here and once released, the cover comes off easily and off in the back. Otherwise, you’ll be placing stress vertically (and rotationally) on the first tab on the side.

    Donovan Ray -

    I appreciate this feedback – thank you. This sounds like a safer method. I’ll test it on our guide unit and update the procedure.

    Sam Omiotek -

    THIS SET OF INSTRUCTIONS FROM YOU, IS ABSOLUTELY SENSATIONAL.

    I got this cover off quite easily. Still some resistance, but I didn't need this significant force at all.

    THANK YOU!!

    :)

    Cary B -

    There is a piece of plastic underneath the casing here. The PS4 I worked on got so hot on the inside that part of the plastic started to melt and warped some inside the metal plate underneath. This made it tricky to open the case, but by using spacers I managed to get it off.

    Kerstin -

    I found an easier method for myself is to have the console upright and pointed away from myself. From this position, wrap your fingers over the top of the cover, hooking it in its front with the last digits of each finger. This allows you to press with your palm into the top of the console and pry in an upward/outward motion. This feels safer as it took much less force to disengage the problematic clip.

    Callie -

  25. YWNY2VNT2SqRLxqF
    YWNY2VNT2SqRLxqF
    px2FCsaZYqeUcIJc
    • Rimuovi le dodici viti Torx da 9,7 mm che tengono ferma la schermatura EMI superiore.

    In my PS4, there is a small black Philips screw behind where the power lead connects to the motherboard. That screw connects the EMI shield to the inner metal where the power supply sits.

    Wouter Rietberg -

    I had exactly the same thing, and mine is a fairly old model of PS4. Confused me for a moment until I spotted it.

    Tom G -

    Can confirm this.

    This screw was on mine. To anyone reading this, flip the PS4 over and look where the pain in the ass power supply connector is.

    Black screw right there.

    If you have that screw of course. :)

    Cary B -

  26. fTffq2EBGNwnytyW
    fTffq2EBGNwnytyW
    DN3ZJPAhdkYapAKT
    Lf1QluHUHD4uNKrr
    • Questo passaggio ti mostrerà come rimuovere la piastra di pressione.

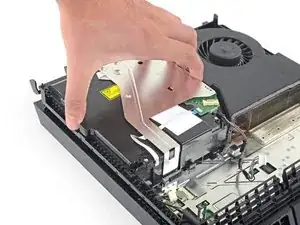
    • Rimuovi le due viti a croce Phillips da 15,6 mm.

    • Svita gradualmente le due viti facendo mezzo giro alla volta per ognuna.

    • Alternati tra le due viti per mantenere una pressione costante sulla piastra.

    • Non svitare completamente una vite alla volta lasciando avvitata l'altra perché potresti danneggiare il processore.

    why does my PS4 have some metal thing attaching the plate to the metal beneath it?

    Beetroot -

    My PS4 also has 2 metal rings around each screw hole and 4 metal pieces 2 on each side closing in the same shape as the pressure plate as you take the pressure plate off?

    Geoff King -

    How strong do you tighten the screws when re-applying the plate?

    To the max, or stop one to two turns before?

    Andreas Raum -

    I've tightened mine until the screws became taut and I've not had any stability issues.

    hazelrat -

  27. 5keR1RSsB2b3iTLa
    • Rimuovi la piastra di pressione.

  28. RYfSgfFXDlGid341
    RYfSgfFXDlGid341
    FigrCWmt6JZbUiMh
    • Rimuovi la schermatura EMI superiore.

    This is the 2nd PS4 I have disassembled and on both units I have found there is a black Phillips screw securing the upper EMI shield. This should be mentioned in the teardown as the EMI shield cannot be removed completely without first removing this screw and you risk damaging the EMI shield in the process . To locate the screw turn the unit over and you will see a small black Phillips screw located near the power supply prongs. There will be a set of arrows pointing to the screw. Once you remove this screw then you can fully release the upper EMI shield.

    Geoff King -

    Ditto. This is my first time disassembling a PS4. EMI shield didn’t lift off easily on one corner. Noticed the black Phillips screw holding it in place. I scrolled up in the tutorial to see if I missed it. Easy enough.

    Kwan Park Tom -

    All the ps4's I opened had this one Phillips screw. And I've cleaned/repaired ~12 units. So I think it's safe to assume that (almost) every one of them have it.

    Manoel -

    throw it way, electromagnetic fields dont exist

    Isaac Voorheis -

  29. BLJqWPsljRAMmBf6
    BLJqWPsljRAMmBf6
    uTyWtC3ItUpmEhY3
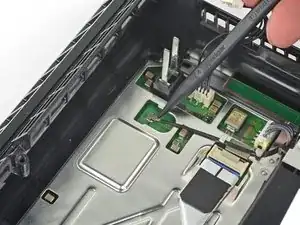
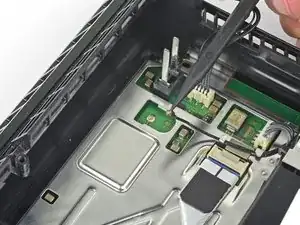
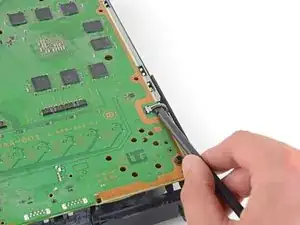
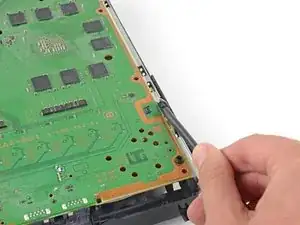
    • Inserisci l'estremità piatta di uno spudger tra il cavo della ventola e la scheda madre.

    • Torci lo spudger per sollevare il connettore e disconnetterlo dalla scheda madre.

    Mir ist der Stecker leider von der Platine gerissen 🫣 kann man den wieder dran löten?

    V. B. -

  30. 4RgFwh1JR6AENLhs
    4RgFwh1JR6AENLhs
    CtVlhGBWoYOXTLyi
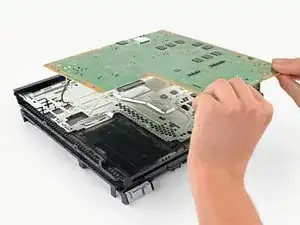
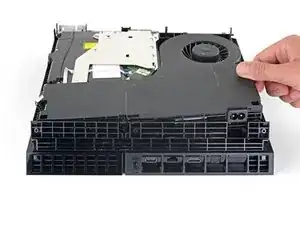
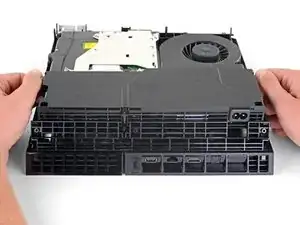
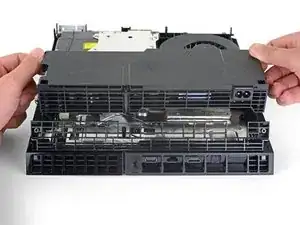
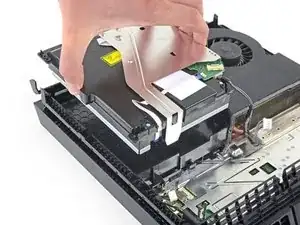
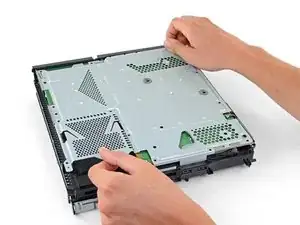
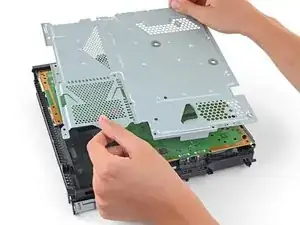
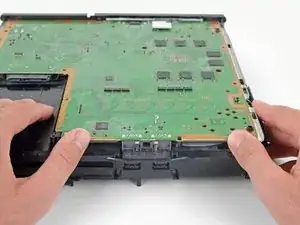
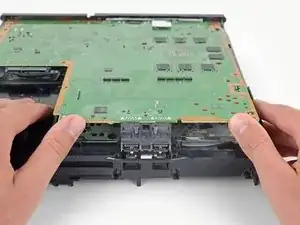
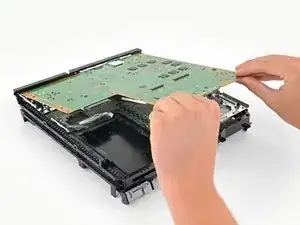
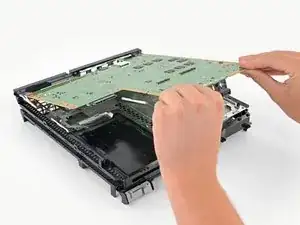
    • Afferra il bordo della scheda madre dalla parte frontale della PS4.

    • Solleva la scheda madre fino a che le porte USB siano libere dalla scocca.

  31. vTfxB4lRi1NjiPLX
    vTfxB4lRi1NjiPLX
    CPwBRFVQEVALTJw1
    dobTJxmcCQVaXEwK
    • Solleva la scheda madre fino a farla uscire dalla PS4.

    • Applica uno strato di pasta termica al processore prima di installare la scheda madre seguendo questa guida.

    • La mancata applicazione della pasta termica causerà surriscaldamento e danni alla PS4.

    • Inserisci prima il lato I/O della scheda madre, poi inserisci l'altro lato abbassandolo.

    That shiny metal cover box on the opposite side of the hdi port shown in picture 30 at the very front is showing over heating signs I guess very brown around the edges I think is causing my PS4 not to show up on tv any ideas how to fix that hdi port looks fairly good to me but the black plastic port shows burnt signs as well that's on the same side of the HDMI port but the shiny metal cover is on the opposite side

    Newuser7878 -

Conclusione

Per riassemblare la PlayStation 4, segui i passi indicati al contrario.

Porta i tuoi rifiuti elettronici a un riciclatore certificato R2 o e-Stewards.

La riparazione non è andata secondo i piani? Vai sulla nostra comunità Risposte per trovare aiuto nella risoluzione dei problemi.

Confronta la parte nuova con la parte da sostituire, potresti dover trasferire alcuni componenti o rimuovere protezioni adesive dalla parte nuova prima di installarla.

Sam Omiotek

Membro da: 25/02/19

71875 Reputazione

17 commenti

Regarding the three wire plug in step 20 - is there a good way to repair this piece if, say, you pulled the wires out of the connector by accident? is there a place to get a replacement part?

Ryan Statz -

I have tried to replace the hdmi port however being somewhat of an idiot I slipped and knocked off onto the little black squares just behind the port on the left hand side. Does anyone know what these are?

Geoff Parker -

contacts of the motherboard

lillarrypimp1993 -

You may be talking about capacitors that are critically important for the unit to function.

South30 -

You mean that little brown parts next to the desoldered HDMI port chip? Seems to be capaciators.

Check it with a multimeter: No connection through that parts: Capaciator, Connection through that parts: Coil

http://www.fingers-welt.de/imghost/up/20...

Sebastian Coenen -

Ok so I was taking mine apart, and while I was separating the ribbon wire from the optical drive during step 7, I broke the top off the connector by accident. I thought I could fix it with hot glue, but my ps4 doesn't read disks (at all, doesn't even know there's a disk in the drive). Is there a way to repair this without getting a new drive?

jonathanhart54 -

when I bought the replacement motherboard and optical drive and installed everything, I got a message saying connect USB with software update. Is this because I'm using my original hdd from my original mobo+ optical drive that is different from the hdd my replacement parts came with?

Quaymetsu -

Could you please tell me where you bought a replacement motherboard from as i've been looking everywhere!?

Roger flaps -

You cannot just replace the motherboard on a PS4. The motherboard is married to the logic board on the blu-ray drive. Swapping the motherboard without carrying over the original logic board will render the drive useless.

Will -

I’ve read along the guides that a BDP-020 optical drive can work with an SAA-001 motherboard, but mine still receives the CE-35888-2 error. Am I replacing the incorrect part?

Cristian Nickles -

Hi my ps4 has stopped working and doesnt turn on at all, ive tried different outlets and different power cables for the ps4, still no luck. Ive pulled it apart and had a look at the power supply board and mother board aswell as dusted it all out. The mother board has yellow stains/ dots near the hdmi port and some other random spots around the mother board. I have the first ps4.

Does anyone know whats wrong? Id rather fix it than pay for a new one.

Jared Breen -

Habe mall eine frage habe meine sauber gemacht die ps4.und jetzt geht die kurz an und wieder aus was kann ich machen jetzt

dst11 -

Hi all, I am facing this CE-34878-0 error on all games. Reinstalled the software, replaced the HDD and reinstalled latest software but this error is keep coming. What is the solution.

Salman Hameed -

Just wondering, can a ps4 work without an optical drive, like being all digital?

Peter Wright -

I am looking to replace the motherboard on my PS4. It’s had an HDMI replacement before, worked fine, but after I replaced the thermal paste it powers on but I don’t get any picture. The HDMI port seems fine all the pins seem ok. I was think of just replacing the whole motherboard all together any advice? Are PS4 motherboards swappable?

Daniel Munsaka -

Excelente 😃

Alexander Henriquez M. -