Introduzione

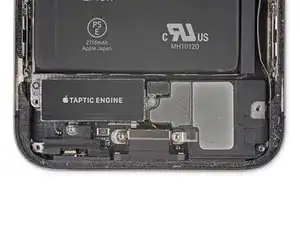
Il Taptic Engine produce le vibrazioni e il feedback aptico del tuo iPhone. Segui questa guida per rimuovere e/o sostituire il Taptic Engine nell'iPhone X.

Questa guida include la rimozione completa del gruppo display allo scopo di evitare tensione eccessiva e danni ai cavi del display mentre lavori. Se pensi di essere in grado di rimuovere il Taptic Engine senza mettere in pericolo i cavi del display, puoi saltare i passi che riguardano la loro disconnessione.

  1. BO6lEF2W1kX5S1sI
    • Prima di iniziare, scarica la batteria del tuo iPhone sotto il 25%. Una batteria agli ioni di litio carica può prendere fuoco e/o esplodere se viene perforata accidentalmente.

    • Spegni il tuo iPhone prima di iniziare a smontarlo.

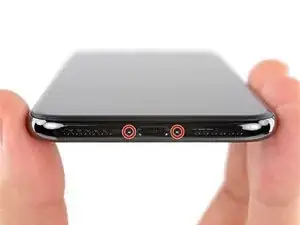
    • Rimuovi le due viti Pentalobe lunghe 6,9 mm sul lato inferiore dell'iPhone.

    • Se le viti sono rotte o danneggiate, sostituisci le viti.

    • L'apertura del display dell'iPhone comprometterà le sue guarnizioni impermeabili. Procurati guarnizioni di ricambio prima di procedere al passo successivo oppure stai attento ad evitare di esporre il tuo telefono ai liquidi se non sostituisci le guarnizioni.

    There are 6.81mm long screws!

    Daniel -

    One of the pentalobe screws is stripped :( - suggestions for how to get it out?

    cgtyoder -

    same situation here

    kaunomarcius -

    Same issue for me too, how do I get the stripped screw out?

    patronics -

    Update: I was able to get the “stripped” screw out using another Pentalobe-2 screwdriver bit from another company. It seems it wasn’t the screw, but the screw driver that was actually stripped. Hence why the other screwdriver kit I got came with 3 of this bit, I suppose.

    patronics -

    I ended up going to a jewelry store, and they drilled down into the screw, with of course an incredibly tiny bit. That allowed me to insert the P2 driver, and I was able to unscrew it at that point. Good luck!

    cgtyoder -

    Same issue with the stripping. The tip of the iFixit P2 head in my $70 kit just ground off on the first screw and that was that. Not much you can do.

    Kyle Harris -

    yes correct the same happened to me, the screws were perfect shaped never been open and as soon as i used the P2 it stripped the screws, seems like the P2 is slightly smaller but Dremel kit with a very small drill bits and precise knife tool is the way to go.

    Dulce Vidal -

    This step in automatically followed through, without any thought. Why remove these screws? Can anybody explain? The Screen is detachable all the same, with them well screwed in…

    Uri -

    These screws attach to a plate that’s part of the screen half of the phone. If you succeed in detaching the screen without removing those, it would seem reasonable that you will have damaged that plate or its ability to keep the two halves together.

    Dan Long -

    @Dan Long is right

    Uri -

    Clean out the pentalobe screw heads first so the tool goes all the way in. A small sewing needle works well to loosen any build up and then press some putty/chewing gum into the screw head and pull away quickly for a final clean out.

    William Olstad -

    The this kit should include screws because you’re going to strip them. Can’t even get past step one. Did anybody figure this out

    justin -

    Never opened my phone ever, when I went to look at the first step.. I noticed one of my screws was stripped. I thought it was impossible, but I removed the non stripped one, then once I got to the stripped one.. I learned my assumptions were correct. I bought this one straight from the apple site years ago ahaha Any tips to remove the stripped screw?

    Clarence Williams -

    William Olstad's tip about cleaning the screws with a needle and a bit of poster putty worked well for me. There was a lot of crud in there! The opening is shallow, so it's easy to see how the screwdriver wouldn't catch with even a bit of grit in the way, No problem getting the pentalobe screws out with the ifixit screwdriver.

    punkinann -

    If all else fails, very carefully cut a slot across the head of the screw with a Dremel tool using a diamond bit that dentist will gladly give you - I ask my dentist for used bits; and chuck them in a drill bit chuck designed for Dremel. The slot allows you to use a tiny, straight blade screwdriver. You can reuse the screw or replace it with a new pentalobe screw.

    Dan Smith -

  2. Whblnhy2uvYmFjIL
    Whblnhy2uvYmFjIL
    4URQtwUtqSQUKdHH
    NgjPkqJtEMhTXkd3
    • Se il tuo iPhone ha uno schermo crepato, evita di peggiorare la situazione e di tagliarti: usa del nastro adesivo per coprire le crepe.

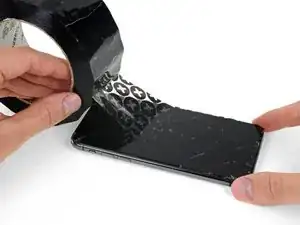
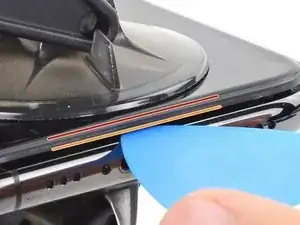
    • Attacca diverse strisce di nastro adesivo da pacchi trasparente sopra lo schermo finché non è completamente coperto.

    • Indossa occhiali di protezione per proteggere gli occhi dal vetro che potrebbe liberarsi durante la riparazione.

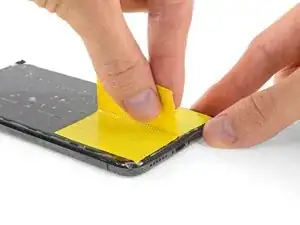
    • Se nei prossimi passi non riesci a far aderire la ventosa, piega un pezzo di nastro adesivo resistente (come del nastro americano) a forma di maniglia e usa quello per sollevare lo schermo.

    • Se non funziona nulla, puoi incollare la ventosa allo schermo con della supercolla cianoacrilica.

  3. aaO4KYlBJShASHjk
    aaO4KYlBJShASHjk
    1r6VLlUjodppndSN
    BMhMJ35CLUOmyNqB
    • Le tre fasi successive mostrano come si utilizza l'Anti-Clamp, uno strumento che abbiamo progettato per facilitare la procedura di apertura. Se non stai utilizzando l'Anti-Clamp, salta i tre passaggi successivi per un metodo alternativo.

    • Per istruzioni complete sull'uso dell'Anti-Clamp, consulta questa guida.

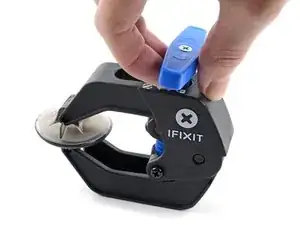
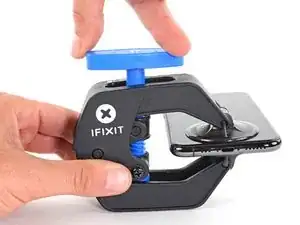
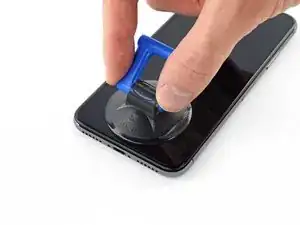
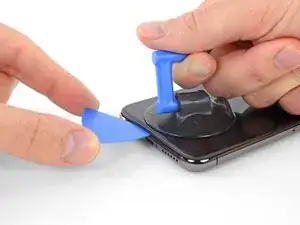
    • Tira indietro la maniglia blu per sbloccare i bracci dell'Anti-Clamp.

    • Fai scorrere i bracci oltre al bordo destro o sinistro dell'iPhone.

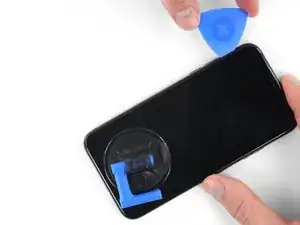
    • Posiziona le ventose vicino al bordo inferiore dell'iPhone: una sulla parte anteriore e una sulla parte posteriore.

    • Premi le ventose nell'area di interesse.

    • Se la superficie del dispositivo è troppo scivolosa per consentire all'Anti-Clamp di aggrapparsi, è possibile utilizzare del nastro da imballaggio per creare una superficie più aderente.

  4. fm1Txb6ZWoZVRccg
    fm1Txb6ZWoZVRccg
    ASYBeEfJh2IqKXlL
    qYIoimNJqUrEuJAT
    • Spingi la maniglia blu in avanti per bloccare le braccia.

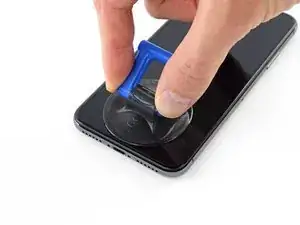
    • Gira la maniglia di 360°, in senso orario, fino a quando le ventose non aderiscono all'iPhone.

    • Assicurati che le ventose rimangano allineate tra loro. In caso contrario, assicurati di riallinearle, allentando le ventose.

  5. fqtITHlwZLOFLmTY
    fqtITHlwZLOFLmTY
    321YFxdKNFRFVwk3
    YctteqQxMcE3kxyP
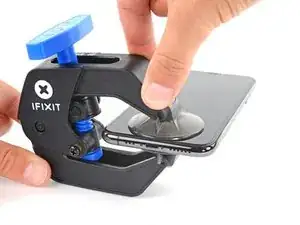
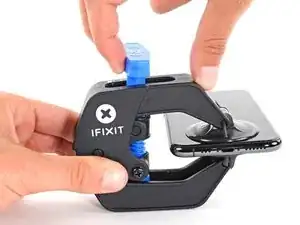
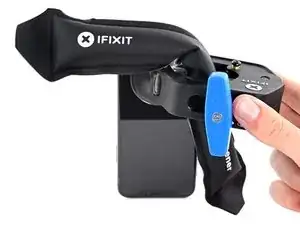
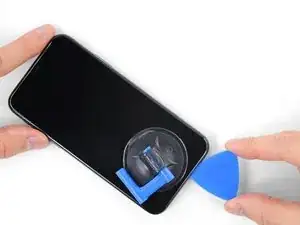
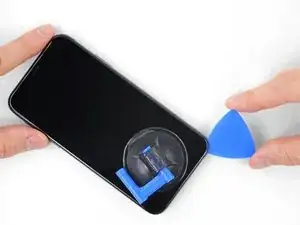
    • Spingi la maniglia blu lontano dalla cerniera per attivare la modalità di apertura.

    • Si può anche usare un asciugacapelli, una pistola termica oppure una piastra riscaldante. Si ricorda che temperature troppo alte possono danneggiare il dispositivo, in particolare lo schermo e la batteria. Procedi con cautela.

    • Piega l'iOpener in modo che sia appoggiato sopra il lato inferiore dell'iPhone.

    • Attendi un minuto per dare tempo all'adesivo di staccarsi e creare un'apertura.

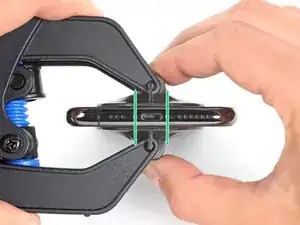
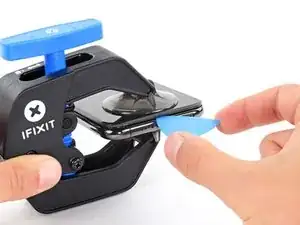
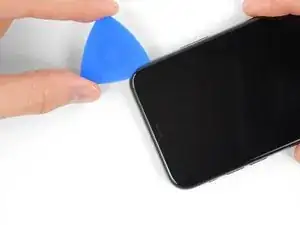
    • Inserisci un plettro sotto lo schermo e la scocca di plastica, non solo sotto lo schermo.

    • Se l'Anti-Clamp non crea uno spazio sufficiente, applica più calore all'area e ruota la maniglia di 90 gradi in senso orario.

    • Non girare più di 90 gradi alla volta e attendi un minuto tra un giro e l'altro. Aspetta e lascia che l'Anti-Clamp faccia il lavoro per te.

    • Salta i prossimi tre passi.

    DO NOT separate the glass from the plastic bumper or rim around it. These instructions don't clarify that the pick has to be inserted between the plastic rim and the metal body. It is likely that the glass will lift slightly off the plastic surround before the plastic will lift out of the metal body. I had success sliding a card or pick back and forth along the bottom edge of the plastic rim while pulling on the suction cup. Eventually there was a space large enough for the pick to go under the plastic rim.

    Anessa -

    Thanks for pointing this out! I'll revise this step to clarify this point.

    Arthur Shi -

  6. JYhTvDYuGLQw3jiI
    • Il riscaldamento del bordo inferiore dell'iPhone aiuta ad ammorbidire l'adesivo che blocca il display, semplificando l'apertura.

    • Usa un asciugacapelli oppure prepara un iOpener e applicalo per circa un minuto al bordo inferiore dell'iPhone per ammorbidire l'adesivo sottostante.

    General tip regarding heating necessary to remove adhesive:

    consider using a heated tip of a small screwdriver or metal spudger (not the one made of plastic, provided in kit), rather than to heat the device itself.

    Uri -

    You then need to be careful about the temp of the tool which if hot enough can melt plastic components or harm them. Keeping the heat source (heat gun) far enough away from the object that you’ll eventually melt the glue but would be much harder to melt components. I try to keep 4” or 5” gap between the source & object

    Sandman619 -

    Thanks for the info. Could a air convector do the job

    dominique.br -

    When opening a device that has previously been worked on, and on which the adhesive might not have been replaced, be extremely carful when opening the phone. It will open much more easily than expected. If you’re not careful you might rip a cable.

    jonpol -

    Is this tool required or can I just use the Anti-Clamp by itself.

    Mikail -

    If you have a 3d printer, heat the bed to 80c and put the phone screen side down on it for 30 secs

    philip.joseph123 -

  7. qXGGZ2MpZIYeQjKI
    qXGGZ2MpZIYeQjKI
    tGDwxj5neYkh3MDh
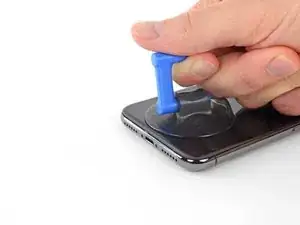
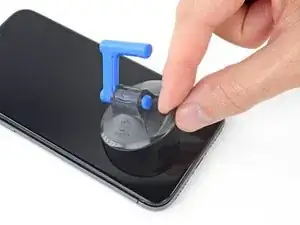
    • Se usi una sola ventosa, applicala sul bordo inferiore del telefono evitando la parte curva del vetro.

    If you were using some form of screen protector, it may come off first as soon as you pull on the suction cup. Do not be alarmed. That is normal behavior.

    Alain-Daniel Wa-Baguma -

    3m VSB double stick tape will stick to the screen when the suction cups fail (see my comment on step 1)

    Tawan Khamapirad -

  8. uTXCGQFa5j4E5T3Y
    uTXCGQFa5j4E5T3Y
    DWfsuj4RCooAtKRa
    Zw4PcEZSTKHaLcqq
    • Tira la ventosa applicando una tensione forte e costante fino a creare una piccola fessura tra lo schermo e il resto dell'iPhone.

    • Inserisci un plettro nella fessura sotto la scocca di plastica, non sotto lo schermo.

    • L'adesivo impermeabile che tiene in posizione lo schermo è molto tenace. La creazione di questa fessura iniziale richiede l'applicazione di una forza piuttosto elevata. Se hai difficoltà nell'aprire una fessura, applica altro calore e muovi lo schermo su e giù per indebolire l'adesivo finché non riesci a infilare lo strumento di apertura.

    In addition to safety goggles, I would recommend you also wear good gloves to avoid getting cut with the glass as you try to pry it open.

    Alain-Daniel Wa-Baguma -

    The top about applying more heat and gently rocking the screen up and down to weaken the adhesive did the trick for me. Thank you!

    Monil Shah -

    There needs to be more clarity on where to shove the opening pick into. There is actually two openings that the pry tool can be forced into: one below the black plastic bezel, and one above the black plastic bezel. When I heated my screen with a warming pad and pulled up the suction cup, it actually pried apart above the black plastic bezel which removed the touch screen from the display panel. With this being the first newer iPhone I'd opened since the 3GS, I didn't realize that I was opening the wrong opening as the directions only mentioned one opening and did not warn of this. I was pretty disappointed in the lack of mentioning this, as I was taking my time and following it to the tee. As a result, it destroyed my original iPhone screen.

    Caleb Davison -

    DO NOT separate the glass from the plastic bumper or rim around it. As someone else noted, these instructions don't clarify that the pick has to be inserted between the plastic rim and the metal body of the phone. When pulling upwards with the suction cup, it is likely that the glass will lift slightly off the plastic surround before the plastic will lift out of the metal body. I had success sliding a card or pick back and forth along the bottom edge of the plastic rim while pulling on the suction cup. Eventually there was a space large enough for the pick to go under the plastic rim.

    Anessa -

    Thank you for pointing this out! I've updated the step to reflect this.

    Arthur Shi -

    The suction cup doesn't work at all... The minimum force I apply to lift it up, it comes off completely. This is very frustrating!!!

    Mario Silva -

  9. QE4lOUoglbyWQUwm
    QE4lOUoglbyWQUwm
    cHHBBJPBr4bVv24U
    agDTTsHWFYyI2WBC
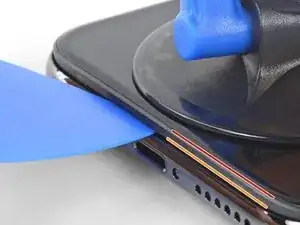
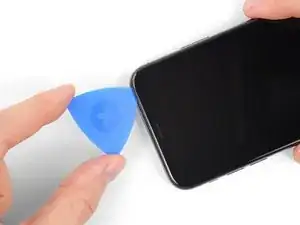
    • Fai scorrere il tuo attrezzo attorno all'angolo inferiore sinistro e lungo il bordo sinistro dell'iPhone per rompere l'adesivo che tiene in posizione il display.

    • Non inserire il plettro più di 3 mm all'interno del dispositivo. Andare troppo in profondità potrebbe danneggiare dei componenti interni.

  10. mkLvBfvMoYsfQbGS
    • Ci sono dei cavi delicati sul lato destro dell'iPhone. Non inserire il plettro all'interno di questo lato, poiché potresti danneggiare questi cavi.

    Wouldn’t it be better to put this part BEFORE the step where you have to pry open the phone?

    Jan D. Höllwarth -

  11. OEUEsoSAmOAWxAMR
    OEUEsoSAmOAWxAMR
    YOhTValkxrevLipu
    aSZ2MAdtw4ZImiCD
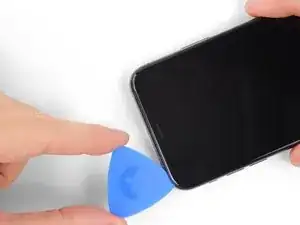
    • Inserisci nuovamente il tuo attrezzo nell'angolo inferiore destro dell'iPhone e fallo scorrere lungo il lato destro del telefono per separare l'adesivo.

    • Non inserire il plettro più di 3 mm all'interno del dispositivo. Andare troppo in profondità potrebbe danneggiare dei componenti interni.

    If you have flat feeler gauges (for adjusting engine valve tappet clearance, ignition points … old school) the .003” thick gauge goes right in. Work your way up in thickness until you can get the pic or supplied pry tool in. Don’t insert metal feeler gauge in too far, just enough to hold crack open. I didn’t need to use the suction cup. I used a hot/cold gel pack heated in microwave to heat edges to soften glue a bit. Made sure it wasn’t so hot I couldn’t stand it on my skin.

    William Olstad -

  12. WfcjjEBfMZqEySEf
    WfcjjEBfMZqEySEf
    PCXKpWMWg6GWEViY
    McqYslJ4vV1SOOnm
    • Il bordo superiore del display è fissato sia con la colla sia con delle clip.

    • Fai scorrere il plettro sotto il bordo superiore del display, mentre muovi o scuoti delicatamente il display verso il basso, in direzione della porta Lightning.

    • Se ci metterai troppa forza, le clip si romperanno. Lavora con cautela e pazienza.

    • Non inserire il plettro più di 3 mm all'interno del dispositivo. Andare troppo in profondità potrebbe danneggiare dei componenti interni.

    • Fai scorrere il plettro nell'angolo opposto e taglia tutto l'adesivo rimanente.

    These are the best instructions I’ve ever read for anything.! Thank you!

    Peter Andrew -

  13. GnieimxVeXdJJobM
    • Tirare la piccola linguetta della ventosa per rimuoverla dal pannello anteriore.

  14. XFu5RLJA6ncMAhxo
    XFu5RLJA6ncMAhxo
    nCGOAuVQLFmYsrOd
    XjQSuyqDe1k51mua
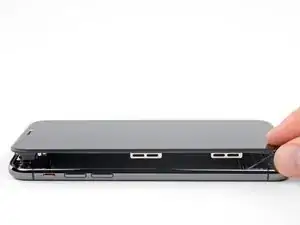
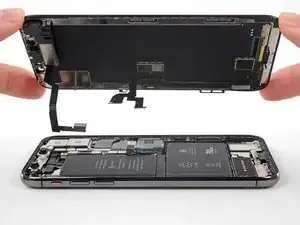
    • Apri l'iPhone sollevando il display dal lato sinistro, come per sollevare la copertina posteriore di un libro.

    • Non cercare di staccare del tutto il display, perché questo è ancora connesso alla scheda logica dell'iPhone da diversi fragili cavi piatti.

    • Come indicato nell'immagine, accertati che il telaio venga via assieme allo schermo e non resti incastrato nel dispositivo.

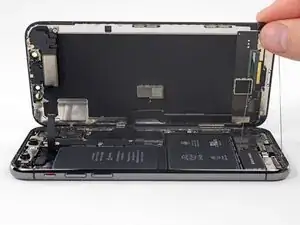
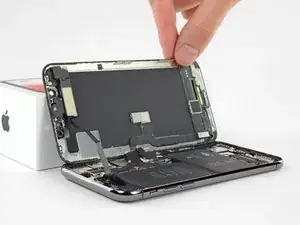
    • Appoggia il display contro qualche tipo di supporto per mantenerlo aperto mentre lavori sul telefono.

    • Durante il rimontaggio poni il display in posizione, allinea le clip lungo il bordo superiore e premi delicatamente il bordo stesso per metterlo in posizione prima di reinserire tutto il display. Se non si incastra facilmente fino al clic, controlla le clip lungo il perimetro del display per assicurarti che non si siano deformate.

    My phone came apart in a different way and looks not right the little box at the top of the display as actually bolted to the top of the frame body I think something went really wrong when I opened it.

    Mike Kostersitz -

    It opens like a book but be careful not to open it all the way — only as far as shown in the photo. Otherwise it will strain the thin cable that connects the sensor module and then no more FaceID for you (or, as it turns out me). This could have been made more explicit in the instructions.

    Richard Tucker -

    It opens like a book but be careful not to open it all the way  … the small stainless steel tabs that hold the screen around the metal frame, that are on the bend place (right side of the phone)… are tend to bend, you can straighten them back to 90 deg. but the plastic base that they are on? very fragile- watch out not to break the plastic bezel … it may come apart of the glass.

    dabur872 -

    Advice for re-assembly: Before closing up the phone with the seal, check if phone is powering up again and speaker, mic and sensors are still working. If done this check even before installing the board connector bracket in Step 13.

    Alexander Nowak -

  15. XWpMWTY4DJnfeUAy
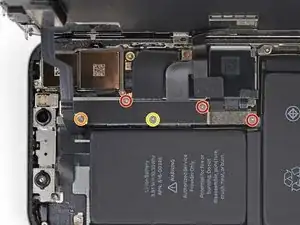
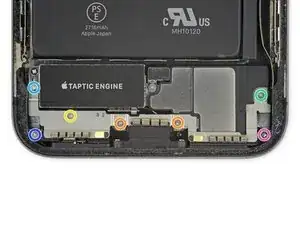
    • Rimuovi cinque viti viti tri-wing Y000 che tengono in posizione la staffa del connettore della scheda logica, delle seguenti lunghezze:

    • Tre viti da 1,1 mm

    • Una vite da 3,1 mm

    • Una vite da 3,7 mm

    • Durante la riparazione tieni traccia di ogni vite e assicurati di rimetterle tutte esattamente dove erano prima per evitare di danneggiare il tuo iPhone.

    One thing I found helpful for replacing the screws was to use only the 000screwdriver tip, without the handle. This way, the tip isn’t magnetized and the screw doesn’t tend to ‘roll’ off the screwdriver tip (the screw has almost no mass, so the head (largest surface) is pulled around to the side of the screwdriver tip when magnetized).

    Rich May 23, 2020

    ungodly -

    My 3.1mm screw had a stripped head, could not remove it. (Factory defect, this iPhone was never opened)

    So I had to give up removing the display assembly, and jumped directly to battery replacement, Step 20.

    That was tricky as I had to keep the display at 90º with a risk of breaking display connectors, but hopefully the replacement went well.

    I would not recommend to do this but to follow the guide, but, in case someone encounters a similar issue, that could help!

    vingu -

    My 1.1mm screw had a stripped head. Used a 3mm steel drill to cut the head off (just 1 mm deep haha) so i could remove the bracket.

    Renout -

    Be careful on reassembly. Keep the screen supported and not moving. I had difficulty getting the screws in and ended up ruining the screen connectivity at the back of the screen where the ribbon cables go in near the center. I was trying to hand hold the screen and it ended up moving around too much.

    SETH GREEN -

    To keep track of the screws, I copy the photos showing their places, then arrange these photos on document in Pages, print it. Next I apply two sided sticky tape (the roll-on type). So all screws have their corresponding places …

    Max Glanzmann -

  16. SmLayTUTWhZPb5Kb
    • Rimuovi la staffa.

    • La staffa può opporre una lieve resistenza al distacco. Sollevala delicatamente ma in modo fermo per staccarla.

    • In fase di riassemblaggio, ecco il momento giusto per accendere il tuo iPhone e verificare tutte le funzioni prima di rimontare e sigillare il display. Non dimenticare poi di rispegnere l'iPhone prima di continuare.

    I tested it, then proceeded to close up the device without the bracket. Do I need to reopen and install? All connections are good?

    monastra7 -

    The bracket helps those many connectors underneath maintain good contact. Probably in the short term nothing bad will happen, but I’d hang onto the bracket and reinstall it when convenient.

    Jeff Suovanen -

    Agree with Jeff

    cgtyoder -

    I tested all imaginable functionality on the new OLED screen. Taptics are fine. Then, I noticed that the battery wasn't charging. Any ideas as to what could have gone wrong?

    Monica -

    for me, the replacement battery was completely dead, small panic when the power-on button was pressed, but quickly realised that this was the situation, and now watching the phone take a power cycle.

    James Stanbridge -

    Before clicking the screen assembly back, I tried to test the iPhone by pushing the start button, but nothing happened. After taking off the bracket, reseating the plugs I tried again - nothing happened! Then I plugged in the charging cable connected with the iMac, and it started immediately. So if the phone does not start using the startup button, it might just be a glitch when reconnecting the battery.

    Max Glanzmann -

  17. eJ1ACHc4FfhUTGYs
    eJ1ACHc4FfhUTGYs
    JGUunolihfMkY3fR
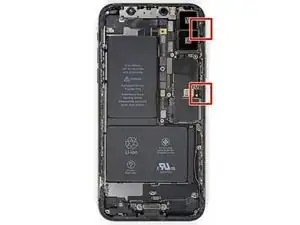
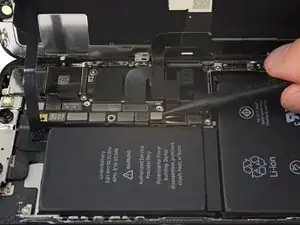
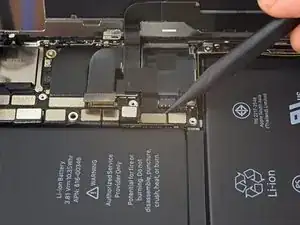
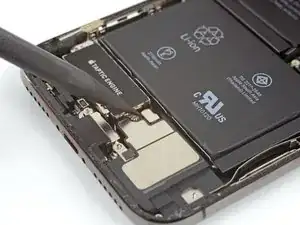
    • Usa la punta di uno spudger o un'unghia pulita per staccare il connettore della batteria sollevandolo dal suo zoccolo sulla scheda logica.

    • Cerca di non danneggiare le guarnizioni in silicone nero intorno a questa e altre connessioni della scheda. Queste guarnizioni forniscono un'ulteriore protezione contro l'intrusione di acqua e polvere.

    • Piega lievemente il connettore per distanziarlo dalla scheda logica ed evitare che questo possa fare contatto con lo zoccolo e quindi alimentare il telefono nel corso della tua riparazione.

    cosa può succedere se non si disconnette la scheda logica'?

    luca.valli -

    note: be careful not to crush or puncture your battery at this step!! I gave mine a minor dent, which I hope wont be a problem.. but something to keep in mind for fxlks in the future!

    Noal Balint -

    Thanks, already did it)

    Stephen Hedrick -

  18. cHVLkYDwhlp2A1Pw
    cHVLkYDwhlp2A1Pw
    K2c31fAgxStY4xjS
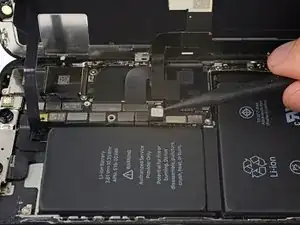
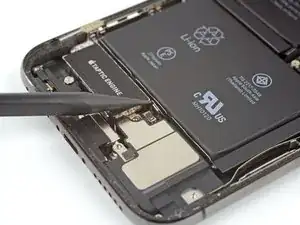
    • Usa la punta di uno spudger o un'unghia per staccare il connettore del gruppo sensori del pannello frontale.

  19. cpYKZSxRSWRr1pJ3
    cpYKZSxRSWRr1pJ3
    ROpbLqGuPSYmQUk2
    • Usa la punta di uno spudger o un'unghia per staccare il connettore del cavo del pannello OLED.

    • Per ricollegare connettori a pressione come questo, premi su un lato finché senti il clic di bloccaggio, poi ripeti l'operazione dall'altro lato. Non premere dal centro. Se il connettore è disallineato può piegarsi, danneggiandosi irreparabilmente.

    Snap ‘em in like little Legos.

    Ray Johnson -

    Maybe the manual should flip step 17 and 18 (as the digitizer cable from 18, is in the way of the OLED cable of step 17) ?

    Renout -

  20. TD3L6MwMyjAtBQJu
    TD3L6MwMyjAtBQJu
    6ApXsETwRu6PQnKr
    • Usa la punta di uno spudger per staccare il connettore del touch pad dal suo zoccolo.

    • Lo spazio ristretto intorno a questo connettore rende la riconnessione più difficile. Prendi il tuo tempo per allinearlo bene, poi premi delicatamente con la punta del dito, prima da un lato e poi dall'altro. Devi sentire un clic quando si blocca in posizione.

    • Se qualsiasi parte del tuo schermo non reagisce più dopo la tua riparazione, disconnetti la batteria, rimuovi e riattacca questo connettore assicurandoti che ci sia un clic quando si incastra nella sede e che non ci sia polvere o altro nello zoccolo.

    This was probably the hardest part other than trying to get the screen off with the crappy suction cups. I re-installed the bracket only the find out that the touch screen would not respond to touch. Had to remove the five screws, remove the bracket and reseat the recessed screen connector. Reseating the bracket took another 10+ minutes. I carefully used the angled forceps to grab the cable and align the connector being careful not to damage the cable.

    Once you have the connector seated, I would reconnect the battery, power on the phone, and check the touch screen response before re-installing the bracket (step 13).

    Tawan Khamapirad -

    Yeah, this was probably the trickiest part of the reassembly. The power connector cable kept getting in the way so I moved it carefully but fully out of the way. Then it was a matter of fiddling around with it a bit and being careful not to force it on.

    Jeffrey Hoy -

    I was positive that I had messed something up, I had powered up the phone to test three different times and everything seemed find except there was no touch at all. On my fourth attempt, I carefully examined everything for dust and debris (blowing gently), and I did notice that a corner of the connector (more like part of the ribbon) was bent slightly, and I straightened it. I don't know if it was the ribbon or some tiny debris, but after reseating a fourth time, it worked.

    Pol Llovet -

    Very important part of the tutorial. Be careful and patience! In my case the screen and camera didn't respond after assemble, so I tried again to reconnect the connector like tutorial said and it worked well. Now my iPhone feel like a new one 💪🏼

    Efrain Maestre -

  21. T4COCwpNIPZglkVc
    T4COCwpNIPZglkVc
    q145rGUkFfAEwOf1
    EgtbW5Mf1lUuPrWK
    • Il cavo flessibile del gruppo sensori del pannello frontale è incollato ma con adesivo poco tenace.

    • Solleva delicatamente il cavo finché non si stacca.

    Do this sensor affect face id?

    bonglkv -

    It is part of the face id part so yes. This is the ear piece too so if the ribbon tears there is a chance the ear piece will stop working as well.

    Stephen Patterson -

    Be super careful handling this ribbon particularly. I did a battery install and, when I was done, I had a phone with a new battery and no Face ID. That’s a $300 Apple repair, and no 3rd party shop will touch it. I believe the ribbon lays vertically (i.e., perpendicular to the “floor” of the phone, against the side edge of the battery. During the re-install, I must have forced the ribbon into position after seating the connector, causing fatal flexing of the ribbon. (Don’t know this for sure, but I see another comment saying that this cable is part of Face ID.) Anyway, bottom line: BE CAREFUL REMOVING AND REINSTALLING THIS RIBBON!

    Jonathan Pines -

    My flex cable was more than lightly adhered in place. I needed to use a guitar pic or similar to help encourage adhesive to separate. I wouldn’t pull too hard like shown in pictures unless you had just the right grip on the ribbon cable so as to avoid damaging flex cable. See note above (5/31/20)

    William Olstad -

    Bizarre — it turns out my whole front panel sensor assembly came entire off of the front screen and is stuck to the logic board.

    Karl Jarvis -

    I also found the glue quite recluctant to release so I applied a second or two of heat using the wife's hair dryer which softened it and the cable lifted much easier then. Be careful not to apply too much heat though which could then impact other internal components.

    LosBenitos -

    Cho ít cồn 90° vào để mềm keo dễ tháo

    huuhaukimngan -

    my iphone x doesn't have a front panel sensor? in fact, it looks completely different than the picture???

    Kenneth McLeod -

    @kennethmcleod, most likely you've separated the screen frame from the screen itself. We see this most commonly when people neglect to remove the pentalobe screws next to the charging port. Usually the cure is to take out those screws, then repeat the screen removal process on the frame that's still attached to the phone.

    Jerry Wheeler -

    You don't need to disconnect the front sensor to change the screen. Just leave it connected and remove from the screen side.

    Anthony Boshell -

  22. 6ik3wBhFQRTApGki

    I tried this and broke the cable can it still repair

    Alexis Rodriguez -

    At this point I would have found it easier to remove the glue from the edges than later on when I was reassembling it. I bought the kit that had the replacement glue in it.

    Grant -

    Excellent guide! Would love to have a link to moving the sensor assembly from the old display to the new here.

    Nicole -

    CAUTION:

    Removing the Taptic Engine or Speaker in next step is optional and the guide continues as this was per se needed.

    Unnecessary work and also If you remove the speaker you lose the adhesive gasket and this is not included in the scope of delivery of the "Battery replacement" offering.

    So do not remove and avoid losing waterproofing.

    Julian Gonzalez -

  23. BoHxHxepsDZEp5B4
    BoHxHxepsDZEp5B4
    dXwiSZ3WZcIoWD1U
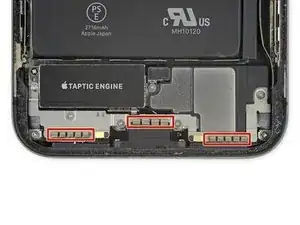
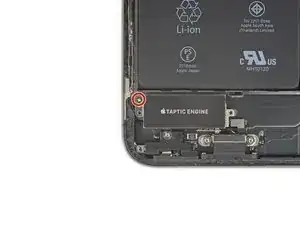
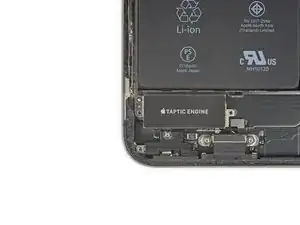
    • Rimuovi le sette viti che fissano la staffa sopra il Taptic Engine e l'altoparlante:

    • Due viti Y000 da 1,9 mm

    • Una vite Y000 da 1,2 mm

    • Una vite Y000 da 1,6 mm

    • Una vite Phillips da 2,4 mm

    • Una vite Phillips da 1,7 mm

    • Una vite Phillips da 1,5 mm

    For battery replacement:

    It is not necessary to remove Taptic Engine and speaker to replace a battery. Go straight to the step #33

    Additional video: https://youtu.be/2GfBOlJEW10

    Alexander -

    I wish I seen this before I did all that! Thank you for that information. Next time I do something like this. I'm gonna pay more attention to the comments.

    Eric Marino -

    Removing the Taptic Engine and speaker greatly improves your chances of getting the battery adhesive strips out intact. If those break, you’ll have a much tougher time.

    Jeff Suovanen -

    Boy, I tried to skip removing these items but was unable to get the glue strips out with them in place, not much to grab and tabs were kind of stuck to a seam in the battery, and hard to tell the difference between the seam and the strip tabs. For me I had to remove these items to get this done.

    marshallburchard -

    I stopped removing things after getting the display side off. There were 3 screws stripped on the speaker cover which wouldn't come out so I punted. Just pried the battery out with a smudger tool and some patience, starting at the top and working towards the bottom. New battery is in and working fine.

    Andy Price -

    The 2.4mm screw identified as “green” needs a Y000 screwdriver

    seb6po -

    Thanks for not removing the following steps. this made me break the connector for the bottom speakers >:(

    Andrew Romano -

    The color codes are missing from my display — only on this step.

    nat2 -

    The screws color and quantities in list don’t match the schematic ! I wish i had a magnetic screw mat before starting, because not only i removed the Taptic Engine and speaker unnecessarily, but i also lost a screw ?

    fb.mailing.lists -

    For first timer, dont think its possible to skip these steps and remove battery. It’s hard to remove the glue

    Wex -

    Does anyone know the purpose of this bracket "with grounding pads"? What would be the possible side effects if it was damaged or not connected properly during reassembly?

    Anne Aunyme -

    I had to remove the tactic and speaker could not get the glue strips out so glad the steps to do so were in this guide.

    P Bond -

    Sure would like to know WHY the warning "Be careful not to touch the three rows of grounding pads..." What would or could happen if I did touch them??

    Chad Gagnon -

    Removing the battery strips is a major PITA, just skip this step and everything onwards, remove the one strip on the top part of the battery (according to step 33) and for the bottom part of the battery, pry it off with a plastic spudger.

    Yes, this is not the elegant solution, but the quickest and easiest one. This method is better, as you don't want to keep the old battery anyway, so why bother. (You must not puncture the battery though! But as long as you're only working with a plastic tool and are careful, nothing can happen from my experience.)

    speaker gasket -

  24. A6XdCYVX6JwfIKyE
    A6XdCYVX6JwfIKyE
    A4EHUTn22AgwPZxR
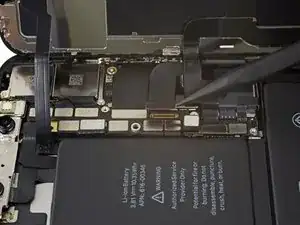
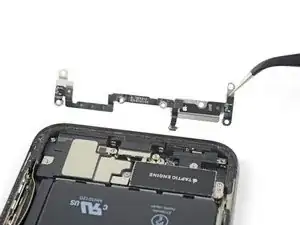
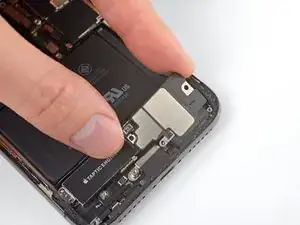
    • Solleva la staffa dal bordo accanto alla batteria. Non provare a rimuoverla interamente perché è sempre connessa tramite un piccolo cavo flessibile.

  25. c5QjrHSAGoEVorBq
    c5QjrHSAGoEVorBq
    qMqUiBcQJqrsMsyd
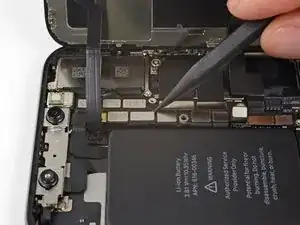
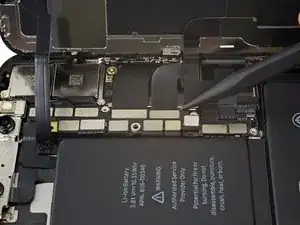
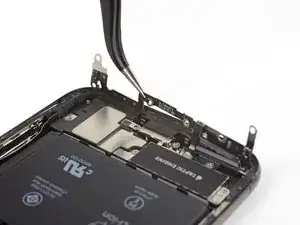
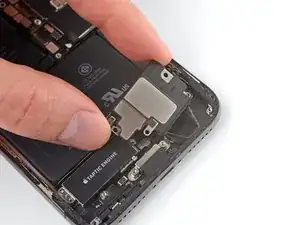
    • Mentre tieni la staffa da una parte perché non interferisca, usa la punta di uno spudger per sollevare e staccare il cavo sottostante.

  26. eoTqiltfnhM1iScH
    • Rimuovi la staffa.

    My bracket was in two pieces.

    Jim Steward -

  27. KVsQuGUlRSYJCgwc
    KVsQuGUlRSYJCgwc
    1oMPc41ZwNKvWSjt
    • Rimuovi la vite Y000 da 2,1 mm che fissa la staffa del connettore dell'altoparlante.

    L'unique vis non?

    Easy Repair -

    Effectivement ;-) Merci pour les bons yeux et la remarque !

    Claire Miesch -

  28. kEdiRARZCyTLEXJG
    • Rimuovi la staffa del connettore dell'altoparlante.

  29. oTiIqEVBPENNIfRv
    oTiIqEVBPENNIfRv
    bPVea3cUUG5ydybE
    • Usa la punta di uno spudger per sollevare e staccare il connettore dell'altoparlante.

    As mentioned in a comment by timblake2112 (see step 29), this step is not necessary and can be skipped skipped. I would advise you to do so, as removing your speaker is guaranteed to ruin your gasket and rubber seal. This will result in loss of water resistancy of your iPhone and could potentially harm the sound quality of your speaker.

    Try removing the Taptic Engine without removing the speaker. It might still be possible removing the battery adhesive strips and your speaker will stay in its original condition.

    speaker gasket -

  30. nbqXImWqlhcmZwLp
    nbqXImWqlhcmZwLp
    XKBNris4snqB4vTl
    • Mentre sollevi l'altoparlante, stai attento a non danneggiare il cavo flessibile che hai appena staccato. Se necessario, mantienilo da parte, così ci sarà abbastanza spazio per rimuovere l'altoparlante.

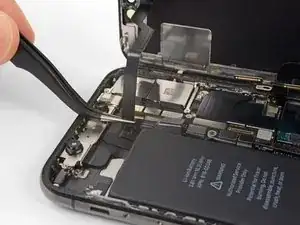
    • Inserisci uno spudger sotto il bordo superiore dell'altoparlante, vicino al bordo del case dell'iPhone.

    • Solleva delicatamente il bordo superiore dell'altoparlante.

    • Quando rimonti l'altoparlante, verifica la posizione del cavo e assicurati che non rimanga intrappolato sotto l'altoparlante.

  31. vP52MSMbQMQVGXDv
    vP52MSMbQMQVGXDv
    jdpMlj6ohBmkmRoF
    aBojFlY2A4cLssW2
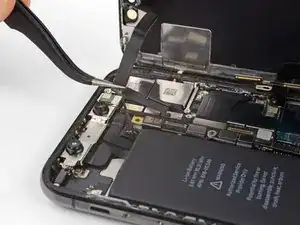
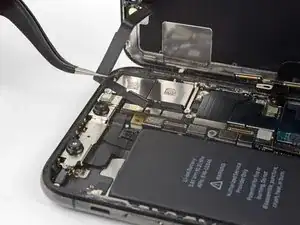
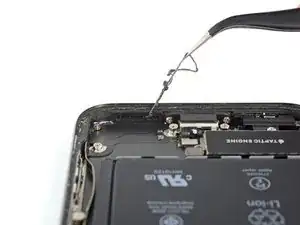
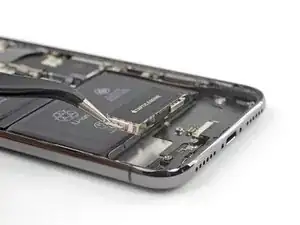
    • Afferra l'altoparlante dai lati e muovilo da un lato all'altro per staccarlo dall'adesivo che lo fissa al bordo inferiore dell'iPhone.

    • Allontana l'altoparlante dal bordo inferiore dell'iPhone finché non si stacca dalla guarnizione adesiva.

    As mentioned in a comment by timblake2112 (see step 29), this step is not necessary and can be skipped skipped. I would advise you to do so, as removing your speaker is guaranteed to ruin your gasket and rubber seal. This will result in loss of water resistancy of your iPhone and could potentially harm the sound quality of your speaker.

    Try removing the Taptic Engine without removing the speaker. It might still be possible removing the battery adhesive strips and your speaker will stay in its original condition.

    speaker gasket -

  32. G1qam2tn3Av5D6ub
    G1qam2tn3Av5D6ub
    RhZADdTaatNHENVB
    • Rimuovi l'altoparlante.

    • La guarnizione adesiva dell'altoparlante non è riutilizzabile. Stacca ogni residuo di adesivo con delle pinzette.

    • Per una migliore protezione contro l'intrusione di acqua e polvere, sostituisci la guarnizione adesiva in fase di rimontaggio. Prepara questa parte pulendola con alcol isopropilico e un panno privo di lanugine o un filtro per caffè, così la guarnizione aderirà bene. Metti una nuova guarnizione sull'altoparlante e installa poi l'altoparlante stesso.

    You don’t need to remove the speaker and ruin its gasket. You can wiggle and slide the taptic engine out without removing the speaker. I’ve done this twice on rear shell replacement jobs.

    timblake2112 -

    Maybe I'm a bit daft, but where's the instruction just how to line up the speaker gasket when replacing? I only have one so I'd like to avoid wrecking it. And I completely cleaned off the old one in order to do a good job of things. Why no simple instruction from part supply link?

    MrRoundel -

  33. XATHudC6esRZFEKI
    XATHudC6esRZFEKI
    4b6hhSLIlJT6Pjum
    • Rimuovi la vite Phillips da 2,3 mm che fissa il Taptic Engine.

  34. aSBjBVvQXPjDTMPE
    aSBjBVvQXPjDTMPE
    JrsJ3crZXUQsaBpo
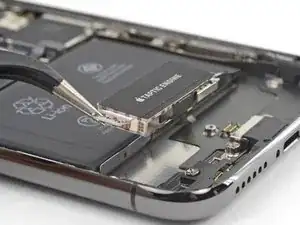
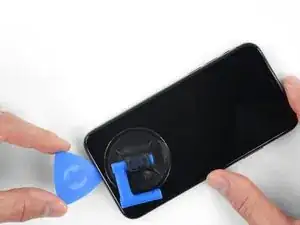
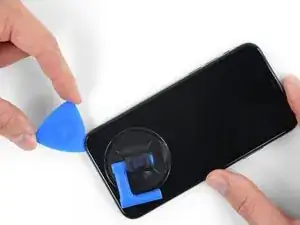
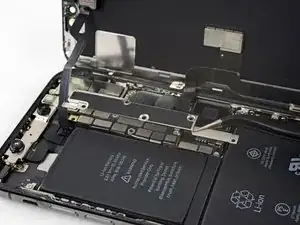
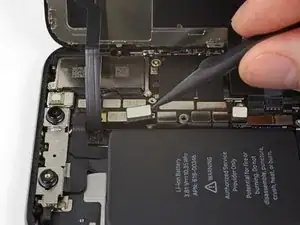
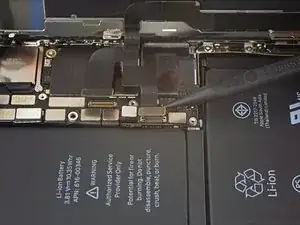
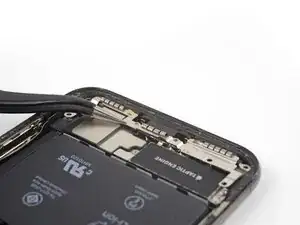
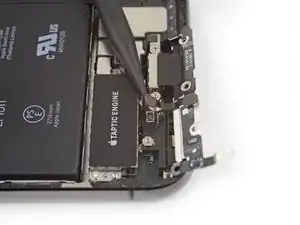
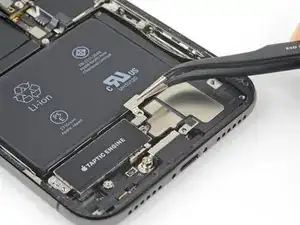
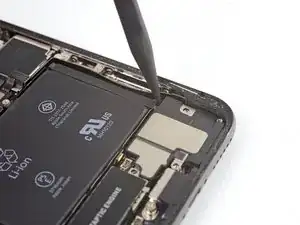
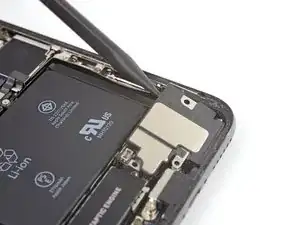
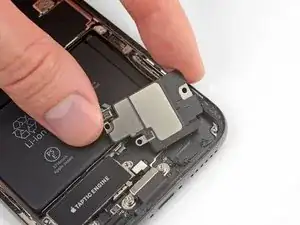
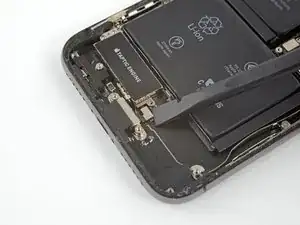
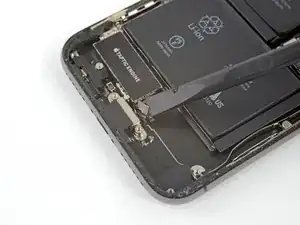
    • Usa uno spudger per staccare il cavo del Taptic Engine, sollevandolo verso l'alto dal suo zoccolo.

  35. FeOXDWVO1kSwkRYc
    • Rimuovi il Taptic Engine.

Conclusione

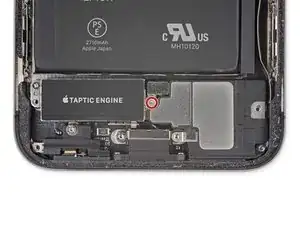
Confronta la tua nuova parte di ricambio con la parte originale: potrebbe essere necessario trasferire i componenti rimanenti o rimuovere le protezioni adesive dalla nuova parte prima dell'installazione.

Per riassemblare il tuo dispositivo, segui i passaggi precedenti in ordine inverso.

Porta i tuoi rifiuti elettronici a un riciclatore certificato R2 o e-Stewards.

La riparazione non è andata come previsto? Prova la nostra comunità Risposte per trovare aiuto nella risoluzione dei problemi.

Jeff Suovanen

Membro da: 06/08/13

426762 Reputazione

Un commento

不需要寫碼?按步驟換完後仍然不行work,賣家說要寫碼?

tseng.mt -