Introduzione

Segui questa guida per sostituire il touch pad, il tasto Start e il tasto Options nel tuo controller DualShock 4 V1.

  1. X5wSfxicAxSko1Zg
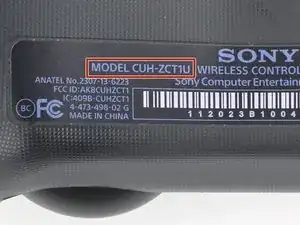
    • Controlla il numero di modello sul retro del controller. La guida è stata scritta usando il modello CUH-ZCT1U. Se hai un altro modello, la procedura presente in questa guida e le parti sostitutive potrebbero essere leggermente diverse.

    • Se hai il DualShock 4 di seconda generazione, modello CUH-ZCT2U, usa queste guide.

  2. w1u5HLFRbQIP2d2F
    w1u5HLFRbQIP2d2F
    pJuWDOWVmAmLyI6V
    • Se ti serve stabilizzare il tuo controller durante la riparazione, appoggialo su una superficie morbida, come un panno in microfibra.

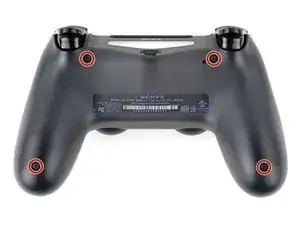
    • Usa un cacciavite a croce Phillips per rimuovere le quattro viti da 6,4 mm che tengono chiusa la scocca posteriore.

    to re-torque these PH00 screw... i found 19Ncm to be about the max. (since 27Ncm was too much)

    Dreamcat 4 -

  3. NgnhjUOrfuwMJyov
    NgnhjUOrfuwMJyov
    cwbJVa63FyosD31P
    HvrmieUp6UwVcySs
    • Usa un plettro in plastica per fare leva su ogni angolo del tasto L1 dalla parte della scocca anteriore.

    • Copri il pulsante per evitare che salti fuori dal tuo spazio di lavoro.

    • Rimuovi il pulsante.

  4. AJugiOXGbAhQ1BMq
    • Usa il tuo plettro in plastica per fare leva e rimuovere il tasto R1, esattamente come hai fatto per il tasto L1.

  5. B1xF1WqHbfBoBJtF
    B1xF1WqHbfBoBJtF
    EHOhhIPKfA2DZQfI
    McHyyAQtKhIUOHJO
    • Sei clip di plastica tengono insieme la scocca anteriore con quella posteriore. I prossimi quattro passaggi mostrano come sganciare le clip prima che tu possa aprire il controller.

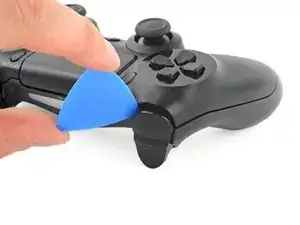
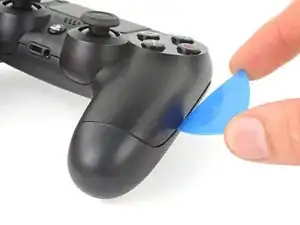
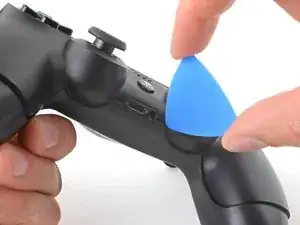
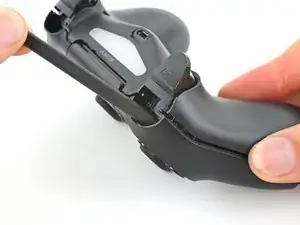
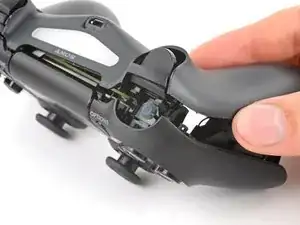
    • Inserisci il plettro tenendolo verso il basso tra la scocca anteriore e la scocca posteriore, a metà tra il manico e i pulsanti azione.

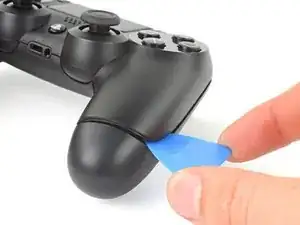
    • Fai scorrere il plettro verso il manico fino a sganciare la prima clip.

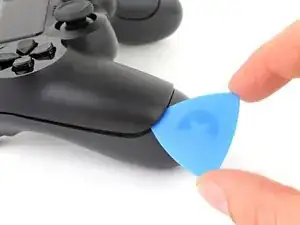
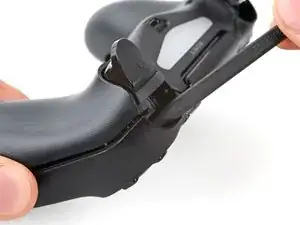
    • Ripeti questa procedura dall'altro lato del controller per sganciare la seconda clip.

  6. j1WZgSo6o3TaODlg
    j1WZgSo6o3TaODlg
    eRF1MNwAMFijHfw4
    ocNfVkqvnbtCNBcd
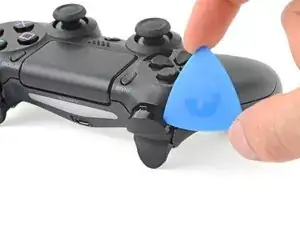
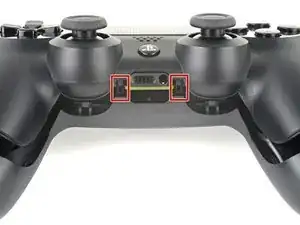
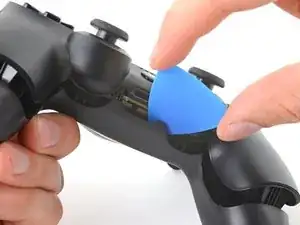
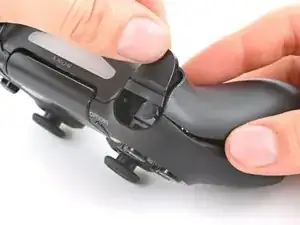
    • Altre due clip agganciano la scocca posteriore; queste si trovano vicino alla porta di estensione e al jack cuffie.

    • Inserisci il plettro fra la scocca anteriore e quella posteriore in uno dei due lati delle porte.

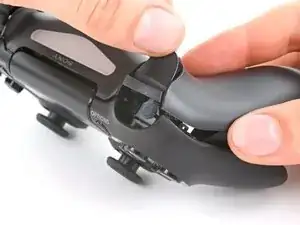
    • Ruota il plettro così da sganciare la sezione della scocca posteriore da quella anteriore.

    • Se la scocca posteriore sembra bloccata, inserisci e ruota il plettro in parti differenti.

    • Non aprire ancora il controller, questo è ancora tenuto insieme da due delicate clip che si trovano vicino ai grilletti.

  7. jf5SveEdOwRIGhJq
    • Le ultime due clip sono molto delicate e per questo devono essere sganciate dalla parte interna del controller. Se vengono rotte, non c'è motivo di disperare; non influenzeranno la riuscita di questa riparazione o la funzionalità del controller.

    • Identifica le clip guardando attraverso lo spazio al di sopra dei grilletti L2 o R2.

  8. qQcyUfycauX1EUE6
    qQcyUfycauX1EUE6
    YFUPEeSZZqPY4U1E
    OHcMVCNj4VJZWyNC
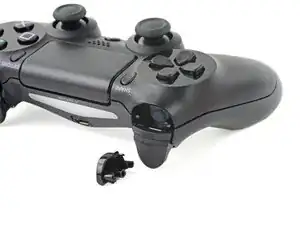
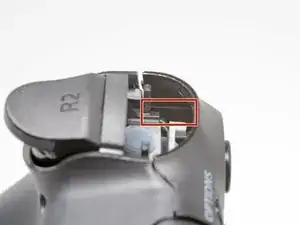
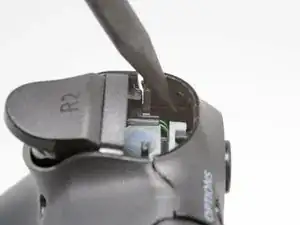
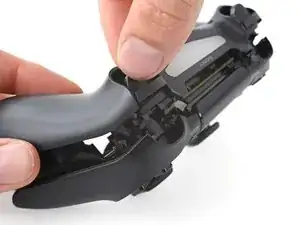
    • Inserisci la punta di uno spudger attraverso lo spazio al di sopra del grilletto R2 e spingi la clip verso l'esterno.

    • Mentre spingi la clip verso l'esterno, allontana lentamente la scocca posteriore da quella anteriore finché non senti che sono prossime a separarsi.

    • Non aprire completamente il controller finché tutte e due le clip di R2 ed L2 non sono state sganciate.

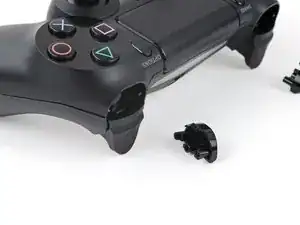
    • Ripeti la procedura per la clip vicina al grilletto L2.

  9. PKcRjl2CIQogpTKp
    PKcRjl2CIQogpTKp
    fip3U51QOcVGEXVJ
    u6ZnJrwXE1clORUW
    • Premi il grilletto R2 e fai scorrere oltre questo la scocca posteriore.

  10. KP2vxXGWlaTfsUDK
    • Premi il grilletto L2 e fai scorrere oltre la scocca posteriore.

  11. 3hhTNdLYVWIBGeVA
    3hhTNdLYVWIBGeVA
    hfTvkNdF3uokn4Pa
    GXsRCZqUChYpLy1d
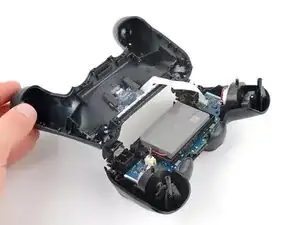
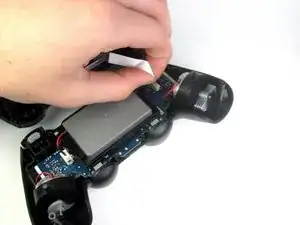
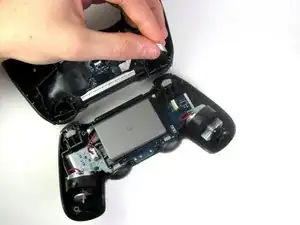
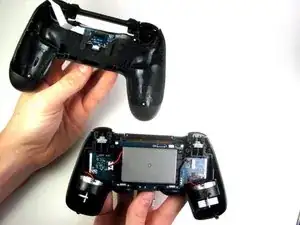
    • Capovolgi la scocca posteriore oltre al controller e poggiala facendo attenzione a non danneggiare il cavo di interconnessione.

  12. nCng6Fw1GK6utOG1
    nCng6Fw1GK6utOG1
    SZUVqTnFbaQPaXbq
    5sWqh1SoSQhBsOFd
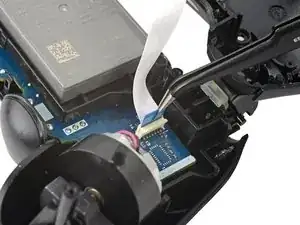
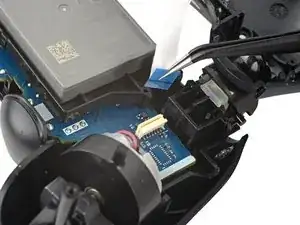
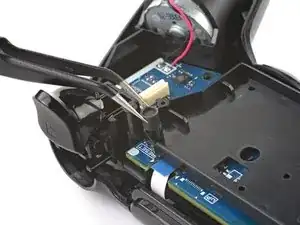
    • Usa delle pinzette o le dita per rimuovere il cavo di interconnessione tirando verso l'alto la linguetta di plastica blu.

    • Durante il riassemblaggio, riconnetti il cavo con la linguetta di plastica blu rivolta verso l'esterno del controller.

    On the model CUH-ZCT2E the circuit board is mirrored so that the connection is on the left side. When reassembling the blue tab should be facing inwards.

    Konrad Skeri Ekblad -

  13. jhmXq12QvXrVUe3t
    jhmXq12QvXrVUe3t
    s3ofOKmDPmTeHDO1
    cWqoWouAmSYSOnfE
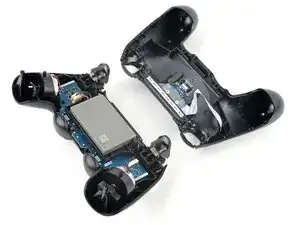
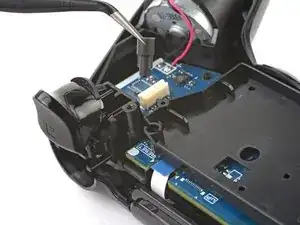
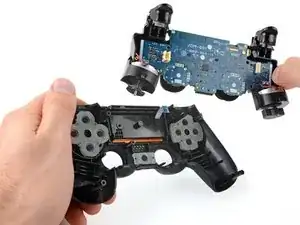
    • Stacca il nastrino della scheda madre che connette entrambi le parti della scocca del controller afferrandolo e tirando con le dita.

    • Ricorda l'orientamento del nastrino, perciò assicurati di reinserirlo nello stesso verso quando lo riconnetterai.

    • Non appena avrai separato le due metà della scocca, metti pure da parte quella superiore.

    can you share the battery dimension?

    luxusmirajane -

  14. JFSegwJUdbwMfmMo
    JFSegwJUdbwMfmMo
    LVLNJgChTlDorDSG
    q1XwODHSoiUGPKdV
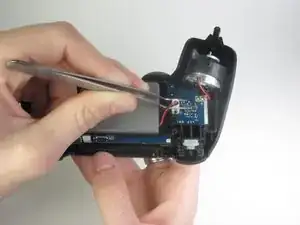
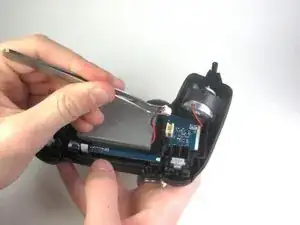
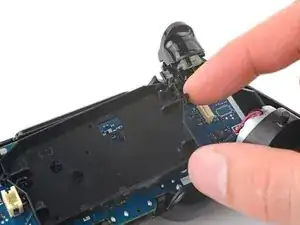
    • Aiutandoti con delle pinzette a becco inclinato, rimuovi il cavetto della batteria scuotendo leggermente il connettore su entrambi i suoi lati.

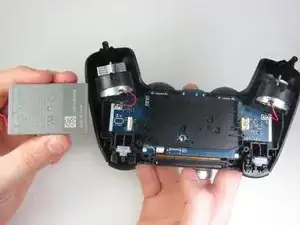
    • Dopo che avrai rimosso il connettore dalla scheda madre, la batteria potrà essere rimossa dal controller.

    • Una rimozione brusca e violenta del cavetto della batteria potrebbe deformarne il connettore.

    For the replacement battery I found that the Turnigy 2000mAh 1S 1C Lipo w/ 2 Pin JST-PH worked perfectly while also being a budget option at only $2.54 USD before shipping. However ONLY INSTALL AFTER CHANGING THE POLARITY OF THE CONNECTOR, this can be done with a pin or craft knife with relative ease. After doing this the controller has doubled in battery life. It required no modification to the controllers internals only extra care to ensure the longer cables didn’t get pinched in reassembly.

    Ryan -

    Got the battery detached without warping the plastic grips/ prongs, but it won't stick back to the board on reassembly. Is there an adhesive i should use?

    Ferrum Phoxx -

    Ferrum Phoxx - Did you just remove the plug from the socket? By that, I mean you didn’t pull the socket it was in off of the board too? If you did pull the socket off as well, I think that would require resoldering the socket to the board first. Tricky, but someone with some soldering experience ought to be able to fix it for you.

    nowurgone -

    I had trouble with analoge, I fixed that but FPC (flat connector) on mainboard broken and I soldered new 12 pin FPC on mainboard again, but in reverse!

    then I put charging cable and the dualshock did not turn on , and I sensed that the dualshock is heating up, I remove charging cable as soon as possible.

    problem is this : negative and positive putted in reverse.

    I don’t kwow what happen if I solder new FPC in right position .

    Does it work or somethings going to out of service?

    sorry formy poor English language .

    regards,

    Hamed

    hamed1379 -

    I can’t pull the connector plug out of the socket. I’ve used my fingers, I’ve tried tweezers. I’ve been rocking it for 15 minutes but it won’t come out.

    marcus2159 -

    I found it difficult to unscrew the four screws on the back of my controller. I recommend a screwdriver that you can get a good grip on so you can turn it precisely.

    My battery came with a screwdriver but when I turned it the handle broke in half. The second screwdriver came from an old set I'd got at Harbor Freight or somewhere. The screws stripped the screwdriver! Then I thought to get the screwdriver from the iFixit kit I'd used to replace the battery in my Galaxy S6 a few years ago. This worked much better. I might just buy a set of screwdriver bits here since both the bits and handle are far better constructed than the cheap stuff I broke.

    Gary F -

  15. 6M2oWXxExT4ElTXk
    6M2oWXxExT4ElTXk
    FwVprSgDuD6bHjCd
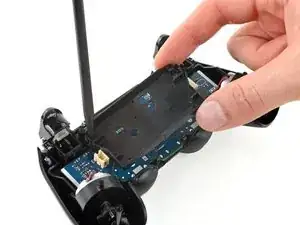
    • Prendi e rimuovi l'estensione del tasto reset dal suo alloggio nella staffa della batteria.

    On the model CUH-ZCT2E this is part of the battery bracket and not removable. Just skip this step.

    Konrad Skeri Ekblad -

  16. OdOvSwnMxMWM4r1W
    OdOvSwnMxMWM4r1W
    mGrvIhfZTUenHG4w
    R1xtscUk6ivQwlFS
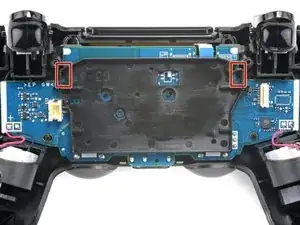
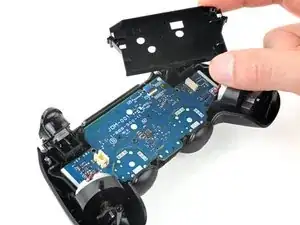
    • Individua le due clip che fissano la staffa della batteria alla scheda madre.

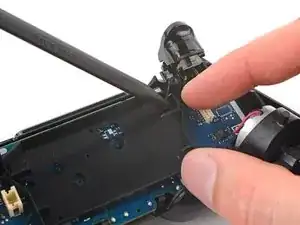
    • Inserisci la punta del tuo spudger nell'apertura dietro la clip della staffa destra.

    • Premi la clip per disinserirla dalla scheda madre.

    • Solleva il bordo destro della staffa della batteria.

    On the model CUH-ZCT2E the battery bracket is not secured by clips but by a PH #00 screw mid height on the right half of the battery bracket. Just remove the screw and for the next step lift the battery bracket straight up.

    Konrad Skeri Ekblad -

  17. MpRnnXNR6AkVJPdE
    MpRnnXNR6AkVJPdE
    JknRtEahfZLV1Rus
    • Inserisci la punta del tuo spudger nell'apertura dietro la clip della staffa sinistra.

    • Premi la clip per disinserirla dalla scheda madre.

    • Rimuovi la staffa della batteria.

  18. NtpB2BKLXfOs3ibt
    NtpB2BKLXfOs3ibt
    ocmExNqCRtHeRbfY
    L2nX3BGEGvqBGKhL
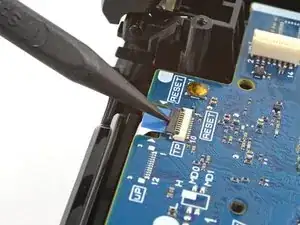
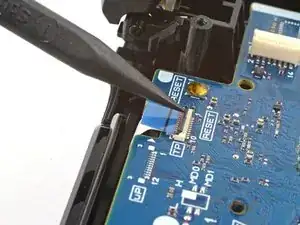
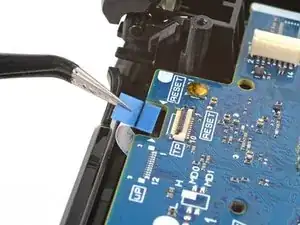
    • Usa la punta del tuo spudger per sollevare l'aletta di bloccaggio che fissa il connettore ZIF del cavo del touch pad.

    • Usa delle pinzette o le dita per scollegare il cavo utilizzando la sua linguetta blu.

  19. cvAhPRrNOSeyOgNH
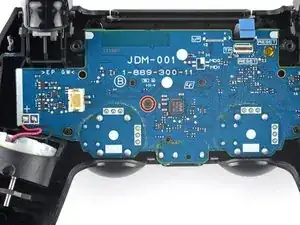
    • Usa il tuo cacciavite a croce Phillips per rimuovere la vite di 6,4 mm che fissa la scheda madre.

    • Durante il riassemblaggio, tieni la scheda madre ben salda al telaio prima di fissarla. Prova ogni bottone per assicurarti che le pulsantiere in silicone siano allineate correttamente. Se ogni bottone viene premuto come previsto, fissa la scheda madre.

    On the model CUH-ZCT2E this screw was removed in step 16. Just skip this step.

    Konrad Skeri Ekblad -

  20. 2yavZDXheRWMZTKn
    2yavZDXheRWMZTKn
    Y1wFpWXa4YDCpvA5
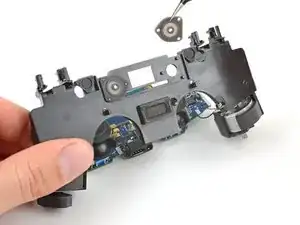
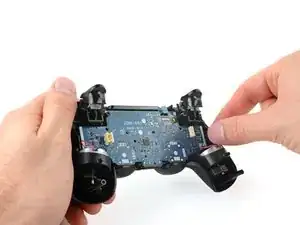
    • Afferra il telaio centrale dalle sue sporgenze di plastica o dai motori di vibrazione e rimuovilo.

    • Fai attenzione a non separare la scheda madre dal telaio centrale, dato che sono tenuti insieme solamente dai cavi del motore a vibrazione.

    • Durante il riassemblaggio, prenditi il tuo tempo per posizionare il telaio centrale. Usa i perni di allineamento come aiuto per collocarlo e assicurati che il cavo del touch pad non rimanga bloccato al di sotto di esso.

  21. gcfKANieSmguUZFy
    gcfKANieSmguUZFy
    pm2dKGdymTLkS13t
    JrCqRBKLETTVb5NC
    • Questo passo è illustrato con la membrana del circuito del pulsante rimossa. Non è strettamente necessario per questa riparazione, ma rimuoverla potrebbe evitare danni accidentali. Per rimuovere la membrana, segui questa guida.

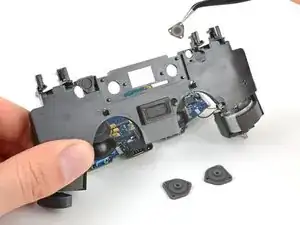
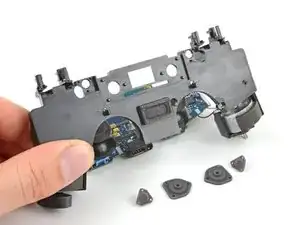
    • Rimuovi il pad dei quattro pulsanti dalla cornice centrale:

    • Due pad sono per il touch pad

    • Due pad sono per i pulsanti Start e Options

Conclusione

Per rimontare il tuo dispositivo, segui queste istruzioni nell'ordine inverso.

Porta i tuoi rifiuti elettronici a un riciclatore certificato R2 o e-Stewards.

La riparazione non è andata come speravi? Prova delle soluzioni di base ai problemi, o chiedi alla nostra comunità Risposte per trovare aiuto.

Clay Eickemeyer

Membro da: 19/09/22

64925 Reputazione

0 commenti