Introduzione

Questa guida ti assisterà nella sostituzione della batteria di un HP Pavilion 15-bk020wm. Verifica di aver acquistato la giusta batteria sostitutiva prima di provare estrarre quella vecchia. Questa è una guida prerequisita per aprire il fondo del laptop e consentire l'accesso le parti interne. Ricordati di spegnere il dispositivo e stacca l'alimentazione prima di qualsiasi operazione di smontaggio.

  1. 5JDfpjDHM3BgT4Tq
    5JDfpjDHM3BgT4Tq
    vwjTLwKTAJaUGcOK
    • Prima di iniziare, spegni il computer e staccalo dall'alimentazione.

    • Rimuovi i quattro piedini del dispositivo (il dispositivo illustrato non li ha; si possono comunque rimuovere con uno spudger di plastica).

    • Rimuovi le due strisce di copertura delle viti.

    • Rimuovi le due spine di copertura delle viti.

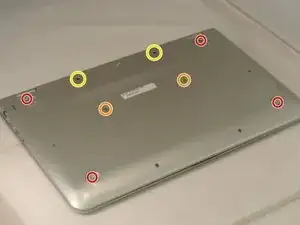
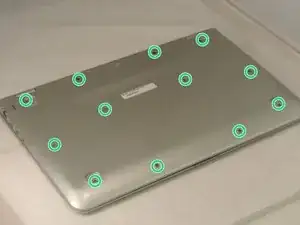
    • Svita tutte le 12 viti a croce Phillips (dimensioni M2,5×7,0) dalla cover inferiore del computer.

  2. HuS6aVIuJZXdHuFo
    HuS6aVIuJZXdHuFo
    ZQsihYbTsKZJYCUp
    xBUWIoia6OnsKLSV
    • Rovescia il computer, portandolo in posizione d'uso.
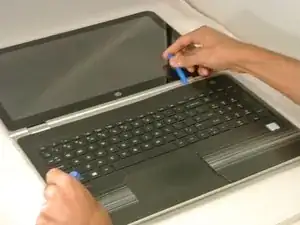
    • Apri il laptop.

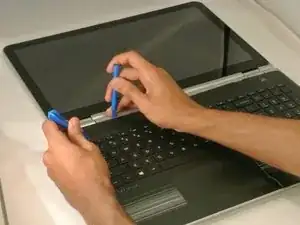
    • Usa uno strumento di apertura in plastica per far leva sotto la cover della della tastiera vicino alle due cerniere dello schermo e quindi fai scorrere lo strumento lungo il bordo verso il touchpad.

  3. 6bEaccJno5DQ15ue
    • Inclina lievemente la cover della tastiera.

    • Non rimuovere completamente la tastiera, perché alcuni cavi la tengono ancora collegata al computer.

    I don’t have the 2 orange screws under my laptop, but when I unscrew the other 10, and try to lift the keyboard, I can’t lift it fully because it’s being held down by something.

    R. Ali Powell -

    The ribbon cables for the keyboard and trackpad are held in place by some clips. Unlatching those clips allow you to carefully remove the ribbon cables and place the keyboard assembly aside. This gives more room for removing the hard drive.

    Miles Carmany -

  4. giKAnsMcX5L16IEE
    giKAnsMcX5L16IEE
    LBZOJHOAyDoCpyqB
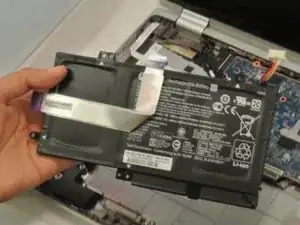
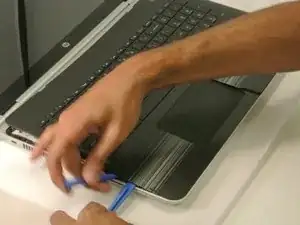
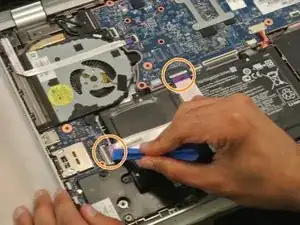
    • Stacca il cavo blu con connettore ZIF dal fondo del computer.

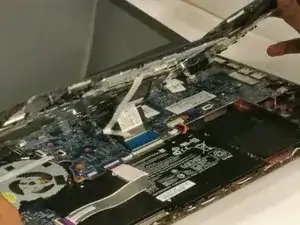
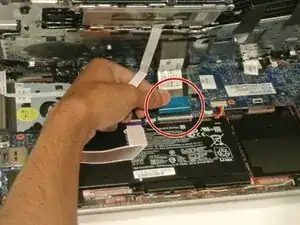
    • Usa uno strumento di apertura in plastica per sbloccare i due cavi ZIF che collegano la batteria alla scheda madre.

  5. Ippow1vMScPRWlhp
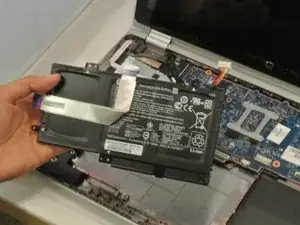
    • Rimuovi le quattro viti a croce Phillips M2,5x4,4 posizionate lungo il perimetro della batteria.

  6. u3ENQGLXIUEehyfh
    • Solleva la batteria da sostituire dal portatile.

    • Inserisci la nuova batteria.

    Exallent, most easy and clear steps to follow. Very good expiation !! Thank u.

    Skanda -

    I didn't actually do this particular repair because i don't have this particular laptop(thank God), however in reading through the directions, if i did have this one, these would've been a God sent without a doubt !

    i was thinking how much easier replacing the cooling fan would've been in my old Compaq laptop if I would've had instructions like these.

    Again, GREAT JOB !!!

    MAX POWER

    Max Power -

    I did this and the beeping stopped, and it seemed like it would power up, and it is turning on now, but it’s not booting up and the screen is dead.

    Robert Sadlowski -

Conclusione

Per rimontare il tuo dispositivo, segui queste istruzioni in ordine inverso.

Porta i tuoi rifiuti elettronici a un riciclatore certificato R2 o e-Stewards.

Hannah Paine

Membro da: 28/06/17

392 Reputazione

2 commenti

Hidden bolts are tricky to understand at first.

Riben Deguhur -

can i still use my laptop without the battery (the same type of battery shown on those picture) and directly plugged in?? I've been worried since it's just stuck on a very low percentage

Shouko kazumi -