Introduzione

Se il tuo laptop non mostra alcun segno di volersi accendere, la batteria potrebbe essere guasta o morta. Questa guida ti mostra come rimuoverla e sostituirla con una nuova.

  1. iaTSuQ65o5eYyMRP
    • Gira il lato inferiore dell'IdeaPad verso l'alto.

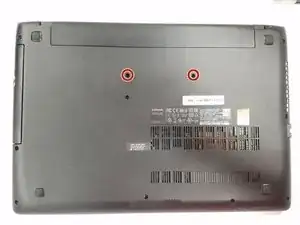
    • Utilizzando un cacciavite Phillips #1, rimuovi le due viti da 6,0 mm sul pannello posteriore, che tengono la tastiera.

    • Gira nuovamente il computer a testa in sù.

  2. MWgAEW1RNUuDyE1A
    • Apri il coperchio.

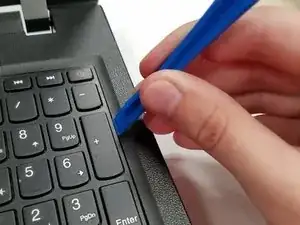
    • Usa un attrezzo di apertura in plastica per far leva sotto la tastiera e quindi staccarla dalla scocca.

    There’s a screw which is fixed behind the laptop which is fixed to keyboard.

    So first remove all screws on the back panel in step 5.

    Suyama Madushan -

    There are actually 2 screws on the bottom of the laptop that secure the keyboard. Removing all screws from the bottom of the laptop is still the best thing to do before beginning.

    Michael Wiseman -

  3. EwNM66JTmlCoEEBO
    • Ora disconnetti il cavo della tastiera usando l'estremità a punta di uno spudger o un dito per spingere dolcemente il cavo a nastro fuori dal suo zoccolo.

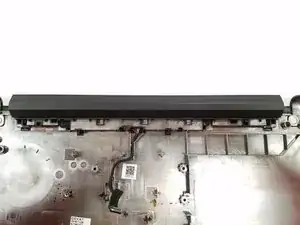
    • Rimuovi completamente la tastiera dalla scocca.

    Die zwei Schrauben auf der Unterseite müssen vorher gelöst werden. Wer dieser Anleitung folgt, bekommt die Tastatur zwar mit Gewalt raus, hat aber dann sie von der verschraubten Halterung abgerissen.

    schiller -

    Danke! Ich hab’s angepasst!

    Fabian Neidhardt -

    Do not pull on the cable. This is a ZIF connector. You will have to unlock the connector before pulling or prying on the cable. Click on the link for instructions on unlocking ZIF connectors .

    Riconoscimento e scollegamento dei connettori dei cavi

    Jeff Moore -

    • Sblocca il connettore ZIF prima di tirare il cavo fuori.

  4. FhggFWKAuCRHg6kh
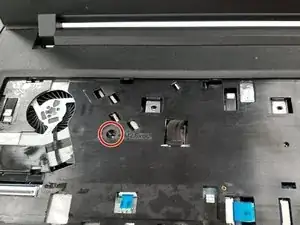
    • Con un cacciavite a croce Phillips #1, svita dal pannello posteriore una singola vite lunga 5,0 mm.

    This doesn’t disconnect the optical drive, as that’s located on the other side of the laptop. It disconnects the fan assembly.

    Michael Wiseman -

    yes the correct screw to remove for freeing up the optical drive is on the underside of the laptop, not the one shown which is on the wrong side and is under the keyboard?

    David Mallinson -

  5. bdtQTToEFl2rnbkp
    • Rovescia il laptop, disponendolo a faccia in giù; in questa posizione il drive ottico si trova nell'angolo superiore destro.

    • Rimuovi l'unità ottica per CD e DVD tirandola fuori con delicatezza dalla scocca.

    When you remove the optical drive, you will find two small screws you need to remove as well, in the lip of the optical drive bay

    Arnold Chavers -

    Before removing the optical drive you will need to remove one of the screws on the bottom of the laptop. Assuming you’ve gotten this far, you probably already did that in order to remove the keyboard. If not, then you should just remove all screws from the bottom of the laptop.

    Michael Wiseman -

    The optical drive screw is actually the 1 screw remaining in the center of the back after removing the keyboard.

    Garret -

  6. qJnJN1jZD4KAdDmS
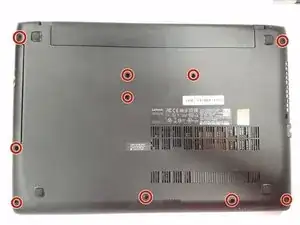
    • Disponi il laptop in modo che la cover inferiore sia in alto.

    • Con un cacciavite a croce Phillips #1, rimuovi dal pannello posteriore le dieci viti lunghe 6,0 mm.

    • Rovescia il computer per rimetterlo in posizione d'uso.

    There are actually 11 of these screws (there are 3 on the right side of the picture, not just 2). Also, there are 2 smaller, flatter screws underneath the optical drive on the left that will need to be removed as well.

    Michael Wiseman -

  7. oFjMlZBnAEFEv6pl
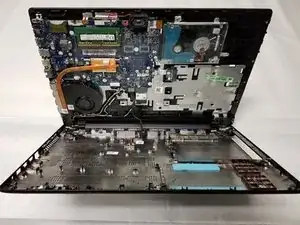
    • Con un attrezzo di apertura in plastica, stacca il case superiore dal fondo.

    • Continua a far leva tra il case superiore e quello inferiore lungo tutto il perimetro del laptop.

  8. t4snPoUfEi1fHQFV
    • Rovescia il laptop e libera il case superiore da quello inferiore.

    Don’t forget to actually remove the Battery cable…

    Chad DePugh -

    I have difficulty in separating the connection cable from the battery to the motherboard, in the connector of this. Please, I would need some advice to do it without having any problems. Thanks a lot.

    Omar Quintas -

  9. SKwbxwE3dxw4exSL
    • La batteria e attaccata al case inferiore del laptop.

    • Rimuovi le due viti lunghe 4,0 mm.

    • Spingi il gruppo batteria lontano da te per poter rimuovere completamente la batteria dalla scocca.

    But what about the covered wire connecting the battery to the board?

    ???

    Roxanne Corbin -

Conclusione

Per rimontare il tuo dispositivo, segui queste istruzioni in ordine inverso.

Jakub Szark

Membro da: 17/10/18

513 Reputazione

0 commenti