Introduzione

Usa questa guida per sostituire la batteria ricaricabile del Moto G4. Se la tua batteria è gonfia, prendi adeguate precauzioni.

Prima di iniziare, scarica l'applicazione Rescue and Smart Assistant per eseguire il backup del tuo dispositivo e diagnosticare se il problema è di natura software o hardware.

Per la tua sicurezza, scarica la batteria da sostituire sotto il 25% prima di smontare il telefono. In questo modo si riduce il rischio di un pericoloso incendio se la batteria viene danneggiata accidentalmente nel corso della riparazione.

  1. amtvddjAmwhmrnqH
    amtvddjAmwhmrnqH
    OWi4m4XCxfEBgDMt
    EwJnFXXfcwhAWbTc
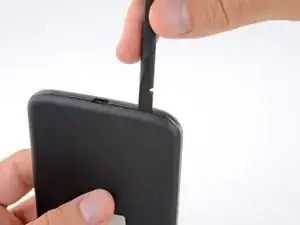
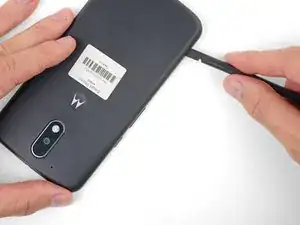
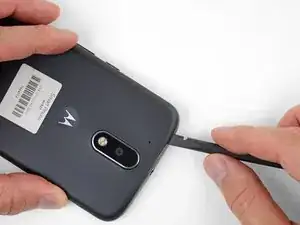
    • Inserisci un'unghia o uno spudger nella cavità del bordo inferiore del telefono, vicino alla porta di ricarica.

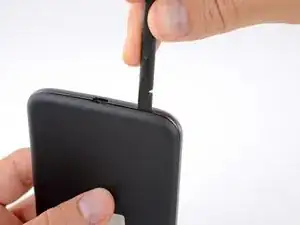
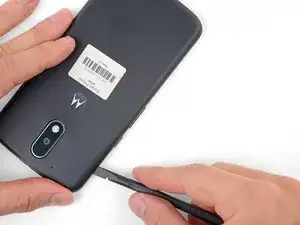
    • Torci delicatamente o fai leva per aprire una piccola fessura tra la cover posteriore e il corpo del telefono.

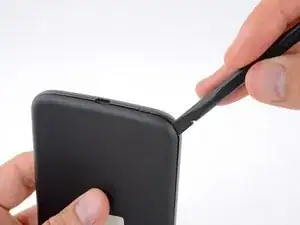
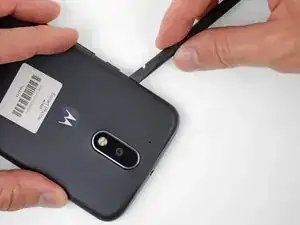
    • Mentre lasci il tuo attrezzo (o la tua unghia) inserito nella fessura tra la cover posteriore e il corpo del telefono, fallo scorrere attorno all'angolo per iniziare a sganciare le clip di plastica che tengono in posizione la cover.

  2. HLqMHMbmASfwFDVU
    HLqMHMbmASfwFDVU
    wkbdCQWZyeoURicu
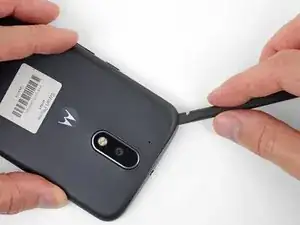
    • Fai scorrere il tuo attrezzo lungo il lato del telefono per separare altre clip di fissaggio della cover.

  3. IRICjJRMR1eUHQvd
    IRICjJRMR1eUHQvd
    frOdNGBIe3yRUYUQ
    DJCAEbwhl6ZN2xON
    • Mantieni il tuo attrezzo inserito appena sotto la cover posteriore e fallo scorrere attorno all'angolo superiore.

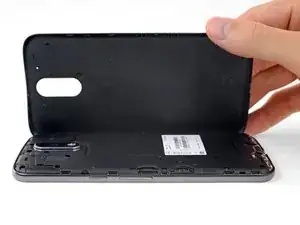
    • Se necessario, continua a far leva attorno ai lati rimasti del telefono finché la cover posteriore non si stacca.

  4. pTETy5GBsJCUgxsO
    pTETy5GBsJCUgxsO
    vKqBpOYKSASlbQkv
    • Rimuovi la cover posteriore.

    • Per installare la cover posteriore, posizionala con cura sopra il telefono e poi premila delicatamente attorno a tutti i bordi finché non senti che tutte le clip sono scattate in posizione di bloccaggio.

  5. ffDFM5MxvYRYGd3M
    ffDFM5MxvYRYGd3M
    KLonmPJiytRfZMPP
    • Fai scorrere fuori i vassoi delle schede microSD e SIM (se non l'avevi già fatto).

  6. CblUBFHebOPfmwHn
    CblUBFHebOPfmwHn
    Y5AmMCGdT5C4OWM1
    • Usa uno spudger per sollevare la cover di gomma del connettore del flash della fotocamera.

  7. MBcHXGXsJATGCWMj
    • Togli la cover di gomma.

  8. 2PT4qZOgF5piDHIy
    2PT4qZOgF5piDHIy
    OALHZ2QuglNBlykt
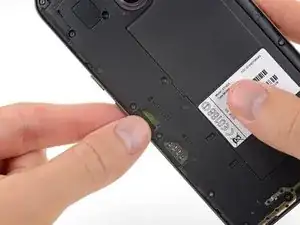
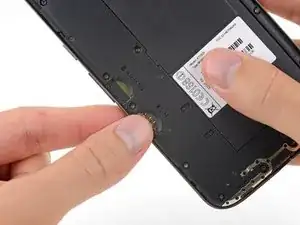
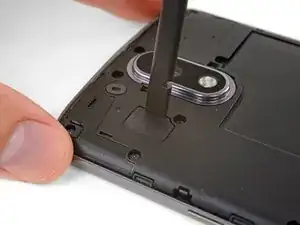
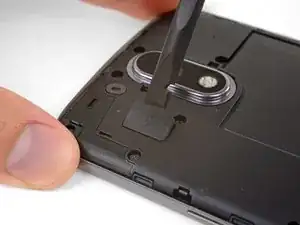
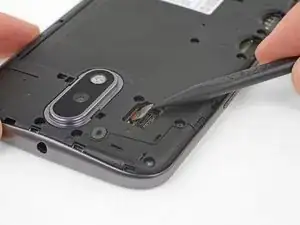
    • Usa uno spudger per scollegare, facendo leva da sotto, il connettore del flash della fotocamera.

  9. R52jISsgc6PJMUYW
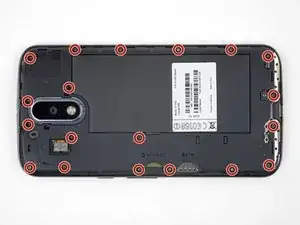
    • Usa un cacciavite Torx T3 per rimuovere le 19 viti tutte uguali che fissano il telaio centrale.

    In my kit, the T3 Torx bit came in the ‘repair part’ box, while a T5 Torx bit was in the ‘repair tools’ box.

    Joseph Albert -

    my phone had t4, not t3

    Donald Smith -

    Screws are stuck quite hard, apply a hefty amount of pressure when removing. Otherwise you’ll destroy the thread

    face -

    unable to remove 8 of the screws. any suggestions?

    wayne malcom -

    My T4 is the tool that fit. I can see why people strip these. They were dam tight for such little screws.

    I also had a tough time getting them out of the socket once loose. Magnet in the tool was not very strong. I used my tweezers, and scratch the screw heads. That means they are real soft steel, and strip easy.

    P 38 -

  10. CdvPqSLWgj4YR1Im
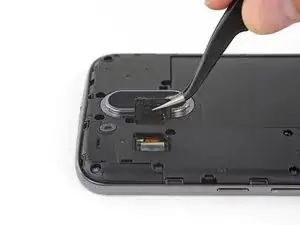
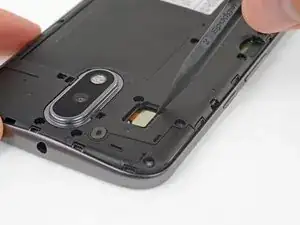
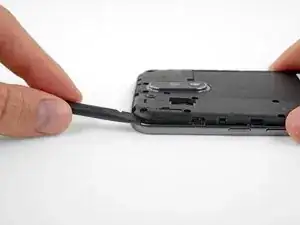
    • Inserisci uno spudger sotto il telaio centrale nel suo angolo superiore sinistro e torci con delicatezza l'attrezzo per separare questa parte dalla scocca del telefono.

    I couldn’t get the spudger in, but had success with the opening pick instead.

    Bernd Mast -

  11. D5HjSM3XUBUJOE6T
    • Rimuovi il telaio centrale.

    During the midframe removal, be careful and do not put too much torsional stress on the loudspeaker pickup wires (to the right of the main camera). It’s not that difficult to crush or shear the pickups there. Doing so will render your phone silent.

    Kevin Kwan -

    Exactly what happened to me. Both contacts broke off and if just loosely put where they were, they can't make proper contact anymore.

    There should be a warning about this in the guide itself!

    Simon Vetter -

  12. MuKCQiG4nYrNx3uC
    MuKCQiG4nYrNx3uC
    L5SaEZ4lgtZZZp4N
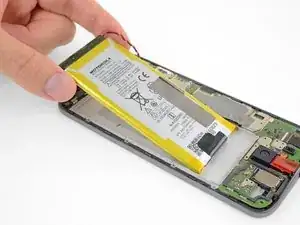
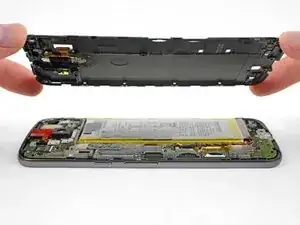
    • Stacca e togli tutti i pezzi di nastro che trattengono la batteria sulla scheda principale.

    • Stai molto attento a non perforare la batteria con strumenti affilati. Una batteria al litio-ioni danneggiata può prendere fuoco e/o esplodere.

  13. BLqEOMklkAkF1Tff
    BLqEOMklkAkF1Tff
    iylMqOYghJOZ5glk
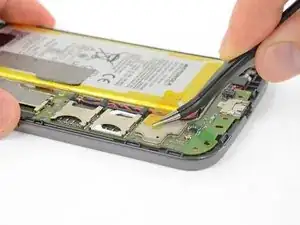
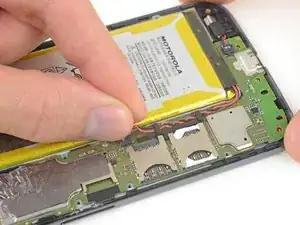
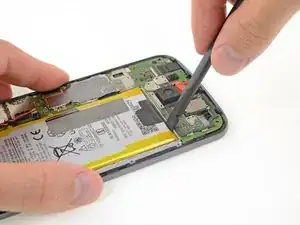
    • Inserisci un attrezzo sottile (come una delle punte delle tue pinzette) sotto i cavi rosso e nero della batteria e fallo scorrere sotto il connettore della batteria stessa.

    • Fai leva con delicatezza per scollegare la batteria.

    • Fai leva solo sul lato dove i cavi sono collegati al connettore: forzando in qualsiasi altro punto, potresti rompere lo zoccolo.

    • In fase di rimontaggio, allinea il connettore sullo zoccolo con la parte con il cavo di rame visibile rivolta in alto e poi premi in verticale per collegarlo, muovendolo un po' durante l'operazione per aiutarlo a infilarsi nella sua posizione corretta.

    Before detaching the connector, you may want to take a photo to remember which way the red and black wires go. Mine were the same way as in this photo, but when looking at the tiny connector of the replacement battery it wasn’t easy to be sure which way to insert it.

    jouniseppanen -

    What can you do if you break the socket??? Will anyone email me an idea, Or- is it simply ruined-??? My email address is jeffrey_f4@yahoo.com. THANKS in advance, IF- anyone will take the time to email me about this-!!!!!!!! :)

    Jeff Farmer -

    So you have bare copper wires and you’re sticking a metal tip tweezer in the vicinity.

    And yes, the battery is discharged as far as you can, but,………

    Maybe an idea to snip the wires somewhere further up before doing this ?

    Gary Jones -

  14. cLCCUCSC2kt4LLNu
    cLCCUCSC2kt4LLNu
    VwJhpUhWKRBeRjMi
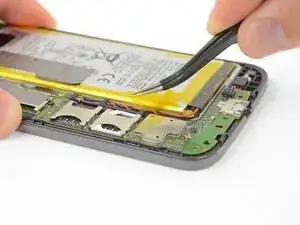
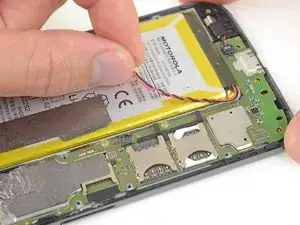
    • Spingi i cavi della batteria verso la batteria stessa per sfilarli dalla staffa nera presente sulla scheda madre.

  15. VFxt4jNROAw1XAGY
    VFxt4jNROAw1XAGY
    evjkNGCOotOYaXHN
    F1cAl2M525S2VFwf
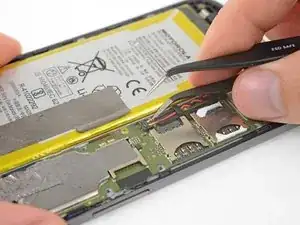
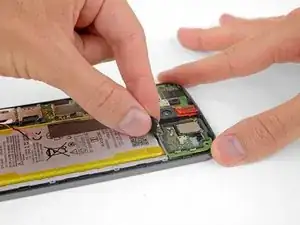
    • Solleva la linguetta di estrazione disposta sulla parte superiore della batteria e tirala lentamente, ma esercitando una forza costante, per staccare la batteria dall'adesivo che la tiene in posizione.

    • La batteria si staccherà più facilmente se aggiungerai qualche goccia di alcol isopropilico lungo ciascun lato della cella per ammorbidire l'adesivo sottostante. L'alcol ad alta concentrazione (90% o superiore) non danneggerà i componenti del tuo telefono.

    • Anche scaldare l'area sotto la batteria può aiutare ad ammorbidire l'adesivo, ma stai molto attento a non surriscaldare la cella.

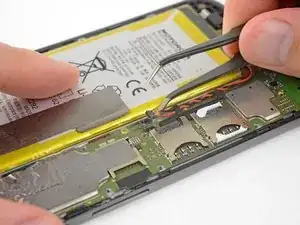
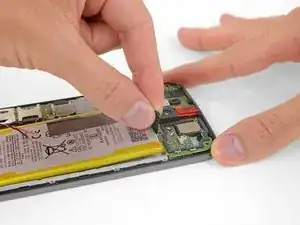
    • Se la linguetta si rompe, usa uno spudger o una vecchia carta di credito per far leva delicatamente sui bordi della batteria finché questa non si stacca.

    • Non deformare o perforare la batteria: può incendiarsi e/o esplodere se viene danneggiata.

    • Non rimontare mai una batteria danneggiata o deformata. Sostituiscila.

  16. IxIGsdTGVdJ3aAYD
    • Rimuovi la batteria.

    • Nel corso dell'installazione, fai caso all'orientamento della batteria. Verifica se il connettore è sullo stesso lato della scheda madre e se il testo è rovesciato rispetto al resto del telefono: in questo caso l'avrai disposta correttamente.

    • Usa qualche striscia di nastro biadesivo sottile o una scheda adesiva pretagliata per fissare la batteria (se stai sostituendo il display, questo potrebbe avere già preinstallato l'adesivo necessario).

Conclusione

Verifica attentamente la nuova parte e paragonala alla parte originale. Rimuovi qualsiasi supporto adesivo dalla batteria prima di installarla.

Per rimontare il tuo dispositivo, segui questi passi in ordine inverso.

Dopo aver completato questa guida, calibra la batteria appena installata.

Porta i tuoi rifiuti elettronici a un riciclatore certificato R2 o e-Stewards.

La riparazione non è andata secondo i piani? Vai sulla nostra comunità Risposte per trovare aiuto nella risoluzione dei problemi.

Jeff Suovanen

Membro da: 06/08/13

426762 Reputazione

17 commenti

Bought the battery from Ifixit because I’ve enjoyed your videos. I changed the battery, all seemed well, but now I get no sound out of the speakers! They are not mentioned on any of the topics. Help!?

Alex G Mendoza -

See the comment on this step. Make sure the two little copper prongs on the back of the speaker make good contact with their respective pads on the back of the midframe. It’s okay to (very gently) bend them up slightly if needed.

Jeff Suovanen -

bought battery and kit from ifixit. replacement went pretty well. Careful with those tiny little screws. They do not like to come out after loosening. I worked over a small tray and still had two get away from me. I also had some tape on the sim card side of battery not mentioned in instructions. I tore it pulling it back. Was concerned as it seemed to be foil faced on back side which sepperated when pulling up. All works though so no worries.

Hugh Wolfe -

Bonjour,

Etes-vous sûr pour le modèle du tournevis ?

J’ai échoué avec le Torx T3, mais réussi avec le Torx T4

LEFEVRE -

It definitely should be a T3, but not all driver kits are created equal. If a T4 works better for you, go with that ;)

Jeff Suovanen -

Def T3, it’s the one not in “The Essentials” kit

Hugh Tattersall -

I encountered two large adhesive pads affixing the battery to the metal frame. A couple drops of IPA weren’t enough. Gentle levering at the camera side of the battery and a slow injection of IPA with a syringe eventually did the trick. Take it slow and let the IPA do its thing.

andrewthocker -

What is “IPA” , mentioned as a lubricate ?

Lester -

my battery worked fine but after charging the phone the first time it wont turn on it has been plugged in for 12 and a half hours

Andrea Emory -

At end of Moto G4 battery replacement instructions , it says “ After completing this guide, calibrate your newly-installed battery. “

Don’t see any furthur explanation of this reference or how to calibrate ?

lestertmurphy@gmail.com 3/21/2020

Lester -

Hi Lester,

Please follow the instructions listed here:

Battery Calibration

Arthur Shi -

Bonjour,

Déjà à la lecture, le tuto est très clair, détaillé. Il met en confiance pour acquérir le kit de réparation. Les illustrations par photo sont très utiles. Un seul tout petit bémol, mais vraiment tout petit à l’étape 13, au remontage, le connecteur de la batterie (qui est vraiment très petit) est quand même assez contre-intuitif. D’un côté on aperçoit 2 petits trous où le cuivre apparaît et de l’autre côté, non. Et c’est ce côté, sans cuivre apparent qu’il faut clipser. J’ai effectué plusieurs tentatives du mauvais côté avant de consulter le tuto et surla photo très claire on voit bien dans quel sens il faut mettre le connecteur.

J’espère que la batterie tiendra mieux…

Merci.

Squelbut Jean-Philippe -

I didn't find your instructions when I first opened the back cover. Followed an instruction on youtube that suggests T4 screwdriver. Now 5 screws were stripped. Can't take them out. Can you post the size of the screws? I may have to drill the screws. Thanks

Ruby -

Hi Ruby,

I’m sorry to hear this! From my experience, there has been quite a bit of variation and manufacturing tolerances with the screws Motorola uses, and as a result, T3 works for some and T4 works for others. I can’t tell you much about these screws other than that they are 3.1 mm long.

Arthur Shi -

Any good suggestion on removing stripped screws? Rubber band did not

Ruby -

Will my apps and data be preserved when the old battery is disconnected?

IanR -

I can answer my own question - nothing lost!

IanR -