
Introduzione
Usa questa guida per sostituire la batteria del tuo Nexus 7.
-
-
Spegni il telefono.
-
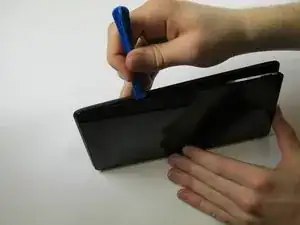
Incunea il tuo strumento di apertura in plastica nella giunzione tra le due facce del dispositivo. Fai leva e apri un lato alla volta.
-
-
-
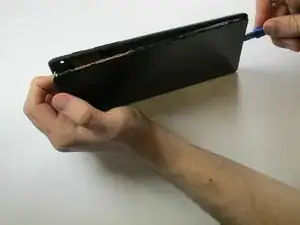
Usa anche le dita attorno alla giunzione tra il dispositivo e la cover posteriore. Usa il tuo strumento di apertura in plastica o le dita per separare ciascun lato fino a staccare completamente tra loro il dispositivo e la cover posteriore.
-
-
-
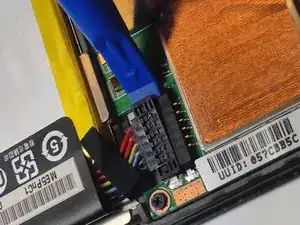
Inserisci lo strumento di apertura in plastica sotto il bordo laterale del connettore della batteria e fai leva delicatamente per scollegarlo.
-
-
-
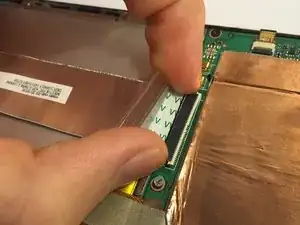
Usa l'estremità piatta di uno spudger o le unghie per far scattare l'aletta protettiva trasparente sullo zoccolo ZIF del cavo piatto.
-
Con l'estremità piatta di uno spudger o le unghie, solleva la porzione sottile del connettore (dal lato opposto a dove si inserisce il cavo) per liberare il cavo dal suo zoccolo.
-
Sfila il cavo dallo zoccolo ZIF.
-
-
-
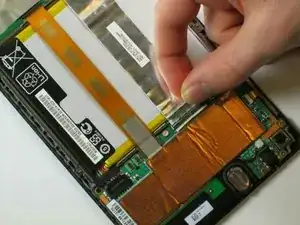
Stacca la lamina protettiva disposta sopra la scheda madre per esporre la connessione del cavo flat arancione.
-
-
-
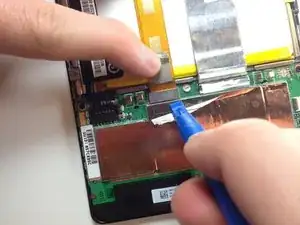
Stacca con delle pinzette il foglio protettivo argentato sopra il connettore del cavo a nastro arancione.
-
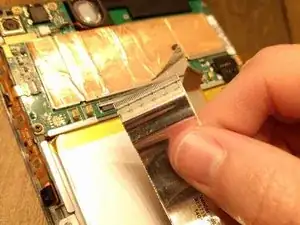
Fai leva sotto il connettore del cavo arancione con lo strumento di apertura in plastica per sollevarlo. Dovrebbe saltare via dalla sua posizione.
-
-
-
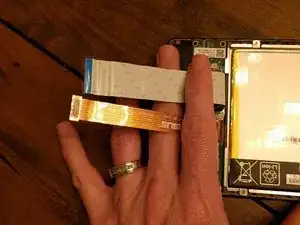
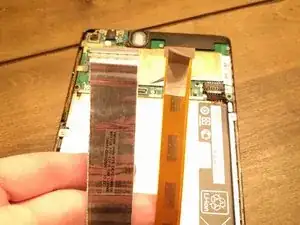
Ora che i due cavi piatti principali sono scollegati, ripiegali e tienili lontano con le dita, oppure sistemaci sopra le pinzette o un altro oggetto leggero per tenerle discoste.
-
-
-
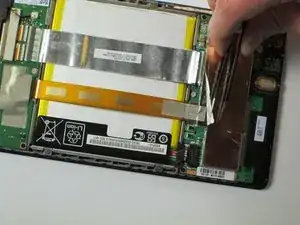
Usa il cacciavite a croce Phillips #0 per rimuovere le quattro viti a croce cromate Phillips #0 da 3 mm disposte attorno all'alloggiamento della batteria.
-
-
-
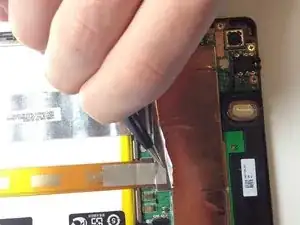
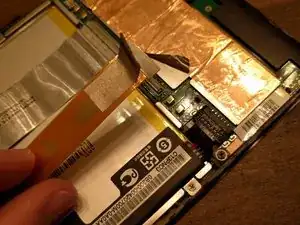
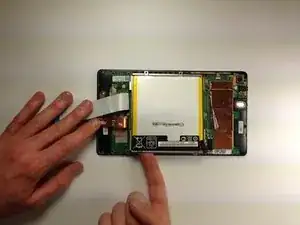
Rimuovi la batteria dal dispositivo esercitando una certa pressione alla base della batteria e quindi sollevandola.
-


Per rimontare il tuo dispositivo, segui queste istruzioni in ordine inverso.
20 commenti
Don't be a goof like me and spend seven minutes trying to pry in the gap between the screen glass and the plastic. I thought that the plastic cover wrapped around the whole of the side and met the unit just under the glass. Nope...find the seam near the halfway point of the case side, between plastic and plastic. (The first photo here is not sufficiently clear to make this obvious.)
This is such a valuable comment. The photos are VERY misleading. Thank you for pointing this out!
q3cq3c -
1 If you look closely, you'll see that at the edge of the glossy, black screen there is a glossy, black, 1mm hard plastic band going all the way around the screen. This provides the beveling on the edge of the screen. Around that is the dull, black plastic case. Insert your spunger or fingernail between these two plastic bands. It is easiest to do near the middle both of the long sides. Gently slide up toward the corners popping each little snap. When you get near the corner, keep one fingernail/spunger in the gap you've created on the side, near the corner, then use another nail/spunger to go around the corner. Be careful here. This is the easiest place to damage.
Once the corners have popped, the end/short top edge is easy. The bottom edge is different since the micro-USB port is also there. I did not pry it open but lifted the other three sides and just slid the screen out from that end. I inserted the USB end first also when reassembling, snapping the other edges then corners in afterward.
I had a heck of a time doing this, spent ten or twenty minutes carefully prying, and I STILL cracked the case. At least on mine, the case was held in VERY well and required prying pretty much everywhere before it would let go. The tools I bought from iFixit really helped, but still a royal pain to open.
pacmanmaster -
a couple of obscure things that might help in opening:
guitar pick. get a few; they are cheap.
a prying device made for the sign industry: its called"lil' chizler". I have found that this to be the most helpful opening tool.
http://www.ebay.com/itm/like/16184595677...
also
https://www.qualitylogoproducts.com/trad...
you can use the broken screen unit to test.
Len Gorsky -
Add "remove the sim tray"...
Iain Lennon -
I echo the previous - a right royal pain to get the cover off! I started on the right side as seemed to be more give there… iFixit tools helped tho!
Steven Emery -
Just for the sake of clarity, I would add that you need to pry between the plastic bezel and the back casing. Not between the glass and bezel. Someone had already tried on the one I worked on and part of the bezel was missing in the top right corner. Made my job easier!
The best tools for this part are definitely something like the iFixit Jimmy and their opening tool, a few guitar picks and a spudger. Not too difficult once you get the first separation.
Cool_Breeze -
I managed to easily crack the screen, guess I’ll have to order a new one and “try” to put it in, in addition to the original job of replacing a dead battery on Nexus 7 2013..ahhhhhh, slow learner…
Gary Stamey -
Opened the case for the first time. It took me a while to find any gaps, but I found that the easy way to begin was using your fingernail to get into the sides. The middle left and middle right seemed a lot easier to…slip a nail in compared to the rest of the case, especially the corners and the top and bottom. With a small opening on both sides I used the opening tool to increase the gaps while using a couple of guitar picks to prop up the device against the back case. With most of the sides exposed, I worked on the bottom (create opening, leave a guitar pick to keep that part open, use the opening tool to get the rest out), and the opening was pretty much complete.
So far only the corners of the back case showed small cracks and my screen was pretty much unscathed.
Nam Lam -
This method worked best for me! Start opening on the middle left and right sides, then prop them open with guitar picks and use to the opening tool (carefully) prying up several times moving away from the middle towards the corners to pop off the back casing.
Frank's VR -