Introduzione
Usa questa guida per sostituire la batteria del tuo Samsung Galaxy S9.
L'apertura del Samsung Galaxy S9 danneggerà le guarnizioni impermeabili del dispositivo. Se non sostituirai queste guarnizioni, il tuo telefono funzionerà normalmente, ma perderà la sua resistenza all'acqua.
Prima di smontare il telefono, scarica la batteria sotto il 25%. Se la batteria è gonfia, non scaldare il tuo telefono. Le batterie gonfie possono essere pericolose, quindi indossa occhiali protettivi e usa la dovuta attenzione; se non sei sicuro di saper eseguire la procedura, porta la batteria da un professionista.
Ti servirà adesivo di ricambio per riattaccare i componenti quando rimonterai il dispositivo.
-
-
Prima di iniziare, spegni il telefono.
-
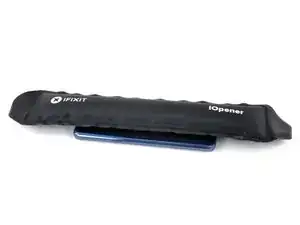
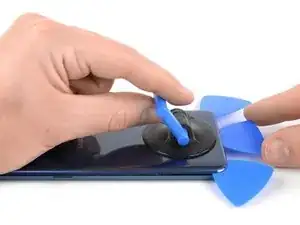
Applica un iOpener riscaldato su uno dei lati lunghi del telefono per ammorbidire l'adesivo sotto il vetro posteriore. Applica l'iOpener per almeno due minuti.
-
-
-
Nei passi successivi, taglierai l'adesivo che fissa la cover posteriore.
-
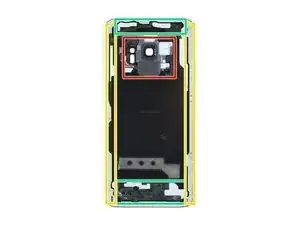
L'adesivo deve essere tagliato nelle aree evidenziate:
-
Parti dove l'adesivo è più spesso
-
Parti dove l'adesivo è più sottile
-
Evita di far leva o tagliare in questa zona per non danneggiare il cavo flessibile del sensore impronte digitali.
-
-
-
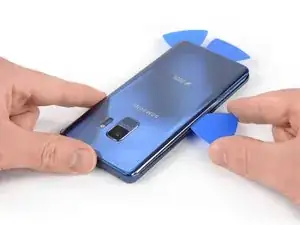
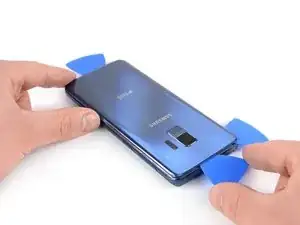
Fai aderire una ventosa alla cover posteriore.
-
Solleva il bordo inferiore della cover posteriore con la ventosa per aprire una sottile fessura tra il vetro e la scocca.
-
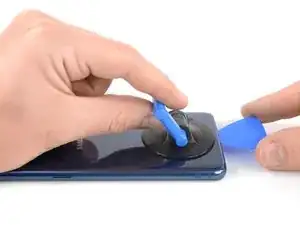
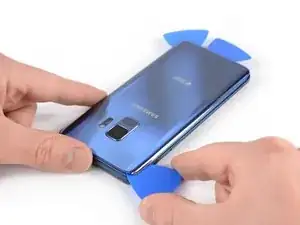
Inserisci un plettro di apertura nella fessura e fallo scorrere fino all'angolo inferiore destro.
-
Inserisci un secondo plettro di apertura e fallo scorrere fino all'angolo inferiore sinistro.
-
Inserisci un terzo plettro di apertura per evitare che l'adesivo possa riattaccarsi nel corso delle operazioni successive.
-
-
-
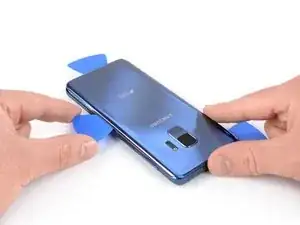
Inserendo soltanto la punta del plettro di apertura, fai scorrere l'attrezzo lungo il lato dall'angolo inferiore sinistro fino alla parte superiore del telefono.
-
Fai scorrere il plettro attorno all'angolo superiore e lascialo in posizione per impedire che l'adesivo possa riattaccarsi.
-
-
-
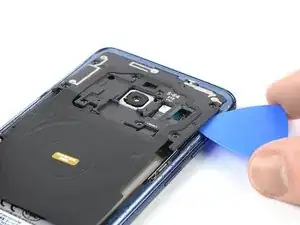
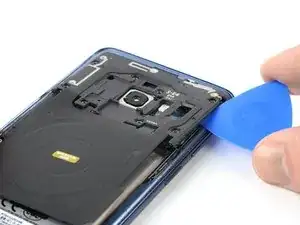
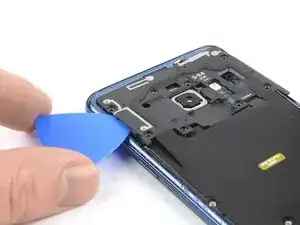
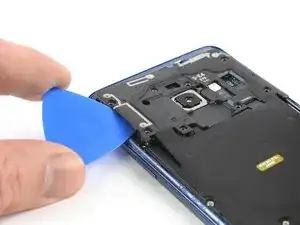
Fai scorrere il plettro di apertura, percorrendo il lato del telefono, dall'angolo inferiore destro fino alla parte superiore.
-
Fai scorrere il plettro di apertura attorno all'angolo e taglia l'adesivo rimasto nella parte superiore del telefono.
-
-
-
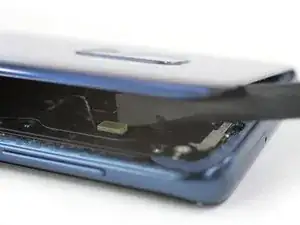
Alza con cautela il lato del vetro posteriore dalla parte dei pulsanti del volume.
-
Usa l'estremità di uno spudger per sollevare e scollegare il cavo flessibile del sensore impronte digitali.
-
-
-
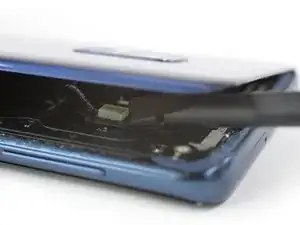
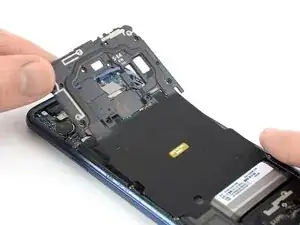
Inserisci un plettro di apertura sotto il lato destro della cover di plastica che contiene l'antenna NFC e la bobina di ricarica.
-
Torci il plettro oppure fai leva per sganciare le clip di plastica che fissano la cover.
-
-
-
Inserisci un plettro di apertura sotto il lato sinistro della cover di plastica.
-
Torci il plettro o usano per far leva per sganciare le clip di plastica che fissano la cover.
-
-
-
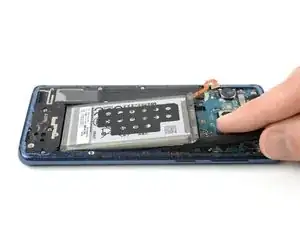
Usa l'estremità piatta di uno spudger per sollevare e staccare il cavo flessibile della batteria.
-
-
-
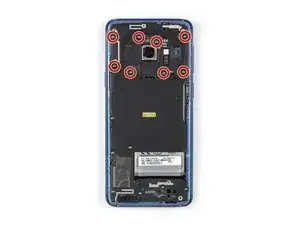
Usa un iOpener per ammorbidire l'adesivo sotto la batteria. Applica l'iOpener per almeno due minuti.
-
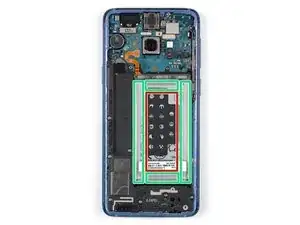
Nel passo successivo, usa lo spudger solo nelle aree segnate in verde, cioè dove è presente l'adesivo che fissa la batteria.
-
Evita questa zona. C'è una fessura nel telaio centrale proprio sotto la batteria e da qui potresti accidentalmente danneggiare il display.
-
-
-
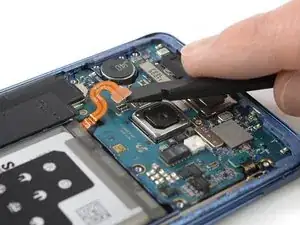
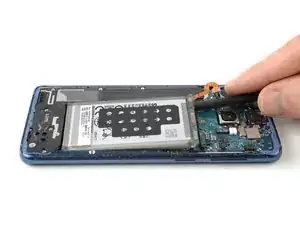
Inserisci l'estremità piatta di uno spudger nell'angolo superiore sinistro della batteria dove è posizionato il cavo flessibile e inizia a staccarla.
-
Continua a lavorare lungo il lato sinistro della batteria allentando l'adesivo con lo spudger.
-
-
-
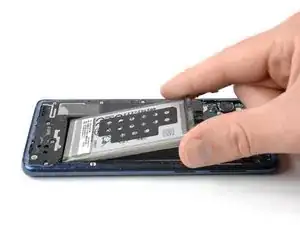
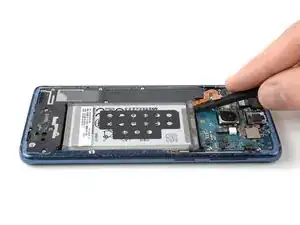
Inserisci lo spudger nell'angolo superiore destro della batteria e fai leva per sollevare la cella.
-


Per rimontare il tuo dispositivo, segui queste istruzioni in ordine inverso.
Se possibile, accendi il telefono e verifica la tua riparazione prima di applicare del nuovo adesivo e risigillare il telefono.
Per prestazioni ottimali, calibra la nuova batteria appena installata dopo aver completato questa guida.
Porta i tuoi rifiuti elettronici a un riciclatore certificato R2 o e-Stewards.
La riparazione non è andata secondo i piani? Vai sulla nostra comunità Risposte per trovare aiuto nella risoluzione dei problemi.

22 commenti
An exceptionally useful, and dare I add - well-written - fixit.
Merci ifixit.
Mais je n ais pas compris la deconnection du NFC, es une nappe. Je ne comprends pas.
Di Da -
Bonjour @Di Da, vous trouverez la partie qui parle de la démontage du coque / de la cache en plastique qui abrite l'antenne NFC et la bobine de recharge dans les étapes 9 à 11. Au fait, la cache en plastique et la nappe sont UNE pièce ensemble, on ne peut pas les séparer et dès que vous démontez la cache, la nappe va elle aussi sortir automatiquement. Elle n’est lié que par quelques contacts, vous n’avez pas besoin de déconnecter ceux-ci, ils se séparent automatiquement quand vous retirez la coque.
Wenn nach Abschluss der Reparatur der Fingerabdrucksensor nicht funktioniert muss man in den Restore Modus des Handy gehen.
Dazu das Smartphone an den Lader hängen und das Gerät ausschalten.
Dannach die Bixby + Power + Lauter Taste gedrückt halten bis das Samsung Logo erscheint.
In dem Menü den Punkt “Wipe Cache Partition” auswählen mit Lauter / Leiser und mit Power die Auswahl bestätigen.
Die Auswahl nochmal mit Yes bestätigen und warten bis das Gerät die Cache Partition gelöscht hat und das Gerät neu starten.
Dannach sollte der Fingerabdrucksensor wie gewohnt funktionieren.
Nightmare. Impossible to get the back off so far. Being trying using the iOpener with hair dryer for last 1hr. No chance.
Chris Bunney -
You’re right Chris. I’ve tried on 3 separate occasions now and haven’t been able to budge that back. All that has happened is the pick has taken a piece out of the glass back leaving a rough edge now.
grahamcatto -
it was not easy but doable.
Clinton Stark -
It’s difficult, but the trick I did to get it was to wrap the hot iOpener around a bottom corner, apply the suction cup, then I covered the opener and phone with a paper plate, better insulating the area. Then I set my blow dryer to high heat and low velocity and heated the area under the plate for about a minute. Right after turning off the blower, I took off the plate and pulled the suction cup with a cutter at hand. You’ll hear a bit of a cracking/popping noise when the adhesive is starting to give, just apply a little more force and push the cutter at the seam. This method worked great for me, so good luck and just keep at it — you’ve got this!
Nicholas Weger -
I used nearly boiling water in a storage zip bag on the phone for 10 minutes. I can’t really recommend this method, but thankfully the bag did not leak - an iOpener is probably a much better way to go. Regardless, the bag covered the entire back of the phone, and the phone was too hot to hold, but I still could not get the glass to budge with the suction cup after struggling with it for about an hour and multiple reheats. I ended up epoxying a 2”x2” square of PVC board to the bottom of the cover and built a relatively complex fixture that pulled on the PVC with the turn of a screw while it held down the frame by the edges. After heating the edges up again It did lift the glass enough to get a pick underneath it, but it cracked the glass and it was a pain to slide a pick around the edge while the glass was cracking all the way around. Once I finally got all the glass off, I spent the next 30 minutes (which is what this entire process is supposed to take… what a joke!) cleaning the adhesive off the phone.
drbenton815 -
Heavy Duty Heat Gun from popular discount tool store for the win!
Jesse Meyer -
Well, it is not obvious how to do this. I have no iOpener, but a heat cushion for remedy hurting muscles and sometimes a backpain. It is filled with grain of some kind and it is to be heated in a microwave oven for about 3 minutes. After that I enveloped this cushion round the phone and brewed myself a cup of tea. After ten miutes the phone was warm (almost hot) and I was able to press the tip of a small (very small) knife above the charging port into the connection between the phone body and the backplate. A very small opening emerged slowly (this is the critical point in this process) and I was able to start using the iFixit opening picks. It became obvious to me that the opening picks are too blunt to achive this with them. But after starting carefully with the (very small and very sharp) knife, everything went straight forward. Thou I had to give the phone a second heatpush with my heat cushion before the backplate came loose.
borutberg -
I used my 3D printer heat bed and heated it to 90 Celcius to succeed.
gahute -
It took about 3 minutes on my 90 C printbed to get the first pick in. If the suction cup gives up before the adhesive does, try using some Isopropyl alcohol to clean the back of the phone, and it should stick better. Also, don't apply heat to the screen, just in case that wasn't clear.
Evan Newman -
Used a corn bag (usually used for sore muscles) and incased the phone. It was hot to the touch, but it did the trick. Also needed a knife to have a small enough edge to start prying the back off and get the adhesive to finally pop.
Laurie Hallberg -
Don't Forget Step 0! Turn the phone Off and remove the SIM card tray. just to be safe, I'd recommend making a full backup of your phone onto a micro SD card in case the worst should happen. also, make sure anyone who needs to contact you knows you aren't currently available at your phone number.
Evan Newman -
We went for a hairdryer. Put it on hot, low blow and put the head right up to the corner. Took maybe 5 minutes per corner!
Robert Tomohamat -
Removing the back wasn't too difficult on my phone: several rounds of heating with the iOpener, applying gentle pressure with the suction cup, and eventually a corner lifted up without much force and I could easily slide a pick in. From there it was very straightforward and I had no trouble sliding the picks around and removing the back. The battery removal was much harder in comparison (especially as the iOpener burst when reheating in the microwave for the battery, despite following the time instructions).
Less eWaste -