Introduzione

Usa questa guida per sostituire la batteria del tuo TicWatch Pro 3 GPS.

Per la tua sicurezza, scarica la batteria al di sotto del 25% prima di smontare l'orologio. Ciò riduce il rischio di incendio se la batteria viene accidentalmente danneggiata durante la riparazione. Se la tua batteria è gonfia, prendi le dovute precauzioni.

Avrai bisogno di adesivo sostitutivo per rimontare il dispositivo. Il tuo dispositivo funzionerà normalmente, ma perderà la classificazione IP (Ingress Protection).

  1. vSj6cyQPPAgmMDAo
    vSj6cyQPPAgmMDAo
    i3yCY6eMJCalJGet
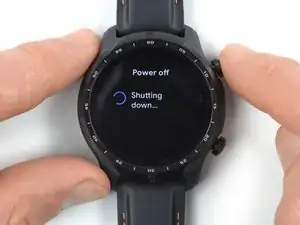
    • Prima di iniziare le riparazioni, togli l'orologio dal caricabatterie e spegnilo.

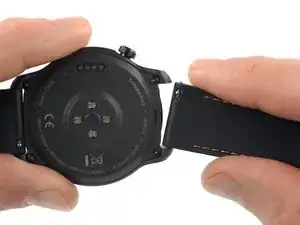
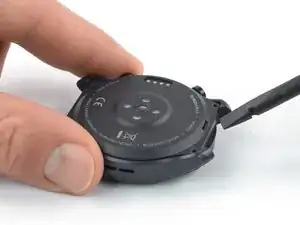
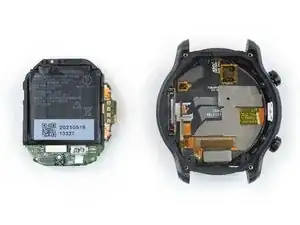
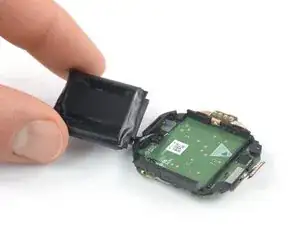
    • Rimuovi il cinturino.

  2. LWbfEUyt33T3cNNg
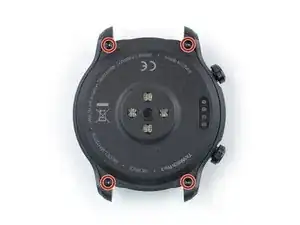
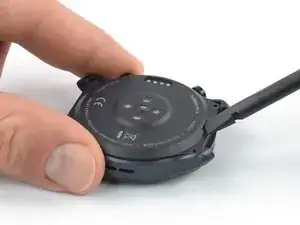
    • Usa un cacciavite Torx T3 per rimuovere le quattro viti lunghe 4,1 mm che tengono ferma la cover posteriore.

  3. kOKfWXIjOdEqYBkX
    • Applica un iOpener riscaldato sul retro dell'orologio per 5 minuti per allentare l'adesivo sottostante.

    • Puoi usare anche un asciugacapelli, una pistola termica o una piastra riscaldante, ma fa' attenzione a non surriscaldare il dispositivo.

  4. U6O1BVJMFNvOOMIy
    U6O1BVJMFNvOOMIy
    5CpaKqBYhhBAOCEj
    HZETxDRaXtAuJBVI
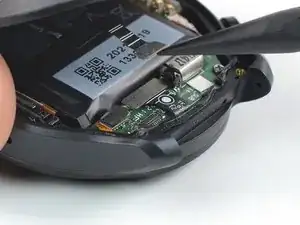
    • Inserisci l'estremità piatta di uno spudger nell'apertura del microfono sul bordo superiore della cover posteriore.

    • Fai leva verso l'alto per allentare il gruppo della cover posteriore. Questo potrebbe richiedere un po' di forza.

    • Non tentare ancora di rimuovere completamente il gruppo della cover posteriore. È ancora connesso alla scheda figlia.

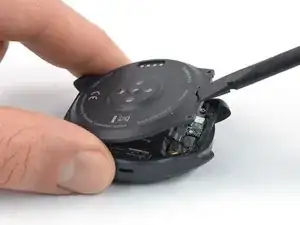
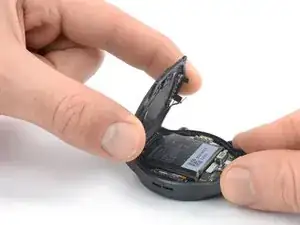
    • Apri il gruppo della cover posteriore di 45 gradi per accedere al cavo del gruppo del sensore.

  5. lQZND6EACeU1FNIt
    lQZND6EACeU1FNIt
    4sDAoEnxKo3vM1sQ
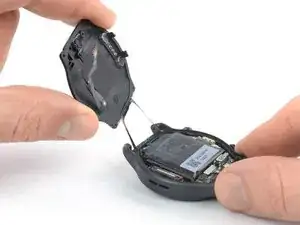
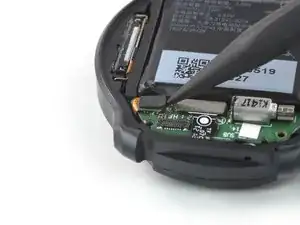
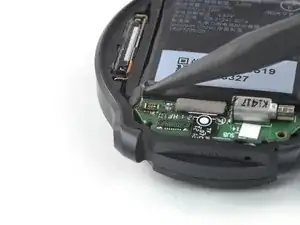
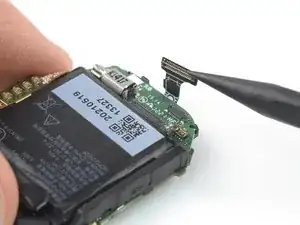
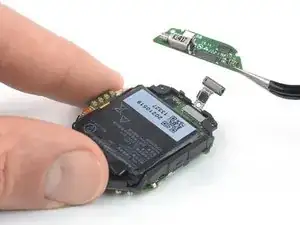
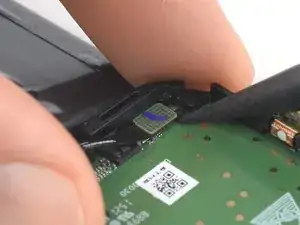
    • Usa uno spudger per scollegare il cavo del gruppo sensore sollevando il connettore dalla sua presa.

    • Per riattaccare i connettori a pressione come questo, allinea con attenzione e premi su un lato finché non scatta in posizione, quindi ripeti sull'altro lato. Non premere verso il basso al centro. Se il connettore non è allineato, i pin possono piegarsi, causando danni permanenti.

  6. dYNcQ3f6QEmip3bb
    dYNcQ3f6QEmip3bb
    PbRUoZOCJ2jsMKRC
    osNCvNgNMJlS1oZR
    • Rimuovi il gruppo della cover posteriore.

  7. HbCFGe5MWGrOEfMs
    HbCFGe5MWGrOEfMs
    kXvUN4yZjCalCmTk
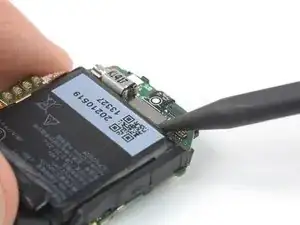
    • Usa uno spudger per scollegare il cavo del microfono sollevando il connettore dal suo zoccolo.

  8. mlesRANSQXNigOBi
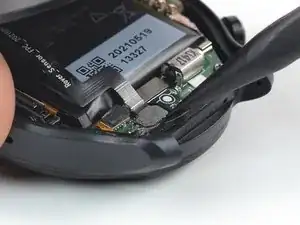
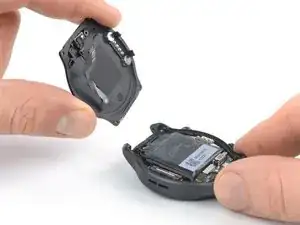
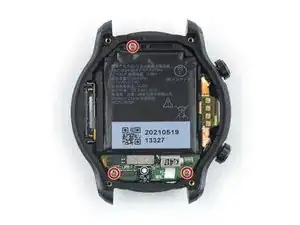
    • Usa un cacciavite a croce Phillips per rimuovere le tre viti lunghe 4,1 mm che fissano il gruppo centrale.

  9. JJFgmhWcTgUXTM2m
    JJFgmhWcTgUXTM2m
    LxwWFyDRlFiQCFZw
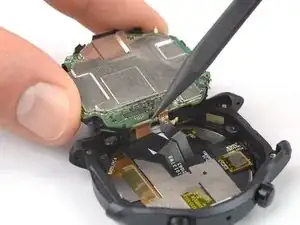
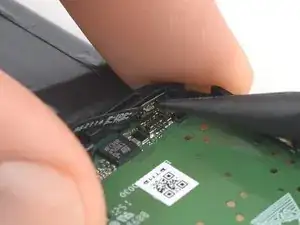
    • Inserisci la punta di uno spudger tra il bordo destro del gruppo centrale e il telaio dell'orologio.

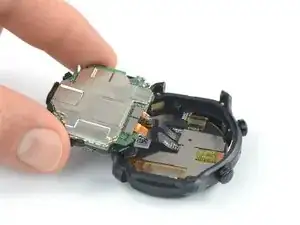
    • Fai leva verso l'alto per allentare il gruppo centrale.

    • Non tentare ancora di rimuovere completamente il gruppo principale. È ancora connesso allo schermo.

  10. qgG1GEVSNRNUsXsB
    qgG1GEVSNRNUsXsB
    gEeHLnne1px6T2f1
    V4GIu2MKoBjdegfp
    • Apri con cautela il gruppo centrale come la copertina di un libro.

    • Evita di tirare o strappare i cavi del display nella parte inferiore del gruppo centrale.

  11. ZwHcLVMfPH2nbByE
    ZwHcLVMfPH2nbByE
    MO2RBdSFIOSIxRO3
    RBfCHZ5WDtAoZkEn
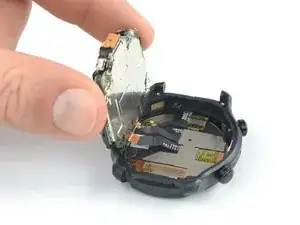
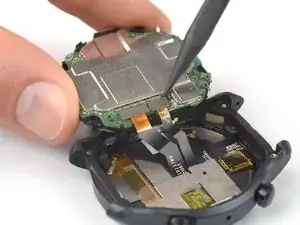
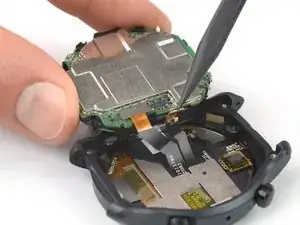
    • Usa uno spudger per scollegare lo schermo e i cavi del digitalizzatore sollevando i connettori dalle loro prese.

  12. XqP4DnbggnhGF5TX
    XqP4DnbggnhGF5TX
    XmjkHcgBWIRyAYjS
    • Rimuovi il gruppo principale.

  13. XRbGjHXgbAsxPgqm
    XRbGjHXgbAsxPgqm
    o3aODLClXSRBQxjK
    • Usa uno spudger per scollegare il cavo di interconnessione sollevando il connettore dal suo zoccolo.

  14. J4CWsA6COjntHopM
    J4CWsA6COjntHopM
    HfZwJBipSfFAflUN
    • Usa un paio di pinzette per rimuovere la scheda figlia.

  15. WFOUHShF2HkuFtS1
    WFOUHShF2HkuFtS1
    YblE1L6LTS6B2rSE
    • La batteria è tenuta in posizione da un adesivo delicato.

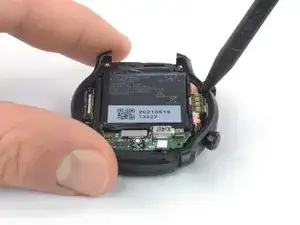
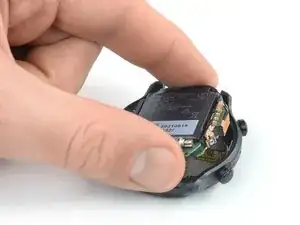
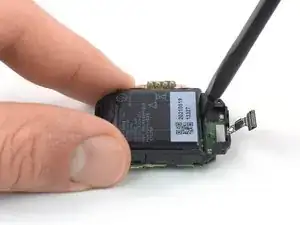
    • Inserisci l'estremità piatta di uno spudger tra il bordo inferiore della batteria e il telaio centrale.

    • Fai attenzione a non forare o piegare la batteria con l'utensile: una batteria forata o piegata potrebbe lasciar fuoriuscire sostanze chimiche pericolose o provocare un incendio.

    • Fai leva verso l'alto per allentare la batteria.

    • Se hai difficoltà a sollevare la batteria, posiziona un iOpener riscaldato sulla scheda madre per ammorbidire l'adesivo sottostante. Non applicare l'iOpener direttamente sulla batteria.

    • Non tentare ancora di rimuovere completamente la batteria. È ancora collegata alla scheda madre.

  16. PEJcThvHRYOJOqoa
    PEJcThvHRYOJOqoa
    XC3KWrXixHPRokKO
    • Piega con cura la batteria per accedere al connettore del cavo della batteria.

    • Evita di tendere o strappare il cavo della batteria.

  17. jCxp3h2c2LNNsxPt
    jCxp3h2c2LNNsxPt
    RfAjjZlbsWbRKmo4
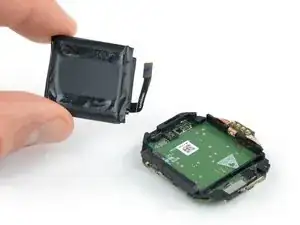
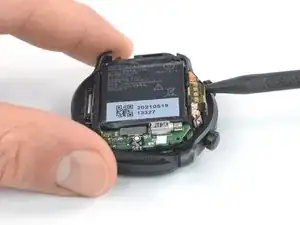
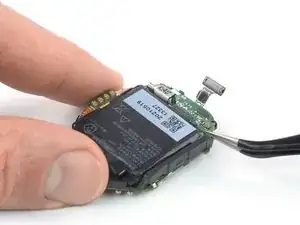
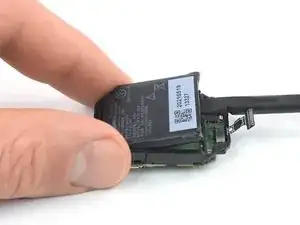
    • Usa uno spudger per scollegare il cavo della batteria sollevando il connettore dalla sua presa.

  18. ayX1EBWcPNxeTpiJ
    ayX1EBWcPNxeTpiJ
    M3ayFJdX4dobXKSQ
    • Rimuovi la batteria.

    • Non reinstallare una batteria danneggiata o deformata, in quanto ciò rappresenta un potenziale pericolo per la sicurezza.

    • Fissa la nuova batteria con adesivo pretagliato o nastro biadesivo. Per posizionarlo correttamente, applica il nuovo adesivo nel dispositivo nei punti in cui si trovava il vecchio adesivo, non direttamente sulla batteria. Premi saldamente la nuova batteria in posizione.

    Battery : pls advise the exact dimensions of the battery? And or provide a weblink?

    Thanks,

    AjTic -

Conclusione

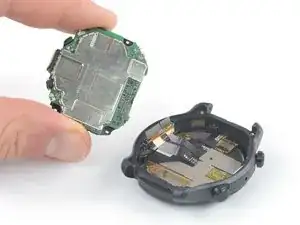
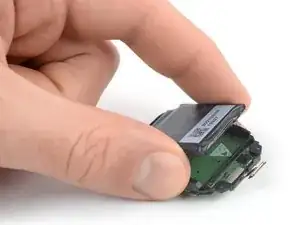
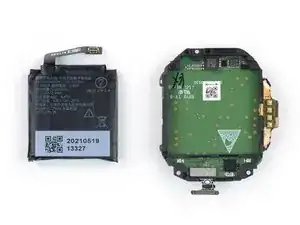
Confronta la tua nuova parte di ricambio con la parte originale: potresti dover trasferire i componenti rimanenti o rimuovere i supporti adesivi dalla nuova parte prima di installarla.

Per riassemblare il tuo dispositivo, segui queste istruzioni in ordine inverso.

In fase di rimontaggio, applica nuovo adesivo dove necessario dopo aver pulito le zone interessate con alcool isopropilico (>90%).

Per prestazioni ottimali, calibra la batteria appena installata dopo aver completato questa guida.

Porta i tuoi rifiuti elettronici a un Riciclatore certificato R2 o e-Stewards.

La riparazione non è andata come previsto? Prova alcuni risoluzione dei problemi di base o chiedi alla nostra comunità Risposte TicWatch Pro 3 per aiuto.

Dominik Schnabelrauch

Membro da: 23/11/16

200708 Reputazione

13 commenti

Where did you buy a replacement battery (if you did)? I have scoured thru aliexpress, ebay, and tried to find shattered-screen watches I could transplant from, with no luck so far. I guess I'll keep looking. My watch barely lasted a year before the battery life halved. The voltage sag is so bad the watch bootloops whenever it vibrates below 30% voltage.

George -

I've found a listing in aliexpress for an aftermarket battery but need to de-solder the original BMS and transfer to this new battery. Here's the link to aliexpress.

https://www.aliexpress.com/item/10050049...

Daniel Lee -

I don't think it's tin welding, but most likely TIG welding.

Difficult to open it, but the less experienced could solder the battery contacts on the top without opening the old solder.

https://imgur.com/zhFXcQ4

https://imgur.com/cKJb137

marco deirossi -

A small problem (solved) that I encountered with the battery purchased as compatible from ali-express is the greater ( >5mm)

distance (compared to the battery) of the original two poles of the battery.

You have to bend them carefully inwards to be able to weld them afterwards.

https://imgur.com/5mrfzDk

https://imgur.com/v2OCVCc

https://imgur.com/Izw3dU1

https://imgur.com/QsnAN6I

marco deirossi -

Hello all,
I bought this battery as marco deirossi but I don't know how to weld them properly. What's the welding method? It doesn't seem like typical welding for me. Also, I have taken off the sticker of the new batter and the new orange foil out of it. Did I do something wrong? Shall I buy new batter?
Best Regards
Paul

rybson1908 -

Hello... Does anyone know where you can get this battery? since on Aliexpress it appears as out of stock in all the sellers that publish it.

luciano.alonso84@gmail.com -

Was able to install a new battery thanks to all the comments here but had to improvise a bit.

I had some trouble connecting the battery adapter to the battery and ended up shortening one of the flat connectors on the battery. Used some copper wire to bridge the gap and make it a bit easier.

After soldering the wires to the original adapter I made a small hole in the flat connectors of the battery, threaded the wire through there and soldered that. Ended up removing the wire insulation to be able to bend it in space. Recommend taping off anything you don't want the wires to touch beforehand if you do try to prevent short circuiting.

Also be mindful of the buttons during repair. Somewhere in the process I somehow lost the tiny clicker on one and misaligned the other. Was able to glue the latter back in the proper spot. Luckily only the one is necessary to do most stuff.

Hope this helps someone

https://imgur.com/a/QCb2nAX

Ferdi -

Hi Ribson

the best thing to do is bend the two poles of the battery 90° inwards and give them a spot of soldering directly on the plus and minus contacts of the BCM circuit. It is NOT necessary to extract the mainboard as per the guide because you risk damaging the button contacts. Remove the cover, unhook the sensor flat cable, slightly heat the battery, pry it and unhook it from the flat cable. Open the battery film in the BCM circuit part and cut the two poles of the battery so that only the charging circuit remains in your hand

marco deirossi -

bend the two poles 90° inwards and solder on the BCM circuit

https://imgur.com/OiLXSrL

marco deirossi -

Hi Ferdi,

I don't understand why you did all that work,

pull the old BCM circuit out of the old battery.

Bend the two poles of the new battery 90° inwards.

spot solder directly on top without drilling anything or adding bits of wire.

marco deirossi -

What's the best temperature for iron to solder the terminals? I have a new battery, I have the old dissected and the terminal pad removed. The new battery already came with the poles be t inwards 90 degrees. Do I need to do more to the BCM circuit? I just cut the old poles off the battery.

Jeffery Cates -