Introduzione

Questa guida di riparazione ti mostrerà come sostituire la batteria delle cuffie Sony WF-1000XM4. In questa guida, sostituiremo la batteria dell'auricolare sinistro, ma puoi seguire questa guida anche per l'auricolare destro, poiché i passaggi sono gli stessi in quanto gli auricolari sono esattamente simmetrici.

La sostituzione della batteria dell'auricolare può risolvere i seguenti problemi:

  • Gli auricolari diventano caldi mentre sono nella custodia di ricarica.
  • Gli auricolari non si caricano al 100%.
  • La custodia di ricarica lampeggia di rosso e un auricolare diventa eccessivamente caldo.
  • Almeno un auricolare ha una breve durata della batteria.

Ci sono state segnalazioni di alcune esplosioni di auricolari con questo dispositivo.

Pertanto, esercita cautela e assicurati che l'auricolare che desideri aprire sia completamente scarico prima di procedere con questa guida.

Avvertenza: Né iFixit né l'autore di questa guida saranno ritenuti responsabili per eventuali danni correlati a questa guida o alla sua pubblicazione.

  1. GBdRP1xopeKjuomZ
    • Prima di cominciare questa riparazione, assicurati che la batterie della cuffia sia completamente scarica. Per scaricarla, tienila fuori dalla custodia di ricarica.

    • Questa è una precauzione per evitare che la batteria esploda in caso di corto circuito accidentale.

  2. QRLd2wNhOolkQLY4
    QRLd2wNhOolkQLY4
    KxRcNV4jqxidFohG
    • Tira il gommino della cuffietta per rimuoverlo.

  3. hOIUnjtLsBrvsJME
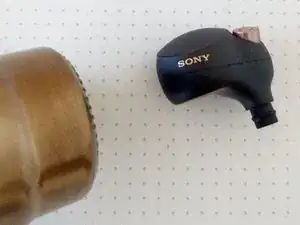
    • Usando un asciugacapelli potente o una pistola ad aria calda, riscalda l'auricolare per circa dieci secondi per ammorbidire la colla che tiene attaccate le due parti dell'auricolare.

    • Attenzione: se riscaldi troppo l'auricolare, la copertura in plastica si può deformare.

    • Riscalda l'auricolare tutto intorno.

    • Questo è un passo difficile, perché devi riscaldare l'auricolare abbastanza da ammorbidire la colla al suo interno senza bruciare la plastica all'esterno.

    I used a small craft heat tool that has a small narrow opening. This may be easier to use to apply heat in a more focused area than a heat gun.

    The model I own is below:

    https://www.amazon.com/Mowis-Mini-Heat-G...

    This one doesn't appear to be available any longer, but similar ones may still be gotten on amazon or a similar website.

    Quinton Parke-Thomas -

    While heating, do not use a tool to hold the bud's ear tip, as it will easily deform since it is quite small and will heat much faster than the rest of the case due to its smaller mass.

    Quinton Parke-Thomas -

    What a pain. I suggest you get an i-opener heat bag up to 180F, wrap the earbud for two minutes, then jab at the corner opposite of the Sony logo with a small electronics flathead screwdriver. After the corner is breached, twist the screwdriver to further separate it, then use a pick to separate the rest. Much easier then trying it with some plastic tool. Minimal damage, and worth it.

    Brian Sommer -

    I opened mine with a hairdryer that I have from my house that I bought from 2005... I just rotated it uniformally, after 30 seconds I tried opening it with the Flex tool thingy and it didn't budge, did it again for 30 more seconds and was able to open it relatively easily. First time ever doing a repair btw.

    MIA -

    I used this method with an I-opener wrapped around the earbud for 2 minutes. Was able to get the case to open using the plastic spudger without damage

    Jimmy Principe -

    12s and the top casing is already melting...

    ThaddeeB -

    I used a Remington hair dryer (my girlfriend's) on highest heat and fan setting. I wore an outdoor canvas/suede yard glove to protect my hand/fingers while holding it in place on top of my desk. It took more time than I thought it might, perhaps, because I started out on the lowest fan setting. None of the Fixit tools worked for me, but eventually I tried a Xacto knife and that did the trick. First-timer; about half an hour on this step. Man, I wish this was all of it. :-|

    C Weldon Taylor -

    I held the headphone with my hand. I figured that would keep me conscious of the heat I was exposing the headphone to and avoid melting the shell.

    jookieapc -

    For this step I used a conventional hairdryer and an oven mitt:

    Placing the oven mitt on my lap, the spot between the thumb and the rest of the hand works well to provide some resistance so the earbud isn’t blown away from the strong airflow. Use the hairdryer on its highest setting and point it away from you while the oven mitt should prevent your legs from getting too hot. Point the dryer at the earbud for a couple of seconds, then use your free hand to turn it and place it down again. If it feels hot to you, try to proceed with step 4 - if your thin tool of choice can’t slide into the gap between the halves, heat more (don’t forget to turn the earbud so the seam is heated from all sides). For me step 3&4 took about 15min on my first attempt (including a few attempts at step 4 and then re-heating because it wasn’t hot enough to get the tool in). Hope that helps.

    Alana -

    If you have access to a hot air soldering station, use it! A temperature of 150°C is more than enough. At medium to high air flow, work your way around the earbud seam with a small to medium nozzle. This loosens just the adhesive and prevents any other parts of the earbud from melting or deforming. Also, you don't have to worry about burning yourself as much. I got mine off in just a few minutes with no problems and without any external scratches, you can barely tell that the earbud was disassembled.

    joha_beere -

  4. MBOqbYivDloMYGYl
    MBOqbYivDloMYGYl
    3LDFU5lERTbCaYQY
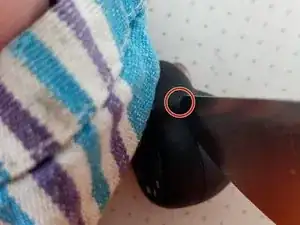
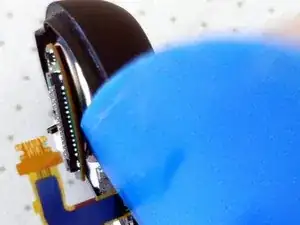
    • Utilizza lo strumento più fine che hai e inseriscilo nella fessura tra le due parti della copertura dell'auricolare.

    • Inizia a fare leva tra le due parti nel punto indicato nella foto per iniziare a separare le due parti dell'auricolare.

    • Se le due parti non si separano, dovrai riscaldare l'auricolare ancora un po'.

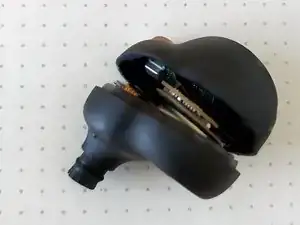
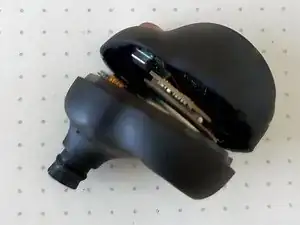
    • Quando le due parti dell'auricolare iniziano a separarsi, continua a fare leva intorno alla copertura per separale completamente.

    • Attenzione a non bruciarti le dita, perché l'auricolare sarà molto caldo.

    • Nella foto viene usato lo strumento di apertura Jimmy di iFixit, ma penso che sia meglio l'iFlex, perché è più sottile e potrebbe quindi rendere questo passaggio più facile.

    I used iFixit's iFlex Opening tool as the author suggested, and it worked quite well.

    Gently heat the case, and insert the edge of the tool into the case seam after heat has been applied evenly around. Once you can insert the tool into the seam, gently twist the tool against the inside edges of the seam to pry the bud open. If it doesnt open easily, you need some more heat.

    Be patient, and work slowly to not damage the plastic housing.

    Be careful to not apply too much heat, as you can quite easily melt the touch pad and deform it.

    Quinton Parke-Thomas -

    I used the edge of a small pocket knife to initially pry open then had space for my other prying tools. Again be patient. Glue came apart easy after using hair dryer to heat up for less than a minute and constantly moving

    Denton Newman -

    For this step I used a plastic pry tool, anything that is very thin and can work as a lever should do. Try inserting the tool of your choice into the thin gap between the two halves of the shell and wriggle it until it slides in - if you can’t do this, repeat step 3 to make sure your earbud is hot enough. Once you are able to slide your tool in the gap (you should see it widen ever so slightly) work around the seam from that entry point. For me the two halves separated as soon as I had pulled my tool through the entire circumference of the gap.

    Alana -

    Before using an opening tool, squeeze the sides of the bud on its widest point (near the top). When enough heat is applied in the previous step, the seam at the top will widen sufficiently to put a pick in the gap. No metal tools needed, surprisingly easy and less risk of damage!

    mgmeulen -

  5. QURJ1BewGMNeubSd
    QURJ1BewGMNeubSd
    fYqbBhhFRBQlTZrV
    1nssUofUU2mBwxad
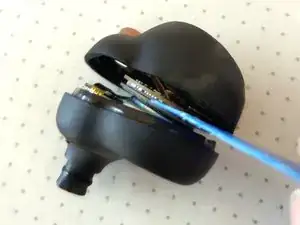
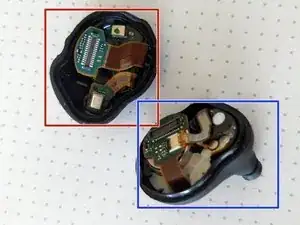
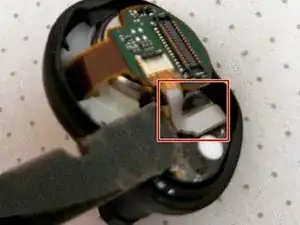
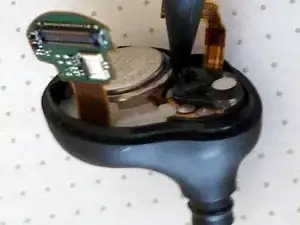
    • Una volta che l'auricolare è aperto, vedrai due piccoli circuiti collegati da un connettore scheda-scheda.

    • Utilizzando un plettro di apertura, scollega i due circuiti facendo leva molto delicatamente tra di loro.

    • Attenzione: non usare uno strumento di metallo per questo passaggio, perché la batteria è ancora all'interno dell'auricolare e potresti involontariamente causare un corto circuito dei componenti siccome sono ancora alimentati.

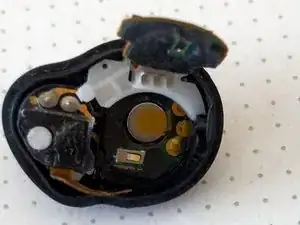
    • Lascia da parte la parte superiore dell'auricolare per riassemblarlo successivamente.

    • La parte superiore è evidenziata in rosso nella terza immagine.

    • La parte inferiore è evidenziata in blu nella terza immagine.

  6. 2RISiVAXteJVO4p1
    2RISiVAXteJVO4p1
    EPANsujomjXpfJCy
    YhSXJAPYRuSs6eNM
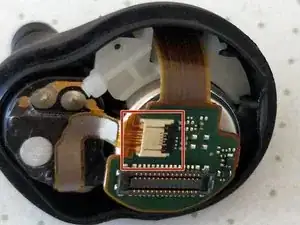
    • Posiziona il connettore ZIF nella parte inferiore della scheda.

    • Evidenziato in rosso nella prima immagine.

    • Alza l'aletta del connettore ZIF usando uno strumento di apertura o un altro strumento sottile di plastica.

    • Attenzione: non usare uno strumento di metallo per questo passaggio.

    I ended up using a set of precision tweezers to lift this connector latch. The plastic tool was much too large for my comfort. However, you must also keep in mind NOT to touch ANY metal component with it, as you may accidentally short circuit the bud.

    Quinton Parke-Thomas -

    Saya cari flexible tersebut apakah ada?

    Gorho -

    I don't know how advisable it is, but i was able to skip this step. I couldn't get the cable out so i decided to try it. and i was able to get the battery out just fine. It was a bit more difficult, but imo much easier.

    Greg Byrne -

    Just skip this and the next step. The ZIF looks and feels very delicate and it stuck quite hard inside its housing. I am able to finish the battery replacement without taking the ZIF out. Just don’t need to risk breaking the connector, thus the whole ear buds.

    Alex Au -

    After considering trying to get Sony to fix or replace these out-of-warranty earphones I decided to try to replace the batteries myself. I followed the (excellent) instructions above. After step 5 I could see that the wide ribbon cable had been folded in such a way that it was creased. When I disconnected the narrow ribbon cable the wide ribbon cable snapped at the crease. This was already the end of the device but out of curiosity I opened the other earphone. Its ribbon cable was also creased and also broke under slight tension. This is a serious manufacturing fault.

    I am reminded that over the years I have owned other Sony products that developed defects soon after the warranty period, e.g., a CD player that wouldn't play past the middle of the disc.

    I have also owned Panasonic products over the years and never had such problems with them, e.g., a VCR from the 90s that works to this day.

    Fyck Sony. I have purchased the (Panasonic) Technics EAH-AZ80. They are awesome.

    T H -

  7. TKq2xWU3vtAUi2yk
    TKq2xWU3vtAUi2yk
    fBr6SEnRcL1mKgVU
    2BQ2s2on1jEVLHMB
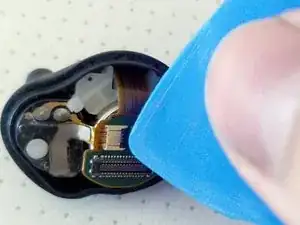
    • Usando un plettro di apertura o uno spudger, stacca il cavo incollato con delicatezza.

    • Questo cavo è evidenziato in rosso nella prima immagine.

    • Successivamente, scollega il cavo delicatamente.

    • Potrebbe essere difficile da staccare, prenditi il tuo tempo e non forzarlo, il cavo è molto delicato.

    Lol... super stuck - broke it. So far I'm 0 for 4 on iFix it repairs.... never buying some piece of crap unserviceable electronic junk like this ever again. It's not worth it. Marketing and Industrial Designers need to get their heads out of the sand.

    Brian Sommer -

    Same happened to me, the device still works after resembling, but noise cancelling doesn't.

    Gregor Lekšan -

    No need to do this, you can move the board away to get to the battery.

    Christo Uys -

    That was my first thought too after I realised It's might not come out in one piece,than I saw your comment and it reassured me that it will work.

    wooex -

    I couldn't pull it out either,so just lifted a board enough to take the battery out,and it worked no problem.

    wooex -

    I was able to complete the process without removing this cable too.

    Paolo Luciani -

    This is easily the hardest part. Was successful with right bud but had to use a small tweezer to tug out cable. Got over confident on left bud ripped the cable in two. Be patient!

    Denton Newman -

    I broke the cable too. Is there nothing else we can do?

    Cleavon Tong -

    After seeing how delicate the ZIF connector looks and reading the comments on this step, I skipped right to step 8 also.

    C Weldon Taylor -

    Ok so the cable is broken. But the audio still works. Apparently the cable is for the mic. I will have to turn off noise cancelling so the audio can still work fine.

    Cleavon Tong -

    At first I thought I'll break it too. The trick is not to pull it straight out...you need to pull ist diagonally. First get one edge out, then the other. Notice the 2 noses at the end of the cable. They prevent it from being pulled out straight.

    Dirk F. -

    For this step I used a pair of needle nose tweezers. I’m no expert on what can cause a short circuit in this step, so I tried to only touch the ribbon cable with my tweezers.

    Make sure the black plastic latch from step 6 is as open as it can be. Get a good grip of the cable near the connector and slightly wriggle it left and right while pulling. For me this took more force than anticipated and I double, triple checked that the plastic latch wasn’t securing the cable anymore. If you are more visual and need to see an example of this process, check out this video: https://youtu.be/x2twbzhtLaE?si=bDv_a8Td...

    Note that the person here is using plastic tweezers to open the latch, don’t try step 6 with a metal tool. For me step 7 worked out fine with metal tweezers but try to only touch the ribbon cable with them.

    Alana -

    I managed to break the ZIF cable in half, but I was able to tape it back together so the noise cancellation works fine thanks to this reddit thread: https://www.reddit.com/r/SonyHeadphones/...

    Andri -

    Just skip this step. The ZIF looks and feels very delicate and it stuck quite hard inside its housing. I am able to finish the battery replacement (both sides) without taking the ZIF out. Just don’t need to risk breaking the connector, thus the whole ear buds. If you already done the previous step, undo it by closing that black latch back to its original place.

    Alex Au -

  8. 4TCWRXmCxwnbuNih
    4TCWRXmCxwnbuNih
    ax2PtMkhIR1OFZr2
    QEcSySg2k1YhNUj5
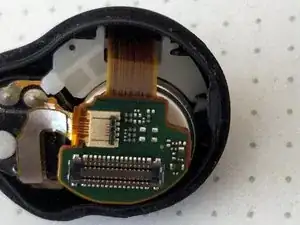
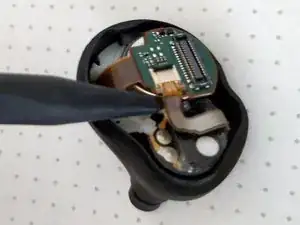
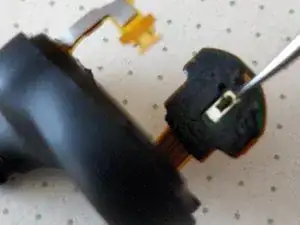
    • Trova la giunzione tra il circuito elettronico e la batteria dell'auricolare, appena sotto di esso.

    • Usando un plettro di apertura o uno strumento di plastica fine, scolla il circuito delicatamente dalla batteria inserendo il plettro di apertura tra il circuito e la batteria.

    • La scheda si attacca direttamente al lato negativo della batteria tramite adesivo.

    • Attenzione: potrebbe esserci un piccolo contatto di metallo sotto il circuito che fa contatto con la batteria. Scolla il circuito delicatamente per prevenire danni al contatto.

    • Non usare strumenti di metallo in questa fase perché potresti causare un corto circuito della batteria.

    • Una volta che il circuito è staccato dalla batteria, alzalo come mostrato nella terza immagine per avere abbastanza spazio da rimuovere la batteria.

    I had to use a razor blade to cut thru the glu

    ThaddeeB -

    Easiest step so far. Slowly and carefully inserted an Opening pick between circuit board and battery poking against the adhesive (felt like butter) until they separated. Pretty quick!

    C Weldon Taylor -

    I used a plastic pry tool to get some leverage between battery and board, then an opening pick to slide between them.

    Note that this is stronger adhesive strip, it will stretch as you try to pull these two components apart so it’s good to have a thin tool (I used the opening pick) to slide between them to push away the black adhesive as it stretches. For me all the adhesive neatly stuck to the back of the board after pushing an opening pick between it and the battery.

    Beware of the thin metal connector that sits roughly in the middle of the board (see picture 3), many commenters have damaged this in step 10 so it’s probably good to be more careful here as well. Ideally, work your way around the board with your opening pick instead of pushing it all the way in from one side, to avoid accidentally bending the small connector in the middle.

    Alana -

    Beware that the black sticky “glue” may deform and become very thick. The too thick glue may hinder the pin from making good contact to the battery. Check the remaining glue on the board after you separate the board and the battery. If it is too thick, remove the thick part.

    Alex Au -

  9. pYxZwNbLHdRrjno1
    pYxZwNbLHdRrjno1
    d4fqhdn41OYSsAUE
    • Rimuovi la batteria alzandola con la punta di uno spudger, come mostrato in questa foto.

    • Potrebbe richiedere un po' di forza, poiché la batteria è incollata alla parte inferiore con un adesivo.

    This can be very tricky. The glue holding the battery in is quite strong. I ended up breaking the tip of the spudger during this step. To remove the battery, i carefully used a pair of needle nose pliers and gripped the sides of the battery and wiggled it very gently off the adhesive strip.

    Be really careful not to crush the battery, or short circuit the side of the battery case to the top of the battery with pliers. You may want to even use some shrink wrap tubing on the pliers ends to ensure you do not have metal to metal contact. If you're careful, and patient, you can get it out.

    Quinton Parke-Thomas -

    READ THIS COMMENT! My spudger tip also broke off :(

    MIA -

    I was a little worried about this step because two people mentioned their Spudger broke. In fact, the tip of mine bent, so I was a bit apprehensive, but I used it to my advantage to lever underneath the battery and just kept working it against the adhesive until it began to give. There wasn't much room to work with because I didn't remove the ZIF connector, but there was enough to work it completely loose and remove the battery. Delicate process; took me about 10min.

    C Weldon Taylor -

    I entered as shown in this video and with some wiggling was enough https://youtu.be/x2twbzhtLaE?t=163

    Daniel Sanchez -

    Thought I'll break my spudger tip too.

    I finally used a very small blade on the opposide point to the spudger on the picture. There was no electronics that I accidently could damage. Be very careful, when using metal tools to not shorten the battery itself.

    Dirk F. -

    For this step I used needle nose tweezers.

    The adhesive strip used to hold the battery in place is the same strong black strip that held the board and battery together in step 8, you should have gotten a feel for how sticky it is so be prepared to use some (gentle) force for this step.

    Remember the ribbon cable we disconnected in step 7? From the corner where it originates you can see the entire side of the battery and have the most access to the bottom. I inserted my needle nose tweezers below the battery and carefully (but firmly) levered it away from the adhesive. You need a thin tool to get below the battery but it needs to be sturdy enough to withstand the force you need to apply against the adhesive - in my case I used very thin metal tweezers and made sure not to touch anything with them but the plastic shell and bottom of the battery.

    If you want a visual example of this technique, check out this video: https://youtu.be/x2twbzhtLaE?si=RlkDg2ul...

    Alana -

  10. anrRdETZQLIwQ4xy
    anrRdETZQLIwQ4xy
    PFj5qyxtyDSIFdoL
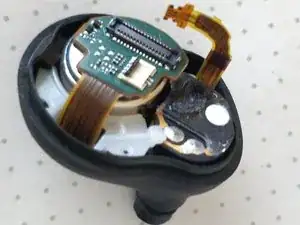
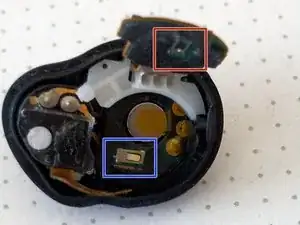
    • Trova i due contatti in metallo

    • Uno è evidenziato in rosso

    • L'altro in blu

    • Se i contatti fossero stati appiattiti durante la rimozione della batteria, sollevali delicatamente di poco con la punta delle pinzette, così che facciano un buon contatto con la nuova batteria quando riassembli l'auricolare.

    Be really extra careful on this part, I was but not enough and one of my pin broke. I had to fix it with a bit of soldering.

    Paolo Luciani -

    It's a shame I didn't read this guy's comment... I broke my unit permanently because of this stupid step. It's EXTREMELY fragile. Be VERY careful when doing this step

    MIA -

    There is a work around for this if you did break off the contact. I broke off the top one connected to the board, so i managed to get some aluminum foil and kind of slide it into the slot of the broken contact and then put very tiny amounts of glue on it to hold it down. Now everything works. did the shake and drop test on the carpet and the bud stays on and intact...as long as it is glued properly.

    Zach Fulmer -

    I broke the upper pin and now the earbud won't work. Be extra careful on this step. You gotta be beyond careful and go waaaay toooo soft on it, and it's a hard thing to do since the glue is way too strong here. I guess I'll have to solder it.

    Juan Pablo Pérez Durán -

    I used a pair of needle nose tweezers for this step, any thin, delicate tool should work.

    As other people have noted, the connectors are very thin so you do not need any force to bend them and it’s easy to break them off. I carefully slid my tweezers below the contact and slowly pushed them further under it - that was enough to make the contact bend at a better angle. You really don’t need to grip it with your tweezers and actively pull it up. Pushing slowly from below should give you more control so you can stop immediately when the metal starts to bend a bit.

    Alana -

    I have done both side of my buds and the left side I do not need to raise the pin. The right side, however, i need to re-visit it as i do not have any response after I re-assemble it. The glue between the negative side of the battery and the chip board deformed and is too thick, the pin is not touching the battery even I tried to raise it a bit. After removing those glue, and adjusted the positive side pin, it works again.

    Alex Au -

  11. Gy2orZXJAYB42LrE
    Gy2orZXJAYB42LrE
    mYm3M5TqJEVyYH5E
    FCUIpRlNvwbHbk5e
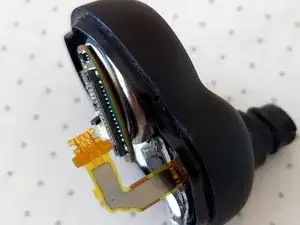
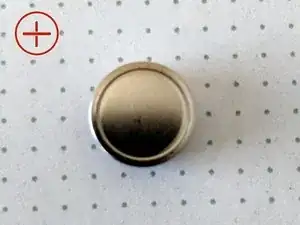
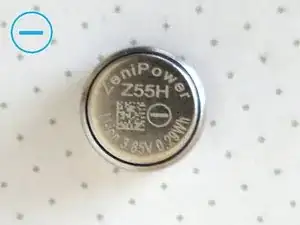
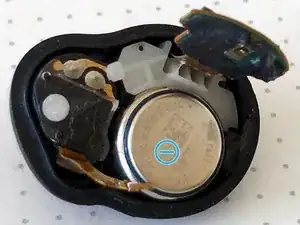
    • Installa la nuova batteria posizionandola nell'auricolare con la parte negativa rivolta verso l'alto.

    • Questo passaggio può essere difficile, poiché la batteria potrebbe essere attratta dal magnete nell'auricolare quando viene inserita nella fessura.

    • La prima immagine mostra il lato positivo della batteria.

    • La seconda immagine mostra il lato negativo della batteria.

    • La terza immagine mostra la nuova batteria installata all'interno dell'auricolare.

    For anyone who was a bit confused like me, here are some notes on the re-assembly:

    > the black adhesive strips we had to wrestle with before (holding battery, connecting board to battery, holding ribbon cables etc.) should all still be sticky and hold the components fine if you push them together once. You only really need to apply the e-8000 glue at the very end.

    > manoeuvring the boards from the top and bottom half of the earbud back together (step 5) can be a bit finicky. I found it easiest to hold the two halves together like an open hinge with one hand, then place the pointer finger from my other hand on top of the board from the upper-shell and guide it until it’s aligned with its bottom counterpart, then gently push the connectors together.

    > once both board are connected, before you glue, you can try placing the earbud into the charging case. A red charging light should appear for a few seconds if the battery is properly connected.

    > apply the e-8000 glue around the seam on the bottom half, push and hold the two halves together for a few seconds

    Done

    Alana -

Conclusione

Per riassemblare l'auricolare, segui le 8 instruzioni della guida al contrario e poi rincolla le due parti insieme usando colla E-8000.

La colla E-8000 rimane transparente e non lascia residui mentre si asciuga.

Brendan

Membro da: 24/09/16

51510 Reputazione

55 commenti

I needed to perform the reinitialization procedure to get the headphones to work together after, but apart from that it worked well!

Rasmy Samy -

Good point, thanks, I completely forgot to write a conclusion about this :-)

Hard reset the earbuds will reset battery stats stored inside the earbuds internal memory, it's essential for earbuds to works well with new batteries.

Brendan -

When replacing batteries in the XM4 it is essential to use 3.85v 75mAh batteries.

Unfortunately, some battery sellers are incorrectly indicating that 3.7v batteries can be used.

JNavas -

Thanks for the heads up. I just checked the batteries I got from Ebay and Indeed got sent Z55 instead of Z55H ( even though the listing said I was buying Z55H batteries.

marconorton -

I understand for the voltage but why couldnt you use a battery with more capacity? That seems like it would be an upgrade (if you could find some that fit obviously)

Ragnarok Del -

@ragnarokdel

These are dumb batteries, not smart batteries that can report remaining capacity, so the firmware in the device has to estimate remaining capacity. It can only do that accurately if it knows the exact battery used. If you substitute a different battery, the firmware will not know the remaining capacity accurately, and won't work properly. Thus it's very important to use the correct Z55H battery.

p.s. This may be why there are so many reported XM4 battery problems. Reports indicate that Sony substituted some different batteries at the beginning of production when it could not get enough Z55H batteries, and the firmware does not work properly with those batteries over the long term, resulting in premature failure, often in only one earbud.

JNavas -

Ugh....ugh..ugh.. should've read this part of the guide multiple times!

"Caution: There is a tiny metal contact under the circuit board that makes contact with the battery. Unstick the circuit board gently to avoid damaging this contact."

The metal contact ended up breaking off. :/

You live and you learn! Hopefully someone else learns from my mistake!

marconorton -

Happen to me too, but you can still save it, I just add a bit of solder on the contact and seems to work good!

Paolo Luciani -

I snapped the little ribbon cable that is locked in by the white locking mechanism, it was hard to pull then came right off and snapped, be careful folks

aemr -

Happened to me too. Surprisingly hard to pull and then releases very suddenly.

Ottomar Vaga -

Same here. Need more info on a better way to remove this. I guess it is the trash bin for these now.

Steve Poulsen -

So glad this guide exists. My 2 year old buds were only lasting 15 minutes.

Opening the earbud was the longest step for me. Hair dryer on high for like 20 seconds. Work a razor back and forth on the edge and then back to heat alternating for like 7 times until I could wedge something else in the crack to pry open.

I skipped unplugging the ZIF connector and had no issues sliding the batteries in and out.

I struggled to mate the boards back together using tweezers or spudger. A fat thumb pressing down on the upper board worked the best for me.

Timothy Englert -

Can confirm that ZIF unplugging can be skipped. Tried unplugging it at first, it was quite a struggle and it kept firmly in place. I was afraid of damaging it, so I skipped it and there were no issues in the remaining steps. Did not even try unplugging when doing the second bud.

Daniel Rys -

Funcionou perfeitamente, acabei esquentando um pouco um dos fones e ficou marcado com minha digital, agora o lado esquerdo é único. rsrs.

Miller Gomes -

Be EXTREMELY careful doing step 10. The tiny piece broke off and now the headphones are paperweight. Use the lightest amount of force possible when doing that step

MIA -

Happend to me too, I just soldered some solder into it as a replacement and works perfectly fine :)

lewis francis -

Is it recommended to get some form of glue to make sure that they remain water resistant or will the residual glue left over be enough for that?

Kade carter -

I personally used a very thin bead of e6000 glue around the edge, then I put it back together and gently clamped them together for a few hours until the glue dried. It holds them together and should keep water out. As long as I didn't miss a tiny spot. I would say that its worth it if you still have them apart, otherwise just leave it as long as they aren't falling open.

Ze-4 -

Thanks for the tip! You saved me from buying new ones.

Regarding the tips: I used a tiny screwdriver and hairdryer to open the earbud and a toothpick for some of the steps. I panicked when I saw it working and then not working (before glueing the earbud). I fixed the contact as described in step 10 and then it worked once again.

Caco Cacovski -

Great guide. Thank you

jookieapc -

I suggest adding the reassembly steps rather than saying "follow these instructions in reverse order from step 8". For example, the spunger is used to remove the ZIF cable in Step 7, but this tool only works for removal. To reinsert the connector I had no success with that tool. I used pointy ended iFixit tweezers for this step. Although there might be a risk of short-circuit, they were the only tool I could think of that could grab and insert in the way I needed.

The E-8000 glue instructions advised leaving the glue to cure for 2-10 minutes - this and some pictures would be nice to elaborate on.

Separating the shell was quite challenging. The first time it was fine, the second time I found it much harder. Do you heat all along the join - or only on one side? Any tips on inserting the insertion tool?

jookieapc -

After completing the battery change, my headphones still connects to my Pixel 7 phone ok. But the headphones are no longer properly registered in the Sony Headphones app. Any ideas on what to do? I've tried unpairing / removing from Headphones.

jookieapc -

Thanks for the nice instructions, I just fixed mine last weekend. Since Sony wouldnt repair them and said they would just replace the whole unit for just 180€, what a bargain! Now i paid about 25€ for parts and the repair toom roughly an hour!

Vincent Graessner -

Great guide! Took me 15mins to swap, and still waiting on my glue to ship. Popped them in the case for a few mins, and heard the lovely "Headphones at 60%" that I haven't heard in months. My headphones are no longer a paperweight! I appreciate this guide so much.

MOlson94 -

Did anyone else have a problem where, after completing the replacement, noise cancelling mode had a weird air flowing noise? I don't think its because I didn't seal the shell back together air-tight, because sealed it with plumber's tape too and it still had that noise.

Otherwise, good guide. Would like to reiterate what others were saying about part 10. I wasn't gentle enough and snapped off the little battery connector piece.

Maxwell Montemayor -

Yep same here with my right earbud. I figured that this is because of the noise canceling and has something todo with the ribbon band because it seems that one connects the inner microphone to the board.

I am not sure if I have damaged the ribbon cable or it isn't placed correctly in the connector... Tried it multiple times to refit but I guess the cable is damaged somehow

Mathias Scherer -

WoW! Good to know this article! I will try to fix my earbud following the manual.

Thanks a lot!

Kevin爻爻 -

Used the Varta CP1254 A4 as replacement batteries.

Voltage: 3.7 V, Capacity: 74 mAh

(https://www.conrad.com/en/p/varta-button...)

They work the same as the original batteries. There's no risk of frying the electronics because the voltage is less than the original, but it's enough and they still work properly.

Blaze -

excelente tutorial bien explicado y con sugerencias exactas....saludos y gracias por los aportes

alejandro alberto -

Thank you for the steps. It helped me replace my batteries and now I can use them again. Great resource!

Vishal Kole -

I used the glue E6000 because there was no availability on amazon or ebay, from what i read in the internet it should be more or less the same but it takes only some more hours to dry.

I hope not to have to repeat these steps in the next 24 months or more...

Thanks Brendan!

daniele -

Merci beaucoup, finalement pas si compliqué que ça à l'air. Les étape 6 et 7 ne sont pas utiles (connecteur zif) il y a assez de place pour passer la batterie sans le retirer. A part ça, déçu de mes écouteurs, leurs autonomies est assez limités.

Paul Byfou -

Worked! Though I'd say it's an intermediate difficulty, not a 'difficult' one.

Blow-dryer thing in the beginning worked well. Kitchen knife with a flat blade worked well too. You can use a cloth as a 'glove' to hold onto the tube of the bud that holds the foam pieces that go into the ear. Then work the blow dryer in stages. My buds never got too hot.

With one of the buds the flat ribbon cable would not come out at all. It is possible to leave it in and work the old battery from an angle.

Before you glue the buds shut, again give them a test run.

chickenwithskillz -

Managed to change batteries without unplugging the zif-cable, and skipped step 10. Made the process a bit easier and faster. Used a kitchen knife to pry the buds open after have used a hairdryer for about 25 sec. Was holding the buds with a towel, didn't get too hot. Glad it worked! :)

Fredrik Kämmerling -

Try calling Sony support first. I had an issue with short battery life in one earpiece. Sony gave me a refund even it was a year past warranty period.

FredW -

Great instructions, I couldn't get past disconnecting the ZIF cable though. For whatever reason the head wouldn't release and broke the cable. Be careful!!!!

Scott Ramsey -

I successfully changed the batteries. However one bud is no longer making connection or being recognized by the charging case. It works perfectly otherwise. What component controls the charging on the earbuds? I want to open it back up and check. Any idea?

Giovanni Juarez-Martin -

I would skip the heating step, as this lead to some warping on the first earbud I attempted. Sliding a razor blade and prying at room temp worked much better.

jjgilles jjgilles -

Success!

Opening procedure was most tricky, needed to squeeze the buds from the sides to create a gap where jimmy the spudger found his way to the internals.

Skipped Steps 5-7 and directly found a way to remove the platine from the battery. Be careful with the little contact!

used only plastic tools and clean fingers for removals!

The removal of the platine should be done slowly, because the glue is soft and needs some time.

The removal of the battery even slower because you have to use a plastic pin to go under the battery without hurting the contact. I used the side of the case to control the force of the pointed tool i used.

Lifting the contacts very gently is needed to create a safe reassembling for full function.

Function check is recommended before glueing case parts together.

I used Miyagi phone glue, its black and creates sth like rubber which is good to fix the battery in position and reseal the case. Excess glue easy to remove.

Resetted the buds one by one and good.

Good luck and thanks 2 Sony for nothing.

Folkert Lübben -

Can I us the battery of wf-1000xm4 for 1000xm3

World of kittens -

Success!

If anyone is wondering about step 3, it took me multiple minutes using the heat gun at 160 Celsius to weaken the adhesive. It did not seem to deform the shell in any way.

Veleth -

well written guide! I did this repair twice and it worked flawlessly both times. some notes:

- melting the glue without melting the plastic is hard. On my heat gun, 180C worked best

- youll need glue to seal the earbud, this amazon Z55H listing includes glue

https://www.amazon.com/dp/B0C62CQ2J4

use a lot, the glue is what keeps the earbud water-resistant

-

Brian Camacho -

Does anyone know the type of epoxy that is used to keep the battery in its place? Too much came off when I was doing the swap and the top connector for the battery isn’t staying down / connected.

C Deters -

How long battery life did you get with the new battery?

Is there some more powerful compatible battery that could last longer?

Wilhelm Thomas -

Personally, I recommend only the Z55H battery, these batteries have a 3.85v nominal voltage and are very small form factor.

It is unlikely that better batteries exist in terms of capacity for this nominal voltage, form factor and this exact battery technology (li-ion).

The battery technology is important as the earbuds case is the earbuds charger and it's only made to charge Z55H li-ion batteries. Other batteries may be overcharged by the battery case because of the maximum voltage too low or too hight charge current as these earbuds have a "fast charge" functionality handled by the earbuds case and the circuitry on the earbuds themselves.

Installing an incompatible battery can lead to the earbuds battery explosion, charging errors or thermal runaway.

1 year after this repair, my earbuds have a battery life of about 8 hours with active noise canceling enabled, 12h when ANC is disabled.

Brendan -

Leider ist mir das Kabel beim Versuch es zu lösen gebrochen und eine Leitung wurde zerstört. Beim zweiten Kopfhörer habe ich es daher dran gelassen und nur den Kleber gelöst und die Batterie entnommen, was ohne Probleme funktioniert. Also Kabel in Ruhe lassen.

Thomas -

Is there anyone who can help me out doing this, im located in the netherland and am willing to pay for it..

David -

Hi David, I contacted Sony support, the told me to send the headphones to their service partner ESR. Mine are outside of the warranty period, but I just got an email confirmation they will be repaired under warranty.

Goedemiddag,

Wij vinden het vervelend om te horen dat uw Sony WF-1000XM4 niet
meer naar behoren blijkt te functioneren, om dit voor u te kunnen herstellen
vragen wij u het product aan te bieden bij ons Service Centrum.

Dit kunt u doen door deze langs te brengen of op te sturen naar ons. Tevens
kunt u het product naar de verkoper brengen en dan zullen zij deze aanmelden
voor een service.

Ons Service adres waar u het product naar toe kunt sturen:
Electronica Service Repair
Faradayweg 6
3208 KS
Spijkenisse
0181 640 607

Graag een duidelijke klacht omschrijving, kopie verkoop bon en u gegevens meesturen svp.
Met alleen een geldig verkoop bon wordt geaccepteerd voor garantie afwikkeling.

Wij hopen u hiermee voldoende geïnformeerd te hebben.


Met vriendelijke groeten,


Sony Service Team.

Kurt Michielsen -

Managed to get the batteries replaced, but since I opened it the left earbuds in ear detection doesn't work properly. It randomly stops my media thinking I've took out the bud even if I haven't. What could possibly causing this?

Mikey Pestovics -

Each earbuds have a touch-sensitive surface. Too much heat might damage it.

But there is also a well known problem on these earbuds related to the touch-sensitive surface randomly active, and Sony provided an option to disable this in the earbuds app. Perhaps this could help you :

https://www.sony.com/electronics/support...

Brendan -

First attempt, the little flex tore. It tore before it came out of the ZIF. :(

Steve Poulsen -

Of note - if you happen to break off the battery contacts, there is enough room for a drop of solder to replace it after removing the sticky padding. Ask me how i found out...

Kevin Landry -

Step 7 required a bit more force to pull the cable out of its connector housing (after unlocking the black clip). It needs to be pulled directly backward which is difficult to do with the cable's 90 degree bend. I found it easier on the second earbud to unstick the battery first so I could manipulate both the angle of the board and the cable at the same time. Your mileage may vary.

To that end, I found that rolling a toothpick backward while pushing forward under the circuit board in step 8 was an effective way to separate the sticky pad from the battery without creating any gummy ripples.

Dracasis -

I broke the battery contact on the bottom of the circuit board, but I put a random small piece of metal in its place and both earbuds are working great now

Unplugging the ZIF connector isn't necessary, but it's nice to have the extra space on the first try; I skipped it on the second bud once I was more comfortable with it

I personally used E6000 glue and held the earbud in a clamp overnight until it set

zane03 -

This repair guide is super easy and detailed to follow. My battery problem for earbuds is now gone. I purchased one pair of Z55H battery from Aliexpress ( https://tinyurl.com/26k83wq9 ) at $7-8 and went ahead following the step-by-step guide. It was successful. The hardest part was the step 1 to open the earbuds. I used hair drier more than seven times for 20 seconds each, but ended up using a screwdriver provided by Aliexpress package. There remains a minor scratch on the earbuds, but that's fine. Even after listening one hour long, it is only down to 97%. I am fully satisfied. I am lucky to find this posting. Thanks a lot.

JH CHUNG -