
Introduzione
Usa questa guida per rimuovere in sicurezza la batteria incollata del tuo MacBook Pro. Un compito che si svolge meglio con l'aiuto di un kit da sostituzione batteria iFixit; il prodotto anti adesivo nel tuo kit scioglierà l'adesivo che fissa la batteria, permettendoti di rimuoverla facilmente. In alternativa, puoi usare un iOpener per applicare una modesta quantità di calore per ammorbidire l'adesivo prima di provare a staccare la batteria.
"Apple ha avviato un programma di ritiro e sostituzione della batteria per questo modello" da giugno 2019 - quindi, prima di sostituire autonomamente la batteria, puoi controllare se il tuo modello è idoneo per la sostituzione gratuita da Apple.
Il prodotto anti adesivo iFixit è altamente infiammabile. Questa procedura va eseguita in un'area ben ventilata. Non fumare e non lavorare vicino a una fiamma libera durante la procedura.
Per la tua sicurezza, scarica la batteria del tuo MacBook Pro prima di iniziare questa procedura.. Una batteria al litio-ioni carica può creare un incendio pericoloso e incontrollabile se viene forata accidentalmente. Se la tua batteria è gonfia, prendi adeguate precauzioni.
Nota: il solvente usato per sciogliere l'adesivo della batteria può danneggiare alcuni tipi di plastica, come le coperture e gli altoparlanti del MacBook Pro. Questa guida ti spiega come rimuovere gli altoparlanti prima di lavorare sulla batteria.
Se stai usando il vecchio tipo di solvente anti-colla iFixit con siringa e bottiglia separata (non più in vendita), clicca qui per passare a un set di istruzioni lievemente diverso.
-
-
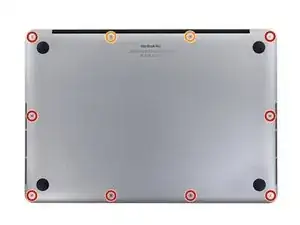
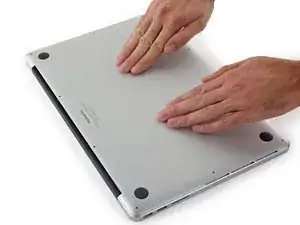
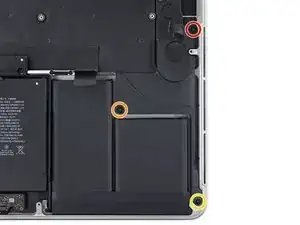
Rimuovi le seguenti viti pentalobe P5 che tengono unita la parte inferiore del case al resto del MacBook Pro:
-
Otto da 3,1 mm
-
Due da 2,3 mm
-
-
-
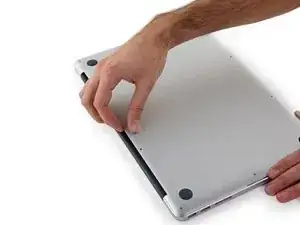
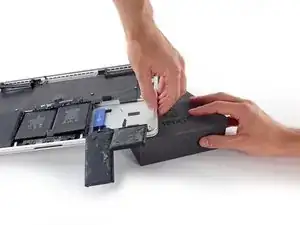
Sollevandolo delicatamente dal bordo vicino alla cerniera del monitor, alza il case inferiore dal MacBook Pro.
-
-
-
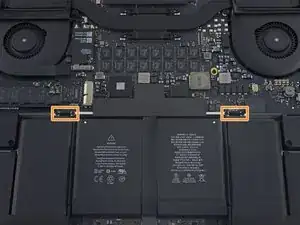
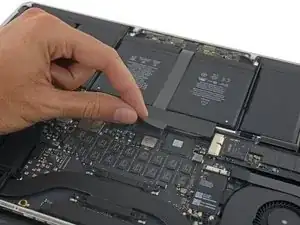
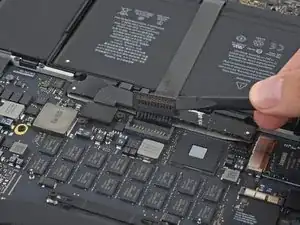
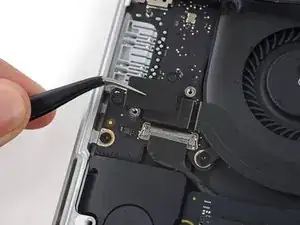
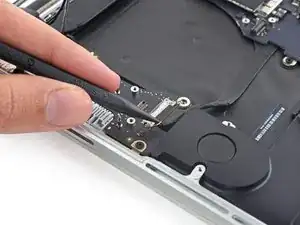
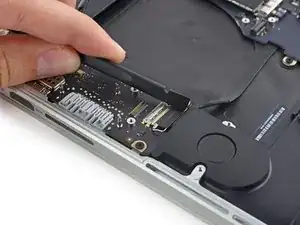
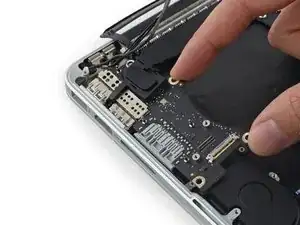
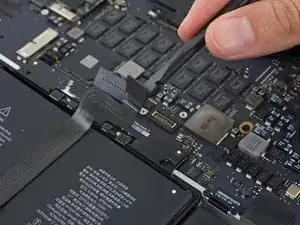
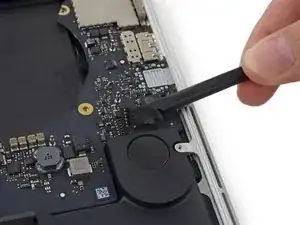
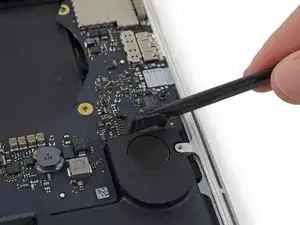
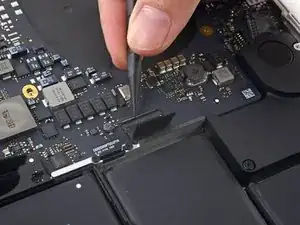
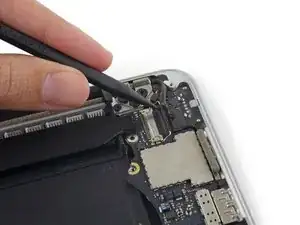
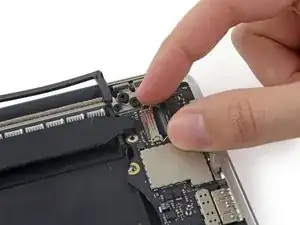
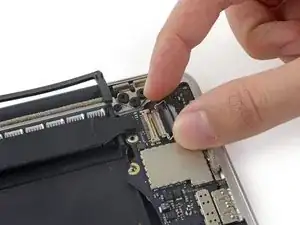
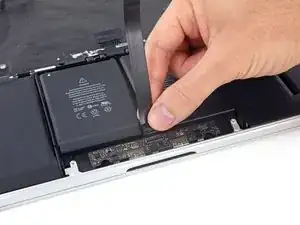
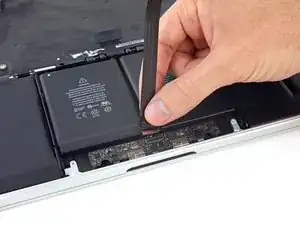
Solleva con cautela ogni lato del connettore della batteria per staccare il connettore dal suo zoccolo sulla scheda logica.
-
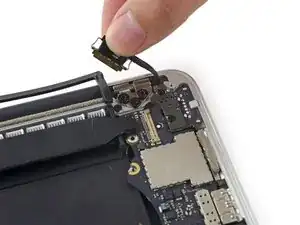
Piega il connettore indietro verso la batteria, per evitare che possa fare contatto accidentalmente con la scheda logica.
-
-
-
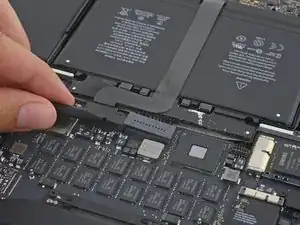
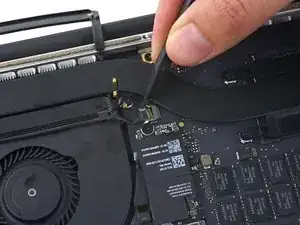
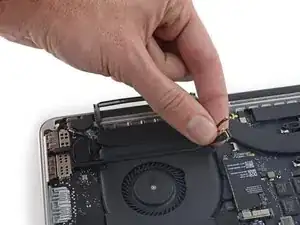
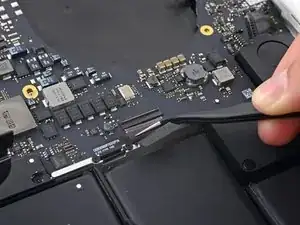
Usa uno spudger o delle pinzette per staccare i tre connettori dei cavi dell'antenna AirPort dalle loro sedi sulla scheda AirPort e ripiegali da un lato in modo che non diano fastidio.
-
-
-
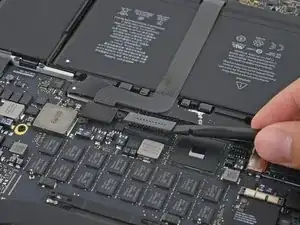
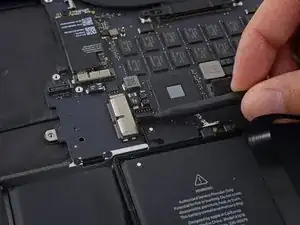
Usa la punta di uno spudger per spingere il connettore del cavo della fotocamera fuori dal suo zoccolino sulla scheda logica.
-
-
-
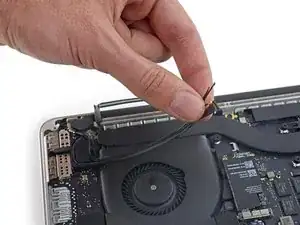
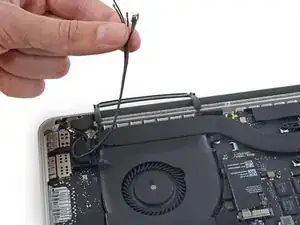
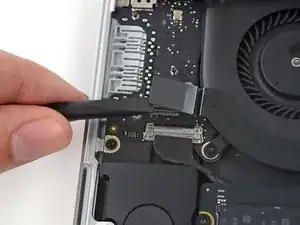
Usa le dita per tirare via dalla ventola i cavi AirPort/fotocamera.
-
Sfila con attenzione i cavi dal passacavo in plastica.
-
-
-
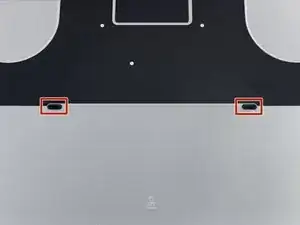
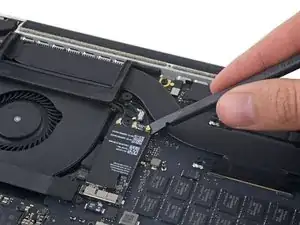
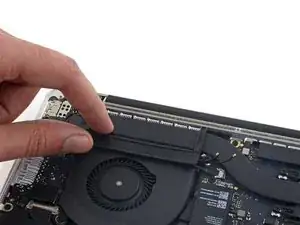
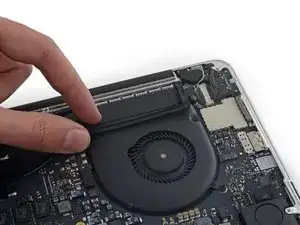
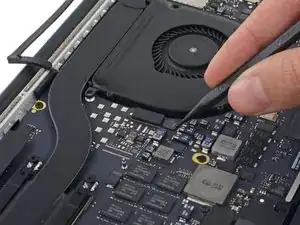
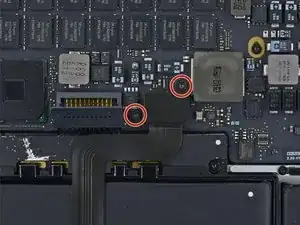
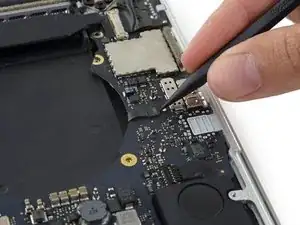
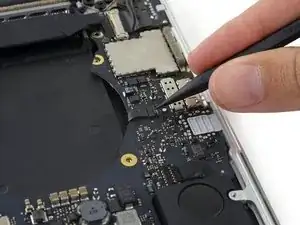
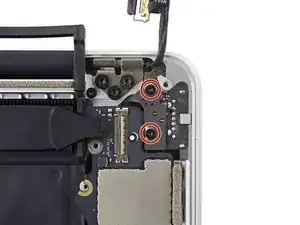
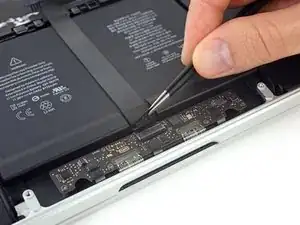
Rimuovi le due viti Torx T5 da 2,2 mm che fissano la copertura del connettore del cavo della scheda I/O.
-
-
-
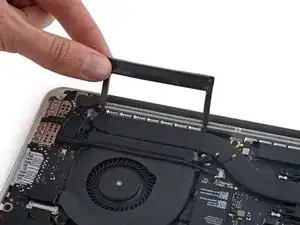
Rimuovi la copertura del connettore sinistro.
-
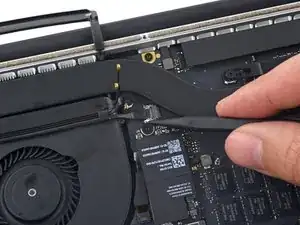
Usa l'estremità piatta di uno spudger per sollevare dal suo zoccolino sulla scheda logica l'estremità sinistra del cavo della scheda I/O.
-
-
-
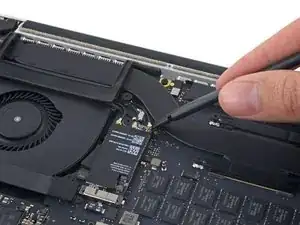
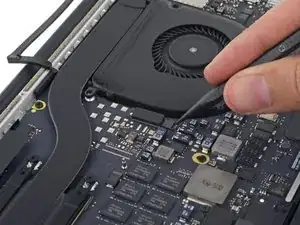
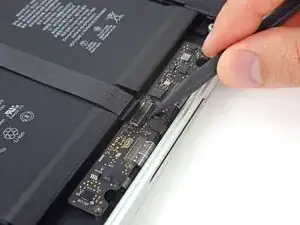
Rimuovi la copertura del connettore destro.
-
Usa l'estremità piatta di uno spudger per sollevare dal suo zoccolino sulla scheda logica l'estremità destra del cavo della scheda I/O.
-
-
-
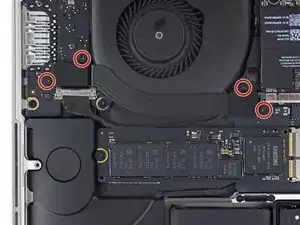
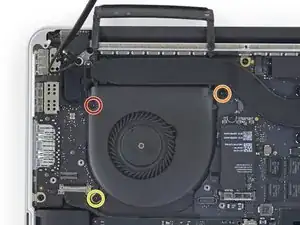
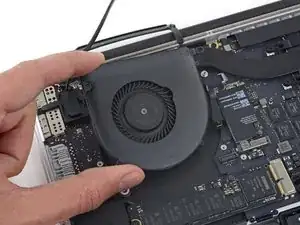
Usa un cacciavite Torx T5 per rimuovere le seguenti tre viti che fissano la ventola di destra alla scheda logica:
-
Una vite da 5,0 mm con una parte cilindrica lunga 2,0 mm
-
Una vite da 4,0 mm a testa larga
-
Una vite da 4,4 mm
-
-
-
Usa la punta di uno spudger per far scattare la linguetta di bloccaggio sullo zoccolo ZIF del cavo piatto della ventola destra.
-
-
-
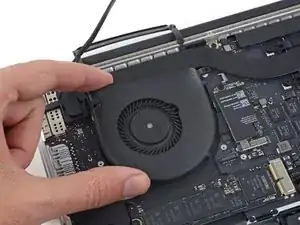
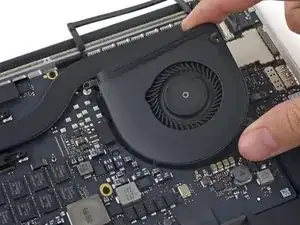
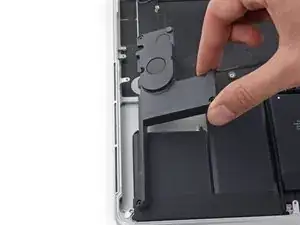
Solleva la ventola e spingi la con cautela verso il bordo posteriore del MacBook per liberare il cavo della ventola dal suo zoccolino.
-
Rimuovi la ventola.
-
-
-
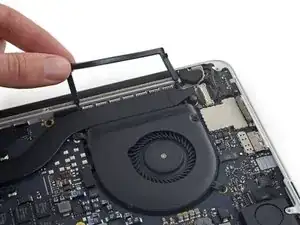
Stacca la copertura in gomma di sinistra dalla ventola e richiedere in modo che non dia fastidio.
-
-
-
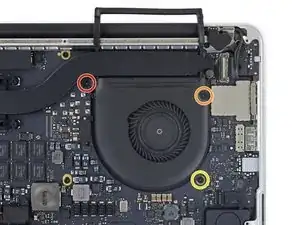
Rimuovi le seguenti tre viti che fissano la ventola di sinistra alla scheda logica:
-
Una vite Torx T5 da 3,6 mm a testa larga
-
Una vite Torx T5 da 5,0 mm con una parte cilindrica lunga 2,0 mm
-
Una vite Torx T5 da 4,4 mm
-
-
-
Usa la punta di uno spudger per far scattare la linguetta di bloccaggio sul lo zoccolino ZIF del cavo piatto della ventola sinistra.
-
-
-
Solleva la ventola e spingi la con cautela verso il bordo posteriore del MacBook per liberare il cavo della ventola dal suo zoccolino.
-
Rimuovi la ventola.
-
-
-
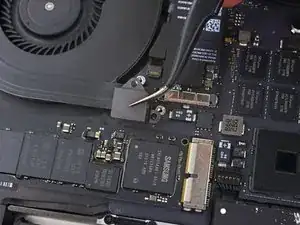
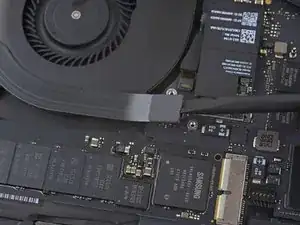
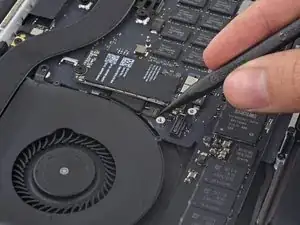
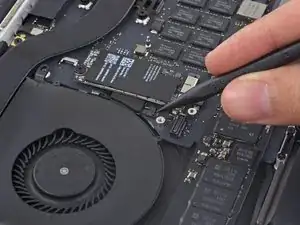
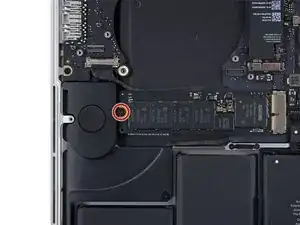
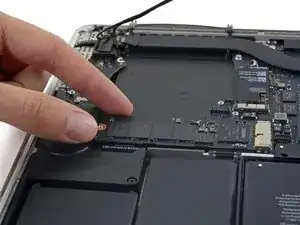
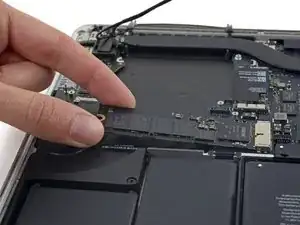
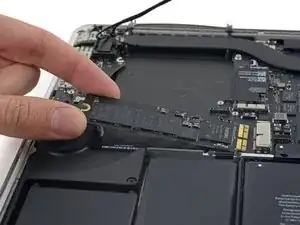
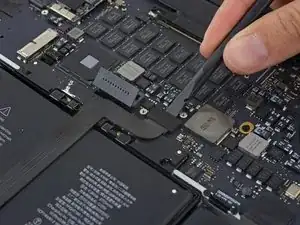
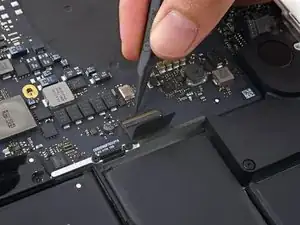
Solleva il lato dell'SSD quanto basta perché superi in altezza l'altoparlante che si trova subito dietro.
-
Tira l'SSD fuori dal suo zoccolino sulla scheda logica.
-
-
-
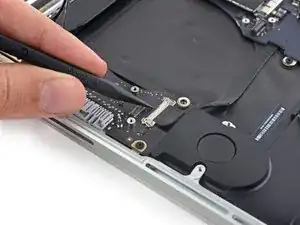
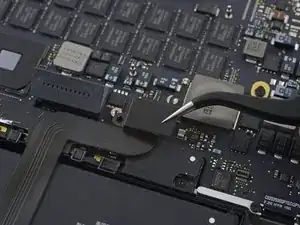
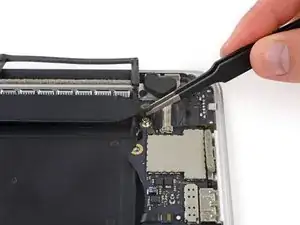
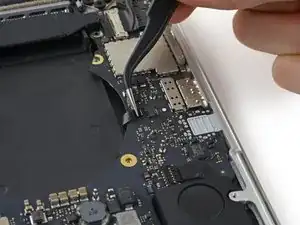
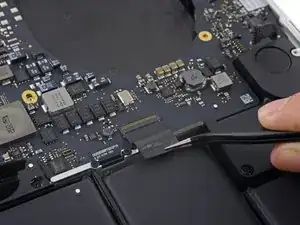
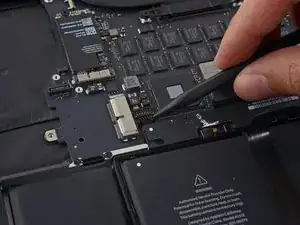
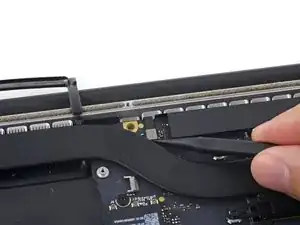
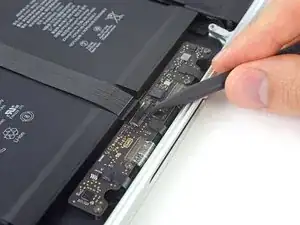
Usa la punta di uno spudger per sbloccare il meccanismo di fissaggio del connettore della scheda I/O.
-
Gira lo spudger e usa l'estremità piatta per far scorrere il cavo I/O fuori dalla sua sede.
-
-
-
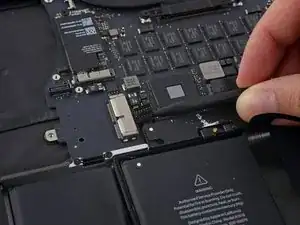
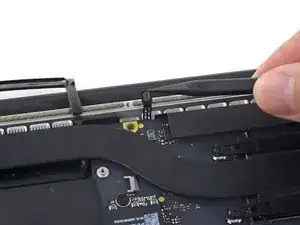
Solleva lievemente il bordo interno della scheda I/O e spingi la scheda stessa verso il centro del MacBook, lontano dal bordo laterale.
-
Rimuovi la scheda I/O.
-
-
-
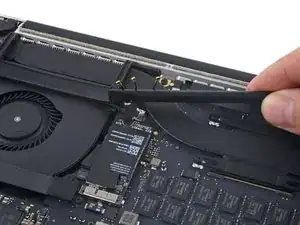
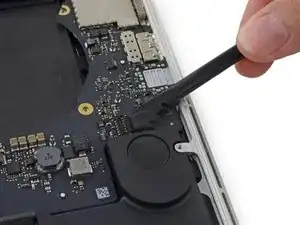
Rimuovi le due viti Torx T5 da 2,2 mm che fissano la copertura del connettore del cavo del touchpad sulla scheda logica.
-
Rimuovi la copertura.
-
-
-
Usa l'estremità piatta di uno spudger per disconnettere il connettore del cavo del touchpad dal suo zoccolo sulla scheda logica.
-
-
-
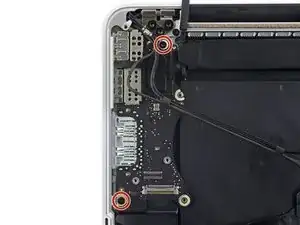
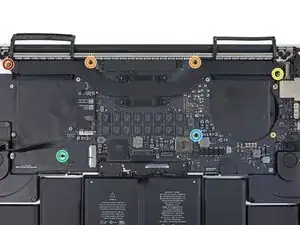
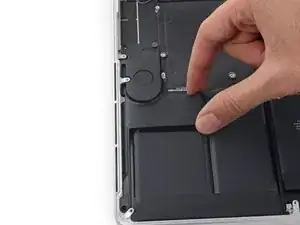
Rimuovi le seguenti sei viti che fissano il gruppo della scheda logica al case superiore.
-
Una vite Torx T5 da 3,8 mm
-
Due viti Torx T5 da 5,7 mm
-
Una vite Torx T5 da 5,6 mm (color argento e con una testa più alta rispetto alle altre)
-
Una vite Torx T5 da 2,6 mm
-
Una vite Torx T5 da 3,2 mm
-
-
-
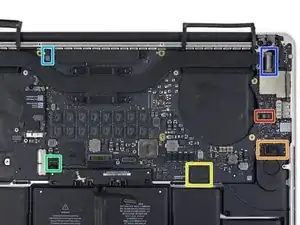
I passi seguenti illustrano in dettaglio la disconnessione di questi sei connettori. Accertati di leggere ogni passo, perché questi connettori sono di tipi diversi e si staccano in modo differente tra loro.
-
Cavo microfono
-
Cavo altoparlante sinistro
-
Cavo dati tastiera
-
Cavo altoparlante destro
-
Cavo retroilluminazione tastiera
-
In fase di riassemblaggio, assicurati di aver ricollegato tutti questi connettori e che siano completamente in posizione nelle loro sedi.
-
-
-
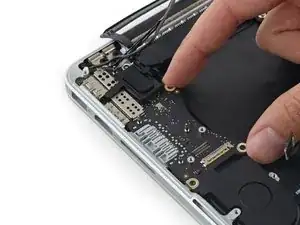
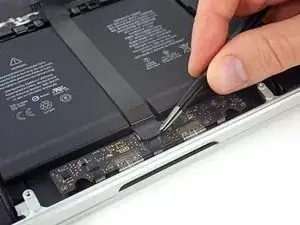
Usa l'estremità di uno spudger per sbloccare la linguetta di fissaggio sullo zoccolo ZIF del cavo a nastro del microfono.
-
Tira fuori dal suo zoccolo, in direzione parallela alla scheda logica, il cavo a nastro del microfono.
-
-
-
Usa l'estremità piatta di uno spudger per sollevare il connettore dell'altoparlante sinistro e staccarlo dal suo zoccolo sulla scheda logica.
-
Piega con delicatezza il cavo per allontanarlo dalla scheda logica.
-
-
-
Usa la punta di uno spudger per sganciare la linguetta di bloccaggio sullo zoccolo ZIF del cavo dati della tastiera.
-
Tira fuori dal suo zoccolo il cavo dati della tastiera. Attenzione, devi tirare in direzione parallela alla scheda logica e non verso l'alto.
-
-
-
Usa la punta di uno spudger per staccare il connettore dell'altoparlante di destra, sollevandolo dal suo zoccolo sulla scheda logica.
-
Piega con delicatezza il cavo per allontanarlo dalla scheda logica.
-
-
-
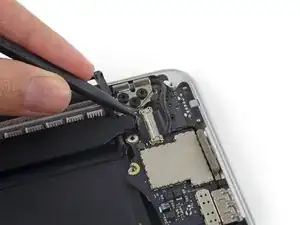
Usa la punta di uno spudger per sollevare il connettore della retroilluminazione della tastiera dal suo zoccolo sulla scheda logica.
-
-
-
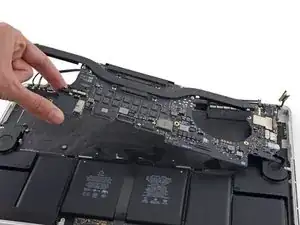
Usa la punta di uno spudger per sganciare il blocco del cavo dati del display e ruotalo verso il lato della porta di alimentazione MagSafe2 del computer.
-
-
-
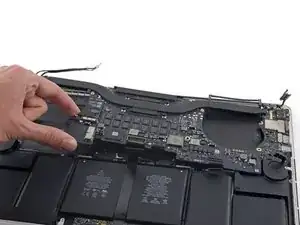
Tira fuori dal suo zoccolino sulla scheda logica il cavo dati del display.
-
Con delicatezza piega il cavo dati del display verso la cerniera del display, per rendere accessibili le viti sulla scheda MagSafe2.
-
-
-
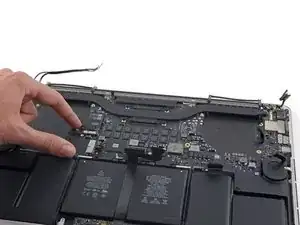
Solleva e tira fuori dalla parete interna del case superiore l'intero gruppo della scheda logica.
-
-
-
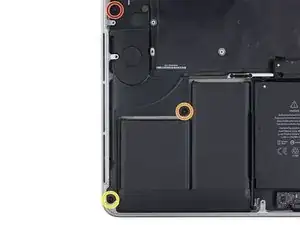
Rimuovi le seguenti viti che fissano l'altoparlante sinistro al case superiore:
-
Una vite Torx T5 da 2,7 mm
-
Una vite Torx T5 da 6,9 mm (con una spalla da 4,5 mm)
-
Una vite Torx T5 da 5,6 mm
-
-
-
Rimuovi l'altoparlante sinistro tirandolo lievemente fuori in direzione opposta al lato del case superiore e quindi sfilandolo da sotto la linguetta di alluminio che lo blocca.
-
-
-
Rimuovi le seguenti viti che fissano l'altoparlante destro al case superiore:
-
Una vite Torx T5 da 2,7 mm
-
Una vite Torx T5 da 6,9 mm (con bordo da 4,5 mm)
-
Una vite Torx T5 da 5,6 mm
-
-
-
Rimuovi l'altoparlante destro tirandolo lievemente fuori in direzione opposta al lato del case superiore e quindi sfilandolo da sotto la linguetta di alluminio che lo blocca.
-
-
-
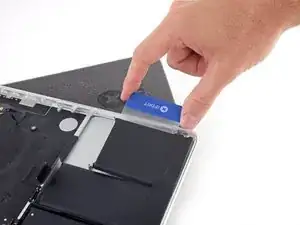
Stacca il nastro adesivo che copre il connettore a nastro del trackpad, vicino al bordo anteriore del MacBook Pro.
-
-
-
Usa la punta di uno spudger per sganciare la linguetta di bloccaggio nera sul connettore ZIF del cavo a nastro del trackpad.
-
-
-
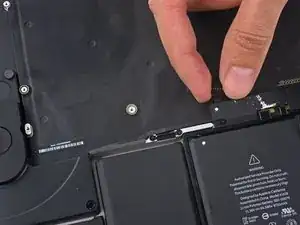
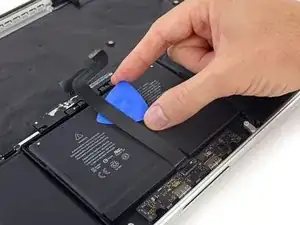
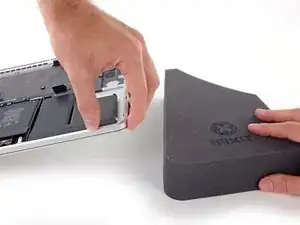
Inserisci uno strumento di apertura tra il cavo a nastro del trackpad e la batteria.
-
Fai scivolare con attenzione il tuo plettro sotto il cavo piatto per tutta la sua lunghezza per staccare l'adesivo che fissa la batteria.
-
-
-
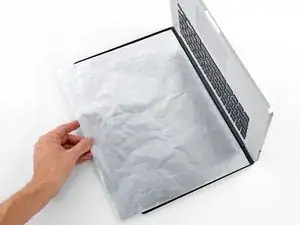
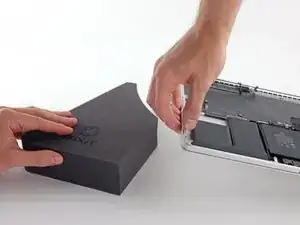
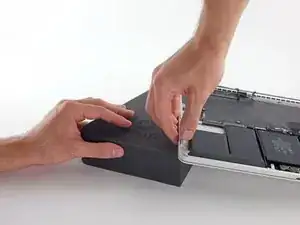
Per proteggere il display, disponi un foglio di stagnola tra il display e la tastiera e lascialo lì mentre lavori.
-
-
-
Con il bordo frontale del MacBook Pro di fronte, solleva il lato destro e infila sotto un solido blocco di espanso o un libro per ottenere una lieve inclinazione.
-
-
-
Ora che il tuo MacBook Pro è stato preparato per l'intervento, è ora di preparare anche te.
-
Indossa occhiali protettivi quando maneggi e applichi l'antiadesivo (gli occhiali protettivi sono inclusi nel tuo kit).
-
Non indossare lenti a contatto senza gli occhiali protettivi.
-
Anche i guanti protettivi sono inclusi nel tuo kit. Se ti preoccupa un'eventuale irritazione alla pelle, mettiti subito i guanti.
-
-
-
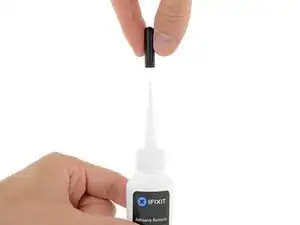
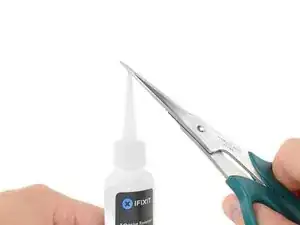
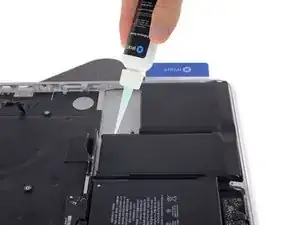
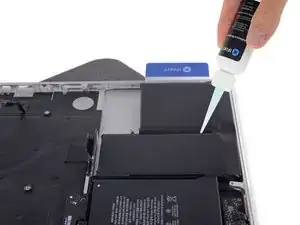
Tira via il cappuccio nero di gomma dalla tua bottiglia di antiadesivo.
-
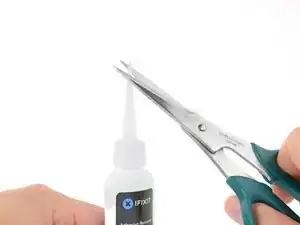
Ruota il tappo erogatore per allentarlo o rimuoverlo prima di tagliare la punta del beccuccio.
-
Usa delle forbici per tagliare la punta ancora sigillata dell'applicatore.
-
-
-
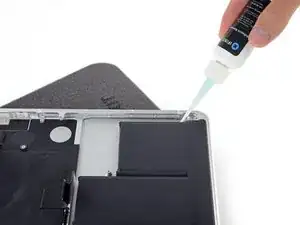
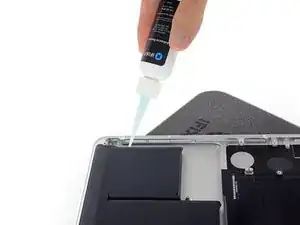
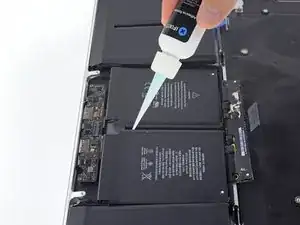
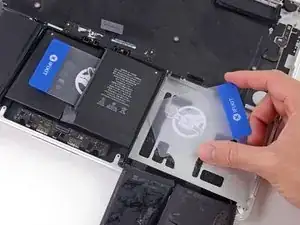
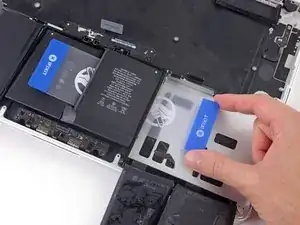
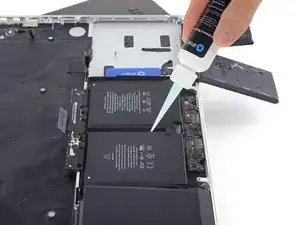
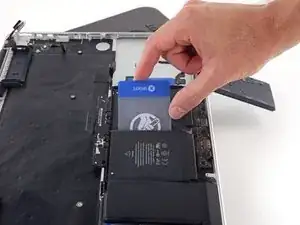
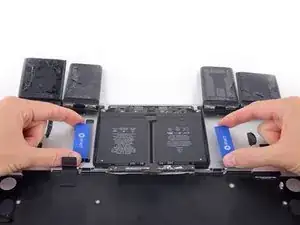
Applica uniformemente delle piccole gocce di antiadesivo sotto il bordo in rilievo della cella della batteria più a destra.
-
Prima di procedere con il passo successivo, aspetta 2-3 minuti per dare tempo all'antiadesivo di penetrare sotto la cella della batteria.
-
-
-
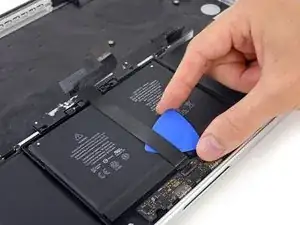
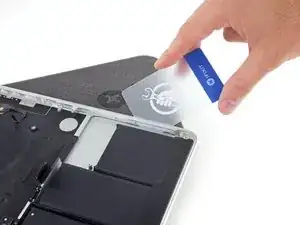
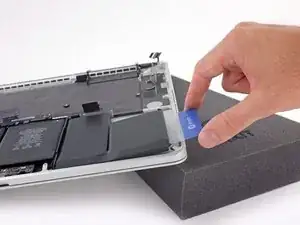
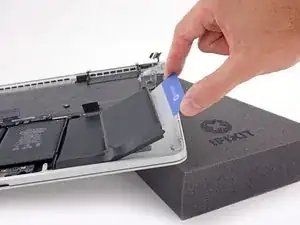
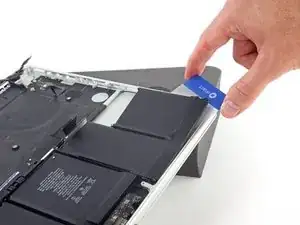
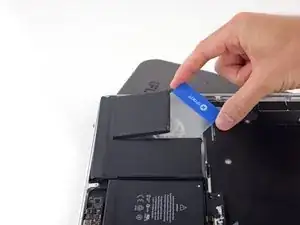
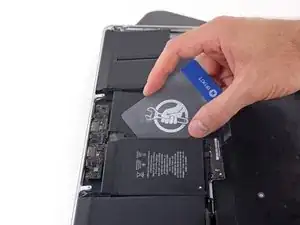
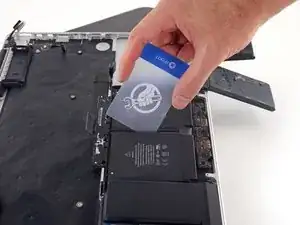
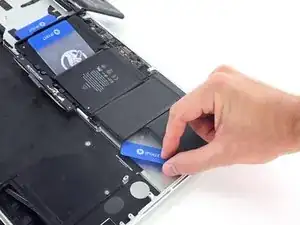
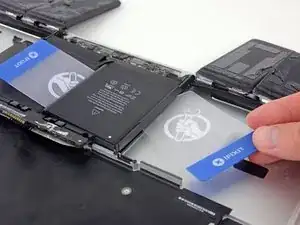
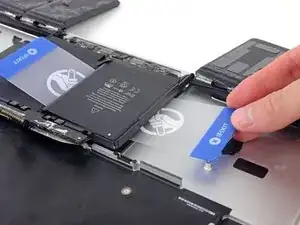
Fai scorrere l'angolo di una scheda di plastica sotto il bordo esterno della cella della batteria.
-
Fai scorrere la scheda ancora più sotto la cella della batteria per separarla dall'adesivo che la fissa al case superiore del MacBook Pro.
-
-
-
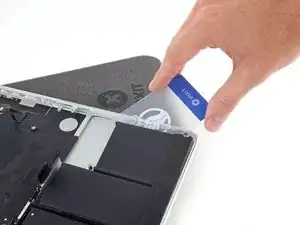
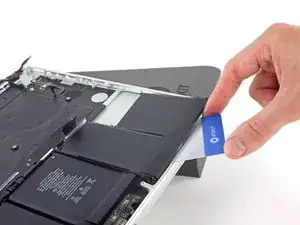
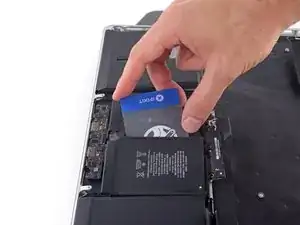
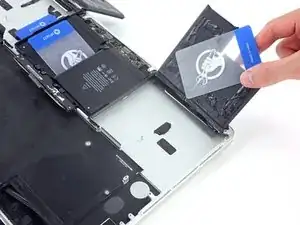
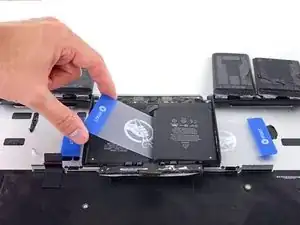
Solleva la cella della batteria per separarla dal case superiore del MacBook Pro, ma non cercare di rimuoverla completamente.
-
Lascia la scheda di plastica sotto la cella della batteria per evitare che possa incollarsi di nuovo mentre procedi con il passo successivo.
-
-
-
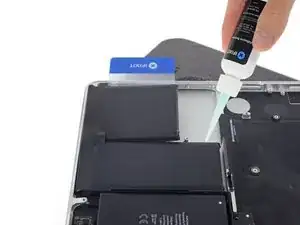
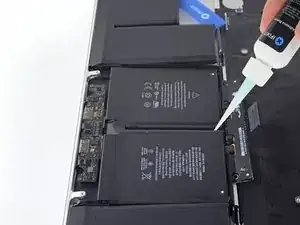
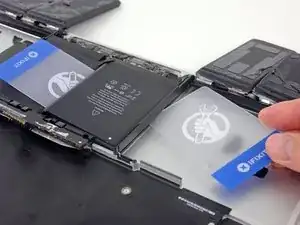
Applica uniformemente delle piccole gocce di antiadesivo sotto il bordo in rilievo della cella successiva della batteria.
-
Prima di procedere con il passo successivo, aspetta 2-3 minuti per far penetrare l'antiadesivo sotto la cella della batteria.
-
-
-
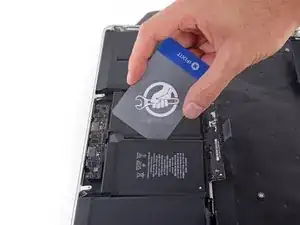
Fai scorrere l'angolo di una scheda di plastica sotto la seconda cella della batteria.
-
Spingi la scheda sotto la seconda cella della batteria e falla scorrere da un lato all'altro per separare l'adesivo sottostante.
-
Lascia la scheda di plastica sotto entrambe le celle della batteria (o ripiegale all'esterno) per evitare che possano incollarsi di nuovo mentre procedi con il passo successivo.
-
-
-
È ora di invertire i lati. Rimuovi il tuo libro o il tuo blocco di espanso e mettilo sotto il lato opposto del tuo MacBook Pro.
-
-
-
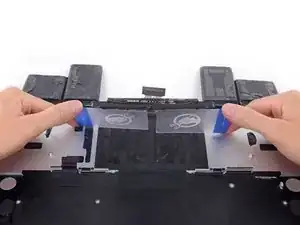
Ripeti la procedura descritta nei passi precedenti per separare le due celle della batteria di questo lato:
-
Applica l'antiadesivo lungo il bordo superiore della cella della batteria esterna più a sinistra e attendi 2-3 minuti per lasciarlo penetrare.
-
Infila l'angolo di una scheda di plastica sotto la cella della batteria e falla scorrere sotto l'intera cella per separarla.
-
Fai la stessa cosa con la cella adiacente.
-
Lascia in posizione la scheda di plastica o ripiega all'esterno le celle per evitare che possano incollarsi di nuovo nel corso dei passi successivi.
-
-
-
Con il bordo sinistro del tuo MacBook Pro ancora sollevato, applica poche gocce di antiadesivo sulla linea centrale tra le due celle centra. Di della batteria di mezzo.
-
Prima di continuare, aspetta 2-3 minuti per dare tempo all'adesivo di penetrare.
-
-
-
Fai scorrere l'angolo di una scheda di plastica tra le due celle centrali e sotto il bordo superiore della batteria centrale di destra.
-
Fai scorrere ancora più in profondità la scheda sotto la cella per tagliare l'adesivo che la tiene in posizione.
-
Non cercare già ora di separare completamente questa cella. Lascia la scheda di plastica in posizione per evitare che la cella possa incollarsi di nuovo.
-
-
-
Ribalta le due celle di destra della batteria staccate oltre il bordo frontale del MacBook Pro, se non lo hai già fatto. Avrai così accesso al bordo esterno della cella centrale.
-
-
-
Spingi l'angolo di una scheda di plastica oltre il telaio in plastica della batteria e sotto il bordo ancora attaccato della cella inferiore centrale.
-
Fai scorrere la tua scheda sotto tutta la cella e lasciala in posizione per evitare che la cella stessa possa incollarsi di nuovo.
-
-
-
Rimuovi la prima scheda di plastica, quella che avevi inserito sotto la cella centrale di destra.
-
Spingi l'altra scheda ancora un po' e lasciala in posizione per evitare che la cella della batteria si possa incollare di nuovo mentre continui con la procedura.
-
-
-
Rimuovi il libro o il blocco di espanso.
-
Con il bordo frontale del MacBook Pro di fronte a te, solleva di nuovo il lato destro per inclinarlo.
-
-
-
Applica poche gocce di antiadesivo tra le due celle centrali della batteria, perché possa fluire sotto la cella rimasta.
-
Prima di continuare, aspetta 2-3 minuti per dare tempo all'antiadesivo di penetrare.
-
-
-
Fai scorrere l'angolo di una scheda di plastica sotto il bordo superiore dell'ultima cella.
-
Spingi la scheda ancora di più sotto la cella della batteria per tagliare l'adesivo che la tiene in posizione.
-
Non cercare già ora di rimuovere completamente la cella della batteria. Lascia in posizione la scheda di plastica per evitare che la cella possa incollarsi nuovo.
-
-
-
Se non lo hai già fatto, solleva e ribalta le due celle esterne di sinistra della batteria per avere accesso al bordo esterno della cella rimasta.
-
-
-
Ripeti la procedura usata per la batteria centrale di destra per ultimare la separazione dell'adesivo sulla cella centrale di sinistra.
-
Spingi l'angolo di una scheda di plastica oltre il telaio in plastica della batteria e sotto il bordo ancora attaccato della cella rimasta.
-
Fai scorrere la tua scheda sotto tutta la cella e lasciala in posizione per evitare che la cella stessa possa incollarsi di nuovo.
-
-
-
Rimuovi la prima scheda, quella che avevi inserito sotto la cella rimanente della batteria.
-
-
-
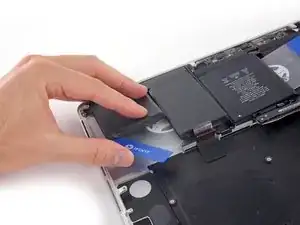
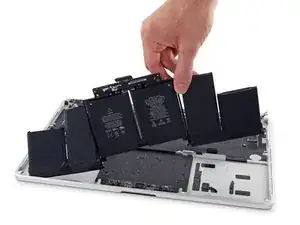
Con una scheda di plastica inserita sotto ciascuna delle due celle centrali, torci e solleva entrambe le schede per separare completamente dal MacBook Pro le celle della batteria, insieme con il telaio di plastica e la scheda della batteria.
-
-
-
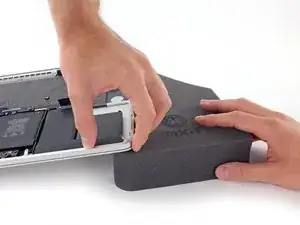
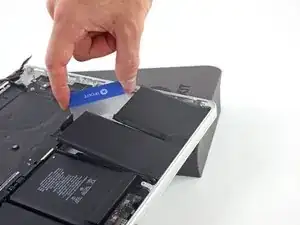
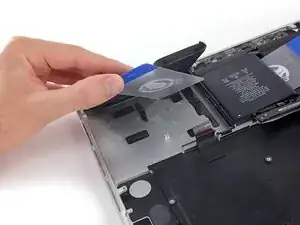
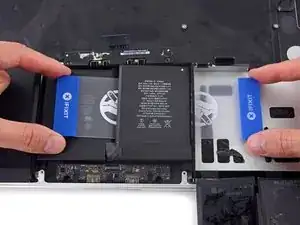
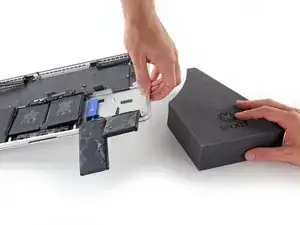
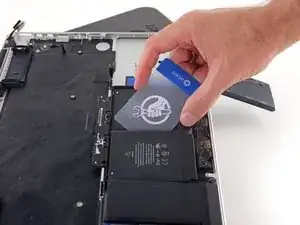
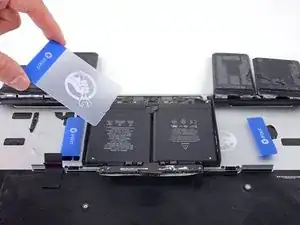
Solleva e rimuovi la batteria.
-
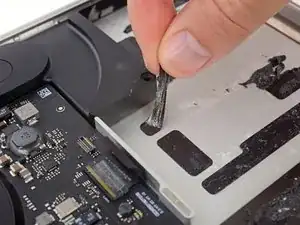
Con un po' di fortuna, dovresti riuscire a tirar via tutte le strisce adesive usando semplicemente le dita.
-
In caso contrario, bagna ogni striscia di adesivo con un po' di antiadesivo per 2-3 minuti e poi grattala via con uno strumento di plastica. Può essere richiesto abbastanza lavoro, quindi cerca di avere pazienza.
-
Elimina ogni traccia dell'adesivo rimanente e lascia asciugare all'aria il tuo MacBook Pro per qualche minuto.
-
Calibra la nuova batteria appena installata: carica al 100% e tieni in carica almeno altre 2 ore. Stacca il cavo e usa il laptop per farlo scaricare. All'avviso di batteria in esaurimento, salva il lavoro corrente e tieni acceso il MacBook finché non si iberna perché scarico. Aspetta almeno altre 5 ore, poi carica senza interruzioni fino al 100%.
-


Per rimontare il tuo dispositivo, segui queste istruzioni in ordine inverso.

217 commenti
Do I need to remove all these things just to replace the battery or can I just remove the connectors above the battery than the battery?
Tony -
I just went through this process yesterday, and today wondered why I needed to take all that crap out, because I don’t remember anything blocking the battery removal, that would require removing the speakers, logic board, etc. I think it’s because of the acetone adhesive solvent. It’s powerful stuff that can easily damage the system. Maybe, if you are able to get the battery out without the solvent, you can skip all the other stuff. I will say, however, that in my system, it seemed like the adhesive is real solid. It felt like I was pressing the card up against aluminum studs in the frame, until the solvent loosened it up. If you try to remove the battery without the solvent, be very careful not to use excessive force and warp your frame.
See the post I just added, it seems that this is all to be able to remove one of the speaker cables, which I don’t think in necessary. I really don’t like messing with delicate connectors and ribbon cables that I don’t have to.
I have done this job before. I remember that it was easy - did it on the kitchen bar.
In hindsight, I didn't have to take out all the crap. I must have used a different guide. Son of a gun, wasted time. I easily got the battery out without "adhesive remover". Hilarious if "adhesive remover" is acetone, a chemical availabe just about anywhere. Note to self, iFixit needs to be second opinioned. I think this guide is written to make it seem like you need a lot of special tools to do this job. Not true - just a few drivers, usually provided with any battery.
I thought this too and didn't wanna do all that work with the solvent. All I removed was the battery connector and the trackpad cable before attempting to remove the battery. The adhesive Apple uses is bewilderingly strong. I thought I could pry it off with a strong paperclip and a screwdriver but it bent both. I ended up using the backend of a hammer and that worked surprisingly well. But it was super janky and I ended up puncturing the battery outer plastic. It didn't catch fire or anything but you can definitly smell the battery juices or whatever so i opened up my window. If you somewhat know what you're doing and accept the risk of setting fire to your house you can get away with not using solvent but I highly recommend doing so as the battery I ended up pulling out of my MacBook is all mangled. And if you use the solvent you have to take everything out. Apple will be Apple.
I made it within 1 hour doing Steps 1-5, then Steps 46-50.
I removed battery heating the aluminium frame in the location of battery pack on the opposite side of the frame with NTE HG-300D Mini Heat Gun, and then gently peeling this battery pack with plastic spudger. You may need to reheat the area several times.
For 2 central battery elements you can't heat aluminium frame because they are below touchpad, so I peeled batteries a little bit with spudger, heated the underneath gently, and then peeled it again. Also dental floss could help cutting the glue underneath the battery.
Thanks for your fast approach, worked fine for me as well! I did not use any glue dissolver at all.
Same for me, about an hour. I didn’t use a heat gun, just finagled the tip of the adhesive dissolver around the edges and otherwise followed the directions using the plastic cards. That dissolver is great stuff, worked twice as fast as the instructions.
Thanks for posting your short version. I did mine in about an hour with dental floss and the plastic cards. No heat. No solvent.
So glad I read the comments before going down the path of insanity.
I followed your comment to skip most of the steps and just remove the keyboard cable and the batteries. The replacement of batteries revived my water damaged MacBook Pro which stucked in boot loop.
In the beginning I tried to avoid “finagled“ situation thus only dripped a drop or 2 of dissolver each time. I also use a thin tip to induct the dissolver into the gap. But it’s very hard to do the flossing work and very slow. For the last 2 central pieces I had to drip 10 or more drops for each line of tapes which eventually helped me to remove them.
For someone who can’t order ifixit dissolver, I got my “Arctic Thermal Material Remover” from canadacomputers.com. It may not be perfect but helps. I didn’t use heat gun.
Great article, thanks!
Yan -
Did the same yesterday; took me closer to 4-5 hours as I was being “exceedingly careful”, as it was my wife’s laptop and she’d been hit with a “perfect storm”: battery died and backup was corrupt (backups.db reported a size of 0, and Migration Assistant hung while trying to look for it). o_O Otherwise, everything worked well, laptop is operational again, and my wife’s files have been backed up, migrated to another laptop, and the backed up again - so she currently has 4x copies of all her files. \o/
Zathras -
I’d recommend to do steps 26 and 27 and remove both ends of the touch pad cable!
If you are careful and tilt the whole Powerbook a bit downwards the solvent doesn’t pose any risk as it will run away from the speakers tec..
Did it nearly the same way (without heating). I also loosened the two accessible screws of the two speakers and bent them up a bit to avoid contact with the spreading dissolver and to better slide the plastic cards under the batteries. You just have to make sure that nothing splashes onto the other components when you tilt the dissolver bottle. If you are anxious, you can also protect them with a non-conductive, acetone-resistant cover.
Martin -
After reading through all of the steps, and seeing this comment, I opted to try this approach. Now, my laptop is getting quite old, so I suspect the adhesive has lost some of its original vigor. I did not need to use heat, dental floss, or the adhesive remover and was able to follow the instructions using the plastic cards to remove the battery without any damage to the laptop.
I followed the same steps and used fishing line to "rip" the glue between the battery and case. Found a video that showed it on youtube. It worked great!
Had to have a friend hold the computer in place for one "battery block" to "cut" it, but other than that, it was quite easy. :)
ssssaaaa -
>>I made it within 1 hour doing Steps 1-5, then Steps 46-50.
I also used that method - I very carefully used the minimum amount of solvent to incrementally loosen the battery for removal.
I was concerned about using heat since the old battery was pretty badly swollen - I used the solvent instead.
CCC -
Just finished this repair, I also did not remove all the components. I have never used a heat gun before, but I had a hair dryer lying around and that did the trick. I used the hair dryer even on the middle two cells and it seemed to come loose with the plastic card tools just fine.
The dental floss suggestion is interesting. I did this (1-5, 26-27, 46-50) using IPA. Using the plastic cards from the kit, the side cells came out pretty easy, but the central cells took a while. Doing 26&27 was probably not necessary
These batteries appear to be actual Apple batteries. How did iFixit remove them from the case? If iFixit didn't, were they able to get replacement batteries directly from Apple (since the adhesive is already installed)?
plink53 -
No idea, but check About This Mac… > System Report > Power; on the one I just replaced, Manufacturer reads “ifixit”.
Zathras -
The number of screws listed here is wrong on my model. I had four of the smaller size.
anonymous 1286 -
Just to add to my comment above (I can't edit it because it's anonymous), my MacBook Pro is a mid-2015 15in model 2.8GHz (A1398; EMC2881). For the bottom case it uses six 3.1mm screws, and four 2.3mm screws at the clutch/hinge side of the MacBook Pro. I tried using a 3.1mm screw at the clutch/hinge end, as described in the main article, and they don't fit. It has to be four 2.3mm screws.
anonymous 1286 -
agreed with above 1286...
I have the Mid 2015/A1398/EMC 2909. the hinge end and two middle side screws used a 1.2x50mm screwdriver while the 'opening' end 4 screws used the T3 screwdriver. I guess different builds used different sized screws!!
Tj Bennett -
The instructions below have you basically taking ALL of the guts out of case. I’ve been doing my own apple repairs since before ifixit was a thing and this one is a handful. My battery was swelling and I wanted to remove it before it burst or bent the case so I took it out without having a replacement and it occurs to me that aside from using the solvent (liquid) to remove the adhesive, you could probably do this only taking the trackpad ribbon out. I have mine reassembled now and will research the best battery to buy but I think installation will take about 5 minutes. See if you can slip a plastic gift card under the battery and wag/saw the adhesive out without the solvent before you go through all of this. It might work. Note, don’t bend or put too much stress on the battery and certainly don’t puncture it…
br1ansk -
Battery Recall for 15-inch MacBook Pro Retina mid-2015. Check Apple’s site for recalls, and put in your serial number. They replaced my swelling battery for free, regardless of warranty.
Steve -
As we are only replacing the battery, you can safely skip steps 6-26 and 28-48, no need to disassemble the computer to pull out the battery. Use nail polisher remover I was able to pull a super bloated battery out, without disassembling my MacBook.
John Sikking -
I qualified for the recall. These bloated batteries are dangerous! DO NOT, UNDER ANY CIRCUMSTANCES, PUNCTURE THE BATTERIES!
Thanks for the heads-up on the recall.
Datajockeys -
For battery replacement, I also chose NOT to remove everything, and NOT to use the solvent. I used an iFixit heating tube (from the iPad kits) to soften the adhesive from the keyboard face… NOT the battery itself! Used the iFixit cards. I have four, so the real work is possible BETWEEN two other cards — reduces the chance of puncturing the battery. Worked fine, took a little while, but no problems.
Steve -
I’m having a problem trying to get the screws off. I have a set of pentalobe screwdriver set. I found one screwdriver that fits perfectly on one set of screws, but I am unable to unscrew it. I tried using some force pushing the screwdriver into the screw, but nothing happens. Any suggestions?
henry_k_wong -
All the screws on mine are the same length for some reason.
ccfman2004 -
I would recommend the first step is: Run the battery down to ZERO before doing any next step. This reduces risk to you, people nearby, to the MBP and greatly reduces the risk of fire. Step 2 should be: Double-check that the battery is at zero.
I like others listed below and on YouTube, disagree with these full tear down 70+ steps being the only focus. I get that I have to be careful not to get the acetone solvent near the speakers. I skipped 25+ steps by: tilting the MBP away from the speakers and using very little acetone solvent. More pressure with the plastic cards and only a few drops of solvent. While giving the full set of instructions is fine it should be very clear that you can (at the user’s own risk) do this.
Kenneth Schleede -
As above—I consider full disassembly to be far riskier to fragile cables and connectors than the risk for solvent spillage. I did steps 1-5 and 46-74. No issues. I HIGHLY recommend the iFixit magnetic Project Mat. It’s a white marker board surface gridded into squares and invaluable for labeling part sizes/steps in disassembly.
philtrit -
As above too. I benefitted from the advice. From step 51 onwards, I found a easier way using tip from China battery seller. Use a 2” width plastic scraper/plastic paint scraper to poke under the battery. Use moderate strength to poke and avoid rough handling of the battery so as not to puncture it. There is no need to pry the battery to avoid stressing it, just use a firm poking action under the battery and the double sided tape adhesive will yield. After 5 min of such poking, the entire battery pack can be removed without the hassle of pouring the adhesive remover from step 51 onwards. Get a scraper with a stronger handle so that it is more comfortable to poke.
https://www.aliexpress.com/item/32889670...
Emma Pn -
Heads up as you go…we (husband/wife team) had a notebook that when screws/covers were removed, we marked the step # and actually taped the screws into the notebook noted by the step number. This was very helpful on reassembly and we knew we would be using the exact screw into the original screw hole.
Ann Brainard -
After replacing the batteries myself, I wouldn’t even consider doing it again. Not that it’s difficult to do—that’s not the issue. The issue is aftermarket batteries. I’ve been using notebooks for well over 30 years, and never had satisfaction with aftermarket batteries.
Modern lithium batteries are an amazing technological feat, but a dangerous one. So even putting aside that I’ve never found any aftermarket batteries with quality anywhere near original, I learned “cheap” aftermarket lithium batteries are downright dangerous.
After doing research into what’s involved with manufacturing lithium batteries, I know there are so many corners to cut, you’ll end up with junk regardless of what you pay.
A week after replacing my batteries with those from iFixit, they showed clear signs of failure. Thank goodness iFixit refunded my money.
After having Apple replace my batteries, everything is back to like-new. For my $199, I got not only excellent batteries, but a new keyboard and trackpad as well. That’s it’s done!!!
AnnoniMoose -
Which of the following companies make their own LiIon cells, Apple, Dell, DeWalt, Milwaukee, Tesla, Trek? Ans: NONE OF THEM. All these companies buy their LiIon cells from companies that will sell to iFixit or any other legitimate company. If you want quality, either do the research or pay through the nose for OEM. And note the Apple battery recall. Apple messes up too.
Bartwick -
I found an Apple Support link that said MBP battery replacement was $199, but the 2 Apple Stores near my house would not provide any appointments. Instead, I scheduled an appointment with and “Apple Authorized Service Provider” & that repair center quoted about $750 to replace the battery.
I refused, went home, & opened a chat with Apple Support.
After a lengthy & painful chat session where the Apple tech didn’t want to provide a battery replacement quote (he feared other issues with the MBPr), he finally gave me an Apple price of just under $650 to replace the battery.
Did you go into an Apple store, or mail it in? I’m struggling to reconcile a price of $199 to get a battery + keyboard + trackpad against what I was just quoted 2 weeks ago. The new track pad & keyboard might have been due to repair tech error. i.e. they trashed those repairing your batter & had to toss them in.
Bartt.Shelton@gmail.com -
I took mine in after being quoted for a $199 replacement of battery and keyboard, only to have the repair refused as they found a "water sensor" triggered and now I'm left with my AUD$5,000 laptop with messed up keys. Shame on me for not getting this repaired during COVID while under warranty. This is the first time I've truly been disappointed in Apple, but suppose it was bound to happen someday. I was quoted US$ 1479 to replace the battery and keyboard and the sensor (likely the logic board is replaced as well) if I were to send it in to the US repair center. Any chance these sensors can be triggered by humidity?
C0RT -
I 1000% recommend watching this video and performing the battery replacement without all these steps from this guide and without using the acetone solvent. https://www.youtube.com/watch?v=ImonCWcc... (15" inch Retina MacBook Pro A1398 Mid 2015 Disassembly Battery Replacement Repair)
The video is narrated well and the guy goes slow and zooms in where appropriate. Instead of removing all components, he simply removes the track pad cable, battery cable, and unscrews two of the speaker screws on each side. From there, you can lift up the speaker arms where the video guy uses a thin pry tool to push through the sticky tape. No solvent is needed except for residual sticky stuff leftover.
Instead of the thin pry tool, I just used the plastic cards that came with this ifixit kit. It takes a little force and wiggle/jiggle so take your time using the corner of the card to start.
This method makes a difficult 2-3hr job into a much easier 1hr job.
Spencer -
+1 for this approach! I watched the video that Spencer mentioned. It took me a little over an hour, and it was stress-free. https://youtu.be/ImonCWcc1xk
Chris Wicklas -
Another +1 - I followed the video pretty exactly (after having already gone through steps 1-5 here). I'm not sure it's necessary to clean off the adhesive residue as thoroughly as he demonstrates in the video, but the instructions were clear and the end results were good - trackpad still working fine and new battery already charged to 50%.
Jeff Zinn -
Glad I read these comments before plunging into the iFixit instructions.
+1 for skipping the iFixit instructions and using the youtube video linked by Spencer.
I followed the instructions and had my battery replacement done succesfully.
Instead of the metal spatula like thing he used - I used the plastic ifixit credit card things that came with my battery kit.
It took about 15 minutes of wiggling under the battery to free it from the adhesive but it wasn't too bad.
I did remove the residual adhesive as he indicated with isopropyl alcohol - but after finishing my installation I realized it was completely unnecessary. You can install the new battery over the residual gunk and skip that step.
picardo -
Yes! This YouTube tutorial works great and it was really easy to replace the battery. I needed about 75 minutes.
Perform steps 1-5,
Then skip to step 41.
In 41 + 43 do not unscrew the red marked screws.
In 42 an 45 just lift the speakers, do not remove them.
Skip 44
Up from 53, I did not use the glue remover, the plastic cards were enough.
In step 63 watch out to start from the middle. This prevents you from peeling up the lower „platform“.
Great job :-)
weekendiac -
It’s now February 2024, and the batteries Apple installed have all swelled up just like the originals. Doing a bit of research on the manufacturer, Simplo, I no longer trust them either. Microsoft used Simplo in their tablets, with countless users complaining about bad batteries. A few days ago, I read a post saying Apple now charges $250 instead of the $200 I paid less than three years ago. WOW! Even if Apple would replace my batteries, there’s no way I’m going that route again. Too bad my MacBook won’t boot without batteries. I don’t need them; I don’t want them. I also don’t want a newer MacBook. What to do???
AnnoniMoose -