
Introduzione
Il tuo trackpad Force Touch richiede più forza del normale per essere premuto? Il Taptic engine fa i capricci? Segui questa guida per sostituire il trackpad sul tuo MacBook Pro Retina 13" di inizio 2015.
Questa procedura richiede l'utilizzo di un prodotto antiadesivo per rimuovere la batteria. Non riutilizzare la batteria dopo averla rimossa: farlo è un potenziale pericolo. Sostituiscila con una nuova batteria.
Il prodotto antiadesivo iFixit è altamente infiammabile. Questa procedura va eseguita in un'area ben ventilata. Non fumare e non lavorare vicino a una fiamma libera durante la procedura.
Per la tua sicurezza, scarica la batteria del tuo MacBook Pro prima di iniziare questa procedura.. Una batteria agli ioni di litio carica può creare un incendio pericoloso e incontrollabile se viene forata accidentalmente. Se la tua batteria è gonfia, prendi le dovute precauzioni.
-
-
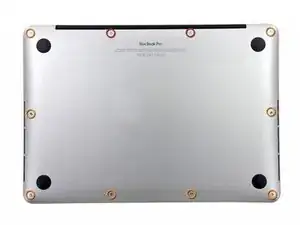
Rimuovi le 10 viti seguenti che fissano il coperchio inferiore al case superiore:
-
Due viti Pentalobe P5 da 2,3 mm
-
Otto viti Pentalobe P5 da 3,0 mm
-
-
-
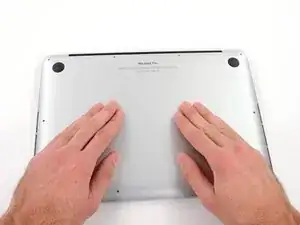
Infila le tue dita tra il case superiore e quello inferiore.
-
Con delicatezza, tira il coperchio inferiore per staccarlo da quello superiore.
-
-
-
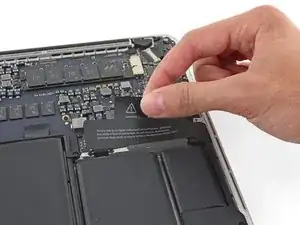
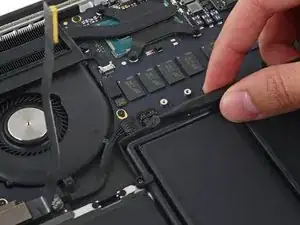
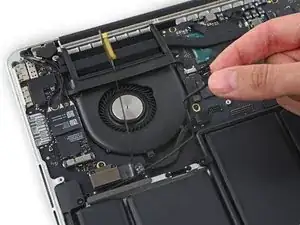
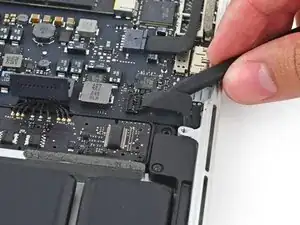
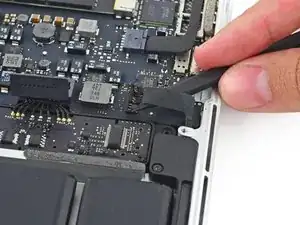
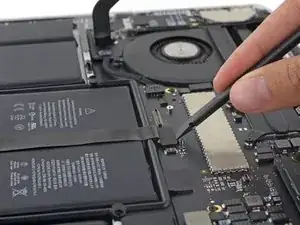
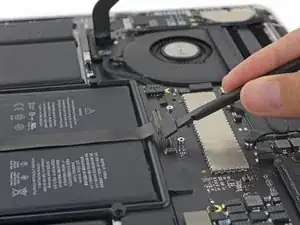
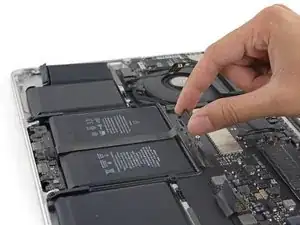
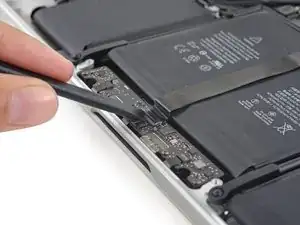
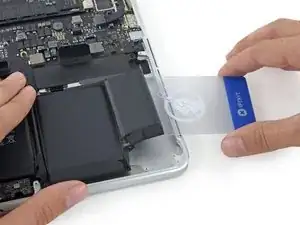
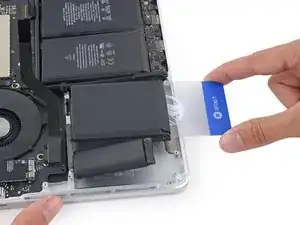
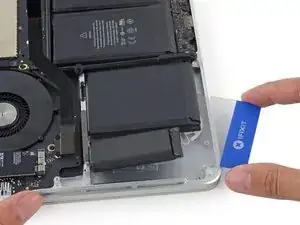
Usa l'estremità piatta di uno spudger per sollevare il connettore della batteria in verticale dal suo zoccolino sulla scheda logica.
-
-
-
Rimuovi le due viti Torx T5 da 2,1 mm che fissano la staffa del cavo della scheda I/O dalla parte della scheda logica.
-
Rimuovi la staffa del cavo della scheda I/O.
-
-
-
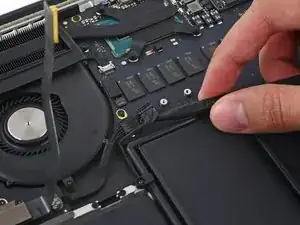
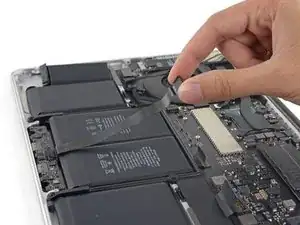
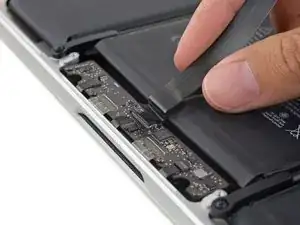
Usa l'estremità piatta di uno spudger per sollevare il connettore della scheda in verticale dal suo zoccolino sulla scheda logica.
-
-
-
Solleva in alto il terminale dal lato della scheda logica del cavo della scheda I/O; quindi ripiegalo in una posizione che non dia fastidio.
-
-
-
Infila con delicatezza la punta di uno spudger sotto il cavo dell'altoparlante destro vicino al suo connettore e sollevano dal suo zoccolino sulla scheda logica.
-
-
-
Rimuovi le viti seguenti, che fissano l'altoparlante destro al case superiore:
-
Una vite Torx T5 da 5,7 mm
-
Una vite Torx T5 da 6,5 mm
-
Una vite Torx T5 da 3,8 mm
-
-
-
Inserisci la punta di uno spudger sotto il cavo dell'altoparlante sinistro vicino al suo connettore e sollevalo dal suo zoccolino sulla scheda logica.
-
-
-
Rimuovi le viti seguenti, che fissano l'altoparlante sinistro al case superiore:
-
Una vite Torx T5 da 5,7 mm
-
Una vite Torx T5 da 6,5 mm
-
Una vite Torx T5 da 3,8 mm
-
-
-
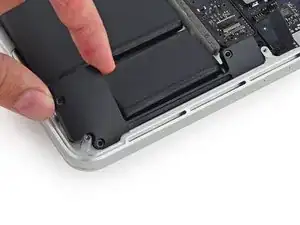
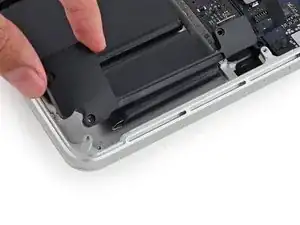
Solleva l'angolo dell'altoparlante destro e fallo scorrere attorno alla batteria per rimuoverlo dal case superiore.
-
-
-
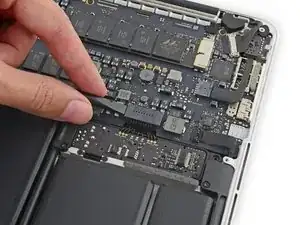
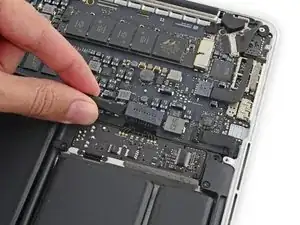
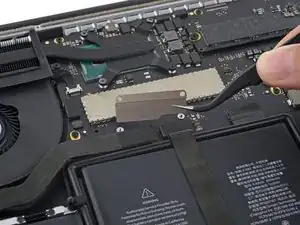
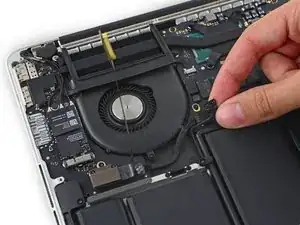
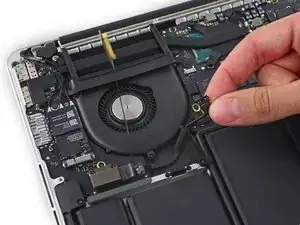
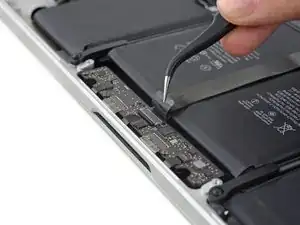
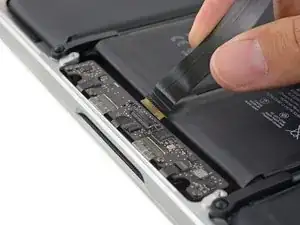
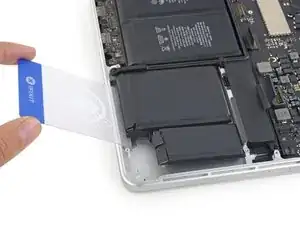
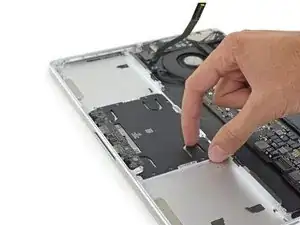
Usa l'estremità piatta di uno spudger per sollevare il connettore del trackpad verso l'alto dal suo zoccolino sulla scheda logica.
-
-
-
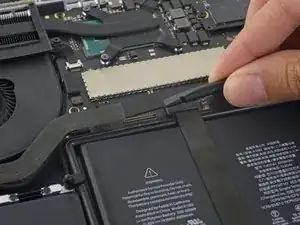
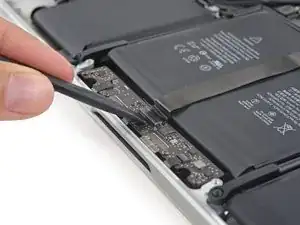
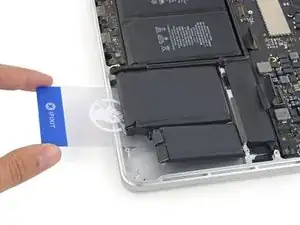
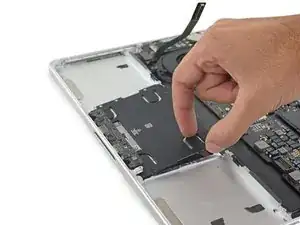
Solleva il cavo del trackpad allontanandolo dalla batteria per separarlo dall'adesivo che lo tiene in posizione.
-
-
-
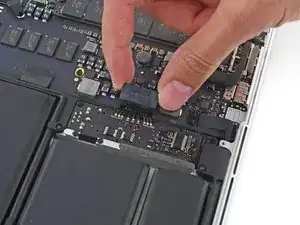
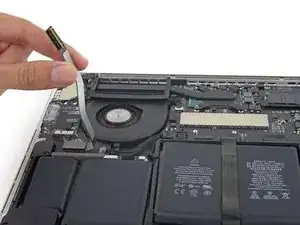
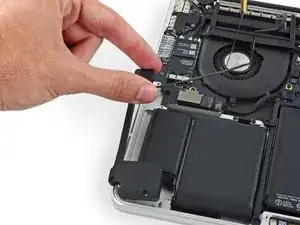
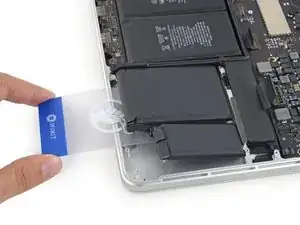
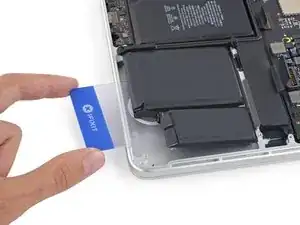
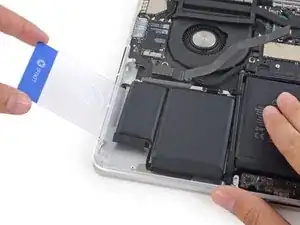
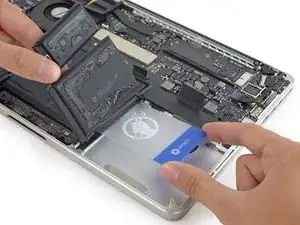
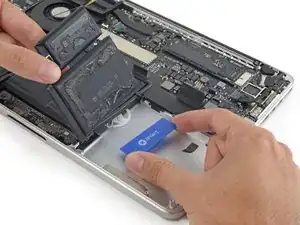
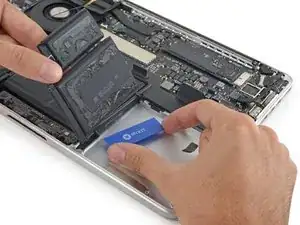
Tira il cavo del trackpad staccandolo dal suo zoccolino ZIF sulla scheda di controllo del trackpad.
-
-
-
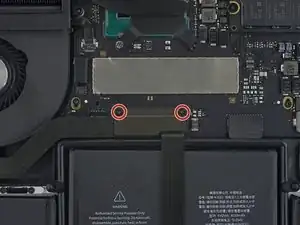
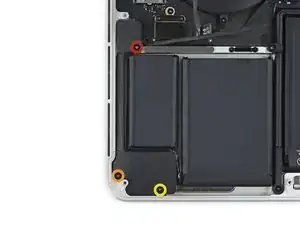
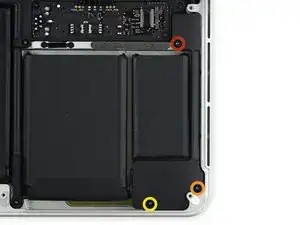
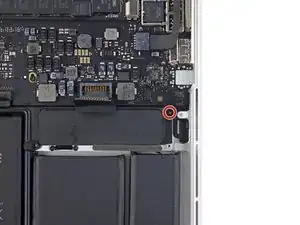
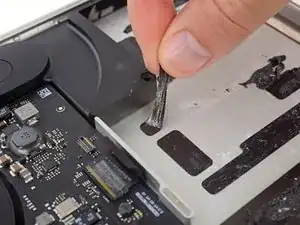
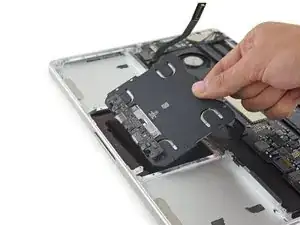
Rimuovi la singola vite Torx T5 da 3,7 mm che fissa la scheda della batteria al case superiore.
-
-
-
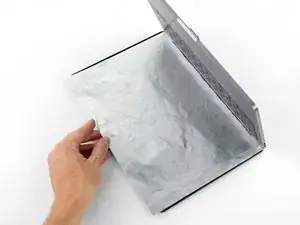
Per proteggere il display, disponi un foglio di stagnola tra il display e la tastiera e lascialo lì mentre lavori.
-
-
-
In alternativa, se stai usando il metodo dell'iOpener caldo, salta i seguenti tre passi.
-
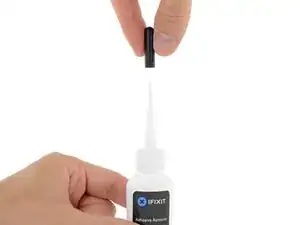
Indossa occhiali protettivi quando maneggi e applichi l'antiadesivo (gli occhiali protettivi sono inclusi nel tuo kit).
-
Anche i guanti protettivi sono inclusi nel tuo kit. Se ti preoccupa un'eventuale irritazione alla pelle, mettiti subito i guanti.
-
-
-
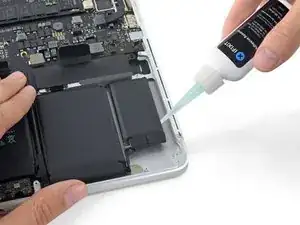
Togli il tappo di gomma nera dalla tua bottiglia di solvente anti-adesivo.
-
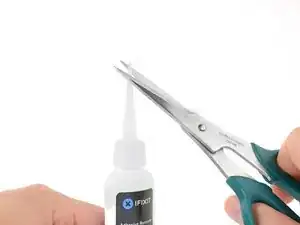
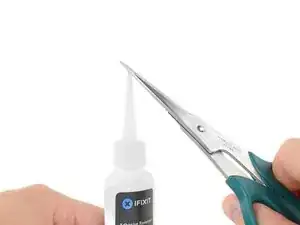
Utilizza le forbici per tagliare la punta sigillata dell'applicatore.
-
-
-
Applicare alcune gocce di solvente anti-adesivo in modo uniforme sotto il bordo della cella della batteria più a destra.
-
Prima di procedere con il passo successivo, aspetta 2-3 minuti per dare tempo all'anti-adesivo di penetrare sotto la cella della batteria.
-
-
-
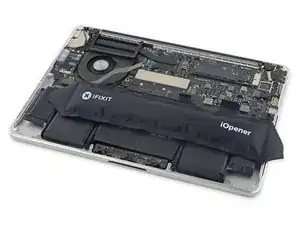
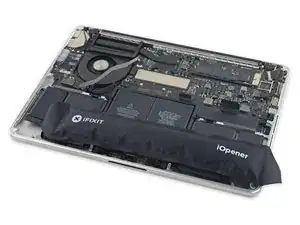
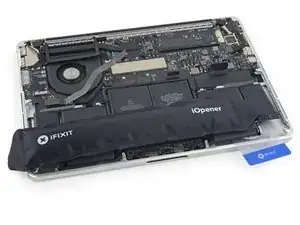
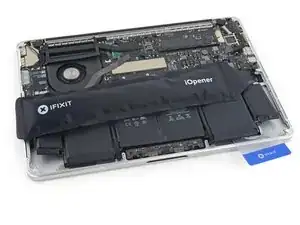
Usa l'iOpener caldo per coprire metà delle celle della batteria più a destra.
-
Dopo circa un minuto riscalda di nuovo l'iOpener e disponilo in modo da coprire l'altra metà delle celle della batteria più a destra.
-
-
-
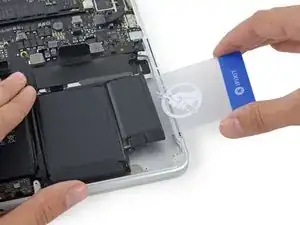
Spingi una scheda di plastica tra la cella più a destra della batteria e il case superiore, tagliando l'adesivo che li tiene insieme.
-
Usando il metodo dell'iOpener caldo, se incontri un'eccessiva resistenza dello staccare la batteria, fermati e usa di nuovo l'iOpener per riscaldare la sezione su cui stai lavorando.
-
-
-
Ripeti questa procedura con la cella della batteria adiacente:
-
Applica una quantità limitata di antiadesivo sotto la cella della batteria e aspetta 2-3 minuti perché possa penetrare e ammorbidire l'adesivo.
-
In alternativa, riscalda di nuovo questa sezione con il tuo iOpener se necessario.
-
Spingi una scheda di plastica per circa 2,5 centimetri tra la cella della batteria e il case superiore, quindi fai leva sulla cella per separare tutto l'adesivo.
-
-
-
Lascia temporaneamente la tua scheda di plastica sotto le due celle della batteria più a destra per impedire che possano incollarsi di nuovo al case superiore.
-
Se usi un iOpener, scaldalo e riapplicalo di nuovo, questa volta sulle celle della batteria più a sinistra.
-
-
-
Ripeti la procedura descritta in precedenza per separare dal case superiore le due celle della batteria più a sinistra.
-
Ricordati di applicare una modesta quantità di antiadesivo per ognuna delle cella della batteria e di aspettare 2-3 minuti per lasciarlo penetrare e ammorbidire l'adesivo.
-
Usa una seconda scheda di plastica per separare le due celle più a sinistra dal case superiore.
-
-
-
Inserisci la scheda di plastica tra la batteria in penultima posizione sinistra e il case superiore per tagliare l'adesivo che unisce insieme questi elementi, quindi fai leva per sollevare la cella.
-
-
-
Lascia la seconda scheda nell'angolo tra le due celle di sinistra.
-
Se usi un iOpener, scaldalo di nuovo e applicalo alle celle centrali della batteria.
-
Come già fatto in precedenza, lascia l'iOpener in ciascuna posizione per circa un minuto, riscaldandolo tra le due fasi, per scaldare ogni metà delle celle centrali.
-
Nei passi successivi, puoi usare una terza scheda oppure la scheda dell'angolo destro. L'adesivo dell'angolo destro dovrebbe essere asciutto/freddo abbastanza per far sì che le celle possano essere tirate via di nuovo in caso di necessità.
-
-
-
Se usi l'antiadesivo liquido, applica qualche altra goccia sotto ciascuna delle due celle centrali rimaste.
-
Prima di continuare, lascia agire 2-3 minuti l'antiadesivo perché possa penetrare.
-
Con delicatezza, ripiega le celle della batteria più a destra in modo che non dia fastidio e inserisci una scheda di plastica sotto la cella centrale destra.
-
Spingi la scheda per circa metà della sua lunghezza per tagliare l'adesivo che fissa la cella della batteria al case.
-
Lascia la scheda in posizione per impedire che l'adesivo possa riattaccarsi.
-
-
-
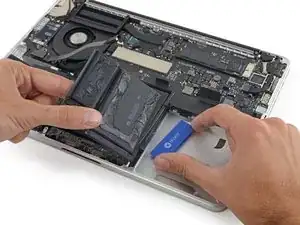
Ripeti la stessa procedura per la cella della batteria rimasta.
-
Allontanando le celle più esterne, inserisci la scheda di plastica per circa metà della sua lunghezza sotto la batteria centrale sinistra, evitando la scheda del trackpad.
-
-
-
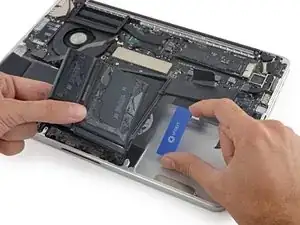
Torna alla scheda disposta sotto la cella centrale destra e applica una torsione per separare l'intera batteria dal case superiore.
-
Se incontri qualche resistenza potrebbe essere necessario scaldare di nuovo l'iOpener e applicarlo alle aree ancora attaccate, quindi continuare con delicatezza a tagliare l'adesivo con le schede di plastica.
-
-
-
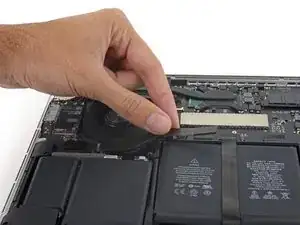
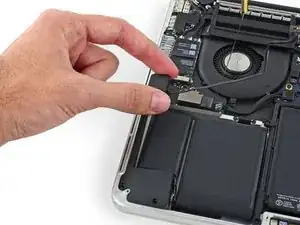
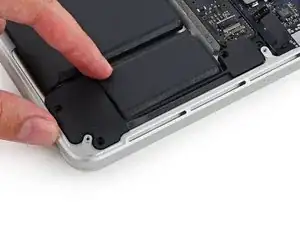
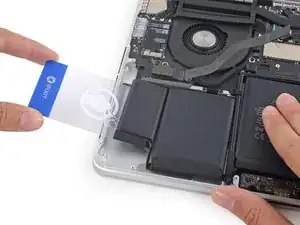
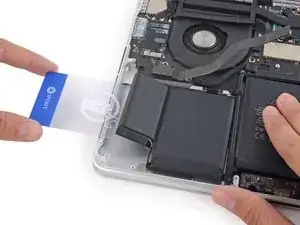
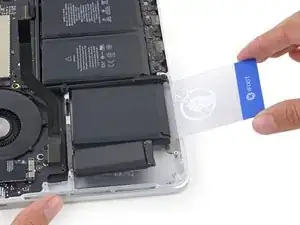
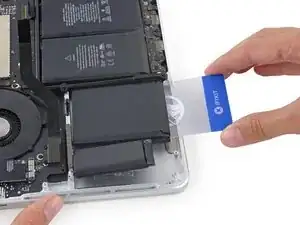
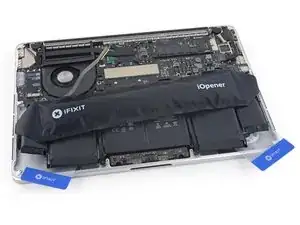
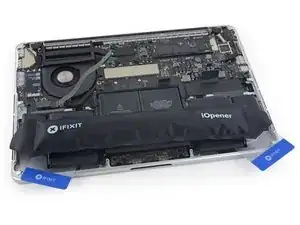
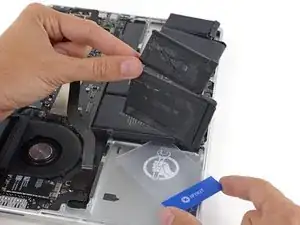
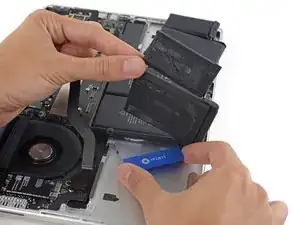
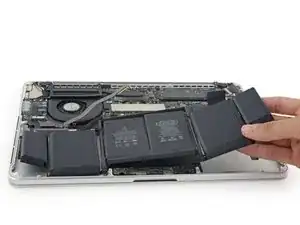
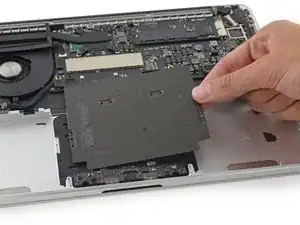
Rimuovi la batteria.
-
Con un po' di fortuna, dovresti riuscire un po' alla volta a staccare ogni striscia di adesivo con le dita.
-
In caso contrario, bagna ogni striscia di adesivo con un po' di antiadesivo per 2-3 minuti e poi grattala via con uno strumento di plastica. Può essere richiesto abbastanza lavoro, quindi cerca di avere pazienza.
-
Elimina ogni traccia dell'adesivo rimanente e lascia asciugare all'aria il tuo MacBook Pro per qualche minuto.
-
Calibra la tua batteria appena installata: caricala al 100% e lasciala caricare per altre 2 ore. Scollega e usa normalmente per scaricare la batteria. Quando vedi l'avviso di batteria scarica, salva il tuo lavoro e lascia acceso il laptop finché non si spegnerà per la batteria scarica. Aspetta almeno 5 ore, poi carica ininterrottamente al 100%.
-
Se noti qualsiasi comportamento insolito o problemi dopo aver installato la tua batteria nuova, potrebbe essere necessario resettare l'SMC (System Management Controller) del tuo MacBook Pro.
-
-
-
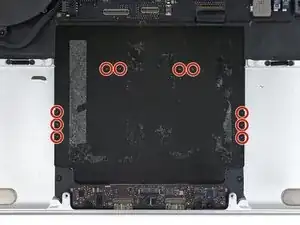
Svita le dici viti Torx T3 da 2,8 mm che fissano la piastra di copertura del trackpad alla scocca superiore.
-
-
-
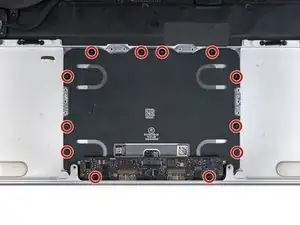
Svita le dodici viti Torx T5 da 2,4 mm che tengono fermo il trackpad sulla scocca superiore.
-


Per rimontare il dispositivo, segui le istruzioni in ordine inverso.
Porta i tuoi rifiuti elettronici a un riciclatore certificato R2 o e-Stewards.
La riparazione non è andata come previsto? Rivolgiti alla nostra comunità Risposte per trovare aiuto.
31 commenti
Is there a way to get a calibration software somehow ? Is Apple offering paid calibration service and what is the cost?
I just followed this repair guide. NO calibration whatsoever needed. It worked like a charm (like new) once I assembled everything back together.
No software needed
If you do this yourself, Apple will not touch your laptop with a 10-foot pole, you will have voided any existing warranty. They would require you to purchase a new trackpad from them and they will install/calibrate it themselves
Can you only replace the control board of the trackpad ?
Gilliano -
I don’t think they sell the control board separate from the trackpad panel - comes soldered together
For all the screws you use the P5 pentalobe screwdriver?
Carlos -
Pentalobe is only for the screws on the bottom cover. The Torx screw driver is for the remainder.
Fredrik -
I never, ever, ever considered using anything but the correct tool on the Pentalobe screws. Too easy to strip and void your warranty (if still in effect), as well as make it almost impossible to get inside later for another upgrade or repair. The Wiha P5 Pentalobe screwdriver fits like a glove and costs only about $11 (a fraction of your drive's price)at Amazon.com. Get it!
marketing -
I followed this exactly and was able to replace my broken trackpad. I did not have to replace the ribbon OR the battery. However I would suggest getting the ribbon since it’s fairly cheap, as for the batteries I was able to do it with a card only. I didn’t use any heat or the liquid but it takes some time. You really have to work the card in there to release the glue. Also you must be very careful not to bend the batteries or damage them, if you do you must replace with new. This took me about 1.5hrs and my computer works like new. Apple cost for this job was around $450, I did it for $120. Big ups to ifixit for this awesome tutorial, tool set and parts!
On a side note, only use quality tools, the cheap ones will break or strip the screws.
Dustin Steward -
Note that the eight 3mm screws have a shoulder under the head, while the two 2.3mm screws are “full thread”, i.e., there is no shoulder under their heads. It’s important to put the two screws with no shoulder at the hinge of the cover.
All ten screws require a P5 Pentalobe screwdriver, preferably with a magnetized tip to help hold and position the screw.
All of the screws have blue “Loctite” thread locker compound on their threads. This is to help prevent the screws from working loose and falling out. Don’t attempt to clean the Loctite from the screws — leave it in place, and it will continue to help prevent the re-inserted screws from working loose.
When replacing the bottom cover, it is a good technique to insert and BEGIN tightening all ten screws BEFORE fully tightening any one screw. After all the screws have been started, then go around and finish tightening all of them. By doing this, you make it easier to feel that each screw has been started properly, and is not “cross-threaded”.
doubleclutch -
This is what I found on my MBP mid-2014 13” Retina. All 10 used the same screwdriver. I didn’t see the blue “loctite” but I also got my computer refurbished.
Evan Shulman -
A good technique for starting to thread the screws when replacing them is to position and align the screw, and with the driver, gently turn the screw in the REMOVAL direction until you feel and hear a slight click. This click happens when the leading thread of the screw drops off of the leading edge of the thread in the hole — this is the point at which the threads are properly positioned for engagement. You can now turn the driver and screw in the TIGHTENING direction. This technique will help prevent accidental “cross-threading” of the screw, which will damage the threads permanently.
Note that this is a useful technique when installing ANY threaded fastener.
doubleclutch -
Hi peeps,
I have a wifi problem on this MBP 13” early 2015 and was pleasently surprised to find your guide to changing the airport card.
However upon closer inspection it seems that on my MBP (purchased new or so I thought) the 3 antennae seem so have been soldered together at the point where they are clamped to the chassis. I have photos but cannot post here. Can anyone conform that where the 3 antennae wires are held to the chssis by the 2 scew metal support (just before disappearing into the screen hinge), the support is not meant to short the 3 wires together. This makes no sense for 3 seperate antennae wires.
Any advice /close up photos is welcome here.
dom
colonel mustard -
Tip: Use post-it notes to keep track of screws
1. Pack of post it notes
2. Stick screws to the sticky part of the post it note
3. Write on the post it note which step and what kind of screw it is
ibash -
Hi, in order to drain the battery I am running:
yes > /dev/null
in 4 terminals, so the CPU maxes out at almost 99%.
I hope this speeds up the battery draining process.
And the backlight is at maximum brightness :-)
You can see the cpu load in Activity Monitor.
Its draining at 20% per 15 minutes.
Any concerns about draining the battery in this way?
Andre van der Ham -
Something I’ve been curious about, is it possible to upgrade a late 2013 Retina model MacBook Pro, with the improved 16gb ram and i7 processor logic board from the 2015 retina model? I’d be interested to try but not ready to shell out the $500+ to be the first lol
Chat Dawgie -
Without rehashing what others have said, I would highly recommend reading through the steps *and* the comments for each before tackling your replacement for tips. Highlights for me were: only disconnecting what actually needed to be disconnected, rotating the spudger to release the track pad cable, a hair dryer worked perfectly fine, and the pencil outline of the battery before you remove. You got this!
N DesRochers -
Installation of replacement AirPort card was easier than I had expected thanks to this guide. Thank you.
chaslaw -
I use replaced SSD and it was super easy and working great. I can finally upgrade Mac OS with plenty of room to spare and no more low memory alerts. Well worth investment and didn’t have to buy new laptop
Pete James -
It's interesting that this tutorial is rated Moderate even though you need to remove the battery. The battery removal tutorial which is basically the same but with fewer steps is rated Difficult.
Marv Ruona -
when i pulled the screws out i arranged them in the same way they were in. the top 2 middle screws appeared to be shorter than the rest. in order to keep them in place i got a square of packing tape sticky side up, taped both sides down with 2 other pieces of tape. and then put the screws head down in the order i pulled them.
Jason Wade -
Excellent instructions although checking battery and speakers aligned before fixing batteries into place is essential. MacBook good as new!
John Foreman -
I find it helpful to spread a soft, slightly fuzzy cloth (like flannel) over my workspace before doing something with small parts. It keeps screws and things from rolling or bouncing away. A towel might be too plush, though, as a screw might get lost in it.
Richard KeslerWest -
I cannot get the two screws (that are different than the other ones) out and now they’re stripped. Any idea what to do without using a drill?
Honeybee94 -
DO NOT REMOVE SPEAKER CABLES!! The connectors are fragile. Just remove speakers and bend attached cable away from battery. Same for trackpad cable connector at front side. This cable crosses the middle of the battery. Just remove the one connector on the back side - leave front side connector attached and fold cable toward front of computer out of way of battery.
Paul Lebow -