Introduzione

Segui questa guida per rimuovere la copertura posteriore di un controller DualShock 3.

  1. MnO4C2NgVBnH1meE
    • Svita le cinque viti a croce Phillips da 7,2 mm che tengono ferma la copertura posteriore.

    I have 2 controllers I'd like to fix, and both have at least one stripped screw in them. Any tips for removing them?

    Joe -

  2. lvGLlAtXpOWLih6R
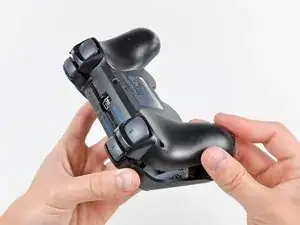
    • Premi la copertura posteriore tra gli stick analogici e solleva leggermente il bordo inferiore dal controller.

    Es ist nicht ganz eindeutig das zwischen den beiden Analog-Sticks gedrückt werden muss. Der gelbe Punkt fällt kaum auf. Ein Bild mit Daumen an dieser Stelle wäre gut oder soooo…

    Tom -

    it’s not very clear but for this step you need to push where the yellow dot is shown on the picture. it’s rather tough. you kind of have to move the whole back plate a bit for it to work.

    Brandon der Blatter -

    I’m stuck at this step because I can’t for the life of me undo the clip

    IttyBittyGamerVR -

    Yeah I’m lost here too. I’m pushing where the dot is but nothing is happening. What am I trying to accomplish by pushing there? Is there a clasp on the inside I’m trying to undo or something? I really don’t want to break the controller by using too much force or opening it the wrong way.

    Could it be that the sixaxis I have is constructed differently? Or is this just a difficult step?

    Joe -

    Adding: I ended up getting the shell off but ended up breaking off a small piece which I'm guessing was securing the front and back shells together. The trigger buttons and pieces remained intact on one of my two controllers which is what I was worried about, though I did have to fit the small trigger pieces back in.

    The one controller seemed to fit back together just fine without the small piece that broke off, and buttons seemed to feel and work fine too.

    Joe -

  3. pteSAIrvQBgU3cdM
    pteSAIrvQBgU3cdM
    BnFWDEdOvNaFHOJa
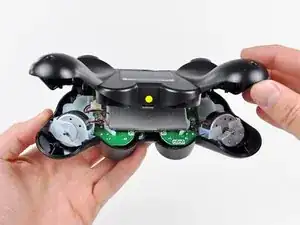
    • Spingi leggermente la copertura posteriore verso il bordo superiore del controller per superare i grilletti R2 e L2.

    • Tira via la copertura posteriore dal resto del controller, stando attento a non far saltare i 2 grilletti.

    • Se per sbaglio i grilletti vengono rimossi, abbiamo una guida per riattaccarli.

    the "trigger button guide" link links back to this page :o

    Alexander McMahon -

    I accidentally popped a trigger off, and both L1 and R1, because I skimmed and didn't read this step. Fortunately it's not hard. The tricky part with the triggers is that there's a little spring on them. You have to press the side of the spring that's pointing away from the trigger against the sloped surface of the controller (look at the other trigger for reference, if you only popped one off). Then you just slide the trigger on until the "handlebar" bits near the center click into place.

    briancaraher -

    The reset button – a small mostly-rectangular rubberized piece – fell out as I removed the rear cover. It covers the hole near the middle screw and has a post that presses SW1 on the motherboard.

    Fletcher Stern -

Conclusione

Per rimontare il dispositivo, segui le istruzioni in ordine inverso.

Andrew Bookholt

585555 Reputazione

3 commenti

i have a different dualshock 3 than yours. mine is built in a different way and has a different battery

MasterKlaus Produtions (Swe0b) -

Sony did that throughout the Dualshock 3’s production as they found out what would cause them to malfunction and fixed the issue. It should be alright as long as you are able to replace the battery when needed.

Aiodensghost -

iran:

نحوهی تعویض طلق دسته پلی سه هم بذارین. لطفان

مجید محمدی -