Introduzione

Segui questa guida per sostituire i grilletti in plastica. Il grilletto 2 ha una molla collegata internamente.

  1. MnO4C2NgVBnH1meE
    • Svita le cinque viti a croce Phillips da 7,2 mm che tengono ferma la copertura posteriore.

    I have 2 controllers I'd like to fix, and both have at least one stripped screw in them. Any tips for removing them?

    Joe -

  2. lvGLlAtXpOWLih6R
    • Premi la copertura posteriore tra gli stick analogici e solleva leggermente il bordo inferiore dal controller.

    Es ist nicht ganz eindeutig das zwischen den beiden Analog-Sticks gedrückt werden muss. Der gelbe Punkt fällt kaum auf. Ein Bild mit Daumen an dieser Stelle wäre gut oder soooo…

    Tom -

    it’s not very clear but for this step you need to push where the yellow dot is shown on the picture. it’s rather tough. you kind of have to move the whole back plate a bit for it to work.

    Brandon der Blatter -

    I’m stuck at this step because I can’t for the life of me undo the clip

    IttyBittyGamerVR -

    Yeah I’m lost here too. I’m pushing where the dot is but nothing is happening. What am I trying to accomplish by pushing there? Is there a clasp on the inside I’m trying to undo or something? I really don’t want to break the controller by using too much force or opening it the wrong way.

    Could it be that the sixaxis I have is constructed differently? Or is this just a difficult step?

    Joe -

    Adding: I ended up getting the shell off but ended up breaking off a small piece which I'm guessing was securing the front and back shells together. The trigger buttons and pieces remained intact on one of my two controllers which is what I was worried about, though I did have to fit the small trigger pieces back in.

    The one controller seemed to fit back together just fine without the small piece that broke off, and buttons seemed to feel and work fine too.

    Joe -

  3. pteSAIrvQBgU3cdM
    pteSAIrvQBgU3cdM
    BnFWDEdOvNaFHOJa
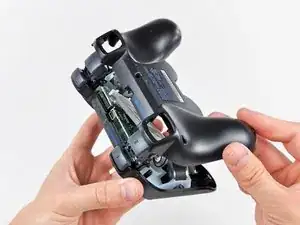
    • Spingi leggermente la copertura posteriore verso il bordo superiore del controller per superare i grilletti R2 e L2.

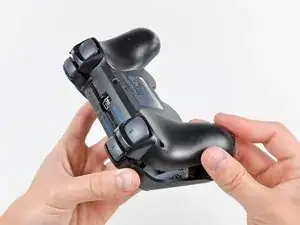
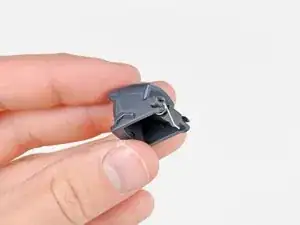
    • Tira via la copertura posteriore dal resto del controller, stando attento a non far saltare i 2 grilletti.

    • Se per sbaglio i grilletti vengono rimossi, abbiamo una guida per riattaccarli.

    the "trigger button guide" link links back to this page :o

    Alexander McMahon -

    I accidentally popped a trigger off, and both L1 and R1, because I skimmed and didn't read this step. Fortunately it's not hard. The tricky part with the triggers is that there's a little spring on them. You have to press the side of the spring that's pointing away from the trigger against the sloped surface of the controller (look at the other trigger for reference, if you only popped one off). Then you just slide the trigger on until the "handlebar" bits near the center click into place.

    briancaraher -

    The reset button – a small mostly-rectangular rubberized piece – fell out as I removed the rear cover. It covers the hole near the middle screw and has a post that presses SW1 on the motherboard.

    Fletcher Stern -

  4. ePnXu1RHEGhtPRK6
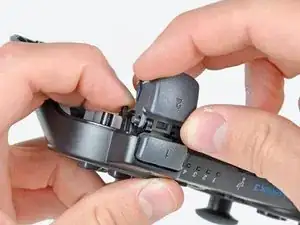
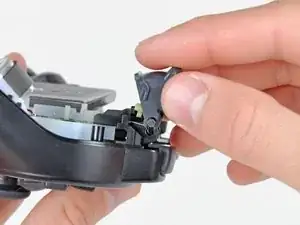
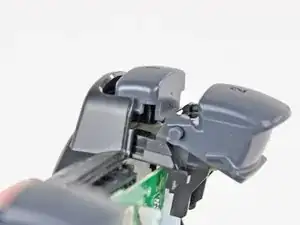
    • Mentre tieni fermo il blocco in plastica del grilletto #2 con una mano, tiralo via dal suo asse.

  5. 4qFpjOuKiJditMGG
    4qFpjOuKiJditMGG
    b3DDMP1YpMDoVEXT
    • Mentre installi il nuovo grilletto #2, assicurati che la molla sia posizionata come mostrato nelle immagini prima di agganciarlo sull'asse.

    For this step, i would suggest looking at the other trigger to get an idea of how to put it back in. So if you were replacing the L2 button look at R2 and vice versa.

    Then looking at the picture above, just make sure that the spring is aligned in a similar fashion to the other button. Pushing it forward to match might help as the spring might fall out of place.

    Michael Vichiola -

    This totally helped me figure this out. Thanks for the excellent tip!

    Steven Folberg -

  6. Y3qeJbDjiYhFVoAd
    Y3qeJbDjiYhFVoAd
    pkqDrsRHOCcQ1QKt
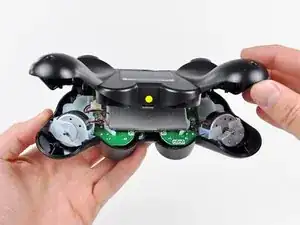
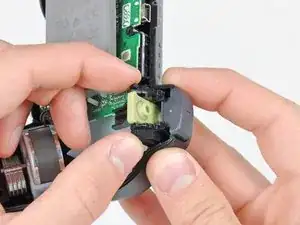
    • Tira leggermente il blocco del grilletto lontano dalla copertura anteriore.

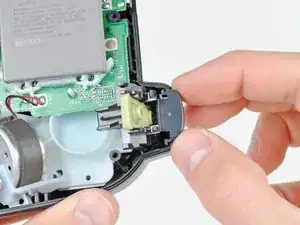
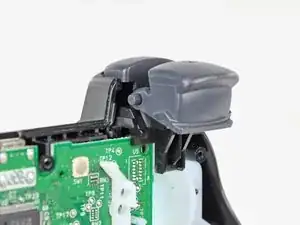
    • Tira via il dorsale dalla copertura anteriore.

  7. vlgF3Q5pFCdPWdBr
    vlgF3Q5pFCdPWdBr
    yArFLBJOXafVqARJ
    • Prima di rinfilare il blocco del grilletto nella copertura anteriore, assicurati che la barra cilindrica attaccata al dorsale sia allineata con la copertura in gomma verde dell'interruttore elettronico. Se non è allineata, potresti avere problemi durante il rimontaggio e il controller potrebbe non registrare la pressione del dorsale nei giochi.

    • Il gruppo del grilletto/dorsale è installato correttamente quando l'aletta sul blocco del grilletto è appoggiata e allineata con la scheda madre.

    I really would have liked to see how the little metal piece on the #2 button is supposed to fit back in

    Miko -

    Wow, so in reverse it’s really really fiddly- probably needs a separate guide as I can’t get it back together with the fiddly trigger parts

    Ben Dawson -

Conclusione

Per rimontare il dispositivo, segui le istruzioni in ordine inverso.

Andrew Bookholt

585555 Reputazione

8 commenti

Might want to add that there's a small catch/tab in the middle of the bottom of the controller that needs to be released when taking apart the covers.

This worked great, and also works on normal Sixaxis controllers. I used this to swap the broken spring from the L2 button on my DS3 for a good spring from my Sixaxis. Works like new now.

Will Foss -

The little green eletronic ribben where is it supposed to go?

dmall -

The #00 screwdriver is working better

Leopold287 -

Did you replace button 2 rod with plastic replacement part or use original rod piece when fixing button 2

Sidney Klemkosky -

Is there a way I can buy trigger retainers?

CynicalSheep -

thank you!!!

ivanbt007 -

I have SIXAXIS gamepad and I don’t know how to put it back I see it have ribborn.

NiGGaZGamePLay -

My ps3 original controller's right trigger is not working properly, it won't regester a whole squeeze and also only register's about half way.

Armand Steyn -