
Introduzione
Usa questa guida per liberare dai suoi componenti e quindi sostituire il case posteriore del tuo iPhone 6.
-
-
Spegni il tuo iPhone prima di cominciare a smontarlo.
-
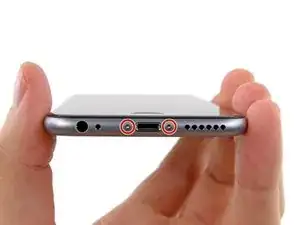
Rimuovi le due viti Pentalobe P2 da 3,6 mm vicino al connettore Lightning.
-
-
-
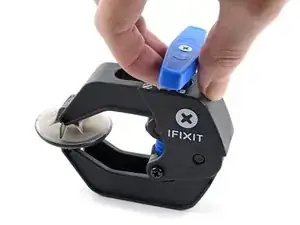
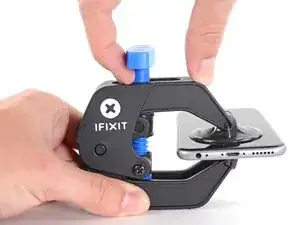
Tira la manopola blu verso la cerniera per sbloccare i bracci dell'Anti-Clamp.
-
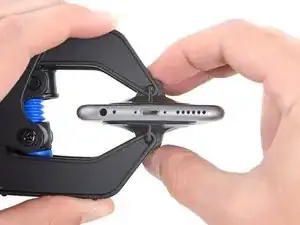
Fai scorrere le braccia o sul bordo sinistro o su quello destro del tuo iPhone.
-
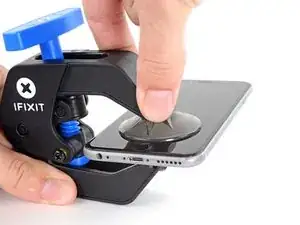
Posiziona le ventose sullo schermo, subito sopra il tasto Home, una davanti e una sul retro.
-
Premi le ventose così che facciano presa sull'area desiderata.
-
-
-
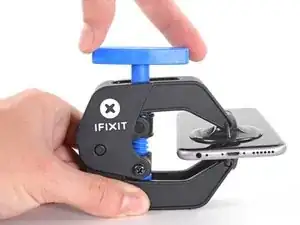
Allontana la manopola blu dalla cerniera per bloccare le braccia
-
Ruota la manopola in senso orario di 360 gradi o finché vedi che la ventosa comincia ad allungarsi.
-
Aspetta un minuto per dare la possibilità all'adesivo di lasciarsi andare e alla parte inferiore dello schermo di aprirsi.
-
Salta i prossimi tre passi.
-
-
-
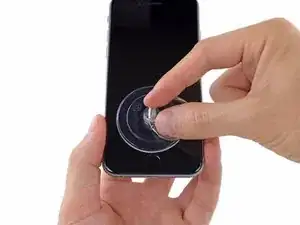
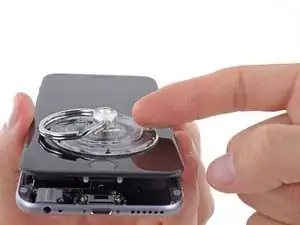
Se non hai un Anti-Clamp, usa una ventosa singola per sollevare il pannello frontale:
-
Premi una ventosa sullo schermo, appena sopra il pulsante home.
-
-
-
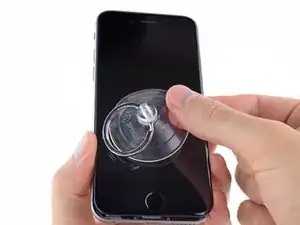
Mentre tieni fermo l'iPhone con una mano, tira la ventosa per separare lievemente il gruppo del pannello frontale dal case posteriore.
-
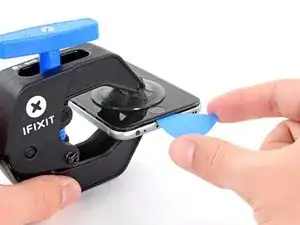
Usando uno strumento di apertura in plastica, inizia a a forzare verso il basso il case posteriore, lontano dal gruppo display, mentre continui a tirare con la ventosa.
-
-
-
Tira la sporgenza in plastica per allentare la ventosa.
-
Rimuovi la ventosa dal gruppo display.
-
-
-
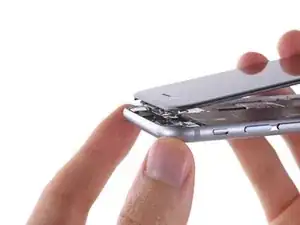
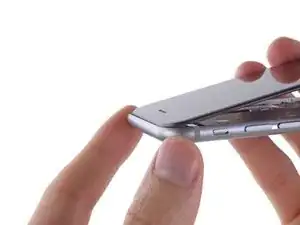
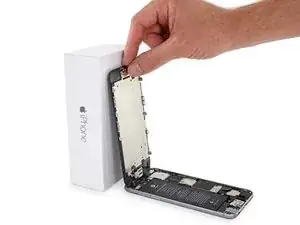
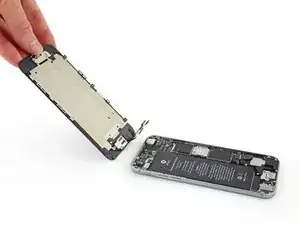
Apri l'iPhone sollevando dal case posteriore il lato del pulsante home del gruppo del pannello frontale, usando il lato superiore del telefono come una cerniera.
-
-
-
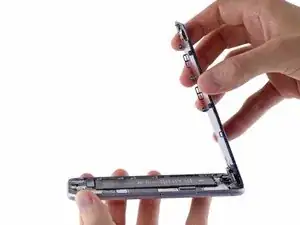
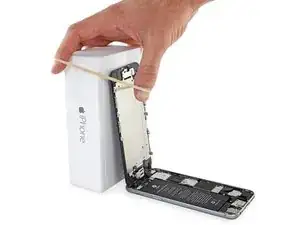
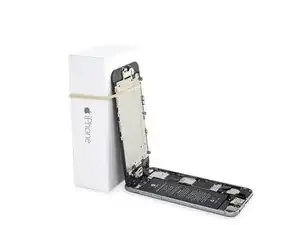
Apri il display a un angolo di circa 90° e posalo contro qualcosa che lo tenga aperto mentre tu stai lavorando sul telefono.
-
Aggiungi un elastico per tenere il display al suo posto mentre lavori. In questo modo si eviteranno sforzi imprevisti sui cavi del display.
-
-
-
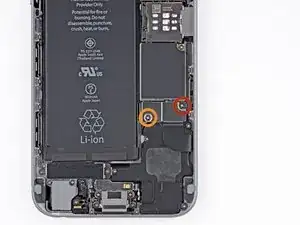
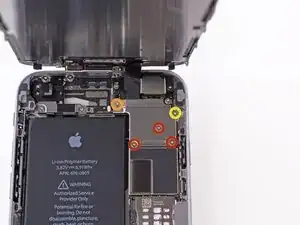
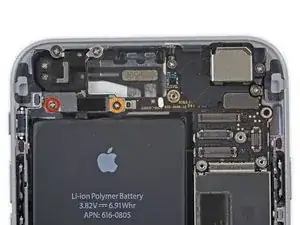
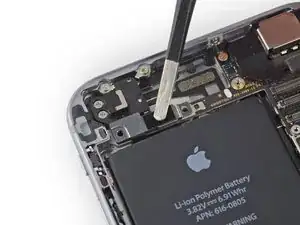
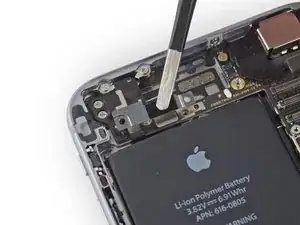
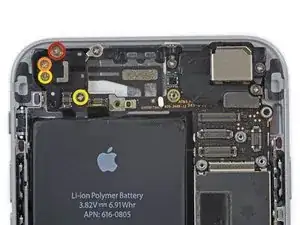
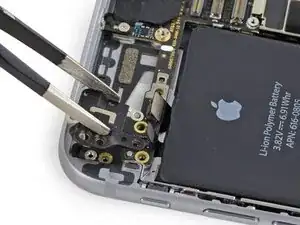
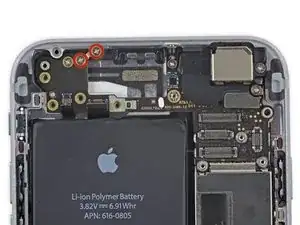
Rimuovi le seguenti viti a croce Phillips dalla staffa del connettore della batteria:
-
Una vite da 2,2 mm
-
Una vite da 3,2 mm
-
-
-
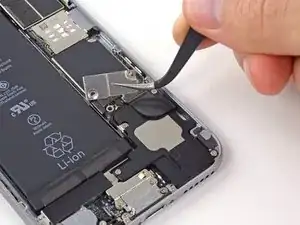
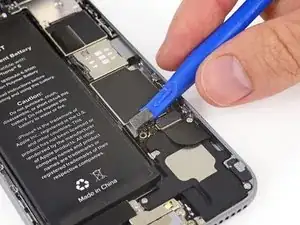
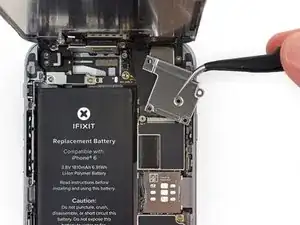
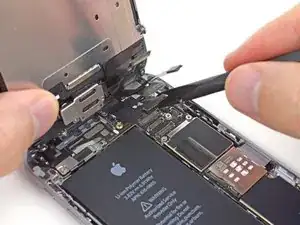
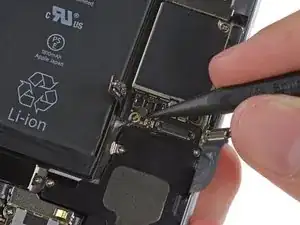
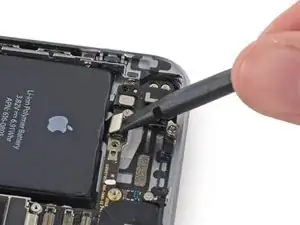
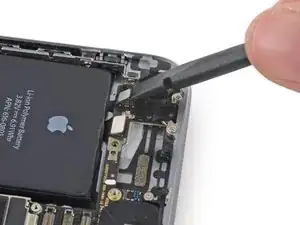
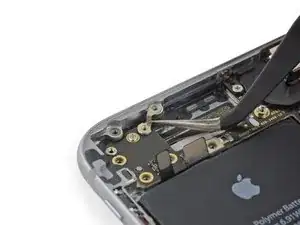
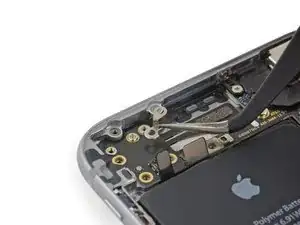
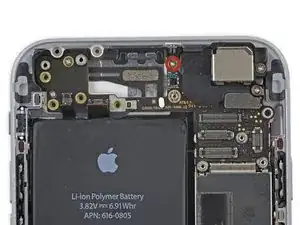
Usa uno strumento di apertura in plastica per sollevare delicatamente il connettore della batteria dalla sua sede sulla scheda logica.
-
-
-
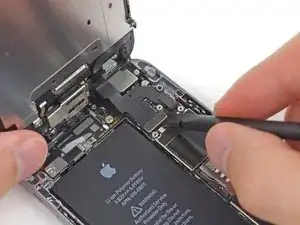
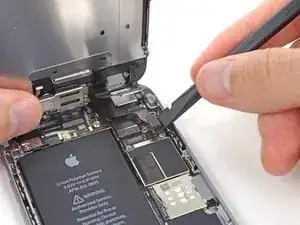
Rimuovi le seguenti cinque viti Phillips che tengono in posizione la staffa del cavo flex del gruppo del pannello frontale:
-
Tre viti da 1,2 mm
-
Una vite da 1,7 mm
-
Una vite da 3,1 mm
-
-
-
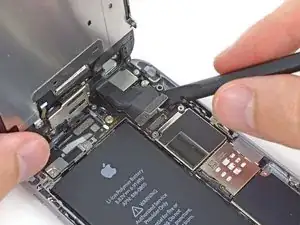
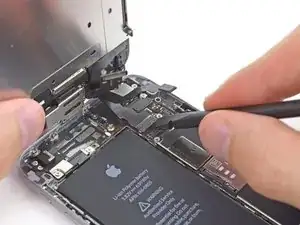
Usa uno spudger o un'unghia per staccare il connettore del cavo della fotocamera anteriore e del sensore.
-
-
-
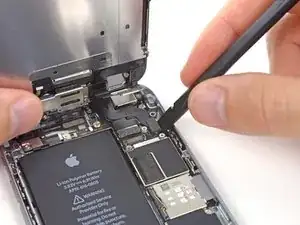
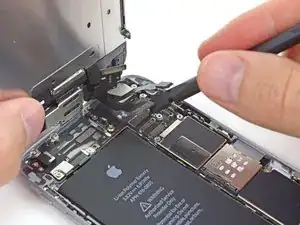
In questo passo, verifica con attenzione di aver scollegato la batteria prima di riconnettere o disconnettere il cavo.
-
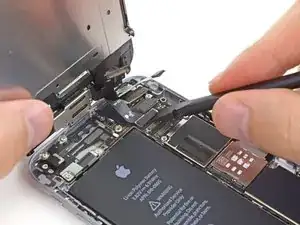
Usa uno spudger o un'unghia per staccare il connettore del cavo dati del display.
-
-
-
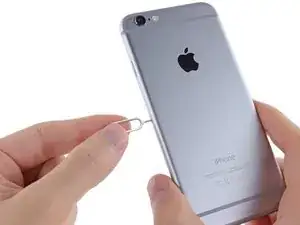
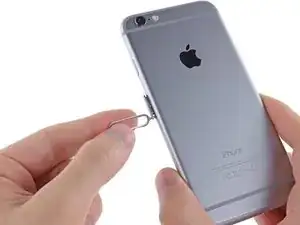
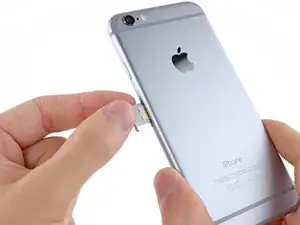
Inserisci uno strumento di estrazione SIM o una graffetta nel piccolo foro nel vassoio della scheda SIM.
-
Premi per espellere la SIM.
-
-
-
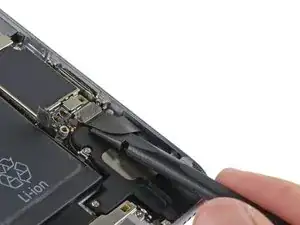
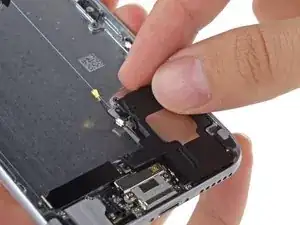
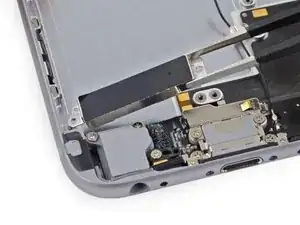
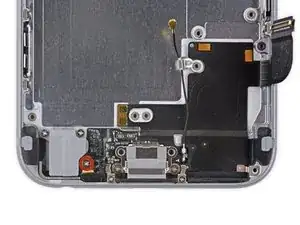
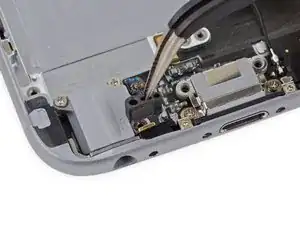
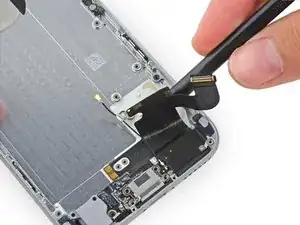
Usa l'estremità piatta di uno spudger per scollegare il cavo del gruppo del connettore Lightning e piegarlo in modo che resti lontano dall'altoparlante.
-
-
-
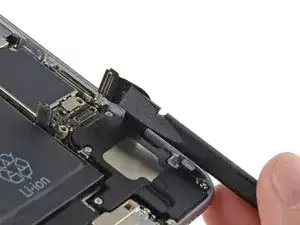
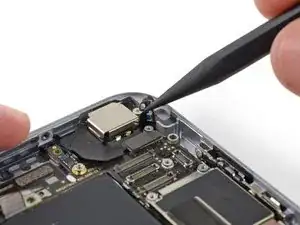
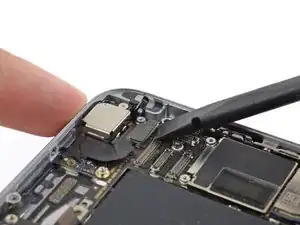
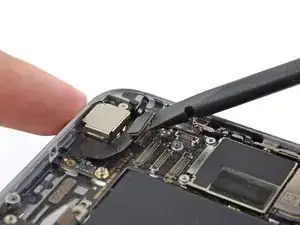
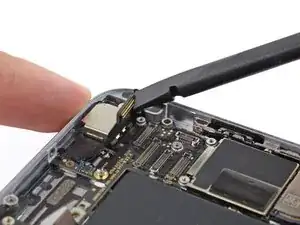
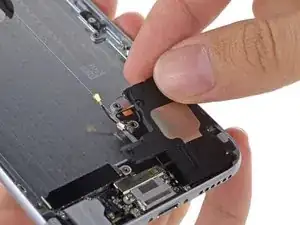
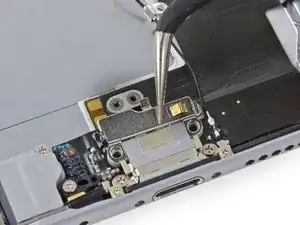
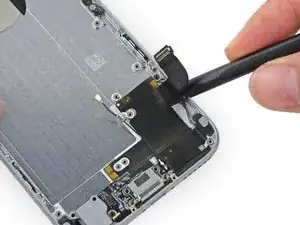
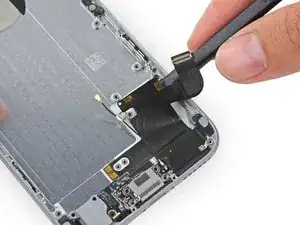
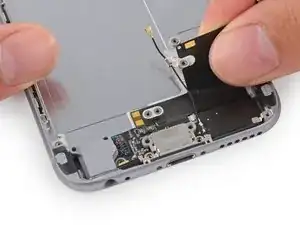
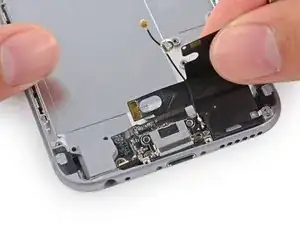
Usa la punta di uno spudger per sollevare il connettore del cavo dell'antenna dalla sua presa sulla scheda logica.
-
-
-
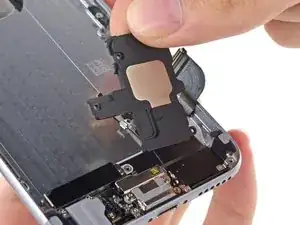
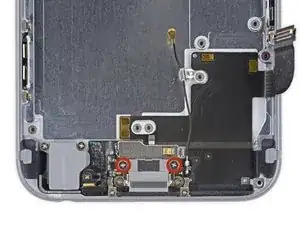
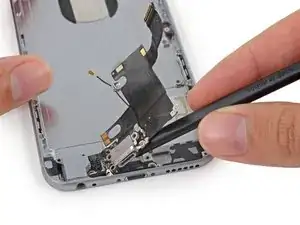
Rimuovi le seguenti viti a croce Phillips dalla staffa del cavo flex superiore:
-
Una vite da 2,9 mm
-
Una vite da 2,2 mm
-
-
-
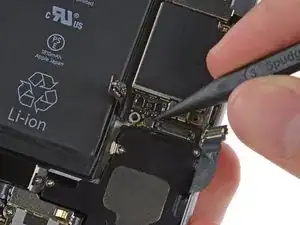
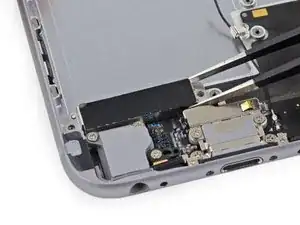
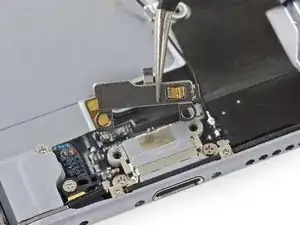
Usa l'estremità piatta di uno spudger per sollevare dalla sua presa il connettore del cavo del pulsante di accensione e del gruppo flash.
-
Stacca dal suo zoccolo sulla scheda logica il connettore del cavo del controllo volume.
-
-
-
Rimuovi le seguenti quattro viti a croce Phillips dall'antenna Wi-Fi:
-
Una vite da 1,5 mm
-
Una vite da 1,4 mm
-
Due viti da 2,1 mm
-
-
-
Rimuovi le seguenti viti a croce Phillips che fissano la staffa angolata della scheda logica:
-
Una vite da 2,6 mm
-
Una vite da 1,3 mm, disposta orizzontalmente nel bordo superiore dell'iPhone.
-
-
-
Rimuovi la singola vite a croce Phillips da 1,2 mm che blocca sulla scheda logica il cavo di interconnessione dell'antenna.
-
-
-
Usa la punta di uno spudger per piegare il cavo di interconnessione dell'antenna allontanandolo dalla scheda logica.
-
-
-
Usa l'estremità piatta di uno spudger per sollevare il connettore del cavo della fotocamera ed estrarlo dalla sua presa sulla scheda logica.
-
Piega il cavo della fotocamera in modo da allontanarlo dalla scheda logica.
-
-
-
Rimuovi le seguenti viti che tengono in posizione la scheda logica sul case posteriore:
-
Due viti a croce Phillips da 1,9 mm
-
Un distanziale a vite da 2,3 mm
-
-
-
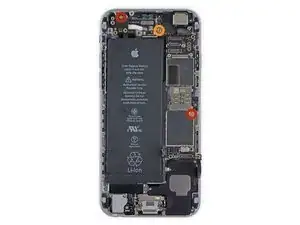
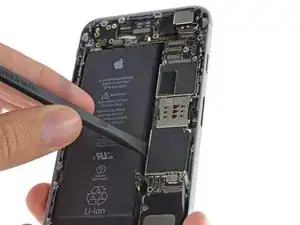
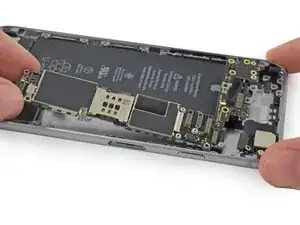
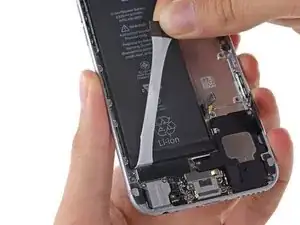
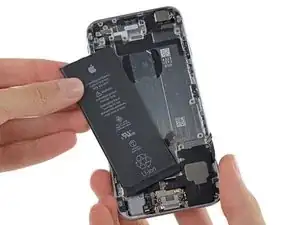
Usa l'estremità piatta di uno spudger per sollevare lievemente l'estremità della scheda logica dalla parte del connettore con la batteria, giusto quanto basta per poterlo afferrare con le dita.
-
-
-
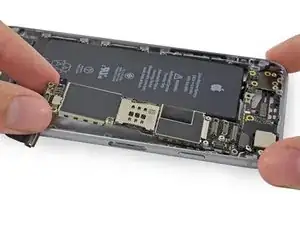
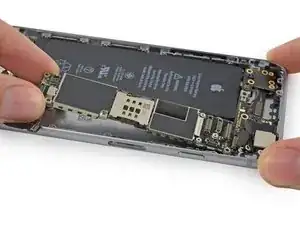
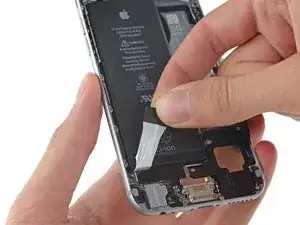
Solleva l'estremità della scheda logica dalla parte del connettore per la batteria e tira fuori la scheda stessa dal case posteriore.
-
-
-
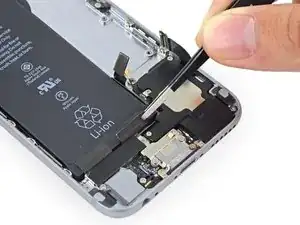
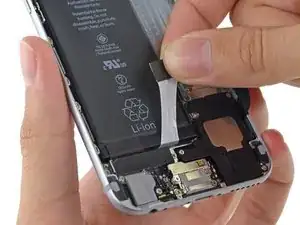
Ripiega all'indietro la prima linguetta adesiva della batteria nel bordo inferiore della batteria sul lato destro.
-
-
-
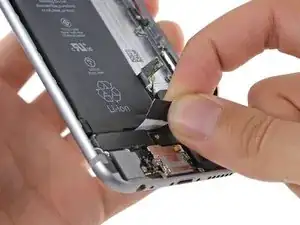
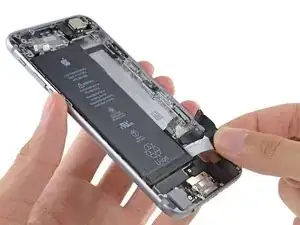
Tira dolcemente la linguetta adesiva della batteria in direzione opposta alla cella, verso il fondo dell'iPhone.
-
Cerca di non tirare contro la batteria o i componenti inferiori, perché potresti rompere la striscia adesiva.
-
Continua a tirare per consentire alla striscia di scivolare lentamente fuori da sotto la batteria. Quando avverti che la resistenza della striscia è aumentata, smetti di tirare e continua con il prossimo passo.
-
-
-
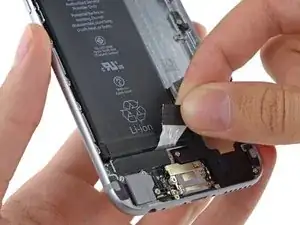
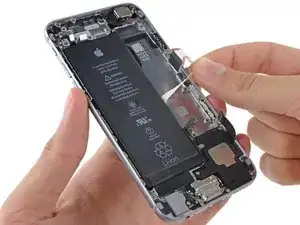
Quando avverti che la resistenza della striscia adesiva è aumentata, tirala dolcemente attorno all'angolo inferiore destro della batteria.
-
Continua a tirare la striscia adesiva verso l'alto allontanandola dal bordo destro della batteria per consentirle di scivolare via lentamente da sotto la batteria, finché la striscia non sarà libera.
-
-
-
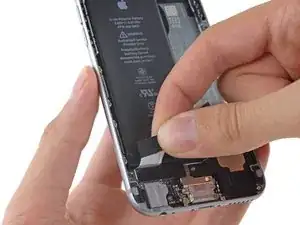
Stacca la seconda striscia adesiva sul lato sinistro del bordo inferiore della batteria.
-
Anche questa volta, tira dolcemente la linguetta verso l'alto allontanandola dalla batteria, per consentire alla striscia adesiva di scivolare fuori da sotto la batteria.
-
Continua a tirare la striscia adesiva finché non avverti che la resistenza aumenta, quindi fermati.
-
-
-
Quando avverti che la resistenza della striscia adesiva è aumentata, tirala dolcemente attorno all'angolo inferiore sinistro della batteria.
-
Continua a tirare la striscia adesiva verso l'alto allontanandola dal bordo sinistro della batteria per consentirle di scivolare via lentamente da sotto la batteria, finché la striscia non sarà libera.
-
Se hai rimosso con successo entrambe le strisce adesive, salta i prossimi due passi e continua dal passo 46.
-
Se una delle strisce adesive si è rotta sotto la batteria e non può essere recuperata, continua con il prossimo passo.
-
-
-
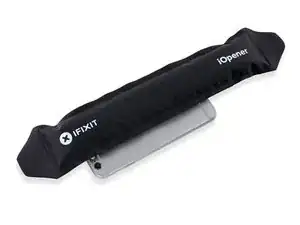
Se una delle strisce adesive si è rotta e la batteria è rimasta attaccata al case posteriore, prepara un iOpener oppure usa un asciugacapelli per riscaldare il case posteriore nell'area retrostante la batteria.
-
-
-
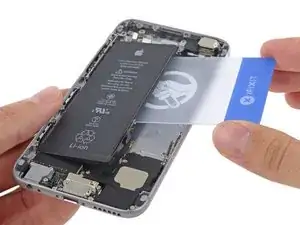
Inserisci una scheda di plastica sotto il bordo della batteria dal lato della scheda logica.
-
Se necessario, spingi dentro la scheda in diversi punti per rompere l'adesivo rimasto dietro la batteria.
-
-
-
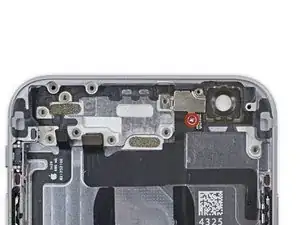
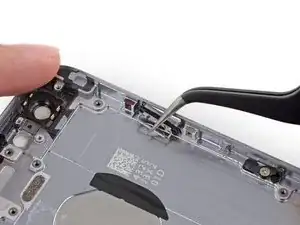
Se presente, rimuovi il nastro adesivo che copre la vite superiore sinistra della fotocamera posteriore.
-
-
-
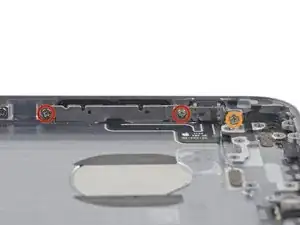
Rimuovi le seguenti viti a croce Phillips #00 dalla staffa della fotocamera posteriore:
-
Una vite da 1,5 mm
-
Una vite da 2,1 mm
-
-
-
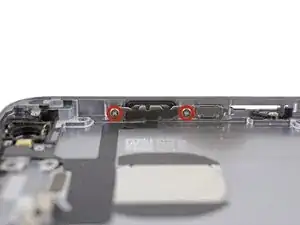
Rimuovi le due viti a croce Phillips #00 da 2,2 mm dalla staffa del pulsante di accensione.
-
-
-
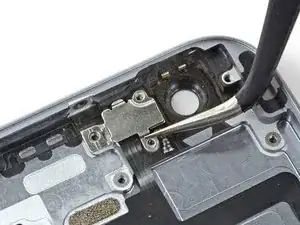
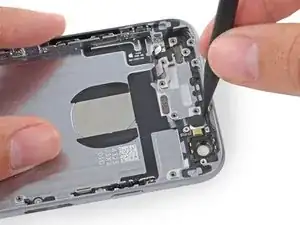
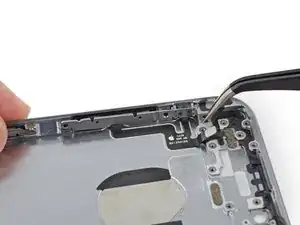
Usa l'estremità a punta di uno spudger per spingere dolcemente i moduli del flash e del microfono fuori dalle rispettive cavità nel case posteriore.
-
-
-
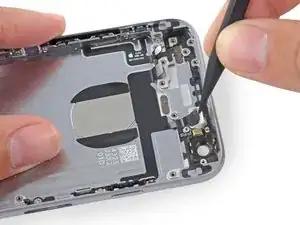
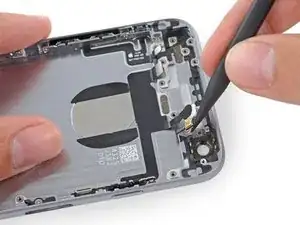
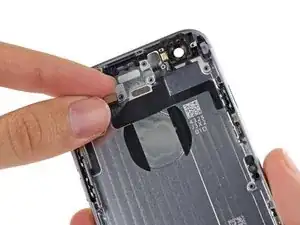
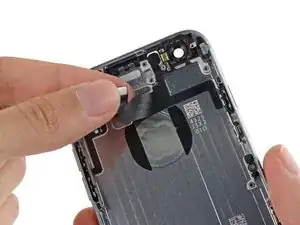
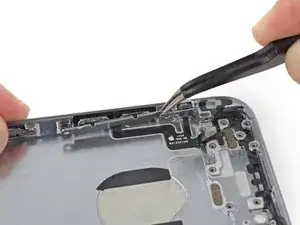
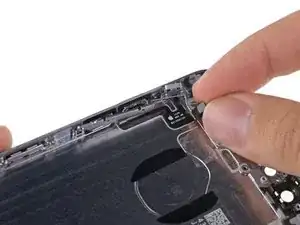
Inizia a staccare il cavo del gruppo flash/microfono/pulsante di accensione tirandolo verso l'alto rispetto al case posteriore e iniziando dall'estremità con il connettore.
-
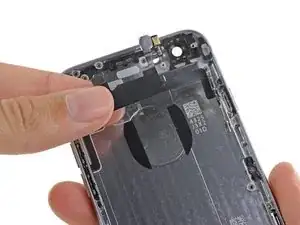
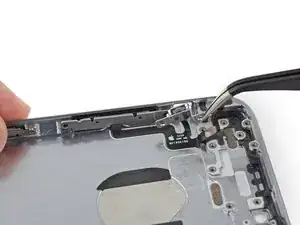
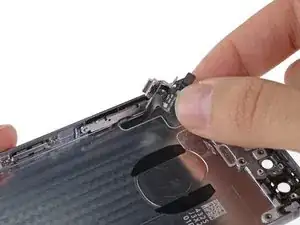
Continua a tirare sul cavo, prestando particolare attenzione alla stretta estremità del cavo che accoglie i componenti.
-
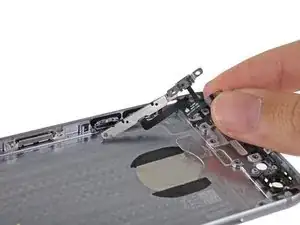
Rimuovi dal telefono il gruppo del cavo del gruppo flash/microfono/pulsante di accensione.
-
-
-
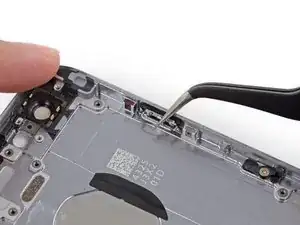
Afferra dalla sua barra metallica il pulsante di accensione per liberarlo dal case posteriore.
-
Il pulsante di accensione è collegato al case con una guarnizione adesiva; fai attenzione a non strappare la membrana.
-
-
-
Rimuovi le seguenti viti a croce Phillips #00 dalle staffe del cavo del controllo volume.
-
Due viti da 2,3 mm
-
Una vite da 1,8 mm
-
-
-
Tira via dal case posteriore le staffe dei controlli del volume per consentire l'accesso alle cover dei pulsanti.
-
-
-
Inizia a staccare dal case posteriore il cavo del tasto del controllo volume iniziando dall'estremità con il connettore.
-
Il distacco dal case delle sottili parti del cavo richiede delicatezza.
-
Rimuovi il cavo del controllo volume dal case posteriore.
-
-
-
Tira, afferrandoli per la barra metallica, i pulsanti di controllo del volume per rimuoverli dal case posteriore.
-
I pulsanti sono collegati al case con una guarnizione adesiva, quindi tira con delicatezza per evitare di strappare la membrana.
-
-
-
Rimuovi le seguenti quattro viti a croce Phillips #00 che fissano l'altoparlante:
-
Due viti da 2,9 mm
-
Due viti da 2,3 mm
-
-
-
Usa la punta di uno spudger per spingere fuori dall'alloggiamento dell'altoparlante la clip del cavo di interconnessione dell'antenna.
-
-
-
Rimuovi le due viti a croce Phillips #00 da 1,6 mm che fissano il motore di vibrazione sul case posteriore.
-
-
-
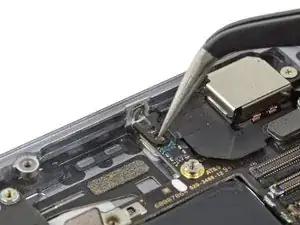
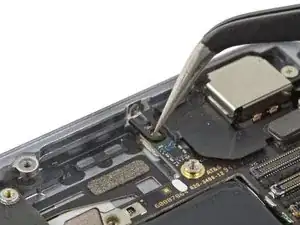
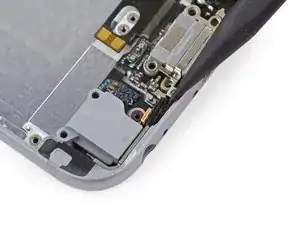
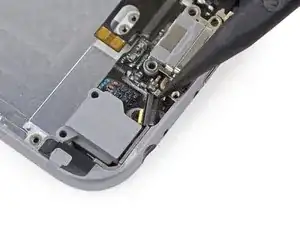
Rimuovi le due viti a croce Phillips #00 da 3,1 mm che tengono in posizione la staffa di supporto della porta Lightning.
-
-
-
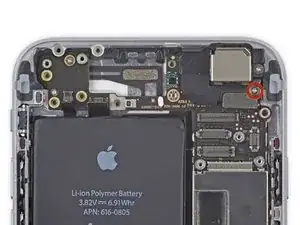
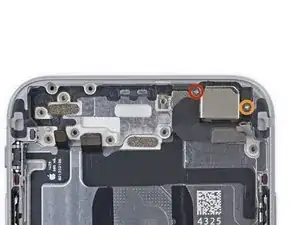
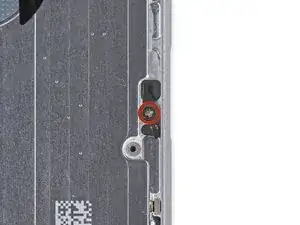
Rimuovi la singola vite a perno da 3,6 mm con testa a croce Phillips #00 dal supporto del microfono.
-
-
-
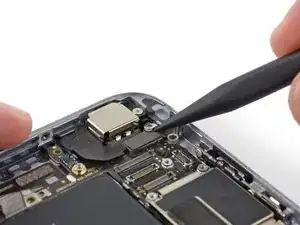
Rimuovi dal gruppo del cavo del connettore Lightning le sei viti a croce Phillips #00 rimaste.
-
Due viti a perno da 3,1 mm
-
Due viti da 1,7 mm
-
Due viti da 1,5 mm
-
-
-
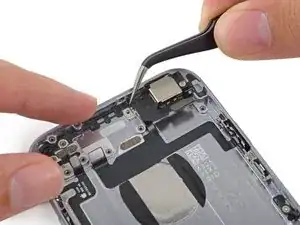
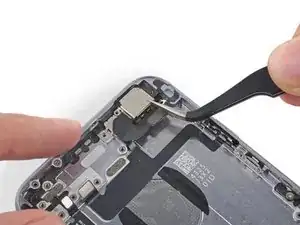
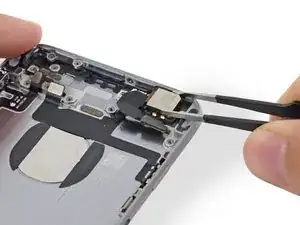
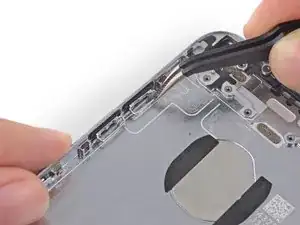
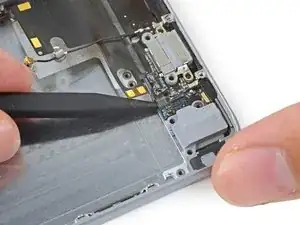
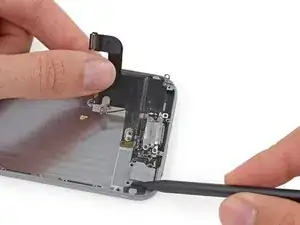
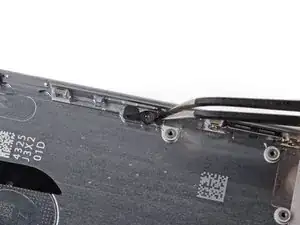
Usa l'estremità piatta di uno spudger per iniziare a sollevare dal case posteriore il gruppo del cavo del connettore Lightning.
-
-
-
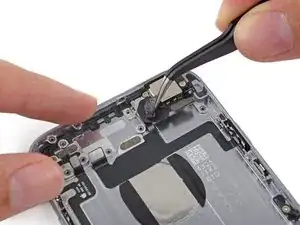
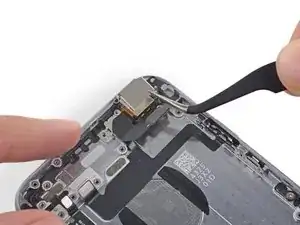
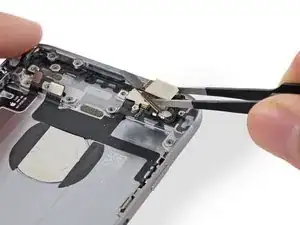
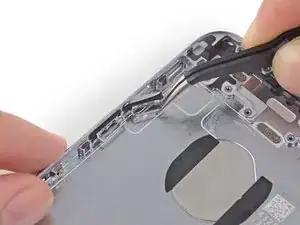
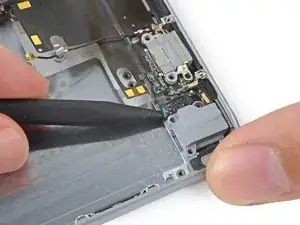
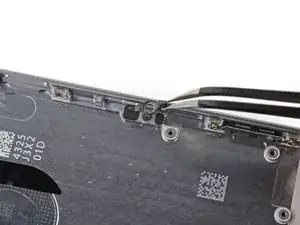
Tira lievemente verso l'alto, con delicatezza, il cavo flex del connettore Lightning per liberarlo dalle sedi cilindriche delle viti del motore di vibrazione e dell'altoparlante.
-
-
-
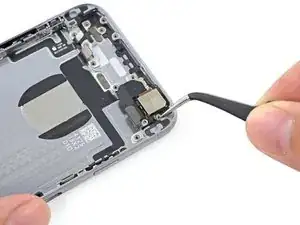
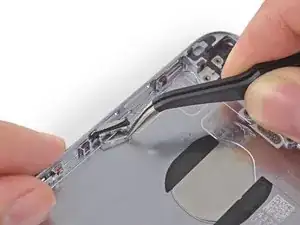
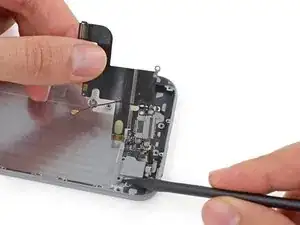
Infila l'estremità piatta di uno spudger sotto la parte del cavo flex con il connettore Lightning per staccare dell'altro adesivo.
-
-
-
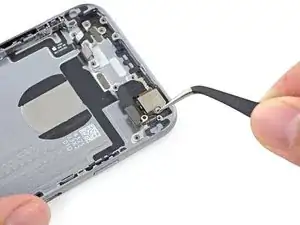
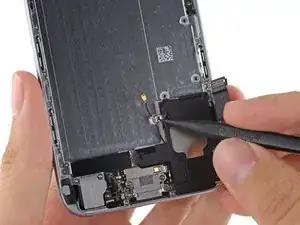
Usa la punta di uno spudger per spingere fuori dal suo alloggiamento nel case posteriore la parte con il microfono del gruppo del cavo Lightning.
-
-
-
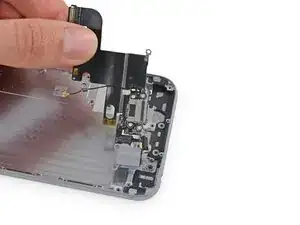
Passa la punta di uno spudger sotto il cavo flex tra il connettore Lightning e il jack cuffie per liberarlo dall'ultima parte di adesivo.
-
-
-
Usa l'estremità a punta di uno spudger per aiutarti a far uscire il jack cuffie dal suo alloggiamento nel case posteriore.
-
Rimuovi il gruppo del cavo del connettore Lightning dall'iPhone.
-


Per rimontare il tuo dispositivo, segui queste istruzioni in ordine inverso.

38 commenti
My first time inside an iPhone. I slipped on some icy steps and bent my phone. Luckily it bent on the battery side and still worked except for the 'down' volume button. That wouldn't move because the housing was so deformed. Took my time and followed the guide carefully, it was absolutely fine. Took an hour and three quarters.
nbuchan -
My issue is the glue on the battery! i destroyed my first battery saying to remove has anyone got any advice on this? thanks
I failed with both battery pull tabs, but I successfully used a microwaveable wheat bag in place of the iOpener, then carefully slid a store loyalty card under the battery. It took a bit of doing but I just took my time. The back of the battery was a bit bubbled but it still works fine.
nbuchan -
I successfully replaced my rear case but upon completion I've noticed my power and volume buttons are no longer clicky in fact they've lost all springiness. I feel like they are constantly touching the button contacts and have yet to turn the phone back on anyone have any ideas as to how to fix this?
csens92 -
In the middle of the volume buttons itself, on the inside is a round plate glued, you have to replace this on the new volume buttons
clbr -
Yeah the buttons themselves have a tiny piece of circular metal that meets a tiny piece of black (carbon?) on the flex button. They are TINY but if there is no black speck OR if the speck is off-center, then you won't have any successful clicking. When it works, it works. There's not mistaking. it's a very simple but tiny mechanical issue with buttons. But it's what makes them so nice.
Check if the circular metal piece on the button is in place. Check if the circular black rubber is in place on the flex cable. Also check if you put the rubber gasket around the button back.
When reconnecting be VERY careful not to over tighten. The connectors on the screen that these 3.6mm Pentalobe screws lock with are notorious for breaking off
Blair Tryba -
what do i do if ive managed to tighten them too hard and now they wont come off?
kristian686 -
Before opening the phone, I gently warmed it using a buckwheat heating pad. This made removal of the adhesive strips (steps 20 to 24) easy.
Howard Bales -
Exactly what I did as well, the gently warming made the adhesive removal work like a charm. The heat as well help to lift the screen easily, no need for the prying tools for me to open te phone.
For the adhesive removal just pull it slowly to the bottom of the phone and keep in under tension.
On reassembly, turn on the phone after getting all connectors back in place to verify all is working fine before putting all screws back in their spot.
Maarten Vergauwen -
Thanks for the suggestion! I heated up a hot/cold pack, and it worked great.
Linda Chandler -
I put mine back together but mine looks very different than this one. Why is it that when I make a call I cannot hear through the ear piece and have to put it on speaker. Also my screen doesn't go black when my face touches it
Bailey Wilson -
Hey Bailey, which repair were you attempting? Is it possible you have a 6s, or maybe a 6 Plus? You may have better luck with faster troubleshooting if you post in our Answer Forum!
Sam Goldheart -
See its a long time ago you had this issue. You can try to remove the cable from front camera/sensor/earpiece from the motherboard port and gently push it back on. All the problems you relate to is thru the same cable. If this dont solve your problem, check if the earpiece is correctly placed onto the polarity poles, and that the proximity sensor is lying right down into the corresponding socket. If something is blocking the sensor, yeah then the screen wont turn on/off when you put it onto your ear.
Kenneth Hilstan -
I see in the preamble that when you replace your logic board, you would lose touch id functionality, so my question is what if you have the homebutton and thus the fingerprint reader for the logic board replacement, would touch id work?
socratesmens -
The guide for the iPhone6 battery replacement needs to be revised. There are a couple of issues.
1) While the battery cover has two screws, they are different lengths. Since they are very small, it can be hard to see the difference (until one tries to screw the smaller one into the longer hole). The video needs to mention this.
2) The application of the adhesive strip if very different from what is mentioned. Also, there is a “one piece plastic” applique, and it is very unforgiving. The video should show this process in more detail.
I believe the attention to this detail would help folks correctly install their iPhone 6 batteries, and with the recent Apple disclosed battery problem, would continue to show that iFixit is very committed to the end-user.
Gary Long -
I felt a bit silly getting stuck at the end of a long repair, unable to screw one of these last screws back in. What worked was gently pinching the phone above and below the screw, to make sure the screen and back were perfectly aligned.
Matt D -
Apple edits posts on their Communities website that link to this fix page justifying as follows:
“We’ve edited your post because following the procedures at the site you provided may lead to damage to the user’s device.”
What is certain is that following Apple Support’s advice of resetting our phones again and again never works whereas this fix works. Apparently Apple does not want people to know that their hardware fails and can be fixed, because then they would need to explain why they don’t offer neither the fixing service nor the fixing advice by directing us to this website.
Brice -
Before you get started, I suggest you confirm you are replacing the correct camera. If you are thinking of a camera, the front is the side of the device with the main lens. On an iPhone this is actually known as the rear facing camera. Once the phone is disassembled your orientation can be distorted and it is not that hard to fail to realize your are replacing the wrong camera. Doh!
William Miller -
I found it very useful to use a magnet sheet when doing these repairs. I use electrical tape or a sharpie to make a grid, and place each micro screw in a separate box on the grid.
I work directly over the magnet sheet, so that if something drops I have a better chance at not losing it.
If you do lose a screw, go over the work area with a fridge magnet. It will pick it up if it hasn’t popped too far away.
Megan Telliano -
I agree. The Magnetic Project Mat makes your project incredibly easier and keeps your screws/parts organized. Here is the link for anyone interested:
Magnetic Project Mat
Cooper -
or some masking tape with sticky side up and the ends folded underneath on a piece of paper, then you can write notes like
“1.4mm for FOO bracket →”
“7x2.3mm for EMI cover, different one by camera →”
The arrows point as appropriate.
If you drop something, put a flashlight on the floor & shine it across the floor — Turn off ceiling & other lights off to maximize the shadow from the flashlight.
Bass Clef -
These screws are tiny, and the first two are the biggest of the lot. Get a magnifying glass or good reader glasses.
Jennifer Porter -
Which torx is this T?
klemenecanze -
The screws are no torx screws they are Apple Pentalobe screws. You need to buy a Pentalobe screwdriver seen above.
Claes -
I have to use the P2 right?
Aman Singh -
The best advice I can give is not to perform this operation over carpet.
Bruce codding -
I'm an amateur, but I was able to replace the parts almost perfectly while looking at this explanation, thank you very much.
irichin.3.26 -
was fairly easy more nerves than anything, one thing one should have on hand is alcohol just in case its needed. also if one doesn’t get the entire tape strips out, use the alcohol like suggested and lift the battery up. Then can grab the remaining tape strips with tweezers and pull it out. Easy to put back together just make sure the connectors are in. The screws are tiny so take your time. I plugged it in and it started charging and it worked. Great to have my 6 back for a trip as I wanted to use it for the camera, also my game phone so nice to have a battery that lasts. Yes having a flat place to put the parts and put them in separate area so they don’t get mixed up. It took about a hour with hunting for a spare bottle of alcohol.
Greg Wischmeyer -
The first step should always to be to backup your phone as there is always a slim chance that even a simple battery replacement may render the phone inoperable and data on it lost.
Jim -
Please do not forget to remove the SIM-Card tray!!
Steffen Albrecht -
I didn’t need to remove my sim card tray when I did my iPhone 6 battery replacement. Why do you suggest to remove it?
Jim -
You dont need to remove sim card while battery replacement
bertan -
Did mine today, with iFixit battery and iFixit tool kit. Did not need suction cup, to open case, as it had partially sprung open on left, as a result of a badly swollen battery. Supported base and screen with a bookend and rubber bands. This kept these parts at a 90 degree angle, so that screen did not need to be removed. IFixit screwdriver tips were perfect fit. Somewhat difficult to remove battery adhesive strips, but slow and steady got it done, after mild heating with hair dryer. Took about 3 minutes to reposition battery connector…just a wee bit tricky, to position correctly. Was careful to place top of screen in place first, and remainder snapped into place with light pressure, and replaced the 2 pentalobe screws.
Will highly recommend iFixit for such a repair. Repair kit and battery, are first rate. I give this an 11, out of 10.?
Len Drasin -