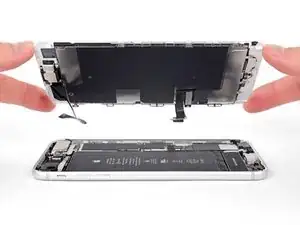
Introduzione

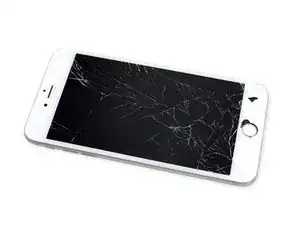
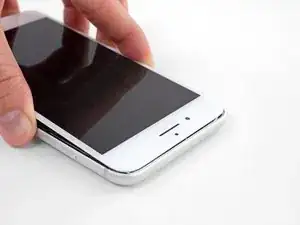
Se hai provato a pulire la porta Lightning senza successo, segui questa guida per sostituire il gruppo connettore Lightning del tuo iPhone 8 Plus. Questa riparazione può risolvere problemi di ricarica e connessione.

  1. OqdAPX1NfcxJgNbg
    • Prima di iniziare, scarica la batteria del tuo iPhone sotto il 25%. Una batteria al litio-ioni carica può prendere fuoco e/o esplodere se viene perforata accidentalmente.

    • Spegni il tuo iPhone prima di iniziare lo smontaggio.

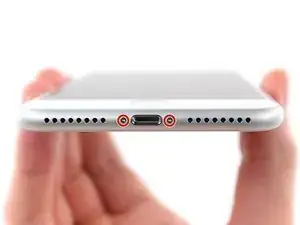
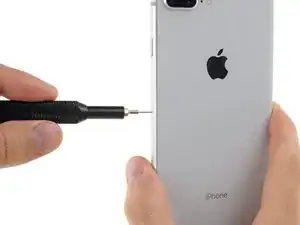
    • Rimuovi le due viti pentalobe da 3,4 mm sul lato inferiore dell'iPhone.

    • L'apertura del display dell'iPhone comprometterà le sue tenute impermeabili. Preparati prima le guarnizioni sostitutive prima di procedere con il prossimo passo, o assicurati di non esporre il dispositivo al contatto con liquidi se decidi di riassemblare il tuo iPhone senza le guarnizioni impermeabili.

    what do I do about super stripped screws?

    Ean Palacios -

    I’m sorry, your comment slipped past my radar earlier. For future fixers that might see this and ask the same question, you can check out our stripped screw guide for some detailed advice.

    Adam O'Camb -

    Do you need a toolkit like the essential toolkit

    Adam Palmer -

    Hi Adam. Having a tool kit with all of the listed parts above is best. The screw heads are very small and each set of screws needs a very specific type of driver to remove them without stripping any of them.

    Kyle Luksa -

  2. 6UPwoloGBO4tmVoS
    6UPwoloGBO4tmVoS
    BmSYPJmOy6dbHipF
    efLfshnM2MVKmJNi
    • Se inserito troppo a fondo, un plettro per l'apertura può danneggiare il tuo dispositivo. Segui i passi di questa guida per segnare il tuo plettro ed prevenire eventuali danni.

    • Misura 3 mm dalla punta del plettro e segna questa distanza con un pennarello indelebile.

    • Puoi anche segnare gli altri angoli del plettro con altre misure.

    • Alternativamente, ferma con del nastro adesivo una moneta al plettro a 3mm dalla sua punta.

    Got to step 2 and realized the fix kit doesn't include an opening pick! Looks like a guitar pick, and I have those lying around. Is that expected? Looks like the pick is used in many steps below. There's a little blue crowbar that isn't mentioned in the instructions. Perhaps that replaces the opening pick?

    Sloan Looney -

    Hi! I can't see which guide you were using when writing this comment. Can you reply here with which guide and fix kit you used?

    Clay Eickemeyer -

    I see you posted this in Meta. I hope it's resolved soon! In the meantime, a guitar pick may work well enough for your repair.

    Clay Eickemeyer -

    what fix kit?

    Meow Purr -

    My fix kit didn't include an opening pick either

    WILLIAM HARRIS -

    Make sure you check inside the black boxes after emptying them. My pick was stuck inside one of the boxes.

    AndyF -

    My AliExpress refurbished screen came with a pick that has a coin-like circle that pops out, so no modification was necessary

    Gijs Leegwater -

  3. TYwCcrqNBd4ohROm
    TYwCcrqNBd4ohROm
    Ui5vOPjtLUbtNCGB
    cvSW1VHhPiNmImkf
    • Se il tuo iPhone ha lo schermo crepato, evita che si rompa ulteriormente e di farti male durante la riparazione mettendo del nastro adesivo sul vetro.

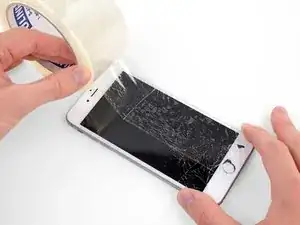
    • Posiziona strisce sovrapposte di nastro trasparente da pacchi sullo schermo dell'iPhone finché non l'hai coperto tutto.

    • Indossa occhiali di protezione per proteggere gli occhi da schegge libere durante la riparazione.

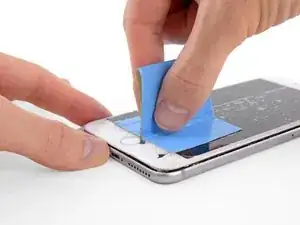
    • Se non riesci a far aderire la ventosa nei prossimi passi, applica del nastro adesivo resistente (come del nastro americano telato) come una maniglia e alza lo schermo con quello.

    • Se non riesci, puoi incollare la ventosa allo schermo con la super colla.

  4. YFbVJy32AORrrT13
    YFbVJy32AORrrT13
    5OoBJRhLaZ2HItnM
    A4T1DxOZSJ16rhJn
    • I prossimi tre passaggi fanno una dimostrazione dell'Anti-Clamp, uno strumento designato per agevolare le procedure di apertura. Se non stai utilizzando l'Anti-Clamp, puoi saltare questi tre passaggi per un metodo alternativo.

    • Per le istruzioni completi su come usare l'Anti-Clamp, guarda questa guida.

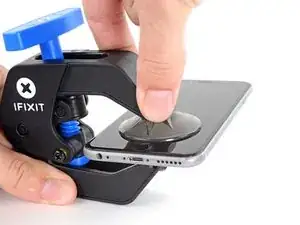
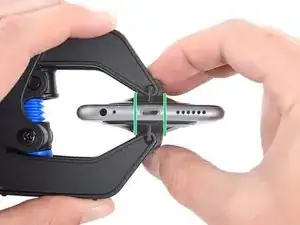
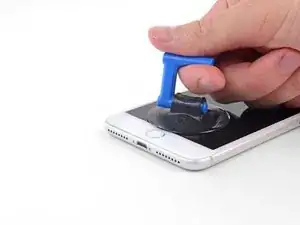
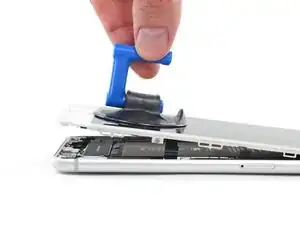
    • Tira la maniglia blu indietro per sbloccare i bracci dell'Anti-Clamp.

    • Fai scorrere i bracci oltre il bordo sinistro o destro del tuo iPhone.

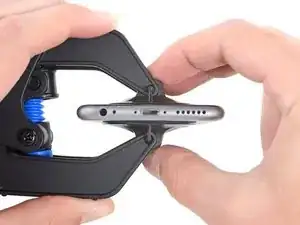
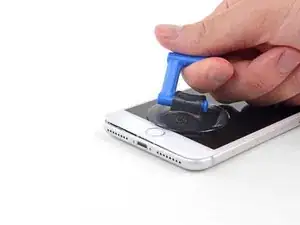
    • Posiziona le ventose vicino al bordo inferiore dell'iPhone, una di fronte e una sul retro.

    • Premi le ventose insieme per farle aderire sull'area desiderata.

    • Se ritieni che la superficie del tuo iPhone sia troppo scivolosa perché l'Anti-Clamp possa far presa, puoi utilizzare del nastro adesivo per creare una superficie più aderente.

  5. jTOgVMBLsXEoHW6M
    jTOgVMBLsXEoHW6M
    GHUOCycRqrdGPloU
    XhWEEIvdRoCv4ayy
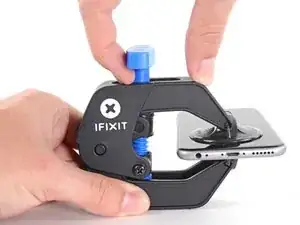
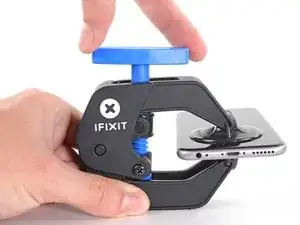
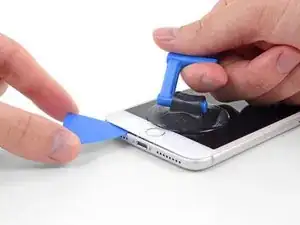
    • Tira la manopola blu in avanti per bloccare i bracci.

    • Gira la manopola in senso orario di 360° o finché le ventose cominciano ad allungarsi.

    • Accertati che le ventose rimangano allineate fra loro. Se si spostano, allentale leggermente e riallinea i bracci.

  6. KbWJQqLcoArLKmUO
    KbWJQqLcoArLKmUO
    RnlwghmEIU5hKxhF
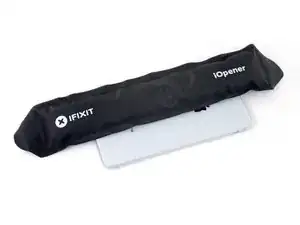
    • Scalda un iOpener e fallo passare tra i bracci dell'Anti-Clamp.

    • Puoi anche usare un asciugacapelli, una pistola termica o una piastra termica, ma il calore eccessivo può danneggiare lo schermo o la batteria interna, quindi prcedi con attenzione.

    • Piega l'iOpener così che sia appoggiato sul bordo inferiore dell'iPhone.

    • Attendi un minuto per dare all'adesivo la possibilità di staccarsi e creare una fessura d'apertura.

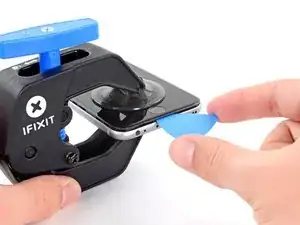
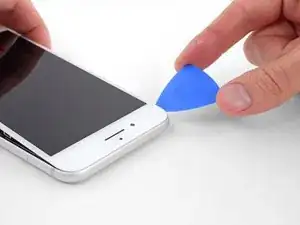
    • Inserisci un plettro sotto lo schermo quando l'Anti-Clamp avrà creato una fessura abbastanza grande.

    • Se l'Anti-Clamp non dovesse creare un'apertura sufficiente, applica più calore all'area e ruota la manopola in senso orario di mezzo giro.

    • Non girare più di mezzo giro per volta, e aspetta un minuto tra un giro e un altro. Lascia che l'Anti-Clamp e il tempo facciano il lavoro per te.

    • Salta i prossimi tre passaggi.

  7. EXTwOVVOnkGXlAiy
    • I prossimi tre passi ti mostrano come separare lo schermo usando una ventosa.

    • Il riscaldamento del bordo inferiore dell'iPhone aiuta ad ammorbidire l'adesivo che blocca il display, semplificando l'apertura.

    • Usa un asciugacapelli oppure prepara un iOpener e applicalo per circa 90 secondi al bordo inferiore dell'iPhone per ammorbidire l'adesivo sottostante.

    6/14/23 I did this repair but used a heat gun on low for 60 seconds. This allowed me to open the case as the instructions say, but in the end the Home button failed. I probably over heated it. I used this "go around" for a virtual Home button. I don't care about touch ID:

    https://www.youtube.com/watch?v=LbTlUm4p...

    laryball -

  8. 1SUHNLjLanp2x1y2
    1SUHNLjLanp2x1y2
    G2AloSCafqypVhRk
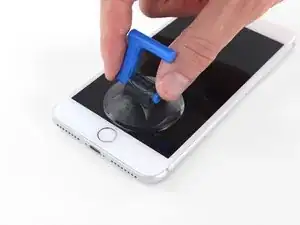
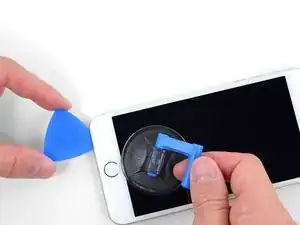
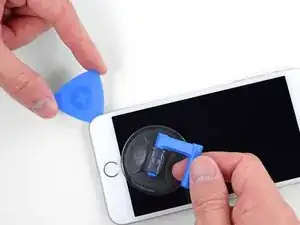
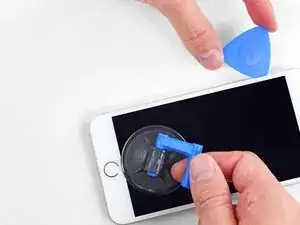
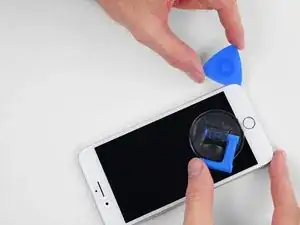
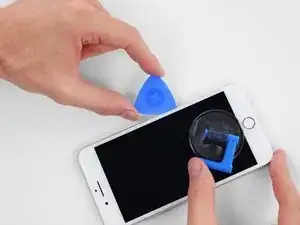
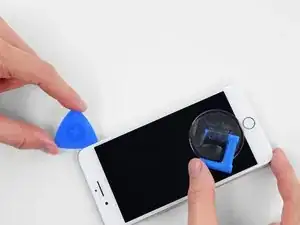
    • Applica una ventosa nella metà inferiore del pannello frontale, appena sopra il pulsante home.

    • Assicurati che la ventosa non si sovrapponga al pulsante home per assicurare un adeguato sigillo tra la ventosa e il vetro frontale.

    Warning ! If you pull too hard (reheat the underside of the display again), you create an gap of air between the glass and the lcd display !

    When you replace the display assembly you end up with gray stains on the display.

    Result: you have to buy a new display (assembly).

    Arnoud -

    Using just the single suction cup that is included in the battery replacement kit probably wouldn’t open the device. An iOpener and an iSlack should be the recommended method. However, you can get it open with just the single suction cup and iOpener, but does take a lot of time.

    Get an iOpener and iSlack with the battery replacement kit.

    Chris -

    I used a flat x-acto (#18) blade knife tool to gently pry back the screen enough to allow me to insert the pick near the bottom corner. I then worked the pick under the screen as mentioned in steps 5 & 6 below then. This worked really well for me.

    Kyle Luksa -

    I used the suction cup without heating the phone - the adhesive came away quite easily without applying any heat. Maybe due to age of phone (nearly 4 years old). Worth trying.

    Ben Vinnerd -

    I can’t get the single suction cup to work. Hate being stuck on the simplest step!

    Donny -

    My screen was very shattered, and was quite hard to get suction, as my tape was very low quality. However, after pulling it up a little bit, I was able to insert a regular razor blade into the very small gap and used that as a lever.

    Michael Scroop -

    Oh my goodness! Don't do that again. You can definitely damage something in the phone if you use a sharp metal razor blade..

    cytur -

  9. mrEFNcgfVQWurjTW
    mrEFNcgfVQWurjTW
    rErHmkOhfvSITnGD
    TohvbXinCCnyfcK6
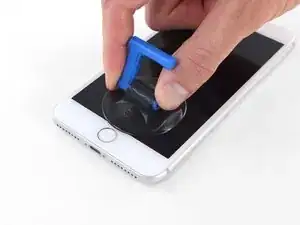
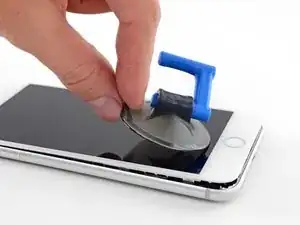
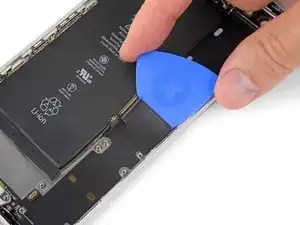
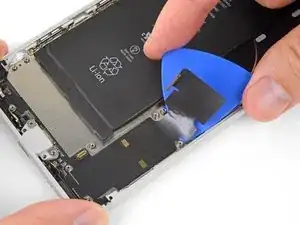
    • Tira la ventosa applicando una tensione forte e costante fino a creare una piccola fessura tra il gruppo display e il case posteriore.

    • Inserisci nella fessura un plettro di apertura o un altro attrezzo fine per una profondità di qualche millimetro.

    • L'adesivo impermeabile che tiene in posizione il display è molto tenace. La creazione di questa fessura iniziale richiede l'applicazione di una forza piuttosto elevata. Se hai difficoltà nell'aprire una fessura, applica altro calore e muovi lo schermo su e giù per indebolire l'adesivo finché non riesci a infilare lo strumento di apertura.

    After multiple tries and using a very hot iOpener, it will not open.

    Kenneth Ewald, Sr. -

    In sheer frustration, I pulled out my trusty pocket knife and managed to lift the bottom of the screen slightly, but in the process, cracked the glass from the bottom to the home button. The case is open now.

    Kenneth Ewald, Sr. -

    this was by far the most difficult part. be diligent and follow the “firm and constant pressure” guide... the “gap” will be extremely “slight”. you will be able to slide a corner of the pry tool even if you cannot see the gap.

    Colleen V -

    This needs a TON of strength and most likely a partner. Your strong partner will pull up the screen with the suction cup and you will put the pick into the small gap that appears.

    cytur -

  10. AOHSGnMOFMrHBNmQ
    AOHSGnMOFMrHBNmQ
    pBblekYxOTaMfuJJ
    GvMBDIHTcivkDvXO
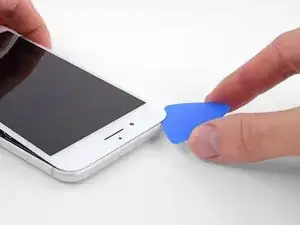
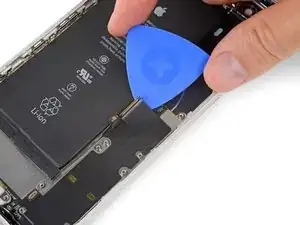
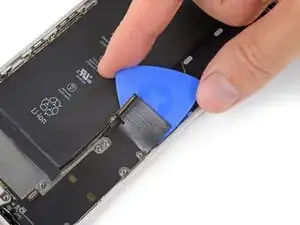
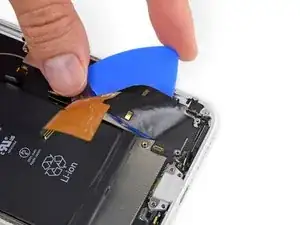
    • Fai scorrere il tuo attrezzo attorno all'angolo e lungo il bordo sinistro del telefono, spostandoti verso i pulsanti del controllo volume e l'interruttore della modalità silenziosa, per rompere l'adesivo che tiene in posizione il display.

    • Fermati vicino all'angolo superiore sinistro del display.

    Do not go over the top otherwise you can crack the screen. Sadly happened to me :(

    The instruction should be:

    “Stop near BUT BEFORE REACHING the top left corner of the display”

    Leonardo Piga -

  11. vNlPrysxSGXqqFA4
    • C'è un cavo delicato lungo il bordo destro dell'iPhone. Non inserire il plettro qui, poiché potresti danneggiare il cavo.

  12. iiGOsaDUPLVF3bpu
    iiGOsaDUPLVF3bpu
    xIUoq1psydvfJCrU
    WRDGbKd2rpx3JRwL
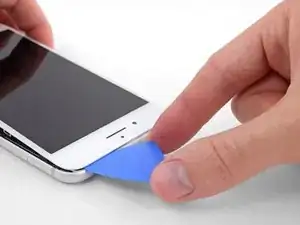
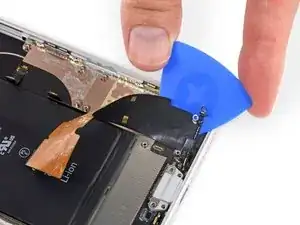
    • Inserisci nuovamente il tuo attrezzo nell'angolo inferiore destro dell'iPhone e fallo scorrere attorno all'angolo e lungo il lato destro del telefono per separare l'adesivo.

    • Non inserire il plettro per più di 3 mm, potresti danneggiare i cavi del display.

    I had really good luck using a hairdryer on some of the more stubborn portions of adhesive.

    Jessica Kirsh -

  13. dlBIvSNLXKCnX4B6
    • Tira dolcemente la ventosa per sollevare il lato inferiore del display.

    • Non sollevare il display più di 15° per evitare il rischio di stirare o strappare i cavi piatti di connessione del display.

  14. STTnPPfiiKNEokvD
    • Tira la linguetta per staccare la ventosa dal pannello anteriore.

  15. FWPXimHpMQKpmZZu
    FWPXimHpMQKpmZZu
    MGZUVhY6gplY6qCc
    voQbuSeunKejF3ic
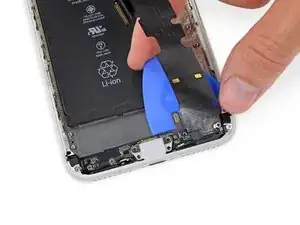
    • Fai scorrere uno strumento di apertura sotto il display lungo il bordo superiore del telefono per allentare l'adesivo rimasto.

    Be very careful at this step. The glass at the top will break very easy when the display is lifted too much.

    Gerdschi D -

  16. Y3wG53ZtiZEQdGYY
    Y3wG53ZtiZEQdGYY
    FNyyLxBTwBhIDlrI
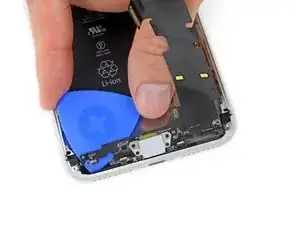
    • Fai scorrere lievemente il gruppo display verso il basso (allontanandolo dal bordo superiore del telefono) per liberarlo dalle clip che lo collegano al case posteriore.

  17. 4NykCXCCyRd5enLv
    4NykCXCCyRd5enLv
    mFZBjHhOBBSSbDKG
    yGLgglmNotb5obSH
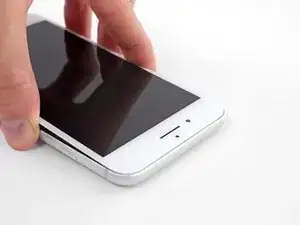
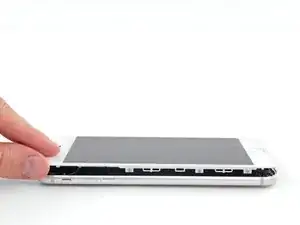
    • Apri l'iPhone sollevando il display dal lato sinistro, come per sollevare la copertina posteriore di un libro.

    • Non cercare di staccare del tutto il display, perché questo è ancora connesso alla scheda logica dell'iPhone da diversi fragili cavi piatti.

    • Appoggia il display contro qualche tipo di supporto per mantenerlo aperto mentre lavori sul telefono.

    Das “links” ist auf dem Foto rechts.

    Matze Diamond -

    Das ist falsch. Wenn man auf das iPhone sieht, ist der Home Button unten. Auf dem Photo ist deutlich sichtbar, dass die linke Seite angehoben wird.

    Hans -

  18. gdf4RAku2FO4NKSD
    gdf4RAku2FO4NKSD
    RrJOlSmc4jTe2Wsm
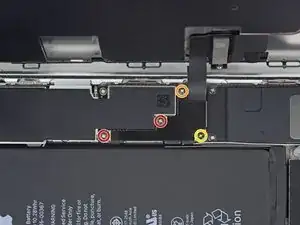
    • Rimuovi le quattro viti Phillips (JIS) che fissano la staffa del cavo inferiore del display alla scheda logica:

    • Due viti da 1,3 mm

    • Una vite da 1,4 mm

    • Una vite da 2,7 mm

    • Nel corso dell'intera procedura, fai attenzione a tenere traccia delle tue viti perché ognuna di esse torni al suo posto in fase di rimontaggio. Una vite messa nel posto sbagliato può provocare danni permanenti al dispositivo.

    The Phillips screwdriver bit is the PH000. The measurement refers to the screw length.

    Jack Harry -

  19. FVmDfbaakEqqPyM5
    • Rimuovi la staffa del cavo inferiore del display.

  20. xCtNERRx2CKlovLn
    xCtNERRx2CKlovLn
    6OqRktbAd2XLTrpP
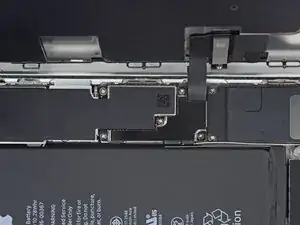
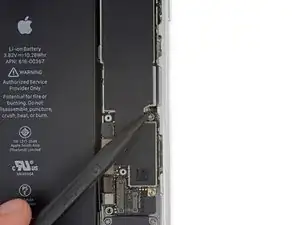
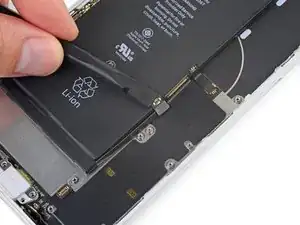
    • Usa la punta di uno spudger per staccare il connettore della batteria sollevandolo dal suo zoccolo sulla scheda logica.

    • Piega lievemente da un lato il cavo del connettore per evitare che questo possa fare contatto con lo zoccolo e quindi alimentare il telefono nel corso della tua riparazione.

    When I reassembled the iPhone 8 Plus, I had to plug it into a Lightning cable to wake it up (just pushing power button wasn’t sufficient).

    browniestarmite -

  21. hSevVTlWDAgGghXZ
    hSevVTlWDAgGghXZ
    xRZuRojAQGBGB3jM
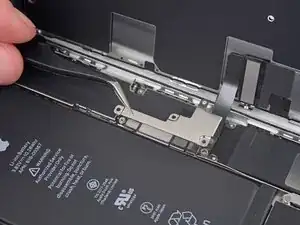
    • Usa la punta di uno spudger oppure un'unghia per staccare il grande connettore inferiore del display tirandolo dritto verso l'alto dal suo alloggiamento.

    • Per ricollegare connettori a pressione come questo, premi su un lato finché senti il clic di bloccaggio, poi ripeti l'operazione dall'altro lato. Non premere dal centro. Il connettore, se è disallineato anche di pochissimo, può piegarsi, danneggiandosi irreparabilmente.

    I got hold of a iPhone 8 Plus with cracked screen that I am planning to fix.

    Here is my problem:

    When I tried to take out the screen from my phone, (step 15-18) I was curious about the new screen, so I tried to connect it. It was completely dead! Then I tried the old cracked one, and suddenly that was dead to! This is a phone that some fool has been inside earlier and changed battery, but I suspect he has done some more really stupid things. The Taptic Engine is living its own life and vibrating every time I slightly touch the home button. (I have a new Taptic Engine) The phone is also full of dust and small particles that does not belong there. One tri-point Y000 screw (step 18) is even missing! Now the biggest problem is that both screens are black! I know the phone is on, because I hear voice command speak when I turn on the power. The screen worked before I tried to change it? And one last thing: My new LCD screen came with new flex cables. Is it possible to switch over, so I can use the old ones?

    smikalsen -

    Hi,

    Is your problem solved?

    Daniel Leprince -

    Be careful of damaging MOSFETs by the LH side of the large lower display cable. After replacing the battery and turning the device on, the phone showed low charge and didn't have a charging symbol even after plugging into multiple cables and chargers. Turns out I had damaged the logic board attempting to disconnect the connector.

    Chris Cerrudo -

  22. aWkRBoqdn5JLDxut
    aWkRBoqdn5JLDxut
    NNsd3K6mmfCyvmLZ
    • Stacca il secondo connettore inferiore del cavo del display, proprio sotto quello che hai disconnesso nel passo precedente.

    I used the other end of the spudger on this connector and it seemed to work a little better for me. I came in from underneath the top-right edge instead of the bottom right.

    Jessica Kirsh -

  23. oJa4BeNCiLydYrFd
    oJa4BeNCiLydYrFd
    GA64GXyHWNMhEGK5
    • Rimuovi le due viti tri-wing Y000 che tengono in posizione la staffa sopra il connettore del gruppo sensore del pannello frontale:

    • Una vite da 1,0 mm

    • Una vite da 1,2 mm

    una vite da 1mm e due viti da 1.2 mm???

    Matteo Carachino -

    Ciao Matteo! Grazie per l’osservazione. Ho appena modificato il testo :) La traduzione è aperta a tutti. Hai quindi la possibilità di fare le tue suggestione direttamente nel testo e sei il benvenuto se vuoi usare di questa possibilità nel futuro. Grazie ancora per la vigilanza! Saluti, Claire

    Claire Miesch -

    The tool kit does include a 1.0 or1.2mm screwdriver! How am I supposed to remove those screws?

    peter frommer -

    Bought the screwdriver that supposedly fits these screws and it still doesn’t work.

    hypercarduser -

    My bracket looks different. Can’t get these screws out.

    Ray Rushing -

    kit came with wrong bit. i received 2x P02 (penta tips) and no tri point y000.

    Christopher Shane Gripp -

    There is no such thing as a trigger point y000 screwdriver. Why couldn't they use Philips like the rest of the screws.Nobody knows what these trips point y000 even look like. this is a scam to force you to buy a new phone.

    Al tb -

    y000 tri-point screw driver comes with the iFixit repair kit at minimal cost

    godo -

  24. hBRGDcEYEQNRA2A1
    • Rimuovi la staffa che copre il connettore del gruppo sensore del pannello frontale.

  25. GacqUhpZexRIIL1r
    GacqUhpZexRIIL1r
    gTmxBknJLSOFdNJx
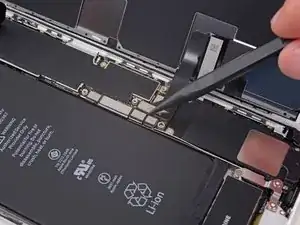
    • Usa la punta di uno spudger oppure un'unghia per staccare dalla sua sede il connettore del gruppo sensore del pannello frontale.

    What happens is this strip is torn and how does one fix it

    Mijinyawa Dauda -

  26. AVYiAe5OJSrbfHdg

    Should there be a step somewhere in here to point out when to remove the blue plastic from the new iFixit screen?

    Paul Santora -

  27. fBrfCqfGMiHrKgQj
    fBrfCqfGMiHrKgQj
    Qq6gXOHJIIEjWY2R
    • Svita le due viti Y000 che tengono in posizione la staffa del connettore della fotocamera posteriore:

    • Una vite da 1,4 mm

    • Una vite (non ferrosa) da 1,4 mm

    • Questa vite non è attirata da un cacciavite magnetizzato. Assicurati di rimontarla al posto giusto, una vite magnetizzata potrebbe interferire con la bussola.

    the standoff screw underneath the left screw came loose together and was impossible to detach from the screw. In a later step (49) it was possible to remove it together with the antenna flex cable

    nilsplackle -

  28. G1XiSMD2cRMenDyp
    • Togli la staffa.

  29. AfCQByWgFeuBkDGA
    AfCQByWgFeuBkDGA
    CiVyAWNoGgXJqWIR
    • Svita le due viti che fissano la piastra di protezione del modulo della fotocamera:

    • Una vite a croce Phillips da 1,8 mm

    • Un distanziale a vite (non ferroso) da 2,7 mm

    • Per rimuovere distanziali a vite l'ideale è usare una punta o un cacciavite per distanziali.

    • In caso di emergenza, può bastare un piccolo cacciavite a taglio, ma è necessaria un'estrema cautela per evitare che scivolando possa danneggiare i componenti circostanti.

    Yeah, the flathead screw driver is not really a good option for the standoff screwdriver bit. I managed to remove the standoff screws easily enough, but replacing them with the flathead was laborious.

    andystills -

    Does the second screw (nonferrous standoff 2.7mm) actually exist? My phone has not had any repairs before but did not have this screw, and the previous step says there's a Y000 screw (for the bracket) in what appears to be exactly the same location as this step says the standoff screw is.

    bbaovanc -

  30. FslTdFua1Jq4UKAA
    • Rimuovi la piastra di protezione dal modulo della fotocamera.

  31. fUtMsWMWxYfRG2bI
    fUtMsWMWxYfRG2bI
    uYPo1TsyDyxcZW4K
    4hHaRuUiM3VNM4mf
    • Usa uno strumento di apertura iFixit o un'unghia per scollegare i due connettori del cavo della fotocamera sollevandoli verso l'alto fuori dalle loro prese.

  32. eXsiACihPeKXjgus
    eXsiACihPeKXjgus
    Ku5bASXYSx6NOtdZ
    IjZPrkxWFrtoAJyH
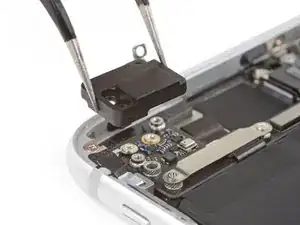
    • Adopera l'estremità piatta di uno spudger per sollevare il gruppo fotocamera frontale dal bordo superiore dell'iPhone.

    • Se hai delle difficoltà, cambia lato e usa la punta del tuo spudger per sollevare l'angolo superiore destro della fotocamera.

  33. CCZMtwOiS5c42MPh
    • Rimuovi il gruppo fotocamera posteriore.

    Using the small supplied none-conductive baggy you get in your parts repair kit, it is generally advised to put your camera sensor in said bag to protect it from dust or other debris as this will not come off the sensor and will mean another repair where one could have been avoided.

    Imname62 -

  34. wFWuxyrGHNTEOapH
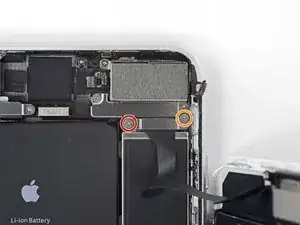
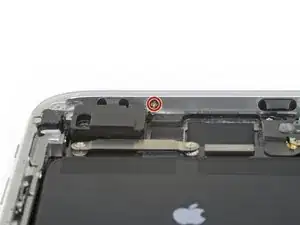
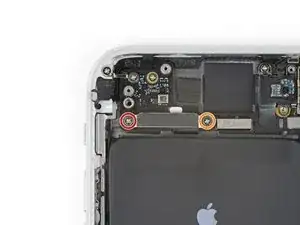
    • Svita le tre viti a croce Phillips che tengono in posizione il componente antenna superiore sinistra:

    • Due viti da 1,3 mm

    • Una vite da 3,1 mm

  35. wIO5FTuJDiCHN1rL
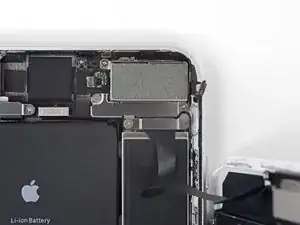
    • Rimuovi la vite a croce Phillips da 1,3 mm che fissa il componente antenna al bordo superiore della cover posteriore.

    This screw is stuck and will not come out. I'm using the same head I used for the previous one which is the same size. I've even tried them all. I can get any other screw fine but this one will not come out. Just wasted my time undoing everything up to then and this stupid screw is stopping me from finishing.

    Jalen Pace -

  36. Z1FXwi4X2rr1RkMM
    Z1FXwi4X2rr1RkMM
    tGjC1OcpFpLVsmQv
    FBOxwZOSMkLdjcWB
    • L'occhiello della vite nella parte superiore del componente antenna è incastrato in un piccolo incavo nel bordo superiore dell'iPhone.

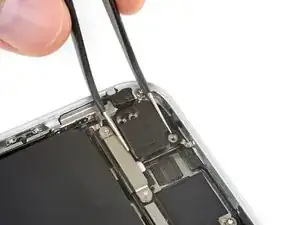
    • Inclina il componente antenna verso l'alto e la parte superiore dell'iPhone.

    • Fai scorrere l'occhiello della vite verso il basso e fuori dal suo incavo.

    I accidently ripped the screw boss of the antenna component. Is that very bad? Do I need to replace the antenna component, or could I try to solder it back on, or does it even matter? Thanks in advance.

    Johannes Jüptner -

  37. pUhR2FTYYZMlqCPZ
    • Togli il componente antenna superiore sinistra.

  38. WCaxo3BGkjxOEdgo
    WCaxo3BGkjxOEdgo
    AUkubFnnLQIa2AJE
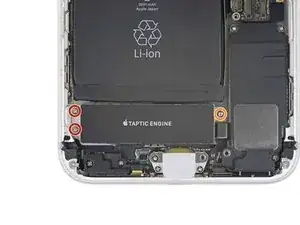
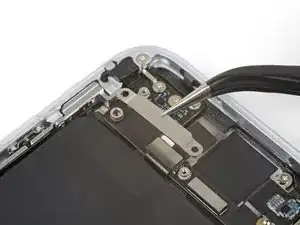
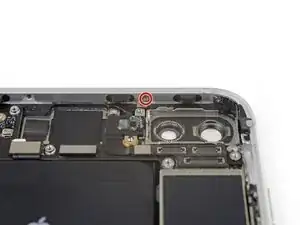
    • Rimuovi le tre viti di fissaggio della staffa a forma di L vicino al Taptic Engine:

    • Una vite Torx Y000 da 1,3 mm

    • Una vite a croce Phillips da 2,6 mm

    • Una vite a croce Phillips da 3,5 mm

    De Y000 schroef nam meteen ook de  2.4 mm standoff-schroef aan de achterzijde mee. Wat lastig om die uit elkaar te halen.

    nilsplackle -

  39. 6d3fHeGCOLMXrDif
    • Rimuovi la staffa.

  40. DFBBDfUmIWeEKUjL
    DFBBDfUmIWeEKUjL
    RWDskoH2EBsx1yhK
    xB11Y4PRLF2OXwUj
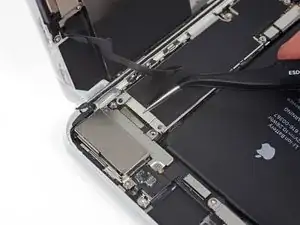
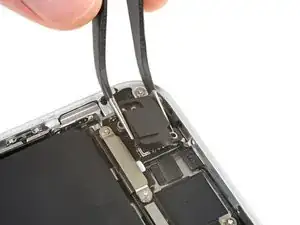
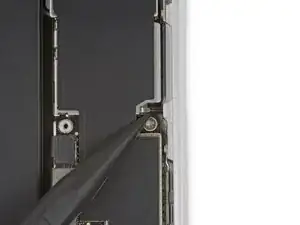
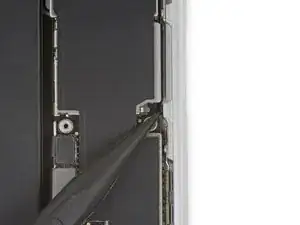
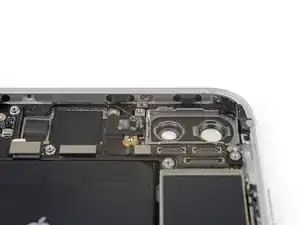
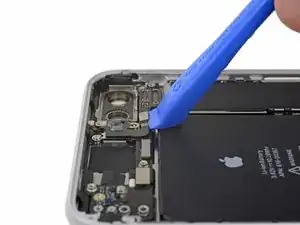
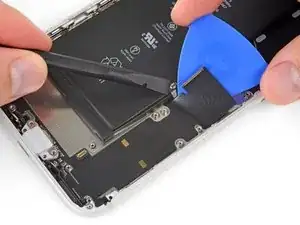
    • Usa un plettro di apertura per separare con cautela la parte del cavo flessibile dell'antenna incollata dalla superficie superiore dell'altoparlante

    • Questa parte del cavo flessibile è bloccata da adesivo poco tenace. Se necessario, applica un po' di calore con un iOpener o un asciugacapelli per ammorbidire l'adesivo. Questo rende più facile e sicuro separare (e far aderire di nuovo) il cavo flessibile.

    should i be worried if the piece with the two holes broke off

    Robert Quinn -

  41. vvOOoFAmmbASeNCN
    vvOOoFAmmbASeNCN
    GCLiDlktfSvveIjc
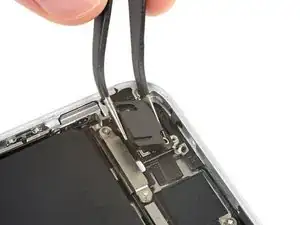
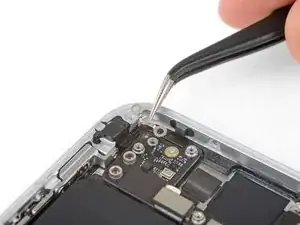
    • Usa la punta di uno spudger per staccare e scollegare dalla scheda logica il cavo flessibile dell'antenna.

  42. VsduvZZnGIWNXXkS
    VsduvZZnGIWNXXkS
    wkZ23mfXWbWi34X4
    nCxYacnrqCRk33ad
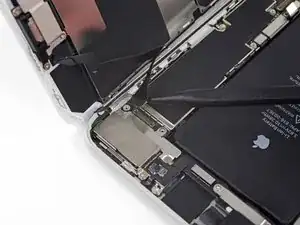
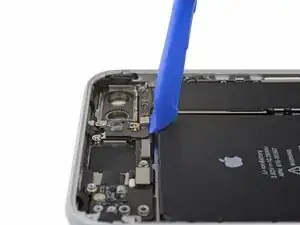
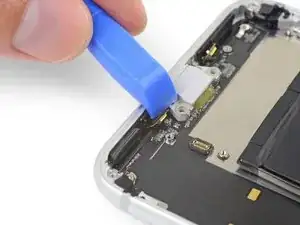
    • Con la punta di uno spudger stacca e scollega l'altra estremità del cavo flessibile dell'antenna dal suo zoccolo vicino alla porta Lightning.

    • Collegare di nuovo questo cavo può essere complicato. Per semplificare l'azione, usa le tue pinzette per tenere in posizione il cavo flessibile in modo che il connettore si allineato con il suo zoccolo. Quindi, premi dolcemente verso il basso il connettore con l'estremità piatta dello spudger finché non senti il clic che conferma l'inserimento.

    I was unable to plug this back in when re-assembling. My home button doesn’t work anymore. The connector it was supposed to plug into seems to spin around.

    Dan Putnam -

    I had a similar experience during this repair. My problem was that the nib on the ribbon that actually connects in to the socket came off the ribbon cable when I initially detached the cable. I didn’t realize this until after the repair, but I also had to replace the Wifi Diversity cable entirely. A tell-tale sign is that you don’t receive good cell reception.

    Lucas -

    I did not notice until reassembly, but the antenna socket pulled off the board. I have no micro-soldering tools. The friction of the connector was greater than the solder holding it in place.

    David Hampson -

    The little connector in the first picture ripped the component off the circuit board when trying to pry it up so be careful. I’m guessing it’s like a previous poster said and the socket is stronger than the glue/material that holds the component to the PCB. This was on a new board during disassembly trying to locate a potential problem. Phone still workings with WiFi and cellular normally but the cellular signal is down about 1/3 on average wherever I am.

    J.Garrecht Metzger -

    Calling this step tricky is an understatement 😅

    cytur -

    Mine broke too and wifi still works fine

    Does this have anything to donwith upper speaker connection?

    Umit Battal -

  43. ICJgunKoBJ6LEXMF
    • Rimuovi l'antenna diversity del Wi-fi.

    This had a little adhesive on the metal band. Couldn’t just pluck it out as shown. What I did worked but what I should’ve done is run my blue puck up and down the length.

    Mark Hintze -

    I followed these steps to this point and maybe applied force in the wrong spot or too much force and it appears that when I loosened the wifi diversity antenna from the socket below the Taptic Engine module, it came up with the socket detached from the logic board. Did I just really screw up my iPhones WiFi capability?

    Joel Potter -

  44. ihmJZqssPBXO2qXW
    ihmJZqssPBXO2qXW
    6aHZVX2GXwlZC1yt
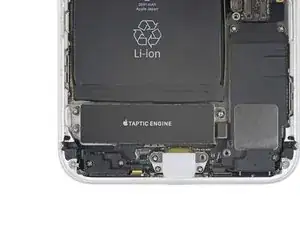
    • Rimuovi le tre viti che fissano la staffa vicino al Taptic Engine:

    • Due viti a croce Phillips da 1,5 mm

    • Un distanziale a vite da 2,4 mm

    • Per rimuovere distanziali a vite l'ideale è usare un cacciavite per distanziali o una punta specifica.

    • In caso di emergenza, può bastare un piccolo cacciavite a taglio, ma è necessaria un'estrema cautela per evitare che scivolando possa danneggiare i componenti circostanti.

  45. OjZ4vHLPiHQIAra1
    OjZ4vHLPiHQIAra1
    UMecLjXrJlTCxdcr
    • Usa la punta di uno spudger per staccare e scollegare il cavo flessibile del Taptic Engine.

  46. hDiqTTJ5Uiihvesu
    • Rimuovi il Taptic Engine.

  47. y1RXPZLKQWXhwKIE
    y1RXPZLKQWXhwKIE
    ShS12cauMgEZooeP
    AoIWdCsCIrCvfbZn
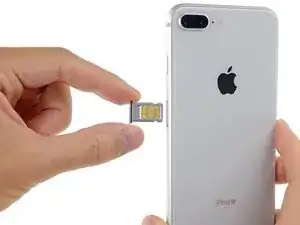
    • Inserisci lo strumento di estrazione SIM o una graffetta nel piccolo foro del vassoio della scheda SIM.

    • Premi saldamente per espellere il vassoio.

  48. tFMNtgDcIW4taL2J
    tFMNtgDcIW4taL2J
    foUq1QMiL4xXHpMc
    • Rimuovi il vassoio della scheda SIM dall'iPhone.

    • La scheda SIM cade facilmente dal vassoio.

    • Quando inserisci di nuovo la scheda SIM, assicurati che sia correttamente orientata rispetto al vassoio.

    • Una sottile guarnizione di gomma attorno al vassoio della scheda SIM protegge dall'intrusione di acqua e polvere. Se questa guarnizione è danneggiata o manca, sostituiscila per proteggere i componenti interni del tuo iPhone.

  49. H5H4XhGfBwRSZv51
    H5H4XhGfBwRSZv51
    oCXXlngamniCnHvI
    WODSnbZ1eGHJl2QW
    • Usa la punta di uno spudger per spostare il cursore di estrazione della scheda SIM lontano dalla scheda logica.

  50. rG3tLqQexjHjKGeT
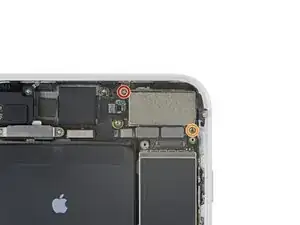
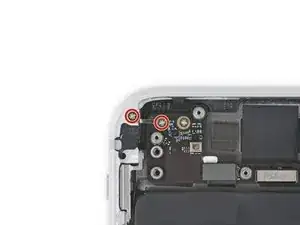
    • Svita le due viti a croce Phillips che fissano la staffa che copre il connettore del cavo superiore:

    • Una vite da 3,1 mm

    • Una vite da 1,3 mm

    • Ricordati che la vite più lunga si trova a sinistra.

    the right screw is 1,33mm, not 3,1mm.

    Boni Zei -

    Die rechte Schraube ( Orange) ist eine 1,3mm Kreuzschlitzschraube

    Schachprinz -

    Geändert! Danke für den Hinweis.

    VauWeh -

  51. Uk1vWJNRxp2DPADp
    • Rimuovi la staffa del connettore del cavo superiore.

  52. WjA4Y2btIYInoFDK
    WjA4Y2btIYInoFDK
    hhDUnpeQODvDfo3y
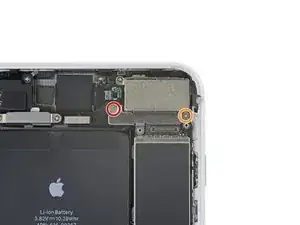
    • Svita le due viti a croce Phillips da 1,2 mm che fissano la clip di messa a terra all'angolo superiore sinistro della scheda logica.

  53. EXukqKdQKCnjVKWq
    • Rimuovi la clip di messa a terra.

  54. 4dbEXkVPmKrMxDan
    4dbEXkVPmKrMxDan
    RQqWA4gKDgSS5cHW
    • Svita la vite a croce Phillips da 1,2 mm che fissa il cavo flessibile dell'antenna al bordo superiore del case posteriore dell'iPhone.

    Here happened the same...

    Johannes Jüptner -

  55. VQLHQnMj6EjHvWFJ
    VQLHQnMj6EjHvWFJ
    WLrdvusPXHr4OTKi
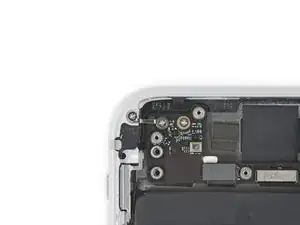
    • Usa un'unghia o la punta affilata di uno strumento di apertura iFixit per sollevare e scollegare il connettore del cavo flessibile dell'antenna dalla scheda logica.

  56. EcJAyvfNvnZjQb2D
    EcJAyvfNvnZjQb2D
    6sJnBLgdMyRXINCq
    • Fai scorrere l'estremità piatta di uno spudger sotto il cavo flessibile dell'antenna per staccare l'adesivo che lo tiene in posizione.

  57. YJq6IlJFwWqqfxlv
    YJq6IlJFwWqqfxlv
    yJHcKjAAvTGKNLMF
    yBXQVjCCZnASbKtt
    • L'occhiello della vite nella parte superiore del cavo flessibile dell'antenna è incastrato in una piccola cavità nel bordo superiore dell'iPhone.

    • Inclina il cavo flessibile dell'antenna verso l'alto e il bordo superiore dell'iPhone.

    • Fai scorrere l'occhiello della vite verso il basso e fuori dal suo incavo.

    • Togli il cavo flessibile dell'antenna.

  58. H1vDITQJMWQDcLDG
    H1vDITQJMWQDcLDG
    uLeGnmD4q3t6rD1L
    YAZgPcHkfcBPQCQc
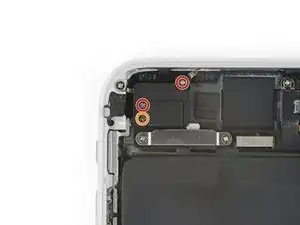
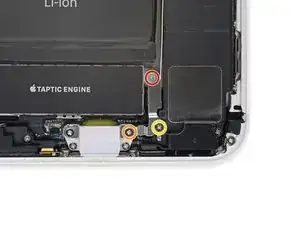
    • Svita le tre viti a croce Phillips che fissano l'altoparlante inferiore:

    • Due viti da 1,4 mm

    • Una vite da 2,4 mm

    • In fase di rimontaggio, spingi l'altoparlante verso il bordo inferiore dell'iPhone finché i fori filettati siano allineati e tienilo in questa posizione mentre installi le viti.

  59. fM3iWLQHyhfr2Ar5
    • Rimuovi l'altoparlante inferiore.

  60. VNEEH2foZABD3AoA
    VNEEH2foZABD3AoA
    4Zw3GLfENTderx3o
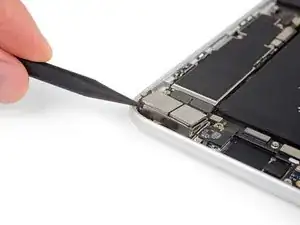
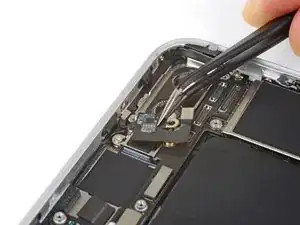
    • Facendo leva dal bordo superiore, usa un'unghia o uno spudger per staccare e scollegare il connettore del cavo superiore.

  61. iCmNhITYNROQFWfo
    iCmNhITYNROQFWfo
    YcgpFMoGgpfq1tkS
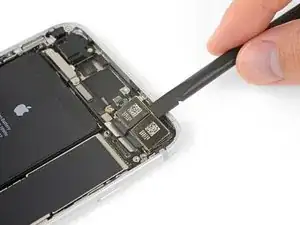
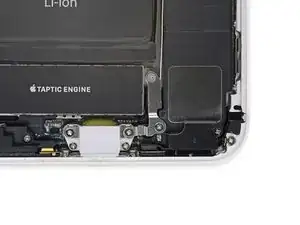
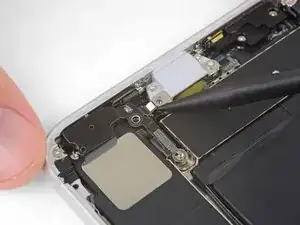
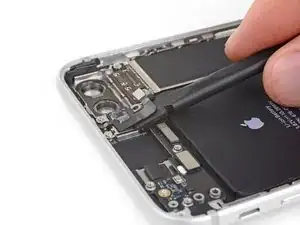
    • Adopera la punta di uno spudger per sollevare e staccare con cautela il cavo flessibile della bobina di ricarica wireless.

  62. cXe4UFIx52UEmW3M
    cXe4UFIx52UEmW3M
    dGKsIOpNELukWinO
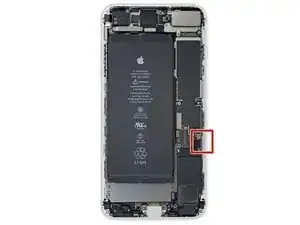
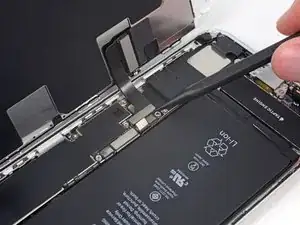
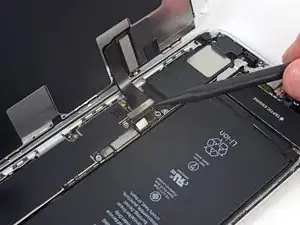
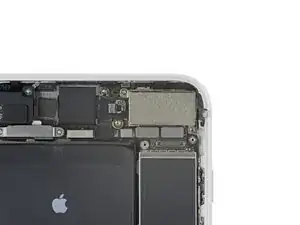
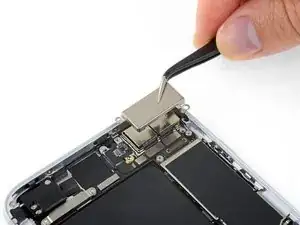
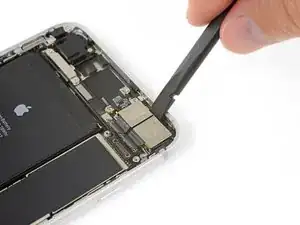
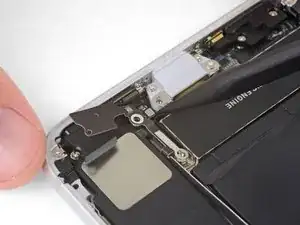
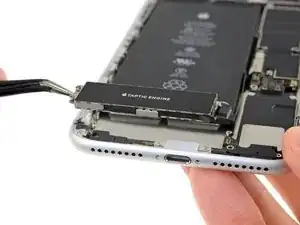
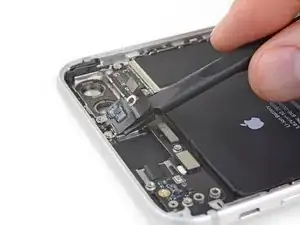
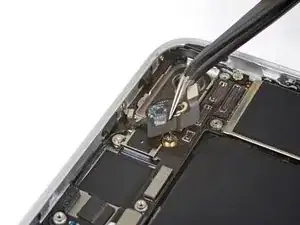
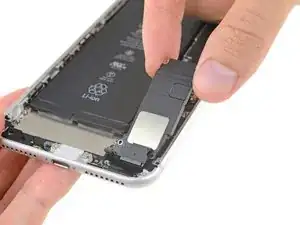
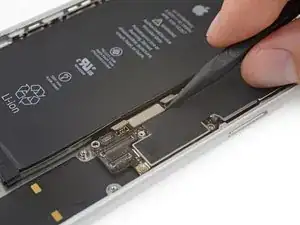
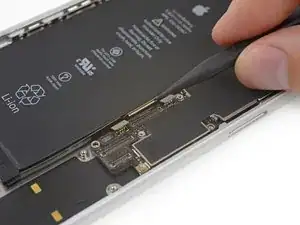
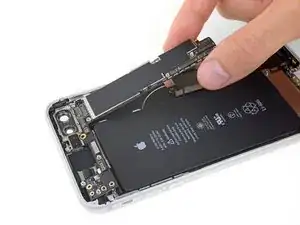
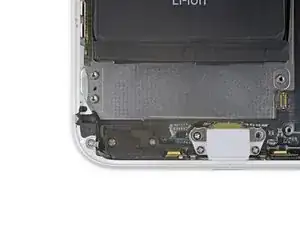
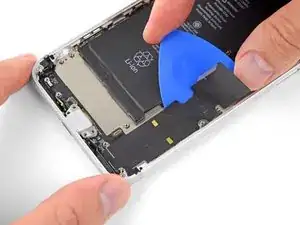
    • Solleva e scollega il cavo flessibile del gruppo connettore Lightning dalla scheda logica con la punta di uno spudger.

    I did this repair and I followed it too a T, but when I reassembled, the flex cable for the Lightning connector assembly keeps popping out. Ive replaced it twice and followed your guide exactly. No mistakes. But when I go to clip it back in, it always does that….

    12 oz Willie -

  63. q4MTRCrrRk22iIq4
    q4MTRCrrRk22iIq4
    a2BwTt5stkMpREeo
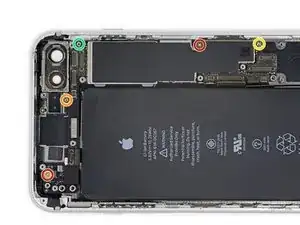
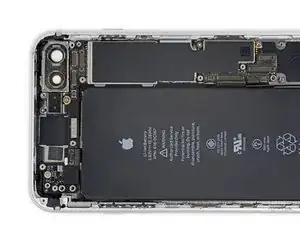
    • Svita le cinque viti che tengono in posizione la scheda logica:

    • Due viti a croce Phillips da 1,8 mm

    • Un distanziale a vite da 2,3 mm

    • Un distanziale a vite da 2,4 mm

    • Un distanziale a vite da 2,7 mm

    • Per rimuovere distanziali a vite l'ideale è usare una punta per distanziali a vite iPhone e l'impugnatura cacciavite.

    • In caso di emergenza, può bastare un piccolo cacciavite a taglio, ma è necessaria un'estrema cautela per evitare che scivolando possa danneggiare i componenti circostanti.

    My repair kit from iFixit included a standoff screwdriver bit. I do not recommend trying this without one.

    jefflongcore -

  64. siI4jrNrwaRChLLT
    siI4jrNrwaRChLLT
    QRXILyAWkqYhHGDt
    TAHKEMRDPwCCxX2G
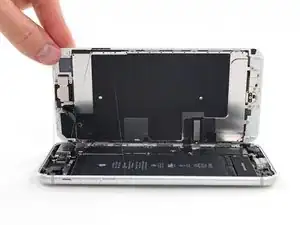
    • Solleva la scheda logica dai bordi inferiori e falla scorrere verso la parte inferiore dell'iPhone per rimuoverla.

    • Stai attento che la scheda logica non si impigli nei cavi.

    • In fase di rimontaggio nota la posizione della clip nera di messa a terra attaccata all'angolo superiore destro della scheda logica, vicino alle fotocamere posteriori. La scheda logica dovrebbe passare sotto la clip.

  65. iKSkqtWCxatoT2GP
    iKSkqtWCxatoT2GP
    JCbJlQQVkuSA1fIr
    • Svita le due viti a croce Phillips che fissano lo sfiato barometrico all'angolo inferiore sinistro dell'iPhone:

    • Una vite da 3,2 mm

    • Una vite da 1,8 mm

  66. 1pTfXBXwTOGJ3chQ
    1pTfXBXwTOGJ3chQ
    uTRBVQJTVXaNTH1I
    • Spingi con cautela lo sfiato barometrico verso la batteria per staccare l'adesivo che fissa lo sfiato al bordo inferiore dell'iPhone.

  67. bDBQ5xhjECsdJMe3
    • Togli lo sfiato.

  68. SwemnkZPsQYAWwok
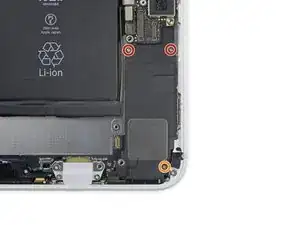
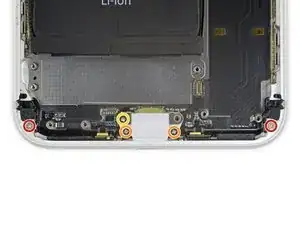
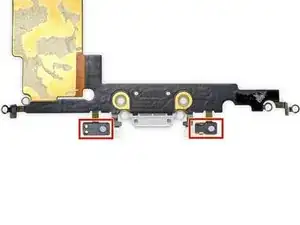
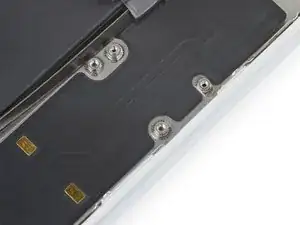
    • Svita le cinque viti a croce Phillips che attaccano il gruppo connettore Lightning alla cover posteriore:

    • Due viti da 1,2 mm

    • Due viti da 2,4 mm

    • Una vite da 2,5 mm

  69. ukt4OltpYrDbHl2e
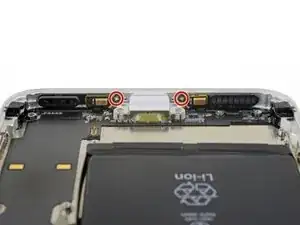
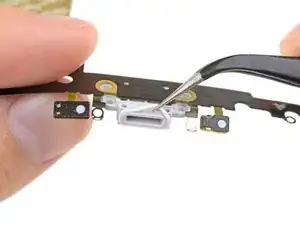
    • Togli le due viti a croce Phillips che fissano la porta Lightning al bordo inferiore dell'iPhone.

  70. gNWGFykX1WRE4fsn
    gNWGFykX1WRE4fsn
    HJ1gaAhr3AD6Sj4t
    uYkyBjaub21JbBy3
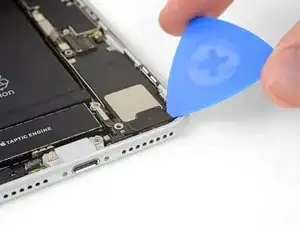
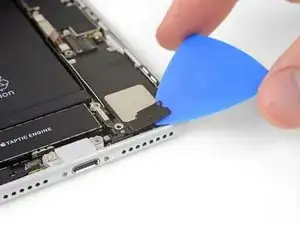
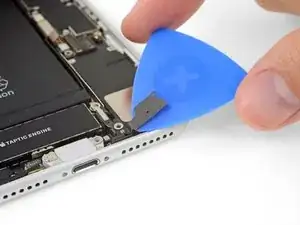
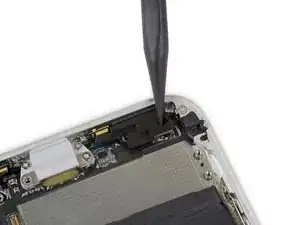
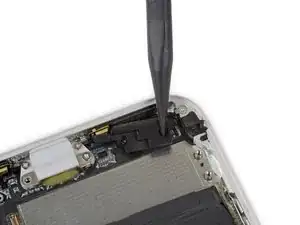
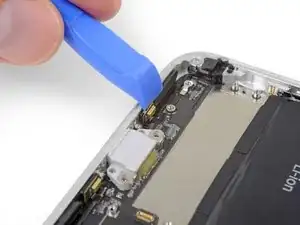
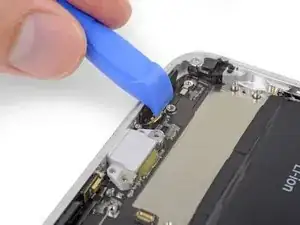
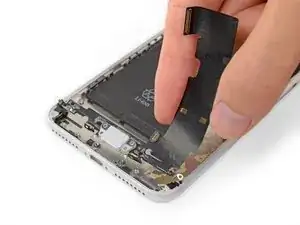
    • Usa il bordo affilato di uno strumento di apertura iFixit per staccare i due microfoni dall'adesivo che li fissa al bordo inferiore dell'iPhone.

    • Non provare ancora a rimuovere completamente i microfoni; staccali solo dall'adesivo come illustrato.

  71. PYMgWZEaQh5YiqVK
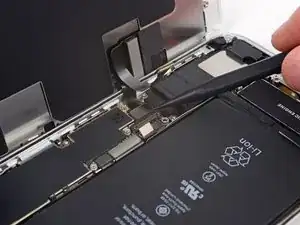
    • Applica un iOpener o usa un asciugacapelli per riscaldare il case posteriore dietro il cavo flessibile del connettore Lightning. Questa procedura ammorbidisce l'adesivo che tiene in posizione il cavo flessibile e permette di staccarlo più facilmente.

  72. LnTeTHje3ECOuAnG
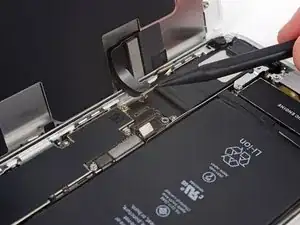
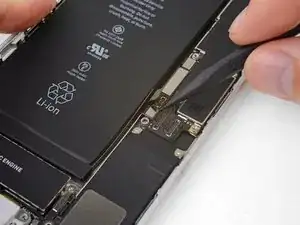
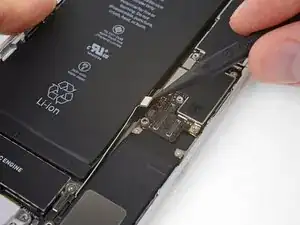
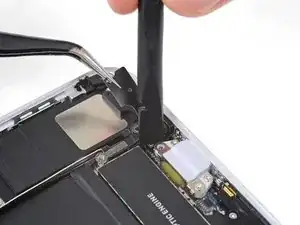
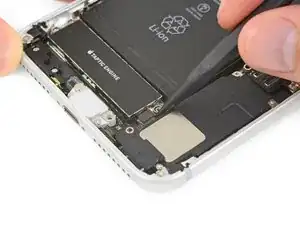
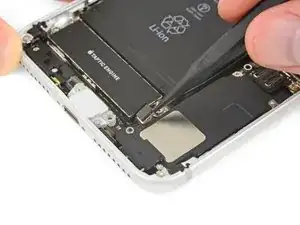
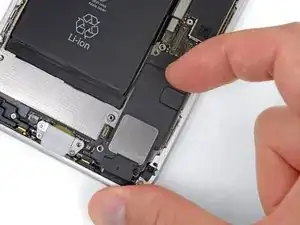
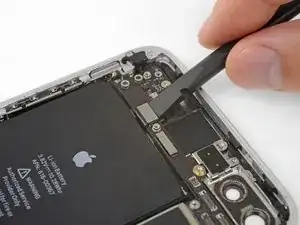
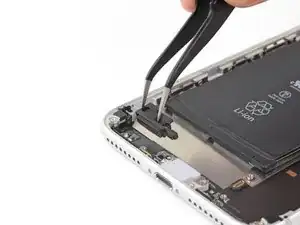
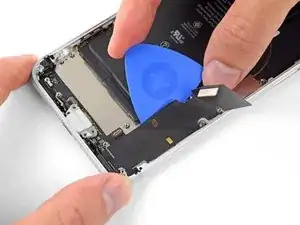
    • Adopera l'estremità piatta di uno spudger per allontanare con cautela il connettore del cavo flessibile della batteria dalla parte superiore del gruppo connettore Lightning.

    • Quando stacchi il gruppo connettore Lightning nei passi seguenti, stai attento a non danneggiare accidentalmente il cavo flessibile della batteria.

  73. rskFZJpCMYapk1Cu
    rskFZJpCMYapk1Cu
    ruPR6XUJmACDhRgd
    yT3L2YUIUgubMSjL
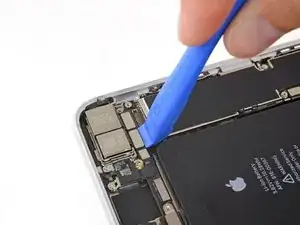
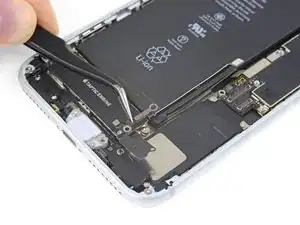
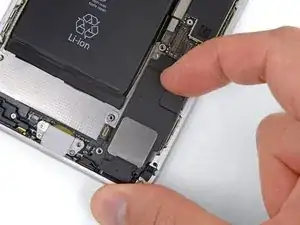
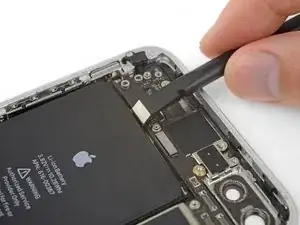
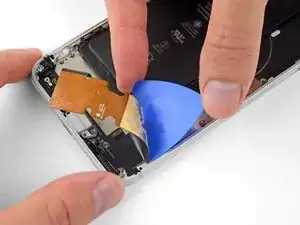
    • Fai scorrere un plettro di apertura o un sottile attrezzo da leva sotto la parte superiore del cavo flessibile del gruppo connettore Lightning.

    • Fai scorrere con cautela il plettro verso il bordo esterno dell'iPhone (allontanandolo dalla batteria).

    • Una parte della bobina di ricarica wireless si trova direttamente sotto questo pezzo del cavo del connettore Lightning. Se sei troppo aggressivo nel far leva, potresti danneggiare la bobina.

    • Se necessario, usa di nuovo il tuo asciugacapelli o iOpener per riscaldare l'area dietro il cavo flessibile del gruppo connettore Lightning al fine di staccarlo più facilmente.

  74. 4j5RFqDZsFxbdTgu
    4j5RFqDZsFxbdTgu
    H45RXudtV6hMD1HS
    QGcUhN4fZTKkEMGn
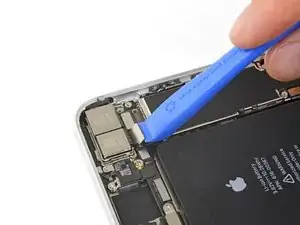
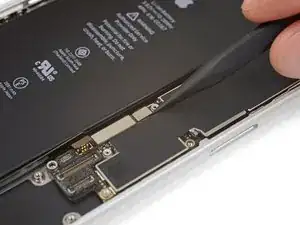
    • Continua a staccare la parte superiore del cavo flessibile del connettore Lightning, stando attento a non danneggiare nessun componente vicino.

    • Spingi il connettore della batteria con cautela da parte in modo da non danneggiarlo.

    • Fai molto attenzione a non danneggiare la batteria stessa. Una batteria perforata può rilasciare sostanze chimiche pericolose e/o prendere fuoco.

  75. eCitBmIpfyUkCuZr
    eCitBmIpfyUkCuZr
    XTrk6JVaV2CACXlW
    KOT4cuGXix1vAFqp
    • Continua a separare il cavo flessibile del gruppo connettore Lightning finché superi il bordo inferiore della batteria.

  76. gUOk3jbaiLvJsfTi
    gUOk3jbaiLvJsfTi
    FBBELu3Wbg51EHMN
    • Fai scorrere con cautela il tuo plettro dall'angolo della batteria verso l'angolo dell'iPhone per staccare la parte del cavo flessibile che aderisce al telaio esterno.

  77. ZSMBK5AYeo2eA2BU
    ZSMBK5AYeo2eA2BU
    3eEeqfZSRT5HFgcG
    ZykMpGUROTMLj5Io
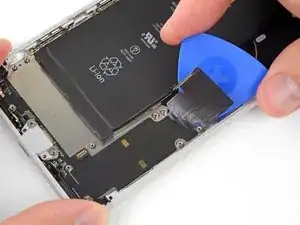
    • Fai scorrere il tuo plettro lungo la larghezza dell'iPhone per staccare le parti rimaste del gruppo connettore Lightning dal case posteriore.

    What purpose do the ribboned screw brackets or bosses have

    Hunter Shaver -

  78. XKBSR1R2DHqRRiMq
    XKBSR1R2DHqRRiMq
    MDqicSlay5IKTNs2
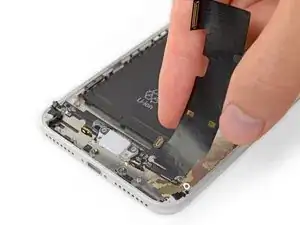
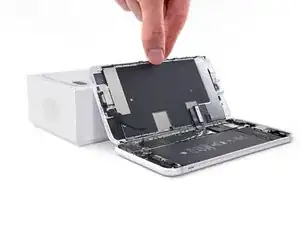
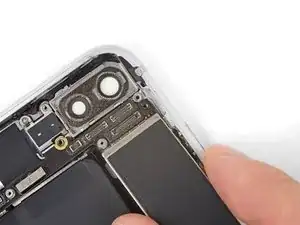
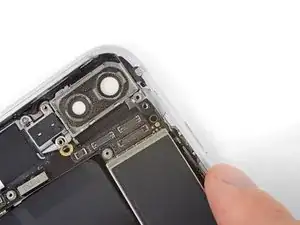
    • Rimuovi il gruppo connettore Lightning.

    • Prima di installare o rimuovere il gruppo connettore Lightning:

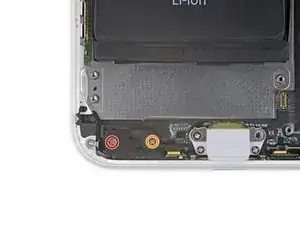
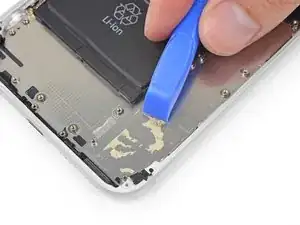
    • Adopera un attrezzo di plastica per staccare tutti i pezzi di adesivo residuo dalla cover posteriore.

    • Pulisci accuratamente ogni residuo adesivo dalla superficie con alcol isopropilico (concentrazione pari o superiore al 90%) e un panno privo di pelucchi. Passa il panno in un'unica direzione, non avanti e indietro.

  79. vLm2U3mfWsPJJkNk
    vLm2U3mfWsPJJkNk
    TUVHPxBDuEJgXPUh
    lRX1GZeLIluvhuWN
    • Una guarnizione di gomma sulla parte inferiore del connettore Lightning protegge il tuo iPhone dall'intrusione di acqua e polvere. Se installi un nuovo gruppo connettore Lightning, dovrai forse rimuovere e trasferire la guarnizione sulla nuova parte.

    • Anche il piccolo pezzo di adesivo sotto ogni altoparlante protegge il tuo iPhone dall'intrusione di acqua e polvere. L'ideale è sostituire i due pezzi di adesivo prima di installare il tuo gruppo connettore Lightning.

    • Importante: In fase di rimontaggio posiziona correttamente il tuo nuovo gruppo connettore Lightning in modo che i ritagli nel cavo siano centrati attorno ai quattro fori filettati. In caso contrario il cavo sarà disallineato e non sarà possibile riconnetterlo al suo zoccolo sulla scheda madre.

    Dopo la sostituzione non funziona più il microfono, ma se non ho capito male i microfoni sono integrati nel gruppo connettore di ricarica giusto? Questo significa che è difettoso? Non mi pare sia possibile montarli male (dato che appunto in effetti non sono da montare). Potrebbe essere qualche impostazione nel sistema operativo per abilitare i nuovi microfoni?

    giulio carlini -

    Correctly positions the new Lightning connector assembly is very important! I found that event the slightest misalignment will prevent you from easily reconnecting the flex cable to the logic board. I had to remove the logic board and peel back some of the new adhesive on my replacement Lightning connector a few times in order to get the proper alignment. I found it useful to plug in the flex cable prior to mounting the logic board so that you have at some leeway when lining up the connectors.

    Lucas -

    Make sure to save the rubber gasket for the lightning connector as my kit did not come with a replacement. The kit also included replacement screens for the microphones but no instructions or labelled parts so you’ll have to use your best guess as to how to install them. Make sure to take pictures of the old screens before you pull them out and use those pics as reference.

    J.Garrecht Metzger -

Conclusione

Confronta la tua parte nuova sostitutiva con quella originale: potrebbe essere necessario trasferire alcuni componenti o rimuovere supporti adesivi dalla nuova parte prima di installarla.

Per rimontare il tuo dispositivo, segui i passi qui sopra in ordine inverso.

Porta i tuoi rifiuti elettronici a un riciclatore certificato R2 o e-Stewards.

La riparazione non è andata secondo i piani? Vai sulla nostra comunità Risposte per trovare aiuto nella risoluzione dei problemi.

Jeff Suovanen

Membro da: 06/08/13

426762 Reputazione

17 commenti

40 minutes seems crazy fast for this repair. If anyone can do this entire repair from beginning to end utilizing these steps in 40 minutes… they should spend a day or two practicing the Rubik’s cube and go smash the world record.

The guide helped me accomplish the repair. So, for that, thank you very much.

andystills -

Very well done and easy to follow. Great piece of work and I appreciate the time spent putting it all together.

Have repaired 2 other iPhones, 6 and 6S, using the guides found here. When confronted with the iPhone 8 plus repair this is the site I came to.

Again, very well done indeed.

Kudos

Rick W -

Where dose one find a new gasket for the lighting cable?

Joshua spaulding -

You will not find a more comprehensive or thorough or accurate guide to dismantling and replacing the charging port on an iPhone 8 Plus than this. Awesome guide, thanks for your attention to detail and thoroughness! Bravo!

Will White -

Thank you very much for the very detailed repair instructions. My microphone wasn’t working properly and I was able to get it fixed for just $12! (got the replacement from eBay)

Vishvaka Ranasinghe -

Dopo la sostituzione non funziona più il microfono, ma se non ho capito male i microfoni sono integrati nel gruppo connettore di ricarica giusto? Questo significa che è difettoso? Non mi pare sia possibile montarli male (dato che appunto in effetti non sono da montare). Potrebbe essere qualche impostazione nel sistema operativo per abilitare i nuovi microfoni?

giulio carlini -

Mi correggo, ho problemi solo durante le chiamate, se uso l’app note vocali o whatsapp o faccio video con entrambe le fotocamere non ho problemi

giulio carlini -

Why is removing the camera and antenna necessary for replacing the lightning port?

nvrm i see why

Miles Henry -

Buon pomeriggio, devo fare i complimenti al sito per come e dettagliato ogni guida e riparazione. adesso ho finito di riparare un iphone 8 plus e va una bomba

Rocco Granato -

Wish I had been told I would need a standoff screwdriver before I was halfway into taking the thing apart…

Nathaniel Moliterno -

This was not a quick job. It took me far longer than expected because the sound did not work the first time that I re-assembled it. I took the phone back apart far enough to remove the speaker and clean the contacts. On re-assembly, it would not boot cleanly. It continuously rebooted until I had to restore to factory settings and reload from save.

Make sure you have a current save _before_ you do this repair.

jefflongcore -

I want to let everyone know that it is absolutely unnecessary to remove the entire logic board when doing this repair. You only need to remove the SIM holder and the the 2 (or 3 on XR) logic board screws (2 saddle screws and 1 Phillips on XR, 2 saddles on 7/8 series) that hold the logic board down. Once those are removed, you can gently lift the lower end of the logic board up enough to slide the portion of the dock flex that is under the logic board out from under the logic board. A few things to keep in mind when removing the existing port are that once all screws and brackets and such are taken off, you need to start the pulling up and removal of the old charging port flex starting from the very bottom first, I start with the with the 2 microphones and then the lightning port itself. As you free the existing port from the bottom upwards, when you peel up the flex where it is held down with adhesive nearing the logic board, it will then simply slide out from under the logic board.

Show less

Chad McCollister -

Ran out of characters!..When you go to install the new port, you must START the process by sliding the new flex cable back up underneath the logic board first (you may need to hold the battery flex cable out of the way a bit and pre bend the new ports flex cable at the connector so that it will slide up easily) and then attach the new flex cable to the connector on the logic board FIRST before you do any other screw or adhesive installations. This way you don't end up struggling to try to get the connector to re-connect to the logic board at the end. If you don't do it this way and you start re-installing the new port from the bottom without pre-connecting it to the logic board, any slight misalignment may cause the connector to not line up properly when you go to connect it to the logic board. I feel on any iPhone component removal/replacement, the less extra parts and connectors you have to touch, pry on, disconnect and/or remove and then reconnect, the better. Good luck all! - Chad from GURUmicro.

Show less

Chad McCollister -

This was a very helpful guide and the photos were really well done. A few pointers for newbies to iPhone repair like myself.

1) The base install (no mesh screen replacements near the microphones) is about 3 hours. Another 45 minutes or so for the mesh screens as there were no instructions.

2) There were no instructions on how to start the phone back up so here is what happened to me. After plugging everything back in (but the phone screen still physically separated from the phone body) I could not start the phone from the battery despite it having about a 30% charge. I ended up taking the phone apart 2 times checking all the connections but couldn’t find a faulty one. In this process I ended up snapping a part related to the antenna off of the PCB (Step 36, see comment above). What ended up working was plugging the phone into a fast charger and waiting about 5 minutes. I wasn’t able to start it after 1 minute and was worried, but after 5 minutes it booted up normally and everything is fine.

J.Garrecht Metzger -

Does this remove any functionality with the phone? I know apple is very difficult with the “right to repair”. At least with replacing the home button and battery, fingerprint and battery health functionality is removed. Does something similar happen with this?

Bryan White -

The microphone of my Iphone8 plus isn't working and the speaker isn't sounding nice, what should I do?....

trust ikara -

As someone with very little to no experience repairing smartphones, I will say that 40min-2hrs is very generous. It took me almost 9 hours to replace both the lightning cable adapter and the battery at the same time, and most of that was just working through the adhesives of both the display and the battery. The second-most time-consuming part was just keeping each screw labeled and organized - I used some sticky tabs to keep the screws in the cardboard trays that the replacement parts came in. Aside from that, the repair process wasn't bad at all. I made some mistakes: I accidentally scraped off some of the black film (graphite?) that was on the logic board, and I placed the new adapter just slightly too far to the right, which made plugging it into the logic board later a bit difficult. If I had to do it again, I would definitely prefer to try the Anti-Clamp and the iOpener - I had neither for this repair, and I would bet having both would have made it much easier. It'd be nice if they came with the tools.

Tyler Drake -