
Introduzione
Strumenti
-
-
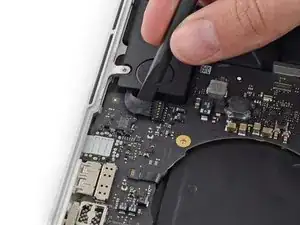
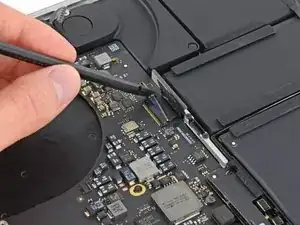
Usa l'estremità piatta di uno spudger per sollevare il connettore dell'altoparlante sinistro e staccarlo dal suo zoccolo sulla scheda logica.
-
Usa la punta di uno spudger per sollevare il connettore dell'altoparlante destro e staccarlo dal suo zoccolo sulla scheda logica.
-
-
-
Stacca il nastro adesivo che copre il connettore del cavo a nastro della tastiera.
-
Usa l'estremità piatta di uno spudger per alzare la linguetta di fissaggio sullo zoccolo ZIF del cavo a nastro della tastiera.
-
Usa l'estremità piatta di uno spudger per spingere il cavo a nastro della tastiera fuori dalla sua sede.
-
-
-
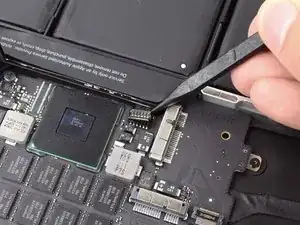
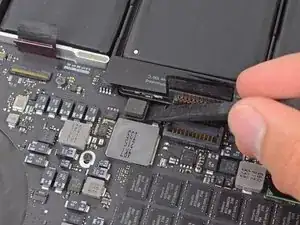
Usa l'estremità piatta di uno spudger per staccare dal suo zoccolo il connettore del cavo a nastro del trackpad.
-
-
-
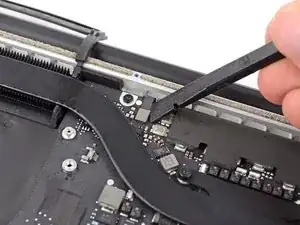
Usa l'estremità piatta di uno spudger per staccare il connettore della retroilluminazione la tastiera dal suo zoccolo sulla scheda logica.
-
-
-
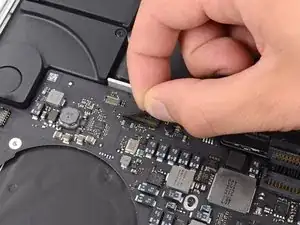
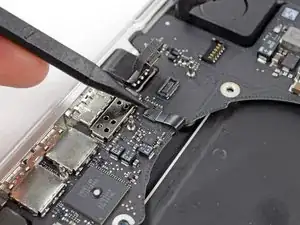
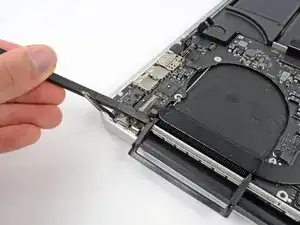
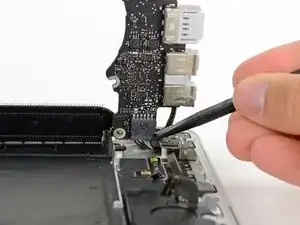
Usa la punta di uno spudger oppure un'unghia per far scattare la linguetta di bloccaggio sullo zoccolo ZIF del cavo a nastro del microfono.
-
Tira il cavo a nastro del microfono fuori dal suo zoccolo.
-
-
-
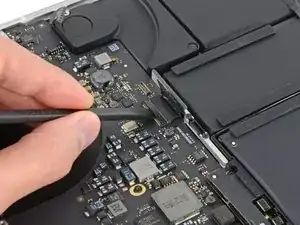
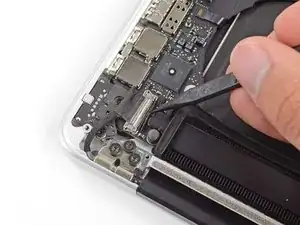
Usa la punta di uno spudger per alzare il blocco del cavo dati del display e ruotalo verso il lato del computer con la presa di alimentazione DC.
-
Tira il cavo dati del display fuori dal suo zoccolo sulla scheda logica.
-
-
-
Usa l'estremità piatta di uno spudger per staccare la copertura in gomma della vite disposto sulla testa rialzata della vite vicino al connettore MagSafe2.
-
-
-
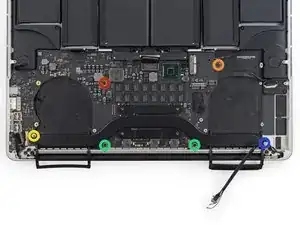
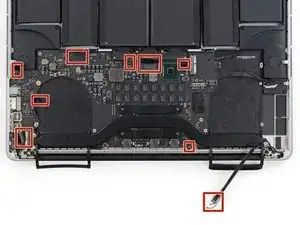
Rimuovi le seguenti sei viti che fissano il gruppo della scheda logica al case superiore.
-
Una vite Torx T5 da 3,1 mm
-
Una vite Torx T5 da 2,5 mm
-
Una vite cromata Torx T5 da 5,5 mm a testa rialzata
-
Due viti Torx T5 da 5,7 mm
-
Una vite Torx T5 da 3,8 mm
-
-
-
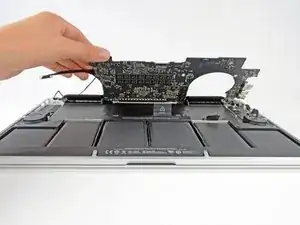
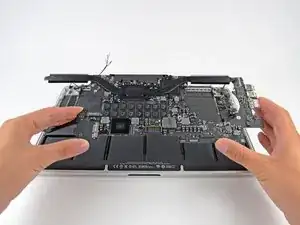
Sollevandola dal lato più vicino alla batteria, ruota la scheda logica verso la parte superiore del MacBook Pro.
-
Usando l'estremità piatta di uno spudger, spingi con cautela il connettore MagSafe2 fuori dal suo zoccolo nella parte inferiore della scheda logica.
-
-
-
Rimuovi il gruppo scheda logica dal MacBook Pro.
-
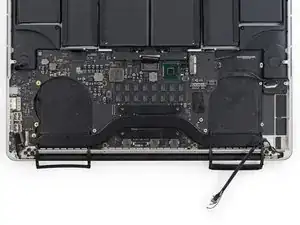
Quando reinstalli la scheda madre assicurati che tutti i cavi siano visibili e non siano rimasti intrappolati sotto la scheda.
-
In senso orario dall'alto: batteria, speaker destro, retroilluminazione tastiera, AirPort/fotocamera, display, microfono, speaker sinistro, tastiera e trackpad.
-

Per rimontare il tuo dispositivo, segui queste istruzioni in ordine inverso.
At this point, it should be noted that the author is using two different logic boards through the procedure. Here, for the first time is the difference between a 2.3 GHz board and the 2.6 GHz board. The audio out socket is integral to the 2.3 GHz board. The 2.6 GHz board has a discrete audio out jack that plugs into the logic board. As the disassembly proceeds, the 2.6 board’s audio outlet is unplugged (Step 26/27 pictures note this, but the author doesn’t. So, as I hoped, the 2.3 GHz board can be replaced by a 2.6 GHz board, IF you don’t want an audio out jack!
David White -
Correction. The two boards are NOT compatible. The battery connector and others do not align. A faulty 2.3 GHz logic board is no excuse to get a faster board.
David White -
Note that you should SLIDE not pull these out. Just broke one of them.
andershegelund -
On this model they should be pried straight up from the board as instructed. If your connector looks different from what’s shown in the photos, proceed with caution, verify your model number and make sure you’re following the corresponding guide.
Jeff Suovanen -
I totally missed the pry STRAIGHT UP instruction. I tried to slide one out and it sheared from the board, taking one copper trace with it. Poop!
Peter Kaczkowski -
On MID-2014 Retina, they definitely lift up and out.
MFMauceri -
On LATE-2013 Retina, they definitely lift up and out
KRIS -
This really was helpfully! Thanks!
Jan Dreyer -
VERY HELPFUL. Thank you.
Rafael Pérez -
Yes. This is tricky. Be VERY CAREFUL. I damaged it. I’m afraid this MacBook is RIP.
Richard Cacciato -
This was tricky. I pried up from where the cable enters the connector with a very small flat headed screwdriver - no spudgers to hand!
aaron.sarginson -
I can confirm. you LIFT UP on Mid-2014.
Costantino -
Yes, LIFT UP with 2,3GHz Late 2013
diplomat3000 -
As others have said, this was pretty nerve-wracking to release. I used the pointed end of a spudger and gently pried up on the plastic corner where the wires go into the connector. Not the wires themselves, but the plastic. I wasn’t sure it would work without breaking the connector until it precariously gave way from the board.
justinlyon -
Mid-2015 they lift up
Aaron -
What's the best way to reinsert the cable into the socket when re-installing?
footeking -