Introduzione

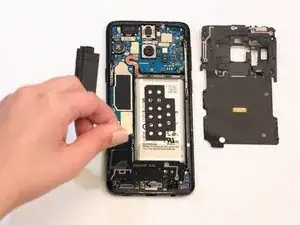
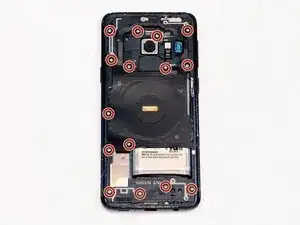
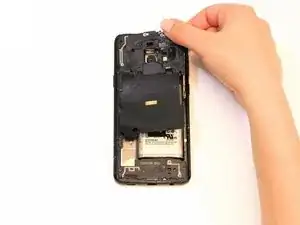
Segui questa guida per rimuovere o sostituire i telai di plastica che coprono le parti interne del telefono, inclusi i gruppi della bobina NFC e l'antenna.

  1. CG2lTSgDh1ZZ2YAR
    • Svita le quindici viti da 4mm con un cacciavite a croce Phillips #000.

  2. NA52q3ap63TeadVS
    • Rimuovi il gruppo della bobina NFC.

    This is not quite as easy as the simple statement “Remove the NFC coil assembly” would lead you to believe. The top and left side of the plastic bracket attached to the coil have tabs inserted into the frame of the phone and you can’t just pick the coil assembly up. It takes a bit of force, and I used a spudger to gently pry along the top from right to left to pop the tabs free, and then the tabs on the left came out more easily. Do not just pull on the coil and bend it up.

    drbenton815 -

    Yeah, for more detailed instructions, check the battery replacement guide and refer to steps 9 through 11.

    Evan Newman -

  3. LTeRVvgoAeGWnUiK
    • Rimuovi la staffa della scheda madre.

    My phone did not have a separate bracket covering the motherboard.

    jason boesiger -

    The NFC/wireless charging coil is adhered to the motherboard bracket, and in my case they both came off together.

    drbenton815 -

    Also, for safety, the battery connecter should be disconnected in this step rather than waiting until after removing the speaker cover/antenna assembly.

    drbenton815 -

    yeah, the coil assembly may take this off for you. pay attention!

    Evan Newman -

  4. NU5jI4KRBFqgPVWq
    • Rimuovi la copertura dell'altoparlante e il gruppo dell'antenna.

    Forgot step to disconnect battery.

    Kara Monster -

    Hi Kara! If I remember correctly, we didn’t need to remove the battery. However, it’s been over a year, so I could definitely be wrong.

    Ani Svadjian -

Conclusione

Per rimontare il dispositivo segui queste istruzioni nell'ordine inverso.

Sam Azevedo

Membro da: 24/01/19

736 Reputazione

0 commenti