
Introduzione
Per una riparazione semplice, usa il nostro |IF314-040|fix kit|new_window=true] e segui questa breve guida per la sostituzione dell´intero schermo del'iPhone. Per riparatori piú avanzati; questa guida aiuterá a sostituire ''solamente'' LCD e digitizer dell´iPhone (alias il "pannello frontale"). Per questo dovrete trasferire diversi componenti dallo schermo originale al nuovo prima di installarlo - inclusi fotocamera frontale, altoparlante, piastra di schermatura dell´LCD e gruppo pulsante home. È importante, in tutte le riparazioni di schermo/LCD, trasferire il tasto home originale, cosí da non perdere la funzione Touch ID (scansione delle impronte digitali). '''Puoi usare questa guida anche per sostituire le parti seguenti:''' * [guide
- Piastra schermatura LCD
- Sticker piastra schermatura LCD
- Supporto fotocamera anteriore
- Spugna protezione altoparlante voce
-
-
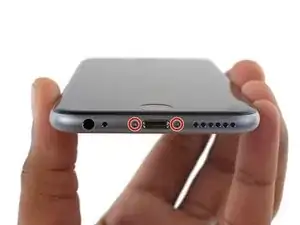
Rimuovi le due viti Pentalobe P2 da 3,4 mm sul lato inferiore dell'iPhone, su entrambi i lati del connettore Lightning.
-
-
-
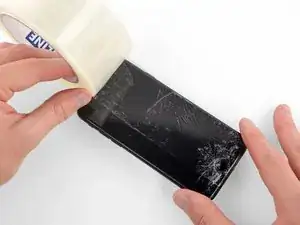
Se il vetro del display è rotto, l'uso del nastro adesivo sulla superficie impedisce alla rottura di espandersi e previene danni fisici dovuti alle schegge di vetro.
-
Stendi delle strisce sovrapposte di nastro adesivo da pacchi trasparente sul display dell'iPhone fino a coprire l'intera superficie.
-
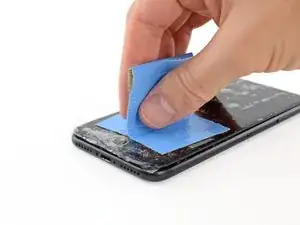
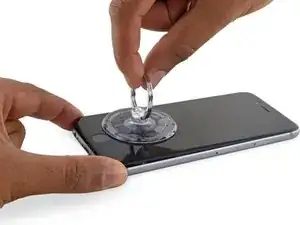
Se, a causa della rottura, risulta difficile far attaccare una ventosa come è descritto nei passi successivi, puoi provare a ripiegare un pezzo di nastro molto tenace (come il nastro americano) per farne una maniglia e sollevare con questo il display.
-
-
-
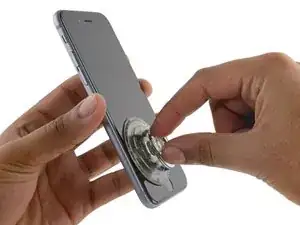
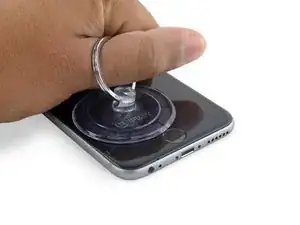
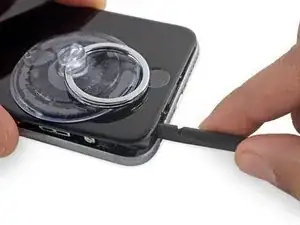
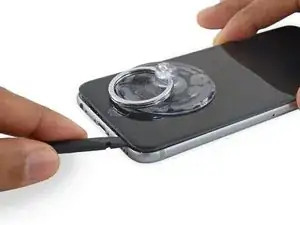
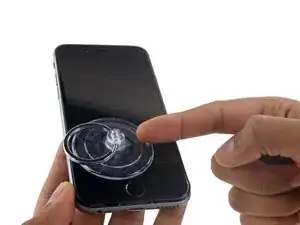
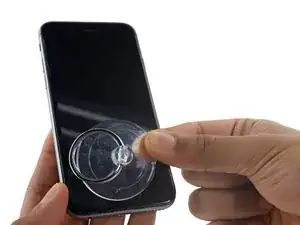
Applica una ventosa nell'angolo inferiore sinistro del gruppo display.
-
Assicurati che la ventosa non si sovrapponga al pulsante home.
-
-
-
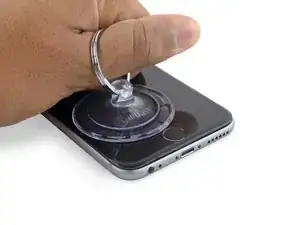
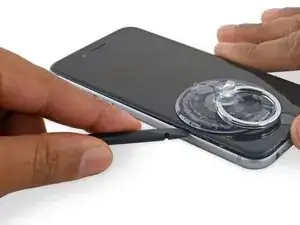
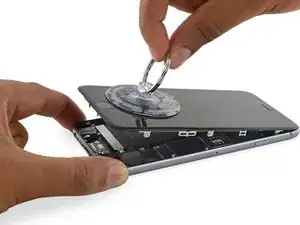
Tira la ventosa con una pressione forte e costante per creare una piccola fessura tra il pannello anteriore e il case posteriore.
-
-
-
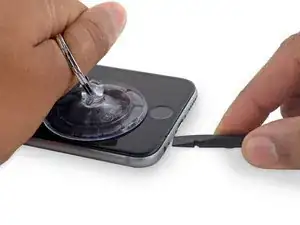
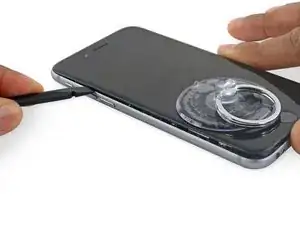
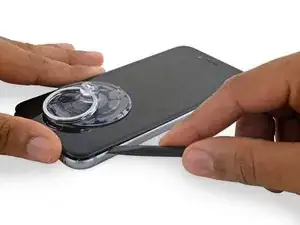
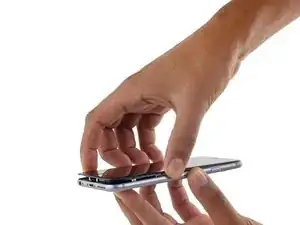
Inserisci la punta piatta di uno spudger nella fessura tra lo schermo e il case posteriore, direttamente al di sopra del jack cuffie.
-
-
-
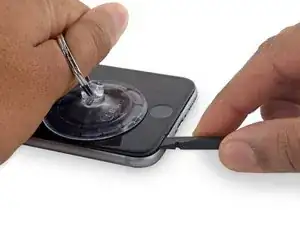
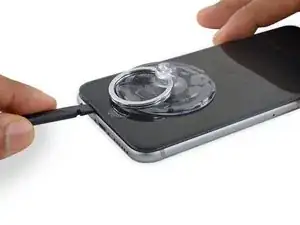
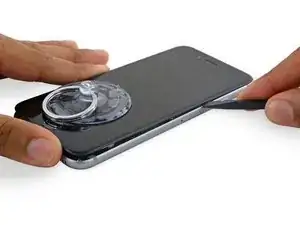
Inserisci la punta piatta di uno spudger nel lato sinistro del telefono, tra il gruppo display e il case posteriore.
-
Fai scorrere lo spudger lungo il lato del telefono per separare l'adesivo e liberare le clip di fissaggio.
-
-
-
Rimuovi lo spudger e reinseriscilo dal lato inferiore, dove hai iniziato ad aprire il telefono.
-
Fai scorrere lo spudger verso destra, lungo il lato inferiore del telefono.
-
-
-
Fai scorrere lo spudger anche lungo il lato destro per continuare a separare l'adesivo e liberare dall'iPhone le clip del display.
-
-
-
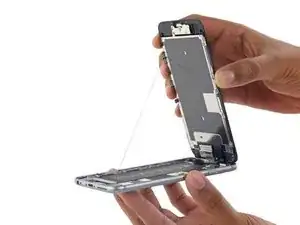
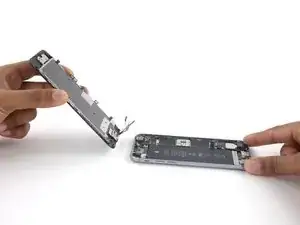
Afferra con delicatezza il gruppo display e sollevalo verso l'alto per aprire il telefono, usando le clip nella parte alta del pannello anteriore come una cerniera.
-
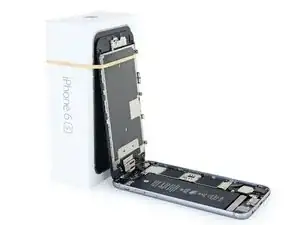
Apri il display a un angolo di circa 90° e appoggialo contro qualche cosa per tenerlo sollevato mentre tu lavori sul telefono.
-
Usa anche un elastico per tenere il display in una posizione sicura mentre lavori. In questo modo eviterai di forzare i cavi del display.
-
-
-
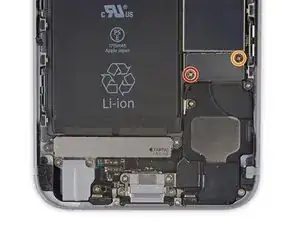
Rimuovi le due viti a croce Phillips che fissano la staffa del connettore della batteria:
-
Una vite da 2,9 mm
-
Una vite da 2,2 mm
-
-
-
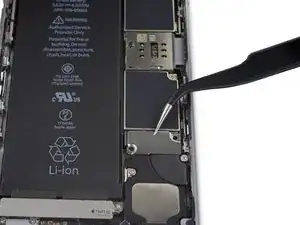
Usa la punta di uno spudger per disconnettere la spina della batteria facendo leva direttamente dalla scheda logica.
-
-
-
Spingi il connettore della batteria lontano dalla scheda logica finché rimane ben separato dal suo zoccolino per evitare il rischio di connessione accidentale alla batteria mentre lavori.
-
-
-
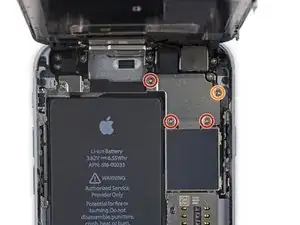
Rimuovi le seguenti quattro viti a croce Phillips che fissano la staffa del cavo del display:
-
Tre viti da 1,2 mm
-
Una vite da 2,8 mm
-
-
-
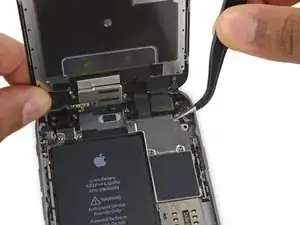
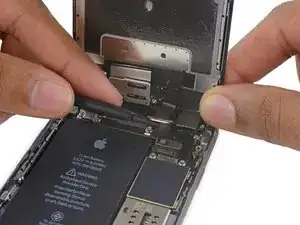
Usa uno spudger oppure un'unghia pulita per disconnettere il cavo flessibile della fotocamera anteriore facendo leva verso l'alto dal suo zoccolo sulla scheda logica.
-
-
-
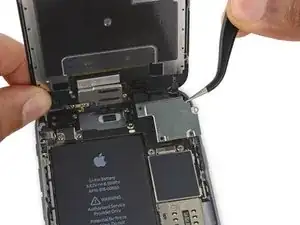
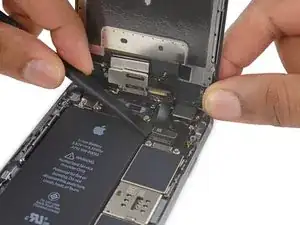
Scollega il cavo del digitizer facendo leva verso l'alto dal suo zoccolo sulla scheda logica.
-
-
-
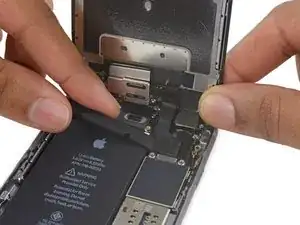
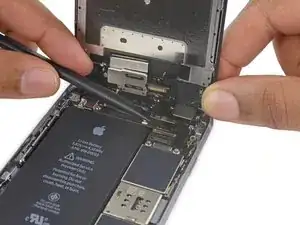
Scollega il cavo dati del display facendo leva verso l'alto dal suo zoccolo sulla scheda logica.
-
-
-
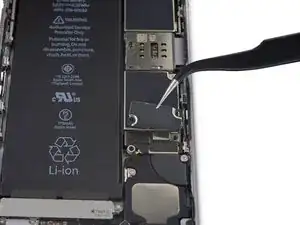
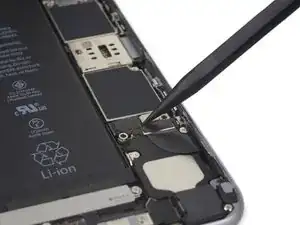
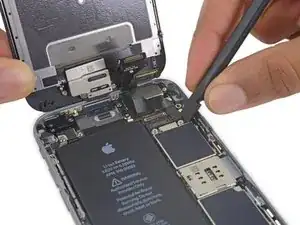
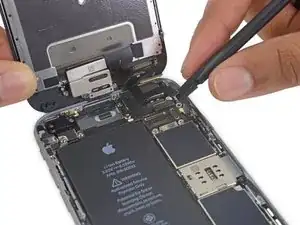
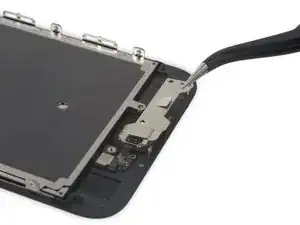
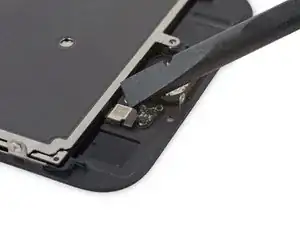
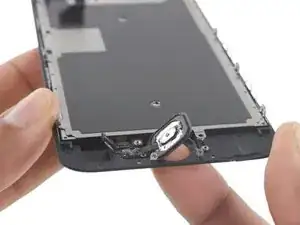
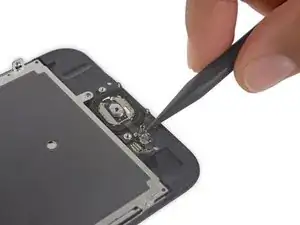
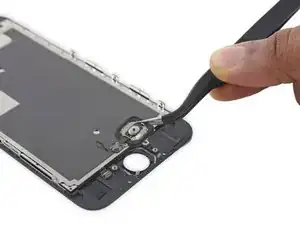
Solleva il bordo inferiore della staffa del pulsante home fino a liberare il piccolo piolino sul lato destro.
-
Fai scorrere verso l'esterno la staffa da sotto lo schermo antidisturbo EMI per rimuoverla.
-
-
-
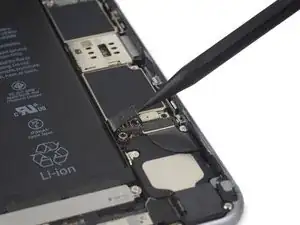
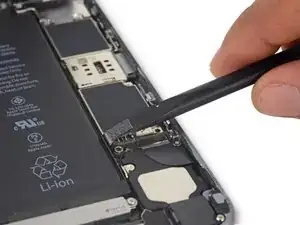
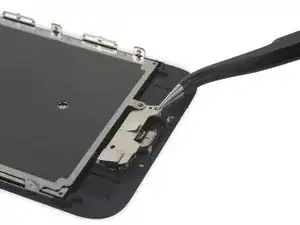
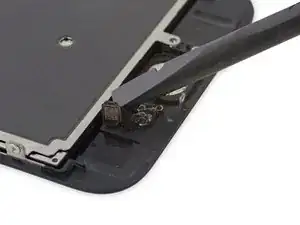
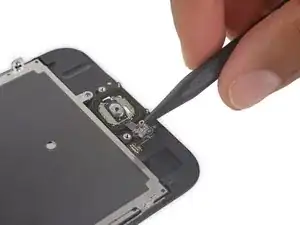
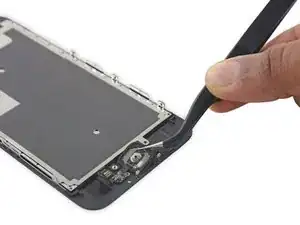
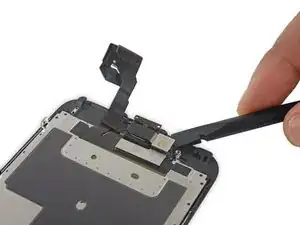
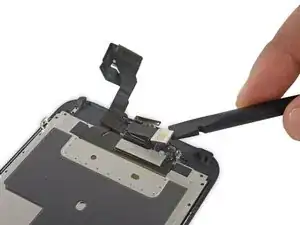
Usa uno spudger per staccare il connettore del pulsante home sollevandolo dal suo zoccolino sul retro del pannello display.
-
-
-
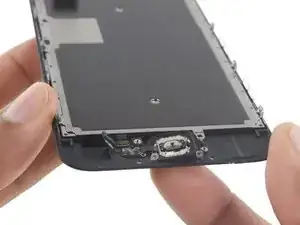
Applica un po' di calore (con un iOpener, una pistola termica o un asciugacapelli) per ammorbidire l'adesivo che fissa la guarnizione del pulsante home.
-
Usando la punta del dito, dalla parte frontale dello schermo, premi delicatamente verso l'alto il pulsante home. Applica una pressione decisa e costante per separare lentamente la guarnizione in gomma del pulsante dal pannello frontale.
-
-
-
Usa l'estremità appuntita di uno spudger per separare delicatamente il cavo flessibile del pulsante home dal retro del pannello display.
-
-
-
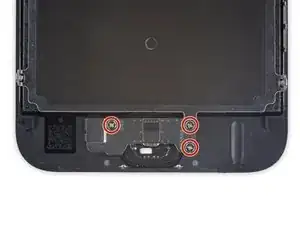
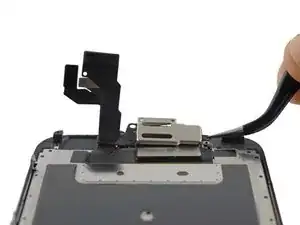
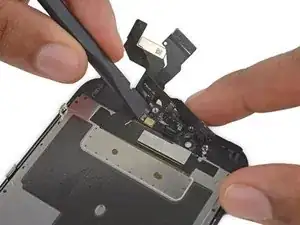
Rimuovi le seguenti tre viti Phillips che fissano la staffa dell'altoparlante voce:
-
Due viti da 2,3 mm
-
Una vite da 1,9 mm
-
-
-
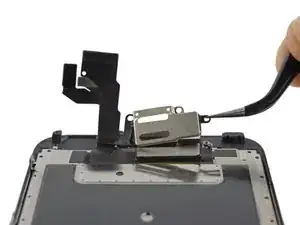
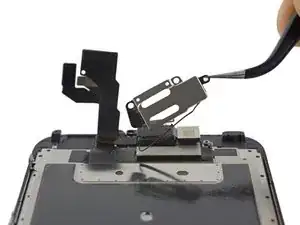
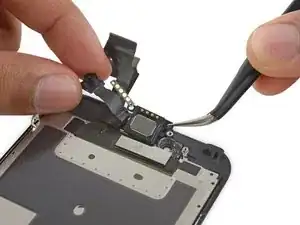
Solleva e rimuovi la staffa dell'altoparlante voce, staccando la guarnizione della staffa mentre procedi.
-
-
-
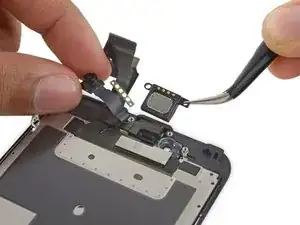
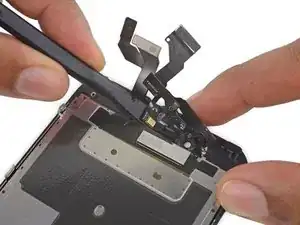
Usa l'estremità piatta di uno spudger per spingere la fotocamera anteriore fuori dal suo alloggiamento.
-
-
-
Usa l'estremità piatta di uno spudger per spingere la fotocamera anteriore fuori dal suo alloggiamento.
-
Rimuovi l'altoparlante voce.
-
-
-
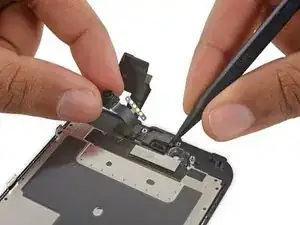
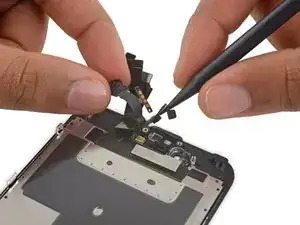
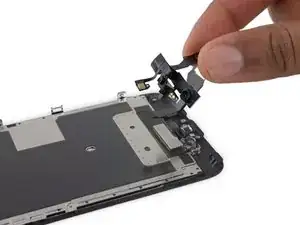
Tenendo distante la fotocamera anteriore, usa la punta di uno spudger per respingere il sensore luce ambiente fuori dal suo incavo nel pannello anteriore.
-
-
-
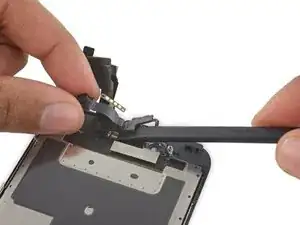
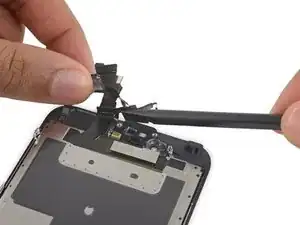
Usa l'estremità piatta di uno spudger per rompere delicatamente l'adesivo che fissa il microfono al pannello anteriore.
-
-
-
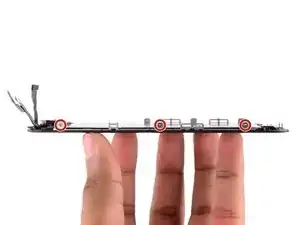
Rimuovi le seguenti sette viti Phillips da 1,3 mm:
-
Tre viti su ciascuno dei lati sinistro e destro del pannello display.
-
Una vite singola, 1,5 cm all'interno del lato destro dello schermo.
-
-
-
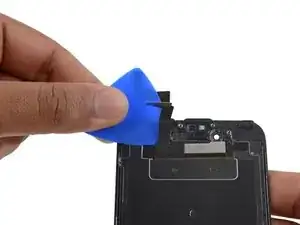
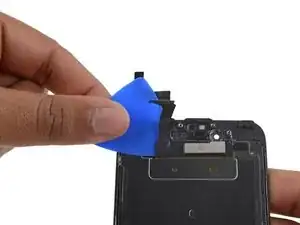
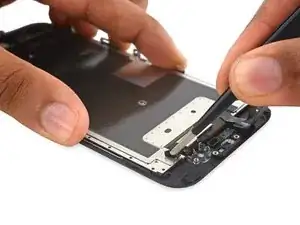
Prepara un iOpener e disponilo sul bordo superiore del telefono per allentare il nastro adesivo che fissa la schermatura EMI al pannello anteriore.
-
Dopo un minuto, inserisci una levetta di apertura tra il nastro adesivo e il cavo dati del display.
-
Spingi la levetta verso il basso finché è a filo del bordo superiore della schermatura EMI.
-
-
-
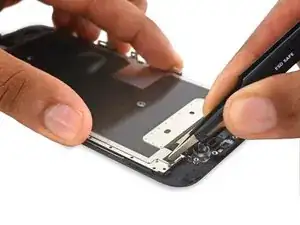
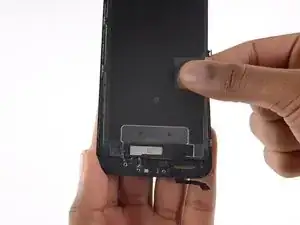
Usa delle pinzette per staccare il pezzo di nastro adesivo dalla schermatura EMI vicino all'alloggiamento della fotocamera anteriore.
-


Per rimontare il tuo dispositivo, segui queste istruzioni in ordine inverso.

50 commenti
Swapping out the home button/main board flex cable on the iPhone 6 disabled TouchID. I assume it was also digitally signed like the home button. Is this also true of the 3D Touch panel now that it supplies that cable? In short, Is the original 3D Touch panel necessary for TouchID to work or will the replacement 3D Touch panel built into the replacement work?
Joe -
I've had touchID work after replacing the flex cable... I cant imagine there would be a problem with it this year...
Does the 6S need the home button flex cable to be moved for touch ID to work like the 6?
Nope! The home button flex cable is integrated into the display and cannot be transferred to the new one.
And then on the Iphone 6s the original flex cable hasn't to be moved. Only the button itself because it is paired with the CPU.
revher -
I've been prying for an hour with the pro tech tool kit. I CANNOT get the display up nearly enough to get a spludger under there. is there something i'm doing wrong? yes i've completely removed both screws. Its really hard to pull up with this crappy suction cup whil pushing back on the metal casing...
Try using a hair dryer or heat gun to soften the adhesive holding the screen in place. Once you do that, you can try pulling up on the screen and letting it down 10-20 times in quick succession to incrementally weaken the glue instead of pulling it all up in one shot (although I assume you've inadvertently done this if you've been working at it for an hour).
To anyone else having this issue, try inserting a thin putty knife first, then separate with guitar picks. Just be careful so you don't scrape the housing!
rka -
I had also no success with the suction cup, so I used strong tape and formed a grip with it. That worked for me.
In step 37, make sure that you keep the single screw separated from the others of the EMI shield, it is thinner!
Hi, just got the repair kit that came with IPhone 6S battery. I felt that there’s no explanation on which tool to use to remove the two 3.4mm P2 Pentalobe screws. It’s not helpful just to say “Remove the two 3.4 mm P2 Pentalobe screws on the bottom edge of the iPhone, next to the Lightning connector. “. It’s more important to explain how and what tool to use. The repair tool kit tools were not marked at all and it’s not right to assume that people know which tool or part to use. Please kindly address this issue. Thanks. Janet
Janet Monaghen -
@beingchen For the P2 pentalobe screws you should use the driver bit marked P2. Might be a little hard to see but it’s there, etched into the side of the bit.
Jeff Suovanen -
It’s very clear which tool you need. As it says these are “3.4 mm P2 Pentalobe screws” - so you need a 3.4 mm P2 Pentalobe screwdriver…
alexanderbrix1987 -
Just a P2 driver—3.4 mm is the length of the screw.
Jeff Suovanen -
If you can’t identify which screwdriver in the kit to use, you probably shouldn’t be working on your phone. Just sayin’
Keith Hockenbeck -
This is very useful
https://www.jerryrigeverything.com/wp-co...
sam distefano -
Is it ok to replace the battery if the phone screen is broken?
Reem -
Of course! As long as the screen and battery are disconnected from the motherboard, you can replace anything!
Charles Bejarano -
is it possible to change my battery on my iphone 6s and use a battery that has been already used in another 6s
morgan durnford -
Yeah it would work, but if the battery heath on the 2nd battery is bad, just get a new one.
Charles Bejarano -
@moe6802 Removing the battery can damage it, and it shouldn’t be used afterward. It may seem fine, but even minor battery damage can lead to a fire hazard. Not worth it for such a cheap part. If you need a battery, just get a new one.
Jeff Suovanen -
How do you discharge a battery? Do you just let the battery drain or is there something less time consuming that you can do?
Matthew Petts -
There is no easy way to discharge the battery in “less time”. Perhaps the fastest way is to play a visually-complex modern game or otherwise make your phone do a lot of work.
Lance J -
So my phone screen is completely black causing me to see nothing that is on my screen. And the battery is above 25%, near 100%. What do I do??
Jessica I -
you should post a question on the answers forum
Seizure Salad -
you should post a question on the answers forum
Seizure Salad -
I can’t the screws with the P2, seems that the screws are stuck, what can i do?
Alberto Jabiles -
My kit came with 3 screws. Are those to replace these 2 P2 screws? And what’s the third one for?
Daniel Morse -
If it came with 3 screws, then it’s an extra one just in case if a replacement screw gets lost.
Charles Bejarano -
My display is cracked/broken and not functioning. The slide bar doesn’t work. How do I shut down my phone?
Timothy Huss -
i have replaced several ipod batteries and laptop work, but these screws seem to loose but do not come out. how am i to remove them.shake the iphone?it seems the ioen is not in my kit, is that how to remove them?
this seems idiotic but i remember some other system magnets that firt make your screws easier to keep, but this might be changed….any video? this seems 1st step blues!!!!
makinfilms -
never ind ishook it… is that in the guide?….iopener is not in the kit……never was before is this an upsell? do i skip it? i dont have it
makinfilms -
My screws aren’t coming out either. I’ve loosened them, but they aren’t coming out. I’ve shaken the phone, given it some slight bangs…nothing.
Jesse Fisher -
The following info is not given until step 21 in the instructions, and probably too late at that.
DO NOT disconnect or reconnect any of the cables in this device until the battery itself has been disconnected!
Don’t skip that step, intending to do it at the end, as you may damage the phone.
ffissk -
2 thoughts:
1) Really? Steps 14-17 are about disconnecting the battery first, and step 17 notes “so it doesn’t get reconnected while you work.” How’d you get to step 21 and miss 14-17?
2) These pages are user-editable. (Probably (hopefully) “curated” by iFixit staff.) You should add a warning to step 17 (or step 24).
Bass Clef -
NOW THAT YOU’VE REMOVED 2 SCREWS, and
BEFORE YOU SNEEZE them into oblivion, or under the refrigerator (which is the same in many houses)
MAY I suggest:
1) Obtain:
— a piece of paper, such as normal printer paper (not too much writing on one side)
— a piece of tape, not too sticky, like masking tape (duct tape would be bad)
——— 1-1.5 inches (2.5-4 cm) wide
——— 6-8 inches (15-20 cm) long
— a pencil (or pen)
2) Put the paper on the side of your work area
3) Lay the tape, sticky side up, on the paper
4) Fold each end of the tape (~1 inch/2.5cm) back under itself, so the folded part faces the paper. Press the folded-back tape onto the paper
You now have Sneeze & Wind Insurance for your tiny bits!
5) Put the 2 pentalobes end down on the top end of the tape, next to each other. Push them a little onto the tape so they stick
6) Use your pencil to note on the paper next to the screws: “1. Pentalobes”
Now you may proceed with dissassembly, without worrying about telling the 1.5mm from the 1.6mm screws.
or about sneezing!
Bass Clef -
My phone has a bad battery and a bad connector and I wasn’t able to get all of my photos before it died. Is there any chance I won’t lose them when I replace the battery? Or, is there any way to charge a 6s battery with a bad connector?
Liz R -
There is a great chance that photos, which are stored to flash memory, which is solid state memory, which is not affected when power is lost, will be there, right where you left them, once you restore power to your device. You could install a partially charged battery into your phone and then retrieve the important things, like your photos, if you don’t intend to continue using the phone. Else look at replacing the lightning connector assembly. Here: Sostituzione gruppo connettore Lightning iPhone 6s
TimD -
The P2 is not getting the screws loose at all. I have tried this several times and no budge on my iPhone 6s.
Cassandra Vigil -
To avoid to be screwed by lost or mixed screws:
- Use magnetic pad, wipeable
- Write the ifixit- steps next to the screws (maybe even with their sizes) and other bits removed
with a non-permanent marker
- When finished, simply wipe the pad, and it’s ready for the next repair
Hope that helps.
Ulrich Janßen -
I found a pentalobe 1 driver to work much better.
joelkevinjones -
The suction cup didn’t hold at all. I tried Windex and then hospital grade alcohol, but nothing worked. Finally had to use two exacto knife blades to begin lifting the screen. As soon as I got a little gap, used the spudger tool the rest of the way, The small philips driver didn’t fit the screws exactly, but with a little effort they came out. My battery adhesive strips snapped immediately and I had to remove the original battery the “hard way”. The kit came with replacement display adhesive but no explanation how to use it. I got some on - so better than nothing. Overall I’m happy with the results, and the new battery is charging now.
Daniel Wolf -
First step problem? Couldn’t get the screws out. I checked my other iPhone and realized the screws were missing!Just started prying it apart.
Hoyt Smith -
I went through the whole procedure, replaced the battery and got the screen back on. Then the 2 pentalope screws would not go into their sockets. They sink in all the way and spin, but it appears there are no threads to grab. The screen seems to be in position since I can insert a plug into the headphone jack without trouble. Did anyone else have this problem. Using the phone now with no screws. Yikes.
Walter Plante -
Hi Walter, in case you’re still dealing with this or anyone else has the same problem, check that the screw bosses on the bottom of the screen are straight and line up with the screw holes on the case. They should be at a 90° angle to the screen, but they’re easy to accidentally bend and could’ve gotten flattened against the screen.
Adam O'Camb -
I recommend a loop of tape attached to the table, and placing the screws on the tape in the order they were taken out. identifying the screws to put back is a simple matter of going the other way back up the tape.
David Taylor -
Did the repair for the second time, each time faster and easier. This steps by step is amazing and crystal clear no mistake possible.
Jean-Gabriel Duquesnoy -