Introduzione
Impara a riparare lo schermo del tuo iPhone 8.
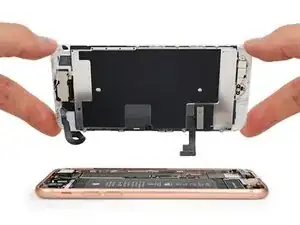
Questa parte ha già installati il gruppo fotocamera anteriore, l'altoparlante e la schermatura dell'LCD, il che semplifica la riparazione.
Tutto quello che dovrai fare è rimuovere il vecchio schermo e trasferire il tasto home nel nuovo schermo, in modo tale che il Touch ID funzioni.
Nota: Se la luminosità automatica del tuo iPhone non funziona correttamente dopo la riparazione, assicurati che il tuo telefono sia aggiornato a iOS 12.
La funzionalità True Tone è disabilitata dopo la riparazione, anche usando uno schermo originale Apple.
-
-
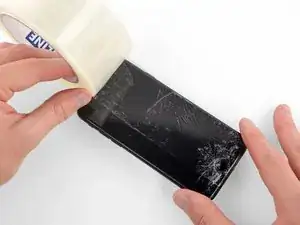
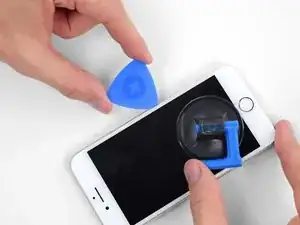
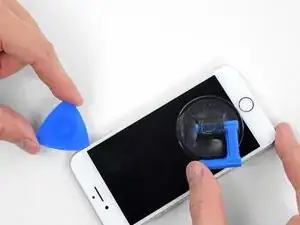
Se il vetro del display è rotto, l'uso del nastro adesivo sulla superficie impedisce alla rottura di espandersi e previene danni fisici dovuti alle schegge di vetro.
-
Stendi delle strisce sovrapposte di nastro adesivo da pacchi trasparente sul display dell'iPhone fino a coprire l'intera superficie.
-
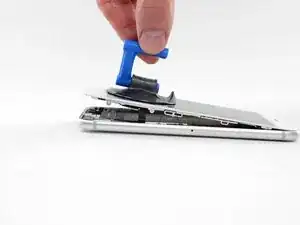
Se, a causa della rottura, risulta difficile far attaccare una ventosa come è descritto nei passi successivi, puoi provare a ripiegare un pezzo di nastro molto tenace (come il nastro americano) per farne una maniglia e sollevare con questo il display.
-
-
-
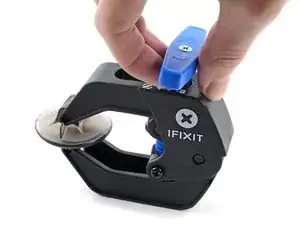
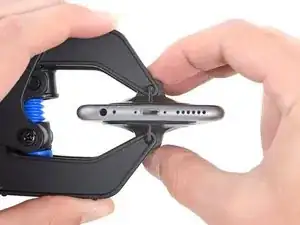
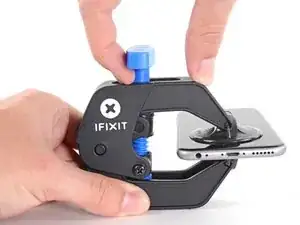
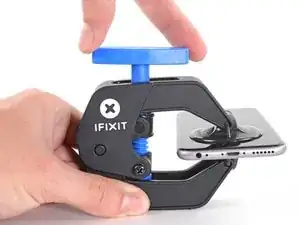
I prossimi tre passaggi ti spiegherano come utilizzare l'Anti-Clamp, uno strumento che abbiamo studiato per rendere la procedura di apertura più facile. Se non stai usando l'Anti-Clamp, salta questi tre passaggi e continua con un metodo alternativo.
-
Tira la manopola blu verso la cerniera per disattivare la modalità di apertura.
-
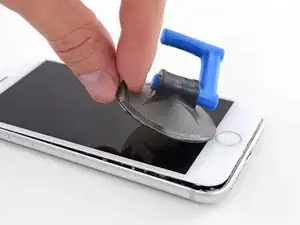
Posiziona la ventosa vicino al bordo inferiore dello schermo: una davanti e una dietro.
-
Spingi sulle ventose in modo tale che possano fare presa sull'area desiderata.
-
-
-
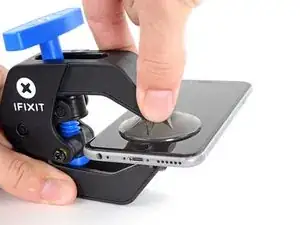
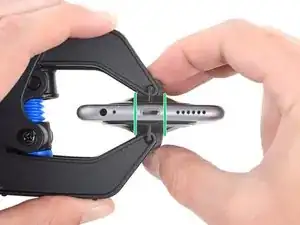
Tira la manopola blu in avanti per bloccare i bracci.
-
Gira la manopola in senso orario di 360 gradi o fino a quando le ventose iniziano ad allungarsi.
-
Assicurati che le ventose siano allineate fra loro. Se dovessero iniziare a scivolare, allenta leggermente le ventose e riallinea i braccetti.
-
-
-
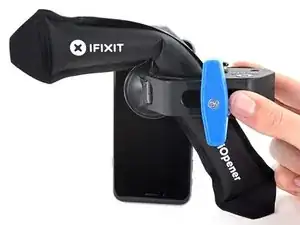
Scalda un iOpener e infilalo tra i bracci dell'Anti-Clamp.
-
Piega l'iOpener in modo che poggi sul bordo inferiore dell'iPhone.
-
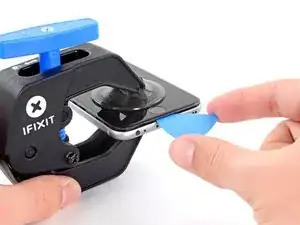
Attendi un minuto per dare all'adesivo una possibilità di staccarsi e formare una fessura di apertura.
-
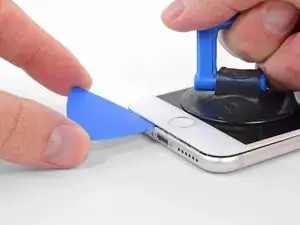
Inserisci il plettro di apertura nella fessura.
-
Salta i tre passaggi successivi.
-
-
-
Il riscaldamento del bordo inferiore dell'iPhone aiuta ad ammorbidire l'adesivo che blocca il display, semplificando l'apertura.
-
Usa un asciugacapelli oppure prepara un iOpener e applicalo per circa 90 secondi al bordo inferiore dell'iPhone per ammorbidire l'adesivo sottostante.
-
-
-
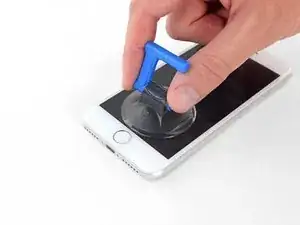
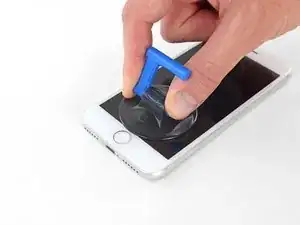
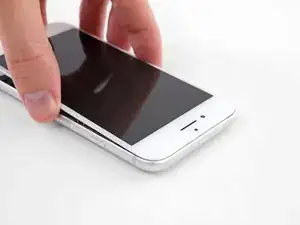
Applica una ventosa nella metà inferiore del pannello frontale, appena sopra il pulsante home.
-
-
-
Tira la ventosa applicando una tensione forte e costante fino a creare una piccola fessura tra il gruppo dello schermo e la scocca.
-
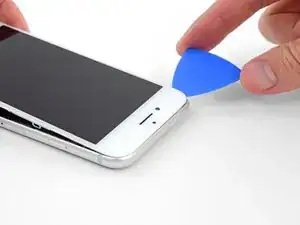
Inserisci nella fessura un plettro di apertura.
-
-
-
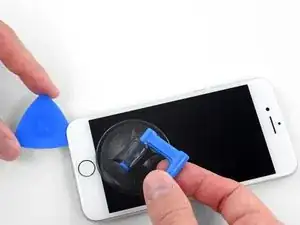
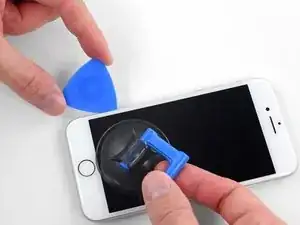
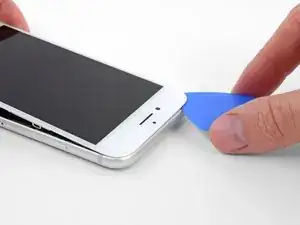
Fai scorrere il tuo attrezzo lungo il bordo sinistro del telefono, spostandoti verso i pulsanti del controllo volume e l'interruttore della modalità silenziosa, per rompere l'adesivo che tiene in posizione il display.
-
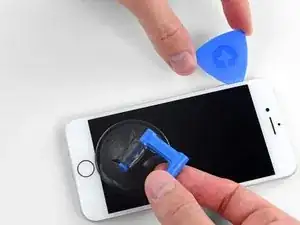
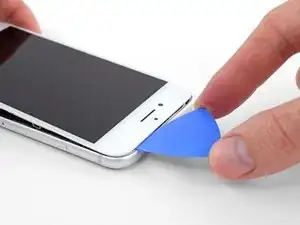
Fermati vicino all'angolo superiore sinistro del display.
-
-
-
Inserisci nuovamente il tuo attrezzo nell'angolo inferiore destro dell'iPhone e fallo scorrere attorno all'angolo e lungo il lato destro del telefono per separare l'adesivo.
-
-
-
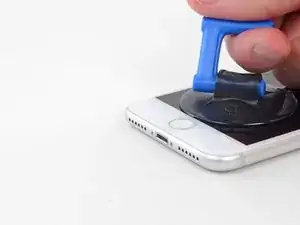
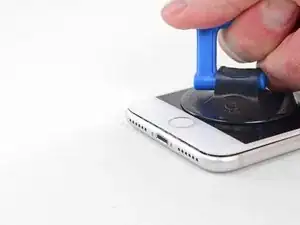
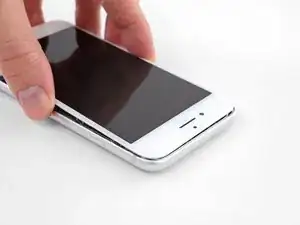
Tira dolcemente la ventosa per sollevare il lato inferiore del display.
-
Tira la linguetta per staccare la ventosa dal pannello anteriore.
-
-
-
Fai scorrere uno strumento di apertura sotto il display attorno all'angolo superiore sinistro e lungo il bordo superiore del telefono per allentare l'adesivo rimasto.
-
-
-
Fai scorrere lievemente il gruppo display verso il basso (allontanandolo dal bordo superiore del telefono) per liberarlo dalle clip che lo collegano al case posteriore.
-
-
-
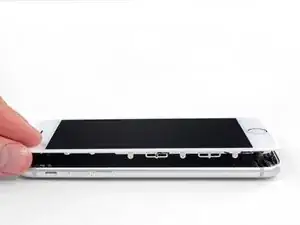
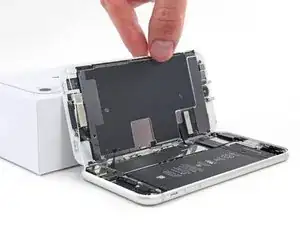
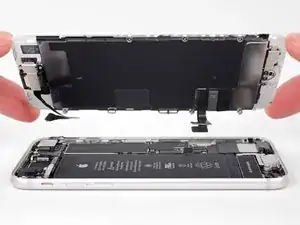
Apri l'iPhone sollevando il display dal lato sinistro, come per sollevare la copertina posteriore di un libro.
-
Appoggia il display contro qualche tipo di supporto per mantenerlo aperto mentre lavori sul telefono.
-
-
-
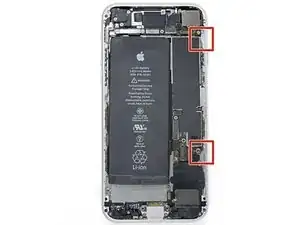
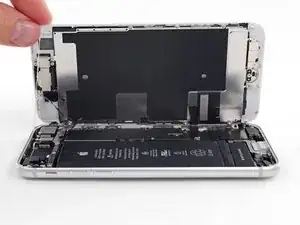
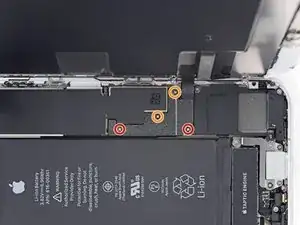
Rimuovi quattro viti a croce Phillips che fissano la staffa del cavo inferiore del display alla scheda logica, delle seguenti lunghezze:
-
Due viti da 1,3 mm
-
Due viti da 2,8 mm
-
Rimuovi la staffa.
-
-
-
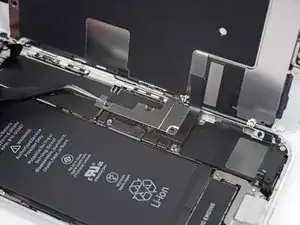
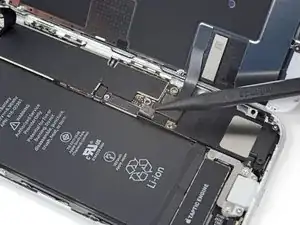
Usa la punta di uno spudger per staccare il connettore della batteria sollevandolo dal suo zoccolo sulla scheda logica.
-
Piega lievemente da un lato, per distanziarlo dalla scheda logica, il cavo del connettore per evitare che questo possa fare contatto con lo zoccolo e quindi alimentare il telefono nel corso della tua riparazione.
-
-
-
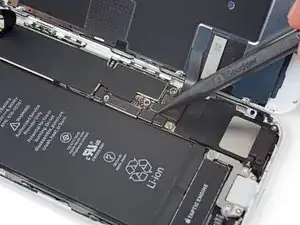
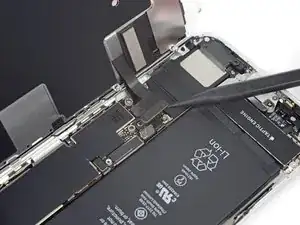
Usa la punta di uno spudger per staccare il connettore inferiore del display dal suo alloggiamento.
-
-
-
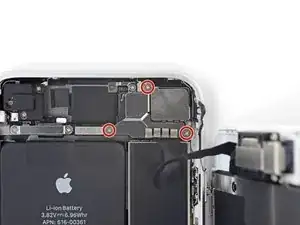
Rimuovi le tre viti Phillips da 1,3 mm che tengono in posizione la staffa sopra il connettore del gruppo sensore del pannello frontale.
-
Rimuovi la staffa.
-
-
-
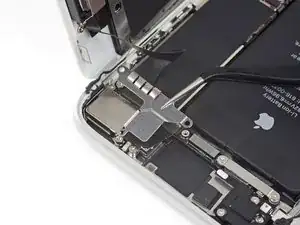
Usa la punta di uno spudger per staccare il connettore del gruppo sensore del pannello anteriore.
-
-
-
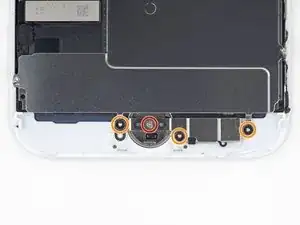
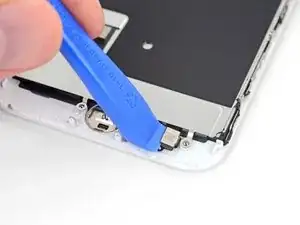
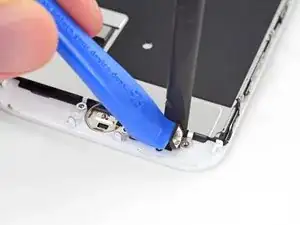
Rimuovi le quattro viti tri-wing Y000 che fissano la staffa sopra il sensore home/Touch ID:
-
Una vite da 1,2 mm
-
Tre viti da 1,3 mm.
-
Rimuovi la staffa.
-
-
-
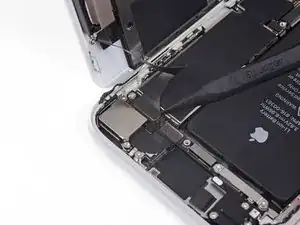
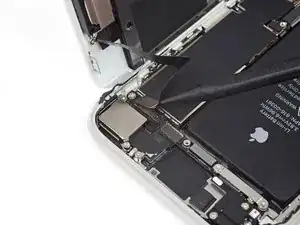
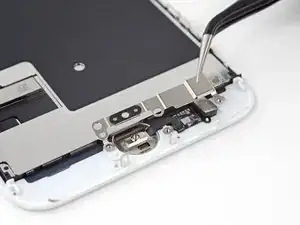
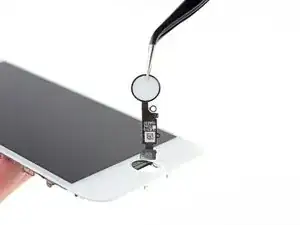
Usa uno strumento di apertura per far leva sotto il bordo sinistro del connettore del cavo del pulsante home per disconnetterlo dal suo zoccolino.
-
-
-
Capovolgi il gruppo display. Usa un asciugacapelli oppure prepara un iOpener e applicalo sul bordo inferiore del display per circa 90 secondi per ammorbidire l'adesivo sottostante.
-
-
-
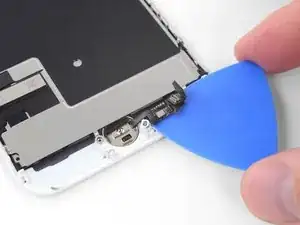
Usa con delicatezza un plettro di apertura per separare l'adesivo che fissa il cavo del sensore home/Touch ID al retro del pannello display.
-


Per rimontare il tuo dispositivo, segui i passi qui sopra in ordine inverso. Non scordarti di applicare di nuovo l'adesivo del display prima di reinstallarlo.
Porta i tuoi rifiuti elettronici a un riciclatore certificato R2 o e-Stewards.
La riparazione non è andata secondo i piani? Vai alla nostra Comunità Risposte per trovare aiuto nella risoluzione dei problemi.
Oppure, se cercate un nuovo dispositivo, prendete in considerazione l'idea di prenderne uno ricondizionato.

38 commenti
And do you just wing it for the front camera, proximity sensor etc ?
kyle -
This guide assumes you’re replacing the entire display assembly, with those parts included. If you bought a bare display then yes, you’ll have to transfer those additional components over, and that’s beyond the scope of this guide—although as mentioned in the introduction, we’re working on adding guides for those additional components as well.
wait a second… Are you saying that when we change the screen it is also necessary to change the front camera?
@eitantonius A lot of new screens come with a replacement front camera already installed. They cost a bit more, but make the job easier. You can save a few bucks if you buy a stripped-down display, but you’ll need to go through some additional steps to transfer the original front camera (and a few other components) from your broken screen to the new one.
I cracked the camera glass (housing) on the back of the phone. Is it possible to replace without replacing the entire back of the phone/case?
Chris -
yes, but it is almost impossible. it involves removing the actual glass from the back housing, and the entire backside has a strong adhesive. Its recommended not to do that as it can result in either cutting yourself, or damaging the wireless charging coil thats found behind the glass.
just how long are those screws- i turn and turn and turn and the lift off is soooo slight, seemingly insignificant…
An. Jahnke -
I would recommend, from the very beginning, dumping all tools out of the kit (if you got it) and using that white paper tool box as a tray to organize the screws and braces in. It’s nice to work over because it catches screws well and makes it easy to see them if you drop any.
Johnny Emrica -
That’s a great idea thank you
Mohamed Dekkiche -
Screw to the left of the charging port will not come out. Screw on the right came out no problem. Any ideas?
Bill Maher -
I already replaced my iPhone 8 battery with one from iFixit and honestly I wasn't impressed. It worked well for a few months, but then I started noticing the peak performance capability dropping significantly thereafter. I followed the initial charging instructions to a tee and only let it drop below 20% once a month. Normal everyday use for me... no intense apps like games, etc. I considered having Apple do it this time around, but for these older models they don't keep the batteries in-stock and you have to give them your phone for up to a week. So in the end, I opted to try another battery from iFixit instead. Hopefully this one will last longer.
tripmusic -