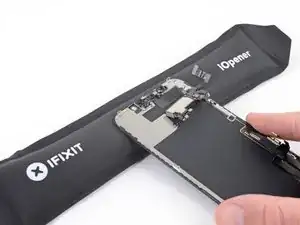
Introduzione

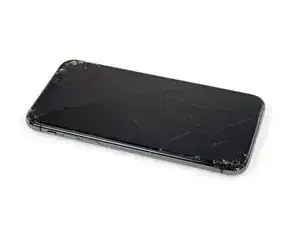
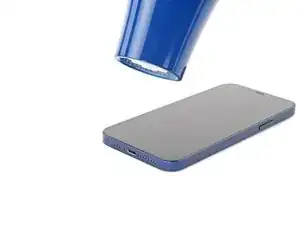
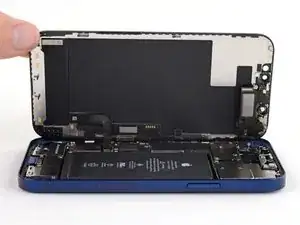
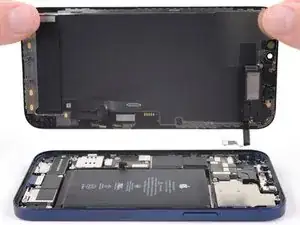
Se lo schermo del tuo iPhone 12 è crepato, non risponde al tocco o non mostra più immagini a schermo acceso, segui questa guida per far funzionare il tuo iPhone con un nuovo schermo (alias gruppo display).

Il gruppo dell'altoparlante voce e dei sensori fissati sul retro dello schermo è associato al tuo singolo iPhone in fabbrica, quindi dovrai trasferirlo dal tuo vecchio schermo sul nuovo durante la sostituzione. Contiene l'illuminatore flood, che è parte del sistema biometrico del Face ID. Se viene danneggiato o sostituito, il Face ID non funzionerà più, quindi stai molto attento a non danneggiare nessuna di queste componenti durante questa procedura. Se danneggiato, solo Apple o dei centri autorizzati Apple possono ripristinare il Face ID.

Nota: La funzione True Tone viene disabilitata dopo la sostituzione dello schermo, anche usando uno schermo originale Apple.

  1. oBBxtkV2gJcIPKkK
    • Attenzione: Prima di iniziare, scarica la batteria del tuo iPhone sotto al 25%. Una batteria agli ioni di litio carica può prendere fuoco e/o esplodere se forata accidentalmente.

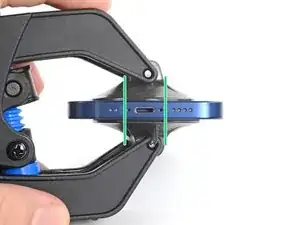
    • Spegni il tuo iPhone prima di iniziare lo smontaggio.

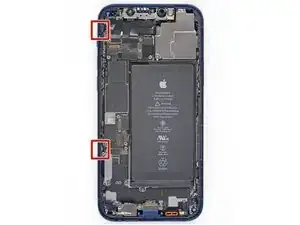
    • Svita le due viti Pentalobe P2 da 6,75 mm sul bordo inferiore dell'iPhone.

    • Aprire l'iPhone ne comprometterà le guarnizioni che ne garantiscono la resistenza all'acqua. Munisciti di guarnizioni sostitutive prima di iniziare questo passaggio, o stai attento a non bagnare il telefono se lo rimonterai senza ripristinare le guarnizioni.

    Do you sell the waterproof seals separately or are they included in the kit?

    Heather Furnas -

    Do you sell the waterproof seals separately or are they included in the kit? (I would like to know this as well.)

    CaliforniaGunner -

  2. 6UPwoloGBO4tmVoS
    6UPwoloGBO4tmVoS
    BmSYPJmOy6dbHipF
    efLfshnM2MVKmJNi
    • Se inserito troppo a fondo, un plettro per l'apertura può danneggiare il tuo dispositivo. Segui i passi di questa guida per segnare il tuo plettro ed prevenire eventuali danni.

    • Misura 3 mm dalla punta del plettro e segna questa distanza con un pennarello indelebile.

    • Puoi anche segnare gli altri angoli del plettro con altre misure.

    • Alternativamente, ferma con del nastro adesivo una moneta al plettro a 3mm dalla sua punta.

    Got to step 2 and realized the fix kit doesn't include an opening pick! Looks like a guitar pick, and I have those lying around. Is that expected? Looks like the pick is used in many steps below. There's a little blue crowbar that isn't mentioned in the instructions. Perhaps that replaces the opening pick?

    Sloan Looney -

    Hi! I can't see which guide you were using when writing this comment. Can you reply here with which guide and fix kit you used?

    Clay Eickemeyer -

    I see you posted this in Meta. I hope it's resolved soon! In the meantime, a guitar pick may work well enough for your repair.

    Clay Eickemeyer -

    what fix kit?

    Meow Purr -

    My fix kit didn't include an opening pick either

    WILLIAM HARRIS -

    Make sure you check inside the black boxes after emptying them. My pick was stuck inside one of the boxes.

    AndyF -

    My AliExpress refurbished screen came with a pick that has a coin-like circle that pops out, so no modification was necessary

    Gijs Leegwater -

  3. U6uMaQ2w3xOXGqZt
    U6uMaQ2w3xOXGqZt
    CPoII2uYnsjeyboh
    UYpZQjIJZTscr1dr
    • Se il tuo iPhone ha lo schermo crepato, evita che si rompa ulteriormente e di farti male durante la riparazione mettendo del nastro adesivo sul vetro.

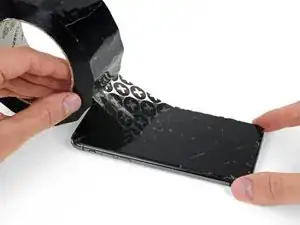
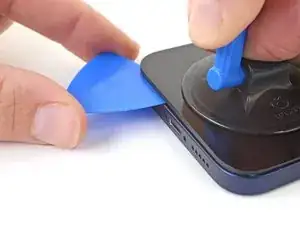
    • Posiziona strisce sovrapposte di nastro trasparente da pacchi sullo schermo dell'iPhone finché non l'hai coperto tutto.

    • Indossa occhiali di protezione per proteggere gli occhi da schegge libere durante la riparazione.

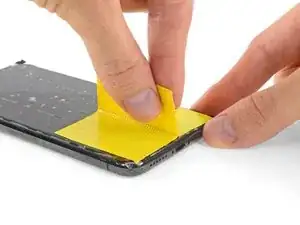
    • Se non riesci a far aderire la ventosa nei prossimi passi, applica del nastro adesivo resistente (come del nastro americano telato) come una maniglia e alza lo schermo con quello.

    • Se non riesci, puoi incollare la ventosa allo schermo con la super colla.

  4. B3jjMp2cvD5Rjabx
    B3jjMp2cvD5Rjabx
    QXAiF3sdtAYXQTQt
    FMOPQmVFrA1qxL1R
    • I prossimi tre passaggi fanno una dimostrazione dell'Anti-Clamp, uno strumento designato per agevolare le procedure di apertura. Se non stai utilizzando l'Anti-Clamp, puoi saltare questi tre passaggi per un metodo alternativo.

    • Per le istruzioni completi su come usare l'Anti-Clamp, guarda questa guida.

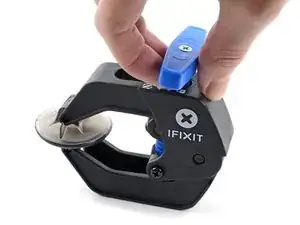
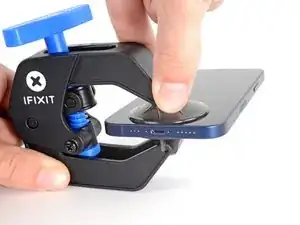
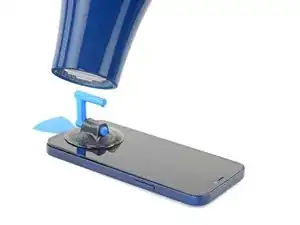
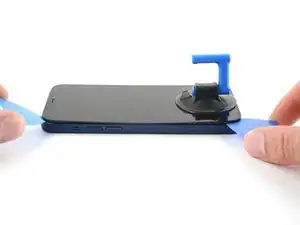
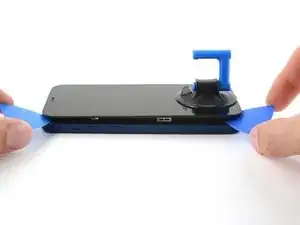
    • Tira la maniglia blu indietro per sbloccare i bracci dell'Anti-Clamp.

    • Fai scorrere i bracci oltre il bordo sinistro o destro del tuo iPhone.

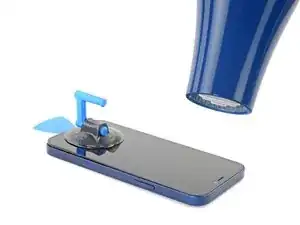
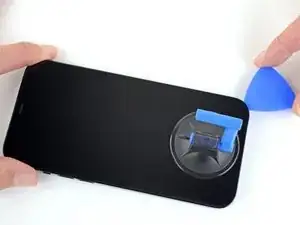
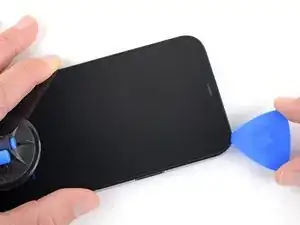
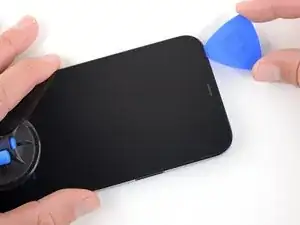
    • Posiziona le ventose vicino al bordo inferiore dell'iPhone, una di fronte e una sul retro.

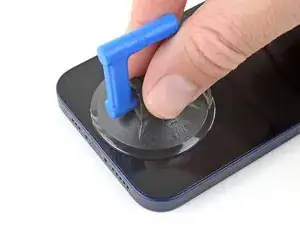
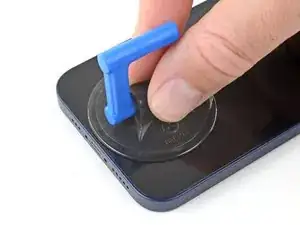
    • Premi le ventose insieme per farle aderire sull'area desiderata.

    • Se ritieni che la superficie del tuo iPhone sia troppo scivolosa perché l'Anti-Clamp possa far presa, puoi utilizzare del nastro adesivo per creare una superficie più aderente.

  5. oVcZhyKbh6AqAYBD
    oVcZhyKbh6AqAYBD
    bPLD3rBQF23DDmGa
    mpAqXAZbRjfBNAkL
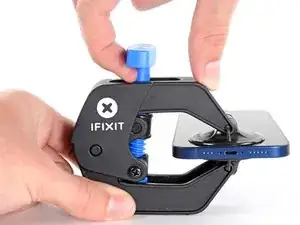
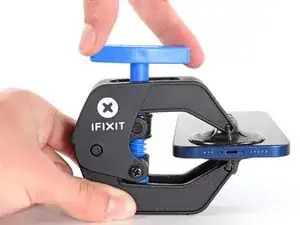
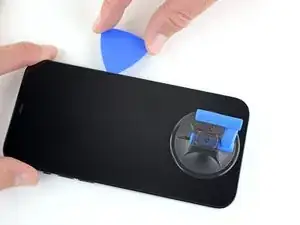
    • Tira la manopola blu in avanti per bloccare i bracci.

    • Gira la manopola in senso orario di 360° o finché le ventose cominciano ad allungarsi.

    • Accertati che le ventose rimangano allineate fra loro. Se si spostano, allentale leggermente e riallinea i bracci.

  6. u1p2GSBABb4i1qXl
    u1p2GSBABb4i1qXl
    TEVkJ3VWQ5bWEZ2G
    LMDHoJDdVkP56a4a
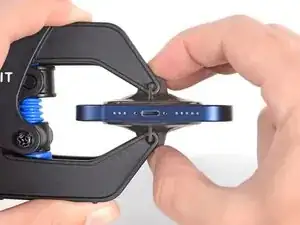
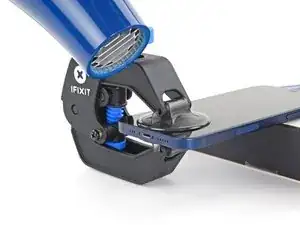
    • Appoggia il tuo iPhone su un oggetto resistente prima di continuare, come un libro con la copertina rigida, così che stia parallelo al pavimento senza tenerlo fermo. Questo rende più facile il lavoro nei prossimi passi.

    • Usa un asciugacapelli per scaldare il bordo inferiore dell'iPhone. Il vetro dovrebbe essere leggermente troppo caldo da toccare.

    • Per le istruzioni complete su come usare un asciugacapelli, da' un'occhiata a questa guida.

    • Aspetta un minuto per dare la possibilità all'adesivo di lasciarsi andare e creare una fessura.

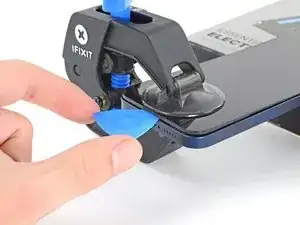
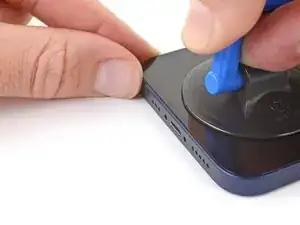
    • Inserisci un plettro di apertura sotto la scocca di plastica dello schermo quando l'Anti-Clamp crea una fessura abbastanza grande.

    • Se l'Anti-Clamp non crea una fessura sufficiente, scalda ulteriormente l'area e ruota la manopola di un quarto di giro.

    • Non girare di più di un quarto di giro alla volta, e aspetta un minuto tra un giro e l'altro. Lascia che l'Anti-Clamp e il tempo lavorino per te.

    • Salta i prossimi tre passi.

  7. OXZKWsxxXqG3arZh
    • Usa un asciugacapelli o una pistola termica per scaldare il bordo inferiore dell'iPhone per 90 secondi, o finché lo schermo è leggermente troppo caldo da toccare.

    • Non lasciare mai l'asciugacapelli nello stesso punto a lungo.

  8. ASLAa2AJO4E5GYT1
    ASLAa2AJO4E5GYT1
    EMmHxm3YOfOoLkEG
    • Se stai usando una ventosa, falla aderire al bordo inferiore dello schermo, lasciando un piccolo spazio dal bordo stesso.

  9. QdfiItrQQ6MhHWbj
    QdfiItrQQ6MhHWbj
    4nKuwPf1B6TyCssL
    eU1UEGuDjKnyIdUg
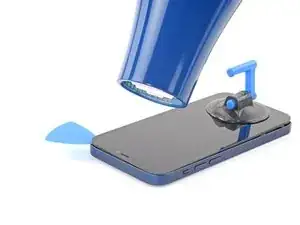
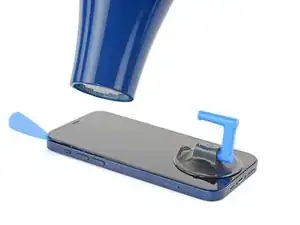
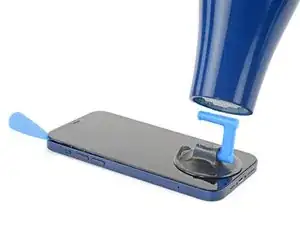
    • Tira la ventosa verso l'alto con una forza decisa e costante per creare una piccola fessura tra il vetro dello schermo e il telaio.

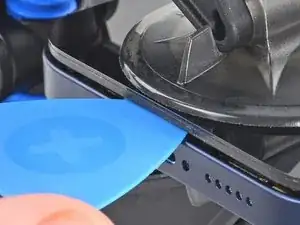
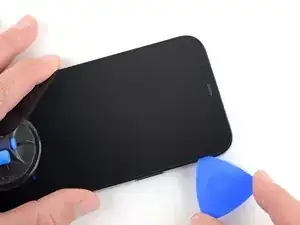
    • Infila un plettro di apertura nella fessura sotto la scocca di plastica dello schermo.

    • L'adesivo resistente all'acqua che tiene fermo lo schermo è molto resistente: creare la fessura iniziale richiede parecchia forza. Se stai avendo problemi a crearla, scalda ulteriormente il bordo inferiore e muovi su e giù lo schermo per ammorbidire l'adesivo fino a creare una fessura sufficiente per infilarci il plettro.

    This seems impossible. I've been trying for an hour with heat and rocking, and the screen doesn't budge. :(

    Aubi Abramowitz -

    this is impossible, will take years

    Evan Z -

    Don’t give up! Use more heat and a tad more force. I know you may fear breaking it more, but as long as you don’t stick the prying tool too far or tug too hard, you can do it! I have faith that you can do it!

    Rachel Kelley -

    I'm in the same boat, this isn't coming off. I've tried the hair dryer as well as the heating pad from ifixit. Any other ideas?

    The suction cup comes off before the screen will

    Brian Melcher -

    Is there a better tool for this? Just saw a video on YouTube where a kid pryed it open with no heating/etc. in 5 seconds.

    Brian Melcher -

    I've changed the batteries in probably a half dozen iphones of different models. But 25 minutes of heating and pulling had no effect on iPhone 12

    Ryan Thornburg -

    Welp. I finally ended up breaking the screen attempting this. DO NOT ATTEMPT THIS REPAIR! Not worth the broken screen and losing the cost of shipping both ways when you return the battery.

    Ryan Thornburg -

    thx, I ll go to an apple repair center

    Ronald Geerligs -

    Back (and bad...) experience ! Even if you heat a lot, the screen is hardly sticked. Take care, before sliding the mediator under the screen, this one should be moved up, at least 2 mm. On my side i have slided around 1 mm and .... inserted the mediator between the glass screen and the screen structure ring.... result : glass break and screen to change (my initial exercise was the battery removal !). I feel that next time i will visit a repair center...

    Gilbert -

    Pro tip for anyone having trouble with this. You have to use multiple rounds of heat and pulling. Use a hair dryer and not the iOpener that comes with the fix kit and get it just too hot to touch then quickly start pulling and wiggling it up and down. Once it cools down grab the hair dryer again and repeat it a couple times until you start to get a big enough gap.

    I just did this yesterday and it took around 5 rounds of heating and pulling to get it to seperate enough from the body.

    Oliver Pressello -

    It's important to insert the pick under the bezel. I just delaminated my screen. The screen was probably fine, but it was glitching, so I wanted to check for a bad connection. Anyway, now I get a new screen.

    Under the bezel, eh.

    Chris Green -

    After reading this almost a year later to the day I last commented on it, I now know that the best way I have found to remove a screen, from pretty much any phone, not just this one, is heat (I use a heating pad on 80 degrees celsius) and before putting the phone on the heating pad, I use 91% isopropyl alcohol around the edges that you will be sliding your pry tools in, and I leave it on for 10 min. I then take it off, add more alcohol, and then put it back on the pad for another 5 min. Also, while I am sliding my tools around the screen, I continuously add more alcohol, and if it takes a really long time, then more heat as well. Heat, alcohol, and patience, lots of patience, and you should be good. Hope this helps, good luck!

    Rachel Kelley -

    Can confirm, this does indeed work. Just keep warming it up, lifting up and down, and repeat when phone goes cold. After around 10 rounds it would move enough to where I could see inside the phone when lifted. You can then insert pick

    Tip: You can also try to apply heat and lift the other corner, just enough to make it move slightly. This will ease pressure needed to separate the glue on the other side as-well.

    Thomas -

  10. TLFrov6MrYfe6MLs
    TLFrov6MrYfe6MLs
    DDIYLM3VDKPF1sdb
    • Usa un asciugacapelli per scaldare il bordo destro dell'iPhone (quello con il tasto di accensione) per 90 secondi o finché lo schermo è leggermente troppo caldo al tatto.

  11. rGMaUZMOwp6jDZup
    rGMaUZMOwp6jDZup
    sBgqGmTWBfaWInJQ
    rxBEr5BO3bFbLaRG
    • Fai scorrere il plettro di apertura intorno all'angolo in basso a destra dell'iPhone per separare l'adesivo.

    • Continua a farlo scorrere lungo il bordo destro dell'iPhone, finché non raggiungi l'angolo in alto a destra.

    • Non inserire il plettro per più di 3 mm nell'iPhone. Potresti danneggiare i componenti interni.

    • Lascia il plettro sotto l'angolo in alto a destra, prima di continuare.

  12. EEAWPuNCXwOopd5j
    • Usa un asciugacapelli per scaldare il bordo superiore dell'iPhone per 90 secondi o finché lo schermo è leggermente troppo caldo al tatto.

  13. jjDP5cRJDxygaS4e
    jjDP5cRJDxygaS4e
    wfpdoWB6GTpFmSWF
    hRbFaNyEBNemtUjd
    • Fai scorrere il plettro intorno all'angolo in alto a destra dell'iPhone per separare l'adesivo superiore.

    • Non inserire il plettro per più di 3 mm o potresti danneggiare i sensori superiori.

    • Lascia il plettro sotto l'angolo in alto a sinistra prima di continuare.

  14. 1iVQp4WpwoHLdBEJ
    1iVQp4WpwoHLdBEJ
    oTaCH2yFmSQBq4A5
    • Usa un asciugacapelli per scaldare il bordo sinistro dell'iPhone per 90 secondi o finché lo schermo è leggermente troppo caldo al tatto.

  15. 1EkaRCPsl1hLCcO5
    • Ci sono dei cavi delicati lungo il bordo sinistro del tuo iPhone. Non inserire qui il tuo plettro, perché potresti danneggiare i cavi.

  16. U32XuDLs5g4YdpJX
    U32XuDLs5g4YdpJX
    P1QKu5D5XkUVQHhB
    • Inserisci un secondo plettro di apertura sotto l'angolo in basso a sinistra dell'iPhone.

    • Ruota entrambi i plettri contemporaneamente finché si sganciano le clip del bordo sinistro.

    • Ruotali gradualmente.

    • Se stai facendo fatica a separare l'adesivo, scalda di nuovo il bordo sinistro.

  17. IWXGOEkVZMt431sG
    IWXGOEkVZMt431sG
    Qxj6lbMWEEfMw45M
    NoVbSlrJHyCMaaFN
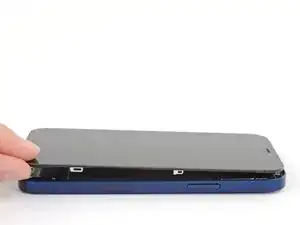
    • Ruota il tuo iPhone così che il bordo destro sia rivolto verso di te.

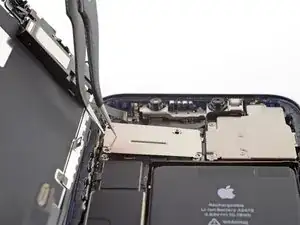
    • Apri l'iPhone sollevando e ruotando il bordo destro dello schermo come la copertina di un libro.

    • Non provare ancora a rimuovere del tutto lo schermo: diversi cavi a nastro delicati sono ancora collegati alla scheda madre del telefono.

    • Appoggia lo schermo a qualcosa in modo che resti aperto mentre lavori nel telefono.

    • Durante il rimontaggio, appoggia lo schermo in posizione, allinea i ganci lungo il bordo superiore e premilo attentamente in posizione prima di far aderire il resto dello schermo. Se non si fissa facilmente, controlla lo stato delle clip lungo il perimetro dello schermo e assicurati che non siano piegate.

    i did this and the shroud with the earpiece speaker still stuck with the phone so its just wedged in there i cant get it out

    lil teslas -

  18. fVLd1ujMC23kPMBM
    • Svita le due viti tri-wing Y000 da 1,1 mm che tengono ferma la copertura dei connettori della batteria e dello schermo.

    • Durante questa riparazione, tieni traccia di ogni vite e assicurati di riavvitarla esattamente nella posizione originale per evitare di danneggiare il tuo iPhone.

    • Durante il rimontaggio questo è un buon momento per riaccendere il tuo iPhone e controllare che tutto funzioni prima di reincollare lo schermo. Assicurati di spegnere di nuovo l'iPhone prima di continuare la procedura.

    Ouch, I see a broken flat here…

    Alessandro Sordelli -

    Can I use a y 0.6 if I don’t have y000

    kellciou cr -

    Yep! The measurements for Y000 are 0.6 mm.

    Alex Diaz-Kokaisl -

  19. nCqmqLuRyNhUsecI
    • Rimuovi la copertura.

    Hi

    On my original display on an iPhone 12, there is no metal hinge as shown here and therefore no place for it when closing the phone. Have double-checked model and the original display - and it is just not there. Is there another model based on serial number?

    Hinge marked: https://www.dropbox.com/scl/fi/asztgi60g...

    Best regards,

    Carsten

    Carsten Feltman -

  20. q1GE6ij6DBGAtVUa
    q1GE6ij6DBGAtVUa
    UFeAbkthIglN1PdG
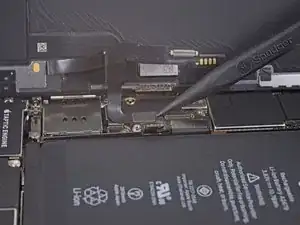
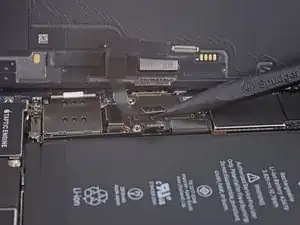
    • Usa uno spudger o un'unghia per sollevare il connettore della batteria dalla sua presa sulla scheda madre.

    • Cerca di non danneggiare la guarnizione in silicone nero attorno a questo e agli altri connettori della scheda madre. Queste guarnizioni forniscono un'ulteriore protezione contro l'acqua e la polvere.

    • Piega leggermente il cavo da parte per evitare che faccia contatto accidentalmente con la presa per evitare dei corto circuiti durante la riparazione.

  21. JWGf11bubrJIQJqt
    JWGf11bubrJIQJqt
    JnsnSmZNtLSbSfID
    • Usa uno spudger o un'unghia per scollegare il connettore del cavo dello schermo.

    • Per ricollegare i connettori a pressione come questo, allinealo attentamente con la presa e premi su un lato finché si fissa in posizione, quindi premi sull'altro lato. Non premere nel centro. Se il connettore non è allineato correttamente i contatti si possono piegare, danneggiandolo irreparabilmente.

  22. FtXJDFkUoD1lyBai
    FtXJDFkUoD1lyBai
    lnDDQGdsvpfnyRjt
    • Usa uno spudger o un'unghia per scollegare il connettore del cavo del digitizer.

    • Se qualche parte del tuo schermo non risponde al tocco dopo la riparazione, scollega la batteria e ricollega questo connettore, assicurandoti che si fissi correttamente e che non ci sia della polvere o altra sporcizia nella presa.

  23. vanQfZqXPQGekhh1
    • Usa un cacciavite tri-wing Y000 per svitare le quattro viti che tengono ferma la copertura dei connettori dei sensori frontali:

    • Tre viti da 1,1 mm

    • Una vite da 1,4 mm

  24. KJnJAuPTwlxnICBD
    KJnJAuPTwlxnICBD
    MHdESpgJCsSSZaMy
    1qodeTMyy56DyGRv
    • Solleva la copertura dal bordo sinistro finché il gancetto su quello destro non si libera.

    • Rimuovi la copertura.

    • Durante il rimontaggio, infila prima la clip del bordo destro nella sua presa, quindi riposiziona il resto della copertura.

  25. LC4oSHWw4nEIZ3H5
    LC4oSHWw4nEIZ3H5
    5PkRCF6AJnj1hYTc
    • Usa uno spudger o un'unghia per scollegare il connettore del cavo del gruppo dei sensori frontali.

  26. XrIRhPcqOHJyMV1q
  27. FNoMExEdtM2bCQRG
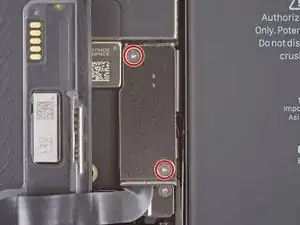
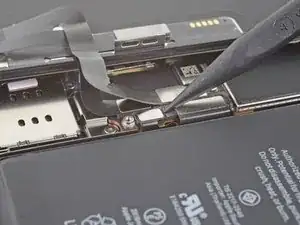
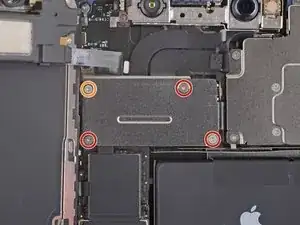
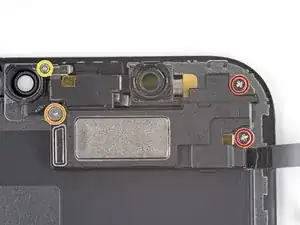
    • Svita le quattro viti che fissano il gruppo auricolare/sensori al retro dello schermo:

    • Due viti a croce Phillips da 1,4 mm

    • Una vite tri-wing Y000 a spallamento da 1,7 mm

    • Una vite tri-wing Y000 da 1,2 mm

    The 2 left screws on my iphone 12 wont budge I dont know what to do?

    Jack aouff -

  28. DfRmLtFThgt3RCJF
    DfRmLtFThgt3RCJF
    JFRDHIoLXoAcQd3j
    • La capsula auricolare è leggermente incollata.

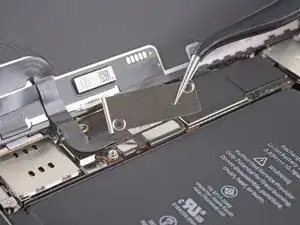
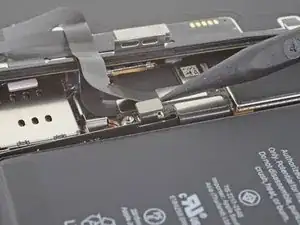
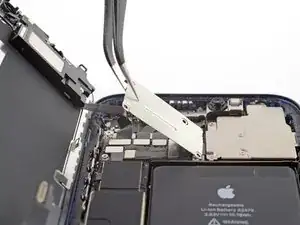
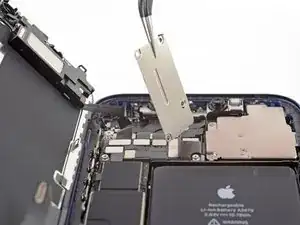
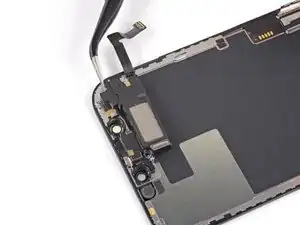
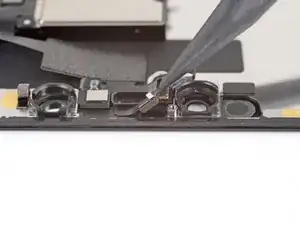
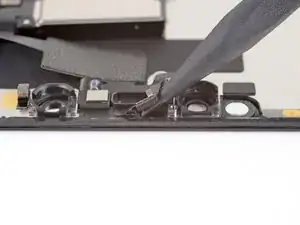
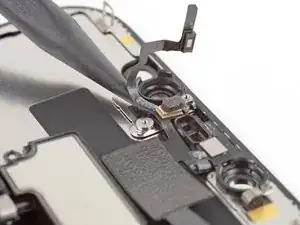
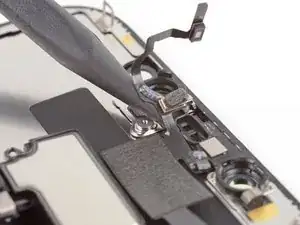
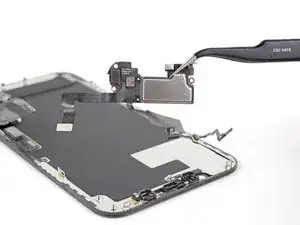
    • Usa la punta di uno spudger per fare leva delicatamente ed alzare il bordo superiore dell'altoparlante.

    • Ruota di 180° il gruppo dell'auricolare verso il basso e lontano dal bordo superiore dello schermo.

    • Lo speaker è ancora collegato tramite un cavo a nastro molto sottile: stai attento a non strappare o danneggiare il cavo.

  29. RdXToegN2BGGYdyN
    • Usa un asciugacapelli, una pistola termica, o prepara un iOpener e appoggialo sul vetro dello schermo lungo il bordo superiore per 1-2 minuti per ammorbidire l'adesivo che tiene fermi i sensori.

  30. BVjAbVWW2crHEFdI
    BVjAbVWW2crHEFdI
    YXlZGYoSRLPmpVEO
    2sEdYZwZK5YtBN5o
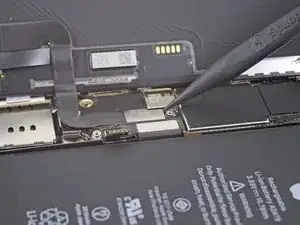
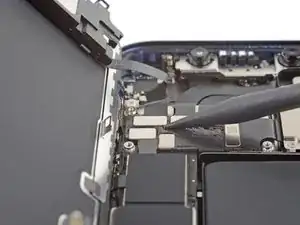
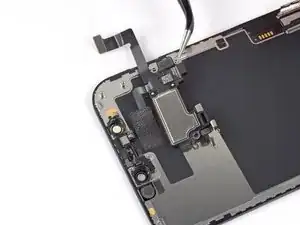
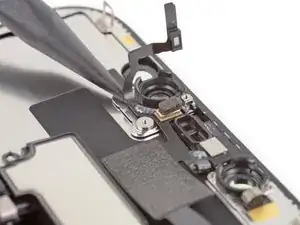
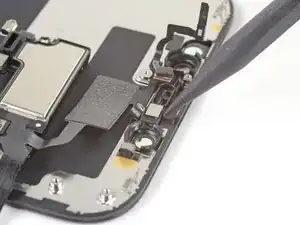
    • Usa la punta di uno spudger per sollevare e separare il sensore della luce ambientale dalla sua rientranza nello schermo.

    • Stai attento a non danneggiare il cavo a nastro del sensore mentre lo sollevi.

    • Continua a far scorrere lo spudger sotto il sensore e il suo cavo per tagliare l'adesivo che lo tiene fermo.

  31. gJMTCKnBTFbYMGir
    gJMTCKnBTFbYMGir
    FW3JR4BeQlirVqEl
    HBEGxfStEHZDjFgw
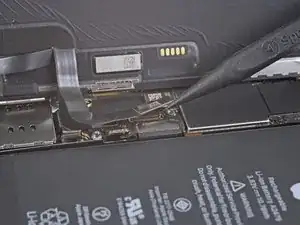
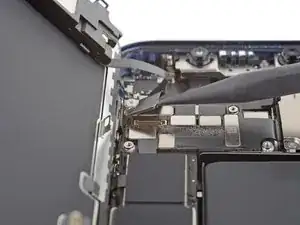
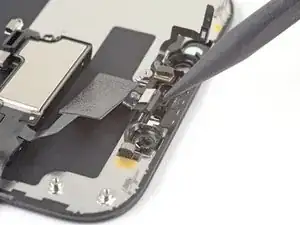
    • Usa la punta di uno spudger per sollevare e separare il microfono dalla sua rientranza nello schermo.

  32. skZ4Y3qHkQJvCHId
    skZ4Y3qHkQJvCHId
    ZqJ3P6fCmcwlKyCw
    • Usa la punta di uno spudger per sollevare e separare il modulo del sensore di prossimità e dell'illuminatore flood dalla sua rientranza nello schermo.

  33. MgCiuB1KVM4cVrui
    MgCiuB1KVM4cVrui
    lP1ybDY4QKcSBQsp
    cJ3liVwEWJmas4Zq
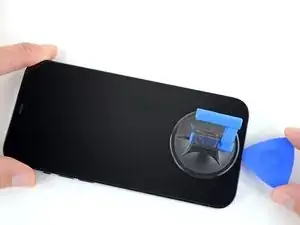
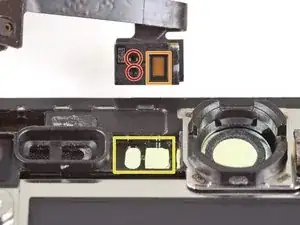
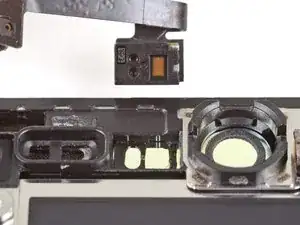
    • Rimuovi il gruppo dell'altoparlante voce e dei sensori frontali.

    • Durante il rimontaggio controlla la posizione del gruppo in plastica nera che contiene le seguenti componenti:

    • Sensore di prossimità

    • Illuminatore flood

    • Il modulo dovrebbe essere posizionato in modo che questi componenti non siano coperti dall'adesivo.

    Beim Testen des neuen Displays ist zu beachten, dass der Hell- Dunkelregler nicht funktioniert, solange der Lichtsensor nicht auf das neue Display montiert wurde.

    Mike Schriewer -

Conclusione

Confronta la tua parte di ricambio con quella originale: potrebbe essere necessario il trasferimento di alcuni componenti o la rimozione di protezioni adesive dalla nuova parte prima di installarla.

Per rimontare il dispositivo, segui le istruzioni in ordine inverso.

Porta i tuoi rifiuti elettronici a un riciclatore certificato R2 o e-Stewards.

La riparazione non è andata come previsto? Prova delle soluzioni di base ai problemi, oppure rivolgiti alla nostra comunità Risposte iPhone 12 per trovare aiuto.

Adam O'Camb

Membro da: 11/04/15

195148 Reputazione

8 commenti

i am trying to source a replacement screen for my iPhone 12 that needs a new digitizer and battery. My main concern is since I cannot purchase an original part from apple and have to resort to eBay they have several option;

Lcd / Oled soft / Oled hard / Incell lcd??

I asssumed the 12 came with the oled screen and I’m worried that if I put a non original type screen it could damage phone after awhile?

what digitizer should I get?

Adam Anderson -

Hi, I would recommend looking at places like Fixez.com rather than Ebay. Their prices are lower and they have a LCD buyback program which is very helpful. They have a wide ranging variety of LCD's. On a scale of best to worst LCD's its ranges: OLED Soft,OLED Hard, Incell LCD, LCD. I hope this helps

Tecc World -

Hi there,

I have read that by installing an aftermarket screen, I would get a non-genuine display message. Has Apple addressed this issue?

Than

Alex Hsu -

Genuine components have chips that allow the phone to identify them - third party ones frequently do not. The phone is doing what it is designed to do so there isn’t really anything for Apple to address. Much as anything it’s to stop companies refurbishing iPhone’s ‘in-house’ and selling them as having genuine parts. The non genuine part message is t inherently a bad thing, it’s an advisory rather than an error.

Core Confusion -

Hi, I lent my grandson my iphone 12 and I got it back with a broken screen and a broken back glass. I have another iphone 12 for parts. I was going to swap out the screen and the back glass. My question is do I have to remove all these parts as described above or c an I just plug the new screen in ? Second question my iphone has a Qlink wireless SIM card in it and it works perfect. The same SIM card will not work in my other iphone that being said would it be easier to somehow take my other iphone and use the parts from my broken one so the SIM card would work in it? I don't know what it would entail to do such a thing but if you would possibly know what I would have to do to make this happen please let me know... Otherwise I will take the screen and back glass and continue to install them on my own phone. also which procedure would be easier to do?? Kudos to you on this article I followed it to the letter and everything worked perfect I removed the screen without any problems. GREAT ARTICLE! Thanks Jeffrey

Jeffrey Miller -

Great guide.... I was able to successfully replace the screen. However, the step to apply the glue sheet is missing. I had to undo what I spent 40 mins doing correctly just to get the adhesive sheet applied and redo it.

CV Sayani (cvs) -

Bonjour suite au changement d'écran sur mon iPhone 12 j'ai acheté un écran d'origine ( service pack) depuis j'ai un message suite a un changement d'écran pièce inconnu impossible de vérifier l'authenticité etc..... d'où peut venir le soucis ?

Aurélien -

Friday March 8,2024 United States Iphone12

Old one had white lines on the left > Put the new one>turned it on and my finger prints would not allow it to open it and did two soft reset up,down and hold power button on until apple logo appears and no success. So next was removing the film that comes attached to it on the back side of new screen , plugged it back in and no success. So then i plugged the old one but only connected two connectors pretty much was lazy to take it all apart lol. Last was put that tiny screen protector that came with the 3rd party screen and sure enough it WORKED!! I also was studying about the motherboard but it did not seem to go that deep in it. Oh and the facetime works as well . I am going to update and let it scan my face for facetime . Don't give up it . You got this.

Kevin Ventura -