Introduzione
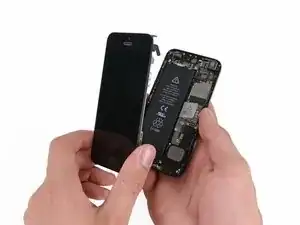
Impara a sostituire lo schermo del tuo iPhone 5. Questa parte ha già installati la fotocamera anteriore, l'altoparlante e la piastra di schermatura dell'LCD, quindi la sostituzione è più facile.
Tutto quello che devi fare è rimuovere il vecchio schermo e trasferire il pulsante home su quello nuovo.
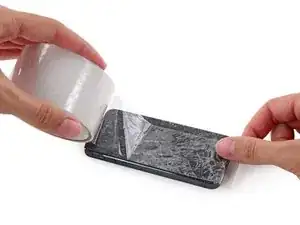
Dopo aver sostituito con successo lo schermo, proteggilo dai graffi installando un proteggi schermo.
-
-
Applica strisce sovrapposte di nastro adesivo sullo schermo del tuo iPhone fino a ricoprirlo tutto.
-
-
-
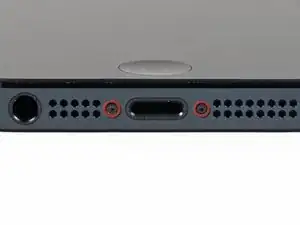
Assicurati che l'iPhone sia spento prima di cominciare a smontarlo.
-
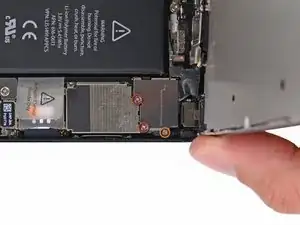
Rimuovi le due viti pentalobe da 3,6 mm accanto al connettore Lightning.
-
-
-
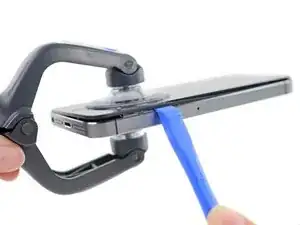
Indipendentemente dallo strumento usato, devi assicurarti di estrarre tutto il display.
-
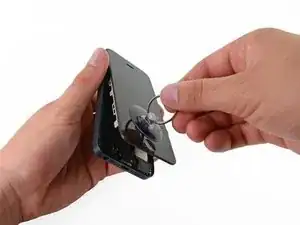
Se il vetro inizia a separarsi dalla plastica, come mostrato nella prima immagine, inserisci lo strumento d'apertura in plastica tra la cornice di plastica e il corpo in metallo del telefono per rimuovere le clip di metallo dal case.
-
-
-
Tira la maniglia blu indietro per sbloccare i bracci dell'Anti-Clamp.
-
Fai scorrere i bracci oltre il bordo sinistro o destro del tuo iPhone.
-
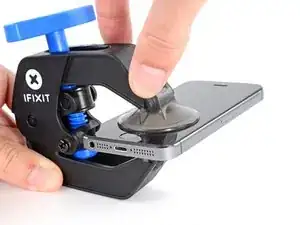
Posiziona le ventose vicino al bordo inferiore dell'iPhone, appena sopra il tasto Home, una di fronte e una sul retro.
-
Premi le ventose insieme per farle aderire sull'area desiderata.
-
Se ritieni che la superficie del tuo iPhone sia troppo scivolosa perché l'Anti-Clamp possa far presa, puoi utilizzare del nastro adesivo per creare una superficie più aderente.
-
-
-
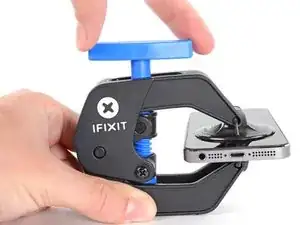
Tira la manopola blu in avanti per bloccare i bracci.
-
Gira la manopola in senso orario di 360° o finché le ventose cominciano ad allungarsi.
-
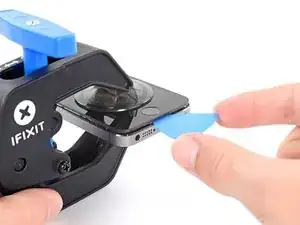
Inserisci un plettro di apertura sotto lo schermo quando l'Anti-Clamp crea una fessura abbastanza grande.
-
Salta i prossimi tre passi.
-
-
-
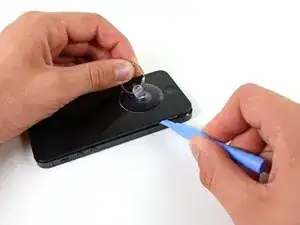
Tenendo fermo l'iPhone con una mano, tira verso l'alto la ventosa per separare leggermente il pannello frontale dal corpo principale del telefono.
-
Con uno strumento di apertura in plastica, forza delicatamente il telefono verso il basso, tirando lo schermo verso l'alto con la ventosa.
-
-
-
Continua a fare leva ai lati del pannello frontale staccando le clip lungo il lato destro e sinistro.
-
-
-
Una volta che le clip sono state rimosse ai lati e alla base del cellulare, solleva la parte bassa del pannello frontale e staccala dal corpo dell'iPhone.
-
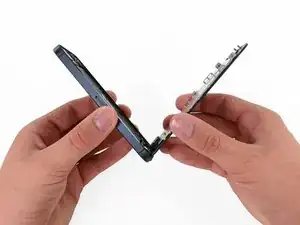
Apri lentamente il pannello fino a un angolo di circa 90 gradi e appoggialo contro qualcosa per tenerlo aperto mentre lavori sul telefono.
-
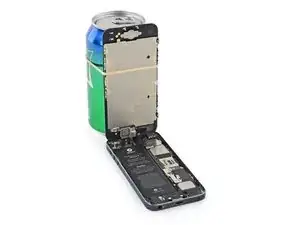
Aggiungi un elastico per tenere il display fermo in posizione mentre lavori. Questo previene uno sforzo eccessivo sui cavi del display.
-
-
-
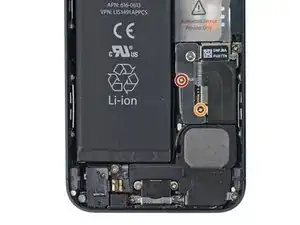
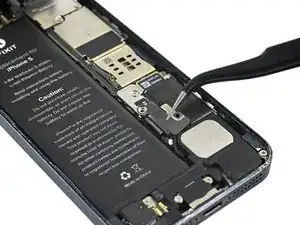
Rimuovi le seguenti due viti che fissano il supporto in metallo del connettore della batteria alla scheda logica.
-
Una vite a croce Phillips da 1,8 mm.
-
Una vite a croce Phillips da 1,6 mm.
-
-
-
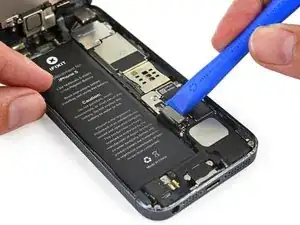
Usa uno strumento di apertura in plastica per sollevare con delicatezza il connettore della batteria dal suo zoccolo sulla scheda logica.
-
-
-
Rimuovi le seguenti viti che fissano il supporto del cavo di assemblaggio alla logic board:
-
Due viti a croce Phillips da 1,2 mm
-
Una vite a croce Phillips da 1,6 mm
-
-
-
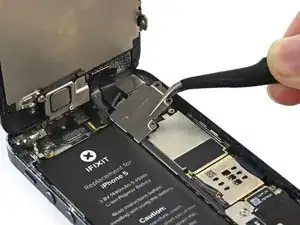
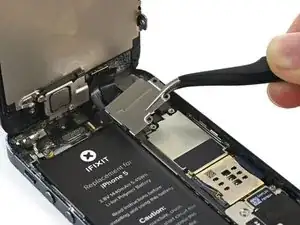
Solleva la staffa del cavo del display verso la batteria per sganciarlo e quindi rimuovila dall'iPhone.
-
-
-
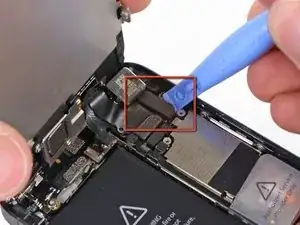
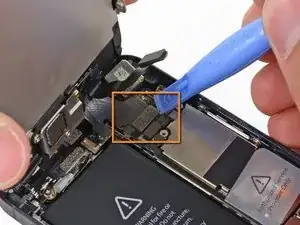
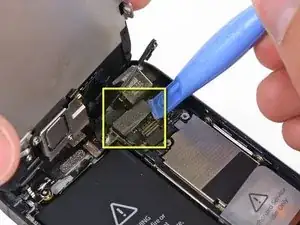
Usa lo strumento di apertura di plastica o un'unghia per staccare i tre cavetti del pannello frontale:
-
Cavo fotocamera frontale e sensori
-
Cavo LCD
-
Cavo digitizer
-


Per rimontare il tuo dispositivo, segui queste istruzioni in senso inverso.
38 commenti
My brother in-law had water damage to his screen and the carrier was going to charge him and arm and a leg for a new phone so I ordered the complete display assembly from right here on iFixit that came with all the necessary tools. Took me a little over 5 minutes between repairing and chit chat to finish. It was a really easy repair and my brother in-law was never happier to have his phone back at a fraction of the cost the carrier was quoting.
Thanks for your guide for replace new touch screen
i had save one tiny screw from inside assembally :) :) :)
My display didn't shut down when i have a call and i put the phone near my ear! I plug my broken display and it work well but not the new one...please someone help! btw thanks for the guide and for the fast delivery
I know you posted this awhile ago, but if anyone else is wondering, how to fix the issue where the display won't turn off while on a phone call, You MUST transfer over the small plastic retaining brackets from the old display, and put them in the correct position! By correct position, I mean the two small transparent points need to line up with the receptors on your iPhone's front panel assembly (Camera, light sensor, mic).
This one is for Max:
Max, can you explain better what you mean by plastic retaining brackets? I'm about to swap my screen out and I wanna be able to do this
U need to scratch the paint in ur display where the proximity sensors are covered by it. After that use a black marker.
Having completed this repair using the rear camera part from Ifixit I have to comment that the camera is noticeably lower quality. Its not huge - You don't notice it looking at the photos scaled down to fit but viewing one for one there is significant detail lost. My staff member has an Iphone 5 bough at exactly the same time as mine so I was able to take a photo side by side on his and mine after my repair and when you view 1 for 1 pixel in product boxes on mine the text was just a colored blur where on his although you couldn't read the text it was more obviously text. Overall though its still better than having a camera that wouldn't focus at all and being that Apple seem to refuse to supply genuine spare parts (Which there has to be a low against??? - Imagine if a car manufacturer did that) its still good buying one from someone who gives good support. At the end of the day its a phone camera not an SLR and its still better than the older Iphone 4 camera.
matt -
The majority of product manufacturers are not required to provide parts, and apple will fix items under the various warranties it offers. Car manufacturers on the other hand are required to make parts available by law. It is part of the regulation of their industry. They get a lot of protection for their business model, but have some obligations too. It's why the EV1 was pulled, they didn't want to have to make the parts, and why there are so many Delorian parts.
William Leeper -
This is a great guide. However, I'm having a hard time popping the screen back into place. Everything works but I'm afraid of putting too much pressure least I crack it again. Any advice?
amciotola -
To avoid broken screens during reassembling:
Put the hooks of the screen in the right place in the housing, then close it loose, don't press it. Turn your phone upside down with the screen on a very flat surface (e.g. table). Now press the housing on the screen -> no more risk for braking the screen because of inhomogeneous force applied on the glass!
mondbewohner -
I hope folks read this comment before proceeding to attempt a Sleep/Wake button repair on the iPhone 5! Apple has an iPhone 5 Sleep/Wake button replacement program, free, for iPhone 5 devices manufactured through March 2013. See program details at https://www.apple.com/support/iphone5-sl.... Don't do this yourself if you don't need to. It's a difficult repair.
Mark Luscher -
I was willing to add the following important remark on top of this guide but, strangely, it has been refused! Here it is:
---
*Check if your Iphone 5 is eligible to the Apple special program for a free battery replacement (devices sold between September 2012 and January 2013, within a limited serial number range).
* If not, watch the video and use this guide [video|https://www.youtube.com/watch?v=6ogE8USs...]
---
And thus, as my Iphone 5 was eligible, I went to the Apple store of Le Louvre in Paris and the battery has been changed for free instead of 65 euros. Thanks to Mark!
revher -
Hi every one i drop my iphone5s 16gb
I replace 10!new screen but cant back to live i see on the "logic board" where u conect the screen i se damage HOW CANT FIX THAT WHITOUT LOST MA DATA ??? Thaks for anny hellp!!!!!
aliroberto01 -
Steps 12-15 seem to be not necessary for battery replacement. They are not required to remove and replace the battery and they at least DOUBLE the amount of work. Most of the time spent on this process involved working with those tiny screws and maneuvering them in place and screwing them down. Steps 12-15 are three of the five screws that you work with inside.
Also, there should be a note at the beginning of Step 2 that if you bought the iFixit kit that you should go directly to Step 6.
Bob Hatcher -
please wear safety helmet too, integral helmet and cover mouth with an N95 facemask underneath, just in case the battery punctures, explodes, you knock your head back to the wall and slam it back forward hitting the screw in your eye and and inhaling toxic fumes! can never be too careful ;-)
ibisiki -