Introduzione

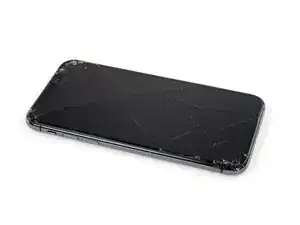
Se lo schermo del tuo iPhone XS Max è rotto, non risponde al tocco oppure non mostra alcuna immagine all'accensione del telefono, usa questa guida per far funzionare di nuovo il tuo iPhone con un nuovo schermo, ovvero un nuovo gruppo display.

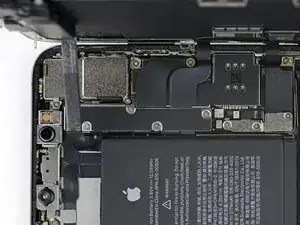
L'insieme altoparlante voce + gruppo sensori attaccato al retro del display è accoppiato in fabbrica al tuo esemplare di iPhone, quindi devi in ogni caso trasferirlo dal tuo vecchio display a quello nuovo quando sostituisci lo schermo. Comprende l'illuminatore flood, parte integrante del Face ID, il sistema di sicurezza per l'accesso. Se danneggiato o sostituito, il Face ID smetterà di funzionare, quindi presta una particolare attenzione a non danneggiare nessuna di queste parti nel corso della procedura. In caso di danneggiamento, solo Apple può ripristinare le funzionalità Face ID.

Nota: la funzionalità True Tone resta disabilitata dopo la sostituzione lo schermo, anche utilizzando uno schermo Apple originale.

  1. QBK2j4bUWjgpw3Ww
    QBK2j4bUWjgpw3Ww
    V5ShMdpIfEVM1AKx
    • Prima di iniziare, scarica la batteria del tuo iPhone sotto il 25%. Una batteria al litio-ioni carica può prendere fuoco e/o esplodere se viene perforata accidentalmente.

    • Spegni il tuo iPhone prima di iniziare lo smontaggio.

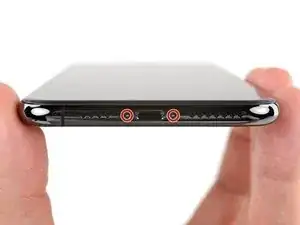
    • Rimuovi le due viti Pentalobe lunghe 6,9 mm sul lato inferiore dell'iPhone.

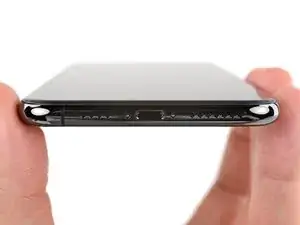
    • L'apertura del display dell'iPhone comprometterà le sue tenute impermeabili. Procurati tenute di ricambio prima di procedere al passo successivo oppure stai attento ad evitare di esporre il tuo telefono ai liquidi se non sostituisci le guarnizioni.

  2. voNWTD25eWiGUdu3
    voNWTD25eWiGUdu3
    XTM1CepRnVkDnbfI
    NgVMfmOgJwEalMFF
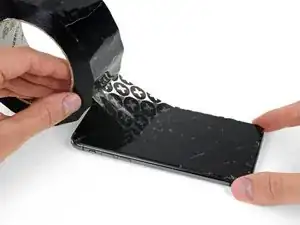
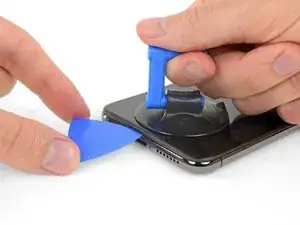
    • Se il tuo iPhone ha lo schermo in pezzi, applicando del nastro adesivo sulla superficie eviterai ulteriori rotture e la possibilità di farti male nel corso della riparazione.

    • Disponi strisce sovrapposte di nastro da pacchi sul display dell'iPhone fino a ricoprire tutta la superficie.

    • In questo modo impedirai la dispersione di schegge di vetro e assicurerai l'integrità strutturale del display quando lo forzerai per sollevarlo.

    • Indossa occhiali di sicurezza per proteggere gli occhi da schegge di vetro che potrebbero volare via nel corso della riparazione.

    • Se la rottura del vetro rende difficile far aderire una ventosa come indicato nei prossimi passi, prova a ripiegare un pezzo di nastro adesivo molto tenace (come il nastro americano) attorno a una maniglia e usalo al posto della ventosa per sollevare il display.

    How to detect my Iphone what screen it is, OLED or LCD?

    sabrihakulii -

    It’s OLED. You can find the specs here, https://support.apple.com/en-us/HT201296

    When you find your phone, at the bottom of the description click on, See the tech specs…

    mcr4u2 -

    The included suction cups were stiff and worthless. They would not lift the screen. Also, I tried every type of tape on the screen to help the suction cups stick without success. Heavy duty suction cups were for my bathroom also failed. However, I had an old GoPro mount with some preapplied double sided 3M VSB tape and stuck that on the screen near the bottom. Magic! This method had the added bonus of being able to use a GoPro attachment as a handle to lift the screen, and propped up the screen like a kickstand in step 12.

    Tawan Khamapirad -

    Very cool! Thanks

    Antonio -

    My screen was pretty stuck… would not budge. Heated, super glued the suction cup, tried gorilla tape. Ended up doing the GoPro mount with 3M VSB tape method mentioned. Worked great. That 3M tape is the bomb.

    Rich Wachtel -

    The included suction cup took a few tries but ended up working for me.

    charlotte -

    If you have flat feeler gauges (for adjusting engine valve tappet clearance, ignition points … old school) the .003 thick goes right in. Work your way up until you can get the pick or supplied pry tool in.

    William Olstad -

    where can I buy 3M VSB plis!!

    gerardo artigas cuellar -

    3M VHB tape is at auto stores and other big box stores, or online.

    nicO -

    I used the tweezers that came with the replacement screen and jammed one of them into the glass and that eventually worked. Heating with a blow dryer is also important. The suction cup was helpful in loosening the adhesive for sure, but just not enough to get the display to come out.

    J Olin -

  3. IZDkMbqPLpSKR3FP
    IZDkMbqPLpSKR3FP
    rsvfxSHYCjPjo5yK
    ipBZZgZIyPGFNAuE
    • Se il tuo iPhone ha lo schermo crepato, evita che si rompa ulteriormente e di farti male durante la riparazione mettendo del nastro adesivo sul vetro.

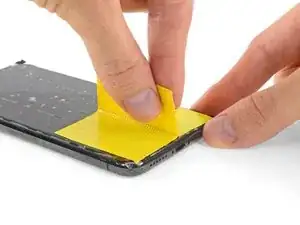
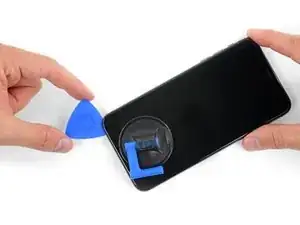
    • Posiziona strisce sovrapposte di nastro trasparente da pacchi sullo schermo dell'iPhone finché non l'hai coperto tutto.

    • Indossa occhiali di protezione per proteggere gli occhi da schegge libere durante la riparazione.

    • Se non riesci a far aderire la ventosa nei prossimi passi, applica del nastro adesivo resistente (come del nastro americano telato) come una maniglia e alza lo schermo con quello.

    • Se non riesci, puoi incollare la ventosa allo schermo con la super colla.

  4. 3IMmwN6eAATEC1Ur
    3IMmwN6eAATEC1Ur
    NkG3JUUmTTT2yuMO
    WfrU35NTLApbNc6m
    • I prossimi tre passaggi fanno una dimostrazione dell'Anti-Clamp, uno strumento designato per agevolare le procedure di apertura. Se non stai utilizzando l'Anti-Clamp, puoi saltare questi tre passaggi per un metodo alternativo.

    • Per le istruzioni completi su come usare l'Anti-Clamp, guarda questa guida.

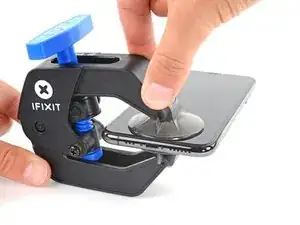
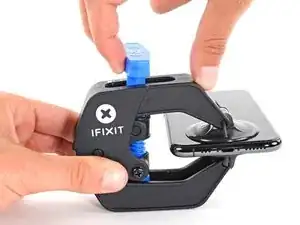
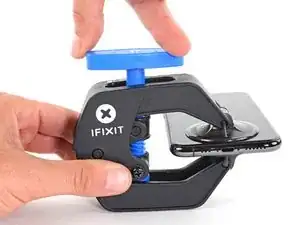
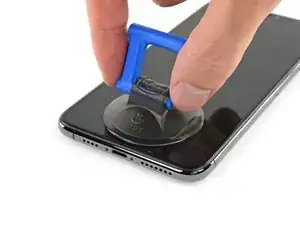
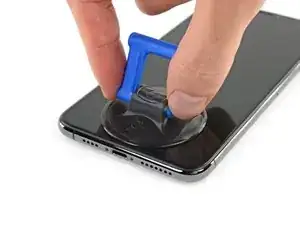
    • Tira la manopola blu indietro per sbloccare i bracci dell'Anti-Clamp.

    • Fai scorrere i bracci oltre il bordo sinistro o destro del tuo iPhone.

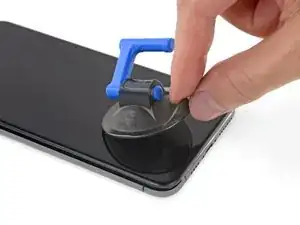
    • Posiziona le ventose vicino al bordo inferiore dell'iPhone, una di fronte e una sul retro.

    • Premi le ventose insieme per farle aderire sull'area desiderata.

    • Se ritieni che la superficie del tuo iPhone sia troppo scivolosa perché l'Anti-Clamp possa far presa, puoi utilizzare del nastro adesivo per creare una superficie più aderente.

  5. iVlbGOyninrhyOwV
    iVlbGOyninrhyOwV
    giIpCvs3bm1tBTSI
    wwLDwYI6O4KuZvfv
    • Tira la manopola blu in avanti per bloccare i bracci.

    • Gira la manopola in senso orario di 360° o finché le ventose cominciano ad allungarsi.

    • Accertati che le ventose rimangano allineate fra loro. Se si spostano, allentale leggermente e riallinea i bracci.

  6. vHSoxjOQn4qraq6k
    vHSoxjOQn4qraq6k
    2Hm25WrXvhbx64si
    su5WEJC6ROUSjhCX
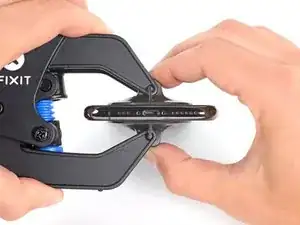
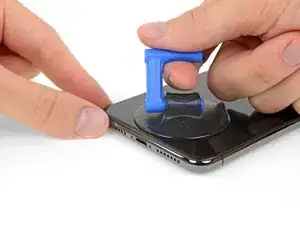
    • Scalda un iOpener e infilalo tra i bracci dell'Anti-Clamp.

    • Puoi anche utilizzare un asciugacapelli, una pistola termica o una piastra riscaldante, ma il calore eccessivo può danneggiare lo schermo e/o la batteria interna, quindi procedi con cautela.

    • Piega l'iOpener in modo che si appoggi sul bordo inferiore dell'iPhone.

    • Aspetta un minuto per dare all'adesivo la possibilità di scollarsi e creare un'apertura.

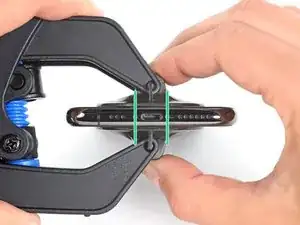
    • Inserisci un plettro di apertura sotto lo schermo e la scocca di plastica, non solo sotto lo schermo.

    • Se l'Anti-Clamp non crea un'apertura sufficiente, applica più calore all'area e gira la manopola di un quarto di giro.

    • Non girare la manopola di più di un quarto di giro alla volta e attendi un minuto tra ogni rotazione. Lascia che l'Anti-Clamp e il tempo facciano il lavoro per te.

    • Salta i prossimi tre passaggi.

  7. BW3q5FMfmVGImZHb
    • Il riscaldamento del bordo inferiore dell'iPhone aiuta ad ammorbidire l'adesivo che blocca il display, semplificando l'apertura.

    • Usa un asciugacapelli oppure prepara un iOpener e applicalo per circa un minuto al bordo inferiore dell'iPhone per ammorbidire l'adesivo sottostante.

    besteht da die Gefahr das sich das Displayglas vom lcd löst?

    roter spieler -

    Besteht da die Gefahr das sich der Kleber vom Displayglas löst?

    roter spieler -

  8. v5JlCmJpbAURMTtH
    v5JlCmJpbAURMTtH
    vv1FBnsV1GwM44ks
    • Se usi una sola ventosa, applicala sul bordo inferiore del telefono evitando la parte curva del vetro.

  9. 5dqKhPLYjtcWGgy3
    5dqKhPLYjtcWGgy3
    F55jAMXGPEW3rXDT
    HDE2vLMvyXosnjZf
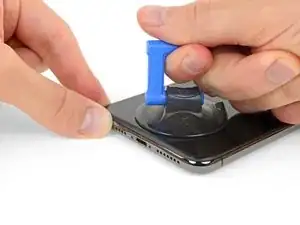
    • Tira la ventosa applicando una trazione forte e costante fino a creare una piccola fessura tra il pannello frontale e il case posteriore.

    • Inserisci un plettro di apertura nella fessura sotto lo schermo e la scocca di plastica, non solo sotto lo schermo.

    • L'adesivo impermeabile che tiene in posizione il display è molto tenace. La creazione di questa fessura iniziale richiede l'applicazione di una forza piuttosto elevata. Se hai difficoltà nell'aprire una fessura, applica altro calore e muovi lo schermo su e giù per indebolire l'adesivo finché non riesci a infilare lo strumento di apertura.

    I need help. I inserted the pick under the screen, but above the touch screen. When I lifted it, all I see is the silver touch screen instead of the interior of the iPhone. How do I to opening the screen the right way from here?

    Joe Blaze -

  10. u3gxvpcYX5nus2KG
    u3gxvpcYX5nus2KG
    Lf4lNqYGWUSKSFVk
    cjFo6MCSU6GWPW2M
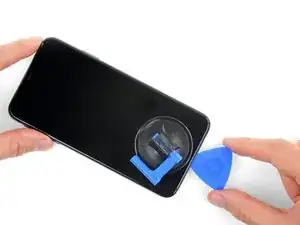
    • Fai scorrere il tuo attrezzo di apertura attorno all'angolo inferiore sinistro e lungo il bordo sinistro dell'iPhone per rompere l'adesivo che tiene in posizione il display.

    • Non inserire il plettro di apertura per più di 3 mm, altrimenti potresti danneggiare i componenti interni.

  11. YMEbS11qnaNowIQc
    • Sul bordo destro del tuo iPhone ci sono cavi delicati. Non inserire il plettro di apertura in questa zona, altrimenti potresti danneggiare i cavi.

  12. BPtLHcqaCd5VPRCl
    BPtLHcqaCd5VPRCl
    D3jOIZyacMYEGeCZ
    kV1cF5WCY4t4WLiE
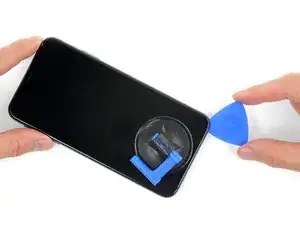
    • Inserisci nuovamente il tuo attrezzo nell'angolo inferiore destro dell'iPhone e fallo scorrere lungo il lato destro del telefono per separare l'adesivo.

    • Non inserire il plettro per più di 3 mm, altrimenti potresti danneggiare i cavi dello schermo.

  13. dZWF1DbESTeClxfK
    dZWF1DbESTeClxfK
    FTYkljksen6hwJjd
    KPEiFcOPGIMQHsyu
    • Il bordo superiore del display è fissato sia con la colla sia con delle clip.

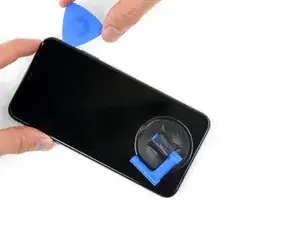
    • Fai scorrere il plettro sotto il bordo superiore del display, mentre muovi o scuoti delicatamente il display verso il basso, in direzione della porta Lightning.

    • Se ci metterai troppa forza, le clip si romperanno. Lavora con cautela e pazienza.

    • Non inserire il plettro per più di 3 mm, altrimenti potresti danneggiare il gruppo dei sensori frontali.

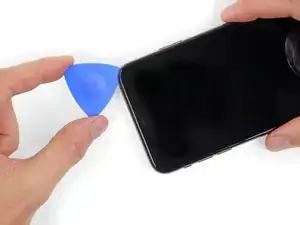
    • Fai scorrere il plettro nell'angolo opposto e taglia tutto l'adesivo rimanente.

  14. eLPsgvEXHeyiFWdQ
    • Tira la linguetta sulla ventosa per staccarla dal pannello frontale.

  15. bCEGsUKgCRjVFMl6
    bCEGsUKgCRjVFMl6
    IgautN6iuZ1aXRAO
    a6gkDXJJRmyOh3fH
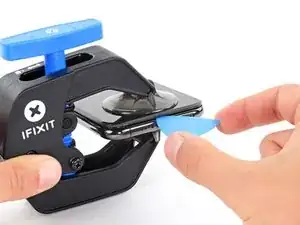
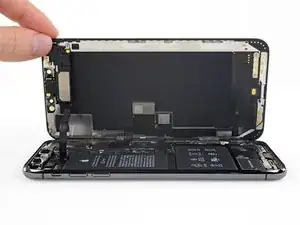
    • Apri l'iPhone sollevando il display dal lato sinistro, come per sollevare la copertina posteriore di un libro.

    • Non cercare di staccare del tutto il display, perché questo è ancora connesso alla scheda logica dell'iPhone da diversi fragili cavi piatti.

    • Appoggia il display contro qualche tipo di supporto per mantenerlo aperto mentre lavori sul telefono.

    • Durante il rimontaggio poni il display in posizione, allinea le clip lungo il bordo superiore e premi delicatamente il bordo stesso per metterlo in posizione prima di reinserire tutto il display. Se non si incastra facilmente fino al clic, controlla le clip lungo il perimetro del display per assicurarti che non si siano deformate.

  16. 1SQyyqNOEOrZUDke
    1SQyyqNOEOrZUDke
    w4YH32anIMmeUVdb
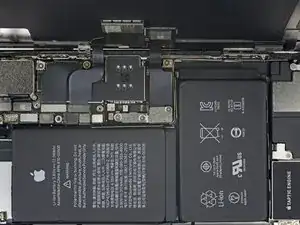
    • Rimuovi le quattro viti tri-wing Y000 che tengono in posizione la staffa del connettore della scheda logica, delle seguenti lunghezze:

    • Due viti da 1,1 mm

    • Una vite da 1,5 mm

    • Una vite da 3,7 mm

    • Durante la riparazione tieni traccia di ogni vite e assicurati di rimetterle tutte esattamente dove erano prima per evitare di danneggiare il tuo iPhone.

  17. G62FCvpLRGTCWaB5
    • Rimuovi la staffa.

    • La staffa può opporre una lieve resistenza al distacco. Sollevala delicatamente ma in modo fermo per staccarla.

    • In fase di riassemblaggio, ecco il momento giusto per accendere il tuo iPhone e verificare tutte le funzioni prima di rimontare e sigillare il display. Non dimenticare poi di rispegnere l'iPhone prima di continuare.

  18. 4CJtRQHCJdJnTQXU
    4CJtRQHCJdJnTQXU
    Dvq1GumBRbewcbYT
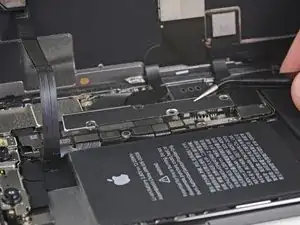
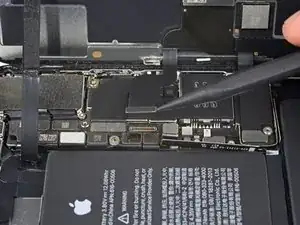
    • Usa la punta di uno spudger o un'unghia pulita per staccare il connettore della batteria sollevandolo dal suo zoccolo sulla scheda logica.

    • Cerca di non danneggiare le guarnizioni in silicone nero intorno a questa e altre connessioni della scheda. Queste guarnizioni forniscono un'ulteriore protezione contro l'intrusione di acqua e polvere.

    • Piega lievemente il connettore per distanziarlo dalla scheda logica ed evitare che questo possa fare contatto con lo zoccolo e quindi alimentare il telefono nel corso della tua riparazione.

  19. kFBx36yybRbt4ene
    kFBx36yybRbt4ene
    dmoCxINdWdXgvQWr
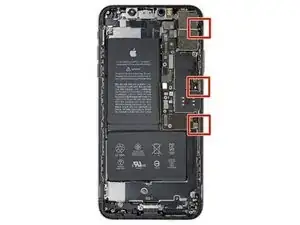
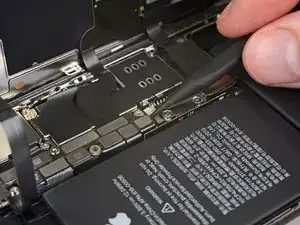
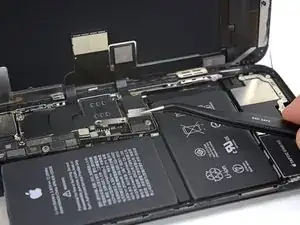
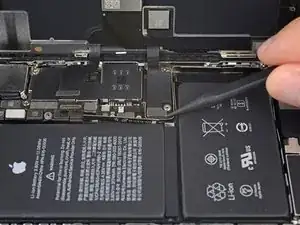
    • Rimuovi le tre viti tri-wing Y000 che bloccano la staffa del connettore del display:

    • Due viti da 1,5 mm

    • Una vite da 1,1 mm

    I am replacing the screen for the 2nd time - the first repair was done by someone else, and the first 2 screws are 1.5mm and the last screw is 1.1mm… If I put the screw back in am I risking Long Screw Damage?

    Sarah Ybarra -

    I think that the outside screw (red one, one the right) is actually 1.5 mm or something longer than 1.1. Looked that way to me.

    Paul Key -

    From the top, the screws are: 2 x 1,5mm + 1 x 1,1mm

    serdev94 -

    I can confirm the above comments on the screw length. Pls correct it in the description!

    k_neuper -

    Thanks for all your comments! I'll amend this step.

    Arthur Shi -

    Hi, I just changed the screen on my XS Max and for this bracket I used 2 x 1.1 mm and 1 x 1.5 mm.

    Starting from left to right:

    - left 1.1 mm (I tried with 1.5 mm like in the above picture but I felt that it didn't wanted to go deeper so I didn't forced and I tried it in the middle and it fit perfectly)

    - middle 1.5 mm

    - right 1.1 mm

    For the two brackets I had 7 screws, I aligned them on the desk by length and I had 2 x 1.5 mm, 4 x 1.1 mm and 1 x 3.7 mm.

    Good luck and I hope it will help someone!

    Adrian Slabu -

  20. 1qRGSCYAJCHCGdPV
    • Rimuovi la staffa.

  21. ERNHPFP6lZuchZCE
    ERNHPFP6lZuchZCE
    S6ekGfOmSEsrpLgY
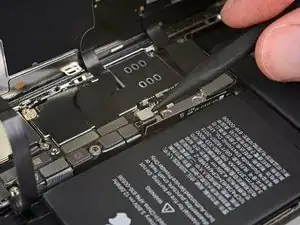
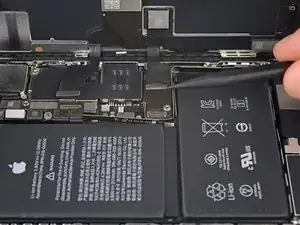
    • Usa la punta di uno spudger o un'unghia per staccare il connettore del gruppo sensori del pannello frontale.

  22. L6fXcoghCZH2MMV1
    L6fXcoghCZH2MMV1
    TVPTLk2aj2kihWvT
    • Usa uno spudger o un'unghia per staccare il connettore del cavo del pannello OLED.

    • Per ricollegare connettori a pressione come questo, premi su un lato finché senti il clic di bloccaggio, poi ripeti l'operazione dall'altro lato. Non premere dal centro. Se il connettore è disallineato può piegarsi, danneggiandosi irreparabilmente.

  23. 4qW2r2RGlLa1H1Wv
    4qW2r2RGlLa1H1Wv
    ARJbNRJOyuL3uDjb
    • Usa uno spudger o un'unghia per staccare il connettore del touchpad dal suo zoccolo.

    • Se qualsiasi parte del tuo schermo non reagisce più dopo la tua riparazione, disconnetti la batteria, rimuovi e riattacca questo connettore assicurandoti che ci sia un clic quando si incastra nella sede e che non ci sia polvere o altro nello zoccolo.

    Mine still won’t respond even after reseating any ideas? Ground issue?

    Jasom -

  24. mhRHh2htSTUovyWb
    mhRHh2htSTUovyWb
    YKTqIYc1ultNHsW3
    PTmKBNdlaMjMDDDY
    • Il cavo flessibile del gruppo sensori del pannello frontale è incollato ma con adesivo poco tenace.

    • Solleva delicatamente il cavo finché non si stacca.

    What if that cable brakes how do u fix that?

    Kourtney Williams -

  25. QYkTkpjLWEUFjK21

    No olviden que para que pase el Face Id tienen q cambiar el flex que va encima de la camara delantera con mucho cuidado ya q si le ponen otro flex no funcionara.

    jeferson -

  26. V3Lvx6DQOmJFJmuW
    V3Lvx6DQOmJFJmuW
    TW1ZmXcJYGmgq3qi
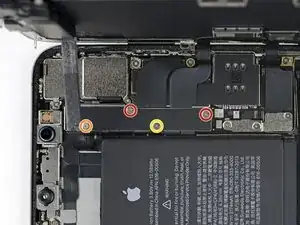
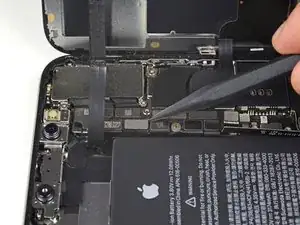
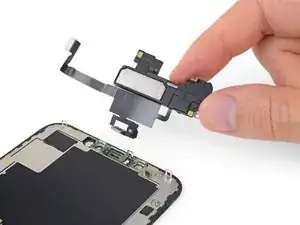
    • Rimuovi le tre viti tri-wing Y000 che bloccano il gruppo altoparlante/sensore:

    • Una vite da 1,4 mm

    • Due viti da 1,5 mm

    Manca lunghezza viti

    Max -

    Ciao @max94949 Quale lunghezza stai cercando? Il passo menziona che si tratta di una vite Y000 da 1,4 mm e di due vite Y000 da 1,5 mm.

    Claire Miesch -

  27. GBOWoTvgpCgGhogB
    GBOWoTvgpCgGhogB
    wLTGWgfwgw4yBRjq
    • L'altoparlante voce è incollato, ma con adesivo poco tenace.

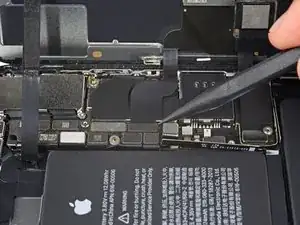
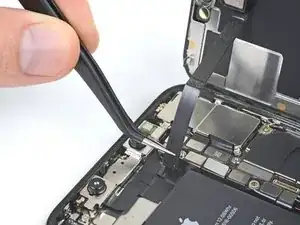
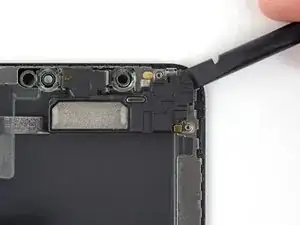
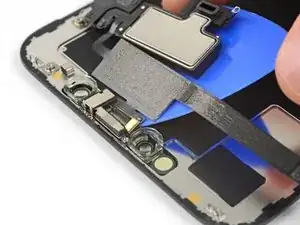
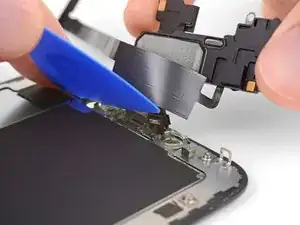
    • Usando uno spudger, fai leva delicatamente sotto il bordo superiore del gruppo altoparlante e rovescialo verso il basso allontanandolo dal bordo superiore del display.

    • L'altoparlante rimane collegato da un cavo a nastro molto sottile. Stai attento a non forzare il cavo per non danneggiarlo.

    If you are using a refurbished display, check for dirt in the earpiece speaker cutout.

    If you have poor quality or low sound after changing the display, use a cotton bud and isopropyl alcohol to clean the earpiece cutout.

    John Gildert -

  28. uOsZrVKFUDQkAMvP
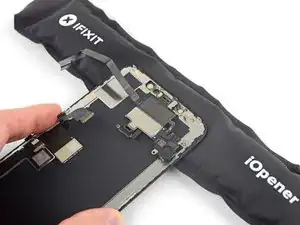
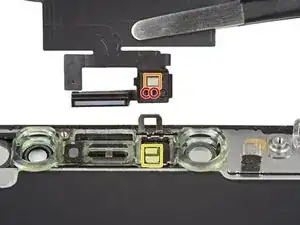
    • Usa un asciugacapelli o una pistola termica oppure prepara un iOpener e applicalo sulla parte superiore del display dal lato frontale per 1-2 minuti per ammorbidire l'adesivo che blocca i sensori.

  29. uvvkyECTiPAxNotm
    uvvkyECTiPAxNotm
    1LkAuAGt2Tq6CR3L
    JUkBWJvIyFADJpGl
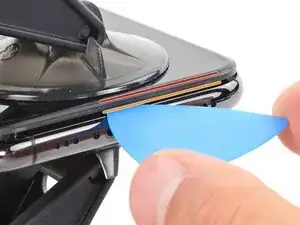
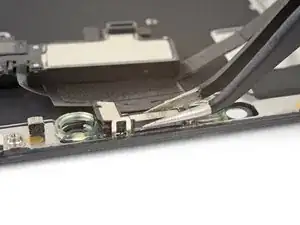
    • Infila con cautela il bordo del tuo plettro di apertura sotto il microfono, passando sotto al cavo flex.

    • Torci delicatamente il plettro per staccare il microfono, stando attento a non forzare o danneggiare il cavo flex.

    • Se necessario, usa la punta dello spudger per portare a termine la separazione del microfono dal suo vano nel pannello anteriore.

  30. CMZJeqFvdECFWqjU
    CMZJeqFvdECFWqjU
    vGjRYoixXjXwTspM
    2Pc2IMXqxoove4gE
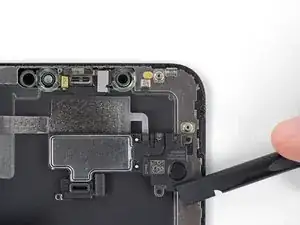
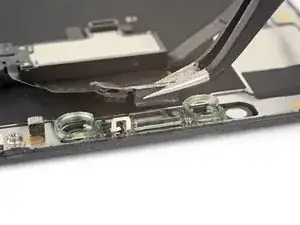
    • Lavorando da sinistra verso destra, fai scorrere un plettro di apertura nella parte sottostante al cavo flex e sotto il modulo sensore prossimità + illuminatore flood.

    • Smuovi e solleva delicatamente il modulo per staccarlo dal suo alloggiamento nel pannello frontale.

    • Può essere di aiuto sollevare e tenere discosto l'altoparlante per accedere al modulo. Fai solo attenzione a non tirare il sottile cavo flessibile nel corso dell'operazione.

  31. oRRqE3jhhflOoegY
    oRRqE3jhhflOoegY
    LVIs3UuVBIxOTvuF
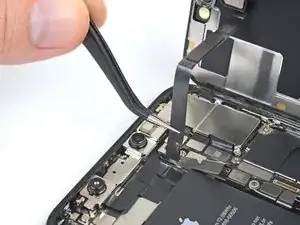
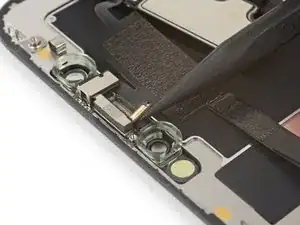
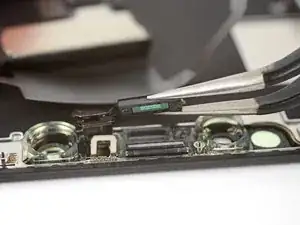
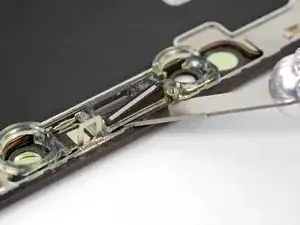
    • Usa delle pinzette per smuovere il sensore luce ambiente e sollevarlo dal suo recesso nel display.

    • Se il sensore non diventa libero di muoversi nel giro di qualche secondo, applica dell'altro calore e prova di nuovo.

    • Il sensore resta collegato al resto del gruppo da un cavo a nastro molto sottile. Stai attento a non forzare o danneggiare il cavo.

    This was the most difficult part for me so i erred on the side of caution. I reheated the display in the oven at 85 degrees celsius. Like in the third picture in the next step, i got a razor into the slot below, to get the diffuser a little loose before wiggling the sensor out. I didn't understand the wiggling until i simply rocked it like a boat would side to side like to the top of the display to the bottom on the display, and voila, all came out easy and in one piece with the diffuser still attached.

    Nachman Laufman -

  32. Oa5c1ikPYKOIxi4m
    Oa5c1ikPYKOIxi4m
    MFkxgZkwWSBLyOh1
    h3VqGkSsQqPmdeY4
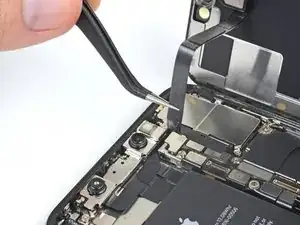
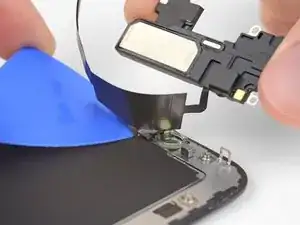
    • Se hai avuto successo nella rimozione del sensore luce ambiente, come illustrato nella prima foto, continua con il prossimo passo qui sotto.

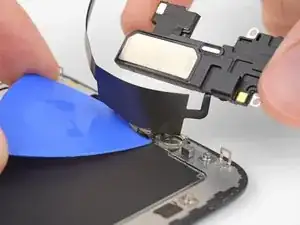
    • Se la striscia diffusiva bianca si è staccata e rimane attaccata al display, come mostrato nella seconda foto, devi staccarla facendo leva con delicatezza lungo il bordo superiore utilizzando una lama sottile o uno strumento di apertura. L'operazione è un po' più facile se prima di iniziare riscaldi di nuovo la parte.

    • In fase di rimontaggio, per prima cosa installa il diffusore sul display, facendo attenzione che sia rivolto nella giusta direzione (la faccia frontale è illustrata la prima immagine, quella posteriore nella terza foto).

    • A questo punto, disponi il sensore luce ambiente al di sopra del diffusore. Dovrai tenere in posizione il sensore mentre rimonti le viti che fissano il gruppo altoparlante/sensore. Una volta che le viti saranno strette a fondo, il sensore rimarrà al suo posto e funzionerà normalmente.

    I have accidentally damaged flood illuminator will it affect the face id also or if I just replace the Earpiece Speaker and Sensor Assembly it will get fixed.

    Devashish Nayak -

  33. HMf3vwiLB2uVca6E
    HMf3vwiLB2uVca6E
    XXVJ2LmpHnFInRgo
    sZrD5AnHONwSQaYc
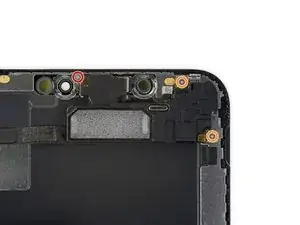
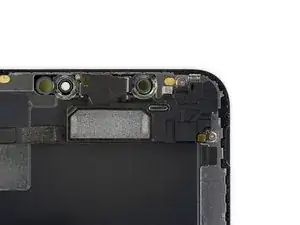
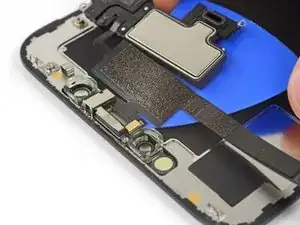
    • Rimuovi il gruppo altoparlante e il gruppo dei sensori frontali.

    • In fase di riassemblaggio, controlla la posizione del modulo di plastica nera che contiene questi componenti:

    • Sensore di prossimità

    • Illuminatore flood

    • Il modulo deve essere posizionato in modo tale che questi componenti non siano coperti in alcun modo da adesivo.

    Do you have to remove the earpiece speaker and front sensor assembly. If you are taking a screen from another Xs max with it already attached?

    atkinson_98 -

    The front sensor assembly is part of Face ID, so you must transfer the original assembly to the replacement screen in order to maintain Face ID functionality.

    Arthur Shi -

    In order to keep the original assembly, do you have to solder?

    qwerty77x -

    No, you just take the whole unit. Warm it up and remove the glued sensors like described. Handle it carefully, the speaker cable is quite thin. If damaged, you might loose your face-ID functionality.

    rob_repair -

    Does the screen need a reprogamation onto the new screen?

    Diogo Helms -

    if the pentalope screws are rusted and the driver can’t fit in it to remove them is there any other way to remove them to replace screen?

    Nicholas Sham Ku -

Conclusione

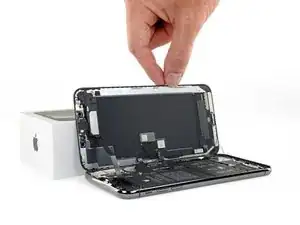
Confronta la tua parte di ricambio con quella originale: potrebbe essere necessario il trasferimento di alcuni componenti o la rimozione di protezioni adesive dalla parte nuova prima di installarla.

Per rimontare il dispositivo, segui queste istruzioni in ordine inverso.

Porta i tuoi rifiuti elettronici a un riciclatore certificato R2 o e-Stewards.

La riparazione non è andata secondo i piani? Vai sulla nostra comunità Risposte per trovare aiuto nella risoluzione dei problemi.

Jeff Suovanen

Membro da: 06/08/13

426762 Reputazione

37 commenti

Nice guide. I could be wrong but for the first time in a while, changing a display on an Apple phone looks like it’s not anymore difficult than previous models.

John K

the-screen-savers.com

John Knirr -

If you remove the screen but then apply the same screen back on the phone, will True Tone still be disabled?

Onel Jimenez -

@onslivion Nope! It'll continue to work fine, so long as you didn’t damage anything.

Jeff Suovanen -

Hi i broke the Flex cable of the Part.

what i can do now.

is their some Parts for sale?

murtasa972 -

I just switched the screens from 2 phones and both are unresponsive, if put them back to its original logic board the work again, any idea why they dont work? both are original.

martinlpz0422 -

Why is True Tone disabled afterwards? Even with an Original Screen how is that possible?

indra.schleiffer -

That's normal. There's a chip in the screen that has info that is specific to the original logic board so unless you have a special machine to read/write to that chip, truetone will not work.

schaubjimmy -

Hello, I just came across a xs max that works otherwise but 1-2 cm from the top wont work. Is this a known issue with a fix? LCD works fine, but digitizer is cracked.

teemupa -

Awesome guide!

iTony -

This was perfect. It definitely helped me replace the screen on a friend IPhone XS Max!

Jordyn Everson -

Every authoritative source (such as Apple Support, Wikipedia) that I read about the iPhone XS Max display states that it has an OLED display - not an AMOLED display, and not an LCD display (such as on the XR model). Yet the parts associated with this guide are LCD (website quirk?) and the written text for XS Max mention AMOLED. Isn’t this important to get right when replacing? The model I have is A1921.

Mark Johnson -

Hi Mark,

The iPhone XS Max uses an AMOLED display. Active Matrix OLED (AMOLED) is a subcategory of the general OLED tech—AMOLED displays contain circuitry which allows them to switch each OLED pixel on or off. Compared to Passive Matrix OLED, AMOLED displays have a higher refresh rate and are more energy efficient . However AMOLED displays are complex, difficult to source, and very expensive to replace (think $200-400 for the part!) Hardware manufacturers sought to resolve this problem by producing LCD replacement screens. These screens are made to be completely compatible with the iPhone XS Max, but are significantly cheaper to replace. They do look slightly different compared to the original screen. Check this link out for a more in-depth review of the differences.

Arthur Shi -

Where is the INSTALL GUIDE this is just removal? And don’t tell me it’s the reverse. I have a small gasket that’s not mentioned in this and it doesn’t explain how to remove the main old gasket or install the new gasket

James Baker -

Where is the installation guide? This is just a removal guide. Don’t tell me that it’s the opposite of removal to install because I have a small gasket that is not mentioned in the YouTube video or on this site in my package

James Baker -

I would like to echo this comment. It is extremely disappointing to see a guide this comprehensive and detailed stop short of reassembly. Especially because some parts need to be transferred from the original display to the replacement one.

Bobby Adamson -

Completed the Repair with the more Expensive alternative - the OLED display.

The guide is very comprehensive and covered all the points including looking out for bits left behind!

- I noticed a tiny piece of conductive foam on the old display which i moved to the new one.

The OLED display is top quality, but a little darker due to losing the “True Tone” no doubt.

The Adhesive kit is very good, but separating the two films was a little difficult and messed up the alignment slightly, however I managed to recover!

John Gildert -

One more addition I had to make after undertaking this repair.

I had noted that after swapping the display the earpiece was very quiet. I thought that I had missed a gasket, misaligned the earpiece speaker or not plugged in the leads correctly.

Nope. Much simpler than that. CLEAN THE EAR PIECE CUTOUT! *Eeeewwww* After putting up with this for about 4 weeks, I happened to get out the Cotton Buds. A quick wipe revealed someone elses EAR GUNK was clogging up the ear piece cutout !

Disgusted, I got out the Isopropyl and cleaned it (carefully) about 10 times, the audio is now crystal clear.

@ifixit - Please ensure your “Refurbished displays” have a clean earhole. It was pretty gross that it was clogged to the point that I could not HEAR!

John Gildert -

Great guide, completely worked for me!

Jonathan Holland -

This guide worked perfectly for my iPhone Max XS screen replacement. This is only my second “project” from iFixit (the first was a replacement display screen for my Canon 6D) and both times, miraculously, everything worked. I’m really not sure if it is my skills or the details in the guides (it’s definitely the latter and a tiny bit of the former). The replacement parts are reasonably priced and the toolkits are VERY GOOD in quality.

For this iPhone screen fix, I used a previously purchased toolkit and “borrowed” suction handles (yes, definitely makes a difference and better than the tape alternative—I tried both) from a bathroom rack.

It took me about 3 hours to get this done. I rushed on step one and stripped the first pentalobe screw. Luckily, one stripped pentalobe screw is still OK. I managed to pull it apart by wiggling the screen around (without too much force). I used a hair dryer to heat the frame/adhesive.

Follow the instructions closely and don’t lose the tiny screws. A magnetic screwdriver helped.

uropygi -

I have accidentally damaged flood illuminator will it affect the face id also or if I just replace the Earpiece Speaker and Sensor Assembly it will get fixed.

Devashish Nayak -

Step 1: Remove pentalobe screws…is very careful to NOT STRIP THE SCREW…tools provided/metal is not hard enough and is unable to take out the screw in Step 1 and am now currently going out to buy better pentalobe screw driver. THANKS. Why don’t you just provide better tools and increase the cost……………………………………………

Michael Wu -

work just fine ,thank you…

moostafak -

for me at least once you get use to repairing this it can take around 30 min too an hour but i also repair all devices even phones for living so i do have experience with repairing these

Zach Mentz -

Changing just the glass screen on my iphone xs max and the black part behind the screen is cracked what do I do ?

Amber Hankins -

Executed this repair almost flawlessly. The FaceID flex cable is very fragile and glued down very well. I advise you be careful when removing is as not much pressure at all can cause it to break (Speaking from experience). Other than that the guide was very easy to follow.

Gerald Johnson -

This was an incredible guide! With the video, it was the perfect guide and I managed to complete the fix in less than 2 hours.

Akshar Jain -

Can water damaged iphone be restored by replacing screen?

Andrea castaneto -

Hey Team iFixit, vielen dank für diese ausführliche Anleitung. Einfach richtig lesen dann macht man auch keine Fehler haha

Valentin Ochs -

Last month I ordered and received a new screen/digitizer for my iPhone XS max. Installation was easy and the phone was back on-line in half ah hour. Not for long unfortunately. A week after the replacement, the digitizer became irresponsive. I had to let the battery die and subsequently reboot my phone.

It fixed the problem for one day. Then the digitizer froze up again. I decided I was going to open the phone to check the ribbon cables for faulty connection. Alas, when opening the iPhone,one of the cables between the screen and the main board tore.

I resorted to re-installing my old cracked screen that now has been working flawlessly for one week.

Is there a fix for the broken ribbon cable, or can I return the screen for credit or repair?

Maurice -

Hey, I'm thinking on fixing up my Iphone Xsmax screen will the Face Id still function after replacement

oguntayo tosin -

Hello oguntayo tosin, as mentioned in the introduction, for Face ID to work you have to transfer the earpiece speaker + sensor assembly as they are paired to your individual iPhone.

Manuel Haeussermann -

I cant put the display on the iPhone and I dont know why.It just doesn't fit right and rises about 2mm higher than it should.What can I do?

Robin -

Hello Robin, did you already go through the recommended troubleshooting steps? It sounds like it could be a bracket or elements of the earpiece speaker and front sensor assembly that are not seated correctly or that there is some issue with the clips holding the display. You could also try checking whether your replacement part deviates from the original screen as discussed here. Hope this helps!

Manuel Haeussermann -

If purchasing the OLED option from here, would I be able to use a programmer to enable back True Tone?

Jeremy Rampersad -

There's a couple extra chips near the bottom of the original screen that aren't on the replacement. Are they surplus to requirement?

Thomas Pharazyn -

after re assembly the screen is loose I attempted to open it and re sitting but still loose!!! why???

Victor Perea -

PLEASE HELP! I have an IPhone XS Max with a cracked screen. It has loads of irreplaceable information on it. I can’t afford to buy a screen right now but I have a brand new screen for a IPhone 6 Plus, I don’t want to install it onto the XS but I was wondering if it could be hooked up long enough to type the passcode and trust a computer so I can download the phone’s contents? Pretty much I just need to know if the cables for the display are compatible.

This is the only thing I could think of that might possibly work and not cost me a bunch of money. I was recently attacked, robbed and assaulted. The IPhone XS Max was recording during the assault but couldn’t back up because I didn’t have any Icloud storage available. If anyone has any other suggestions please help me out. P.s. I have went to the police and they couldn’t care less, I live in a small town and my abuser is a prominent member of the community so I am on my own.

PerfectlyBroken -