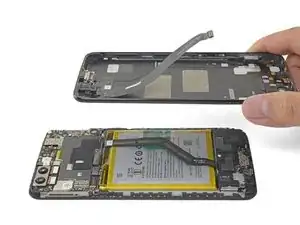
Introduzione

Segui questa guida per rimuovere il gruppo dello speaker principale da un OnePlus 5. La parte più difficile è rilasciare i ganci della cornice. Dopodiché il gruppo dello speaker viene via facilmente.

  1. SYlGM5WyOaBd6pLj
    SYlGM5WyOaBd6pLj
    QAibbw1Y4MJGdgwG
    GPrXnC6XtihhFYj6
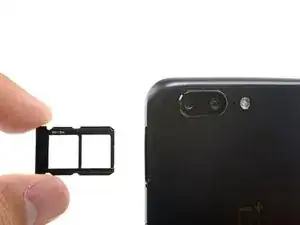
    • Infila uno strumento o una punta per l'eiezione della scheda SIM, o una graffetta raddrizzata nel piccolo foro sotto il vassoio della scheda SIM, posizionato vicino alle fotocamere posteriori sul bordo del telefono.

    • Premi con decisione per espellere il vassoio.

    • Quando reinfili il vassoio della scheda SIM, assicurati che sia orientato correttamente come mostrato.

  2. TBQWhWKy1QEZvuXb
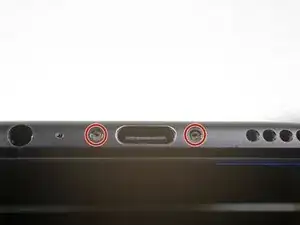
    • Svita le due viti Torx T2 da 2,6 mm accanto alla porta USB-C sul bordo inferiore del telefono.

    What are the reference of the screws ? They are missing in the one I bought !

    Yôken Asakura -

    Hi Yôken,

    They help hold the back cover on. Most of the time, the clips are enough to hold the phone together.

    Arthur Shi -

    Just FYI, for whatever reason my brand new OnePlus 5 had 0,8 mm stars screws instead of T2 Torx.

    strixaluco -

    Same here, T2 doesn’t fit the screws on my Oneplus 5. More like T1’s

    Shaze An -

    Definitely T2 for me. Do watch out during assembly. I have a feeling that it’s easy to strip these.

    Juno Grégoire -

    T2 for me too. It was missing in my kit and iFixit sent it later when I asked them about it.

    Gitanshu Sardana -

  3. P3gkh4u1CW6BvaUT
    P3gkh4u1CW6BvaUT
    HZ2oq3334XBwxOSd
    Z2kNTKjf2Hn4xfhd
    • C'è un elevato rischio di danneggiare il pannello dello schermo se questa procedura di apertura non viene eseguita correttamente.

    • I prossimi quattro passi mostrano come separare la copertura posteriore dalla cornice in plastica. Leggi tutti i passaggi prima di provare ad eseguire questa procedura.

    • Ci sono due diverse fessure tra il corpo del telefono e lo schermo:

    • Fessura del pannello dello schermo: Questa fessura fa parte del gruppo dello schermo. Non fare leva in questa fessura, o separerai e danneggerai il pannello dello schermo.

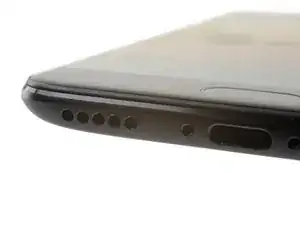
    • Fessura della cornice: Questa è dove la cornice in plastica incontra la copertura posteriore. Fai leva solo in questa fessura.

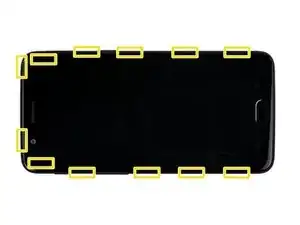
    • Ci sono dodici ganci che fissano la cornice contro la copertura posteriore. Ricordati la loro posizione mentre rimuovi la copertura posteriore nei prossimi passaggi.

  4. etwdJRYqsaaDhSnk
    etwdJRYqsaaDhSnk
    KfBDXKWXddFXRNSI
    • Mentre procedi, cerca di non accendere accidentalmente il telefono. Se succede, spegnilo prima di procedere.

    • Fai aderire una ventosa vicino al bordo inferiore dello schermo.

    • Tira la ventosa con forza costante.

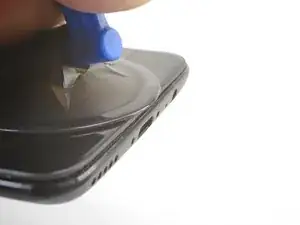
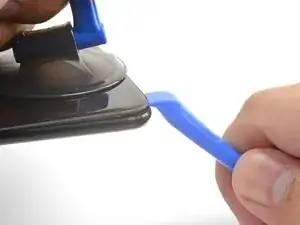
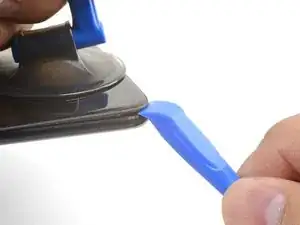
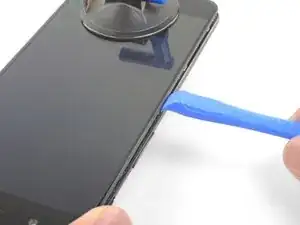
    • Premi il bordo di uno strumento di apertura nella fessura della cornice vicino alla ventosa finché non si infila tra la cornice in plastica e il bordo della copertura posteriore.

    • A causa degli spazi ristretti, questo richiederà parecchia forza. Usare un nuovo strumento di apertura con un bordo intatto ti aiuterà in questo passaggio.

    I found pushing open the frame seam at the corner works better than pushing from the middle like it is shown in the pictures

    Mark -

    I found the suction cup to be more of a hindrance and kept hitting the power button, making it necessary to stop and turn the phone off again. I watched a youtube video where the person didn't use a suction cup at all and decided to try that. I also found that a guitar pick type spudger worked far better than the one shown in the picture. If you're having trouble getting it started, I suggest trying those two things.

    Brett Gersekowski -

  5. G2EuFKReywNVunqY
    G2EuFKReywNVunqY
    2EGqswv53ufVdUop
    KCOec3LgxFrVKBPp
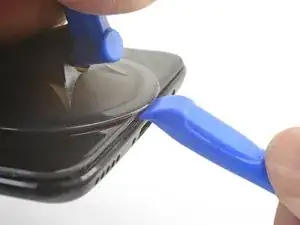
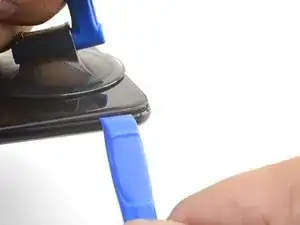
    • Dopo aver infilato lo strumento di apertura, fallo scorrere attentamente sotto il bordo inferiore del telefono.

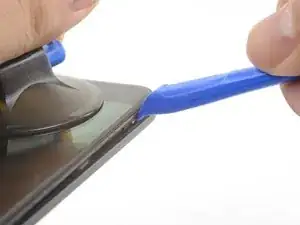
    • Guida attentamente lo strumento di apertura attorno all'angolo in basso a sinistra del telefono mentre lo tieni infilato nella fessura.

    This was extremely difficult & took a lot of force. I needed a thin flat metal spudger and wrecked a couple of plastic ones in the process. I left a few scratches along the join in the process. It would be easier if I had something to hold the phone, in my hand I kept turning it on by accident.

    David Hoffman -

    what was the metal spudger did you use? I am having trouble as well. I cannot seem to pry the back cover and it feels like it is shut tightly, there are no crevices I can pry into. What was your strategy may I ask?

    Azure Shoti -

    At first, I slightly opened the body with a plastic tool, but it was not enough to actually open the back cover. Then I used a thin metal screwdriver for this. It was difficult but nothing special. Just be sure that you are opening the correct seam between the body and the screen and don’t make sudden moves. I bent nothing, everything came back in place when reassembled.

    ivan -

    Same as David here: the plastic opening tools/guitar picks were doing nothing (not even creating the first "crack") . In the end I managed to open it using Jimmy (the metal knife/spudger), but not without scratching the whole metal cover.

    Nessuno Nessuno -

  6. rUcRRH2p6evfJ4RY
    rUcRRH2p6evfJ4RY
    DLUeRvMBGB6N1HCZ
    • Fai leva con lo strumento di apertura per rilasciare il primo gancio dalla cornice.

  7. 1IHQhNpSXtTNfbdc
    1IHQhNpSXtTNfbdc
    GdYPl1KTgPXLaenS
    23SiWCmSwCvYEIZ5
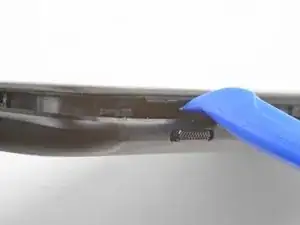
    • Continua a far scorrere lo strumento di apertura sotto il bordo lungo, rilasciando i ganci sulla strada.

    • L'ultimo gancio nell'angolo in alto a sinistra, vicino al selettore di modalità, è incassato e può essere difficile da rilasciare. Prenditi tutto il tempo necessario ed usa la parte piatta di uno spudger o un plettro per aiutarti.

    If you have difficulties with the last clip on the upper left. Try to go round the other side (right side), beginning at the bottom. This worked very well for me after having some difficulties with the clip near the front camera.

    Sebastian -

  8. 6ViL6JCT2JdJC2mB
    • Dopo aver liberato i bordi inferiore e sinistro del telefono, fai ondeggiare delicatamente la cornice per rilasciare i ganci dei bordi superiore e destro.

    • La cornice è ancora collegata alla copertura posteriore tramite un lungo cavo a nastro. Non rimuovere la copertura posteriore.

    • Durante il rimontaggio, fermati qui per provare la funzionalità del tuo telefono prima di richiudere la copertura posteriore.

    • Per richiudere la copertura posteriore:

    • Allinea il bordo superiore della cornice alla copertura posteriore ed assicurati che i ganci superiori si infilino in posizione.

    • Schiaccia i bordi lunghi del telefono per far scattare i ganci restanti.

    Reinstalling the back cover stumped me for a second… If you’re struggling with aligning the top edge of the frame, remember that the camera is going to look off/pointed a bit too low until you actually clip the frame back in.

    Really stupid but it was the only thing that tripped me up in this guide.

    Roger -

  9. s3eTthVrvSeQdHbg
    s3eTthVrvSeQdHbg
    OpemIa6DLGUeoyEj
    AwYBQfaKDAKrtFmE
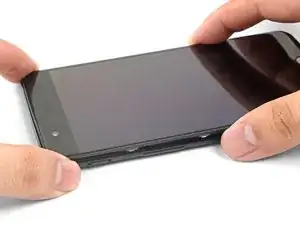
    • Dopo aver rilasciato tutti i ganci, gira il telefono in modo che lo schermo sia rivolto verso il basso.

    • Ruota la copertura ed appoggiala sulla cornice esposta.

    • Stai attento a non tirare il cavo a nastro che collega la copertura posteriore alla cornice.

  10. pfyQGq3RaDESTTM2
    pfyQGq3RaDESTTM2
    rTFqnIgaPC1VYRKZ
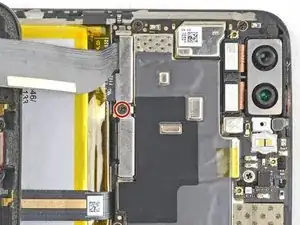
    • Svita la vite a croce Phillips da 2,6 mm che tiene ferma la copertura del cavo sopra la batteria.

    • Solleva e rimuovi la copertura del cavo.

    • Per reinstallare la copertura, posiziona correttamente un'estremità e piega leggermente la copertura per posizionare l'altra estremità.

  11. RJeEHKqpOLtBPtO6
    RJeEHKqpOLtBPtO6
    EANPufBOY5oCwAai
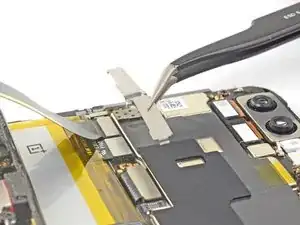
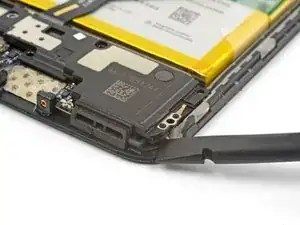
    • Usa la punta di uno spudger per sollevare e scollegare il cavo a nastro della copertura posteriore dalla sua presa.

    • Per ricollegare i connettori a pressione come questo, allinea attentamente e premi su un lato, quindi ripeti per l'altro lato. Non premere nel centro. Se il connettore non è allineato correttamente, i contatti si possono piegare, causando danni permanenti.

    If it is damaged permanently is there a solution for it?

    Run River -

    If the flex cable pins are damaged, the flex cable can be replaced.

    If the connecter pins (on the motherboard) are damaged, you might need to do microsoldering (or contact a microsoldering company) to replace the damaged connector.

    Brendan -

  12. CkrFZmYRNbVCqR4i
    • Rimuovi la copertura posteriore.

  13. hWAKPeA4uPKOHV4n
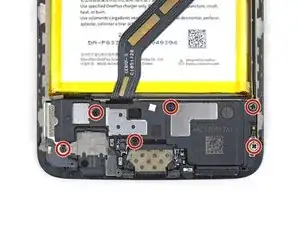
    • Svita le sei viti a croce Phillips da 2,6 mm che fissano lo speaker principale alla cornice.

  14. SAq12RkicpY13HQU
    SAq12RkicpY13HQU
    NhLAyY5F5CxkQU3D
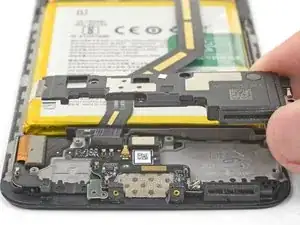
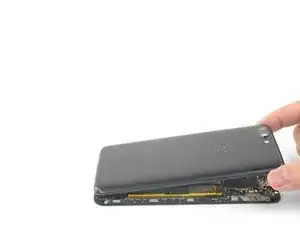
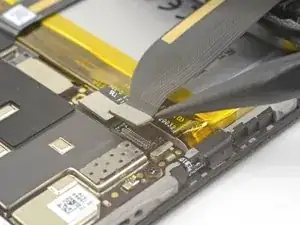
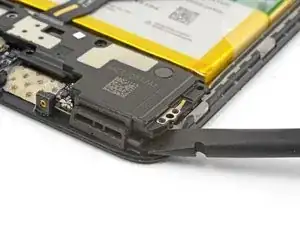
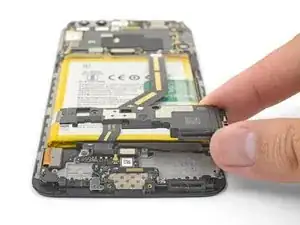
    • Infila la parte piatta di uno spudger nell'angolo del gruppo dello speaker principale e sollevalo leggermente, rilasciando lo speaker principale dal suo alloggio.

  15. gwWsgoh41HeHMTqc
    • Rimuovi lo speaker principale.

    • Per reinstallare lo speaker principale, allineane il bordo inferiore alla cornice, quindi premilo in posizione.

    • Durante il rimontaggio, assicurati che il connettore del cavo dello schermo sotto il gruppo dello speaker principale sia ancora collegato saldamente.

Conclusione

Per rimontare il tuo dispositivo, segui le istruzioni in ordine inverso.

Porta i tuoi rifiuti elettronici a un riciclatore certificato R2 o e-Stewards.

La riparazione non è andata come previsto? Prova delle soluzioni di base ai problemi, oppure rivolgiti alla nostra comunità Risposte per trovare aiuto.

Arthur Shi

Membro da: 03/01/18

248254 Reputazione

0 commenti