
Introduzione
Segui questa guida per sostituire un trackpad rotto.
-
-
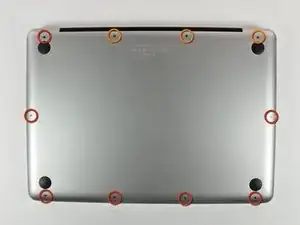
Rimuovi le dieci viti seguenti, che fissano il case inferiore al MacBook Pro Unibody da 13":
-
Sette viti con testa a croce da 3 mm.
-
Tre viti con testa a croce da 13,5 mm.
-
-
-
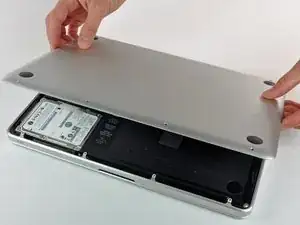
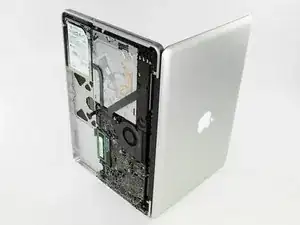
Solleva leggermente il case inferiore e spingilo verso la parte posteriore del computer per liberare le linguette di montaggio.
-
-
-
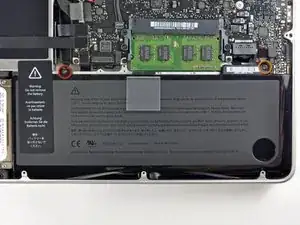
Svita le seguenti viti tri-point che fissano la batteria al case posteriore:
-
Una vite tri-point da 5,5 mm
-
Una vite tri-point da 13,5 mm
-
-
-
Con l'estremità piatta di uno spudger solleva il connettore della batteria verso l'alto dal suo zoccolo sulla scheda madre.
-
-
-
Solleva la batteria dal case superiore.
-
Carica al 100% e poi tieni sotto carica almeno altre due ore. Quindi stacca l'alimentazione e usa il laptop normalmente per farlo scaricare. All'avviso di batteria in esaurimento, salva il lavoro corrente e tieni acceso il MacBook finché non si iberna perché è scarico. Aspetta almeno altre 5 ore, poi carica il laptop ininterrottamente fino al 100%.
-
Se noti qualsiasi problema o comportamento inusuale dopo l'installazione di una nuova batteria, può essere necessario resettare l'SMC del tuo MacBook.
-
-
-
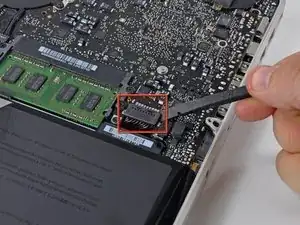
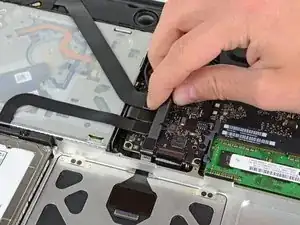
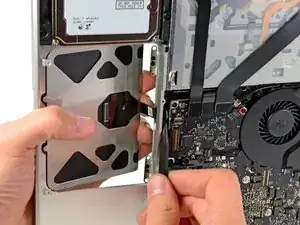
Usa la parte piatta di uno spudger per scollegare attentamente il connettore del trackpad dalla sua presa sulla scheda madre.
-
-
-
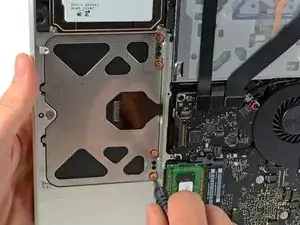
Mentre tieni fermo il bordo del trackpad più vicino alla scheda madre con una mano, svita le quattro viti a croce Phillips da 1,2 mm evidenziate in rosso.
-
-
-
Se necessario, solleva il bordo del trackpad più vicino alla tastiera dal suo alloggio nella copertura superiore spingendolo via dal supporto attaccato alla copertura superiore.
-
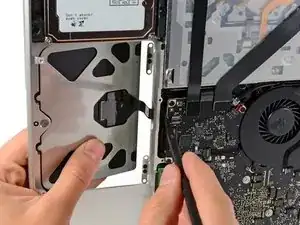
Spingi attentamente il cavo del trackpad e il suo connettore attraverso l'apertura nella copertura superiore.
-
Potrebbe essere necessario usare uno spudger per aiutare il connettore del trackpad a superare il bordo della scheda madre.
-
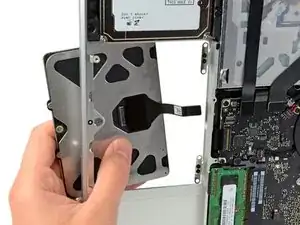
Una volta sfilato del tutto il cavo dalla sua apertura nella copertura superiore, tira il trackpad via dal bordo anteriore della copertura superiore e rimuovilo dal portatile.
-
-
-
Per rimuovere il cavo a nastro dal trackpad originale, prima apri l'aletta sul connettore ZIF, dalla parte opposta al cavo. Quindi scalda l'adesivo che fissa il cavo al trackpad con un asciugacapelli o un iOpener per ammorbidirlo, separa delicatamente l'adesivo e rimuovi il cavo.
-
-
-
Infine riavvita le quattro viti a croce Phillips da 1,2 mm sul bordo interno interno del trackpad.
-
Controlla che il trackpad sia allineato dalla parte della tastiera della copertura superiore. Una volta centrato il trackpad nella copertura superiore, stringi del tutto le quattro viti a croce Phillips.
-


Per rimontare il tuo dispositivo, segui le istruzioni in ordine inverso.

14 commenti
I replaced the trackpad and the new one had a strange behave: the arrow moves, the multi-touch works, but was not possible to click and when the arrow passes on the dock it doesn't react at all, then I plugged in an external mouse and the behave was the same (in few words it was impossible to use the computer).
Now I putted back the old trackpad and I work with the external mouse.
Did someone experienced something similar?
Did you solve in some way?
Thank you in advance.
Are you sure you pushed the cable in all the way
Hello,
I also had a similar problem. I was told to try to reset the SMC in this way:
1. Attach the MagSafe power cord
2. Power off the MacBook Pro
3. Press the L-Shift/Control/Option and Power button at the same time and hold.
4. Release them all at the same time
5. Then power on the MacBook Pro
but didn't work for me. Any other suggestion?
Anyone have trouble with the trackpad acting wonky after installation? Clicking well, but the right 1/3 side does not track properly. Cursor will start to go all over the place or stop. Also installed an Anker replacement battery as well, took off the foot pads as recommended. Just trying to figure out if it's software or hardware. (i.e. did I get a faulty replacement trackpad.).
Thanks!
Compare the short screws carefully before reinstalling them. The shouldered screws go in the holes on the front edge.
David Kilbridge -
Before I started removing any screws I took a piece of paper and drew the bottom of the laptop and put a piece of double-sided tape in the spot where each screw goes. That way when I took out the screws, I could put them on the tape so I knew exactly which screw went in which spot. I did the same thing for dismantling the inside on another sheet of paper, then a third sheet for the screen after getting the front glass off.
mastover -
I use a similar technique: I print out the iFixit manual for the job, and Scotch-tape down the screws/brackets/cables I remove at each step next to the component descriptions. That way, when I'm reassembling, the bits are taped right next to the photo of where they came from.
adlerpe -
That's exactly what I do for all my repairs! It's the best way to keep track of all of the parts ' original location and to make sure that you don't miss any parts during reassembly.
joyitsjennie -
Great idea and one I use often
Thomas Overstreet -
Excellent idea! Thanks for sharing it here.
Laura Sharkey -
I used a 00 that fit but the screws were very tight so I used a tiny paintbrush with some wd40 on it and put it around the edges of the screws. Worked like a charm
valentinedhdh -
I use a magnetic mat and place the screws in order on that :)
Cary B -