Introduzione

Segui questa guida per installare il kit di iFixit per risolvere il cerchio rosso della morte.

Il reflow della scheda madre dopo aver completato il passo 48 di questa guida (prima di installare il kit per risolvere il cerchio rosso della morte) garantisce una maggiore probabilità di successo nella riparazione e riduce la possibilità che si ripresenti il problema.

  1. yMUJPMnCJJuiSO6X
    yMUJPMnCJJuiSO6X
    14IrWYZVEVr1aEfS
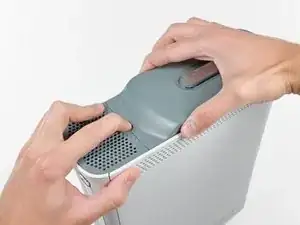
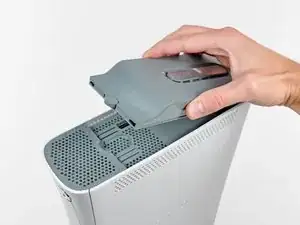
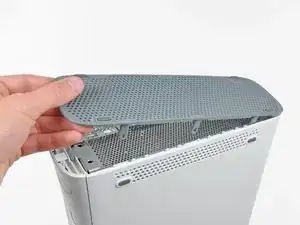
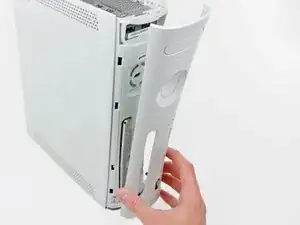
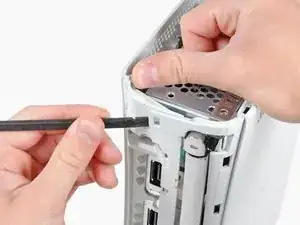
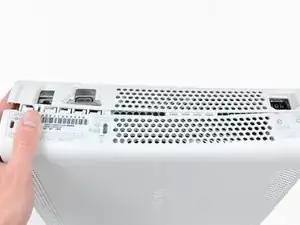
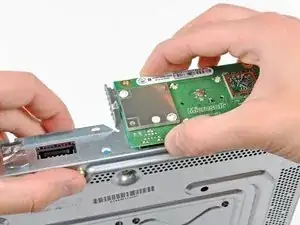
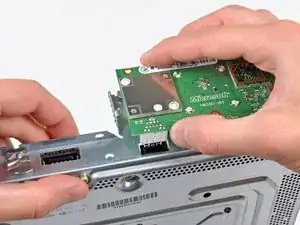
    • Mentre premi il pulsante di sbloccaggio sul gruppo del disco rigido, solleva il bordo anteriore.

    • Rimuovi il gruppo dell'hard drive dalla presa d'aria superiore.

    WARNING: Just replacing the drive will not make it work correctly. Microsoft has married the drives to the motherboard. Hence, in order to get full operation out of the drive you'll have to perform more steps not listed here. Search in the FAQ on this specific topic for more details. Otherwise, before buying a new drive, try cleaning the inside of the old one and/or replace the belt involved in opening and closing the drive door.

    - Good Luck

    Eric -

    Thanks..helped!

    joseph zulu -

    bress the button and lift with the same hand! i thought mine was stuck because of this pic!!!

    Maths with Luigi -

  2. J6CIpEaLOoYAQHxb
    • Metti in verticale la console con il lato inferiore rivolto verso l'alto.

    • Durante questa procedura puoi usare la punta dello strumento di apertura per la Xbox 360 al posto di uno spudger.

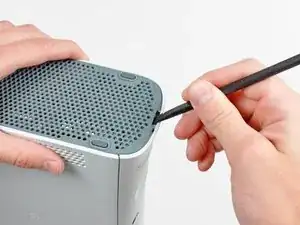
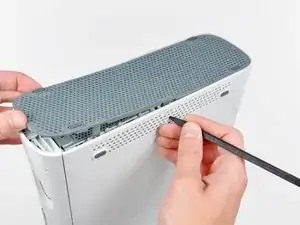
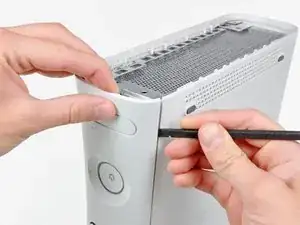
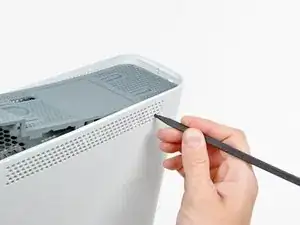
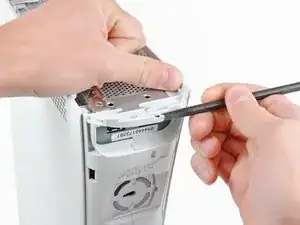
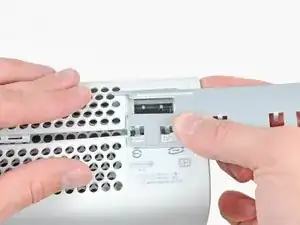
    • Inserisci la parte piatta di uno spudger o il bordo dello strumento di apertura per la Xbox 360 nella piccola apertura sul bordo anteriore della presa d'aria inferiore.

    • Solleva il bordo anteriore della presa d'aria inferiore dalla mascherina.

    You can avoid this step by pulling the front cover off. Just make sure you don't break the springs for the USB bay area.

    Repair Doctor -

    Hello, thank you ifix for this guide, I followed this guide, I got stuck at some point but I resolved it. Also I want to share this resource: Step by Step guide to fix Xbox 360 errors it helped me go through all the things associated with Xbox 360 and the troubleshooting of errors. Hope this can also help you all.

    Christopher Sage -

  3. ELe3ImNHnfjH5CMS
    ELe3ImNHnfjH5CMS
    XlYWdcnwtOrB1W3S
    NJBPRBLSExTr3Den
    • Nei prossimi passaggi dovrai usare la punta di uno spudger o dello strumento di l'apertura per la Xbox 360 per rilasciare i gancetti lungo i bordi destro e sinistro della presa d'aria inferiore. Le loro posizioni sono evidenziate in rosso.

    • Dovrai inserire la punta nei fori sui lati in plastica della sconsole.

  4. MacUdYZ1EwkBWQmW
    MacUdYZ1EwkBWQmW
    kL3iWK2V1YIMoyBX
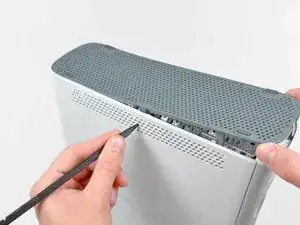
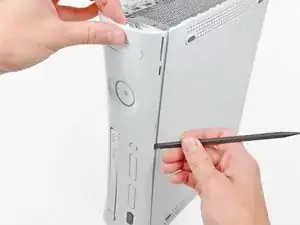
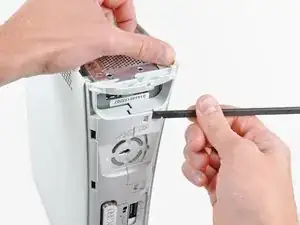
    • Per per sganciare le clip, inizia da quelle più vicini al bordo frontale della presa d'aria inferiore.

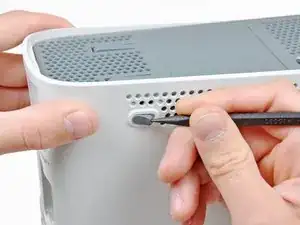
    • Mentre tiri leggermente verso l'alto il bordo anteriore della presa d'aria inferiore, spingi i ganci più vicini alla parte anteriore della ventola stessa verso l'interno della console con la punta di uno spudger.

  5. vPypAIcA45sMw4Y4
    vPypAIcA45sMw4Y4
    o6vXGPFRiS5OhrXC
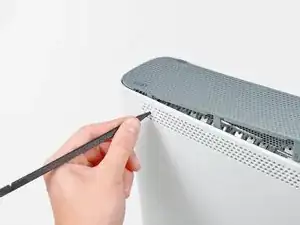
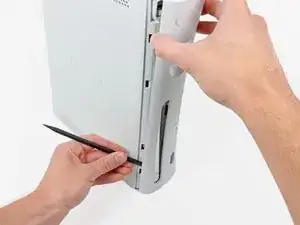
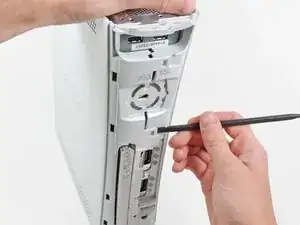
    • Ripeti la stessa procedura per rilasciare le due clip centrali della presa d'aria inferiore.

  6. HS2EJegmA2DGOAE1
    HS2EJegmA2DGOAE1
    3VgWioIEgIExHeDa
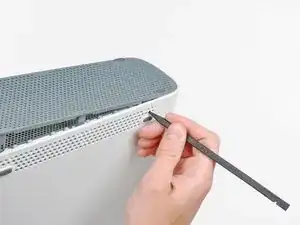
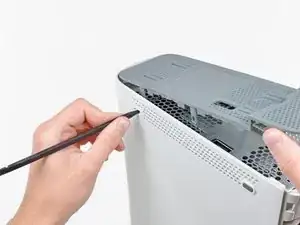
    • Usa la punta di uno spudger per rilasciare i ganci della presa d'aria inferiore più vicini al retro della Xbox.

  7. IIcCSDqQGMSuBFJW
    • Rimuovi la presa d'aria inferiore della Xbox 360.

  8. K34QYfxVrrftatym
    K34QYfxVrrftatym
    ytuwV2efqMfxRndW
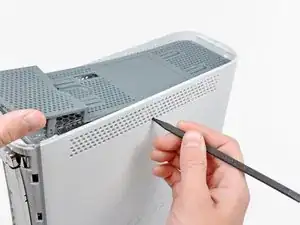
    • Infila la parte piatta dello spudger tra la mascherina e la scocca esterna vicino al tasto di accensione.

    • Fai scorrere lo spudger lungo il bordo della mascherina per rilasciare i ganci che la tengono ferma.

    • Puoi usare anche il bordo dello strumento di apertura per la Xbox 360 per questo passaggio, ma potrebbe graffiare la scocca in plastica.

    • In alternativa puoi usare le mani per tirare via, prestando attenzione, la mascherina dalla Xbox 360.

    The faceplate just pulls off, using a tool is completely unneccessary. https://beta.support.xbox.com/help/xbox-...

    Erik Tomlinson -

  9. xM4CxhxJnIT4eHCA
    • Ripeti la stessa procedura per rilasciare l'altro lato della mascherina.

  10. uqjqI2HkmxeYCGNH
    • Rimuovi la mascherina dal lato anteriore della console.

  11. HMMFtOmkPd6YTvo4
    HMMFtOmkPd6YTvo4
    CM3dOusgANm2syl1
    • Metti la console in verticale con il bordo superiore rivolto verso l'alto.

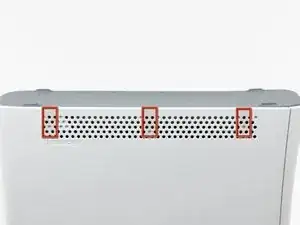
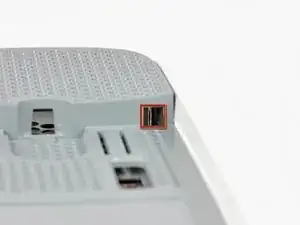
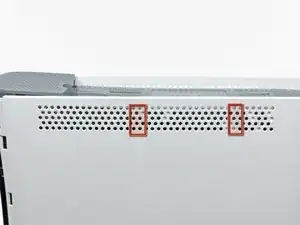
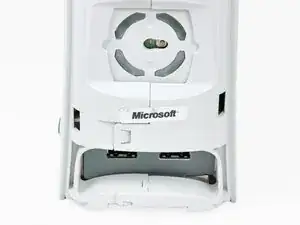
    • La presa d'aria superiore è fissata alla console con delle clip. Le prime due sono posizionate sotto la presa d'aria vicino alla mascherina, come mostrato in figura.

  12. hLQONPwYWw5wwuku
    hLQONPwYWw5wwuku
    vG3S2NKpGQNSJi2m
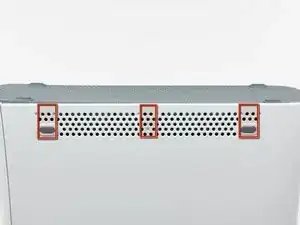
    • Infila la parte piatta di uno spudger nelle piccole aperture menzionate nel passo precedente per sganciare le clip.

    • Puoi anche usare la punta dello strumento di apertura per la Xbox 360 per questo passaggio.

    I found it easier to open these clips using the pointy end of the spudger rather than the flat end. Just slide it in against the side of the case and the clip will pop off.

    dave -

  13. Jcd3cuuefWPTrKGO
    Jcd3cuuefWPTrKGO
    ESFwEvEAkCyE1Y51
    GHihpIrQVQUlSBCN
    • Nei prossimi passaggi dovrai usare la punta di uno spudger o dello strumento di l'apertura per la Xbox 360 per rilasciare i ganci lungo i bordi destro e sinistro della presa d'aria superiore. Le loro posizioni sono evidenziate in rosso.

  14. cLODuehWcnPCYpHx
    cLODuehWcnPCYpHx
    ZNDntxLmkPnmgeDd
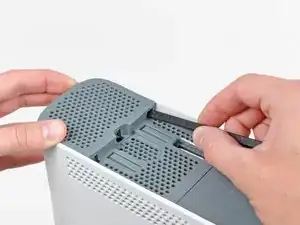
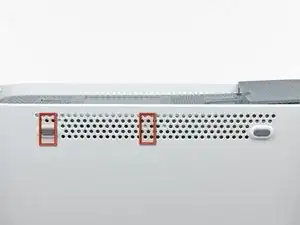
    • Per rilasciare i ganci della presa d'aria superiore, inizia da quelli centrali.

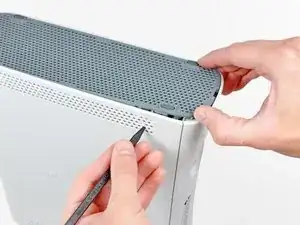
    • Mentre tiri leggermente verso l'alto il bordo anteriore della presa d'aria superiore, spingi le clip centrali verso l'interno della console con la punta di uno spudger.

  15. 3NS6J5nJKAOQxDdZ
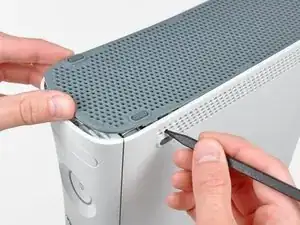
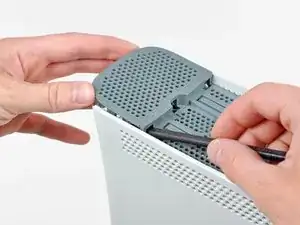
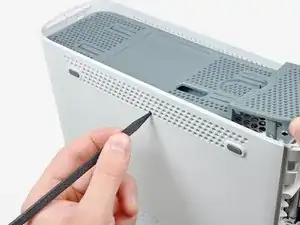
    • Usa la punta di uno spudger per rilasciare il gancio della presa d'aria superiore più vicino al retro della cover superiore della Xbox.

  16. satartHPCh3cCoKK
    satartHPCh3cCoKK
    pfYZbHEZFGAGpkAw
    • L'ultima clip è nascosta dietro al piedino in gomma più vicino al retro della console.

    • Usa la punta di uno spudger per rilasciare il gancetto della presa d'aria superiore più vicino al retro della Xbox.

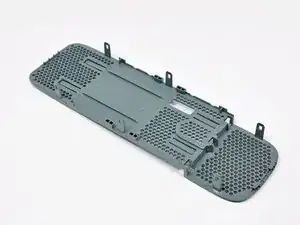
    • Rimuovi la presa d'aria superiore dalla Xbox 360.

  17. IyFVa2YVF16dYNPr
    • Metti in verticale la console con il lato superiore rivolto verso il basso.

    • Rimuovi l'etichetta della garanzia dalla console.

    There is an alternate to breaking the seal. If you open the back first starting with the opposite side of the sticker you can get the rear to "Clam Open" retaining the seal.

    Eric -

    LOL “Romove the warenty seal”

    Alexander Wiand -

  18. bfLLW2eb1mul2OvC
    bfLLW2eb1mul2OvC
    nGyMgcPrm6q5alKf
    PatF4YGqcIFHXTGM
    • La scocca superiore e inferiore sono unite da diverse clip sia sul fronte sia sul retro della console. Questi ganci devono essere rilasciati per separare la scocca inferiore dalla console.

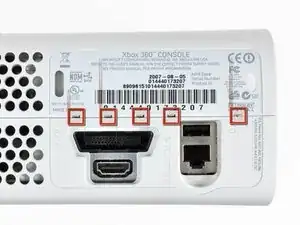
    • Usa la parte piatta di uno spudger per rilasciare i seguenti ganci:

    • Sopra le prese USB anteriori.

    • Sotto le prese USB anteriori.

    • Sopra lo slot per la memoria esterna.

  19. 3xXd6DhVwt4ibPIW
    • Infila la parte piatta di uno spudger sotto l'ultimo gancio posizionato sopra il tasto dell'espulsione del cd e fai leva per rilasciarlo.

  20. G54PXDV62XGnhhuV
    • Solleva leggermente la parte anteriore della scocca in plastica per assicurarti che sia completamente sganciata.

  21. xCaY2FIFFFI4Isfv
    xCaY2FIFFFI4Isfv
    RSrCtVYWkTQCbQaq
    • La scocca superiore e inferiore sono unite da 7 ganci sul retro della console. La loro posizione è evidenziata in rosso.

  22. Yujni1lYPGpADBlS
    Yujni1lYPGpADBlS
    kOdJT5HjlrWoW44h
    FaKq6NRVtQOZjelM
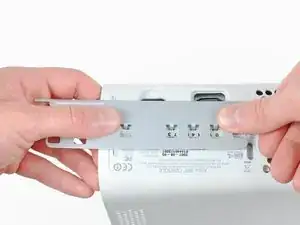
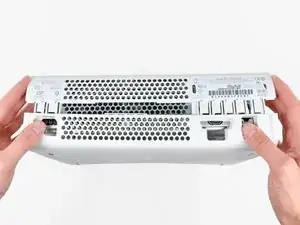
    • Premi lo strumento di apertura per la Xbox 360 nelle fessure dei ganci vicino alle porte I/O che uniscono la scocca inferiore a quella superiore.

    • Mentre premi sullo strumento, separa la scocca superiore da quella inferiore per rilasciare le clip.

    I didn't have an XBox tool, so I followed instructions in this video for this step (https://www.youtube.com/watch?v=qaxIB6cX...) to pry it open with your fingers and a screwdriver.

    Nick Karnik -

    The small (metal) women's hair clip is best for un-latching the tabs. The screw drivers just make the holes bigger.

    Denny Ross -

    You can also use the pointed end of a plastic spudger to push each clip free while you separate the case with your free hand.

    Michael Carson -

  23. IAAAOka4GMbPLtIU
    IAAAOka4GMbPLtIU
    r1n4vHDX1G6iMJg5
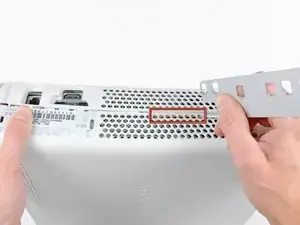
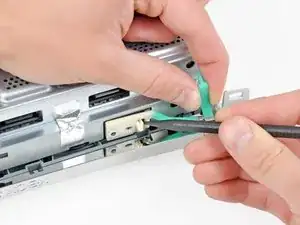
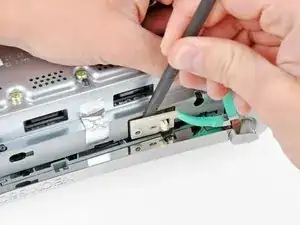
    • Mentre tieni separate le due metà della scocca, usa la punta di uno spudger o dello strumento di aperura per la Xbox 360 per premere sulla lunga clip evidenziata in rosso al centro della console.

    • Il gancio dovrebbe rilasciarsi, lasciando così solo quelli vicini alla presa d'alimentazione ad tenere insieme le due parti della scocca.

  24. ONLOcaEGdYN5F5XJ
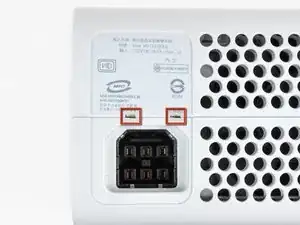
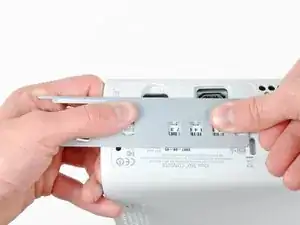
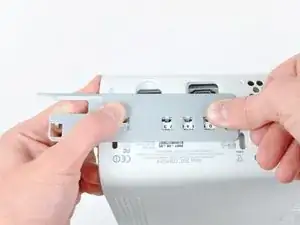
    • Premi lo strumento di apertura per la Xbox 360 nelle fessure delle clip restanti vicino alla presa d'alimentazione.

    • Separa la scocca superiore da quella inferiore per rilasciare i ganci.

  25. jrKfppdCFKeYeJTs
    • Metti la console in modo che il alto anteriore sia rivolto verso il basso.

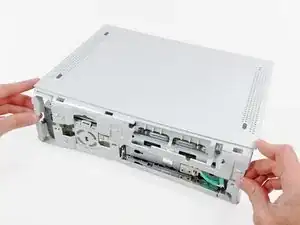
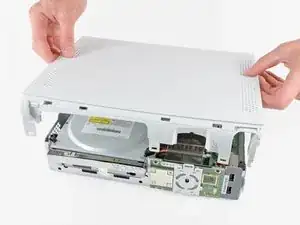
    • Solleva verso l'alto la parte posteriore della scocca inferiore per rimuoverla dalla console.

    • Stai attento a non piegare troppo la scocca vicino alla presa d'alimentazione: si può rompere facilmente.

  26. vKpq2mTLPKe6FEdf
    vKpq2mTLPKe6FEdf
    hPMYNsCmxTPh1auj
    • Usa la punta di uno spudger per rilasciare il gancio che fissa il tasto d'espulsione al telaio in metallo.

    • Infila la punta di uno spudger tra il tasto d'espulsione e il lettore CD.

    • Fai leva sul tasto d'espulsione e rimuovilo dalla Xbox 360.

    • Puoi usare anche uno strumento di apertura per la Xbox 360 per questo passaggio.

  27. xWrVtTRiATabXKR5
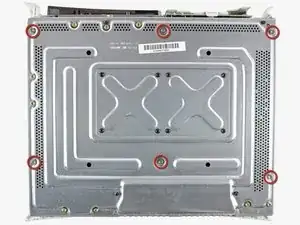
    • Svita le 6 viti Torx T10 argento da 64 mm che uniscono la scocca superiore al telaio in metallo.

  28. xK4P5MWDdRargYm4
    • Appoggia la console in modo che la scocca superiore sia rivolta verso l'alto.

    • Solleva la scocca superiore e rimuovila dalla console.

  29. MZPUUJVPxxANUeoT
    • Rimuovi il nastro argentato che unisce il lettore CD al telaio in metallo.

    Does anyone know if the Silver Tape is Lead Tape?

    Sean -

    Looking at mine, I doubt it. It looks like standard foil tape

    Rukir Gaming -

  30. ZtSZCTiWnI1mFySC
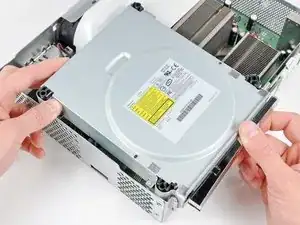
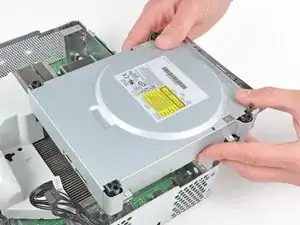
    • Solleva leggermente il lettore CD per avere accesso ai connettori SATA e di alimentazione sul retro del lettore per scollegarli.

    • Non provare ancora a rimuovere del tutto il lettore: i 2 cavi sono ancora collegati alla scheda madre.

  31. aP5BgixloKHsaQOB
    aP5BgixloKHsaQOB
    bFYsJNjL6UUJtumE
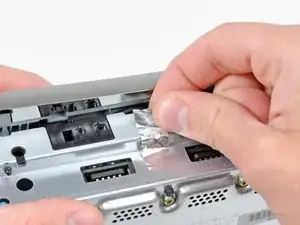
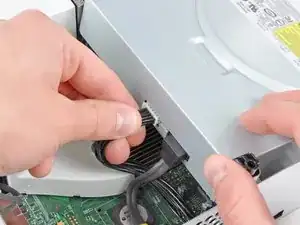
    • Prendi il cavo d'alimentazione e tiralo fuori dalla sua presa sul drive ottico.

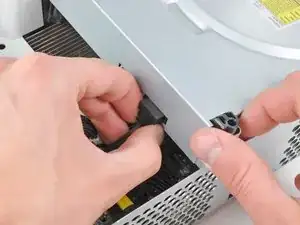
    • Scollega il cavo SATA dalla sua presa sul lettore CD.

    I found the power cable to be very tough to get out, at least it is the first time doing this.

    Nick Flacco -

  32. NlR5YgLZKUOY6y2G
    • Solleva il lettore CD per rimuoverlo dal telaio in metallo.

    Be careful not to lose or break the two teeny metal clips securing the optical drive assembly snugly to the metal casing on either side of the drive's front face. I used a spudger to press in the topmost tines on these clips because they were catching on the drive and bending up. The clips should stay on the metal housing, not come off with the drive.

    Vaughn Baker -

  33. FbTDBr5ICtBm1Hnb
    FbTDBr5ICtBm1Hnb
    KGtmstsOkUgtlFVM
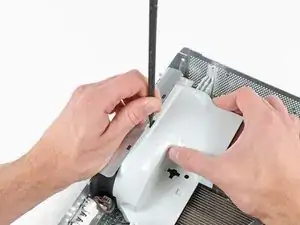
    • Infila la parte piatta di uno spudger nella piccola apertura rettangolare sopra il condotto della ventola.

    • Rilascia la clip che trattiene il condotto della ventola e rimuovilo dalla Xbox 360.

    • Puoi anche usare la punta dello strumento di apertura per la Xbox 360 per rilasciare il gancio.

    Fair warning for people using this guide for maintenance, the inside will likely have a coating of fine dust or dirt

    Rukir Gaming -

  34. lgWG2cHPjbDgEgAb
    lgWG2cHPjbDgEgAb
    ypaTyJutIXsFFfeL
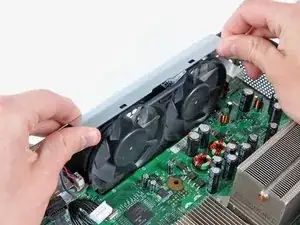
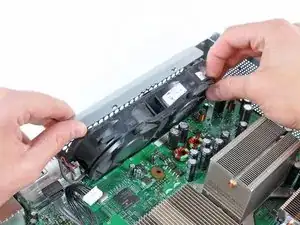
    • Sollevando la striscia del telaio sopra le ventole, tira il gruppo ventole verso il centro della scheda madre.

    • Non muovere ancora la doppia ventola: il suo cavo è ancora collegato alla scheda madre.

    Cleaning out the fan now, will help problems in the future.

    Joe Begley -

    Super easy as long as you have that tool and follow the directions. Having never opened the xbox before I was able to do this in 15 min. And im sure now that I know how to do it, next time will be even quicker.

    Thanks for the great instructions!

    Lasher M -

    Do Step 35 first (remove the fan connector from the motherboard), otherwise as you pull the fans forward out of the metal bracket you risk stressing the connector's attachment to the motherboard (because the fans will press against the connector as you pull them forward).

    Vaughn Baker -

    There are small black feet on the bottom of the fan assembly, You can push up from the bottom of the case if needed.

    Gary Gallant -

    these are powerful fans. im having over heating issues with a brushless motor. anything less than a 120mm pc fan does nothing. but i must keep the top off to fit the 120 and adequate heat removal. so i wanna use tbis turbo fan and mount i ti the lid.

    how do i remove the blades and get to the bearings and guts??

    theres no rear access hole hiding under the specs sticker.

    please help! thank

    Robert Ahearn (Little Bobby) -

  35. G6NIJ4hBE6MvQIsA
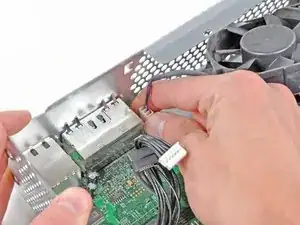
    • Scollega il connettore del cavo della doppia ventola dalla sua presa sulla scheda madre.

    • Alcuni connettori hanno un'aletta di bloccaggio. Se è il tuo caso, assicurati di rilasciarla mentre scolleghi la doppia ventola dalla scheda madre.

    • Rimuovi la doppia ventola dalla console.

  36. dWt1tegCBKUiIdKV
    dWt1tegCBKUiIdKV
    2AHDxmfnKnWSgDUE
    3IeYMLga1WChZUVP
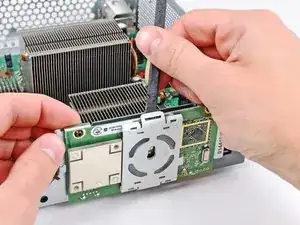
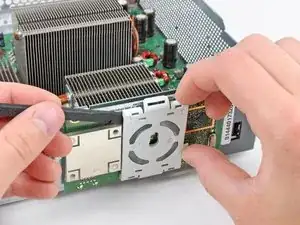
    • Usa la parte piatta di uno spudger per rilasciare le clip che tengono ferma la protezione del modulo RF sui bordi superiore e sinistro dell modulo stesso.

    • Può essere più facile usare le unghie per rilasciare i ganci dal modulo RF.

    • Rimuovi la protezione del modulo RF dalla console.

  37. UrbhkaS1VHTDaQDm
    • Svita le tre viti Torx T8 da 5,6 mm che fissano il modulo RF al telaio in metallo.

    for whatever reason the T8 screws holding the RF receiver on my unit were torqued on pretty hard. almost impossible to get off. IS taking the RF off really necessary?

    matt337 -

    They all seem like that the further down we go. Unless you're here to just repaste the board, you have to take it off

    Rukir Gaming -

  38. slFxInXBlk6up4RI
    slFxInXBlk6up4RI
    YmFTx6tt3IGitaNV
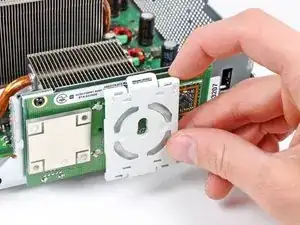
    • Afferra il modulo RF e sollevalo per scollegarlo dalla sua presa sulla scheda madre.

    • Rimuovi il modulo RF dalla console.

  39. PYK1RfYL3qeZk1VW
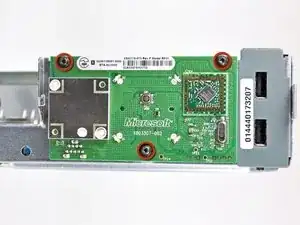
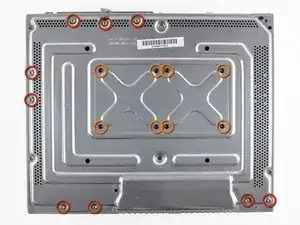
    • Svita le seguenti viti che fissano la scheda madre al telaio in metallo:

    • nove viti dorate Torx T10 da 11 mm.

    • otto viti nere Torx T8 da 5,6 mm.

    • Se stai riassemblando la Xbox 360 dopo aver installato il kit per risolvere il cerchio rosso della morte, le 8 viti cerchiate in arancio non vanno reinserite.

    kinda hard for a KID to do this huh also I am a 9 year old you get it

    Andy Ewing -

    well, it almost as if this is labeled as Difficult in the beginning!

    Francisco Ontiveros-Nuñez -

    The T8’s were T9’s on mine. This guide could be wrong, or my toolkit was mislabeled. If you can’t get the T8’s out, try a T9 before stripping the screws!

    Braden Estenson -

    They were T8’s for me

    Ryan Lee -

  40. 2ZJNWwkmk62rFwXw
    2ZJNWwkmk62rFwXw
    QkWCORJTETni2VmH
    • Gira la Xbox 360 stando attento a non far cadere la scheda madre dal telaio.

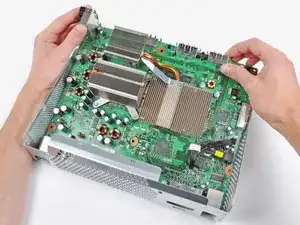
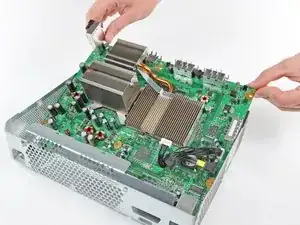
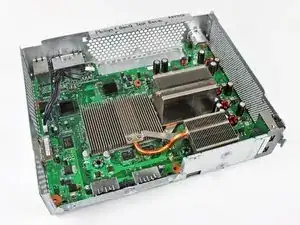
    • Solleva la scheda madre dal suo alloggio prendendola dai bordi.

    • Stai attento a non danneggiare le prese mentre sollevi la scheda madre dal telaio in metallo.

    • Rimuovi il gruppo della scheda madre dal telaio in metallo.

  41. SRplgWZDQ51qRj2U
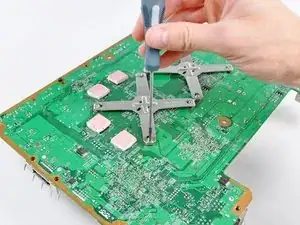
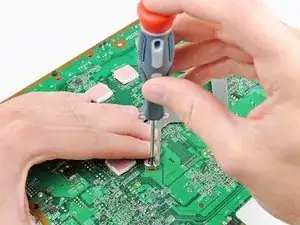
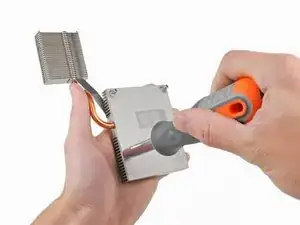
    • Inserisci la punta di un piccolo cacciavite piatto tra l'X clamp (la staffa a X) e il suo supporto di bloccaggio sul dissipatore.

    • Fai leva sulla X clamp dal suo supporto sulla scheda fino a sollevarla sopra la piccola scanalatura intagliata nel supporto stesso.

    Place a piece of cardboard on the motherboard to protect it from scratches in case the screwdriver slips.

    Aaron -

    The instructions on how to remove the x clamps are insufficient. I had a great deal of trouble with them. The small flathead screwdriver included with the kit is too small and weak to do the job. I ended up Googling other how-to's. I used a larger screwdriver and FINALLY popped them off, however as careful as I tried to be in the process I accidentally damaged a few traces around the screw hole. Repair was a failure, still have 3 red lights. Waste of time and money.

    sbrasfield1 -

    Why the heck would you suggest using a screwdriver to release the x-clamps from the motherboard, knowing that the screwdriver could slip and damage some of the traces on the motherboard!? Didn't see the comment about placing a piece of cardboard on the motherboard to prevent scratching until I had already screwed up my Xbox. How hard would it be for iFixit to develop a tool to easily remove the x-clamps like they did to open the Xbox? I wanted to do this to prevent any possibility of overheating, and went from a working Xbox to a dead one because of this bad step. Definitely took my view of iFixit down a notch, will be much more hesitant to recommend their tools and guides after this. Would like a refund but I know that's not going to happen. Super ticked!

    fdwboy -

    Same thing just happened to me, the tiny screw driver they say to use has next to 0 leverage to get it off. Now my repair kit is useless cause I physically removed some of the bits because my screwdriver slipped.

    Forren -

    I found that inserting a sprudger between the X clamp and retaining post and turning while lifting worked well without damaging the board

    Patrick Kremer -

    The tool provided in the kit is completely incapable of performing this step (prying the X off the post).

    Ben Mulligan -

    I had no problems using the tools provided in the RROD kit. Patience is key, also pay close attention to the pictures referenced in the guide, they are incredibly helpful.

    Adam Hall -

    I originally had a lot of issues prying them up; I was really worried about accidentally scratching the board. The instructions don’t seem fully adequate. Instead, first pry all four corners as high up as possible, pointing the screwdriver towards the center of the X clamp. If you pry them practically horizontally, then it makes the whole process a lot easier. Then work individually, pushing each corner slowly outwards and upwards, putting the screwdriver in from above (not the side as step 42 shows, too dangerous) into the small space between the screw and the X. Be careful at this point, just in case. Also, DON’T use the small flat head screwdriver provided; it’s too tiny to get proper leverage. I used 1/8 in. See this tutorial: https://www.youtube.com/watch?v=pHzEV3c_...

    Sophia Vera -

    Maybe the tiny flathead in the kit I got is newer than the old ones…

    DO NOT stick the screwdriver vertical as shown in step 41!

    Instead use it like step 42. Insert it only that way, between each front of the X clip arm and the post, and turn it so the screwdriver turn pushes the bottom of the X clip off the post.

    No risk of damaging the board this way.

    Christopher Evert -

    Instructions were very unclear, but comments helped. Both used cardboard and the tutorial found here https://www.youtube.com/watch?v=pHzEV3c_... as mentioned by Sophia Vera. Took my time, and mostly used a longer screwdriver like in step 42. Once the first 3 clips come off, the fourth one essentially falls off, so be ready to catch your heat block when you pop the third one.

    KYLE MANN -

  42. gOORwSsCQwKDF3gA
    gOORwSsCQwKDF3gA
    ZEHpIpLJCZSuiBNV
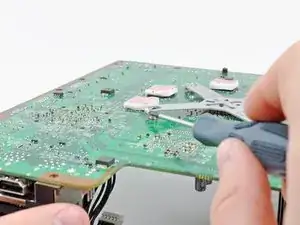
    • Infila il cacciavite tra il supporto di bloccaggio e l'X clamp parallelamente alla scheda madre.

    • Gira il cacciavite per rilasciare la staffa a X dal suo supporto di bloccaggio.

    • Ripeti questa procedura per tutti i 4 angoli del'X clamp.

    • Quando rilasci l'ultimo angolo della staffa tenendo la scheda madre a testa in giù, assicurati di tenere fermo il dissipatore della GPU per evitare che si danneggi cadendo.

  43. qUDamKNxa21OFASG
    • Per reinstallare la X clamp inizia bloccando 2 angoli ai supporti del dissipatore.

    • Mentre tieni il terzo braccio della X clamp contro il rispettivo supporto del dissipatore, fai leva con un piccolo cacciavite piatto sulla X clamp dal supporto.

    • Mentre fai leva, spingi verso il basso sul braccio della X clamp per "guidarla" nella scanalatura apposita nel supporto di bloccaggio del dissipatore.

    • Ripeti questa procedura per il quarto braccio della X clamp.

    Is the x-clamp supposed to be reinstalled? It's not pictured in any part of the instructions after this point, so I did not reinstall it, and putting the xbox back together now is different than taking it apart.

    amplifiedgir -

    The X-clamps are not reused. Since you install machine screws in place of the X-clamp mounting posts, you do not reinstall the eight screws highlighted in orange on step 41.

    Andrew Bookholt -

  44. BD1X4kXXJmALiSsv
    • Rimuovi il dissipatore della GPU.

    • Prima di reinstallare il dissipatore della GPU assicurati di applicare un nuovo strato di pasta termica.

    • Se devi rimontare il dissipatore sulla scheda madre, abbiamo una guida sulla pasta termica per rendere facile la sostituzione del composto.

  45. BRaIPGTiYbCUVsoo
    BRaIPGTiYbCUVsoo
    QoIDm3J2Yf45FPZo
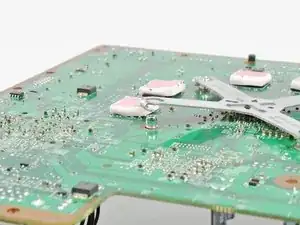
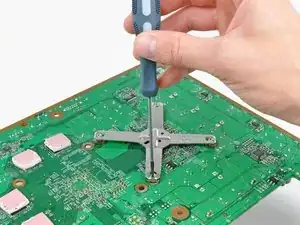
    • Inserisci la punta di un piccolo cacciavite piatto tra l'X clamp e il suo supporto di bloccaggio del dissipatore.

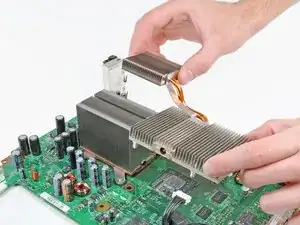
    • Fai leva sulla staffa a X dal supporto sulla scheda fino a sollevarla sopra la piccola scanalatura intagliata nel supporto stesso.

    • Se necessario, infila il cacciavite tra il supporto di bloccaggio e l'X clamp parallelamente alla scheda madre. Gira il cacciavite per rilasciare la staffa a X dal suo supporto di bloccaggio.

    • Ripeti questa procedura per tutti i 4 angoli della staffa a X .

    • Quando rilasci l'ultimo angolo dell'X clamp tenendo la scheda madre a testa in giù, assicurati di tenere fermo il dissipatore della CPU per evitare che si danneggi cadendo.

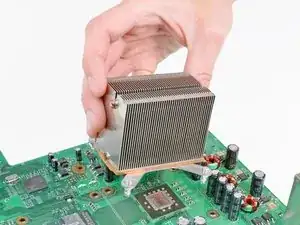
    • Rimuovi il dissipatore della GPU dalla scheda madre.

  46. MhahQa1sWuwKpwFE
    MhahQa1sWuwKpwFE
    kepjqctiiSfEKLnX
    • Le X clamp (i supporti a X) non vanno reinserite dopo aver installato il kit per risolvere il cerchio rosso della morte.

    • Ora che i dissipatori sono stati rimossi da entrambi i processori usa uno spudger in platica per rimuovere la vecchia pasta termica dai processori e dai dissipatori.

    • Procedi lentamente nella rimozione: molte componenti delicate sono saldate vicino ai processori. Se danneggiate potresti dover acquistare una nuova scheda madre.

    • Per rimuovere la vecchia pasta termica è meglio utilizzare un solvente come ArtiClean per dissolverla prima di applicarne di nuova. Oppure puoi usare un solvente leggero come dell'alcool isopropilico.

    • Puoi usare anche molti classici spray secchi deossidanti: applicalo sulla pasta, quindi grattala via. Dovresti riuscire a rimuovere la pasta quasi senza alcuno sforzo.

    • Questo è un buon momento anche per pulire la polvere tra le alette del dissipatore.

    Do yourself a favor and buy some ArctiClean... I used Isopropyl Alcohol and Q-Tips and ended up spending 45 mins scrubbing the surfaces. I imagine with the Arcticlean it would've taken mere minutes.

    Vaughn Baker -

    WD-40 is another option, Be sure to apply minimal amounts carefully using q-tips to gently rub away the thermal paste. Use isopropyl to clean up afterwards.

    PATRICK BRUNER -

  47. 4PiZY1NMGktcjaRb
    4PiZY1NMGktcjaRb
    cyCUUxcPjx16ihFZ
    • Dopo averli puliti, i dissipatori e i processori dovrebbero apparire come mostrato.

    • Prima di procedere, questo è il momento perfetto per ripristinare le saldature sulla scheda madre. Il reflow garantisce una maggiore probabilità di successo nella riparazione del cerchio rosso della morte e non è difficile da realizzare. La procedura richiede una pistola termica. Abbiamo una guida per semplificare la procedura.

  48. QUBftrgteVKGuMIJ
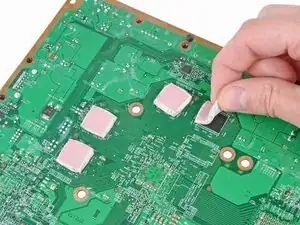
    • Gira la scheda madre.

    • Se la tua scheda madre non ha i chip della RAM sul suo lato posteriore come quella in figura, salta questo passaggio.

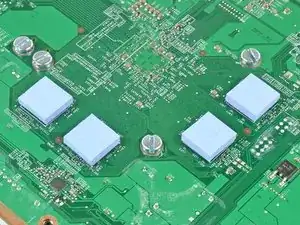
    • Rimuovi i 4 pad termici in silicone attaccati ai chip della RAM sul retro della scheda madre.

  49. HYyGYJdxAmHZEA6F
    • Usa la presa per le punte da 1/4" del cacciavite incluso (senza nessuna punta inserita) per rimuovere i quattro supporti di bloccaggio per l'X clamp dai dissipatori per la GPU e la CPU.

  50. CHQlCFJjSq6lTwoj
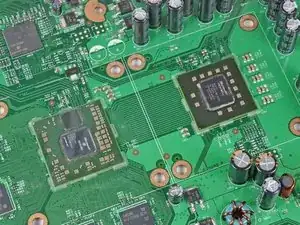
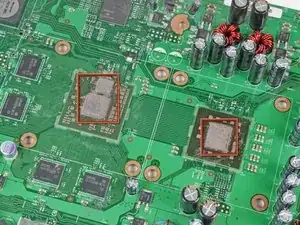
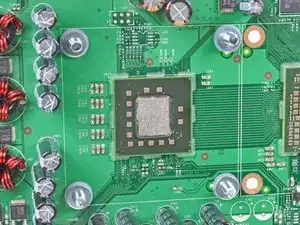
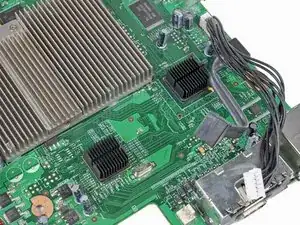
    • Applica un sottile strato di pasta termica sulle zone evidenziate in rosso.

    • Se non hai mai applicato della pasta termica, abbiamo una guida per renderlo semplice.

    • Dopo aver applicato la pasta termica è il momento di reinstallare entrambi i dissipatori, uno alla volta. Noi abbiamo iniziato con quello della CPU.

  51. EyFI4HmiTR3p1bQj
    EyFI4HmiTR3p1bQj
    YsZ4pSYor24CWqOi
    Ur5hVkL6FMvvsj6v
    • Questo passaggio va fatto con la scheda madre fuori dal telaio.

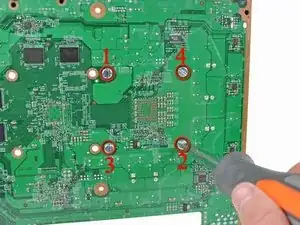
    • Inserisci una vite a testa cilindrica in ognuno dei 4 fori attorno al dissipatore della CPU, con la testa sul lato posteriore della scheda madre.

    • Mentre tieni la testa della vite, dall'altra parte infilaci una rondella in nylon, dopodiché infilaci una rondella in metallo.

    • L'ordine delle rondelle è importante. Non infilare quella in metallo per prima.

    • Quando reinstalli il dissipatore della CPU assicurati che le alette siano allineate con il flusso d'aria delle ventole (come mostrato nella terza immagine). Posizionare le alette perpendicolarmente al flusso d'aria farà surriscaldare la tua Xbox 360.

    • Usa la punta piatta più grande per avvitare le viti nel dissipatore della CPU. Prima avvita leggermente le 4 viti procedendo in uno schema a X come mostrato nella seconda immagine, quindi finisci di avvitarle con forza seguendo lo stesso schema.

    • Non aver paura di applicare forza alle viti: è richiesta una certa pressione tra il dissipatore e la CPU per farli aderire.

    • Ripeti la stessa procedura per rimontare il dissipatore della GPU.

    what size screws and washers are those?

    Matt -

    M5 x 10 I beleive

    Marc -

    We only had a hardcopy printout of this guide when we tried this fix, but we were still confused by the relative order of the placement of the washers. If we had read the nylon washers makes contact with the motherboard and the metal washers make contact with the heatsink, we would likely get more clarity with the washer placement.

    lkvee -

    Maybe consider including a couple of extra washers in the kit. The vast majority of my repair time has been spent looking for the nylon washer that dispersed onto the kitchen tile floor.

    Christopher Garner -

    There is exactly one valid orientation for the CPU heatsink - the heat pipe must be on the side with the capacitors, not the side where the GPU is, otherwise it’d block the GPU heatsink from fitting back. I had to take the CPU heatsink off and re-do it after doing it the wrong way the first time.

    ajanata -

    is one single nylon washer important? because I bumped into the table and it fell out and got lost :/

    Francisco Ontiveros-Nuñez -

    This part was a little tricky fitting the screws under the tray through the heat sinks

    Ishmael Willis -

  52. p56nKyGvUKShwNST
    p56nKyGvUKShwNST
    5gONgEsmmMAlZRjF
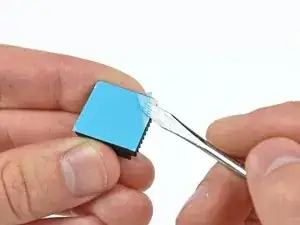
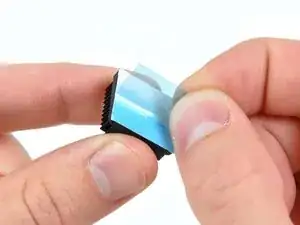
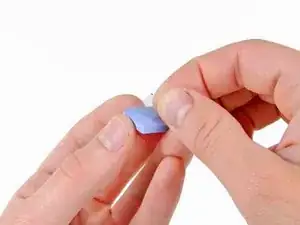
    • Usa la punta del tuo piccolo cacciavite piatto o un altro strumento appuntito per sollevare delicatamente un angolo del foglio protettivo in plastica blu o bianca che ricopre l'adesivo sul fondo di entrambi i dissipatori.

    • Stai attendo a non far raggrinzire o rimuovere l'adesivo nella procedura.

    • Rimuovi le coperture protettive su entrambi i dissipatori.

  53. 6yPUhxy2AkNGYF5w
    6yPUhxy2AkNGYF5w
    F4MNEWGN6whEQXQG
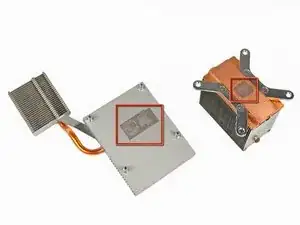
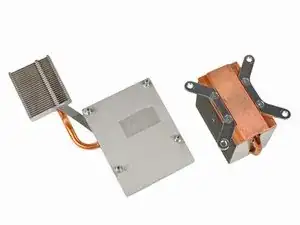
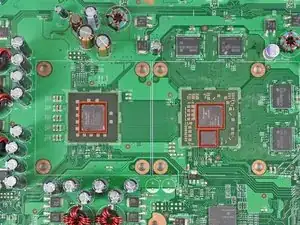
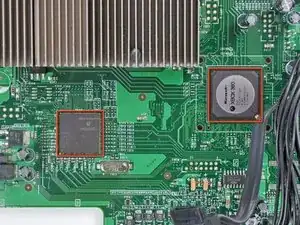
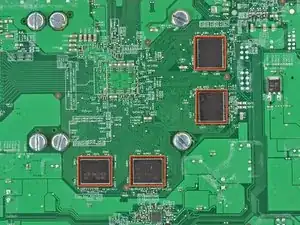
    • Pulisci delicatamente la superficie dei due chip evidenziati in rosso nella prima immagine.

    • Assicurati di posizionare correttamente i dissipatori prima di fissarli, in quanto l'adesivo è molto resistente e sensibile ai riposizionamenti.

    • Fissa i due dissipatori sopra i due chip evidenziati in rosso nella prima immagine, assicurandoti che le alette siano allineate come mostrato nella seconda immagine.

    • Quando reinstalli il lettore CD, assicurati che i cavi d'alimentazione e SATA non interferiscano con il dissipatore più vicino alle loro prese sulla scheda madre.

    They provide you with different heat sinks in the kit. Correct me if i am wrong but it looks like it is not nessary to make sure your are placing the heat sinks correctly, since all sides look the same.

    Joey J -

    I did the fix and now it does nothing I can't figure out why

    Andrew woods -

  54. DK2FDOR2uYYafK4F
    DK2FDOR2uYYafK4F
    bcMJFRUPJ1IYlNZn
    • Se la tua scheda madre non ha i chip della RAM sulla sua faccia inferiore, non serve applicare i pad termici.

    • Rimuovi la copertura in plastica trasparente colorata da tutti e quattro i pad termici.

  55. bXQbTKTEZWw4Ji3M
    bXQbTKTEZWw4Ji3M
    WHG5MVHuOFHYCVi5
    5asNXlV3uriBgaPW
    • Fai aderire i pad termici ai chip della RAM sulla parte inferiore della scheda madre.

    • I pad termici inclusi nel tuo kit potrebbero essere di colore leggermente diverso da quelli nelle immagini.

    • Reinstalla la scheda madre nel telaio e rimonta la Xbox 360.

Conclusione

Per rimontare il dispositivo, segui le istruzioni dal passo 42 in ordine inverso.

Andrew Bookholt

585555 Reputazione

68 commenti

I didn't have a heat gun so I disabled the fan and left the 360 on for 1/2 hour to heat up the weak solder points and then let it cool down for 1/2 hour before re-assembling the 360. This gave me all green lights.

ChasCam580 -

Unfortunately this repair only lasted a few months on my xbox, going to try it again and hope for better results.

zima539 -

When you take it apart, I recommend following our reflow guide before installing the RROD fix kit. I recently did this to an X360 that the RROD kit fixed only momentarily and afterwards it worked good as new.

Andrew Bookholt -

I did the relowing of the motherboard this weekend, hopefully it lasts longer than the previous repair.

zima539 -

I followed this guide and even performed the reflowing procedure. It worked perfectly. I noticed that when I took my Xbox 360 apart there were no existing thermal pads on the RAM chips on the underside of the mobo. Perhaps this caused the problem...? Either way this guide was thorough and easy to follow. Be sure to read ahead a step or two because some things are described generally in one step, then in better detail in the step after.

joekane1 -

first of all -> THANK YOU iFIXIT!

my xbox died on me 3 days before the MW3 release. 3 red lights! what a timing.

i followed the guide and did everything slow and careful as instructed. (didnt do the reflow.)

the thermal paste thing was a bit tricky wasnt really sure how much i

have to put on the CPU and GPU to provide the right cooling but after

assembling all back together and hitting the "on" button the green lights came on!

haven't tried to play a longer session but i definetly will do this weekend with MW3.

Tsimi -

my 360 didn't have the three lights, but it still didn't work. First I thought there was something with the AV cables because the power button was green like normal yet there was no audio or video response coming from the TV. I tried swapping cables and that didn't work so I figured it was the xbox. I tried this fix and it worked great! So if anyone is wondering if this can fix a broken xbox only if that xbox has a RROD, perhaps give this fix a try because it worked for me.

Alexander DeBavelaere -

I have a question, can i do it only by changing the 4 thermal pads, and not moving on those x things? like, not changing anything on the cpu or gpu, please someone let me know asap

SergioSilva -

no change.didnt work

terry -

What's the best place to purchase all the parts in repair kit, but individually. I don't need everything provided, but just the heat sinks etc.

Eric Long -

Eric,

you can get the kit and tools to repair your xbox thru www.Ifixit.com for a little over $30. for everything you get its well werth it.

Hope this helps!

Laurap6286

Laurap6286 -

iFIXIT store probally

Alexander Wiand -

first off the instructions were great i followed everything didn't have a heat gun so i tried what the first commenter tried with just lettting it run without the fan let it cool still nothing I used rubber washers instead of nylon washers could that be whats preventing my xbox from working? any comments or advice would be greatly appreciated

tdawg -

This worked perfectly! Took a bit longer than I thought, but I went slow with the X clamps and decided to reuse them as well. Just paid for a $5.00 tube of thermal paste. $5.00 and no more RROD, thanks!

avoca120 -

I didn't have 3 red rings before the repair, but I knew it was overheating as it couldn't run a game for long, but was fine with some arcade games and DVDs. After the repair, and removing lots and lots of dust that has accumulated over 6 years, it NOW has the 3 red rings. Did I not put enough paste on? Any ideas would be helpful.

larzjudith -

The RROD is caused by the mother boards bending form poor heat transfer out of the system....the circuits become weak and break. the heating gun is used to effectively resolder the system and hopefully unbend the motherbaord enough to ge the system working again....their solutions to keeping it from happening again is thermal paste and new conduction tech that is more modern...once you get it working try getting more fans...or some sort of cooling solution in the system.

Samuel Irwin -

Guide worked great. Cleaned off all the old thermal paste with isopropyl then used a heat gun to reflow the solder. To all those wondering if you have to remove the x-clamps; the answer is yes. The reason the consoles RRoD is because of the x-clamps putting too much stress on the motherboard. Just make sure you clean everything really well and be careful. Also, I used MX-2 instead of the crap they send with the kit.

fliprealsorry101 -

i did all the thing it said in the guide to do worked great my xbox is working again but now i cant sink my wireless controllers to my xbox iv read online that it might be the RF that needs replacing i just want to see if anyone can tell if there is anything i can try before i buy the part

bradley -

Just used your Red Ring of Death Kit with success. Did the thermal rework too. It has been working for over an hour now so looks ok. Cooking the chips on "High" for four minutes was a bit scary but it survived. I have a thermal rework gun which I check with a thermocouple temperature probe which plugs in to my test meter. If I may make one small criticism it would help to have actual temperatures where you have stated "Low" and "High" Just ball park figures would be enough. This is the first use I've made of the rework gun so still building up skill with the technique. Obviously the effective temperature will vary according to the nozzle distance from the job. Otherwise very good kit and excellent instructions. Also worked with your Android app running on my tablet next to the job. Fantastic. Have fitted very many heat sinks as I have built computers since they ran on steam so no problem here. I'm a retired Electronics Engineer and will be 80 in December this year. Hands as steady as a surgeon but need glasses to work now. Many thanks. Keep up your good work.

Pete Green -

Well that made 2 hours of my time worth it, my old 360 runs again. Thanks to Ifixit for the kit and the guide on how to do it. Well worth the cost.

mittelk -

This technique works. Use a heat gun. Don't try any of the dopey "hack" fixes, like wrapping your Xbox in a towel, running it without the fans, or putting it in the oven. This is iFixit - they show you the right way to do things. Their guides work for a reason - they know what they're doing.

You CAN buy thermal compound, cleaning solution, and even the screws & washers elsewhere, but these dudes deserve your cash.

bundito -

i had the code E74 problem for my xbox 360 elite. the Ring Of Death kit fixed the problem. now my elite works like a charm. it had 1 ring on bottom right corner of the console. thank you for the support

Mathology317 -

I originally tried to fix my Red Ring of Death issue by just applying new thermal paste and not using iFixit's RRoD kit. Unfortunately, the repair did not work. So stopped being cheap and decided to buy the iFixit RRoD kit. Reflowing my XBOX's motherboard and applying the iFixit RRoD kit worked like a charm. GTA 5...here I come!

Hero Johnson -

Thank you for the guide and the repair kit. It unfortunately didn't solve my issue, but everything went smoothly and if I were to get another old Xbox - for repair or for a friend - I'd look here first to getting it up to par and to increase its life.

And to those who go "The video wasn't all that descriptive about x"... READ! Seeing can help, but the text guide was perfect at describing every aspect of my Xbox's dis-assembly.

markwatermaniac -

this didnt work at all im afraid, it would have been great if it did. but nothing has changed.

Ben Kiddle -

So successfully installed RROD kit and did a very cautious reflow... had green lights and went to bed. Woke up to continue reassembling unit and it was right back to 3 light RROD... I have just done a slightly less cautious reflow and am hopeing it will ressurect the console... if it doesn't well there goes the cost of the kit, 30 bucks in shipping and an unhappy family.

Kassandra Ariel Sherry -

Just received my kit and installed it in my RROD Xbox 360. Followed all the steps as well as the reflow and thermal paste guides. After reassembling the whole thing carefully... the kit unfortunately didn't work.

neilkrentz -

Do i really need arctic silver thermal paste or i can use any other?

vladtiry -

You can use a different type of thermal paste, but we recommend Arctic Silver.

Taylor Arnicar -

Hi all,

I did the advices in the guide but unfortunately, it doesn't work. Now i have two red lights before i had three. Anybody can help me ?

Thank you.

garcialoic1 -

This RROD fix kit didn't work for me, sadly.

Julian -

I don't care what anybody says, this guide actually worked for me. I made an account just to say that. Although, I will tell you, after immediately following the guide I got RROD again. What I did was towel trick (Google it ;) my console for a good 45 minutes. I then, let it cool for like another 45 minutes. Next thing you know.... :D

Shohid Islam -

The RROD kit did not work for me. :( So I guess I wasted $30 I could have put toward buying a different one.

neptune3452 -

I went through the guide a few nights ago. I have an older Xbox, One of those old white guys that everyone knows and loves. It lasted me a lot longer than I had expected, outliving a few of the newer versions that my friends had bought long after I had gotten mine. However, a few months ago it came down with a case of RROD. I thought "Great, no more warranty, I guess i can pay 100 bucks to get it repaired or just buy a whole new system for even more!" but thankfully, I bought the kit and now it's working like new. Super easy to take apart, no problems except for two. The first being that it's a pain to bolt in the heatsinks with the washers and everything. I used a trick where I used a few toothpicks through the mobo holes and washers to hold everything in place until I could get the bolt in and threaded. Aside from initially reinstalling the CPU heatsink in the wrong way (i blame lack of sleep) i was able to take it down again and redo it no problem at all. A fairly easy, cheap, and effective repair.

Zombie1995 -

Is this fix permanent? If it is not how long does it last?

Potato -

Kit was missing a nylon washer, and peeling the backing off of the thermal pads tore the pads to pieces. I followed the instructions exactly and made due with what I had, and did an entire system dusting. Now the Xbox won't run, whereas it had the red ring and would run prior to the repair. I have a history with computer construction and repair, so I was very careful and exact. I'll troubleshoot and re-do the thermal paste, yet at this time I'm calling this product a waste of time and money.

Chase -

I didn't have a heat gun so I used a blow dryer to heat up the board. Might not have been hot enough I assume since I still have the 3 red lights. I left it connected and turned on but nothing happens with the 3 red lights flashing. Can't even get it to heat up without the fans either. I will be buying a heat gun today to try it again and hope it works. If not, is there anything else I can try?

WALTER BARRIOS -

You can put the board in your oven I've done it a long time ago on one xbox 360 and I still have it, sense then it hasn't had the rrod

coolgamez -

Imagine my horror when I went to play my brand new copy of Dragon Age: Inquisition, and received a nasty little screen that said "E74". Came here, bought this kit & a $20 heat gun from the hardware store (to reflow the motherboard), and now I and Iron Bull are roaring through the Hinterlands! I am not a particularly "handy" person, so if I can do it, so can you. iFixit, you guys are awesome!

sabina007 -

Followed all the steps meticulously and still RROD. Another $30 down the drain I suppose plus still a nonfunctional xbox. sighh

JAZYTSAX -

I finally had the chance to attempt to repair the xbox for my son, it took a few but at the end with the guide and the parts I bought NO MORE RROD :-)

Thank you for the guide

Tom G.

Thomas Giles -

I did this for error code 0020 and now I get 0003. I bought the kit installed it after reflowing the xbox. Please help, eager baby cousin waiting to get back to his minecraft.

Ivanscreativity -

I just completed the above steps. I reflowed the board prior to putting in the kit. No more Red lights! We will see how long it lasts but for now, I'm one very satisfied customer!

Toby Brogden -

Installed the RROD fix kit and it didn't work. I didn't do the reflow because I don't have a heat gun. It was a great guide and fun project.

Brent Mealhouse -

A blow dryer (Hair dryer) works great as a heat gun... I have had many successes on second tries because the first try didn't work...

Tim Gelvin -

I din't work for me.. i have purchased the repair kit and installed all but i have still the red ring!

Sorry for my bad English.

willemswesley -

It didnt work for me.. i have purchased the repair kit but i still have the red ring of dead.. please help

willemswesley -

Purchased the kit and installed, however the unit booted up, saw the Xbox logo, then it locked up and back to the red ring :(

John Wiggins -

I went this way but it was not fixed :(

Mohy -

On the bottom side of the Mainboard just under the X clips some super Tiny small blocks fell off when I tried to reflow with the heat gun. Now my xbox wont work at all. What are those TINY blocks called that is just beneath the center of the X clips.

Samuel Marcum -

Well you just made your xbox a toaster set... those pieces that fell off were electrical components. Time to go buy a new xbox! You might want to let the professionals do the repairs for you next time. Sorry for your bad luck!

Tim Gelvin -

Many thanks... tried my first one today... bought the complete repair kit.. Found the instructions an images very easy to follow.. Job done and working perfectly... THANK YOU.. keep up the good work

damian s -

Thank you! My xbox360 is almost more than 10 years old, and have three red rings after 10~15minutes. I tried this guide without kit and skipped some steps, but it works!

My six screw driver did not match small size screw…. so I skipped step 36 ~ 52 , 54, 55. I just sticked two heat sinks on two chips (only step 53) but it works. Thank you very much!!!

William Jang -

Worked for us, Thanks a lot! We have launch core console, that we bought for 40€ on the flea market, but had a 3 rrod. We 've done the reflow, and used coins instead of cooling pads. We had then 4 rrod after it, but fortunately we only forgot the AV cable (this box has no HDMI). Now it runs like new. :-)

anonymous 6698 -

Never use this “Fix”… Please please do not use bolts. It breaks the system even more and acts as a temporary fix. Use the original X Clamps that were originally on the system. Your best bet would be re flowing the chips are replacing the thermal paste. ALWAYS USE THE X CLAMPS, NEVER USE BOLTS!

Jacob Fulenwider -

bonjour, merci pour le démontage mais je veut un schéma électrique / électronique du carte mère de x box 360 fat 2005 merci d’avance mon

email : rida9901@gmail.com

rida -

Awesome! it works, and it's not the first time I deal with micro electronics, I try to be more careful every time ( I'm getting better I think?) This is a cool website and I will further look into its fixings for other things I have that need updating to figuring out questions I have.

I finally was able to fix my xbox from 20 years of rrod circle, avoiding wanting to send it in, ha, I'm curious to see if other functions are now out of date with what they have going on in their database systems to tech now in bits communication. Yes, it was like going into the past with my old profile, will have to set it up a new now.

Ishmael Willis -

I just installed the kit and everything seems to be working. However, the fans are really loud now. I may be miss remembering but I have never heard them this loud before. I’m wondering if somehow the heat sensors go off of the heat sync temp and since they are transferring heat better now they are hotter and the fans are told to spin faster? It seems to be running fine so I just want to be sure that I can keep using the system without having to worry about it.

Braxton Biggers -

Please don’t do this to your 360… all you will do is damage it beyond repair bu trying to fix “broken solder joints” that aren’t even there… the issue lies in the flip chip itself, not the solder under the substrate.

RockL79 -

Yeah right microsoft design the xbox 360 do die back in 2006-2008

sportyantoniow1 -

I bought the RROD repair kit from IFIXIT. I think the motherboard solder reflow step was critical for fixing my unit. I used an Ancor heat gun on low setting (572 F) for 1 minute on the bottom side followed by 3 minutes on top side. I monitored the temp of the board by touch and when it started getting pretty warm, decided to stop the reflow. it’s all a guess as to what time and temp will work. I then applied the thermal paste and heat shields, reassembled the unit, powered it on and it ran perfectly. The RROD repair kit and instructions were great.

Michael Phillips -

I performed this repair about 8 months ago as a preventive measure. Console has not had any issues since the repair, but I’ve been reading that replacing the x-clamps with the screws and washers (the so-called “bolt mod”) actually will (1) cause the motherboard to flex and (2) lead to unrepairable damage. iFixit contributors, is it true? If so, does the method in this guide somehow protect against flexing? Should I disassemble my console and reinstall the x-clamps?

Michael Fleischmann -

Well, I have everything torn down and cleaned up and am ready to put the thermal paste on and put things back together. BUT I noticed there were two small silver “clip like” pieces that came off from somewhere and I don’t know where!! HELP!! They are about 1 - 1.5 “ long and 1/8 inch wide or narrower. There are 6 small rectangular holes with little flaps that look like they should slide onto or connect to something. One end has a small clip and the other end has a arrow like slide. Anyone have any ideas where these go? Thanks for any advice!!

Dschue -

I think the ones you mean are the clips of the chassis that go on the left and right side of the dvd drive opening . You have to put the bottom of the clip in the chassis and then slide it up over the edge on the top of the chassis

TheKillerbee24 -

Where do I even start? PLEASE FOR THE LOVE OF GOD DON’T DO THIS TO YOUR CONSOLE. Instead of me rambling about how this should be removed, watch this video which explains why this is a BAD IDEA: https://www.youtube.com/watch?v=C8gggL3f...

wavvy01 -

I didn't work for me but I'm going to let it run for a little while to over heat it also were do you solder the motherboard?

Aurelio -

Try hot iron on the chip instead of reflow.And pls check capacitor's they go.bad.fast.usualy I recap first.

ediflorianUS -

This guide worked! That was definitely worth it. Thank you ifixit!

JetBluefan1 -