Introduzione

Per una riparazione più facile, usa il nostro kit riparazione e segui questa guida più breve per sostituire lo schermo completo del tuo iPhone.

Per i riparatori con maggiore esperienza, questa guida aiuta a sostituire solo il gruppo schermo LCD & digitizer dell'iPhone 8 Plus (cioè il nudo “pannello frontale”). Questo richiede di trasferire alcuni componenti dal display originale sul nuovo prima di installarlo, compresi la fotocamera frontale, l'altoparlante voce, la piastra di schermatura LCD e il gruppo pulsante home.

Per qualsiasi riparazione dello schermo/display bisogna trasferire con cautela il sensore home/Touch ID sul nuovo display affinché funzioni. Il pulsante home a stato solido è stato accoppiato alla sua scheda madre originale da Apple, sostituirlo lo renderebbe quindi inutilizzabile.

Nota: Se la funzione di regolazione automatica della luminosità non funziona dopo la riparazione dello schermo, assicurati che il tuo iPhone sia aggiornato alla versione iOS 12. La funzione True Tone non funziona dopo un cambio dello schermo, anche se usi un display originale Apple.

  1. OqdAPX1NfcxJgNbg
    • Prima di iniziare, scarica la batteria del tuo iPhone sotto il 25%. Una batteria al litio-ioni carica può prendere fuoco e/o esplodere se viene perforata accidentalmente.

    • Spegni il tuo iPhone prima di iniziare lo smontaggio.

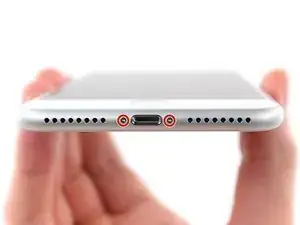
    • Rimuovi le due viti pentalobe da 3,4 mm sul lato inferiore dell'iPhone.

    • L'apertura del display dell'iPhone comprometterà le sue tenute impermeabili. Preparati prima le guarnizioni sostitutive prima di procedere con il prossimo passo, o assicurati di non esporre il dispositivo al contatto con liquidi se decidi di riassemblare il tuo iPhone senza le guarnizioni impermeabili.

    what do I do about super stripped screws?

    Ean Palacios -

    I’m sorry, your comment slipped past my radar earlier. For future fixers that might see this and ask the same question, you can check out our stripped screw guide for some detailed advice.

    Adam O'Camb -

    Do you need a toolkit like the essential toolkit

    Adam Palmer -

    Hi Adam. Having a tool kit with all of the listed parts above is best. The screw heads are very small and each set of screws needs a very specific type of driver to remove them without stripping any of them.

    Kyle Luksa -

  2. 6UPwoloGBO4tmVoS
    6UPwoloGBO4tmVoS
    BmSYPJmOy6dbHipF
    efLfshnM2MVKmJNi
    • Se inserito troppo a fondo, un plettro per l'apertura può danneggiare il tuo dispositivo. Segui i passi di questa guida per segnare il tuo plettro ed prevenire eventuali danni.

    • Misura 3 mm dalla punta del plettro e segna questa distanza con un pennarello indelebile.

    • Puoi anche segnare gli altri angoli del plettro con altre misure.

    • Alternativamente, ferma con del nastro adesivo una moneta al plettro a 3mm dalla sua punta.

    Got to step 2 and realized the fix kit doesn't include an opening pick! Looks like a guitar pick, and I have those lying around. Is that expected? Looks like the pick is used in many steps below. There's a little blue crowbar that isn't mentioned in the instructions. Perhaps that replaces the opening pick?

    Sloan Looney -

    Hi! I can't see which guide you were using when writing this comment. Can you reply here with which guide and fix kit you used?

    Clay Eickemeyer -

    I see you posted this in Meta. I hope it's resolved soon! In the meantime, a guitar pick may work well enough for your repair.

    Clay Eickemeyer -

    what fix kit?

    Meow Purr -

    My fix kit didn't include an opening pick either

    WILLIAM HARRIS -

    Make sure you check inside the black boxes after emptying them. My pick was stuck inside one of the boxes.

    AndyF -

    My AliExpress refurbished screen came with a pick that has a coin-like circle that pops out, so no modification was necessary

    Gijs Leegwater -

  3. Ig5vLyOaFbSqPtl3
    Ig5vLyOaFbSqPtl3
    BgjjokgRTOEeHDtq
    4MmKE22Cy2MavVZU
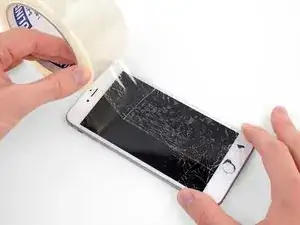
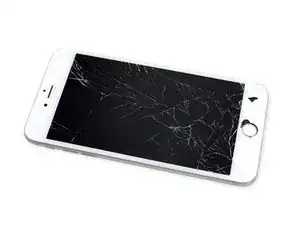
    • Se il vetro del tuo display è crepato, l'applicazione di nastro adesivo sullo schermo blocca ulteriori rotture e previene possibili infortuni.

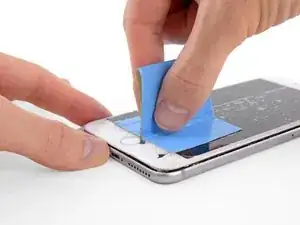
    • Disponi strisce sovrapposte di nastro adesivo trasparente sul display dell'iPhone fino a coprire l'intera superficie.

    • In questo modo eviterai la dispersione di schegge di vetro e assicurerai l'integrità strutturale dello schermo quando staccherai e solleverai il display.

    • Indossa occhiali di sicurezza per proteggere gli occhi da schegge di vetro che potrebbero saltar via durante la riparazione.

    • Se, a causa della rottura, risulta difficile far attaccare una ventosa come è descritto nei passi successivi, puoi provare a ripiegare un pezzo di nastro molto tenace (come il nastro americano) per farne una maniglia e sollevare con questo il display.

    Tape doesn’t hold. suction cup doesn’t work. Tape folded over doesn’t work as a handle. I’ve used 3m’ s Gorilla duct tape. The glass is so shattered I cant get a point started to remove the glass. Phone has been in an otter box for years. dropped it and shattered glass while replacing case. Now what?

    Martin Speedy -

    When all else fails, you can superglue your suction cup (or tape) to the display, wait for it to cure, and pull.

    Jeff Suovanen -

    I had issues getting the suction cup to stick on my cracked screen, so I tried using scotch tape (only tape I had around), but it didn’t work. This best thing I did was to forcefully pry the screen off (I wasn’t worried about damages because it’s already cracked) with the spudger. I think its best to find something stickier (like Duct Tape) and used that to lift up the screen.

    Definitely surprised how sticky the adhesive was.

    Jeffrey Robinos -

    When using packing tape: the suction won’t hold well with the overlapping pieces, so add a square of tape where you want to put the suction cup, so it will provide an unbroken surface for the seal.

    Christa -

    It’s amazing how a heat gun or hair dryer makes life easier to soften up the adhesive. Then use a thin iSesame opening tool to get in under the screen (start @ 90 degrees/vertical either side of the home button & slowly go horizontal) the need to use suction cups. Run the opening tool along the front and down both sides to cut the adhesive before trying to lift the screen.

    Cheers Wayne

    Wayne Lyell -

    I didn’t have a hair dryer so I (gingerly) used an iron over some wet coffee filters (I mean , it is waterproof) . Then, quickly dried i off with paper towels, used gorilla tape and my fixit metal splunger . worked like a charm .

    MajorCouillon -

    What about baby cracks? skip to step 3 or not…

    Andruw Holland -

    As others have mentioned, suction cup and tape doesn’t work. I used the blade of a box cutter (watch fingers) and inserted just below and right of home button. Then moved spudger along the crack to tear adhesive/seal. Easy peasy.

    Stephen Smith -

  4. TYwCcrqNBd4ohROm
    TYwCcrqNBd4ohROm
    Ui5vOPjtLUbtNCGB
    cvSW1VHhPiNmImkf
    • Se il tuo iPhone ha lo schermo crepato, evita che si rompa ulteriormente e di farti male durante la riparazione mettendo del nastro adesivo sul vetro.

    • Posiziona strisce sovrapposte di nastro trasparente da pacchi sullo schermo dell'iPhone finché non l'hai coperto tutto.

    • Indossa occhiali di protezione per proteggere gli occhi da schegge libere durante la riparazione.

    • Se non riesci a far aderire la ventosa nei prossimi passi, applica del nastro adesivo resistente (come del nastro americano telato) come una maniglia e alza lo schermo con quello.

    • Se non riesci, puoi incollare la ventosa allo schermo con la super colla.

  5. YFbVJy32AORrrT13
    YFbVJy32AORrrT13
    5OoBJRhLaZ2HItnM
    A4T1DxOZSJ16rhJn
    • I prossimi tre passaggi fanno una dimostrazione dell'Anti-Clamp, uno strumento designato per agevolare le procedure di apertura. Se non stai utilizzando l'Anti-Clamp, puoi saltare questi tre passaggi per un metodo alternativo.

    • Per le istruzioni completi su come usare l'Anti-Clamp, guarda questa guida.

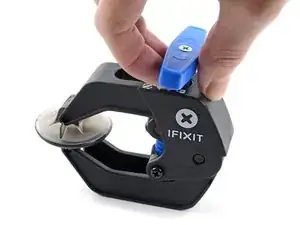
    • Tira la maniglia blu indietro per sbloccare i bracci dell'Anti-Clamp.

    • Fai scorrere i bracci oltre il bordo sinistro o destro del tuo iPhone.

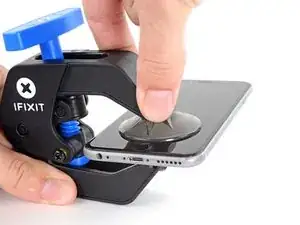
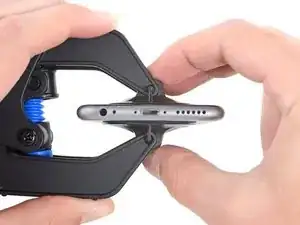
    • Posiziona le ventose vicino al bordo inferiore dell'iPhone, una di fronte e una sul retro.

    • Premi le ventose insieme per farle aderire sull'area desiderata.

    • Se ritieni che la superficie del tuo iPhone sia troppo scivolosa perché l'Anti-Clamp possa far presa, puoi utilizzare del nastro adesivo per creare una superficie più aderente.

  6. jTOgVMBLsXEoHW6M
    jTOgVMBLsXEoHW6M
    GHUOCycRqrdGPloU
    XhWEEIvdRoCv4ayy
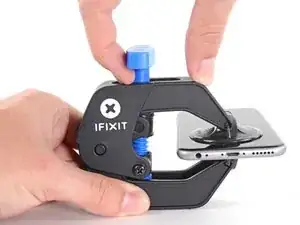
    • Tira la manopola blu in avanti per bloccare i bracci.

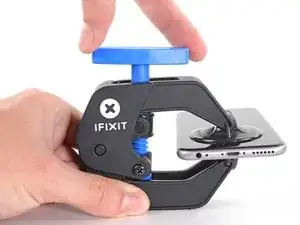
    • Gira la manopola in senso orario di 360° o finché le ventose cominciano ad allungarsi.

    • Accertati che le ventose rimangano allineate fra loro. Se si spostano, allentale leggermente e riallinea i bracci.

  7. KbWJQqLcoArLKmUO
    KbWJQqLcoArLKmUO
    RnlwghmEIU5hKxhF
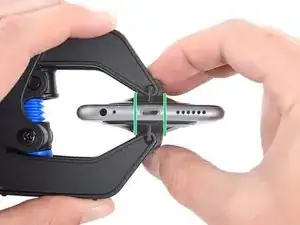
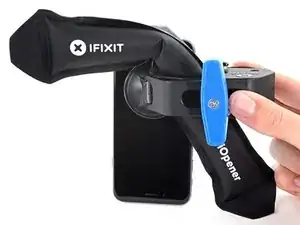
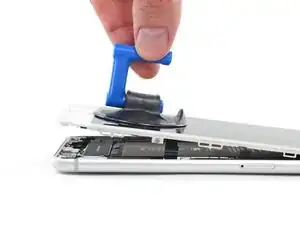
    • Scalda un iOpener e fallo passare tra i bracci dell'Anti-Clamp.

    • Puoi anche usare un asciugacapelli, una pistola termica o una piastra termica, ma il calore eccessivo può danneggiare lo schermo o la batteria interna, quindi prcedi con attenzione.

    • Piega l'iOpener così che sia appoggiato sul bordo inferiore dell'iPhone.

    • Attendi un minuto per dare all'adesivo la possibilità di staccarsi e creare una fessura d'apertura.

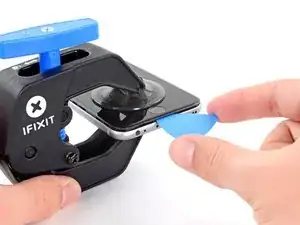
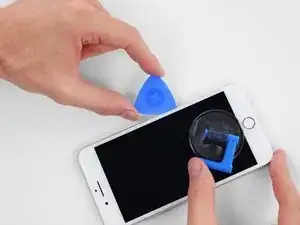
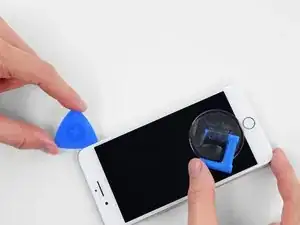
    • Inserisci un plettro sotto lo schermo quando l'Anti-Clamp avrà creato una fessura abbastanza grande.

    • Se l'Anti-Clamp non dovesse creare un'apertura sufficiente, applica più calore all'area e ruota la manopola in senso orario di mezzo giro.

    • Non girare più di mezzo giro per volta, e aspetta un minuto tra un giro e un altro. Lascia che l'Anti-Clamp e il tempo facciano il lavoro per te.

    • Salta i prossimi tre passaggi.

  8. EXTwOVVOnkGXlAiy
    • I prossimi tre passi ti mostrano come separare lo schermo usando una ventosa.

    • Il riscaldamento del bordo inferiore dell'iPhone aiuta ad ammorbidire l'adesivo che blocca il display, semplificando l'apertura.

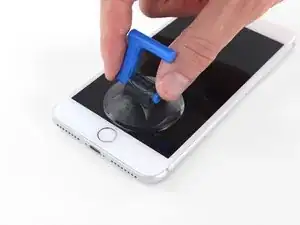
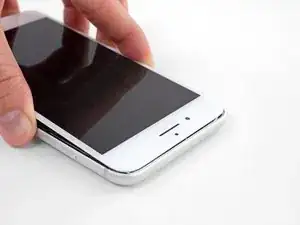
    • Usa un asciugacapelli oppure prepara un iOpener e applicalo per circa 90 secondi al bordo inferiore dell'iPhone per ammorbidire l'adesivo sottostante.

    6/14/23 I did this repair but used a heat gun on low for 60 seconds. This allowed me to open the case as the instructions say, but in the end the Home button failed. I probably over heated it. I used this "go around" for a virtual Home button. I don't care about touch ID:

    https://www.youtube.com/watch?v=LbTlUm4p...

    laryball -

  9. 1SUHNLjLanp2x1y2
    1SUHNLjLanp2x1y2
    G2AloSCafqypVhRk
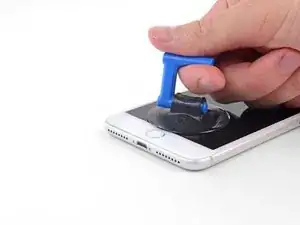
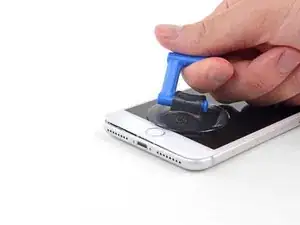
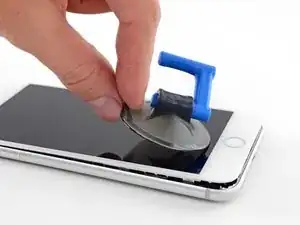
    • Applica una ventosa nella metà inferiore del pannello frontale, appena sopra il pulsante home.

    • Assicurati che la ventosa non si sovrapponga al pulsante home per assicurare un adeguato sigillo tra la ventosa e il vetro frontale.

    Warning ! If you pull too hard (reheat the underside of the display again), you create an gap of air between the glass and the lcd display !

    When you replace the display assembly you end up with gray stains on the display.

    Result: you have to buy a new display (assembly).

    Arnoud -

    Using just the single suction cup that is included in the battery replacement kit probably wouldn’t open the device. An iOpener and an iSlack should be the recommended method. However, you can get it open with just the single suction cup and iOpener, but does take a lot of time.

    Get an iOpener and iSlack with the battery replacement kit.

    Chris -

    I used a flat x-acto (#18) blade knife tool to gently pry back the screen enough to allow me to insert the pick near the bottom corner. I then worked the pick under the screen as mentioned in steps 5 & 6 below then. This worked really well for me.

    Kyle Luksa -

    I used the suction cup without heating the phone - the adhesive came away quite easily without applying any heat. Maybe due to age of phone (nearly 4 years old). Worth trying.

    Ben Vinnerd -

    I can’t get the single suction cup to work. Hate being stuck on the simplest step!

    Donny -

    My screen was very shattered, and was quite hard to get suction, as my tape was very low quality. However, after pulling it up a little bit, I was able to insert a regular razor blade into the very small gap and used that as a lever.

    Michael Scroop -

    Oh my goodness! Don't do that again. You can definitely damage something in the phone if you use a sharp metal razor blade..

    cytur -

  10. mrEFNcgfVQWurjTW
    mrEFNcgfVQWurjTW
    rErHmkOhfvSITnGD
    TohvbXinCCnyfcK6
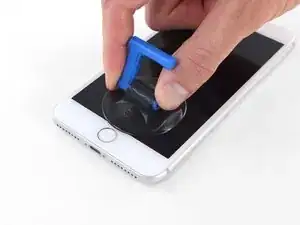
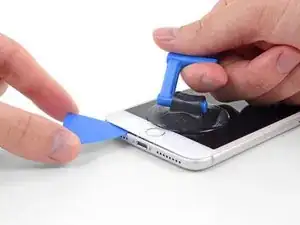
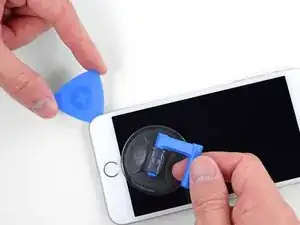
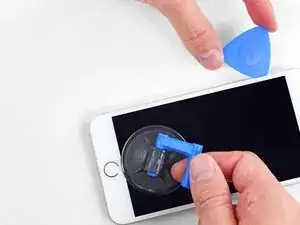
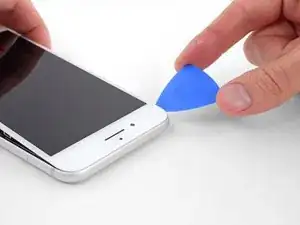
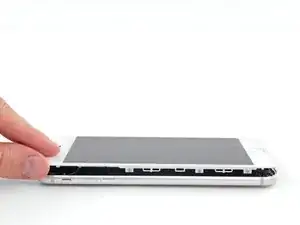
    • Tira la ventosa applicando una tensione forte e costante fino a creare una piccola fessura tra il gruppo display e il case posteriore.

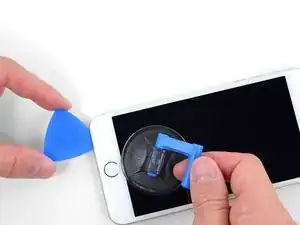
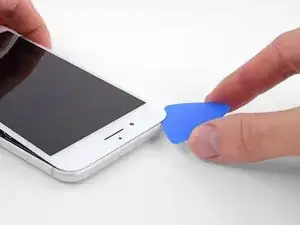
    • Inserisci nella fessura un plettro di apertura o un altro attrezzo fine per una profondità di qualche millimetro.

    • L'adesivo impermeabile che tiene in posizione il display è molto tenace. La creazione di questa fessura iniziale richiede l'applicazione di una forza piuttosto elevata. Se hai difficoltà nell'aprire una fessura, applica altro calore e muovi lo schermo su e giù per indebolire l'adesivo finché non riesci a infilare lo strumento di apertura.

    After multiple tries and using a very hot iOpener, it will not open.

    Kenneth Ewald, Sr. -

    In sheer frustration, I pulled out my trusty pocket knife and managed to lift the bottom of the screen slightly, but in the process, cracked the glass from the bottom to the home button. The case is open now.

    Kenneth Ewald, Sr. -

    this was by far the most difficult part. be diligent and follow the “firm and constant pressure” guide... the “gap” will be extremely “slight”. you will be able to slide a corner of the pry tool even if you cannot see the gap.

    Colleen V -

    This needs a TON of strength and most likely a partner. Your strong partner will pull up the screen with the suction cup and you will put the pick into the small gap that appears.

    cytur -

  11. AOHSGnMOFMrHBNmQ
    AOHSGnMOFMrHBNmQ
    pBblekYxOTaMfuJJ
    GvMBDIHTcivkDvXO
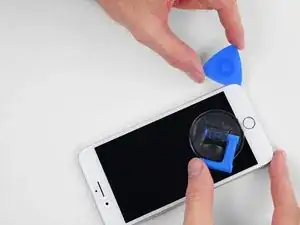
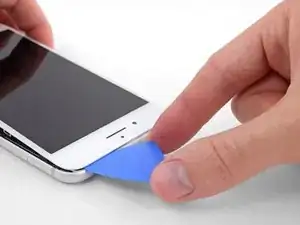
    • Fai scorrere il tuo attrezzo attorno all'angolo e lungo il bordo sinistro del telefono, spostandoti verso i pulsanti del controllo volume e l'interruttore della modalità silenziosa, per rompere l'adesivo che tiene in posizione il display.

    • Fermati vicino all'angolo superiore sinistro del display.

    Do not go over the top otherwise you can crack the screen. Sadly happened to me :(

    The instruction should be:

    “Stop near BUT BEFORE REACHING the top left corner of the display”

    Leonardo Piga -

  12. vNlPrysxSGXqqFA4
    • C'è un cavo delicato lungo il bordo destro dell'iPhone. Non inserire il plettro qui, poiché potresti danneggiare il cavo.

  13. iiGOsaDUPLVF3bpu
    iiGOsaDUPLVF3bpu
    xIUoq1psydvfJCrU
    WRDGbKd2rpx3JRwL
    • Inserisci nuovamente il tuo attrezzo nell'angolo inferiore destro dell'iPhone e fallo scorrere attorno all'angolo e lungo il lato destro del telefono per separare l'adesivo.

    • Non inserire il plettro per più di 3 mm, potresti danneggiare i cavi del display.

    I had really good luck using a hairdryer on some of the more stubborn portions of adhesive.

    Jessica Kirsh -

  14. dlBIvSNLXKCnX4B6
    • Tira dolcemente la ventosa per sollevare il lato inferiore del display.

    • Non sollevare il display più di 15° per evitare il rischio di stirare o strappare i cavi piatti di connessione del display.

  15. STTnPPfiiKNEokvD
    • Tira la linguetta per staccare la ventosa dal pannello anteriore.

  16. FWPXimHpMQKpmZZu
    FWPXimHpMQKpmZZu
    MGZUVhY6gplY6qCc
    voQbuSeunKejF3ic
    • Fai scorrere uno strumento di apertura sotto il display lungo il bordo superiore del telefono per allentare l'adesivo rimasto.

    Be very careful at this step. The glass at the top will break very easy when the display is lifted too much.

    Gerdschi D -

  17. Y3wG53ZtiZEQdGYY
    Y3wG53ZtiZEQdGYY
    FNyyLxBTwBhIDlrI
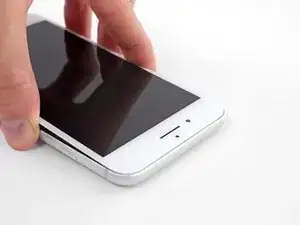
    • Fai scorrere lievemente il gruppo display verso il basso (allontanandolo dal bordo superiore del telefono) per liberarlo dalle clip che lo collegano al case posteriore.

  18. 4NykCXCCyRd5enLv
    4NykCXCCyRd5enLv
    mFZBjHhOBBSSbDKG
    yGLgglmNotb5obSH
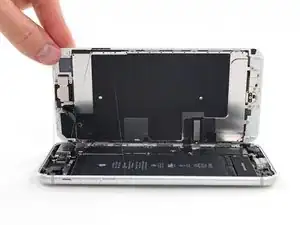
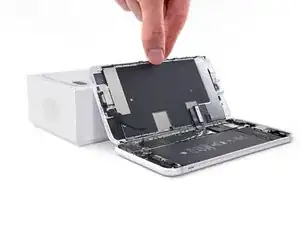
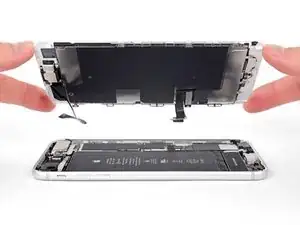
    • Apri l'iPhone sollevando il display dal lato sinistro, come per sollevare la copertina posteriore di un libro.

    • Non cercare di staccare del tutto il display, perché questo è ancora connesso alla scheda logica dell'iPhone da diversi fragili cavi piatti.

    • Appoggia il display contro qualche tipo di supporto per mantenerlo aperto mentre lavori sul telefono.

    Das “links” ist auf dem Foto rechts.

    Matze Diamond -

    Das ist falsch. Wenn man auf das iPhone sieht, ist der Home Button unten. Auf dem Photo ist deutlich sichtbar, dass die linke Seite angehoben wird.

    Hans -

  19. gdf4RAku2FO4NKSD
    gdf4RAku2FO4NKSD
    RrJOlSmc4jTe2Wsm
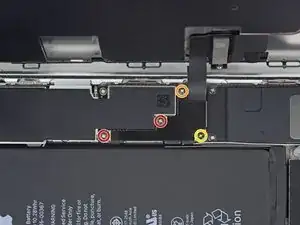
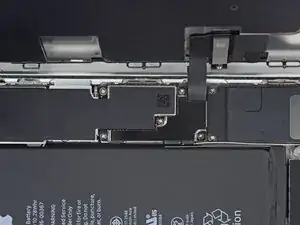
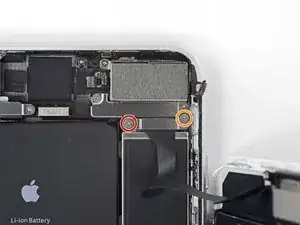
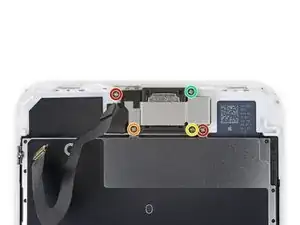
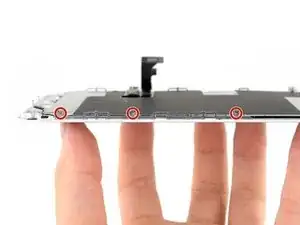
    • Rimuovi le quattro viti Phillips (JIS) che fissano la staffa del cavo inferiore del display alla scheda logica:

    • Due viti da 1,3 mm

    • Una vite da 1,4 mm

    • Una vite da 2,7 mm

    • Nel corso dell'intera procedura, fai attenzione a tenere traccia delle tue viti perché ognuna di esse torni al suo posto in fase di rimontaggio. Una vite messa nel posto sbagliato può provocare danni permanenti al dispositivo.

    The Phillips screwdriver bit is the PH000. The measurement refers to the screw length.

    Jack Harry -

  20. FVmDfbaakEqqPyM5
    • Rimuovi la staffa del cavo inferiore del display.

  21. xCtNERRx2CKlovLn
    xCtNERRx2CKlovLn
    6OqRktbAd2XLTrpP
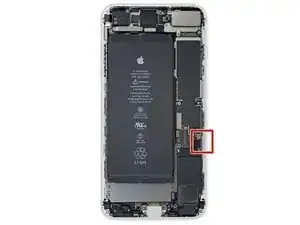
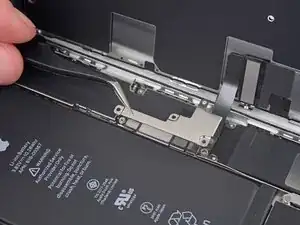
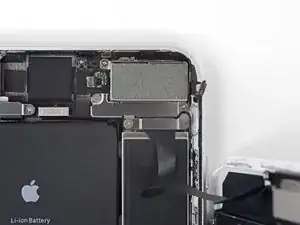
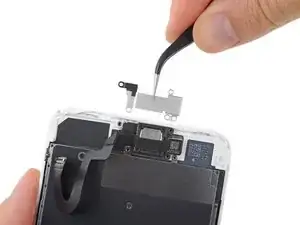
    • Usa la punta di uno spudger per staccare il connettore della batteria sollevandolo dal suo zoccolo sulla scheda logica.

    • Piega lievemente da un lato il cavo del connettore per evitare che questo possa fare contatto con lo zoccolo e quindi alimentare il telefono nel corso della tua riparazione.

    When I reassembled the iPhone 8 Plus, I had to plug it into a Lightning cable to wake it up (just pushing power button wasn’t sufficient).

    browniestarmite -

  22. hSevVTlWDAgGghXZ
    hSevVTlWDAgGghXZ
    xRZuRojAQGBGB3jM
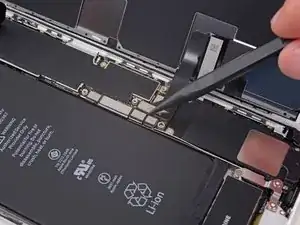
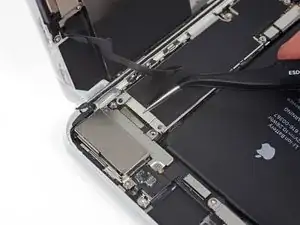
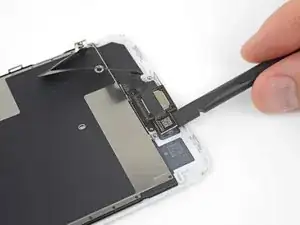
    • Usa la punta di uno spudger oppure un'unghia per staccare il grande connettore inferiore del display tirandolo dritto verso l'alto dal suo alloggiamento.

    • Per ricollegare connettori a pressione come questo, premi su un lato finché senti il clic di bloccaggio, poi ripeti l'operazione dall'altro lato. Non premere dal centro. Il connettore, se è disallineato anche di pochissimo, può piegarsi, danneggiandosi irreparabilmente.

    I got hold of a iPhone 8 Plus with cracked screen that I am planning to fix.

    Here is my problem:

    When I tried to take out the screen from my phone, (step 15-18) I was curious about the new screen, so I tried to connect it. It was completely dead! Then I tried the old cracked one, and suddenly that was dead to! This is a phone that some fool has been inside earlier and changed battery, but I suspect he has done some more really stupid things. The Taptic Engine is living its own life and vibrating every time I slightly touch the home button. (I have a new Taptic Engine) The phone is also full of dust and small particles that does not belong there. One tri-point Y000 screw (step 18) is even missing! Now the biggest problem is that both screens are black! I know the phone is on, because I hear voice command speak when I turn on the power. The screen worked before I tried to change it? And one last thing: My new LCD screen came with new flex cables. Is it possible to switch over, so I can use the old ones?

    smikalsen -

    Hi,

    Is your problem solved?

    Daniel Leprince -

    Be careful of damaging MOSFETs by the LH side of the large lower display cable. After replacing the battery and turning the device on, the phone showed low charge and didn't have a charging symbol even after plugging into multiple cables and chargers. Turns out I had damaged the logic board attempting to disconnect the connector.

    Chris Cerrudo -

  23. aWkRBoqdn5JLDxut
    aWkRBoqdn5JLDxut
    NNsd3K6mmfCyvmLZ
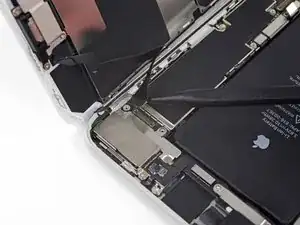
    • Stacca il secondo connettore inferiore del cavo del display, proprio sotto quello che hai disconnesso nel passo precedente.

    I used the other end of the spudger on this connector and it seemed to work a little better for me. I came in from underneath the top-right edge instead of the bottom right.

    Jessica Kirsh -

  24. oJa4BeNCiLydYrFd
    oJa4BeNCiLydYrFd
    GA64GXyHWNMhEGK5
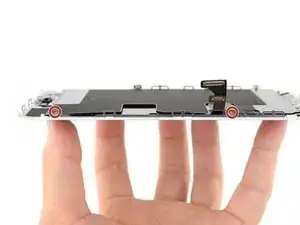
    • Rimuovi le due viti tri-wing Y000 che tengono in posizione la staffa sopra il connettore del gruppo sensore del pannello frontale:

    • Una vite da 1,0 mm

    • Una vite da 1,2 mm

    una vite da 1mm e due viti da 1.2 mm???

    Matteo Carachino -

    Ciao Matteo! Grazie per l’osservazione. Ho appena modificato il testo :) La traduzione è aperta a tutti. Hai quindi la possibilità di fare le tue suggestione direttamente nel testo e sei il benvenuto se vuoi usare di questa possibilità nel futuro. Grazie ancora per la vigilanza! Saluti, Claire

    Claire Miesch -

    The tool kit does include a 1.0 or1.2mm screwdriver! How am I supposed to remove those screws?

    peter frommer -

    Bought the screwdriver that supposedly fits these screws and it still doesn’t work.

    hypercarduser -

    My bracket looks different. Can’t get these screws out.

    Ray Rushing -

    kit came with wrong bit. i received 2x P02 (penta tips) and no tri point y000.

    Christopher Shane Gripp -

    There is no such thing as a trigger point y000 screwdriver. Why couldn't they use Philips like the rest of the screws.Nobody knows what these trips point y000 even look like. this is a scam to force you to buy a new phone.

    Al tb -

    y000 tri-point screw driver comes with the iFixit repair kit at minimal cost

    godo -

  25. hBRGDcEYEQNRA2A1
    • Rimuovi la staffa che copre il connettore del gruppo sensore del pannello frontale.

  26. GacqUhpZexRIIL1r
    GacqUhpZexRIIL1r
    gTmxBknJLSOFdNJx
    • Usa la punta di uno spudger oppure un'unghia per staccare dalla sua sede il connettore del gruppo sensore del pannello frontale.

    What happens is this strip is torn and how does one fix it

    Mijinyawa Dauda -

  27. AVYiAe5OJSrbfHdg

    Should there be a step somewhere in here to point out when to remove the blue plastic from the new iFixit screen?

    Paul Santora -

  28. 6BZsE4NglAuSLpqB
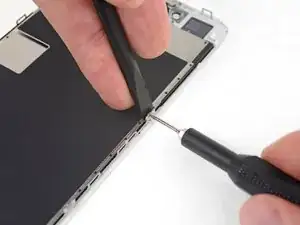
    • Svita le cinque viti a croce Phillips che fissano la staffa dell'altoparlante voce:

    • Due viti da 1,8 mm

    • Una vite da 2,3 mm

    • Una vite da 2,4 mm

    • Una vite da 2,8 mm

  29. pMAIN3Kd6BGQEFKF
    • Rimuovi la staffa dell'altoparlante voce.

  30. DFC2RHWQG3PAdcXt
    DFC2RHWQG3PAdcXt
    ywLvOiKKZmdYTL3K
    4S3Rv6tMW6ALVOZU
    • Usa l'estremità piatta di uno spudger per sollevare la fotocamera frontale dalla sua cavità.

    • Piega con cautela il cavo piatto della fotocamera da parte per accedere all'altoparlante voce sottostante.

  31. KsZtuTIJhGrAQaUV
    • Rimuovi l'altoparlante voce.

    Could it be possible to make the phone waterproof again after an earpiece replacement?

    Stefan -

  32. iQhOpUUA4mKhNIGT
    iQhOpUUA4mKhNIGT
    C4rwrXGGA2V1BTvI
    • Piega con cautela la fotocamera e il cavo piatto attaccato verso la parte inferiore dell'iPhone per accedere ai componenti sottostanti.

  33. 4seCQuljyj2tmYGo
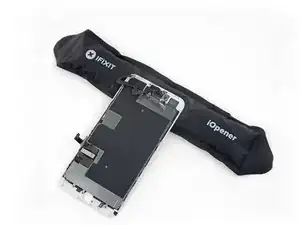
    • Usa un asciugacapelli, una pistola o prepara un iOpener e applicalo al bordo superiore del pannello frontale del display per circa un minuto al fine di ammorbidire l'adesivo che fissa i sensori.

    • I sensori dei passi seguenti sono fragili. Per aumentare la probabilità di rimuoverli senza fare danni, applica calore più volte se necessario. Oppure applica una o due gocce di alcol isopropilico che lascerai penetrare sotto i sensori prima di staccarli.

  34. nRPFXHaO2sDIVaCA
    nRPFXHaO2sDIVaCA
    e4awPvsX2Jh4wcBV
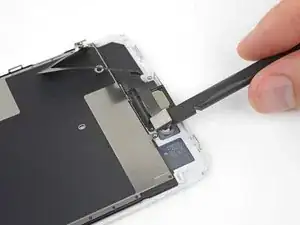
    • Fai scorrere uno spudger sotto il cavo flessibile del sensore di luce ambiente e solleva il sensore fuori dal suo alloggiamento.

  35. TCrYrLGWNbWmDcCN
    TCrYrLGWNbWmDcCN
    rScSYtr4khUERCBU
    pogcxkgrSM4VXtZw
    • Fai scorrere la punta di uno spudger sotto il cavo flessibile del sensore di prossimità e solleva il sensore fuori dal suo alloggiamento.

  36. XvoCnSTITqmQHe1b
    XvoCnSTITqmQHe1b
    IeVtd3SwcpGXLWfI
    wyqCVhM5cGmBTlnF
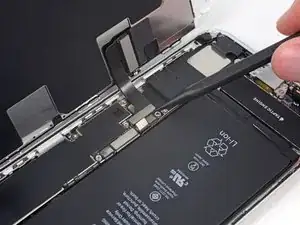
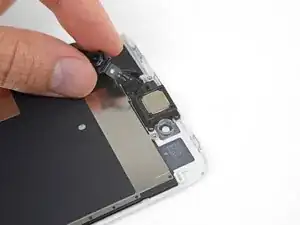
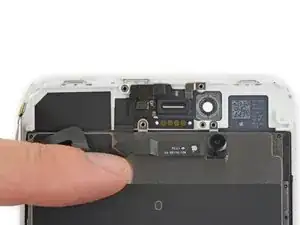
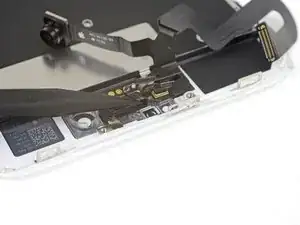
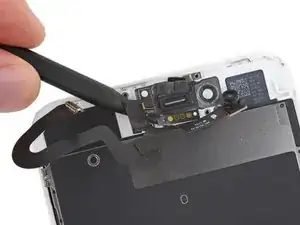
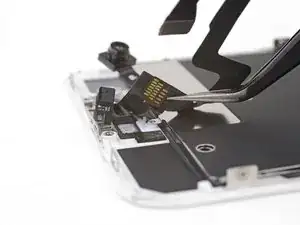
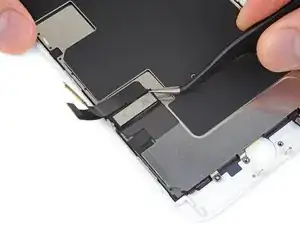
    • Inserisci il bordo affilato di uno strumento di apertura iFixit sotto il cavo flessibile del gruppo fotocamera, dal lato opposto alla fotocamera frontale.

    • Se necessario usa un iOpener o un asciugacapelli per riscaldare la parte superiore del display e ammorbidire l'adesivo che tiene in posizione il cavo flessibile.

    • Fai leva per separare il bordo del cavo flessibile dal retro dello schermo.

    FYI i think you should put up a warning on which side you should start the prying from. If you start prying from the top there’s a risk of prying apart the two parts of the flex cables that are soldered together. If you start from the bottom as pictured you should be safer, but I think it should be specified in text on this guide… because I managed to do this mistake and have to order the whole front cam/speaker/etc. assembly now. My own fault but still, haha!

    Andreas Kokkinos -

  37. RFPJV3bv4mwTqmLd
    RFPJV3bv4mwTqmLd
    CIZbMbssR61Nrs4o
    O3JDPRu3GYJMWrCK
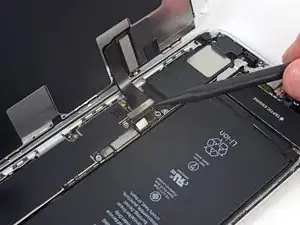
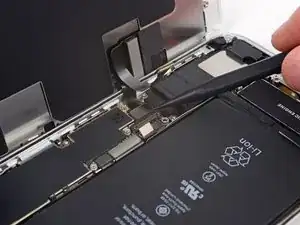
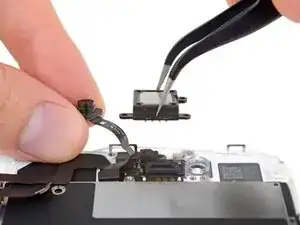
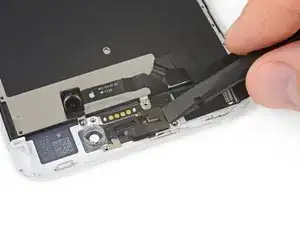
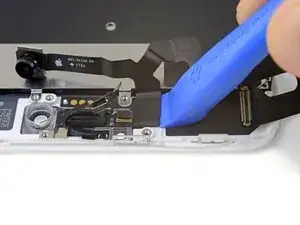
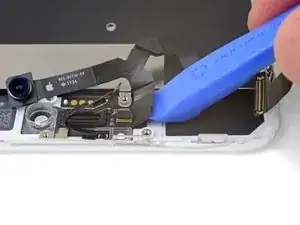
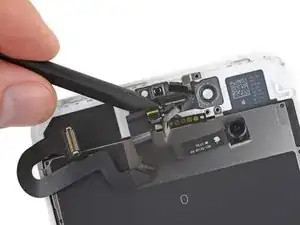
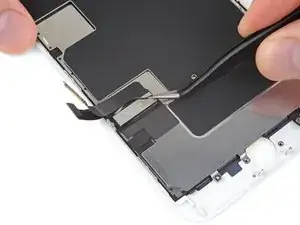
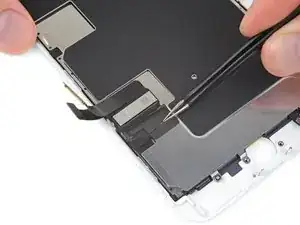
    • Inserisci la punta di uno spudger sotto la stessa porzione del cavo flessibile che hai staccato nel passo precedente.

    • Continua a staccare il cavo residuo, spingendo lo spudger sotto la fila di contatti rotondi dorati dell'altoparlante voce.

  38. CroKr52AuLgecqEU
    CroKr52AuLgecqEU
    lmPU6mRIpESQOxb3
    q1rjMST6Z55xLMhu
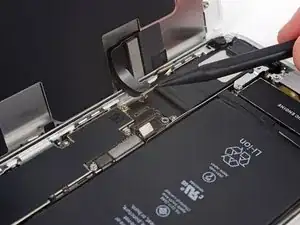
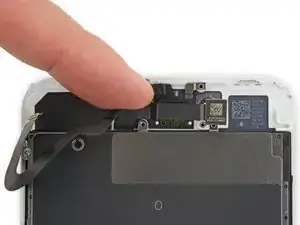
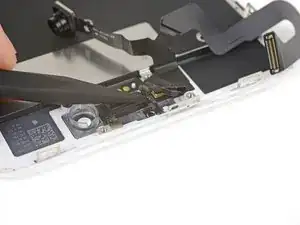
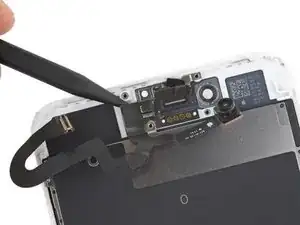
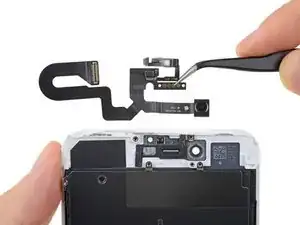
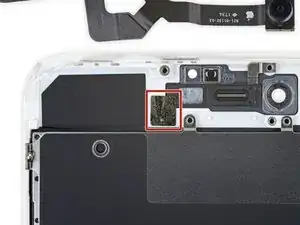
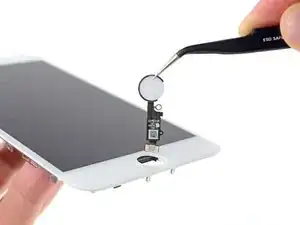
    • Rimuovi il gruppo fotocamera frontale e sensore cavi.

    • Tra il display e le 3 file di contatti di rame sul retro del cavo fotocamera/sensori c'è un pezzo di nastro biadesivo nero isolante. Può rimanere incollato al display o staccarsi insieme al cavo.

    • In fase di rimontaggio, verifica che il nastro sia al suo posto. In caso contrario copri i contatti sul retro del cavo con un pezzo di nastro adeguato, come il Kapton.

    Why is the insulating tape needed, and what other materials should I using instead of it if I loose the tape?

    jhtran1234 -

    I moved the insulating tape from the broken screen to the new screen.

    browniestarmite -

    Don’t forget to check if your new screen assembly has the two plastic pieces for the camera and proximity detector. You’ll need to move them from the old screen if it doesn’t have them.

    browniestarmite -

    Hi, is it possible for the flex cable to work without placing he tape over the contacts?

    Thanks

    shaneyarrow -

    I forgot to add move the double sided tape over and I’m wondering if that was why my ear speaker wasn’t working. I opened it back up and put the tape on the new screen but the speaker is still not working. Any ideas? Did the speaker “short” out?

    Ming -

    Mine the same , did you solve the problem? Thank you

    Marco Mazzini -

    I bought the ifixit tool kit iPhone plus 8 screen. Do i need to skip this step ? (not sure)

    Marcial Vazquez -

    Whenever I had my camera unit and speaker in, it prevented my phone from charging or finding my sim. Any explanation for this? seems really strange to me

    calumbrown15 -

    Did anybody move the plastic piece for the camera? Is it glued? It looks like it might break easily.

    Hans -

    I did remove it before. u can wiggle it a little bit then pull it up, it won't break, and there's no glue at all.

    iAziz -

  39. JjpPyrsaW2PrKPeW
    JjpPyrsaW2PrKPeW
    JFSTFpVaHkuTLbOn
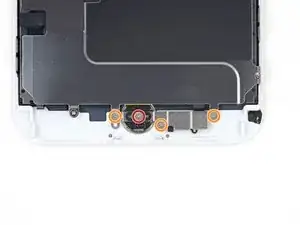
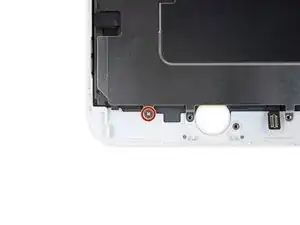
    • Svita le quattro viti tri-wing Y000 che fissano la staffa sopra il sensore home/Touch ID:

    • Una vite da 1,2 mm

    • Tre viti da 1,3 mm

    The 1.2mm screw on the home button stripped for me. I ended up bending the bracket on each side in order to remove the home button. I then bent it back as best I could during reassembly and screwing it down.

    browniestarmite -

    The leftmost screw here (attaching the display bracket to the front panel plastic) was not present on my aftermarket screen assembly. Had to pull it from the original.

    handemail -

  40. nrVbhmS6UdvyrMlS
    • Rimuovi la staffa che blocca il sensore home/Touch ID.

  41. M5RAcUTYWZUROQnW
    M5RAcUTYWZUROQnW
    QHT5NUyXQYXfHMi4
    YCREWlQsUNsbXdMn
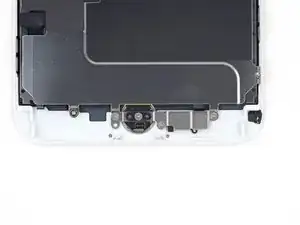
    • Fai leva sotto il bordo sinistro del connettore del cavo del pulsante home per disconnetterlo dal suo zoccolino.

    • Se l'intero connettore inizia a sollevarsi ma non si stacca, premi con la parte piatta del tuo spudger sul cavo in corrispondenza del bordo superiore del connettore, mentre allo stesso tempo sollevi il bordo sinistro del connettore. Stai attento a non danneggiare il cavo o il connettore, perché potresti disabilitare permanentemente il sensore.

    I accidentally severed the cable, now my sensor is disabled. So far this was the most delicate cable I encountered because it was so small.

    Harmonie Beckham -

  42. NUTlB2f6WdjrBhbG
    • Il riscaldamento dell'area attorno al sensore home/Touch ID aiuta ad ammorbidire l'adesivo che tiene in posizione il suo delicato cavo, rendendo più facile e sicura la rimozione.

    • Capovolgi il gruppo display. Usa un asciugacapelli oppure prepara un iOpener e applicalo sul bordo inferiore del display per circa 90 secondi per ammorbidire l'adesivo sottostante.

    • Non surriscaldare il display. Deve diventare lievemente troppo caldo per poter essere toccato a lungo.

  43. wyDvpaBVRSP4ovWU
    wyDvpaBVRSP4ovWU
    xTYJBCRPKagBULx3
    4Tf1oXFd6M3Kd3a3
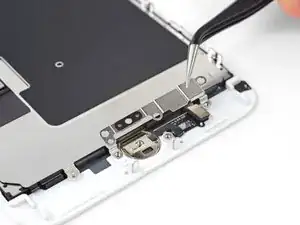
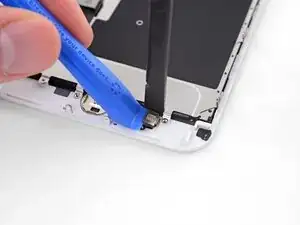
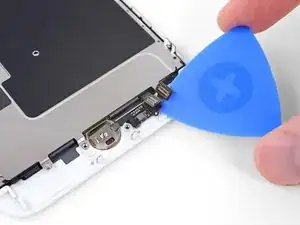
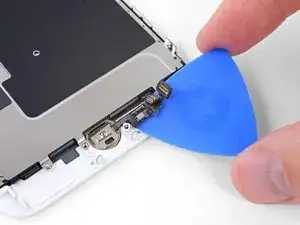
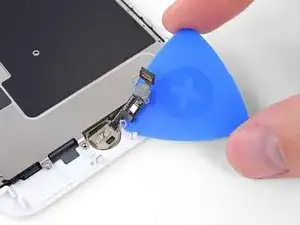
    • Usa con delicatezza una levetta di apertura per separare l'adesivo che fissa il cavo del sensore home/Touch ID al retro del pannello display.

    This did not work for me…. ended up breaking the connector from the home button. Most likely messed up the customer’s iPhone… the adhesive would not pry up with just pick… does iFixit offer a home button replacement?

    Sidar M Caceres -

    did not work for me either, also ended up breaking the connector, just use the tweezer to separate it. do not use opening pick!!!!! it’s too thick for it!!

    Jeffrey Tang -

    Isopropanol and heat will loosen the adhesive and its possible to gently remove with plastic pick, metal tweezers risk damaging the Home button cable and disabling the Touch facility.

    Chris Smith -

    Pretty easy to follow instructions if you have patience and careful hands. If you have clumsy hands you will not succeed in fixing any small electronics. There are some small things you should use to help you succeed at fixing small electronics, like some scotch tape or other clear tape to hold some of the cables in place while you work on small electronics items, also a small heavy bottle or object to propped the iPhones cases against to hold them from falling over so that your hands can be free to perform your tasks. Great job you are doing iFixit personel and I am with you all the way with fighting for our rights to fix our electronics equipment.

    wogriffith -

    Isopropanol in conjunction with the heat really did the trick here. Heat up first, then use plenty of the alcohol to pry it up carefully using the pick.

    Maximilian Krause -

    Heat dryer on high worked for me.

    Stephen Smith -

    I followed exactly the method in Step 37. First, turn the screen over and warm up slightly around the home/Touch ID sensor , making the cable easier to come loose from the screen. I didn't use an opening pick, I used a spudger it worked fine, but be careful

    clbr -

    why is my home button attached to the lcd? there is no clip and makes it impossible to easily remove home button. help!!

    Joel -

    I also was mystified as to why I could not remove the home button after successfully removing the cable. Then I remembered that I had suggestion at step 4 and covered shattered screen with clear tape! Once tape was removed, button came out! LOL!

    bseagrave -

    I heated the tip of a thin knife with a hot air gun and slide it under the flexible cable. When I hit resistance I reheated the knife. Keeping it parallel to the board while doing this. After 4 heatings the knife moved the rest of the way and the cable lifted easily off of the iPhone back. This method left enough glue on the cable that it restuck fine when moved to the new iPhone.

    Bill Auerbach -

    Apple loves to make this the most difficult thing. I've been successful many times, and not so on other repairs. I just finished a repair and everything was in tact, but sadly it didn't work. Took a part and put back. So I turned on the assistive touch home button. They will be getting a new phone soon, so not a big issue except Pride.

    Shawn Bailey -

  44. iTSSaELEwxXa5kW3
    • Rimuovi il gruppo sensore home/Touch ID facendolo passare dal lato anteriore del display.

    • In fase di rimontaggio, per prima cosa fai passare il cavo attraverso il foro dalla parte superiore del display.

    • La tua parte di ricambio può avere altre viti tri-wing Y000 in più già installate vicino al pulsante Home. Rimuovi le viti non necessarie in modo tale da poter reinstallare la staffa del pulsante home.

    What is a good alternative adhesive for sticking this back on the new screen?

    Jithesh -

  45. vIPOuYOVHKryqQJ6
    vIPOuYOVHKryqQJ6
    aXZc3kT46TbDO2qj
    2uMYx44jPxxgRt2W
    • Stacca la parte superiore rettangolare dell'etichetta della piastra di schermatura LCD dal cavo flessibile sottostante.

    • Non serve rimuovere completamente l'etichetta a meno che tu voglia sostituirla.

    Not sure what this sticker is for exactly. It broke during reassembly. So far, so good.

    browniestarmite -

    I lost this sticker cuz it just tore out during removal and I thought it was unneeded adhesive. Now this rectangular part seems to be pushing against the LCD, causing color distortion near that point when assembled and distortion at that point when pressing the screen. D:

    Lamp -

    Is this sticker necessary to prevent the distortion?? or is my new lcd just defective with tolerances or something? how do I fix dis D:

    Lamp -

    AYY FIXED! The cables were naturally resting lower than they needed to be. I just pushed up on the block thing to pull the cables up right before snapping the screen on. I guess it was mis-aligned with its space it’s supposed to go in and was getting pushed on.

    Lamp -

  46. EiXvAxFGcsQ14vSm
    EiXvAxFGcsQ14vSm
    ZVnZVmmZIOVKpvJa
    • Usa un cacciavite tri-wing Y000 per svitare le tre viti da 1,2 mm da un lato della schermatura EMI.

    • Se hai delle difficoltà a svitare queste viti, premi più forte il cacciavite mentre lo fai girare. Se necessario, supporta da dietro le singole clip con l'estremità piatta del tuo spudger in modo da poter premere con più forza sulle viti senza deformare le clip stesse.

  47. 1O3lpGxJLNu4GFp2
    • Con un cacciavite Y000 rimuovi due ulteriori viti da 1,2 mm dall'altro lato dello schermo EMI.

  48. Zh2BOXKWjSAvvORC
    • Svita la vite a croce Phillips da 1,8 mm che fissa la schermatura EMI vicino alla parte inferiore del display.

  49. eQYDhELAsnIooihO
    eQYDhELAsnIooihO
    Z6fP6dRrbxJQdUFt
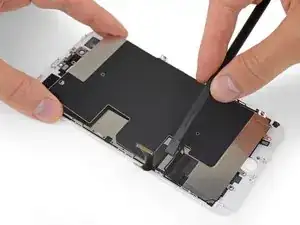
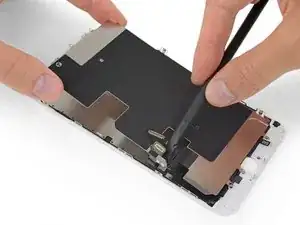
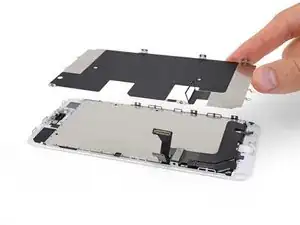
    • Solleva la piastra di schermatura LCD mentre premi sul cavo flessibile circondato dalla piastra stessa.

    • Fai passare il cavo flessibile attraverso il ritaglio nella piastra di schermatura LCD, stando attento a non romperlo.

    My new LCD screen came with new flex cables. Is it possible to switch over, so I can use the old ones?

    When I tried to take out the screen from my phone, (step 15-18) I was curious about the new screen, so I tried to connect it. It was completely dead! Then I tried the old cracked one, and suddenly that was dead to! This is a phone that some fool has been inside earlier and changed battery, but I suspect he has done some more really stupid things. The Taptic Engine is living its own life and vibrating every time I slightly touch the home button. (I have a new Taptic Engine) Now the biggest problem is that both screens are pitch black! I know the phone is on, because I hear voice command speak when I turn on the power. What could this be? The screen worked before I tried to change it?!…

    smikalsen -

  50. TJMsQ1VnYOmZPNaJ
    • Rimuovi la piastra di protezione LCD.

  51. FbglfShukGgGA6PZ
    • Rimane solo lo schermo LCD + digitizer.

Conclusione

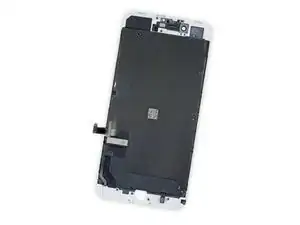
Confronta la tua nuova parte di ricambio con la parte originale: prima dell'installazione potrebbe rendersi necessario trasferire alcuni componenti dall'una all'altra o rimuovere dal ricambio eventuali elementi adesivi.

Per rimontare il tuo dispositivo, segui queste istruzioni in ordine inverso.

Porta i tuoi rifiuti elettronici a un riciclatore certificato R2 o e-Stewards.

La riparazione non è andata secondo i piani? Vai alla nostra Comunità Risposte iPhone 8 per trovare aiuto nella risoluzione dei problemi.

Jeff Suovanen

Membro da: 06/08/13

426762 Reputazione

8 commenti

Bonjour,

Savez-vous si le problème de la fonction True Tone est résolu sous iOS 12.3.1 ?

Merci pour votre tutoriel : )

Merci pour votre réponse.

Cancan -

Truetone - Has anybody used the eprom programmer devices to transfer the id from the previous screen to the new one to rectify the truetone absence?

hardijs -

I got hold of a iPhone 8 Plus with cracked screen that I am planning to fix.

Already got all new part that I think I need.

Here is my problem:

When I tried to take out the screen from my phone, (step 15-18) I was curious about the new screen, so I tried to connect it. It was completely dead! Then I tried the old cracked one, and suddenly that was dead to! This is a phone that some fool has been inside earlier and changed battery, but I suspect he has done some more really stupid things. The Taptic Engine is living its own life and vibrating every time I slightly touch the home button. (I have a new Taptic Engine) The phone is also full of dust and small particles that does not belong there. One tri-point Y000 screw (step 18) is even missing! Now the biggest problem is that both screens are pitch black! I know the phone is on, because I hear voice command speak when I turn on the power. What could this be? The screen worked before I tried to change it?!…

smikalsen -

Hi smikalsen,

Did you disconnect the battery when you swapped the screens? If not, there is a chance that the screen backlight circuits are damaged as a result of disconnecting/reconnecting to a powered phone. With a screen connected and the phone powered on, shine a bright light directly at the screen. If you can faintly see the screen, it means that the LCD is working but the backlight is broken.

Arthur Shi -

Thank you Jeff for these very clear instructions, and for the warnings on cautions to take in the delicate steps. This guide was helpful in replacing my broken screen on an iPhone 8 Plus. Every step was successfully accomplished, and now my iPhone is back to life. Of course, as a caution I did a backup before starting all the procedures. Thanks again. Saul

Saul -

Okay can I bring it in

Kpehe Borlay -

Thanks Jeff for this really helpfull instruction.

I have a question about the colors displayed on the new display. I heard that you can restore TrueTone function using light sensor programmer. But before I invest another $40 in something I will use only once, I would like to ask if darker and very saturated colors on display is the fault of lack of TrueTone function or the fault of display itself?

Max Elearning -

Hi There. I have got one with damaged digitizer, but screen seemed to be intact. Is there a way to split the screen from digitizer and replace only digitizer ?

Second question is if i change the screen to aftermarket, would i loose functionality of true tones ect ?

Mariusz -