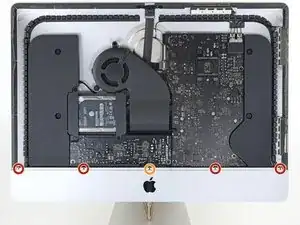
Introduzione

Questa guida mostra come rimuovere la scheda madre in un iMac 4K del 2019 per poter rimuovere o sostituire la RAM.

Alcune immagini in questa guida mostrano un iMac più vecchio, che ha delle piccole differenze visive. Queste differenze non influiscono la procedura di riparazione.

Questa guida ti richiede di maneggiare un alimentatore che contiene dei grandi condensatori. Stacca la corrente al tuo iMac e tieni premuto il tasto di accensione per almeno 10 secondi per aiutare a scaricare i condensatori. Tocca la scheda dell'alimentatore sui bordi e non toccare i componenti sulle facce.

  1. xew1BWp2BZwFMbWh
    • Se la cerniera è libera di muoversi, l'iMac si può sbilanciare e rendere difficile il lavoro. Sistema sotto lo stand un supporto di riparazione iMac per rendere stabile il dispositivo.

    • Se stai usando il supporto in cartone iFixit, segui queste istruzioni per montarlo.

    • Prima di iniziare qualsiasi intervento sul tuo iMac: scollega il computer dall'alimentazione e tieni premuto il pulsante di accensione per dieci secondi per scaricare i condensatori dell'alimentatore.

    • Stai molto attento a non toccare i capi del condensatore o qualsiasi saldatura esposta nella parte posteriore dell'alimentatore. Maneggia il pannello tenendolo soltanto dai bordi.

    Maybe your directions should suggest fixers to buy RAM cards in pairs. I wanted 32 Gig of RAM, and I bought and installed one 32 G RAM and while it seems fine, one source told me it would be 5-10% faster if I had put in two 16 RAM cards. Is that accurate?

    BRUCE CLARKE -

    it would at least be that much faster, in theory some applications should run twice as fast

    blakebest -

  2. M42hmSlBUbk6PbHC
    M42hmSlBUbk6PbHC
    YmEFhp4dqiXysxIN
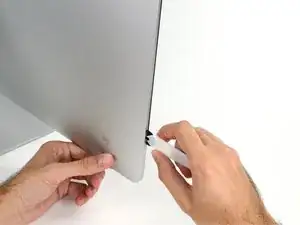
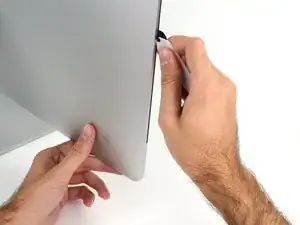
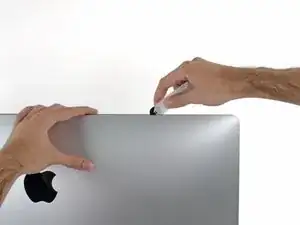
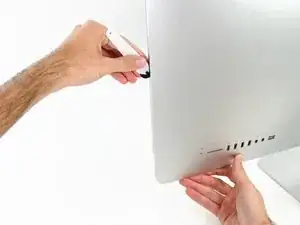
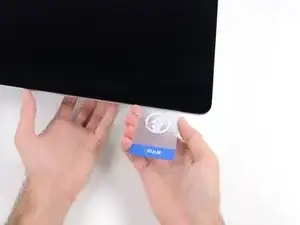
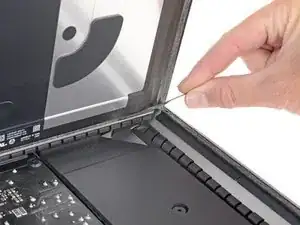
    • Iniziando dal lato sinistro dello schermo, vicino al pulsante di alimentazione, inserisci lo Strumento di apertura iMac nella fessura tra il pannello di vetro e la cover posteriore.

    • La sporgenza sullo Strumento di apertura iMac impedisce alla rotellina di entrare troppo in profondità. Se usi un attrezzo diverso, non inserirlo per più di 9,5 mm nello schermo. In caso contrario, rischieresti di tagliare dei cavi di antenna e di causare seri danni al dispositivo.

  3. cOVEfbnXgUttrW2b
    cOVEfbnXgUttrW2b
    FlMUC3pRXZOFhcoB
    tKQWoCGakrogQTPD
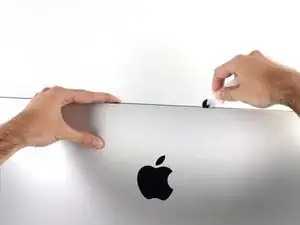
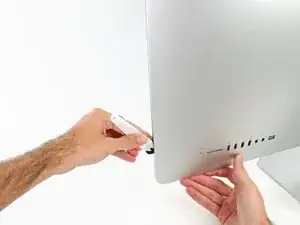
    • Usa l'attrezzo come se fosse una rotella per tagliare la pizza: fallo girare lungo la fessura, tagliando così l'adesivo in schiuma tra la scocca e lo schermo.

    • Stai attento a mantenere premuta la rotella verso l'interno. Se la tiri, la rotella potrebbe uscire dall'impugnatura.

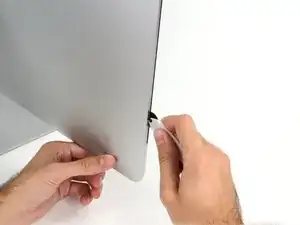
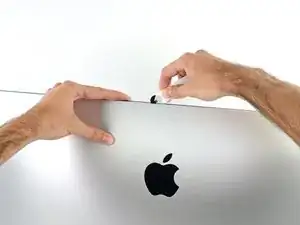
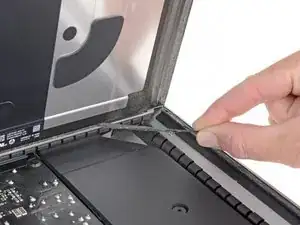
    • Passa l'attrezzo attorno al lato sinistro dello schermo.

  4. tSAS3Jn3qghgZJDe
    tSAS3Jn3qghgZJDe
    KCyqluPop5fjDYAE
    IqxfhhMDuT5ibx1P
    • Continua a far scorrere l'attrezzo attorno all'angolo superiore sinistro.

  5. Gr5frklRP5SSCfcs
    Gr5frklRP5SSCfcs
    ja4mM4JMGPU2UVrV
    • Taglia l'adesivo lungo l'angolo superiore sinistro del display.

  6. NZSSQT4P2YuyMtAf
    NZSSQT4P2YuyMtAf
    BudRMK2UCrSCEYOO
    • Continua a lavorare lungo la parte superiore dello schermo.

    • Puoi far andare l'attrezzo avanti e indietro un po' di volte per essere sicuro di avere completamente tagliato l'adesivo.

  7. AFpWIRNam5smLYMl
    AFpWIRNam5smLYMl
    RXhs3VgToDNZiJpM
    gxF3JYbbkAp4VTJN
    • Spingi l'attrezzo attorno all'angolo superiore destro dello schermo.

  8. RZ6ybv2fcA12MLAL
    RZ6ybv2fcA12MLAL
    yfJAyWOQtfxUkTCE
    • Spingi lo strumento lungo il lato destro dello schermo.

  9. MbfslBJoWVDXS5kR
    MbfslBJoWVDXS5kR
    NoNsLWkB1JuDpsvo
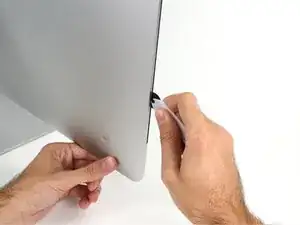
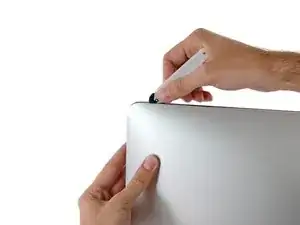
    • Finisci di lavorare con lo strumento di apertura sul perimetro arrivando all'angolo inferiore destro del display.

    • A questo punto, puoi far scorrere l'attrezzo di nuovo lungo l'intero perimetro per essere certo di avere tagliato tutto l'adesivo possibile.

  10. 1OOl3uQ3SUHBD5XD
    1OOl3uQ3SUHBD5XD
    65vvKRUNKxVKGOwY
    lPpjVUkv1sMMaSav
    • Anche se lo strumento di apertura ha tagliato la maggior parte dell'adesivo, lo schermo rimarrà ancora un po' aderente al case. Servirà una scheda di plastica per staccare l'adesivo rimanente.

    • Disponi l'iMac in piano a faccia in su.

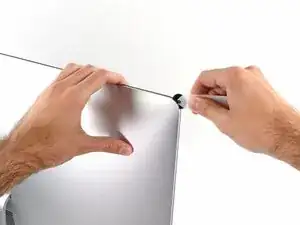
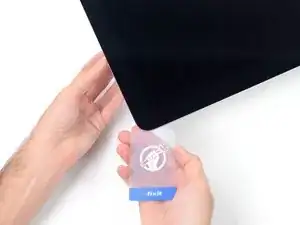
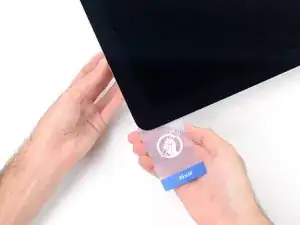
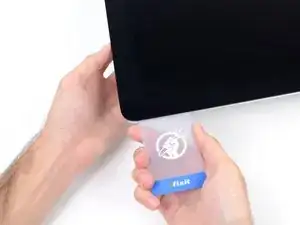
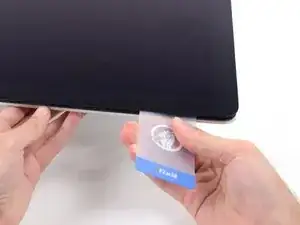
    • Iniziando dall'angolo superiore destro dell'iMac, infila una scheda di plastica tra lo schermo e la scocca.

    • Stai attento a non inserire la scheda di plastica più di 9,5 millimetri per non danneggiare i componenti interni.

    9.5mm in the rest of the world

    Tal Glazer -

  11. TwUkxBqp3WUU5SQM
    TwUkxBqp3WUU5SQM
    nMscaGHNZwiXWGTU
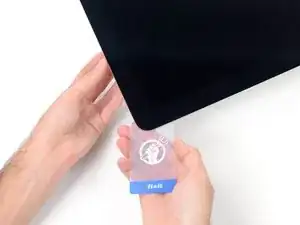
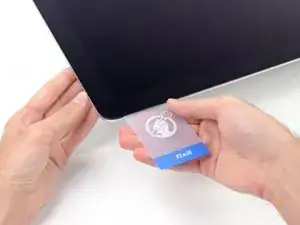
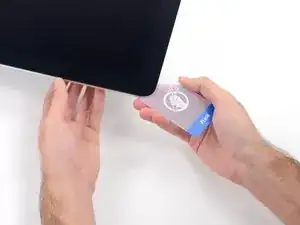
    • Torci delicatamente la scheda di plastica per creare una fessura tra il display e la scocca.

    • Agisci lentamente stai attento a non stressare troppo il vetro dello schermo: ti basta creare una fessura di circa sei mm.

    Which is around 6.5mm

    Tal Glazer -

  12. 5H2mrXvL1GqHCbMH
    5H2mrXvL1GqHCbMH
    JAkiWZj5Ho4yNTYo
    EskKkKR4VOrJcuhl
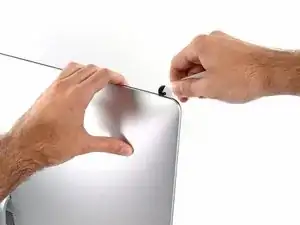
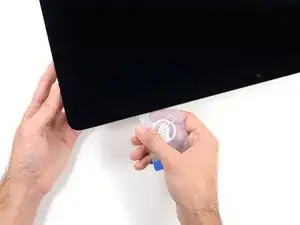
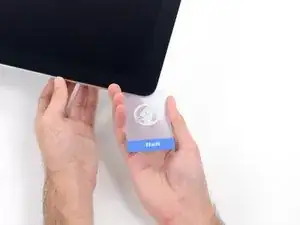
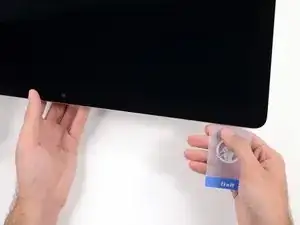
    • Fai scorrere la scheda verso il centro dello schermo per tagliare tutto l'adesivo rimasto lungo l'angolo superiore destro dell'iMac.

    • Devi fermarti prima della fotocamera iSight, altrimenti potresti danneggiarla.

  13. QVKUQYp4K6pmbyjX
    QVKUQYp4K6pmbyjX
    OgKJPO6IXFXkEDtt
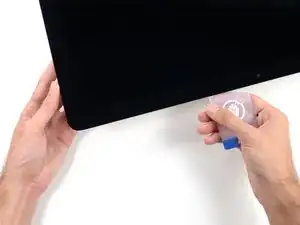
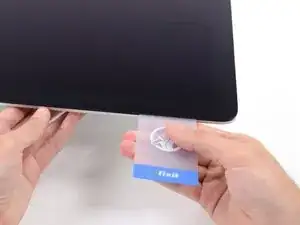
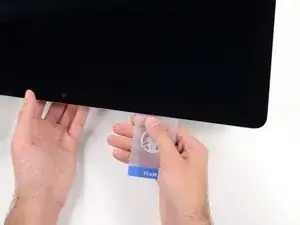
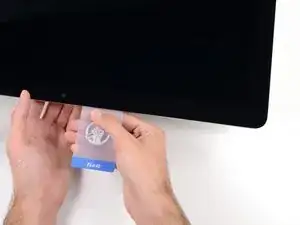
    • Infila di nuovo la scheda di plastica nell'angolo superiore destro e lasciala in posizione per evitare che la colla possa riattaccarsi.

  14. YLlxXZGUiVKXEPX1
    YLlxXZGUiVKXEPX1
    d2mHEVkqOtcoxt62
    aybCLgwrfPOFlWjR
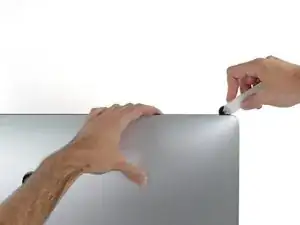
    • Inserisci una seconda scheda di plastica nella fessura tra lo schermo e la scocca vicino all'angolo superiore sinistro dell'iMac.

  15. WfyVK51oSKrP4Zmm
    WfyVK51oSKrP4Zmm
    Hcaw4qZgJJXva4Ls
    • Inclina delicatamente la scheda per aumentare lievemente lo spazio libero tra il display e la scocca.

    • Come già fatto sull'altro lato, applica molto lentamente la torsione alla scheda per dar tempo all'adesivo di staccarsi e presta una particolare cura a non forzare troppo il vetro dello schermo.

  16. yXDZaJkjPkEAcVep
    yXDZaJkjPkEAcVep
    iGsPuW6mkoqZTeWO
    YFQAcDZXTypgc4kn
    • Fai scorrere la scheda di plastica verso il centro.

    • Interrompi lo scorrimento appena prima della fotocamera iSight per evitare di danneggiarla.

  17. 6eIbW1PCSMq6Bers
    6eIbW1PCSMq6Bers
    pd3AFHwUgYpc4dtt
    • Infila di nuovo la scheda di plastica nell'angolo superiore sinistro.

  18. GOUrhY1NeK1fcLaC
    GOUrhY1NeK1fcLaC
    QRPTMuatYNuyUKMD
    NfjmyRMmXDIgiVec
    • Con le schede di plastica inserite come in figura vicino agli angoli, applica ad entrambe una torsione per allargare la fessura tra lo schermo e il case.

    • Se ci sono delle parti che sembrano rimanere attaccate e non intendano separarsi, interrompi la torsione e usa una delle schede per tagliare l'adesivo rimasto.

    • Inizia a sollevare la parte superiore dello schermo dalla scocca.

    • Solleva lo schermo solo di qualche centimetro: i cavi dei dati e dell'alimentazione dello schermo sono ancora connessi alla scheda logica.

    Ich habe den unteren Klebestreifen gar nicht gelöst! --> Monitor (Glasscheibe) nach vorne auf ein dickes Kissen gelegt - so dass das Glas nur ca. 80° Winkel nach vorne zu liegen kommt und dann habe ich die Festplatte getauscht! So konnte ich die untere Klebeleiste wieder verwenden und hatte genügend Platz um die senkrechten und oberen Leisten zu verkleben!
    Tip: Klebestreifen zuerst auf dem Alugehäuse befestigen......

    Fridtjof Schüssler -

  19. 2CYaRvZMKD1MHJWF
    2CYaRvZMKD1MHJWF
    fHCLPYQIpP4EVOLZ
    • Solleva lo schermo abbastanza in alto da avere un accesso facile al connettore, ma non tanto da strappare i cavi e forzare i rispettivi connettori (alzalo di circa 20 cm).

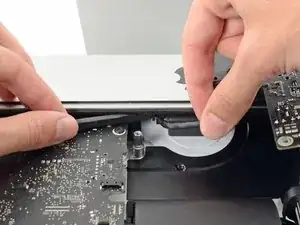
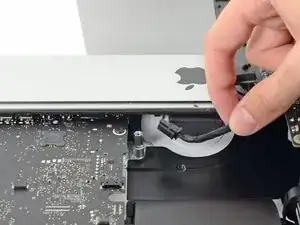
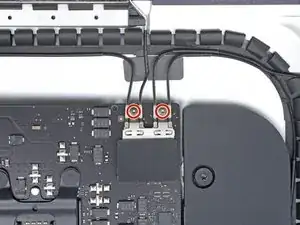
    • Mantieni lo schermo con uno mano mentre con l'altra stacchi il cavo di alimentazione dello schermo .

    It was difficult to remove this connection. I ended up having to gently pull-up vertically a little on the wire side to unsnap it about 1mm and then horizontally wiggle it out.

    delacrj2 -

    I had a difficult time removing this connection. I had to lift the wire-side about 1mm before it unsnapped and then carefully wiggle it out horizontally.

    delacrj2 -

    Can this cable be replaced? I am worried mine is damaged. I have no display after the screen fell and stressed the display flex cables following an SSD upgrade.

    Jeremy Brainard -

    This step should be done with extreme caution and care, as this step 19 is not described in great detail (sorry, author).

    The first (most outward) cable will slide out by gently pulling it by its tabs. The second (inner) cable is more tricky, as the locking lever must be moved backward first, before gently pulling backward on the cable connector. The angled tweezers are useful here, to help lift that locking lever, because fingers are too big for this.

    Ernst -

    be VERY careful and SLOW...take your time. These displays crack VERY easily when removing and they'll spider web on you. I've done probably 20 or so of these and cracked 3 being super careful.....ugh.

    Faslane -

    I found the best way to unplug this display power cable was to use my right hand, and the fingernails of my index finger and thumb to grab the ends of the tabs on either side of the connector, squeeze, and pull the connector out gently.

    Phil McInnis -

    i think the cable nearest the case edge is held in by friction and can be gently pulled, maybe with fingernails or a spudger. The next cable is held by a wire lever clip as described above it unlocks so the cable can be removed. These cables are also fiddly to re-insert, I didn't get one of them home and had no display after power-up, so at the end, don't re-seal the screen until tested.

    Peter Taffs -

  20. Zh56FQPLtH1qJkBF
    Zh56FQPLtH1qJkBF
    RuoSZ5iXxQqvKfcF
    MuEuntgC4FjFNuDJ
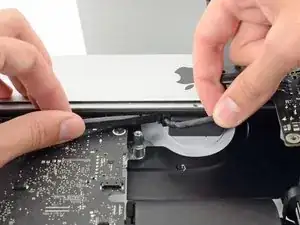
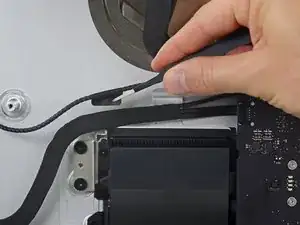
    • Continua a tenere lo schermo con una mano, sblocca la staffa metallica di ritenuta del cavo dati dello schermo.

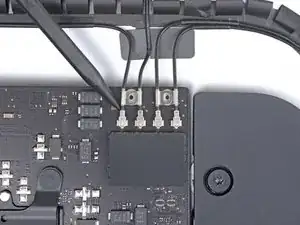
    • Stacca con cautela il cavo dati dello schermo dalla sua presa nella scheda madre.

    • Assicurati di tirare il cavo dati dello schermo direttamente fuori della sua presa, mantenendolo parallelo alla scheda madre, per evitare di danneggiarlo.

    Cannot seem to find a replacement cable for this, as I suspect mine is damaged. Can’t even find a part number. Anyone know what it might be?

    Jeremy Brainard -

    https://www.amazon.com/gp/product/B08TTL...

    That's the part I ordered for mine and it seems to work ok. I did make a point of contacting the seller and advising them of my requirement and they ensured I got the right part and it matches the description of the link. Bear in mind I bear no responsibility if yours does not work since I am just sharing what I did and what I ordered. Thanks.

    Jim Stanford -

    I also need that cable.

    cameronjpu -

    It's a little difficult to tell... but looking at the connection to the logic board on the video data cable, are the pins faced up or down?

    On the display, same question since it appears you have to "twist" the cable during the reconnection step.

    Jim Stanford -

    For this particular cable, take a good look before pulling on anything. Plug is locked on its socket with a bracket. You can lift this bracket by holding the small, flat black plastic handle that is attached to it. If you're struggling to grab it, use the end of the pizza roller handle to lift it, or the tweezers. Cable then comes off by pulling parallel to the main board.

    Froggy Manny -

    How can I tell if either of this cable is bad? My iMac display won't turn on after reconnecting it. I'm using an external display and everything is working except for the iMac display. If I go to settings - display the built-in display is recognize. But again nothing shows up in the screen - not even the apple logo when turning it on.

    Carlos Sosa -

  21. m3V4TQFe6DgIXYuF
    m3V4TQFe6DgIXYuF
    yZM3Md1BCHXDXXZn
    • Solleva lo schermo in posizione all'incirca verticale.

    • A questo punto c'è ancora una striscia di adesivo lungo il bordo inferiore dello schermo che tiene ancorato il display alla scocca come se fosse una cerniera. Puoi indebolire questo adesivo muovendo lo schermo su e giù per alcune volte di seguito.

    I was fretting that i would break my screen, it's really hard to see what is holding the screen in place and i was ready for it to snap the last 1/2 inch or 12mm of the glass I worked slowly and as you say, keep lifting and working it gently until you can see and cut the remaining adhesive.

    Peter Taffs -

  22. NXHcDMt52ENK4HPi
    NXHcDMt52ENK4HPi
    b6qImCFu2OHQHfip
    xMgGXmp4o3Pik4Y1
    • Se necessario, puoi usare una scheda di plastica per tagliare eventuali porzioni rimaste della striscia adesiva inferiore.

    The bottom adhesive strips have small tags at a 90 degree angle that can be used as handles to strip them out at this point. https://d3nevzfk7ii3be.cloudfront.net/ig...

    Dom -

  23. V4PqOetM2FuNQDNf
    V4PqOetM2FuNQDNf
    5GW2KD3C4FYXniog
    FuOZoIpxcQjjpXrW
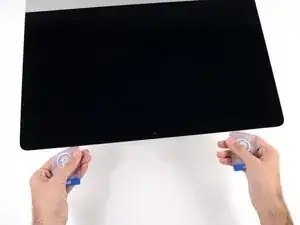
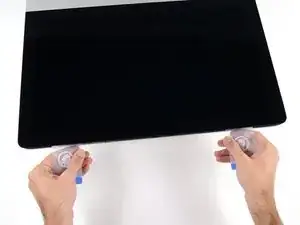
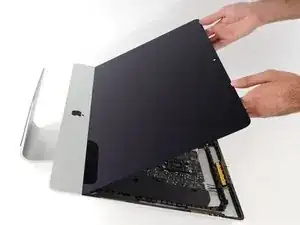
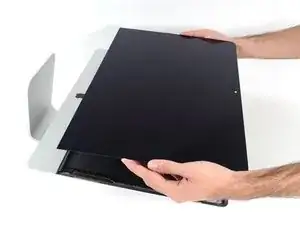
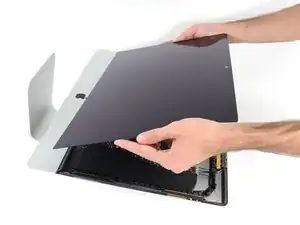
    • Solleva lo schermo dalla scocca e rimuovilo dall'iMac.

    • Può rendersi necessario sollevare lentamente il display da uno dei bordi laterali per staccare l'adesivo rimasto.

    • Stai molto attento nel maneggiare lo schermo: è grande, pesante e di vetro.

    • Dopo aver tagliato l'adesivo, non può essere più riutilizzato per rimettere al suo posto il display. Segui questa guida per sostituire le strisce adesive che fissano lo schermo alla scocca.

  24. Y6rgiDSintoHTbSh
    Y6rgiDSintoHTbSh
    TQY6Rva3IOMgdCPo
    • Svita le cinque seguenti viti a croce Phillips che tengono ferma la staffa di supporto inferiore:

    • Quattro viti da 3,2 mm

    • Una vite da 1,7 mm

    • Potresti dover rimuovere l'adesivo dello schermo dal bordo inferiore dell'iMac per accedere alle viti.

    These screws are VERY small and very easy to lose. Ideally you use a magnetized screw driver to help here.

    Charlie Nancarrow -

  25. bMsILZASiLpPMxXI
    • Rimuovi la staffa di supporto inferiore dall'iMac.

    The 'chin strap' is very easily bent, which makes it difficult to put the very small screws back in place.

    Charlie Nancarrow -

    Questa staffa a cosa serve ?

    Nicola Demetrio -

    Non rimetterlo che cosa comporta?

    Nicola Demetrio -

  26. vnCZOVJAfQMkCXVO
    • Rimuovi le seguenti viti Torx T10 che tengono ancorato il supporto del'hard drive sull'iMac:

    • Due viti da 21 mm

    • Una vite da 9 mm

    • Una vite da 27 mm

    At step 26, when reassembling, it's super easy to over-tighten the 9mm screw and strip the brass ferrule out of its hole in the plastic bracket (%#*@).

    roberttrevellyan -

    Mine has 4 different length screws, the two red colored 21mm screws in this guide are actually two differ lengths

    anonymous 523 -

    Mi imac does not have a HDrive whats the steps to follow?

    Charlie -

    buongiorno, l'imac del 2019, non monta alcuna ssd, ma monta una m2 direttamente sulla scheda madre!

    pertanto nella guida andrebbe aggiunto il cavo sata con sensore temperatura da aggiungere sulla scheda madre, per poter collegare un nuovo hd ssd altrimenti rimarrete come me bloccati con un imac aperto e non assemblato, in attesa di ricevere il cavo acquistato su internet da amazon o terze parti.

    vi consiglio inoltre di aggiungere una foto reale del ò'imac 2019 nella guida in cui manca l'ssd, renderà subito la problematica che avranno in molti!

    Donato Altomare -

    Hi, mine doesn’t HAVE an HD/SSD to remove, the bay is empty (yes it was fully working yesterday. So what do we do ? I see someone else with the sane issue above….

    Jeroen Speak -

  27. MFEFhp6PYNe1LMei
    MFEFhp6PYNe1LMei
    YOZ6AmbKs2AlGURG
    • Rimuovi i supporti sinistro e destro dell'hard drive dell'iMac.

  28. mvMdQktTba6hAHXt
    mvMdQktTba6hAHXt
    Xrb5HKoQvsB3M1aL
    ngWQxHCLD5HUmXC1
    • I prossimi passaggi ti faranno lavorare con le mani vicino all'alimentatore esposto. Non toccare la faccia della scheda o le saldature. Toccarle significa correre il rischio di ricevere una scossa ad alta tensione dai diversi potenti condensatori fissati alla scheda.

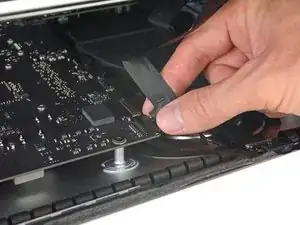
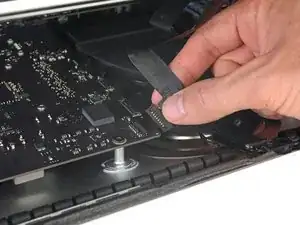
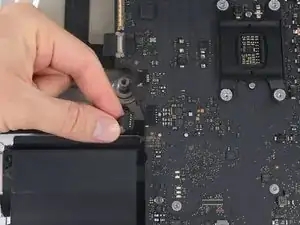
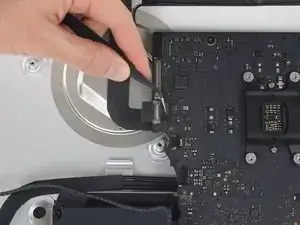
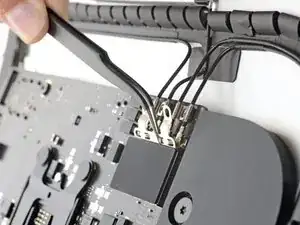
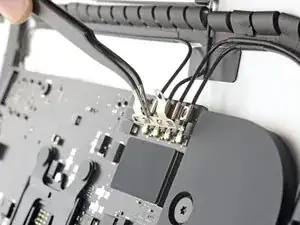
    • Usa la punta di uno spudger per spingere su un lato alla volta del connettore del cavo del tasto di accensione e scollegalo lentamente dalla sua presa.

    I would advise that before removing the PSU unit and all other components from the bottom of the case that you remove the 5 screws at the bottom of the display which hold an insulation strip in place.

    The guide shows this piece removed, but does not tell you how to remove it.

    There will be 5, small J1000 screws. The middle one, which goes over Apple Logo is the shorter one of the 5, all others are the same length. Once this piece is gone removing the components is much easier, and chance of damage lessened.

    [deleted] -

    Added to the guide. Thanks for the tip!

    Jeff Suovanen -

    No need to remove power board and logic board and all other components, just remove the fan and it is quite "easily" accessable to change the RAM. Just need to use the tools to remove the old RAM and carefully install the new RAM.

    I just did it without removing the logic or power board

    Oleksandr Trokhymchuk -

    could you elaborate a little more, I would love to skip the rest of these steps. How did you accomplish this?

    ej P -

    Oleksandr Trokhymchuk,

    Thank you! You just saved me so much time! I wouldn’t call this “easy” but it saved me a lot of time and effort.

    Joshua Ericson -

    ej P: remove the fan assembly first. Then remove the connector that runs from the iSight camera to the logic board on the left.

    the RAM is located right near that cable. It’s tricky to remove but you can pop open the connectors with a black nylon stick and the RAM chip will pop up at 45 degrees. Make a mental note on which way you will need to install the new ram as it’s tough to see. For the Crucial memory I got it was label side facing away you (facing towards rear metal enclosure).

    the second chip has a plastic adhesive piece on it that you should probably attach to the new ram.

    remove both chips then install the new ram in sequence from the board out.

    Wizdom On Wheels -

    In the photo for Step 28, the power button cable connector is placed around the power board screw hole on the top left of the power board.

    However, on the iMac I upgraded, the power button cable connector was “fed” through the power power screw hole on the top left of the power board. The cable was too short to run around and below the hole.

    Hence, I had to ensure the cable was “fed” through the hole during re-assembly and the screw carefully screwed back through the hole.

    I guess every iMac is assembly just a bit differently, just to make repairs that much more fun.

    Tim Telcik -

    This is not correct and may have been assembled incorrectly during a previous repair.

    Charlie Nancarrow -

    Just replaced the hard drive and RAM with SSD and 16GB respectively and did NOT remove the power supply or logic board. Tricky is a word to describe putting the RAM in without removing the logic board. You work in the dark with little room to get your fingers in between the logic board and the back of the case. I put the first RAM chip in without a problem (the one next to the logic board), but the second to four tries and dropped it behind the logic board three times before finally getting it to position correctly. Just impossible to see and must work but feel. Still it was faster than removing all the components… though did remove the fan (needed cleaning anyway). All in all I can’t say enough about the help the guide was through the upgrade ! Thanks !

    Ray Burgard -

    I found this connector to be very tight and was afraid of breaking it off. I just kept slowly working on it—it did eventually come out.

    I did try to sneak the RAM in without removing the logic board but my fingers were too big. I found it too difficult and just continued on with this guide.

    Mikkif -

    I was not able to install the memory without removing all the components. My fingers are too big and I could barely get in that tight spot to swap out the memory. The hardest part about the power supply is that one connector under the chin next to the Apple logo. Once it is out, you are home free because it is so easy to plug it back in when you are putting it all back together again. Ridiculous that Apple did not put a simple access door behind those memory slots because they are on the backside of the Mac! They did an access door on the PowerBooks and it did not ruin the appearance. They could have designed a cool looking pop out door that only had a thin seam around it so it would still look good. Then you could remove the access door to upgrade the memory easily.

    Peter Hillman -

    Does anyone know if this is the same situation as in the 2017 model? I just changed RAM in the 2017 version and also skipped taking out the logic board. I just bent a pair of tweezers and put some tape around the tips to make them less scratchy and used them to place the RAM modules into the slots. Worked supereasy and much much quicker than performing the complete tear down of the whole machine.

    Nils Witte -

    This step is impossible!

    Cecily Walker -

    @wizdomonwheels, I don’t see how I can get the RAM shield off of the logic board to access the RAM without removing the logic board. What am I missing?? I’m guessing that those of you that are suggesting this technique are working on older iMac models that don’t have the RAM shield.

    jiclark -

    Yes, you are correct. It is likely the various steps are a bit different on each model. If I recall I was likely working on a 2015 or older system. If there’s a shield in the way, I can’t think of a way you could get around it without pulling the logic board.

    Wizdom On Wheels -

  29. FRyHHB3eYim1Mlap
    FRyHHB3eYim1Mlap
    QYTUyMIUOCpNBKj3
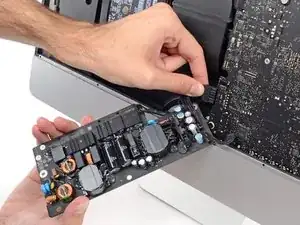
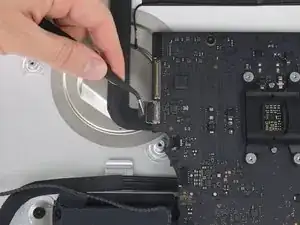
    • Usa la punta di uno spudger per spingere su un lato alla volta del connettore del cavo di controllo dell'alimentatore e scollegalo lentamente dalla sua presa.

  30. CH3APYFIpiKhphHv
    • Svita le due viti Torx T10 da 7,2 mm che fissano l'alimentatore al case posteriore.

    • In alcuni modelli più recenti di iMac queste sono due viti T8 da 7,2 mm.

    • Durante il riassemblaggio assicurati di non bloccare il cavo del tasto di accensione dietro all'alimentatore.

    In my case, the left side corner of the PS was caught against the Lower Support Bracket, and I had to remove the LSB in order to get the PS freed and out.

    I think the author Walter Galan should put this in the main section of his instructions. I have TWO identical iMac 14,1 / i5 2.7GHz / 21 Inch Late 2013 / Order ME086LL/A. They both required removing the LSB. Thank you very much Walter Galan & others for your contributions.

    Ted Horodynsky -

    Those screws were definitely not T10 but T9 on my unit

    Vincent Monteil -

    Those screws were T8 on my unit.

    jag32mobile -

    c'est du torx 08

    pascal cacou -

  31. ydiE3k5Fa2YpKhyx
    ydiE3k5Fa2YpKhyx
    2WOoukeWyEZYOdGS
    • Mentre sei alle prese con l'alimentatore stai molto attento a non toccare i contatti dei condensatori o le saldature sul retro dell'alimentatore. Spostalo toccando esclusivamente i bordi della scheda.

    • Inclina l'alimentatore in avanti.

    When replacing the PSU (on the re-build) take care not to trap the power button cable behind it - I did...

    Dave Hallett -

  32. PKvyIF2PGHKLVC2I
    PKvyIF2PGHKLVC2I
    QS1usHIbpanvhs6M
    mWlTKHdQmhbCG6Sm
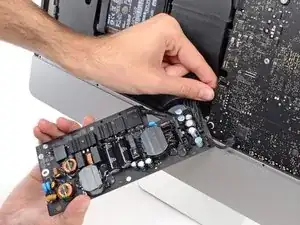
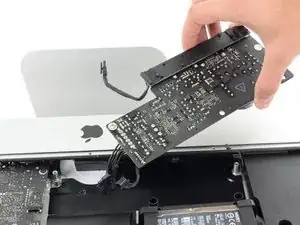
    • Tira leggermente l'alimentatore verso l'alto e fuori dalla scocca.

    • Ruota l'alimentatore in senso antiorario, sollevando il lato destro di circa 2 cm rispetto a quello sinistro.

    In my case, the left side corner of the PS was caught against the Lower Support Bracket, and I had to remove the LSB in order to get the PS freed and out.

    I think the author Walter Galan should put this in the main section of his instructions. I have TWO identical iMac 14,1 / i5 2.7GHz / 21 Inch Late 2013 / Order ME086LL/A. They both required removing the LSB. Thank you very much Walter Galan & others for your contributions.

    Ted Horodynsky -

  33. wWakaG6mtCcwjET3
    wWakaG6mtCcwjET3
    yOSa1on1CEscZMhj
    • Fai scorrere l'alimentatore verso destra per evitare i supporti per le viti sulla scocca.

  34. jLV1p6yQHGorKX6J
    jLV1p6yQHGorKX6J
    RXTvMCHuVc2YG6Bw
    AhUBHxjjc4AVbOIJ
    • Muovi l'alimentatore avanti e indietro per rimuoverlo da suo alloggio nella scocca.

    • Non cercare di rimuovere del tutto già ora l'alimentatore: è ancora collegato alla scheda madre.

  35. qeKSCvwUpYnww3Xq
    qeKSCvwUpYnww3Xq
    DpV1XSNW6lES4k6h
    • Stai molto attento a non toccare i contatti dei condensatori o le saldature sul retro dell'alimentatore. Spostalo toccando esclusivamente i bordi della scheda.

    • Gira l'alimentatore per avere accesso al cavo di alimentazione DC sul retro della scheda madre.

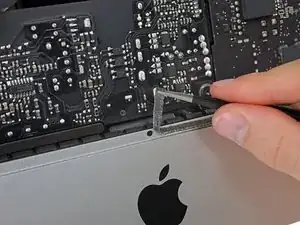
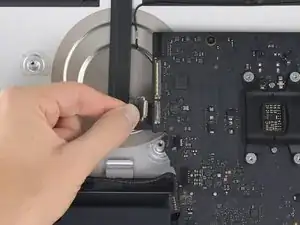
    • Schiaccia l'aletta sul retro del connettore del cavo di alimentazione e sfilalo dalla sua presa sulla scheda madre.

    when pulled the cable, even slightly, the actual female piece that connects to the logic board came off. am i screwed?

    Racheal Major -

    Repairing sockets that come off the logic board is possible, but very specialised work. Unless you have a magnifying lamp and the necessary desoldering and soldering skills, it will be difficult but not impossible.

    Charlie Nancarrow -

    The tab is at the far end of the connector, so you’ll need to reach farther than you might think.

    lkollar -

    When I pulled the disconnect, I pushed down on the disconnect, instead of pushing down on the tab on the disconnect and bent those pins… tried to straighten the bent pins and two of the pins broke off the logic board. Will I need a new logic board or can I purchase the pins…?

    Ray AA -

    I could not disconnect this cable without fear of breaking something (as previous posters did). I found that I could skip this and the next step by wrapping the power supply in a couple layers of a small towel (to prevent shorting with any other metal surfaces), and laying the power supply on the aluminum face of the iMac near the Apple logo. This got it out of the way enough to do what I needed on the logic board (changing PRAM battery) after completing removal of the other items in this guide.

    Phil McInnis -

  36. X1O2EONkUfMWVDIU
    X1O2EONkUfMWVDIU
    afj3FkjCDfAuRAC3
    IpAy5PoZ5NsXFekL
    • Può esserti d'aiuto appoggiare l'iMac sul suo retro per i prossimi passaggi.

    • Usa l'estremità piatta di uno spudger per premere verso l'interno l'aletta sul lato del connettore del cavo di alimentazione AC.

    • Mentre premi l'aletta per il rilascio, afferra il cavi di alimentazione AC e sfilalo dalla sua presa.

    I didn't disconnect the input cable to the power supply. Because I had the machine lying on its back throughout, I placed it on to the metal bit at the bottom of the machine instead (with a cloth to stop the metal getting scratched). The AC inlet cable was pretty tricky to get un-locked, and the PSU sat on the case fine. It didn't hinder anything else throughout the guide.

    Dave Hallett -

    I thought from Dave’s comment that I could leave the power supply completely in place, but I was mistaken. In order to remove the hard drive assembly after you remove the center screw in it, you’ll need to at least unscrew it and the HD assembly will slip out. Like Dave said, you don’t need to unplug the AC or PSU, which I left hanging.

    Getting power supply to the logic board unplugged is also tricky without unscrewing the two bottom screws. They didn’t make this part easy.

    delacrj2 -

    Kleiner Rechtschreibfehler - statt „denac“ muss es wohl „den iMac“ heißen

    Gonzalo -

    Au ja. Du kannst so was selbst ausbessern. Einfach auf “Übersetzen" gehen und loslegen.

    VauWeh -

    I would like to thanks Dave Hallett for his tip of not removing the AC inlet connector of the power supply. I simply wrapped the board in bubble wrap and taped to the iMac case, out of the way, thus giving access to the remaining disconnection procedures and preventing the board from scratching to the iMac case. It also made reassembly much simpler.

    Rob Hogan -

    Yeah, that AC inlet plug was a nasty one to unplug, mainly because I was trying not to bump the solder joints on the PSU. After a few wiggles and pulls while manipulating the spudger tool to release the clip, it finally unplugged. Made it easier by removing the PSU completely so you don’t have to worry about it. Don’t worry, plugging it back in is a breeze!

    Peter Hillman -

    With the right tool this plug comes out very easily. Forget about your tiny computer tools, go to the garage and grab a regular old needle nose pliers. Grab the clip and the plug at the same time. The plug will come right out.

    Carin Ann Loewen -

    Carin Ann— The most helpful comment on this procedure. After reading what you wrote I maneuvered the board, grabbed the clip with my left hand (a little awkward because of the cooling enclosure), squeezed the front of the plug, and got it out.

    Glen Kohler -

    +1 for needle nose pliers!

    Sam -

  37. 2VMnTxjOOO1L43of
    • Rimuovi l'alimentatore dall'iMac.

    erreur: retirer "la carte d'alimentation" et non" le disque dur" !!!!!

    Moreau -

  38. IBchvnpx6554SHJh
    IBchvnpx6554SHJh
    jLqgVF2XZOkqBAdw
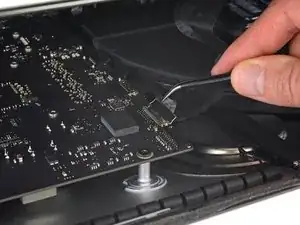
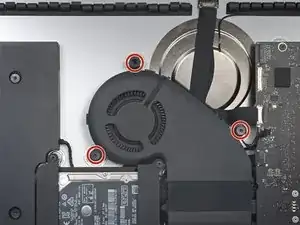
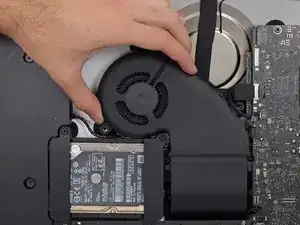
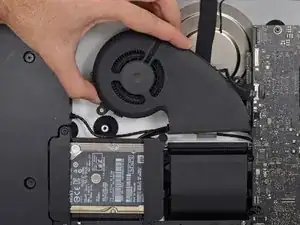
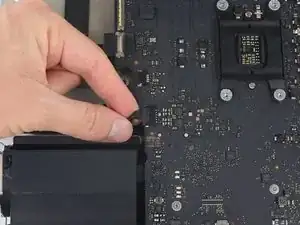
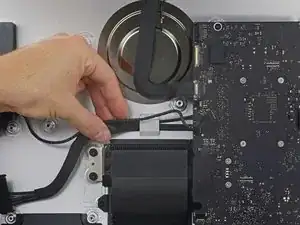
    • Delicatamente scollega il connettore del cavo della ventola dal suo alloggiamento sulla scheda logica.

  39. 1gYVUM6CGnCxNNJN
    • Rimuovi le tre viti Torx T10 da 10 mm che fissano la ventola sulla scocca posteriore.

    • La vite più in alto ha una guarnizione in gomma per aderire meglio e supportare lo schermo: lascia la guarnizione dov'è.

    In this photo the hard drive brackets and tray are fully assembled. But, you’ve just dismantled about half of it already in early steps. This photo is apt to confuse you a bit when you’re doing everything in reverse order.

    Timothy Reynolds -

    Another way to say what Tim said above:

    For reassembly, this picture, showing the hard drive brackets back in place, is misleading. Leave them off still.

    IF, at this stage, you reinstall the hard drive brackets, when you get to the time to reinstall the power supply, you will have to backtrack and take the brackets off.

    Tech Medic -

  40. wnVqqqD5gF6xqW2a
    wnVqqqD5gF6xqW2a
    X5QHlckCAJJWfZJv
    • Rimuovi la ventola dall'iMac.

    For reassembly, this picture, showing the hard drive brackets back in place, is misleading. Leave them off still.

    IF, at this stage, you reinstall the hard drive brackets, when you get to the time to reinstall the power supply, you will have to backtrack and take the brackets off.

    Tech Medic -

  41. rAirT1GHZP1qpIqC
    rAirT1GHZP1qpIqC
    FI1BVEajFcTkxyGe
    fH3KYDKkVeWLdH2L
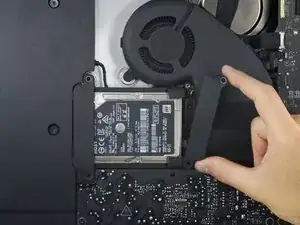
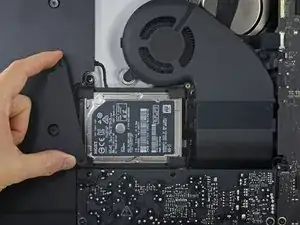
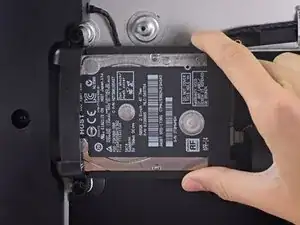
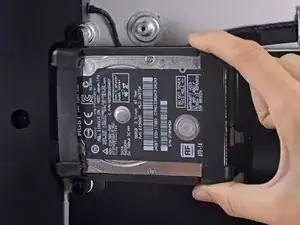
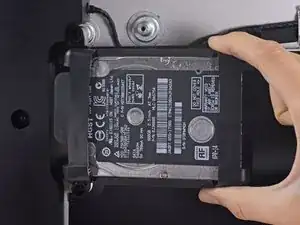
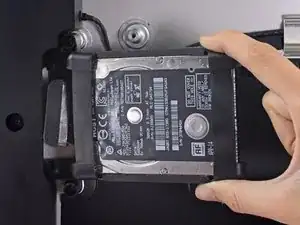
    • Solleva l'hard drive dal lato più vicino alla scheda madre e tiralo leggermente fuori dal suo alloggio.

    • Il disco rigido è ancora collegato all'iMac con un cavo dati/alimentazione SATA: non cercare di rimuoverlo ora.

    The newer drives have rubber ends and an adhesive side, be careful removing them if replacing the drive and be sure they are securely pushed back into the holder

    Carl Schultz -

  42. xAT4mnLlMEmZaE1l
    xAT4mnLlMEmZaE1l
    nUVTcTkKjNk2phCg
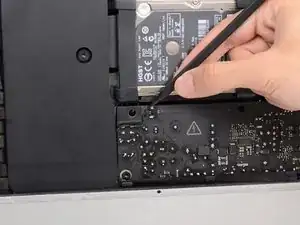
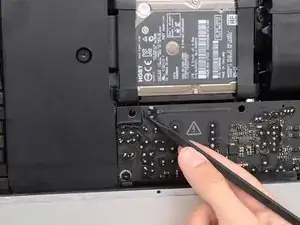
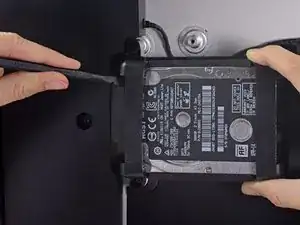
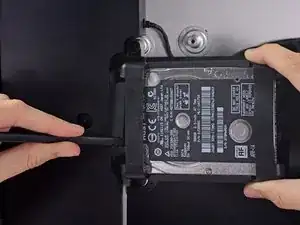
    • Usa uno spudger per scollegare il cavo dati/alimentazione SATA facendo leva delicatamente su entrambi i lati del connettore per farlo scorrere lontano dall'unità.

    When reconnecting the SATA cable, there is nothing to make the connector hold still, and it is hard to reach, so it took several tries. I ended up taking off the rubber baby buggy bumpers to get more room, and then jamming them back on after getting the SATA connector snugged up.

    bstaud -

    If by rubber baby buggy bumper, you mean left speaker, then yes, I agree. Reinstall the hard drive before the left speaker.

    jerrid_foiles -

    Kudo to @jerrid_foiles! I was going crazy trying to attach the SATA cable until I took the two screws out of the left speaker and slid the top end of it aside by about 3/4 inch. Make the whole process SO MUCH easier!!

    jiclark -

    We solved this by removing the hard drive tray screw, then inserting the cable into the SATA hard drive. Then hold the hard drive a bit out of the way to insert the 7.3mm hard drive tray screw.

    Marjie -

    Agree with this method, found it an impossible task to reconnect the SATA connector until removed the tray screw, then it was relatively easy to reconnect and then replace the tray screw.

    daveedwards -

    Also agree with this method!

    jmorphett5 -

  43. gPY6hXsOGJ1vn6ij
    • Rimuovi il gruppo dell'hard drive dall'iMac.

    When reassembling, I found it easier to loosen the HD tray screw from Step 48 and pull the tray outwards from the left side in order to plug the SATA cable in more easily.

    Cool_Breeze -

    Thanks! I, too, had a hard time reconnecting the SATA cable.

    boboswell -

    I found this helpful too!

    Anwar -

    And DON’T do what I did, which is to remove the left speaker - which can easily lead to breaking the cable between the power on button and the power supply. The cable is routed through a hidden slot at the very bottom of the left speaker

    bsmith1 -

    I did loosen the speaker so I could get a tool behind the SATA cable to push it on to the SSD drive. Otherwise hard to align cable.

    Noah Ralston -

    I found the easiest way to connect the SATA cable was to not screw the plastic hard drive tray down until you plug the drive in. That way you can easily push the connector in and due to the cable you’ve got some wiggle room. You can position the tray then just lift one end of the drive up and secure the screw. Then just push the drive down.

    Chris Caldwell -

    This was the step that I had the most trouble with. I’m used to replacing a hard drive in a MacBook Pro, where the “plug” that you plug the drive into is a rigid thing that you can firmly press the hard drive into.

    With the iMac, the plug is situated on the end of a non-rigid cord, so the plug moves back when you try to snap a drive into it. Also, those two rubber gasket things that you adhere to the side of the drive really make it difficult to maneuver the now-overly-chubby drive towards the plug.

    After must frustration/concern, what I ended up doing was temporarily removing the rubber gasket things, using the “spudger” as kind of a lever behind the “plug on a cord” so that it didn’t move as much, and then pushed the gasket-less SSD into the plug.

    Once I got it connected, I put the rubber gaskets back on the sides of the SSD and kind of coaxed it down into place, using the pointy end of the spudger to get the chubby corner pieces to “sit” correctly in the rigid plastic tray that the SSD kind of rests in.

    Jack OnFlickr -

    From another comment elsewhere on this repair, I *highly* recommend removing the two screws holding the left speaker in place, then sliding it just a tad out of the way to be able to easily attach the SATA cable. You don’t have to move it much to make the whole process so much easier!

    jiclark -

  44. HlyFX1SKeB5XaS1A
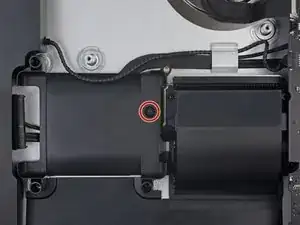
    • Svita la vite Torx T8 da 7,3 mm che fissa il carrello del disco rigido alla copertura posteriore.

  45. WHcOrWobQNNZeior
    WHcOrWobQNNZeior
    dPAqvkcXmGpQwMvq
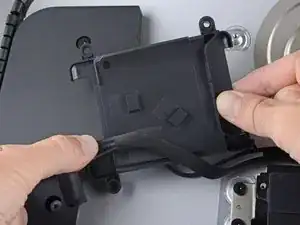
    • Rimuovi il cavo SATA dai ganci sul retro del carrello del disco rigido.

    • Rimuovi il carrello del disco rigido.

  46. JEsPRvPMFKPLp5OK
    JEsPRvPMFKPLp5OK
    TuZySaCUvfdXBXY1
    • Sfila delicatamente il cavo dello speaker sinistro dalla sua presa sulla scheda madre.

  47. D51gdUGxZ3AvIgCd
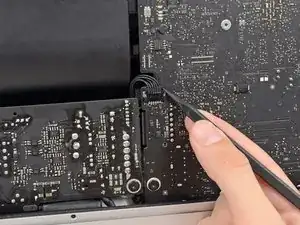
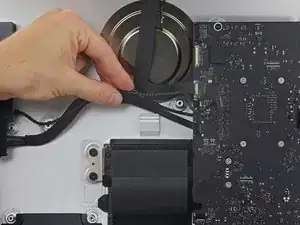
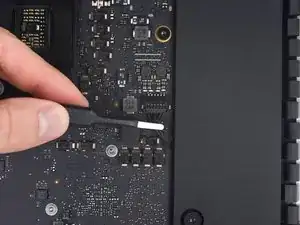
    • Sfila il cavo dello speaker sinistro tirandolo fuori dal gancio di bloccaggio sul retro della copertura posteriore.

  48. PPslOJpbNCYXfS1N
    PPslOJpbNCYXfS1N
    yRMteRIkDKWAU2gU
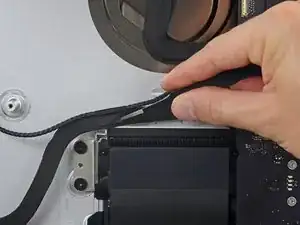
    • Similarmente al passaggio precedente, sfila i cavi SATA e di alimentazione tirando il cavo intrecciato fuori dal gancio di bloccaggio.

  49. aKOJpkAxPCMiXtPi
    aKOJpkAxPCMiXtPi
    hb4CjyEYjYej3Irf
    • Rimuovi il pezzo di nastro che collega il connettore dello speaker sinistro ai cavi SATA e di alimentazione.

  50. TvUP2KJ35YILsJgX
    TvUP2KJ35YILsJgX
    KaLL2hJVHrY1xHMi
    ZcUTUiR4rWTEifIP
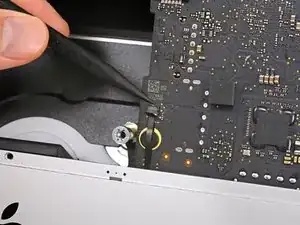
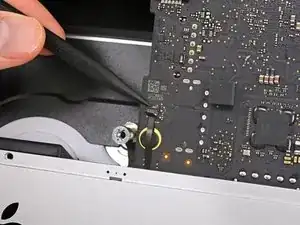
    • Ruota verso l'alto la staffa di bloccaggio in metallo sul connettore del cavo della fotocamera FaceTime.

    • Sfila il cavo della fotocamera iSight dalla sua presa sulla scheda madre.

    • Questo è un connettore delicato che può venire danneggiato facilmente.

  51. kKAkZISMtblWboHT
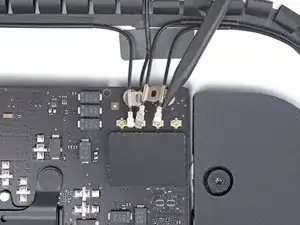
    • Svita le due viti Torx T5 da 4,0 mm che tengono fermi i quattro connettori dell'antenna AirPort/Bluetooth.

    On my A2116 iMac19,2 3.0 GHz i5, these two screws were T4 Torx (same as the T4s securing the RAM cover in step 62) not T5 Torx.

    Zarino Zappia -

  52. bfdQshviyZgEYxrd
    bfdQshviyZgEYxrd
    EuwZCQKBOC2xnBVJ
    wnZAsXrEMlcXyONZ
    • Ruota la parte superiore della staffa del connettore AirPort/Bluetooth lontano dalla scheda madre, quindi solleva la staffa e rimuovila.

    • Durante il rimontaggio, assicurati di allineare le alette sulla parte inferiore della staffa con i fori sulla schermatura EMI. Queste alette dovrebbero inserirsi completamente nei fori prima che la staffa venga installata.

  53. IUUbh6EhGejksWe2
    IUUbh6EhGejksWe2
    Cj5gtQFTaDDHp2DW
    WSJSGudM6HmUDn3l
    • Usa la punta di uno spudger per sollevare tutti e quattro i connettori dell'antenna dalle loro prese e scollegarli dalla scheda AirPort/Blueetooth.

  54. vyFlNtaUT1yUH6HF
    vyFlNtaUT1yUH6HF
    QnEGWpLEVy3VSAEG
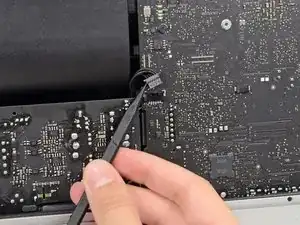
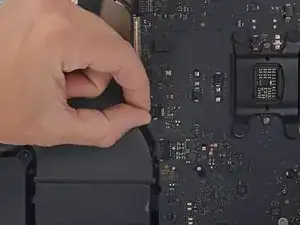
    • Usa un paio di pinzette o le dita per tirare il connettore del cavo dello speaker destro verso il basso e sfilarlo dalla sua presa sulla scheda madre.

  55. OdPVtlWK6TeqPEnm
    OdPVtlWK6TeqPEnm
    hZokClWNoRZmS4n5
    BPJt3yhuTEbv5dtR
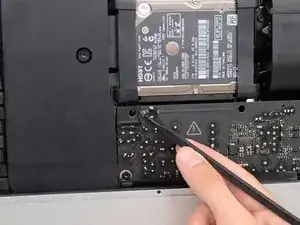
    • Usa la parte piatta di uno spudger per scollegare il connettore del cavo della presa jack dalla sua presa sulla scheda madre.

    • Spingi il cavo leggermente verso destra per liberare la strada alla scheda madre.

  56. H45gWVABEDbRphkK
    • Rimuovi il nastro che copre il condotto di scarico.

  57. kOqJZvEfAVJSGIfD
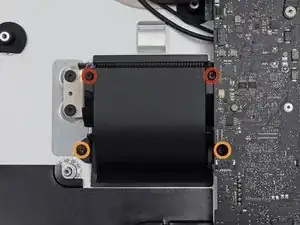
    • Rimuovi le seguenti viti Torx T8 che fissano il condotto di scarico alla copertura posteriore:

    • Due viti da 6,2 mm

    • Due viti da 4,7 mm

  58. tEpJYJjRc2ovFpSy
    tEpJYJjRc2ovFpSy
    VIqSSd2fW5tx6gsT
    TBVjjCqNGAvbSDC1
    • Usa la punta di uno spudger per aprire l'aletta di bloccaggio sulla presa ZIF del cavo a nastro del microfono.

    • Assicurati di fare leva sull'aletta di bloccaggio incernierata, e non sulla presa stessa.

    • Usa le pinzette per sfilare delicatamente il cavo a nastro del microfono dalla sua presa.

  59. aAw2er4tESOMM1Jk
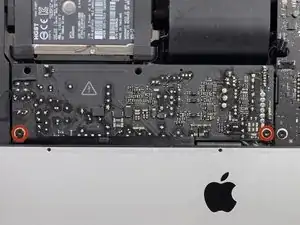
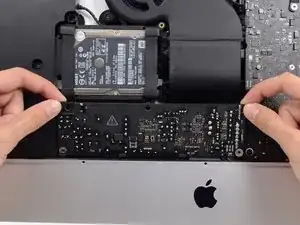
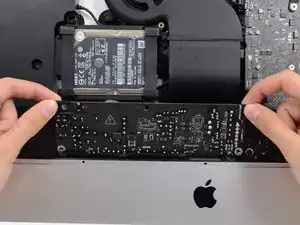
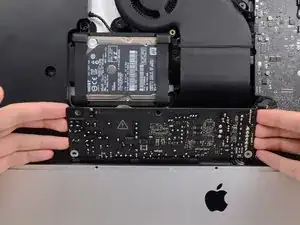
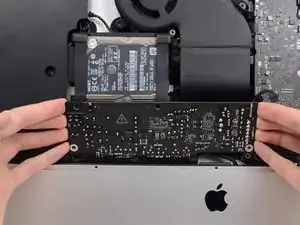
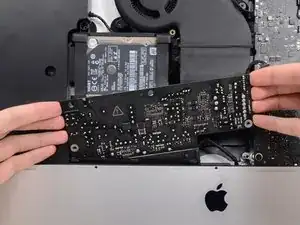
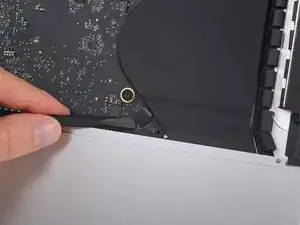
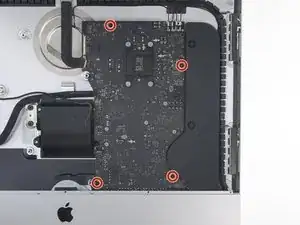
    • Svita le quattro viti Torx T8 da 7,3 mm che fissano la scheda madre alla copertura posteriore.

    On my 2019 A2116 (i3), there is a black vinyl sticker over the lower left screw, possibly a tamper-detection sticker like the ones on the CPU bracket on the 2013 Mac Pro.

    Rana Raychoudhury -

    I think that sticker is just to protect the microphone cable from possible shorting out on the screw, since it lays across it.

    jiclark -

  60. jJUoZKFgxHo6tgvk
    jJUoZKFgxHo6tgvk
    ZQPBTH1AFQCYFXBO
    HquXQeLPUxCSRbE5
    • Mentre rimuovi ed installi la scheda madre, stai attento a non danneggiare il delicato cavo a nastro del microfono in basso a sinistra della scheda.

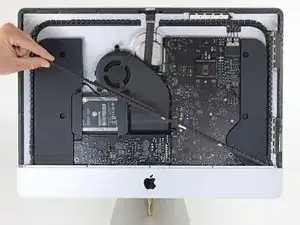
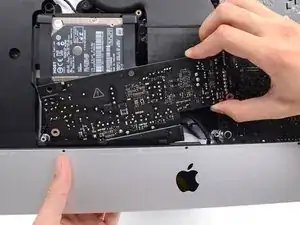
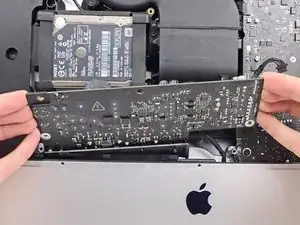
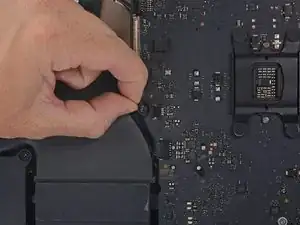
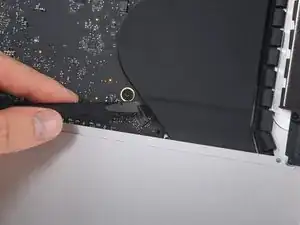
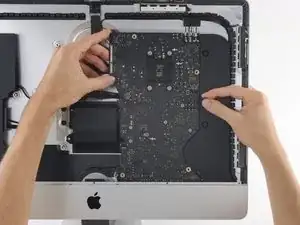
    • Inclina la parte superiore della scheda madre lontano dalla copertura posteriore.

    • Mentre inclini la scheda madre, tira il connettore dello speaker destro verso destra per liberare la strada alla scheda.

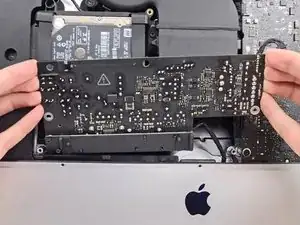
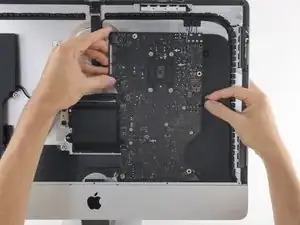
    • Solleva la scheda madre per rimuoverla dall'iMac.

    • Stai attento a non impigliare la scheda su nessuno dei supporti delle viti sulla copertura posteriore.

    this would have been a great place to include a picture of the other side of the motherboard. to see the PCIe slot, for instance.

    David -

  61. u2UPTHWR5gKyRruS
    u2UPTHWR5gKyRruS
    ARGpUPRDrd2Iwpdp
    • Durante il rimontaggio del tuo iMac, stai molto attento ad allineare le porte I/O esterne correttamente. La scheda madre può essere storta anche quando tutte le viti sono avvitate.

    • Usa una chiavetta USB e/o un cavo ethernet per tenere la scheda madre posizionata correttamente mentre avviti le viti.

  62. mLsNcMalhlCnxHNA
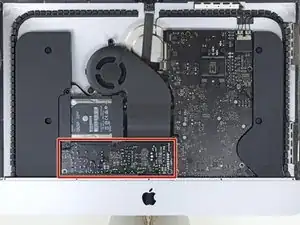
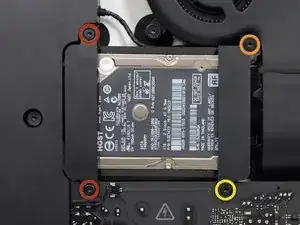
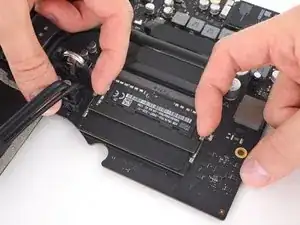
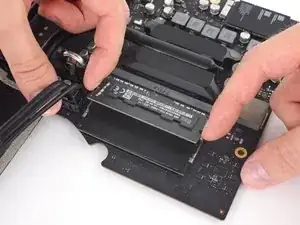
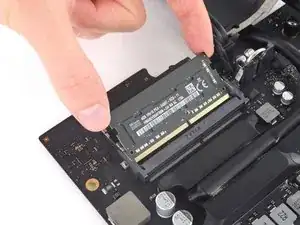
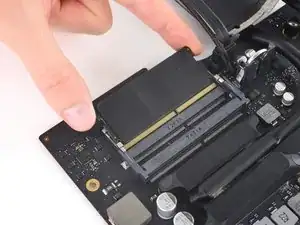
    • Toccando la scheda sui bordi, ruotala scheda madre per accedere ai due moduli della RAM.

    • Usa un cacciavite Torx T4 per svitare le quattro viti da 2,4 mm che tengono ferma la schermatura della RAM.

  63. OqmtyDVWUlKBJoSD
    • Rimuovi la schermatura della RAM.

  64. ZKxSxjFeTTOmmaYM
    ZKxSxjFeTTOmmaYM
    2yMLSpJ2VQHUp3lq
    • Due ganci tengono fermo il modulo della RAM, uno so ogni lato. Usando le dita, allontana i ganci dal modulo della RAM.

    • Una volta rilasciati, il modulo della RAM si alzerà ad un piccolo angolo.

  65. B4tsnREY6owAwFWK
    B4tsnREY6owAwFWK
    AhC2KKyTOMlKA1SE
    • Solleva il modulo della RAM ad un angolo di circa 30 gradi e sfilalo.

    • Mentre maneggi il modulo della RAM, toccalo solo sui bordi esterni. Stai attento a non toccare i contatti dorati lungo il bordo inferiore.

    • Per installare un nuovo modulo della RAM, infilalo in posizione con circa lo stesso angolo finché si incastra, quindi spingila verso il basso finché i due ganci scattano in posizione.

  66. Q5qRUpRGiNnfr3NO
    Q5qRUpRGiNnfr3NO
    TafYZvnpmvInGaPN
    • Il modulo della RAM originale più vicino alla scheda madre potrebbe avere un pad termico attaccato alla sua faccia superiore (quella rivolta lontano dalla scheda madre, tra i due moduli).

    • Se la tua RAM include un pad termico, rimuovilo e trasferiscilo dal modulo originale a quello di sostituzione prima di installarlo nella presa inferiore.

    I did this! and changed the HD to SSD. And it works much faster than before. I chose to just use some painters tap to temporarily hold the glass display in place while I tested the computer to make sure it worked fine. The only problem Ive had is some lagging and occasional temporary drops (a second at most) by the mouse. Could this be the result of anything I did? Maybe the antenna? My keyboard seems fine, so that seems to rule out a problem with the antenna, unless the mouse and keyboard use different parts of the antenna. Getting the antenna wires back onto those sockets before attaching the bracket was more difficult than these instructions make it seem.

    BRUCE CLARKE -

Conclusione

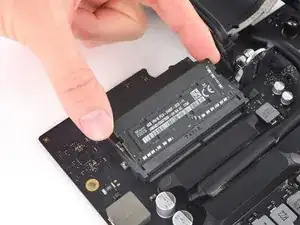
Confronta la tua parte di ricambio con quella originale: potrebbe essere necessario il trasferimento di alcuni componenti o la rimozione di protezioni adesive dalla nuova parte prima di installarla.

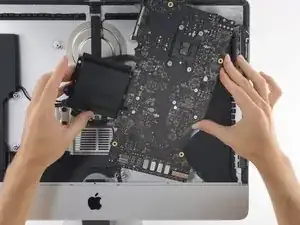
Per rimontare il tuo dispositivo, segui le istruzioni in ordine inverso.

Porta i tuoi rifiuti elettronici a un riciclatore certificato R2 o e-Stewards.

La riparazione non è andata come previsto? Da' un'occhiata alla nostra comunità Risposte per trovare aiuto nella risoluzione dei problemi.

Adam O'Camb

Membro da: 11/04/15

195148 Reputazione

19 commenti

I attempted this upgrade myself because iFixit labeled this as Moderate difficulty. The entire process took me seven hours from start to finish, and when I was done my computer would not turn on. I tried to do this repair myself because my local computer company wanted $400 to do this upgrade using Apple RAM, and I couldn’t afford that at the time. I had to take the iMac in to be serviced when it wouldn’t turn on, and the computer company just quoted me a price of $600 for a new logic board if it was damaged during the upgrade.

I am posting this to warn anyone else who is considering doing this upgrade to hire a certified technician. Do not go by iFixit’s difficulty rating. If you do, you may risk even greater expense if something goes wrong, like it did with my own attempt.

Perhaps iFixit should consider changing the rating on this task to Extremely Difficult, or Advanced, or LOL DON’T EVEN TRY IT to warn any other unsuspecting customers who are looking to save a little money.

Cecily Walker -

It is very likely you just missed plugging in the cable from the power button to the power supply. Very easy to do and very easy for the very small cable to slip behind the power supply and you never notice.

Always a good idea to check each step as you go and read the whole guide from start to finish before you start and also in the process of reassembly.

Charlie Nancarrow -

I did this in about 3-4 hours over a Saturday afternoon. I had previously done hard rive upgrades in a 2009 iMac and a 2012 MBP. I was encouraged by a tech friend and pored over the guide for a few times to get my courage up and then discussed the step by step with him first on a zoom call. The courage is required to remove the screen. After that the guide is very solid and clear and the steps are easy to comprehend though removing the power supply is a bit tricky and the microphone cable can be elusive. The only mistake I made is when reapplying the screen, having already checked function, I got into a sweat and banged to sick it on with the VDU cables not properly connected. I would recommend have some help for the screen re application and talk it through so you avoid that kind of schoolboy error. Having removed the screen and re-applied it I am very happy. A great guide.

Jon H Smith

Jonathan Smith -

Sehr gute Beschreibung, jedoch stellt sich mir eine Frage nach dem Wieder zusammen setzen benötige ich doch einen Vergleichsweisen Kleber der meinen Bildschirm auf den Rahmen setzt. Damit er nicht herunter fällt. Gibt es da welche zu kaufen oder hält das wieder von alleine?

Ich habe einen IMAC 4k 21´Zoll 2019 und möchte gerne Arbeitsspeicher und CPU tauschen.

Michael Meschenat -

id did it in 3,5 hours, no problems at all, everything works as described.

Josef Niggemeyer -

I used this instructions to upgrade my iMac with 32Gbytes RAM and 1Tbyte SSD. Everything went well in about 4 hours of hard work. You’ll need the right tools, adhesives to put the screen back and, above all, be very careful with the cables and the logical board, otherwise you’ll have a huge problem! May God bless who created this tutorial!!!! Thank you very much. By the way, fusion drive sucks!

Othon Batista -

Hey Othon, I also want to upgrade the hard drive to SSD because I have the fusion drive. Did you use another guide from this website?

Andrew Oliver -

Possibly a sad story, possibly a happy ending. I upgraded my iMac with an Intel i9 9000 CPU, 32 GB of ram and a 1Tb SSD - Not too difficult apart from the microphone cable which is a b*gg*r. I did shut down the computer (and disconnect the power supply 24 hours before attempting the upgrade. Knowing how one can ‘miss something, I initially assembled the computer screen and held it is place with masking tape so that I could check everything out. Started up first time and ran as sweet as a nut. Good - I obtained the official adhesive strips and this afternoon installed the screen permanently. Now it will not switch on (the computer starts OK with the Apple Hmmm sound). I have been really gentle with the display cables and now I am at a loss of how to proceed. Taking it to a local repair shop next week.

Rod Peel -

Reseat the cables, they can take an extra (very careful) nudge to really seat home and square.

Charlie Nancarrow -

Hey Rod, I'm looking to do all 3 for the upgrade as well. Was the other two guides (SSD & CPU) on here as well?

Andrew Oliver -

Great guide! I replaced the fusion drive with an SSD in while I was in there, and this was a really pleasant repair. Having the ifixit opening tools and guide made it all go very smoothly. Thanks!

Mark Pruett -

This repair is cake. Changed the ram, hard drive and cpus in the last five iMacs. How come cpu switch isn’t on here?

blakebest -

Successfully used this guide, after using similar guides for a 2017 version of this iMac to replace both RAM and hard drive in both models. SATA SSD drive greatly improves speed of the machine. Having done this sequence of steps multiple times now, it does get easier each time. I have it down to about 1.5-2 hours now. I was a bit surprised, however, to find the RAM shield on this model (not present on the 2017 model), mostly because the tool required to remove it was not listed in the required tool list. Luckily I did have a T4 Torx in my toolbox so it did not cause a delay in completing the fix. (Tried to add it, not sure if my edit saved or not.) Thank you for this guide!

jan -

After having seen this very well illustrated guide and watched the very good video from OWC, what I can say is: God! Why the heck couldn't Apple's designers just provide a backdoor on the iMac to make upgrading RAM easier (like on some older iMacs)? We're talking about... RAM upgrade, not CPU upgrade! We miss those old Steve Jobs days so much!

Arty -

What kind of ram needs the Mac to upgrade it? Now I have 2x4GB but I want to upgrade to 16 or 32 because Photoshop doesn't run good with 8gb

Daniele Vecchi -

I try with crucial 2x16GB and corsair 2x32GB they are labled as mac memory. Owc is good choce too.

cumledomla -

Like first comment I made a mistake and my iMac not started .Re assembled it again 15 times changing ram in one place to other, old one, new one.Only original moduls working and top one .At last it was that slot near pcb was to tide and ram partly fitted. Even it locks at place needed some force to get inside. Finlay started and everything is ok. Just you may advise to look how deep is module inserted in slot.

What type of thermal pad is used between ram modules?

cumledomla -

Hole saw drill bit, I can cut the time down to minutes. Great guide, looking forward to replacing my clunky HDD.

Marcar Elliott -

This project is a bear; not for the faint-of-heart. But, doable. Haven taken apart iMac screens before, that part was not difficult. The things to watch for are: grouping and labeling every screw/bolt you take out (I stuck them in PostIt notes), and detaching/reattaching all the tiny, delicate little cables.

If you have it, I'd recommend jeweler's magnifying glasses and some tweezers to help re-attach cables. And keep in mind the more stuff you pull apart, the more risk you incur. Though the odds are in your favor if careful, be prepared to potentially have a useless brick at the end of the process if something goes wrong (or require expensive professional help).

Randall Perry -