
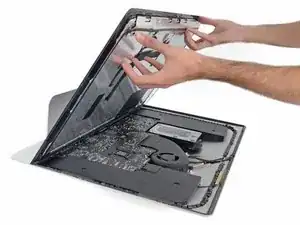
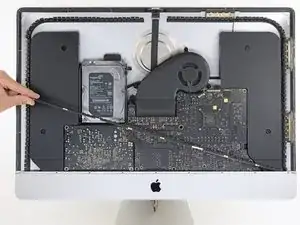
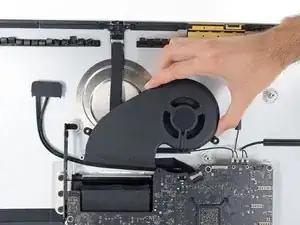
Introduzione
Se il tuo iMac era configurato con un SSD o un Fusion Drive, include un SSD Blade sul retro della scheda logica. Usa questa guida per accedere e rimuovere l'SSD Blade.
Prima di iniziare qualsiasi lavoro sul proprio iMac: Stacca il computer dall'alimentazione, premi e tieni premuto il tasto d'accensione per 10 secondi per scaricare i condensatori dell'alimentatore.
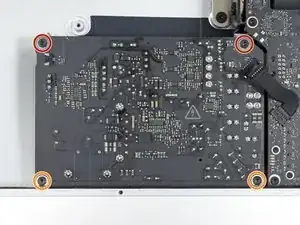
Stai molto attento a non toccare i connettori dei condensatori o qualsiasi saldatura scoperta sul retro della scheda di alimentazione. Maneggiala solo dai lati.
-
-
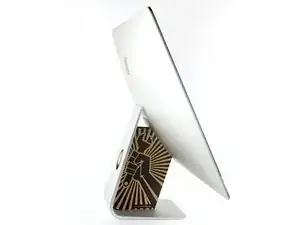
Se la cerniera è libera di muoversi, l'iMac si può sbilanciare e rendere difficile il lavoro. Sistema sotto lo stand un supporto di riparazione iMac per rendere stabile il dispositivo.
-
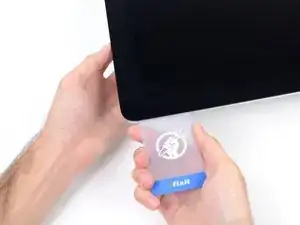
Se stai usando il supporto in cartone iFixit, segui queste istruzioni per montarlo.
-
-
-
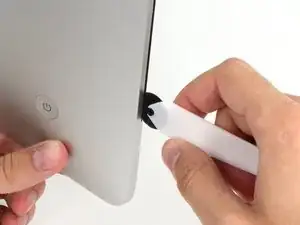
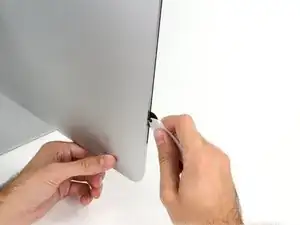
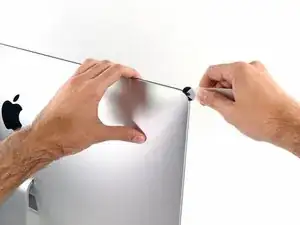
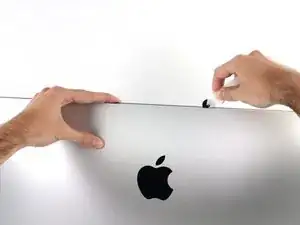
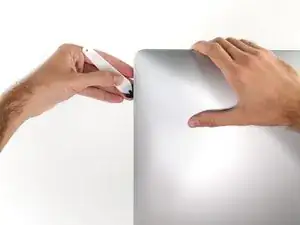
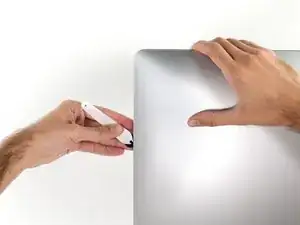
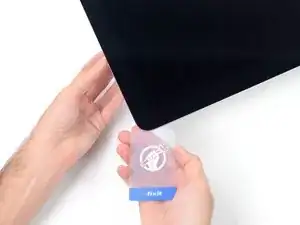
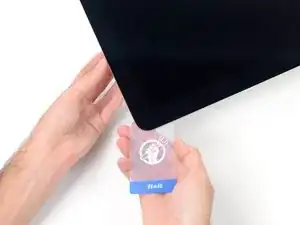
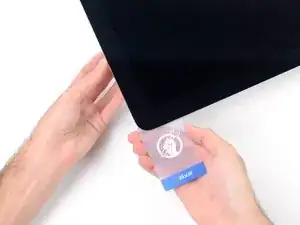
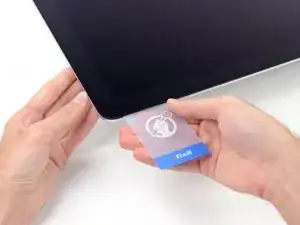
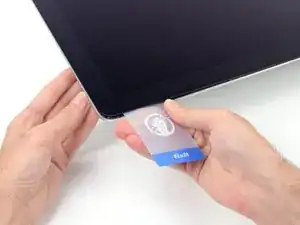
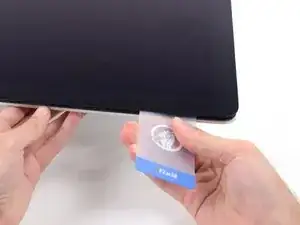
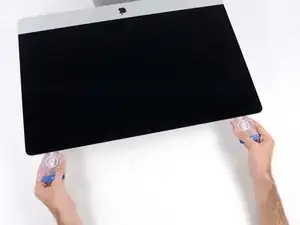
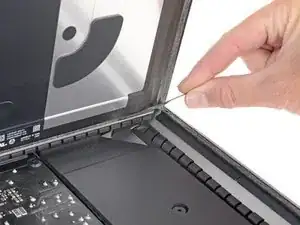
Iniziando dal lato sinistro dello schermo, vicino al pulsante di alimentazione, inserisci lo Strumento di apertura iMac nella fessura tra il pannello di vetro e la cover posteriore.
-
-
-
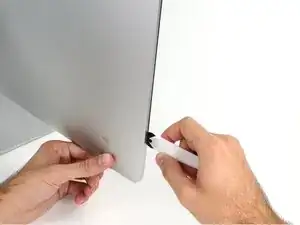
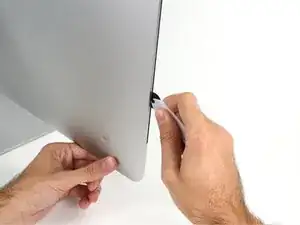
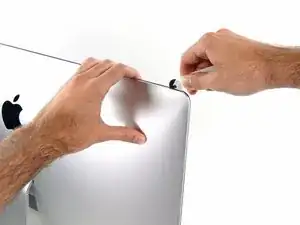
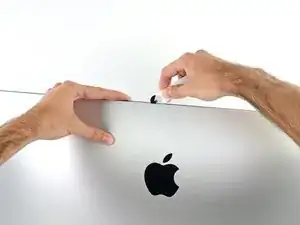
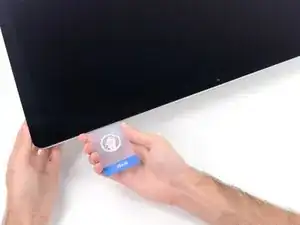
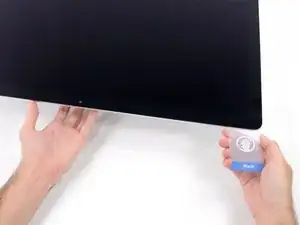
Usa l'attrezzo come se fosse una rotella per tagliare la pizza: fallo girare lungo la fessura, tagliando così l'adesivo in schiuma.
-
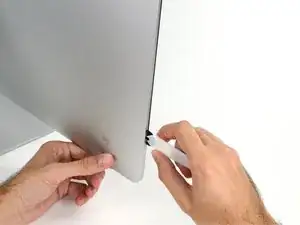
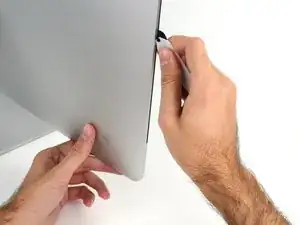
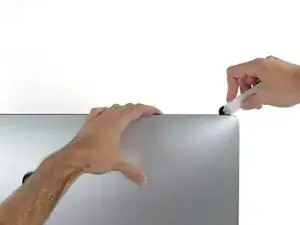
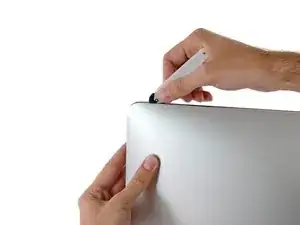
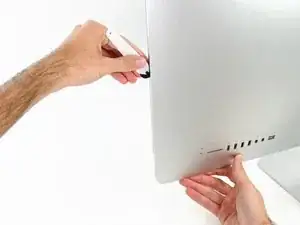
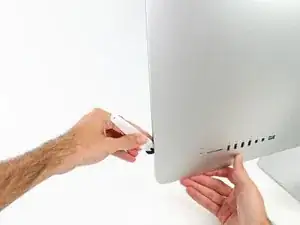
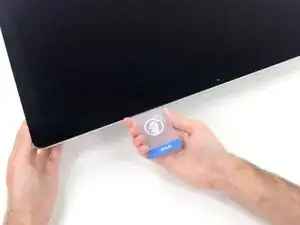
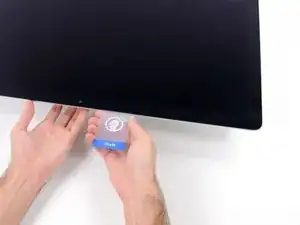
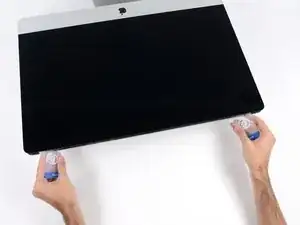
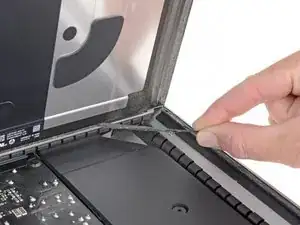
Passa l'attrezzo attorno al lato sinistro dello schermo.
-
-
-
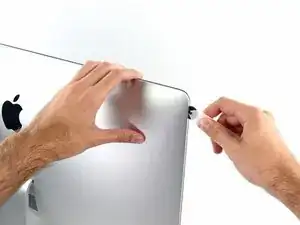
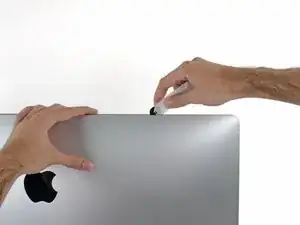
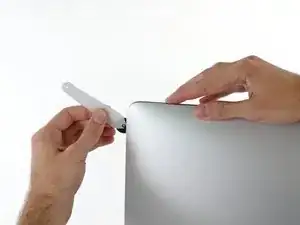
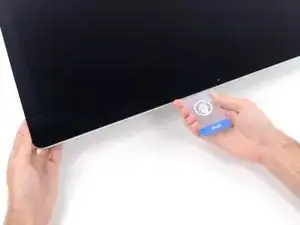
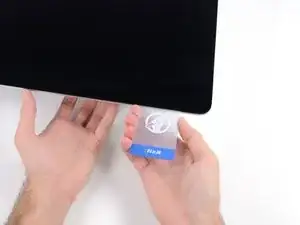
Finisci di lavorare con lo strumento di apertura sul perimetro arrivando all'angolo inferiore destro del display.
-
-
-
Disponi l'iMac in piano a faccia in su.
-
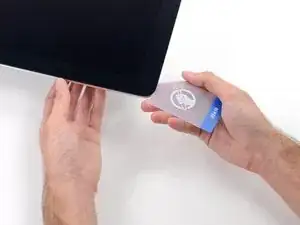
Iniziando dall'angolo superiore destro dell'iMac, infila una scheda di plastica tra lo schermo e la scocca.
-
-
-
Torci delicatamente la scheda di plastica per creare una fessura tra il display e la scocca e per tagliare tutto l'adesivo rimasto vicino all'angolo.
-
-
-
Infila di nuovo la scheda di plastica nell'angolo e lasciala in posizione per evitare che la colla possa riattaccarsi.
-
-
-
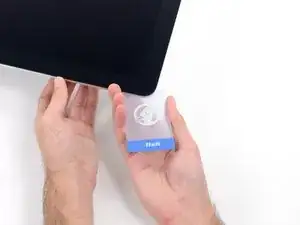
Inserisci una seconda scheda nella fessura tra lo schermo e la scocca nell'angolo superiore sinistro.
-
-
-
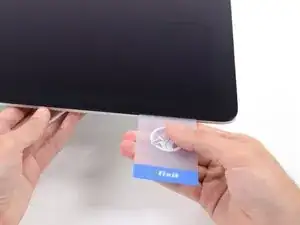
Inclina delicatamente la scheda per aumentare lievemente lo spazio libero tra il display e la scocca.
-
-
-
Fai scorrere la scheda di plastica verso il centro, anche questa volta fermandoti appena prima della fotocamera iSight.
-
-
-
Con le schede di plastica inserite come in figura vicino agli angoli, applica ad entrambe una torsione per allargare la fessura tra lo schermo e il case.
-
Se ci sono delle parti che sembrano rimanere attaccate e non intendano separarsi, interrompi la torsione e usa una delle schede per tagliare l'adesivo rimasto nell'area interessata.
-
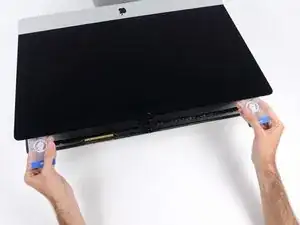
Inizia a sollevare la parte superiore dello schermo dalla scocca.
-
-
-
Mantieni lo schermo con uno mano mentre con l'altra stacchi il cavo di alimentazione dello schermo .
-
-
-
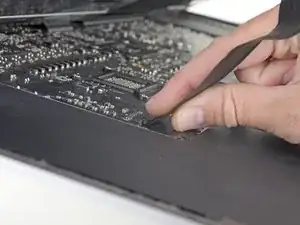
Sblocca la staffa metallica di ritenuta del cavo dati dello schermo.
-
Scollega il cavo dati del display.
-
-
-
Afferra la piccola linguetta all'estremità di una delle strisce adesive nella parte inferiore dello schermo e tira la striscia verso la parte superiore dell'iMac per rimuoverla.
-
Ripeti questo passo con l'altra striscia adesiva e rimuovi anche questa.
-
-
-
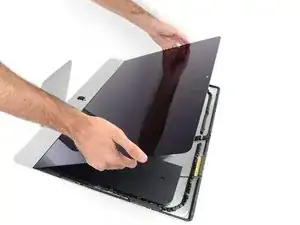
Solleva lo schermo dalla scocca e rimuovi lo dall'iMac. Disponi il display a faccia in giù su una superficie piatta e morbida.
-
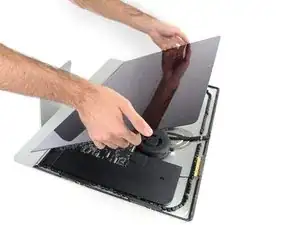
Può rendersi necessario sollevare lentamente il display da uno dei bordi laterali per staccare l'adesivo rimasto.
-
-
-
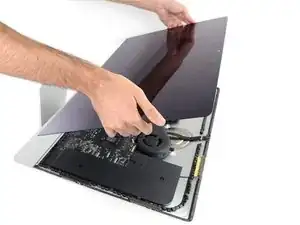
Usa un cacciavite a croce Phillips per svitare le nove viti da 3,2 mm che tengono ferma la staffa di supporto.
-
Potresti dover rimuovere l'adesivo dello schermo dal bordo inferiore dell'iMac per accedere alle viti.
-
-
-
Disconnetti il cavo dello speaker tirandolo direttamente dalla sua porta sulla scheda madre. Stai attento a sfilare il cavo rimanendo in direzione dell'asse della presa.
-
Sfila il cavo dalla fessura tra l'hard drive e la scheda madre.
-
-
-
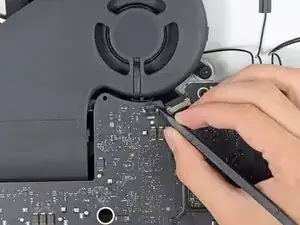
Usa uno spudger per disconnettere il connettore del pulsante di accensione dalla sua sede sulla scheda madre.
-
-
-
Solleva con attenzione l'altoparlante sinistro fino a quando il cavo del pulsante di accensione diventa visibile (1-2 cm).
-
-
-
Sfila delicatamente il cavo del pulsante di accensione dal suo incavo sull'altoparlante sinistro.
-
-
-
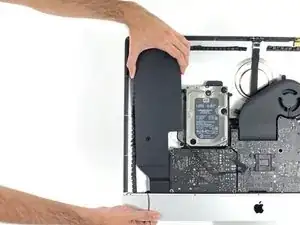
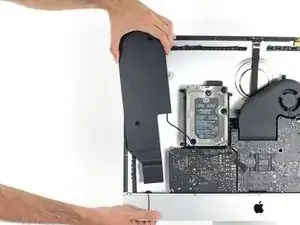
Solleva l'altoparlante sinistro e toglilo dall'iMac.
-
Spingi dalla parte terminale del connettore mentre tiri dalla parte terminale dell'altoparlante per infilare il cavo sotto il supporto destro dell'hard drive.
-
-
-
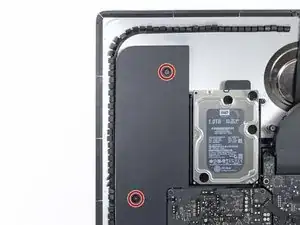
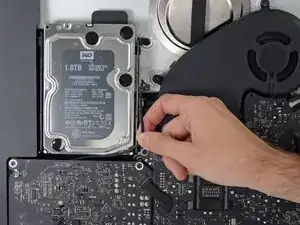
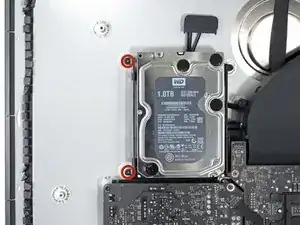
Svita le due viti Torx T8 da 7,3 mm che fissano la staffa sinistra del disco rigido alla copertura posteriore.
-
-
-
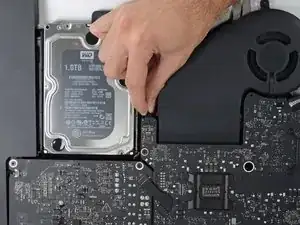
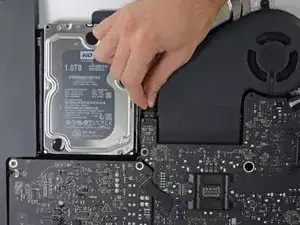
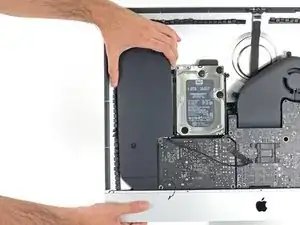
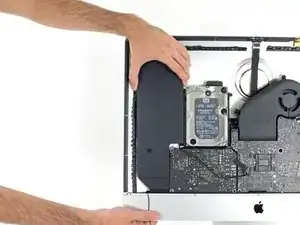
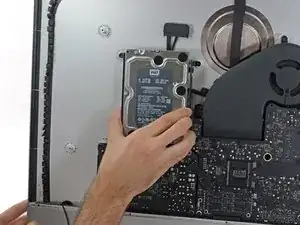
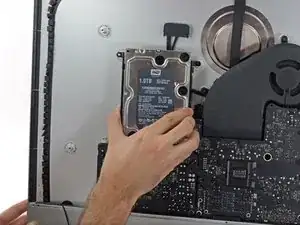
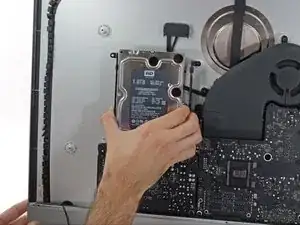
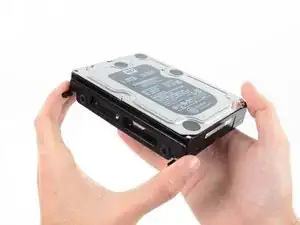
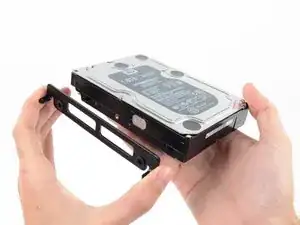
Prendi insieme il disco rigido e la sua staffa sinistra.
-
Allontana il bordo sinistro dalla copertura posteriore e fai scorrere il gruppo verso sinistra.
-
Rimuovi il disco rigido e la sua staffa sinistra dall'iMac.
-
-
-
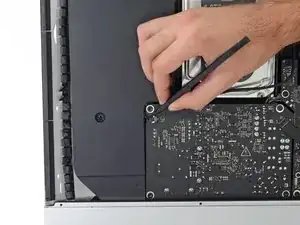
Rimuovi le seguenti 4 viti che fissano l'alimentatore al case (T8 o T10 a seconda del modello):
-
2 viti Torx da 23,7 mm
-
2 viti Torx da 7,3 mm
-
-
-
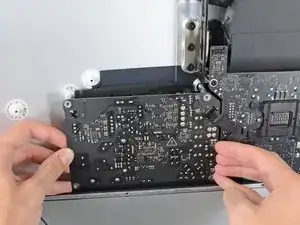
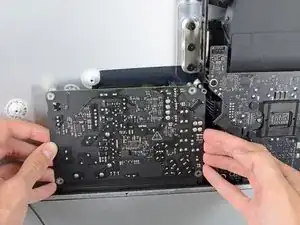
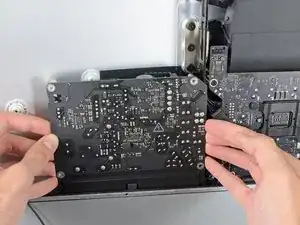
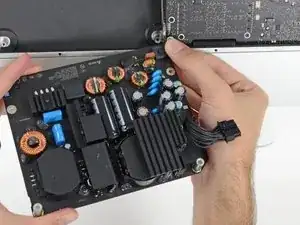
Sposta la scheda dell'alimentatore verso il bordo sinistro del case e verso l'alto per liberarla dall'incavo nella scheda logica.
-
-
-
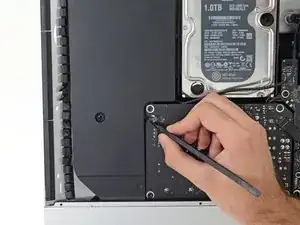
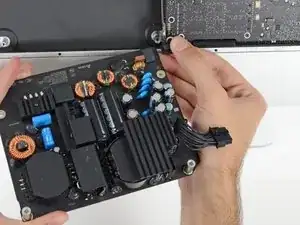
Premi la linguetta sul connettore del cavo di alimentazione DC, quindi estrai il connettore dalla sua presa sul retro della scheda logica.
-
-
-
Capovolgi verso di te la parte superiore dell'alimentatore per rivelare il connettore del cavo di ingresso AC.
-
Scollega il connettore del cavo di ingresso CA.
-
-
-
Usa un cacciavite Torx T10 per rimuovere le due viti da 10 mm che tengono fermo l'altoparlante destro.
-
-
-
Muovi l'altoparlante destro leggermente verso destra, per avere accesso al collegamento del suo cavo sulla scheda madre.
-
-
-
Usa uno spudger per allentare il connettore del cavo dalla sua presa sulla scheda logica.
-
Tira il connettore verso destra per rimuoverlo dalla presa.
-
-
-
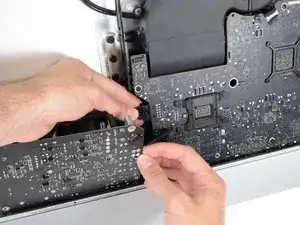
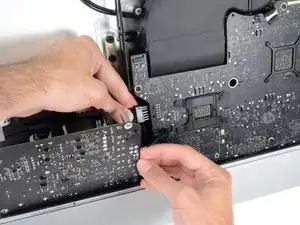
Usa l'estremità a punta di uno spudger per scollegare i connettori dei cavi dalla presa nella scheda logica.
-
-
-
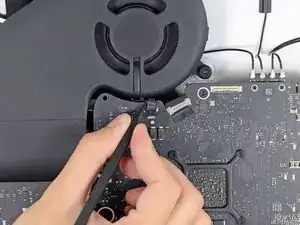
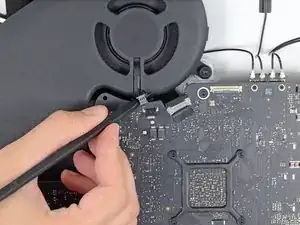
Distacca parzialmente il nastro adesivo nero che connette la ventola al condotto di scarico.
-
Lascia il nastro sul condotto di scarico: ti basta solo esporre la giunzione per liberare la ventola.
-
-
-
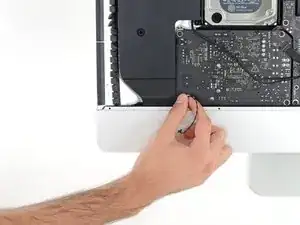
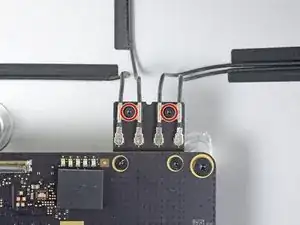
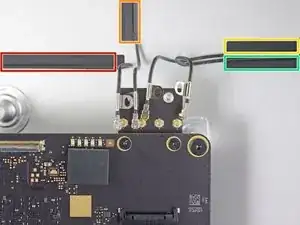
Usa un cacciavite Torx T5 per rimuovere le due viti da 4 mm che tengono fermi i cavi delle antenne AirPort/Bluetooth.
-
-
-
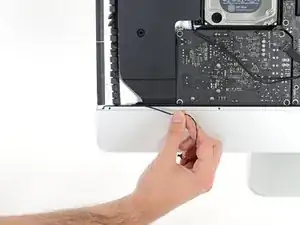
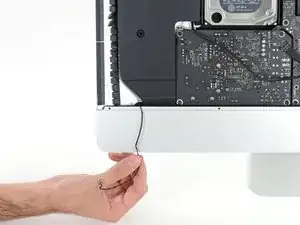
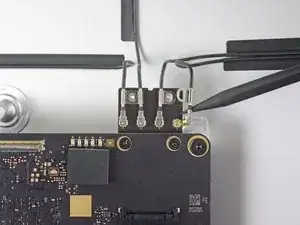
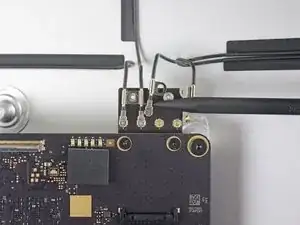
Usa la parte piatta di uno spudger per scollegare tutti i quattro connettori delle antenne dalla scheda AirPort/Bluetooth.
-
Il più a sinistra
-
Quello in alto
-
Quello sopra a destra
-
Quello sotto a destra
-
-
-
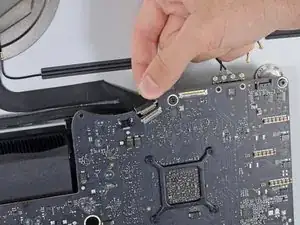
Ruota verso l'alto la staffa di bloccaggio in metallo sul cavo della fotocamera iSight.
-
Sfila il connettore del cavo della fotocamera dalla sua presa, tirandolo verso la parte superiore dell'iMac.
-
-
-
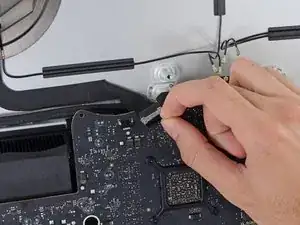
Usa la parte piatta di uno spudger per scollegare il connettore del cavo della presa jack dalla sua presa sulla scheda madre.
-
Sposta delicatamente da parte il cavo.
-
-
-
Usa la punta di uno spudger per aprire, ruotandola, l'aletta di bloccaggio sul connettore ZIF del cavo a nastro del microfono.
-
Usa delle pinzette per sfilare delicatamente il cavo a nastro del microfono dalla sua presa.
-
-
-
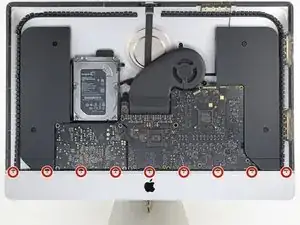
Svita le seguenti viti che tengono ferma la scheda madre:
-
Due viti Torx T8 da 23,7 mm
-
Una vite distanziale Torx T25 da 20,1 mm
-
Una vite Torx T8 da 17,6 mm
-
Una vite Torx T8 da 7,2 mm
-
Tre viti Torx T8 da 7,1 mm
-
Una vite imperdibile Torx T8
-
-
-
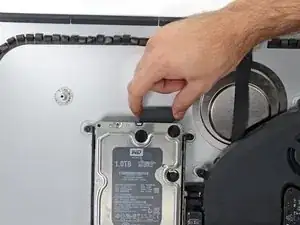
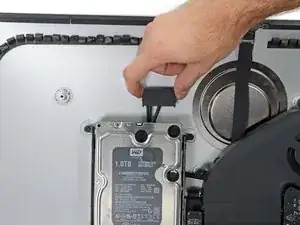
Tira il cavo SATA del disco rigido e il connettore attraverso la staffa destra del disco rigido. Sposta il cavo alla destra dell'iMac, lasciando libera la porta dello scarico.
-
-
-
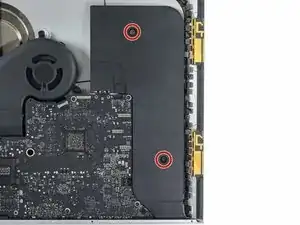
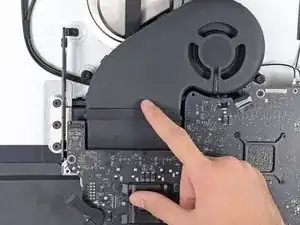
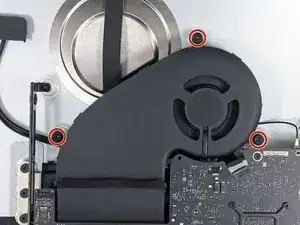
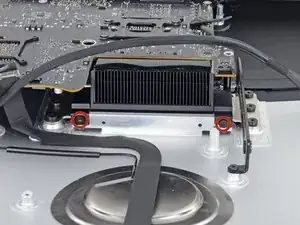
Usa un cacciavite Torx T8 per svitare le due viti da 5,6 mm dalla parte superiore del condotto di scarico del dissipatore.
-
-
-
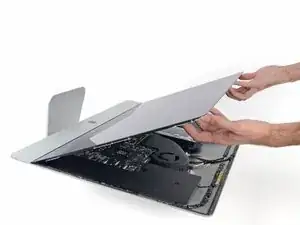
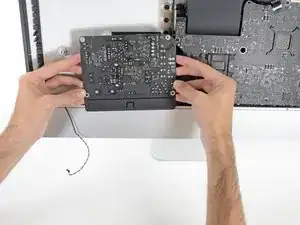
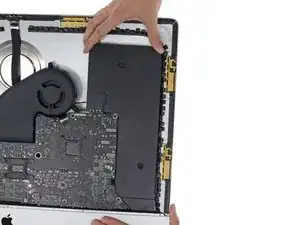
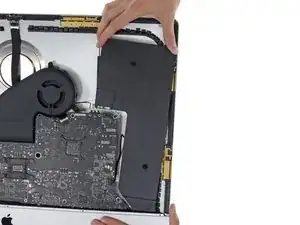
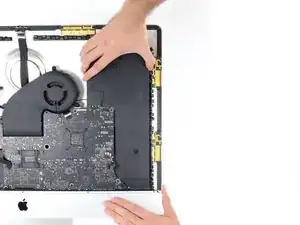
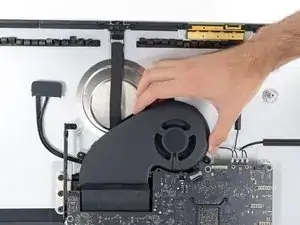
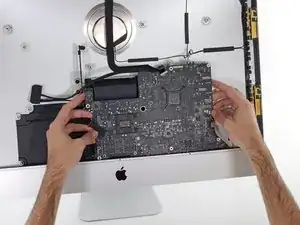
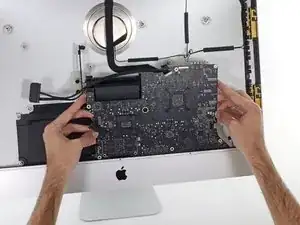
Inclina leggermente in avanti la scheda.
-
Solleva la scheda madre e rimuovila dall'iMac. Stai attento a non rompere nessuna delle prese per le viti fissate all'interno della copertura posteriore.
-
-
-
Mentre rimonti il tuo iMac, stai molto attento ad allineare correttamente le porte I/O esterne. La scheda può essere storta anche con tutte le sue viti avvitate.
-
Puoi usare una chiavetta USB o un cavo ethernet per assicurarti che la scheda madre sia posizionata correttamente mentre la avviti.
-
-
-
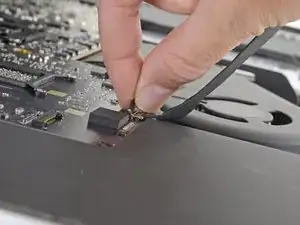
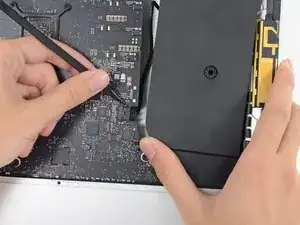
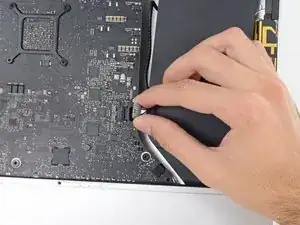
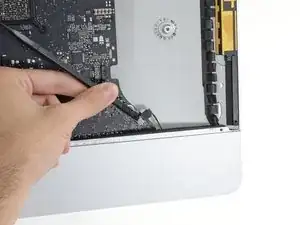
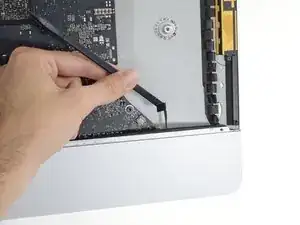
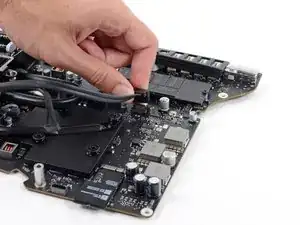
Tira verso l'alto il connettore del cavo SATA per scollegarlo.
-
Scollega il connettore del cavo SATA sganciando la sua aletta di bloccaggio e tirandolo verso l'alto sul connettore.
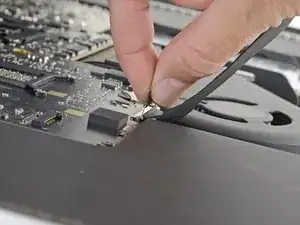
-
Rimuovi il cavo SATA dal gruppo della scheda logica e spostalo in un punto dove non interferisca per prevenire un eventuale danneggiamento.
-
-
-
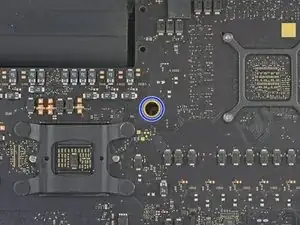
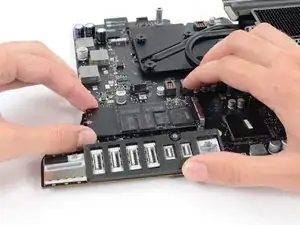
Solleva lievemente l'estremità dell'SSD e tiralo direttamente fuori dal suo zoccolo sulla scheda logica.
-


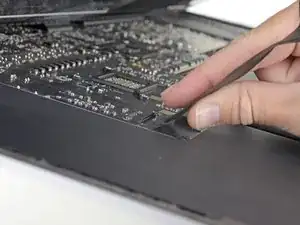

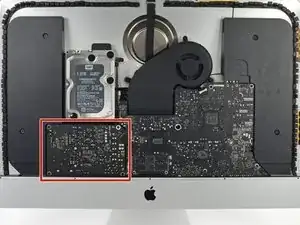


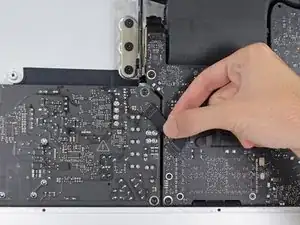
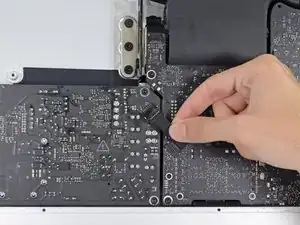
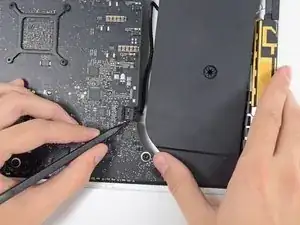


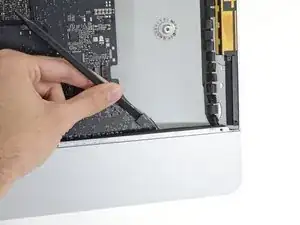
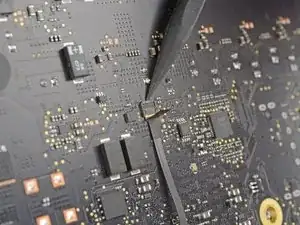
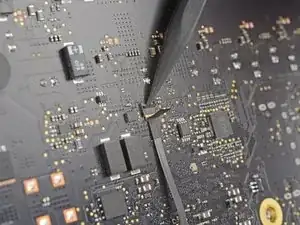
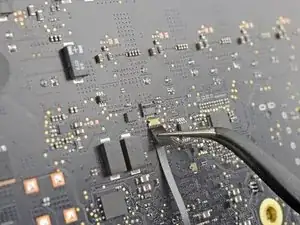

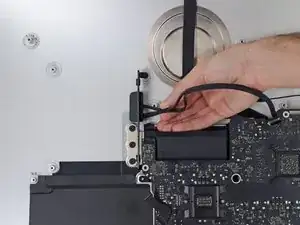
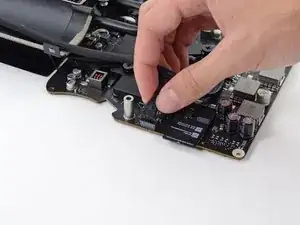
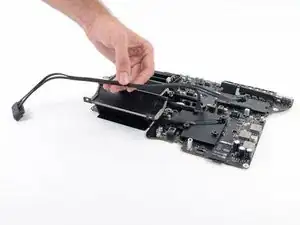
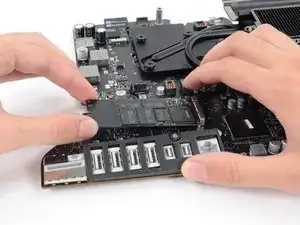
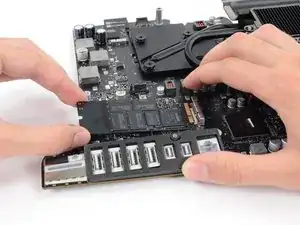
Confronta la tua parte di ricambio con quella originale: potrebbe essere necessario il trasferimento di alcuni componenti o la rimozione di protezioni adesive dalla nuova parte prima di installarla.
Per riassemblare il tuo dispositivo, segui queste istruzioni in ordine inverso.
Porta i tuoi rifiuti elettronici a un riciclatore certificato R2 o e-Stewards.
La riparazione non è andata come previsto? Rivolgiti alla nostra comunità Risposte per trovare aiuto.

12 commenti
About as complex as a Mac gets in the modern era :-)
I struggled with re-engaging the ZIF socket for the microphone. Patience won out.
Re-seating the rear ports took a little effort; tolerances for USB-C is less than the motherboard screws. I wound up loosening all the MB screws, fully populated the rear USB/Ethernet/etc, then tightened them.
Having the correct tools definitely helped. The pizza cutter and Service Wedge makes quite the difference. Well stocked with iFixit tools here, but purchase of the adhesive package definitely helped the build.
Great teardown, thanks.
And, wow, Terminal command I haven’t used before - “diskutil resetFusion”.
Made setting up a Fusion drive a snack!
Hat problemlos funktioniert, neue WD 2 TB -SSD eingebaut.
Adapter von Amazon: NGFF M.2 NVMe SSD Convert Adapter Card für Upgrade MacBook Air 2013 2014 2015 2016 2017 und Mac Pro Retina 2013 2014 2015 (Schwarz) von Anyoyo
MMOBIEL Klebe Sticker Strip Set für LCD Display kompatibel mit iMac 27" A1419 iMac13,2 2012, iMac14,2 2013, iMac15,1 Retina 5K 2014 mid 2015, bei Amazon gefunden und damit das Ganze wieder verklebt.
jetzt läuft die Monterey-Installation durch…
Vorsicht mit den Kabeln, wie immer, ist Alles sehr fummelig.
Mit Vorsicht hat die Bastelei etwa 3 Stunden gedauert…
Reparatur-Set für iMac 5,6 cm (21,5 Zoll) / 68,6 cm (27 Zoll), rutschfester Griff + 4 Ersatzrollen aus Karbonfaser ebenfalls von Amazon zum Öffnen.
das Teil hier zum Öffnen.