Introduzione

Questa guida di riparazione è stata redatta dallo staff di iFixit ma non è stata approvata da Google. Leggi di più sulle nostre guide qui.

Usa questa guida per sostituire lo schermo rotto o crepato del tuo Google Pixel 6.

Il tuo nuovo schermo arriverà con il sensore di impronte già montato. Altrimenti, dovrai reinstallare il lettore di impronte digitali originale sul tuo nuovo schermo. Se stai sostituendo il lettore di impronte digitali, dovrai ricalibrarlo per mantenerne la funzionalità.

Se stai utilizzando uno schermo e un sensore di impronte digitali aftermarket, potresti riscontrare problemi con lo strumento di ricalibrazione delle impronte digitali.

Se il telaio è deformato, è importante sostituirlo per assicurarsi che il nuovo schermo si monti correttamente e non subisca danni da pressione irregolare.

Se la batteria è gonfia, prendi le dovute precauzioni. Prima di smontare il dispositivo, scarica la batteria al di sotto del 25%. Ciò riduce il rischio di un pericoloso evento termico se la batteria viene danneggiata accidentalmente durante la riparazione.

Attenzione: Il Pixel 6 contiene laser di classe 1. Il disassemblaggio potrebbe esporti a laser infrarossi invisibili.

Nota: Questa guida mostra come sostituire solo lo schermo, compreso il suo telaio di sicurezza in plastica. Tuttavia, alcuni schermi sostitutivi per questo telefono vengono forniti senza il telaio preinstallato (noto anche come chassis), che richiede una procedura di rimozione diversa. Assicurati di avere la parte corretta prima di iniziare questa guida.

Mantenere l'impermeabilità del dispositivo dipende da come verrà applicato il nuovo adesivo. In ogni caso il telefono perderà la sua valutazione di impermeabilità nella scala IP (Ingress Protection).

Se non sostituisci le guarnizioni adesive durante il rimontaggio, il dispositivo funzionerà normalmente, ma molto probabilmente perderà la protezione dall'acqua.

Prima di iniziare questa procedura, assicurati di avere un set di adesivi sostitutivi per lo schermo.

  1. NFSVg5QTLwkvZtNV
    NFSVg5QTLwkvZtNV
    5QQ1fPapkTjIBtnZ
    • Prima di cominciare la riparazione, aspetta che la batteria scenda sotto il 25%. Una batteria completamente carica potrebbe prendere fuoco se danneggiata.

    • Spegni completamente il telefono e stacca ogni cavo collegato.

    If I cannot use my screen, how do I power it off?

    Craig Joseph Van Vliet -

    I was thinking the same. Could let the battery run down.

    Jack Adrian Zappa -

    You can turn the Smartphone off via the boot menue. Push the on/off-button plus the volume up button at the same time. Once the smartphones goes off to restart, hold the volume down button. The smartphone will boot and you can select between recovery mode and other options. You will find the option turn off, which you can select then with the buttons on the side.

    Jonas R. -

  2. JUojptYOCPfWpKwR
    JUojptYOCPfWpKwR
    6EOGcWdcUhaMsXSM
    fNoWRlymkgMqNfDU
    • I prossimi tre passi fanno vedere come usare l'Anti-Clamp, uno strumento con lo scopo di rendere l'apertura del telefono più facile. Se non stai usando un Anti-Clamp, salta i prossimi 3 passi

    • Per istruzioni complete su come usare l'Anti-Clamp, consulta questa guida.

    • Se il tuo schermo è crepato, coprilo con delle strisce di nastro adesivo trasparente per aiutare le ventose ad aderire con il telefono.

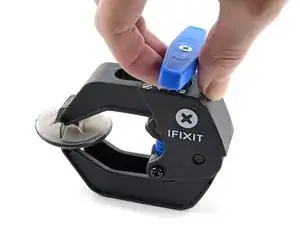
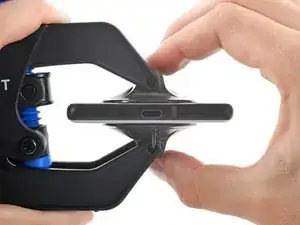
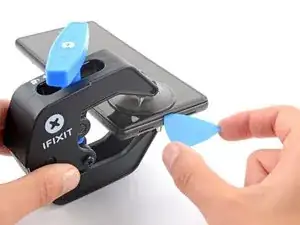
    • Spingi la maniglia blu indietro per sbloccare i bracci dell'Anti-Clamp.

    • Fai scorrere i bracci oltre il lato sinistro o destro del telefono.

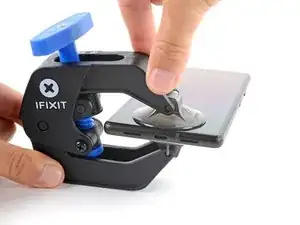
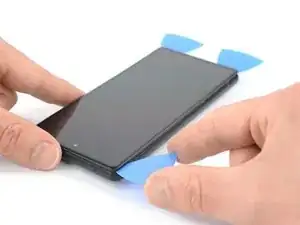
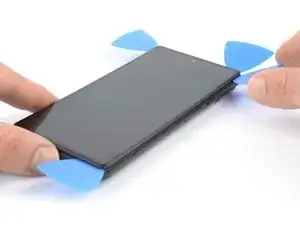
    • Posiziona le ventose vicino al bordo inferiore del telefono. Le ventose vanno una sullo schermo e una retro del telefono.

    • Premi insieme le ventose per farle aderire al telefono.

    • Se noti che la superficie del telefono è troppo scivolosa per far aderire le ventose dell'Anti-Clamp, usa del nastro adesivo per creare una superficie più aderente.

  3. DiLZKhBnBZ2hoHfl
    DiLZKhBnBZ2hoHfl
    cGyPvLXV4aavHKYT
    KigjYLVnPKEuBAtL
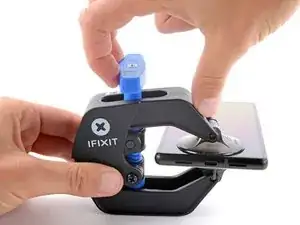
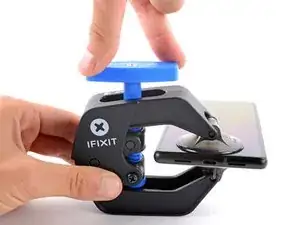
    • Spingi la maniglia blu in avanti per bloccare i bracci.

    • Ruota la maniglia blu in senso orario di 360 gradi o fino a quando le ventose cominciano ad allungarsi.

    • Assicurati che le ventose rimangano allineate. In caso non fossero allineate, svita la maniglia e sposta le ventose fino a quando non tornano allineate.

  4. FbfxUJQfgPIhMlDK
    FbfxUJQfgPIhMlDK
    onVEDYZV3YFNcbJT
    TrHcTZ1qJn4Lhy5O
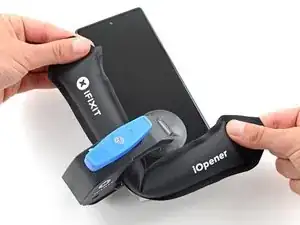
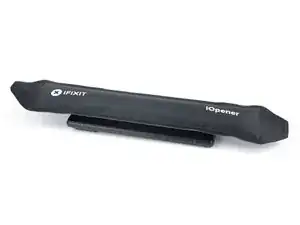
    • Riscalda un iOpener e fallo passare attraverso i bracci dell'Anti-Clamp.

    • Puoi anche usare un asciugacapelli oppure una pistola termica, ma il calore estremo può danneggiare il display e/o la batteria interna, quindi procedi con cautela.

    • Piega l'iOpener in modo tale che poggi sul bordo inferiore del telefono.

    • Aspetta un minuto per dare il tempo all'adesivo di scollarsi e presentare uno spazio di apertura.

    • Inserisci un opening pick sotto la cornice dello schermo quando l'Anti-Clamp forma uno spazio abbastanza ampio.

    • Se l'Anti-Clamp non crea uno spazio sufficiente, scalda maggiormente l'area e ruota e la maniglia di mezzo giro in senso orario.

    • Non girare più di mezzo giro alla volta e attendi un minuto tra i giri. Lascia che l'Anti-Clamp e il tempo facciano il lavoro per te.

    • Salta i prossimi due passaggi.

  5. NQKD1XK5SEyZ2pcK
    • Applica un iOpener riscaldato allo schermo per allentare l'adesivo sottostante. Applica l'iOpener per almeno tre minuti.

    • È possibile utilizzare anche un asciugacapelli, una pistola termica o una piastra riscaldante, ma fai attenzione a non surriscaldare il dispositivo.

    what area of the phone do i apply it to?

    middle, edges, diagonal?

    johnathandoe -

    Only on the edges.

    bogdan dobrin -

  6. cYyiIKFogElwfati
    cYyiIKFogElwfati
    UW31YPIdylgY3D2H
    TfSLnFsLfwnF1A2V
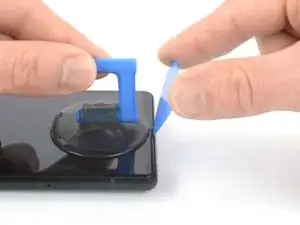
    • Quando lo schermo è caldo al tatto, applica una ventosa sul bordo inferiore dello schermo.

    • Se lo schermo è gravemente rotto, coprirlo con uno strato di nastro adesivo trasparente potrebbe far aderire la ventosa. In alternativa, nastro adesivo molto forte può essere utilizzato al posto della ventosa. Se tutto il resto fallisce, puoi incollare la ventosa allo schermo.

    • Solleva lo schermo, compreso il suo telaio di sicurezza, con la ventosa per creare un piccolo spazio tra lo schermo e il gruppo del telefono.

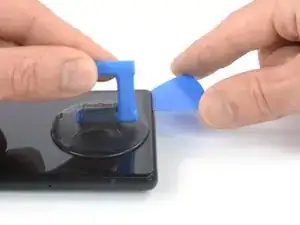
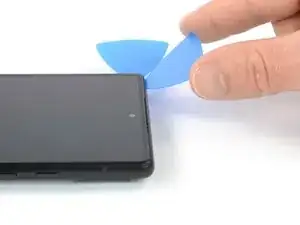
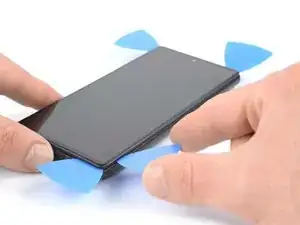
    • Inserisci un plettro di apertura nello spazio tra la cornice dello schermo e il gruppo del telefono.

    • Assicurati di inserire il tuo plettro di apertura nella posizione giusta per evitare di separare lo schermo dalla sua cornice di sicurezza invece che dal gruppo del telefono.

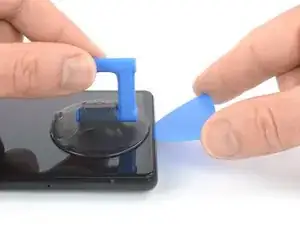
    • Fai scorrere il plettro di apertura nell'angolo in basso a destra dello schermo per tagliare l'adesivo.

    • Lascia il plettro di apertura in posizione per evitare che l'adesivo si richiuda.

  7. VgYxHhOv2ANdZhBj
    VgYxHhOv2ANdZhBj
    T6sO3hSXwWPrGMLR
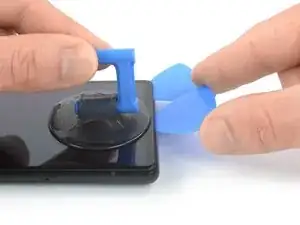
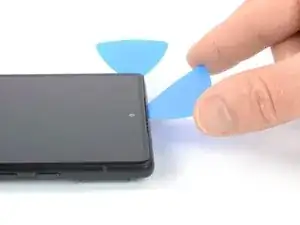
    • Inserisci un secondo plettro di apertura sul bordo inferiore e fallo scorrere verso l'angolo inferiore sinistro dello schermo per tagliare l'adesivo.

    • Lascia il plettro di apertura in posizione per evitare che l'adesivo si richiuda.

  8. cJwEmdUkAHVMxuGa
    cJwEmdUkAHVMxuGa
    lZvbIkb6yRvLCHNY
    bILZg3nTYhAgEAYD
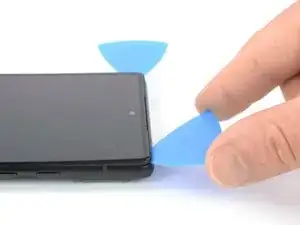
    • Lo schermo del Google Pixel 6 non è solo tenuto in posizione dall'adesivo, ma anche piccole clip di plastica. Se il plettro di apertura viene bloccato durante la procedura di rimozione dello schermo, significa che hai inserito il plettro troppo in profondità sotto lo schermo. Inserisci solo la punta del plettro di apertura (3-4 mm) quando tagli l'adesivo del display.

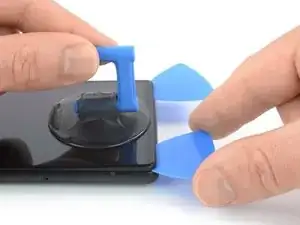
    • Inserisci un terzo plettro di apertura sotto l'angolo inferiore sinistro dello schermo.

    • Fai scorrere il plettro di apertura lungo il bordo sinistro dello schermo per tagliare l'adesivo.

    • Lascia il plettro di apertura nell'angolo in alto a sinistra per evitare che l'adesivo si richiuda.

  9. 1My5XLwo1mBpLmTW
    1My5XLwo1mBpLmTW
    WqGUe6d5wnaAVGDy
    DoXGAU6d5H44FI4b
    • Se l'adesivo diventa difficile da tagliare, molto probabilmente si è raffreddato. Usa il tuo iOpener o pistola termica per 1-2 minuti per riscaldarlo.

    • Quando tagli vicino alla fotocamera frontale, inserisci solo la punta del plettro di apertura (2-3 mm) per evitare di danneggiare o macchiare la fotocamera.

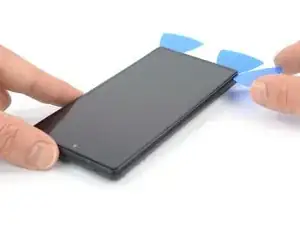
    • Inserisci un quarto plettro di apertura nell'angolo in alto a sinistra dello schermo.

    • Fai scorrere il plettro di apertura lungo il bordo superiore del telefono per tagliare l'adesivo.

    • Lascia il plettro di apertura nell'angolo in alto a destra per evitare che l'adesivo si richiuda.

  10. oc26Ut2TqOXsSApn
    oc26Ut2TqOXsSApn
    GRRyAxb5PErHCLEj
    • Inserisci un quinto plettro di apertura e fallo scorrere lungo il bordo destro del telefono per tagliare l'adesivo rimanente.

    • Non provare ancora a rimuovere completamente il display, lo schermo è ancora collegato al gruppo del telefono.

  11. RuEUIInW6MLASrru
    RuEUIInW6MLASrru
    banNiywUPAjPnNOY
    r1hEEeZcCNUrSiW3
    • Evita di sforzare il cavo del display durante la procedura seguente.

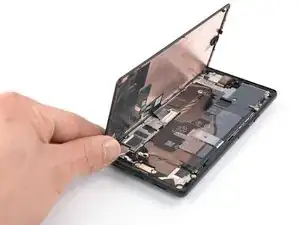
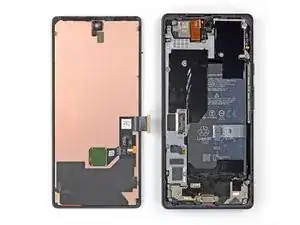
    • Apri con cautela il lato destro dello schermo sul lato sinistro del gruppo del telefono come se aprissi un libro.

  12. hvjCSMnSLpvKtTLC
    hvjCSMnSLpvKtTLC
    RHNWK5RKHyUOC4Sy
    uD4WvXdPvX2tNSw3
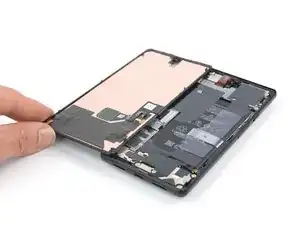
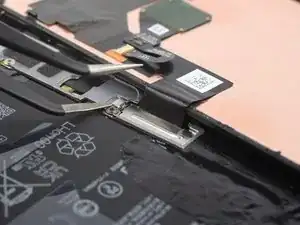
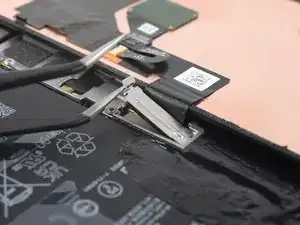
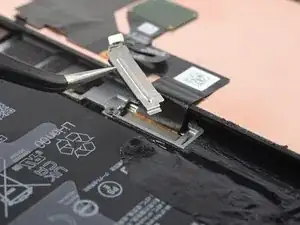
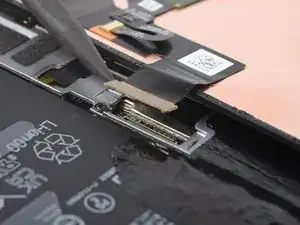
    • Usa un paio di pinzette per sganciare e rimuovere con cautela la staffa metallica che si trova sopra il connettore del cavo dello schermo.

    • Assicurati di tenere questo componente per reinstallarlo durante il rimontaggio.

    Don't be afraid to bend that clip. I had to bend mine to around 90 degrees.

    Jack Adrian Zappa -

    Thank you very much for the information

    Carlos López (España - Spain) -

    Don't forget to put the bracket back on during reassembly!

    I only realised I had forgotten to reattach it when I was putting the tools away and saw the bracket on the desk... both halves are already glued together so far too late for me. Let's hope it doesn't come loose or I'll be meticulously scraping off all that glue again lol

    Sam Hobbs -

    The absolute same thing happened to me...! I just saw it laying around on the table after cleaning up... Did you experience any issues so far? Not keen on opening it up again eager haha.

    Milkiman -

    My bracket was a little bit stuck. I bent the tab on the left side to 90 degrees, as Jack mentioned. Then I folded the bracket with my finger to the right side and then upwards. When reinstalling, you can bend the bent tab back to its original position.

    Alessio -

  13. Vl25352xbMJOyJf2
    Vl25352xbMJOyJf2
    JlXiF4IOKQTRHBit
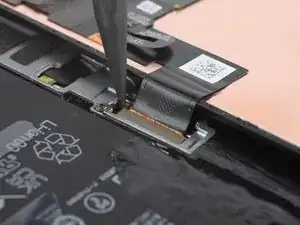
    • Usa uno spudger per scollegare il cavo flessibile del display sollevando il connettore dalla sua presa.

  14. DLLMweSo6ZRPrLYE
    • Rimuovi lo schermo.

    • Durante il rimontaggio:

    • Se hai sostituito lo schermo, controlla il foro della fotocamera frontale sullo schermo e rimuovi eventuali pellicole protettive residue.

    • Ricorda di reinstallare la staffa del cavo del display.

    • Questo è un buon momento per testare il tuo telefono prima di richiuderlo. Collega temporaneamente lo schermo, accendi il telefono e assicurati che funzioni come previsto. Prima di proseguire con il rimontaggio, spegni il telefono e scollega lo schermo.

    • Segui questa guida se stai usando delle strisce adesive tagliate su misura per il tuo dispositivo.

    • Segui questa guida se stai usando un foglio adesivo pretagliato.

    • Se stai installando uno schermo nuovo, segui questa guida per calibrare il sensore di impronte digitali.

    Has the issue with the fingerprint not working after screen replacement been sorted?

    [deleted] -

    I bought the repair kit that included the adhesive & fingerprint module. If that's what you bought as well, you will have to use the google repair tool. https://pixelrepair.withgoogle.com/udfps. I had to manually download the google usb drivers & install them on Windows 11 because the phone wasn't being detected by the pixel repair tool.

    Kwame Bailey -

    Hello, fingerprint does'nt work now.... any tips ? thank !

    willy kedziora -

    I had the screen on my 6A replaced at a U-BreakiFix got home fingerprint reader does not work. It says enrollment not complete. Go to your repair facility. I guess they must have some magic that makes it work again due to security issues

    Lynne Ayers -

    Great directions, would be helpful to have a section on Google Pixel 6 Display Adhesive - Genuine

    Troy O'Connor -

    This guide is clear and easy to follow. The other one where you actually replace the screen and put the new adhesive is much less easy to follow, and takes much more time to complete because you have to remove all traces of the old adhesive. I used GooGone and a 2mm flat head screwdriver as a scraping tool and it worked well.

    The fingerprint reader was not working after the upgrade, but I got it to work by visiting https://pixelrepair.withgoogle.com/udfps and since I'm using Ubuntu, I had to run those two commands:

    sudo usermod -aG plugdev $LOGNAME

    sudo apt-get install android-sdk-platform-tools-common

    And then reboot my computer before my phone could be connected. I rebooted my phone manually after the upgrade and all was working normally. In fact, the new fingerprint sensor works better than the one I got before. The new one is actually usable.

    My Pixel 6 is like new! (except perhaps for the water resistance)

    Francois Lord -

    Great tips! I wish I had thought of Goo Gone. By far the longest part of the procedure was cleaning out the old adhesive, and using alcohol swabs (including a few spares on hand) was slow and not very effective.

    After Chrome on ubuntu was unhappy with recognizing my phone I had to resort to using a Mac, but I would prefer your solution.

    Gary Smith -

    Alternate solution, without installing anything:

    Determine the USB bus and device ID of your phone.

    lsusb

    Assuming, the bus ID is '004', and the device ID is '001', temporary allow access to this USB device for all users.

    chmod 0777 /dev/bus/usb/004/001

    Thomas -

    Easy enough and excellent guide! Thank you!

    Jason -

    The guide was very helpful, but could be improved somewhat. I made the mistake of removing the screen without the bracket & didn't realize until I had attached the adhesive & tried to put the new screen on. So I had to remove the adhesive & the bracket before the new screen would fit, since it has it's own bracket. Another tip would be to include the instructions for getting the fingerprint module to work. Including https://pixelrepair.withgoogle.com/udfps & downloading & installing the google usb driver.

    Kwame Bailey -

    I agree that the guide was good. To be more clear, after the screen is completly installed you have go here https://pixelrepair.withgoogle.com/udfps to fix your fingerprint sensor, but my phone was not recognized by the utility when you plug it in Fast Boot Mode. This requires the usb drivers to be installed on the computer. Go here to download the usb https://developer.android.com/studio/run... Once you have the drivers you will have to go to device manager and you will see your Pixel 6 with a exclamation point on it. Right click on the Pixel 6 and select update drivers. Now browse to the folder that you extracted your drivers to that you just downloaded. This will fix the pixel 6 to be recognized by the utility. Now run the utiltity, and just make sure you reboot your phone when the utiltiy is done and it should be fixed.

    Wedge Fike -

    Just finished a screen replacement on my pixel 6. Everything was pretty straight forward and the instructions and guide was really clear. Scraping all the old tape/glue and making sure I get every last piece out of the phone was the most time consuming part, but totally doable in the end. Using something like goo gone or lighter fluid helps greatly in dissolving the tape residue and the include plastic scraper tool helped scraping every single last piece of goop off the phone.

    Had a little scare with the fingerprint scanner not working even after following the guide and calibrating the fingerprint scanner through google's website. I did it on a win11 computer at first, but thought I would use another computer with win10 to see if that made any difference. Fortunately that worked and my phone is back to 100% working again.

    Lawrence Chan -

    Thank you very much, worked as expected! Had also to recalibrate fingerprint censor AND then reboot the phone manually.

    For Ubuntu, you have to add some udev rules or use some other trick to make Chrome/Chromium access your USB devices.

    Alexis Le -

    Never explains how to snap the bracket of the new phone screen onto the device. Incomplete.

    Orlowski Sal -

Conclusione

Se possibile, accendi il dispositivo e verifica la riparazione prima di installare nuovo adesivo e risigillare.

Per rimontare il dispositivo, segui queste istruzioni in ordine inverso.

Per eseguire un test diagnostico con lo strumento diagnostico integrato di Pixel, clicca qui.

Porta i tuoi rifiuti elettronici in un Riciclatore certificato R2 o e-Stewards.

La riparazione non è andata secondo i piani? Prova delle soluzioni ai problemi di base, o chiedi alla nostra comunità Risposte per trovare aiuto.

Dominik Schnabelrauch

Membro da: 23/11/16

200708 Reputazione

63 commenti

Ordered the official Google Pixel 6 display part from iFixit and followed this guide, which worked well. However, it's probably worth adding that you may need to manually calibrate the display once it's installed if the phone is throwing up fingerprint reader errors (which is what happened to me). You can do that via this tool from Google: https://pixelrepair.withgoogle.com/udfps

Mark Walton -

The guide worked great, thanks! :D

Warning to others though: Careful what you buy! The genuine display was out of stock so I bought from a different source which didn't come with a fingerprint reader or display adhesive. My fault for not paying attention when buying, but fair warning to everyone else to double check. I hadn't even considered the reader being glued to the screen but not included on replacement parts. The adhesive is an easy purchase, but not sure how hard the fingerprint reader will be. I might be back to unlocking with a pin like some kind of caveman!

Jonathan Michaud -

Nvm, found the guide for the fingerprint reader replacement. Hopefully I can just move this one over.

Jonathan Michaud -

Bought the screen with repair kit from iFixit. Be aware, the custom cut adhesive guide they recommend for reattaching the screen is WRONG. It says you hold the tabs to align and place the adhesive strip. That's NOT the case with the one included here. The side with the tabs actually has to be pulled off first. Had to order another one from iFixit. Now without my phone a couple days while waiting for the new part to arrive. Now without my phone for a few days waiting for the new adhesive to arrive. Not great.
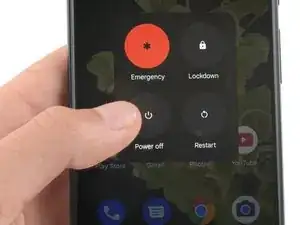
Ravi Chopra -

For those who are not able to get the Pixel 6 detected in the "Fast Boot Mode" on the website https://pixelrepair.withgoogle.com/udfps you need to install the Driver. First and foremost on Device Manager you should see Pixel 6 or other device, and then update driver, install the driver from the downloaded w/ instructions from https://developer.android.com/studio/run.... Update Driver and point the driver to this location where you just downloaded the driver. (unzipped version). Once you are done the device gets recognized immmeidately on the Chrome Repair Website.

And one more important steps, make sure this is in Fast Mode (not safe/recovery/rescue). Second after you see successful installation on Chrome, you need to restart the Pixel 6, the automatic first restart does not work, you need to restart manually. And then go to finger print and setup again. This is very important!!

Venu Reddy -

Thanks, useful info Venu.

Bill Tolbert -

Thank you. Your solution worked perfectly. I'm glad I saw it before I started the repair otherwise I would have been stressed out.

Justin Farischon -

Couldn't find the unique calibration software for this deviceCouldn't find the unique calibration software for this device
i get thhis messege
did you know how to fix it ?

giorgos pelekanos -

I installed the driver using the following method and had success:

1. Download driver from link in Venu's post

2. Unzip download folder

3. Double-click android_winusb.inf inside the folder and install

4. Go to the udfps site and perform update

5. I had to perform two restarts and then my fingerprint sensor started working again!

Austin -

Soooooo good! Got a dude screen on Monday. Thought I screwed up and was sweating. Tested the broken screen and realised it still worked. Support came back to me in 24 hours and put me on the list for the next part available. Got it today (Thursday) and now I have a working phone again. Very easy and fun fix. Used the heat pack and a hairdryer, Take your time opening it and do as best you can on cleaning out the glue on the edge. Also, recommend using some books or other gentle clamps to close after. Finally, like Mark, I needed to use https://pixelrepair.withgoogle.com/udfps and it worked after I restarted manually.

#RightToRepair #FTW so happy. Saved 45% of the cost to repair in a shop and got a little more comfortable with my phone and own skills.

Denis Hoctor -

So I have two pixel 6 phones with physical damage to one causing the display to have a "black ink spot" eventually overtake the screen, and the other with water damage that initially seemed inconsequential, but within an hour rendered the screen unusable(due to not being able to see what's displayed. Dropped it in a toilet 😑 fully submerged for all of one second).

Both phones work perfectly well otherwise. Will this replacement work(fix the phone), or is this something one cannot determine with certainty? If not, will it likely do so (or more commonly/most often the case)

Theodore Leahy -

Success! I was dubious on the iOpener and after reading the comments, decided to use a heat gun and an instant read thermometer. Slowly got around 150 degrees F and using the suction cup it started opening up. The other tools worked great. I ordered the OEM replacement screen and it included the display adhesive. That wasn't clear to me so I ordered one separately and now I have an extra.


I assumed you would not need to re-calibrate the fingerprint reader since the OEM screen included the reader. But, I did. Note that you don't have to reset the phone to factory settings. Something I read made me think you did. As posted by Venu Reddy above, follow the instructions at https://pixelrepair.withgoogle.com/udfps.

Bill Tolbert -

Fantastic guide. Replaced a Pixel 6 screen that was totally smashed from a face-flat fall outside. Seems to have worked like a charm, and has saved a huge amount of money (and e-waste)! I had to recalibrate the fingerprint reader after installing the new screen (via the tool at https://pixelrepair.withgoogle.com/udfps), and after doing that everything is working as expected. Overall, very satisfied. Thanks to Dominik Schnabelrauch and iFixit!

William Barber -

So fo those struggling to get the pixelrepair tool to recognise there phone. on windows 10/11

Step 1. Try connect using instructions here > https://pixelrepair.withgoogle.com/udfps If it works, Yay! if it doesnt proceed to step 2.

Step 2 > Download the Google USB Driver Zip (https://developer.android.com/studio/run... extract the file to a known location

Step 3 > Go into Fastboot mode and connect your phone

Step 4 > Open Control Panel > Device Manager > Other Devices , Locate the device with the error message , Right click and Update that driver

Step 5 > Browse my computer for Drivers

Step 6 > Browse the location you extracted the Google USB Driver to and Next Next Next

Step 7 > Browse to https://pixelrepair.withgoogle.com/udfps and try again

It should work, the issue is Fast boot appears to use a different driver then the primary OS (which makes sense) the only issue is you cant install the driver until you are in fastboot mode and that isn't mentioned anywhere!

Hope this helps someone :-)

Jim Catelli -

Thank you so so much for taking the time to write out the steps! After an hour of frustration, I found your comment and it worked!!! Appreciate it !!!

Aneta Otylia Siwiec -

The hardest part of this repair is getting the old adhesive out of the track along the edge before putting the new one in. I sprayed some WD-40 into a cup and used the tip of the spudger to apply some to loosen it. I don't know if it helped. Wish I had read the previous comment about using a 2mm jeweler's screwdriver (yes, metal!). That and some Goo Gone or WD-40 should work. I couldn't figure out the coffee filter technique. I used about 15 alcohol prep pads (they include one in the kit). I found a fast scrubbing action with my fingernail jamming the alcohol pad into the track to be effective as a final cleaning. Good luck! Overall, this screen replacement isn't that hard.

Kurt Roskopf -

I purchased this exact screen from iFix-it and the instructions and install were excellent. One major flaw is that fingerprint reader does not even work, almost like it is not even recognized as being present. When the software calls for fingerprint it immediately goes gos to request 4 digit screen lock pin. Very frustrating.

David Blevins -

Pretty straightforwad and P6 is way easier to open than my old P3. One thing to note, when lifting the old broken screen, the small rectangular rubber surround thing which borders the light sensor under the camera stuck to the screen. I didn't pay close attention to this until I was about to install the new one and noticed this part should've stayed with the phone / bottom portion. As others said, cleaning the old adhesive was the hardest bit and I second what Kurt said, 2mm screwdriver + lots of isopropyl alcohol. The bottom frame doesn't seem too scratch easily, seems to be made out of plastic instead of aluminium. Finally thanks to Jim for the UDFPS walkthrough, my Win11 failed to recognise the P6 initially until I followed your instructions :)

L Santoso -

Not good. No good explanation for the blue screens of plastic and how to reassemble. This is half of a guide.

Daniel McKinlay -

Why does this "genuine" screen replacement look so thick to me? It looks like an LCD that belongs on a phone made 10 years ago.

owens87 -

Could you share what 10-year-old phone you refer to?

Davit Zen -

Just finished using this guide alongside the replacement screen and tool kit from iFixit. When I first decided to fix my screen myself, I was worried that I might have struggled along the way, but I can happily say my repair went without issue. Instead of using the included heat pad I used a hair dryer and carefully heated the edges of the phone, I then proceeded to use the suction cup and guitar pick to begin slicing through the adhesive. This part was surprisingly easy and did not take much effort. The hardest part of this repair was adequately cleaning up the old adhesive that comes with the phone, which was more tedious than hard. The new screen fits in perfectly after applying the new adhesive. Just a tip for others looking to take this on, the in-screen fingerprint sensor needs to be calibrated, you can find the tool online by searching for pixel 6 fingerprint calibrator. Overall a very good experience.

Cameron French -

I can see my display but the screen is unresponsive to touch

Daniel Robinson -

If the screen is unresponsive to touch, then the screen cable is not plugged correctly. I had same problem, removed the screen again, insert the plug correctly and firmly, and it worked.

To prevent snapping the cable, I used adhesive tape on the outside of the screen to act like a hinge, so the screen would not be supportet only by the thin cable. Hope this helps, good luck!

David

David T. -

Hilfe, mein Bildschirm ist nach der Displayinstallation schwar geblieben. Es kommt aber zu einem klacken, wenn ich die Tasten drücke, d.h. das Telefon hat gebootet. Was kann ich tun?

Stebbke -

Hallo Stebbke, es könnte sein, dass das Display-Kabel nicht fest sitzt oder der Connector verschmutzt ist. Ich würde dir empfehlen, die empfohlenen Schritte zur Problembehebung durchzugehen.

Manuel Haeussermann -

Just want to give my hats off to the IFIXIT team. My wife dropped her phone the day before her phone case showed up. Since she had a history of not dropping her phones....we didn't purchase the add-on warranty. Welp such is life. The last time I had to replace a screen was my HTC DNA way back in the day, and needless to say I really didn't go in prepared with all the truly necessary tools for the job. So in some way's I still somewhat dreaded replacing the screen from past experience. Thankfully the tool kit was mighty impressive and honest to God worth every extra dollar(unless you already have comparable or better tools), and made the screen removal a total breeze, well other then that pesky adhesive remnants. The how-to tutorial was well written and very helpful. The adhesive template was brilliant and well thought out, and worked perfect. The phone is perfect again. Happy Wife Happy Life. Thank you IFIXIT Team!

Joey Rakas -

I learned some things during the process that I wished I knew before I started

1. There are two metal springy things at the bottom corners. You can seen them in figure 12. If your pick slips too far in they can become damaged and they might catch on a sleeve during the adhesive cleaning.

2. The screen connector is hard to reconnect and clip in place. Took me a good 30 minutes of fiddling, applying a suction cup to the back at the start would have made the screen easier to hold.

3. Fingerprint recalibration requires connection to you computer and if you use windows the driver must be installed before hand. Matt M. had a good explanation on how to install the driver. Fingerprint scanner not working after replacing screen. Pixel 6 Pro

Daniel Lutz -

This guide was perfect. Worked as a sharm.

The only note I have is that the guide is not showing you how to reassmble the screen (I see now however, at the bottom of the guide, that one should just follow the guide in reverse order, which makes sense). One thing worth noting though is that there is a "protective" cover over the hole for the front camera, so make sure to remove that before gluing the screen back on the phone (then you wont need to remove the scree a second time and damage the adhesive 😊).

Also, make sure to follow the other posts regarding the fingerprint-reader (install from https://pixelrepair.withgoogle.com/udfps and restart).

Overall, very thorough guide and I couldn't be more pleased with my result.

⭐⭐⭐⭐⭐

Patrik Martinsson -

I installed my new screen, per the instructions above. When I power the phone on, I have no display. Any help would be appreciated. Did I receive a defective screen or do I have more damage beyond the screen? TIA

John C -

Did you find a solution? I'm having the same problem

issa dare -

how did you solved it? we have the same difficulty.

Tomas Danko -

I had same problem, removed the screen again, insert the plug correctly and firmly, and it worked.

To prevent snapping the cable, I used adhesive tape on the outside of the screen to act like a hinge, so the screen would not be supportet only by the thin cable. Hope this helps, good luck!

David

David T. -

Touch is unresponsive after replacement

Juan Carlos Iturri -

Good product. Installed and it works fine. BUT, we are missing some crucial steps. Where is the step to reassemble the screen once you have installed the adhesive? Where is the step to show you how to remove all the strips once the screen is connected? Where is the step to show you how to test the screen before removing the strips and clicking in the screen? I searched a long time for these steps and couldnt find them,. so either theyre missing or too hard to find, either way, this is an oversight. I became quite frustrated with it and could have used the help.

Caspar Redgrave -

Install was great and screen looks the same as new as i expected. I did run into the fingerprint scanner issue and have to reinstall the software as well. Followed instruction from this video https://www.youtube.com/watch?v=qiU6PAnj... and got USB Driver download from this article https://www.thecustomdroid.com/google-an... Hope it helps. Did not need to factory reset the device.

Daniel Mason -

A good guide with a few things left out

The instructions were very clear but it did take at least an hour to remove the adhesive and the guide also doesn't tell you how to put the screen back on but its not too hard to figure out and getting the finger print reader working again was easy after a google. overall the difficulty is moderate but doable and for me a lot cheaper to fix and buy the part from here so I'm pretty happy with the replacement kit

Archie A -

What an easy repair that was! I only needed to heat the phone up a little with a hairdryer to get the screen off using some guitar plectrums. Didn't bother with the gasket but used Zhanlida T-7000 glue to stick the screen back on (the perfect glue for the job as it does not go hard).

Thanks very much guys.

Simon Turner -

The adhesive comes along with the Display, but better to order extra one at 5 $, as you might damage the first one, as in my case.

The time consuming part - Removing the adhesive, IPA dipped in cotton earbuds helps.

The tricky part- Applying the adhesive properly. Tip- Rest/align the adhesive bottom edge with phone's frame bottom edge and then proceed upwards. It will be perfect.

Fingerprint scanner might not work initially but don't worry, You can fix it via this tool from Google: https://pixelrepair.withgoogle.com/udfps.

Siddharth Prakash -

After this repair, my front camera does not work anymore. Does anyone know a potential fix?

Anon Reviewer -

I had all of the problems above, followed the steps and had minor success. Then my phone simply didn't restart. After trying everything and leaving it for 30 minutes or so, I was able to restart it. So don't worry too much if doesn't restart straight away. Side note, I accidently turned my phone on half way through, but I continued with the procedure and everything was fine.

caljamez -

Après une longue hésitation j'ai décidé de franchir le cap et de changer l'écran moi même.

Dès la reception j'ai été agréablement surpris par la qualité du fix kit. Je le recommande vivement pour faciliter la démarche. Je n'ai pas acheté l'anti clamp. Pas besoin, surtout si l'écran est dejà cassé et qu'on à pas a faire attention à la manipulation liée au démontage.

En suivant le tuto tout s'est déroulé à merveille. Aucun soucis, faire attention aux petites pattes près de chaque angle du téléphone une fois démonté. On les accroche régulièrement pendant le nettoyage.

L'étape la plus délicate à étée de recalibrer l'emprinte. En sois la manip est simple mais sans traduction claire en français j'ai mis du temps à réussir. donc dans l'ordre :

Eteindre le telephone - L'allumer en "fast boot mode" (bouton de démarage + volume bas pendant 3s. Un écran noir avec quelque trucs apparaît) - à ce moment là UNIQUEMENT

Robin Delus -

- à ce moment là UNIQUEMENT, branchez le telephone et suivez la manipulation indiquée dans le lien entre parhenthèses pour installer le driver (https://developer.android.com/studio/run...).

- une fois le driver installé ouvrez ce lien vers le site google https://pixelrepair.withgoogle.com/udfps

Le téléphone sera reconnu dirrectement. Suivre a démarche qui dure 5 secondes et c'est ok.

Pour moi tout le processus de changement d'écran à été un succès. Je suis ravi de retrouver mon telephone ainsi que tout ce qui s'y trouve.

Robin Delus -

Hola, cambie la pantalla de mi pixel 6 y segui todos los pasos para la calibracion de huella, aun asi cuando intento agregar mi huella me dice que ha pasado el tiempo para agregar mi huella y no funciona, alguna solucion ?

Ivan Andres Lopez Hernandez -

The fingerprint tool should be mentioned in the guide, not everyone reads the comments. After finishing the screen install the fingerprint sensor didn't work, I didn't look at the comments here for a little while and when I did I used the first comment to fix it. This worked really easy, just make sure to reboot once after the phone boots up: https://pixelrepair.withgoogle.com/udfps

scristopher -

Happy with this purchase. I preordered the Pixel 6 when it was coming out with the phone case and protective screen all from Google... It didn't all come at the same time and my screen cracked at the bottom literally the same day I got it from a <4 inch slip from couch to carpet since when bare it's so... slippery. Google wouldn't do anything for me. Official repair shops are double the price of this, so I finally purchased and it was ridiculously easy. The hardest part was getting the adhesive loose and off. The instructions were good to follow, and I liked the options for the different links depending on things like if you got the pre-cut adhesive or not. The final reassembly I thought was self explanatory reading it but maybe adding in the picture steps of those last steps would benefit others that have commented about it (removing the plastic covers/reattaching). Otherwise, this was really easy. Really happy with it, it's like a brand new phone for me.

Cassandra Melnyk -

okay I completed to installation and I believe I followed all the steps correctly. However, as I pulled off the blue plastic of the custom cut adhesive for my device. I noticed a piece of the blue plastic with a black dot was over the camera lens. I did not read anything in the instruction about this. Now my phone is all back together and my forward lens is clear but my rear lens is cloudy. What did I do wrong? And I can't figure out that finger print calibration, I find my phone listed but it still will not connect.

I need some additional guidance.

Ron Tatham -

After repair by these instructions I have managed to recalibrate fingerpeint sensor and thought that everything is good, until I noticed that the proximity sensor doesn't work anymore. Help me please, I sis everything correctly

Vlad Gaevsky -

Was able to repair perfectly with the ordered screen+tools. Removing the glue was a pain, and with reassembly I would have appreciated a bit more guidance. But nonetheless can recommend 100% - Thanks!

Martin Weiß -

The replacement screen is too thick in comparison to the original. It doesn't fit inside the bevel of the frame. It works but looks terrible. I also had to remove the adhesive and check the connection after it didn't work the first go around. It still would have been sitting up too high in comparison to the original. I could have paid 200 at CPR for them to fix it for me, which is only 50 more than what I paid for a replacement screen that didn't fit. I get the right to repair and I'm all for it, but this did not work out for me at all. I'll be carrying around something that looks put together by a 5 year old for at least a couple years until the phone is paid off.

Troy Carter -

Has anybody experienced that the screen cracks by itself AFTER replacement same as with lots of the new Pixel 6 phones? Just got mine and am thinking about replacing the screen because it has this self-cracking issue - but only if the replacement doesn't have the same issue a few days later.

Theo Retiker -

Did the following as instructed;

Removal of old screen was a breeze, used a hairdryer to soften the glue. Screen came off with little effort. Remains of the glue was easily removed with some zippo fuel on an eartip.Tested the screen and it was good. Put everything together, left the phone under some weight for half a day to make the glue bind better. Had to calibrate the fingerprint sensor [Google; pixelrepair.withgoogle]. All in all an easy fix for a good price.

Thanks for the manual, tips and have a good day =]

Harry Huig -

Replacing the screen was very easy, the hardest part was to remove the display cable bracket and remove old adhesive. But IMO guide should have a few more details. For some reason, a tool for the fingerprint scanner recalibration didn't work the first try, so I did it twice. Also worth mentioning, that (in the time of writing this comment) it is not available on Android 14, so I was forced to downgrade to A13 to recalibrate and then update.

sdzkhelince -

Anexo la traduccion ya que considero es de interes:

Sustituir la pantalla fue muy facil, lo mas dificil fue quitar el soporte del cable de la pantalla y quitar el adhesivo viejo. Pero la guía de la OMI debería tener algunos detalles más. Por alguna razón, una herramienta para el escáner de huellas dactilares recalibración no funcionó el primer intento, así que lo hice dos veces. También vale la pena mencionar, que (en el momento de escribir este comentario) no está disponible en Android 14, así que me vi obligado a downgrade a A13 para recalibrar y luego actualizar.

Carlos López (España - Spain) -

As others shared, by following the instructions I did not have much troubles replacing the screen. Two small tips that I learned in the process:

- Removing the old adhesive from the phone was the most timely task. Initially I was making almost no progress and was close to give up leaving it more or less as it was and thus compromising with the quality of the sealing of the new display. Eventually I changed the strategy and was very happy with the results. I made good and relatively fast progress by using very small pieces of cotton, soaked in 95% isopropyl alcohol. Holding the small piece with the tweezers I went over the old adhesive numerous time and it eventually staid on the cotton.

- On a first glance the instructions looked like only giving the disassembly part and I started looking for alternatives until I realized there was also the additional page accessible from Step 14 - on the new adhesive application.

V I -

C’est pour la première dans cette plateforme et j’apprécie vraiment ce que vous faites je compte apporter mon soutien en étant dans ce domaine de réparation

Ahmad Diallo -

Hi Guys.

Is there any manual on how to replace the back glass? And by back glass, I mean the big glass under the camera bar.

I can't seem to find it here nor anywhere else.

Thanks!

Arnaud Degueldre -

Very easy to install! The longest part for me was removing the adhesive. Recalibrated the fingerprint sensor with Google and I'm good to go. I feel like a techie now- gonna advertise my replacement screen services. lol! Thanks guys!

Trisha Austin, PMP -

So I finally got the courage to do my first phone screen replacement. I have replaced screens on laptops and TV's but never anything that uses a form of adhesive.
3 parts were frustrating, separating the screen, cleaning the adhesive and the final time I plugged in the connector.
It was my first time separating a screen and it was fiddly.
What I found to be best for removing the adhesive was the closed tip of the fine tweezer and just slowly scraping it away and wiping the big glue boogers onto a tissue. You can run a little ball of adhesive over the other remnant bits of adhesive to pull more off.
Also I had a lot of gunk built up on the inside walls and running the spudger around helped clear that off.
The rest of the process was cruisy and I am currently leaving my phone to get squashed by a big book.
Aussies, 15c stacked or a $1 coin sits at the perfect height.
I feel really proud of myself right now. :)

Adele Smith -

Please add notes for putting devices back together. I finished doing this guide and putting together to figure out I was supposed to take the blue sticker off the back of the screen.

I did the one on the camera hole.. but missed the big one.. I'm guessing it's blocking the proximity sensor since after putting it all back together, that doesn't work.

This is the second guide I've done recently where I wish more steps were given on the putting back together.

Ordered another display adhesive since I'll need that now.

Charles Machalow -

Great guide to follow would recommend if colder climate maybe heat the ieopener for a 15 seconds longer and the clip is slightly diff on the ipxel 6a but other wise great guide thankyou!

Hi Fedz -

Zum Thema "Pixel Diagnostic Tool": Das Teil läuft laut meinem Pixelchen nur in Amerika! Voll doof ist dieser Tip! 3Thumbsdown !!

Noah Hansen -

Guide doesnt go through how to put the new screen on?

Evan Perry -