Introduzione

Questa guida è stata redatta dallo staff di iFixt e non è stata approvata da Google. Scopri di più sulle nostre guide di riparazione qui.

Segui questa guida per sostituire lo schermo del tuo Google Pixel 7 Pro.

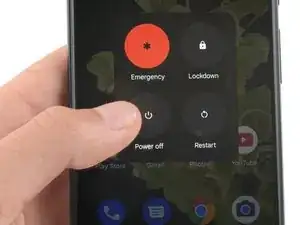
Per la tua incolumità, scarica la batteria meno del 25% prima di smontare il telefono. Questo riduce il rischio di incendio se la batteria viene danneggiata accidentalmente. Se la tua batteria è gonfia, prendi le dovute precauzioni.

Il tuo nuovo schermo dovrebbe il sensore di impronte già installato. In caso contrario, dovrai trasferire il sensore dallo schermo originale a quello nuovo e ricalibrarlo per mantenere le sue funzionalità.

Attenzione: Il Pixel 7 Pro contiene laser di classe 1.

Il disassemblaggio può comportare l'esposizione a emissioni laser di luce infrarossa invisibile.

La resistenza all'infiltrazione d'acqua dipenderà da quanto bene riapplicherai l'adesivo, ma in ogni caso il dispositivo perderà la certificazione IP (Resistenza all'Ingresso).

Avrai bisogno di adesivo sostitutivo per completare la guida.

  1. pcCOWHCOgiE1OqGw
    pcCOWHCOgiE1OqGw
    jJUWoaZ3KpXfhiPF
    • Lascia che la batteria si scarichi al di sotto del 25% prima di iniziare questa riparazione. Una batteria carica può incendiarsi se danneggiata.

    • Spegni completamente il telefono e scollega tutti i cavi.

  2. r4cF1OLmMUoCTLb3
    r4cF1OLmMUoCTLb3
    rWVVVxdKliEb2ajr
    GupbaQq5eGmqFscR
    • Lo schermo del Google Pixel 7 Pro è fissato in posizione tramite clip in plastica e adesivo. Nota quanto segue:

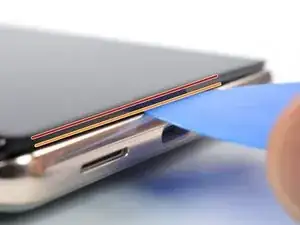
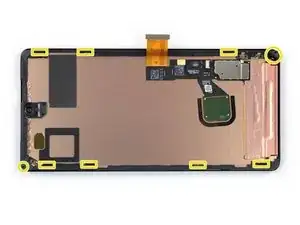
    • Linea dello schermo: Questa giuntura separa lo schermo dal resto del telefono. Non fare leva su questa linea.

    • Linea della cornice: Questa è la giunzione tra la cornice in plastica progettata per proteggere lo schermo e la struttura del telefono. È fissata in posizione tramite clip in plastica. È qui che dovresti fare leva.

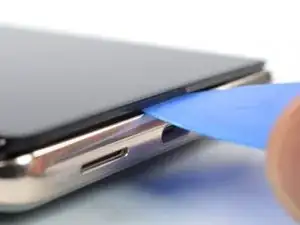
    • Durante la procedura di rimozione, assicurati di inserire i tuoi plettri di apertura nella posizione corretta per evitare di separare lo schermo dalla sua cornice di sicurezza.

    • Inserisci il plettro solo circa 3,5 mm durante la procedura di rimozione per evitare di danneggiare le parti interne e per evitare di interferire con le clip di plastica.

    • Ci sono diverse clip di plastica attorno all'intero schermo. Se il tuo plettro di apertura si blocca durante la procedura di rimozione dello schermo, hai inserito il tuo plettro troppo in profondità sotto lo schermo.

    About the paragraph:

    During the removal procedure, make sure to insert your opening picks in the right position to avoid separating the screen from its safety frame.


    It was not clear to me what the safety frame was until I opened the phone; I was careful but while opening the phone I slid a pick between the screen and the frame, and they became separated in one corner, I wonder if this resulted to my screen being damaged after the repair.

    An image that shows what the security frame is would be helpful.

    Eduardo CGZ -

    It is VERY difficult to get an angle into the frame and under the plastic bezel. Since this repair is for a screen, you don't have to worry about damaging it further because you will. I've done dozens of these repairs and have gotten ONE removed without further damage. Just an FYI. I also use 91% alcohol around the edges off the frame as well as heat (I have a hot plate set at 80*c that I lay it on after adding alcohol around the edges, place on hot plate for about 10 minutes, add more alcohol around the edges and then place on hot plate for another 5 minutes).

    Gregg Stanley -

    Thank you so much for the info about the degrees, amount of time, and when to apply alcohol! I really needed this info!!! Hallelujah!!

    Rachel Kelley -

  3. AYwHUCCnKa1PMPBk
    AYwHUCCnKa1PMPBk
    yNNd3VhQocdUMaOI
    SCh6OtwmLUCIn5j1
    • I prossimi tre passaggi illustrano l'Anti-Clamp, uno strumento da noi progettato per facilitare la procedura di apertura. Se non stai utilizzando l'Anti-Clamp, salta tre passaggi per un metodo alternativo.

    • Per istruzioni complete su come utilizzare l'Anti-Clamp, consulta questa guida.

    • Se lo schermo è rotto, coprilo con uno strato di nastro adesivo trasparente per aiutare la ventosa ad aderire.

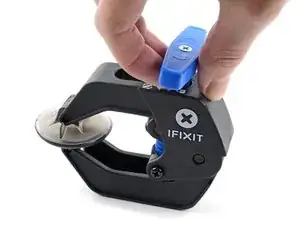
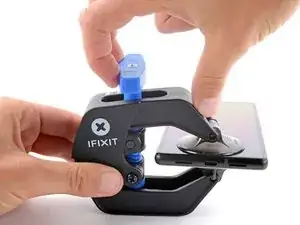
    • Tira indietro la maniglia blu per sbloccare i bracci dell'Anti-Clamp.

    • Fai scorrere le braccia oltre bordo sinistro o destro del telefono.

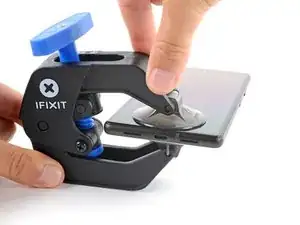
    • Posiziona le ventose vicino al bordo inferiore del telefono, una nella parte anteriore e una nella parte posteriore.

    • Stringi le ventose insieme per fargli fare presa.

    • Se ritieni che la superficie del tuo telefono sia troppo scivolosa perché l'Anti-Clamp possa trattenerla, puoi utilizzare del nastro adesivo per creare una superficie più aderente.

    The pixel 7 pro kit does not come with the clamp and may have to be purchased separately

    juji juman -

  4. s4bXrPEIrDSclUY1
    s4bXrPEIrDSclUY1
    xOmcoIQRPcMiuOrf
    trhAAYQPS13QxU3X
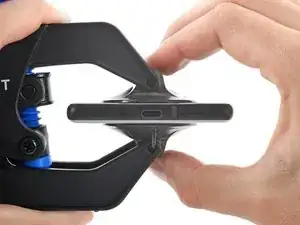
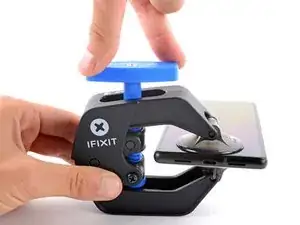
    • Tira in avanti la maniglia blu per bloccare i bracci.

    • Ruota la maniglia in senso orario di 360 gradi o fino a quando le coppe iniziano ad allungarsi.

    • Assicurati che le ventose rimangano allineate l'una con l'altra. Se iniziano a scivolare fuori allineamento, allentare leggermente le ventose e riallineare i bracci.

  5. qnrEDsCQlNx3INRF
    qnrEDsCQlNx3INRF
    YdcsV4CGCCD2YxkZ
    HuaYDv3YNjHEvN5X
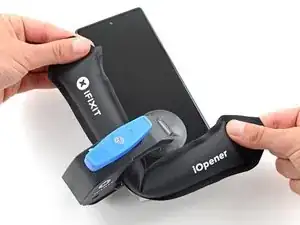
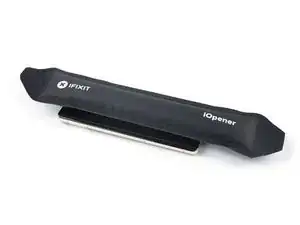
    • Scalda un iOpener e fallo passare attraverso i bracci dell'Anti-Clamp.

    • Puoi anche usare un asciugacapelli o una pistola termica, ma il calore estremo può danneggiare il display e/o la batteria interna, quindi procedi con cautela.

    • Piega l'iOpener in modo che poggi sul bordo inferiore del telefono.

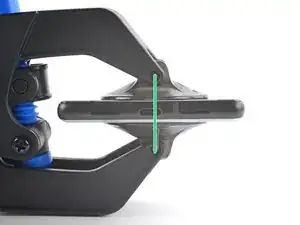
    • Attendi un minuto per dare all'adesivo la possibilità di staccarsi e presentare uno spazio di apertura.

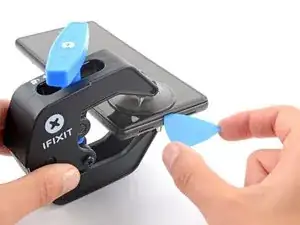
    • Inserisci un plettro di apertura sotto lo schermo quando l'Anti-Clamp crea uno spazio sufficientemente ampio.

    • Se l'Anti-Clamp non crea uno spazio sufficiente, applica più calore all'area e ruota la maniglia di mezzo giro in senso orario.

    • Non girare più di mezzo giro alla volta e attendi un minuto tra ogni giro. Lascia che l'Anti-Clamp e il tempo facciano il lavoro per te.

    • Salta i due passaggi successivi.

  6. kYIPqvhXCJ1NBLIi
    • Applica un iOpener scaldato sullo schermo per ammorbidire l'adesivo sottostante. Lascia l'iOpener appoggiato per almeno 3 minuti.

    • È possibile utilizzare anche un asciugacapelli, una pistola termica o una piastra riscaldante, ma fai attenzione a non surriscaldare il dispositivo. Il bordo dovrebbe essere leggermente troppo caldo al tatto.

  7. PeNGZEHQUUUXVT1r
    PeNGZEHQUUUXVT1r
    L4JtimoXTuDctFTG
    JIGomFFqcX2UFdaU
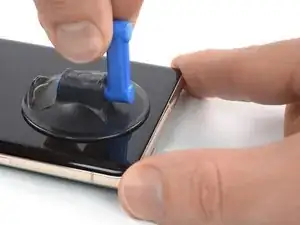
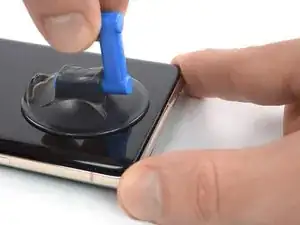
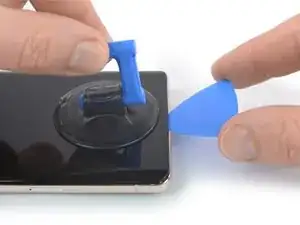
    • Una volta che lo schermo è caldo al tatto, applica una ventosa sul bordo inferiore dello schermo.

    • Se il display è gravemente incrinato, coprirlo con uno strato di nastro adesivo trasparente può consentire alla ventosa di aderire. In alternativa, al posto della ventosa è possibile utilizzare un nastro molto resistente. Se tutto il resto fallisce, puoi incollare la ventosa allo schermo rotto con la supercolla.

    • Solleva lo schermo, inclusa la cornice di sicurezza, con la ventosa per creare un piccolo spazio tra lo schermo e il gruppo del telefono.

    • A seconda dell'età del tuo telefono, questo potrebbe essere difficile. Se riscontri problemi, applica più calore sul bordo inferiore e riprova.

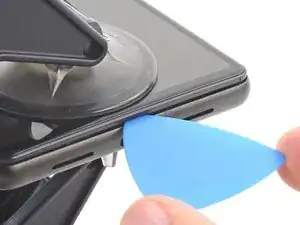
    • Inserisci un plettro di apertura nella fessura.

    The crack on my screen is along the bottom, on a diagonal. I cannot get the suction cup to lift off the edge. I've tried more heat using a hair dryer, using tape, but nothing seems to work! The phone is only a few months old, could that be the issue? I'm really frustrated after trying multiple times throughout the day today.

    AMB -

    I’m having the same issue unfortunately. I’ve superglued the suction cup and have it under weight. Going to wait 24 hours to see if it helps. Without a proper seal, there’s no way it’s going to lift. I made sure to leave about a half inch gap from the bottom of the phone to try and use the warming pad one more time

    Claudio Sandoval -

  8. WtsW1wWeNrRMUTmr
    WtsW1wWeNrRMUTmr
    IGkvmFQmLJALAeSW
    • Per evitare di danneggiare il telefono, non inserire il plettro a più di 2,5 mm circa di profondità quando separi l'adesivo. Fa' attenzioni alle seguenti aree:

    • Il cavo dello schermo è un po' più in alto della metà del bordo sinistro del telefono. Qui presta molta attenzione per evitare di strappare il cavo.

    • Ci sono molti contatti a molla sul perimetro del telefono. Presta molta attenzione in queste aree per evitare di piegare i contatti.

  9. omlR6Jkq43Lt3Vp4
    omlR6Jkq43Lt3Vp4
    eaXnOrF2qrKe5EPi
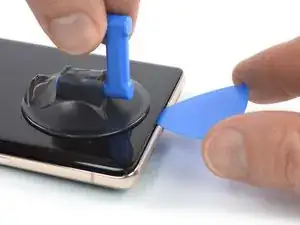
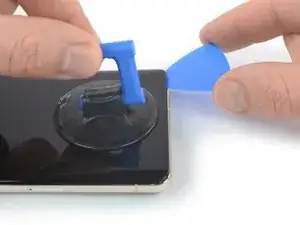
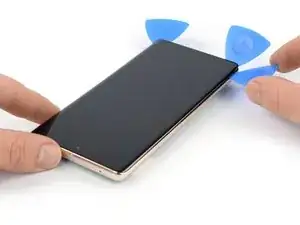
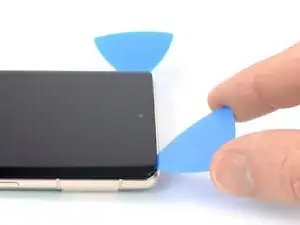
    • Fai scorrere il plettro di apertura nell'angolo in basso a destra dello schermo per tagliarne l'adesivo.

    • Lascia il plettro di apertura in posizione per evitare che l'adesivo si richiuda.

    is there any top speaker grill/mesh on Pixel 7 pro?

    Mostafa Kamel -

  10. 4NQTIvBDbIAyxkFV
    4NQTIvBDbIAyxkFV
    yR5ymuvShRAeDLVc
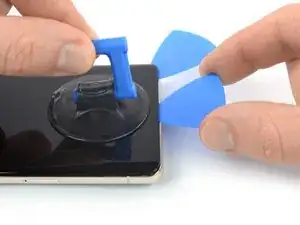
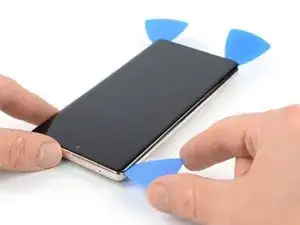
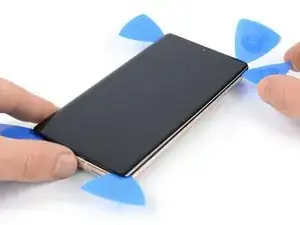
    • Inserisci un secondo plettro di apertura sul bordo inferiore e fallo scorrere fino all'angolo in basso a sinistra dello schermo per tagliare l'adesivo.

    • Lascia il plettro di apertura in posizione per evitare che l'adesivo si richiuda.

    • C'è una clip di plastica nell'angolo in basso a sinistra che bloccherà il tuo plettro di apertura. Usa solo la punta del plettro di apertura (~1 mm) per aggirarlo.

  11. tArTDTqN2LK6GhId
    tArTDTqN2LK6GhId
    5vMVYYuPuERQHXqy
    JACYuENUqUA5bvoW
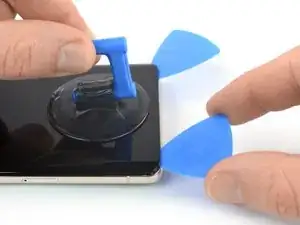
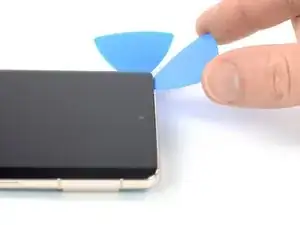
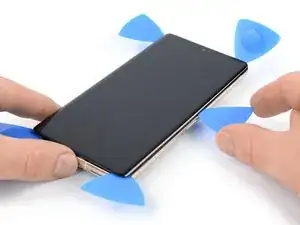
    • Inserisci un terzo plettro di apertura sotto l'angolo in basso a sinistra dello schermo.

    • Fai scorrere il plettro di apertura lungo il bordo sinistro dello schermo per tagliare l'adesivo e rilasciare le clip di plastica.

    • Lascia il plettro di apertura nell'angolo in alto a sinistra per evitare che l'adesivo si richiuda.

  12. UO6jX5pnbY321YRC
    UO6jX5pnbY321YRC
    5PtIvBbaZ6bIQCI4
    UoguGE13LKwywumV
    • Se l'adesivo diventa difficile da tagliare, molto probabilmente si è raffreddato. Usa l'iOpener o la pistola termica per 1-2 minuti per scaldarlo di nuovo.

    • Quando tagli vicino alla fotocamera frontale, inserisci solo la punta del plettro di apertura (circa 2,5 mm) per evitare di danneggiare o macchiare la fotocamera.

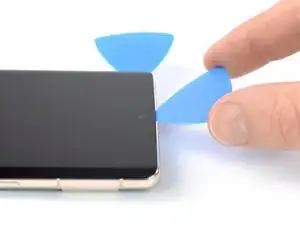
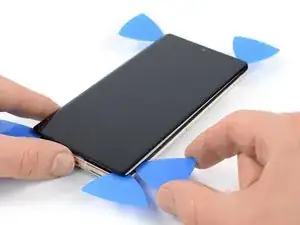
    • Inserisci un quarto plettro di apertura nell'angolo in alto a sinistra dello schermo.

    • Fai scorrere il plettro di apertura lungo il bordo superiore del telefono per tagliare l'adesivo.

    • Lascia il plettro di apertura nell'angolo in alto a destra per evitare che l'adesivo si richiuda.

  13. l5pYkUOOVLpkPl32
    l5pYkUOOVLpkPl32
    VIiGmqFDhmZJ4FWT
    mBm34rSKijkgG25V
    • Inserisci un quinto plettro di apertura e fallo scorrere lungo il bordo destro del telefono per tagliare l'adesivo rimanente e rilasciare le clip di plastica di destra.

    • Non tentare ancora di rimuovere completamente il display, lo schermo è ancora collegato al gruppo del telefono tramite un cavo flessibile.

  14. cyGRQp6UwNmhnB6T
    cyGRQp6UwNmhnB6T
    vCf5HqyX2FKfIAtt
    EbGcFSX5cdP3PrlN
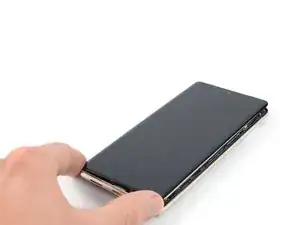
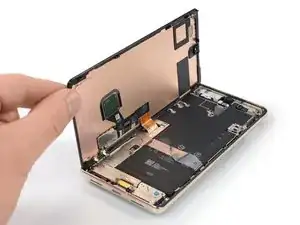
    • Solleva il bordo destro dello schermo verso l'alto e verso il lato sinistro del dispositivo, come per aprire un libro.

    • Non torcere lo schermo o allontanarlo troppo dal telaio per evitare di sforzare o danneggiare il cavo flessibile.

    • Appoggia lo schermo capovolto e parallelo al telaio.

  15. EqZdPNUuC5LFAgRG
    EqZdPNUuC5LFAgRG
    nIvkgQ5cQZSCZTSV
    • La staffa del cavo del display è fissata saldamente e richiede un po' di forza per sbloccarla.

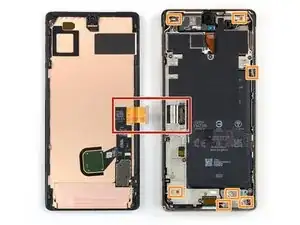
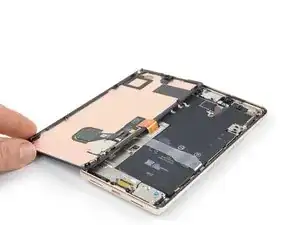
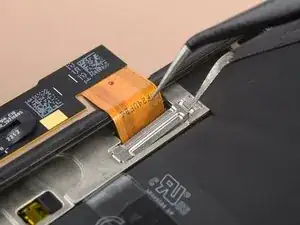
    • Inserisci un paio di pinzette nell'apertura all'estremità superiore della staffa del cavo del display.

    • Spingi la staffa verso l'interno e fa' leva per rilasciarla.

  16. ZT2CSWdPIEV36jbJ
    ZT2CSWdPIEV36jbJ
    upn1sPjlWOBlBlMw
    G5TJqWF6l1rpJXZ5
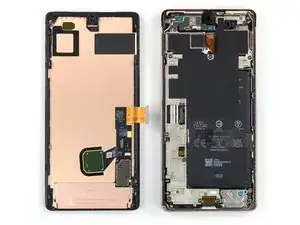
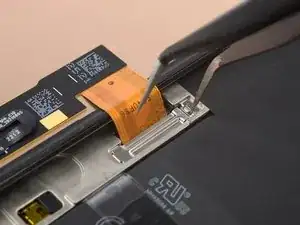
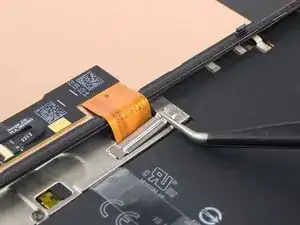
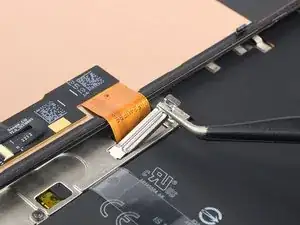
    • Usa un paio di pinzette per rimuovere la staffa del cavo del display tirandola da sotto il telaio centrale e in direzione della fotocamera.

  17. hkaumpj4K3uXMnUD
    hkaumpj4K3uXMnUD
    1uXl52GPnG6yFc5W
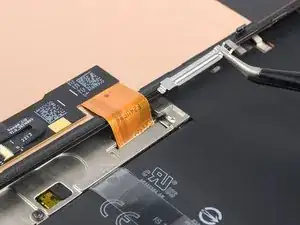
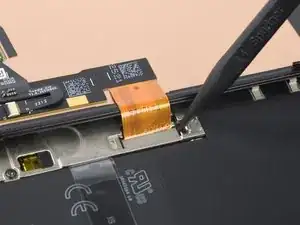
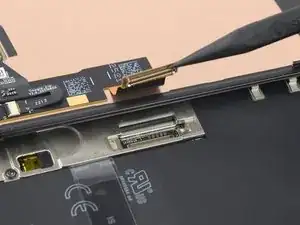
    • Usa uno spudger per scollegare il cavo flessibile del display sollevando il connettore dal suo alloggiamento.
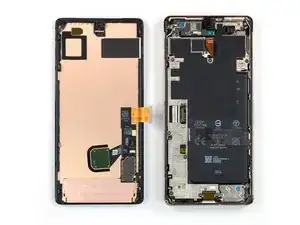
    • Per riattaccare i connettori a pressione come questo, allineali con cura e premi verso il basso su un lato finché non scatta in posizione, quindi ripeti sull'altro lato. Non premere verso il basso al centro. Se il connettore non è allineato, i pin possono piegarsi, causando danni permanenti.

  18. YKsBagWeomVU2hmX
    YKsBagWeomVU2hmX
    hJwAL1WqKkrHjjwk
    • Rimuovi lo schermo.

    • Durante il riassemblaggio:

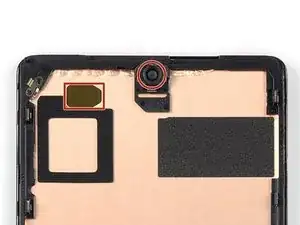
    • Se hai sostituito lo schermo, controlla il foro della fotocamera frontale e l'incavo del sensore sul tuo nuovo schermo di ricambio e rimuovi eventuali pellicole residue.

    • Ricorda di reinstallare la staffa del cavo del display.

    • Questo è un buon momento per testare il tuo telefono prima di sigillarlo. Collega temporaneamente lo schermo, accendi il telefono e assicurati che funzioni come previsto. Prima di continuare con il rimontaggio, spegni il telefono e scollega lo schermo.

    • Segui questa guida se stai usando dell'adesivo fatto su misura.

    • Segui questa guida se stai usando una carta adesiva pre tagliata.

    • Se stai installando uno schermo nuovo, segui questa guida per calibrare il sensore di impronte digitali.

    I just realized none of the screen sellers I found include the finger print flex cable. I am wondering why? If I want take the fingerprint cable out of the original one, is it difficult to do?

    Kellen Wong -

    Why are there no instructions for the reassmbly?

    Alejandro -

    Two simple reasons: one is that you should be able to reverse the steps for reassembly and the second is that snapping one bracket in, putting down the retaining clip and gluing/taping your phone back together should be easy to do once you've gotten everything apart.

    And they did include instructions about calibrating the new screen.

    Jeremy Skrenes -

    Jeremy Skrenes it's definitely not as simple as reversing the steps. There's no mention in here of the contact pins that may be pointing upwards (and shouldn't be), no direction on where adhesive covers are located and need to be removed (especially the black cover over the selfie lens), no mention of if/how long to press the screen on...and the videos on YouTube take varying approaches to several of the steps. Bottom line: if Google is going to offer a repair program through iFixIt, detailed instructions and a video should be part of that program.

    John Cornwell -

    Don't forget to transplant your old fingerprint reader into the new screen.

    Eduardo CGZ -

    this is the dumbest part of the screen replacement since it comes with one

    Phil Klassen -

    Worked perfectly. Instructions are pretty vague though, would be good to have a video.

    Sarah Oliver -

    I 100% agree!

    Valentyna Kelley -

    Don't forget to transplant your old fingerprint reader into the new screen.

    so this is why my fingerprint reader doesn't work???

    this instructions are absolutely garbage...

    (but thanks for the tip, wish I would have noticed this first)

    kelsey wynns -

    How do you transpant your old fingerprint reader into the new screen?

    Christian Matzen -

    My display is completely dead after restart? I cannot even restart it as I don't see anything. Does anyone has a hint how to rescue the repair?

    Christian Matzen -

    Same here. Please help!

    George -

    same issue after replacing the screen. The phone vibrates but the new screen is completely dead.

    jack nimble -

    Got the same problem here

    Patrick Trump -

    Same issue. I wasn't able to power off the phone when I started the repair, but the battery was dead with the red dead battery. When I reconnected the new display cable, the screen was perfect and showed the red dead battery. I then closed the display, charged the phone and attempted to recalibrate the fingerprint. I don't get any screen display, but the phone is turning on and I can hear the screenshot tone from before. Any help?

    C * -

    Were you able to find a solution to this?

    Jason Schunk -

    Add please to the last step or as a last step:

    Place back the display cable bracket

    I forgot to do that)

    Anton Karpenko -

    Good day, how can someone get the schematic for pixel 7 pro…

    The phone was on 20% and the owner try charging it and when he plug it and later come back to check, it noticed that it was off..

    Ozemoya Emmanuel -

    So I disassembled it and bring out the board, wen I plug it on charger to see what current enter it, it show 0.07 and later went back to 0.00 while plug on charger…

    Ozemoya Emmanuel -

    Please also provide the instruction for the fingerprints sensor as if anyone follow this guide they will miss that part.

    Musa -

    I needed to disconnect the battery and push the start button for some seconds. Otherwise the new screen did not start and stayed black. I did break my first screen since I needed to disassemble everything again.

    Patrick Trump -

    In order to remove the fingerprint scan module without damage, you have to be VERY careful. The scanner is a very thin membrane and will crack if you bend it at all. I disengage the connector, then drop 91% alcohol around all four edges of the sensor, place it on a hot plate that's at 80*c for about five minutes, add some more alcohol around the edges and heat it again for another five minutes. Then using a very thin piece of plastic, such as an iPlastix LCD Touch Screen Separation Repair Opening Tool, and wiggle it back and forth around the edges and you can separate it. It's difficult to do, but it can be done. The odds of it working after replacement are low (as they have issues working out of the box) but this is the only way I have found that works.

    Gregg Stanley -

    Microphone isn't working at all after repair.

    adriankmatthews -

    Hola, he podido probar y cambiar la pantalla sin problema, pero cuando iba a sellarla, la pantalla se quedó completamente negra y ahora no se ve nada, y no consigo reiniciar el teléfono ¿alguien sabe qué ha podido ser y cómo puedo solucionarlo? funcionaba antes de cerrarlo, incluso el lector de huellas. Gracias

    Daura Soto -

    指紋認証のキャリブレーションを行う際に、対応した機器が接続されておりませんと表示されます。
    国によって、キャリブレーションツールの提供が前後するのでしょうか?ちなみに日本です。

    暴れミナ -

    キャリブレーションツールのダウンロードページが日本語化されているので、日本でも利用可能だと思います。

    この作業をしたことがないのでアレですが、キャリブレーションツール上で対応した機器が接続されていないと表示されるのであれば、作業に使うPCとPixelの接続が上手く行ってない可能性が高いと思います。

    キャリブレーション作業ガイドなどをみながら確認してみることをお勧めします。

    Servause -

Conclusione

Confronta il nuovo componente con la parte originale. Potresti aver bisogno di trasferire i rimanenti componenti o rimuovere i supporti adesivi dalla nuova parte prima di installarla.

To reassemble your device, follow the above steps in reverse order.

Per eseguire un test diagnostico con lo strumento diagnostico integrato di Pixel, clicca qui.

Porta i tuoi rifiuti elettronici a un riciclatore certificato R2 o e-Stewards.

La riparazione non è andata come previsto? Prova delle [[Troubleshooting Problems After a

Repair|soluzioni di base]], o prova a chiedere alla comunità Risposte Google Pixel 7 Pro per dell'aiuto.

Dominik Schnabelrauch

Membro da: 23/11/16

200708 Reputazione

66 commenti

After doing a few of these, using the fingerprint calibration tool is always needed. https://pixelrepair.withgoogle.com/udfps
I think it should be included in the final steps for completeness.

Also, the plastic bracket on the back of the screen usually is more willing to separate from the screen than from the phone chassis. I think this may lead to confusion for some people who may try to install the new screen over the old plastic. Some mention of this would be helpful.

Chip Needham -

All guides say we have to recalibrate the fingerprint sensor after a screen replacement by going here https://pixelrepair.withgoogle.com/udfps

Problem is that this does not work anymore. With a Pixel 7 Pro it says software failed to install. Looking at Android and Google forums is seems a common problem that broke this year. Is there another way to install the fingerprint calibration software on the phone without that link above??

Michael Blake -

I never change any mobile phone parts.

Should I try it?

Tulio Gilberto Silva Junior -

Yes. It worked like a charm. I just followed the steps, and after calibrating the fingerprint sensor, everything was working 100%.

Tulio Gilberto Silva Junior -

Is it possible to replace the fingerprint scanner separately?

Yabsra A -

As mentioned by @chipneedham , I would recommend adding in a note that the plastic bracket may not have come off with the screen. This tripped me up in my repair and meant I had to reapply the adhesive.

Chris Vella -

I followed the steps and it was excellent. This is my first time repairing a screen and it was so easy. Thanks for the guidance.

Adey Naas -

Is it possible to just replace cracked glass and not the whole screen unit?

p38lightng -

After the screen replacement, Finger Print Unlock does not work in Pixel 7 Pro. I tried to delete old fingerprints and when I try to save a new fingerprint, it says time out.

G Registration -

Is water resistance unaffected after a successful repair?

Oluwademilade Akintan -

using authentic sealant it allegedly isn't, but i wouldn't risk it. Officially they do not guarantee it either

Leo Radonjic -

My pixel 7 pro did not go through a calibration process during boot-up after replacing the screen. Now I just have a message on both my lock and home screens stating ‘Fingerprint setup timed out. Can’t use fingerprint sensor. Visit a repair provider or g.co/pixel/fingerprintunlock’

Russ Vick -

I originally sent mine to Google for repair. They upped the repair price after they received it. I opted to do it myself. When I got the screen replaced it had been flashed to some special firmware. I re-flashed it normally and it appeared to be fixed. Then I got this error. Finally, I re-flashed it here and it worked. https://pixelrepair.withgoogle.com/

Dustin Burckhardt -

Do not forget to remove BLACK sticker behind camera hole.

David Bucio -

Arg. I missed this. Front camera is black and face unlock doesn't work. Did you reinstall the screen? It seems kind of flimsy and I'm afraid I'll break it.

Dustin Burckhardt -

after google boot logo there is no image

K baroud -

Great kit and guide! I was able to replace my screen easily. I had to calibrate my fingerprint sensor via Google, but that was easy too :)

Marizabeth Perez -

from which PC did you do the calibration I tried several times the PC recognizes my pixel when it is turned on but in fastboot it does not recognize it

jj59840 -

If your device isn't recognized while in fastboot, you don't have the proper USB drivers installed. You can get them from the Google pixel support page

Chip Needham -

After taking on this adventure as a complete newbie to this kind of repair I have a couple of suggestions:

- the phone needs to be quite hot to the touch, more like 50 degrees rather than 40 degrees Celsius. Hotter than you'd think for such a delicate device. A tiny bit warmer than your hand isn't enough to loosen the adhesive. The tape tip for my cracked screen worked perfectly!

- the screen ribbon connector is invented to agonize those in the lowest parts of hell, you need so much more force than such a tiny thing should be able to handle, all laws of physics are bypassed by it. You THINK it clicked in, but it was merely a blank and now you have to start over.

- on my pc the fingerprint calibration needed an additional android fastboot driver, then the Google link will work.

All in all a very fun, interesting, but sometimes agonizing evening was spent! Phone is so much more responsive and vibrant without the cracked screen, thank you very much!

Inlandnavigator -

These kits are garbage. Stuff doesn't line up. THere are plastic pieces that don't fit. Waste of money. I followed directions to a tee. The new frame does NOT line up with the screen. There are plastic pegs that have no place to fit. Screen will not fit. WASTE OF TIME

Jason Hopper -

@jasonhopper I think you may have left the bracket in place, it needs to be removed with the old screen. I tried to alert people in my comment above:

"Also, the plastic bracket on the back of the screen usually is more willing to separate from the screen than from the phone chassis. I think this may lead to confusion for some people who may try to install the new screen over the old plastic. Some mention of this would be helpful."

Chip Needham -

Chip. Yes, disappear to be what has happened. Unfortunately now the adhesive is over the bracket and that part will have been destroyed trying to get the bracket off. I think I fix it should send me new adhesive, which means I will have to wait again the instructions are not clear enough here. If I had read your input I probably would have figured it out. Thank you for your response.

Jason Hopper -

READ THE COMMENTS. I ran into literally every issue mentioned in the comments. Definitely the hardest repair I've done and I do this professionally.

Rahsaan B -

I agree. The comments led me to my ultimate problem. The screen delaminated and left the black bracket on the frame. IFIXIT sent me another adhesive and after pulling the frame off and applying the new adhesive the screen went back on just fine. Of course I had to run the fingerprint scan fix from Google. So my screen replacement was a success but I stand by my comments that the guy needs to be more informational with regards to problems you could encounter.

Jason Hopper -

Bon tuto mais comme précédemment conseillé, voici quelques conseils suite à l'installation d'un nouvel écran.

- pour décoller le vieil écran, bien chauffer et bien passer le médiator sous le plastic support de l'écran. Je ne l'ai pas bien fait du coup j'ai juste décollé l'écran mais pas le support plastique collé à l'écran et coller au téléphone. Celui-ci est bien emboîté au téléphone. Heureusement que l'on peut le déboîter, toujours avec le médiator ensuite car sinon impossible de mettre le nouvel écran

- ne pas oublier d'enlever le sticker noir de protection derrière la vitre selfie du nouvel écran

- pas évident de reclipser la nappe du nouvel écran je trouve ! Une fois fait, j'ai vérifié que celui-ci fonctionne bien en allumant le téléphone

- il a fallut recalibrer l'empreinte digitale car il ne fonctionnait pas. Pas de messages, rien. Comme indiqué, j'ai connecté mon telephone au PC, sur une prise USB-A. car le téléphone n'a pas été reconnu en le branchant sur une prise USB-C

Si ça peut aider ! Top Ifixit !

Komanile -

So I received a kit that has two different size blue film parts. One is to apply the new edge adhesive, but no clue (or docs) as to where the other one goes ... The above instructions conveniently skip over applying the adhesive ....

Fred Cassirer -

Bonjour .

Combien ça coûterait faire réparer la vitre interne ? L'écran ne sallume plus

La vitre extérieure ( je ne.parle pas du film collé ) est intacte c'est la vitre en dessous Qui est cassée.

Ferrandeznathalie12@gmail.com

Merci

Nathalie Ferrandez -

+

Directions are missing some extremely important details and my new screen being damaged during installation. It feels like Ifixit is more focused on selling nice tools than making sure that the finer details are covered in the install process. (Admittedly the anti clamp it is an excellent tool, but it did separate the screen from the plastic frame not the phone, but it isn't part of the basic tool kit or the repair kit)

What damaged my new screen was a tiny little contact spring in the bottom right corner that must have been bent in the removal or cleaning process (I think the cleaning cloth while removing the adhesive). Either way bent contact damaged the new screen on install causing a white line to run across the screen. There are several of these small contacts and no mention of them in the instructions. (In my opinion they should be mentioned as the bent contact would have been easy to fix had I been aware of it instead I am either out $206 or stuck with a white line on my screen)

immaterial -

Screen replacement went well, hardest thing for me was reseating the flex. Found this youtube vid helpful. https://www.youtube.com/watch?v=yIiRc97D...

Repair of fingerprint sensor worked fine via https://pixelrepair.withgoogle.com/

Very happy!

Ashley Andersen -

Please can someone explain this step to me: Be sure to remove all adhesive liners from your replacement screen. Check the selfie camera recess and make sure you've removed the liner there.

Keiron -

For the Google/Ifixit screen there is a black liner from the factory covering the selfie camera hole that needs to be removed.

You should be able to see through the back of the screen where the hole for the selfie camera is.

If you flip the screen around and you can't see through the hole, the camera won't be able to either.

Joe -

For me it worked like a charm- except for the fingerprint Calibration software via https://pixelrepair.withgoogle.com/udfps

My Pixel is connected in Fastboot mode, and when I try to start the procedure I get stuck at step 1 "downloading the software"

"Couldn't download the software"

Anyone else facing this issue (or haveing a fix for that?

Marco Reiter -

I've the same error - Does anyone solve this?

Lars Moltke -

I'm getting couldn't install the software, 2nd step on the https://pixelrepair.withgoogle.com/udfps webpage... Does anyone know if your phone device state needs to be unlocked for the software to install? Does it need to be unlocked through your cell carrier?

C * -

Agreed that the guide leaves too much ambiguity. If you're gonna sell the whole repair kit, at least describe what everything that comes in it does. I ignored the unmentioned graphite paper looking sheet. Everything was going ok until after snapping the display back on, there's a white line on the top - likely from one of those annoying metal pieces that stick up inside the device. Convenient that iFixIt will sell you a genuine part and kit but only write up half a guide just telling you to reverse the steps (what adhesive would I remove when reversing them? Pictures of replacing parts would be great too. It's just a lazily written guide.) and not give precautions to common issues. I want an anal and detailed repair guide so I can feel confident in it, not another blasé guide. Also shame on Google for putting those pins there - it all feels very anti right to repair making it harder to fix a broken display.

Nick Cipriani -

I agree with you and @immaterial . The pins should definitely be in the guide. The part costs 200 dollars and pushing thise pins down can avoid a whole lot of damage. Had to do this twice because of such a small issue. It should definitely be added to the guide.

Mohammed Aadeel Bobat -

Incomplete guide. I had to check youtube to learn to remove the blue stickers from the display itself. I had to check other sources multiple of times to ensure my screen replacement goes smoothly. Extremely disappointed at this guide. Could be better written.
The linked adhesive installation guide IS NOT FOR THIS PHONE. IT's for generic phones. Check youtube for proper installation guide. This guide is useless.

rcolbeck -

Did you see the black sticker on the selfie (inside) remove it prior to installing the screen. Check youtube guides. This guide is useless.
Check: https://www.youtube.com/watch?v=yIiRc97D...

rcolbeck -

Followed the instructions very carefully, and it was going well, too well. The guide mentions plastic clips but my picks were doing it with almost no resistance. Well, that's because I managed to cut between the digitizer and the glass, so the glass popped off first. then I had to cut under the digitizer to get that off. I thought that was the end of it, and I started cleaning. There was a glaring lack of adhesive while cleaning and something felt off. It took me a while to get the ribbon cable on. I put the cable bracket back in, then applied the adhesive. Everything was going smoothly, until I tried to pop the screen on. It physically was incapable of fitting. Well, after ~45 minutes trying to figure out where I went wrong, I discovered that the plastic bracket attached to the back of the digitizer was still glued onto the phone. After peeling it off, it all made sense. Adhesive was unsalvagable though, now I have to wait for more to come in, ughhhhh. I wish the guide made that more clear.

Matthew M -

Does this display fits in made in China model or made in Vietnam model ?

saran -

To recalibrate fingerprint scanner, use the link but keep the hone in fastboot mode not rescue mode, worked a charm

Yousuf Bhikha -

My Google pixel 7 pro display was damaged and I tried changing the display 3,4 time but Everytime there will be a white line on the side from top to bottom. Can you help .

Shibin Boby -

I have the same problem

Rome Gabe -

Those the item include the fingerprint?

Edgar Jiménez -

Easy repair, but remember to remove the plastic frame from the old screen, if they spit disassemble.
And then my fingerprint scanner doesn't work after replacement of screen, and the calibration tool doesn't work.
I'm getting a 'Couldn't install the software' when I try to install the calibration software. I then tried to reinstall Android but the fingerprint scanner still doesn't work. :(
Running Android 13.

Lars Moltke -

For me, it was the internet security software (zscaler) on the work laptop that caused the error. The site itself worked, only the download ran into above error. Took me a while to figure it out ;)

Marco Reiter -

I've seen multiple reports that you need to run the fingerpirnt calibration tool TWICE. https://pixelrepair.withgoogle.com/udfps

This was my case too. Ran once, didn't work, ran again, and then it works. Good luck!

Jedadiah Ashford -

Did anyone else end up with a proximity sensor that doesn't work after install? I think mine is defective. I also have a black round spot on the LCD near the camera. Reaching out to support for help...

Jedadiah Ashford -

I contacted Google Support, asking them why the calibration tool doesn't work, and I got this answer:

I’ve checked my resources and we do not recommend running a recalibration tool on your device as this may further complicate the issue. Recalibration tools are designed to fix specific problems, but they can also cause new problems if they are not used correctly. In your case, there is a chance that running a recalibration tool could damage your device or make the problem worse.

What they then did offer me was a warranty repair, even that I told them than I did the screen replacement myself:

You can rest assured that the repair of your device will be free of charge since you purchased the parts of your device from our authorized partner iFixit. This is because we have a partnership with iFixit, which means that they offer a warranty on all of the parts that they sell.

So this is what I'll do.

Lars Moltke -

Did Google repair fix the calibration for you? Did you send it to them?

C * -

I disassembled my phone and when I plug the new screen in the phone fails to boot and displays the google boot screen with messed up colors. It will then continue to boot over and over. I switched back to my damaged screen and it works like it did before. Is this a lemon part?

mrsetiman -

I had a very similar issue, the old one plugged it in works, but the new one doesn't do anything :-( keep going back and forth and I am able to reproduce that every time. Contacted support will update this comment later.

Alberto Martin -

Before install make sure you received the correct screen! Pixel 6 Pro screens are being incorrectly packaged and labeled as Pixel 7 pros. I was shipped a 6 pro screen and was only able to tell after finding this video (https://www.youtube.com/watch?v=MhvvNaFK...). You will be able to tell since the proximity sensor window and alignment tabs will be slightly different (skip to 7:00 minutes in to the video above to see the differences).

Dave K. -

finger print not working as yet. replaced screen for pixel 7 pro yesterday. Else worked fine

arslan nadeem -

You should really mention how important it is to pay attention to the earpiece speaker grill, I didn't and since it's so tiny I didn't even notice until the screen was permanently glued on again that I don't have a speaker grill up there anymore

Mattis -

me neither :(

Leo Radonjic -

just replaced my screen, no images just green, yellow, & red pixels.

James -

Received my replacement screen today and did the job under 30 minutes thanks to this guide. Thank you guys so much for this guide and especially iFixit for providing us with the original parts. Everything went smoothly and the fingerprint sensor works great after the calibration.

Amix -

Works like a charm, I had worries concerning the accuracy of my sealant placement skills, but there were no issues. Fingerprint scanner doesn't work until you calibrate it using Google website, entire process takes a minute and you only have to click "confirm" twice. AFTER THAT YOU HAVE TO RESTART THE PHONE and it will work. Also remember to remove the selfie camera hole protector on the screen or you will only be able to take pitch dark selfies

Leo Radonjic -

Not very easy but very doable as a first timer replacing a phone screen follow this link as reference https://www.youtube.com/watch?v=yIiRc97D... very helpful.

NOTE: I also encounter the plastic bracket issue where you cannot identify if its part of the old screen that's why you have to check or compare the image from the guide.

Abel Go -

Was there really a cover on the front camera glass of the new display?

I haven't seen it and now the front camera shows only black....

Update: didn't know I can see more comments here when I'm logged in, otherwise I would have read the comments about the black front camera cover ;-(

Michael Tansella -

Another important point is to do manual reboot after fingerprint calibration, otherwise it doesn't work.

Michael Tansella -

I just did a test before I put adhesive on and its just a black screen. I was unable to power my phone off before repair and have been unable to tell how much battery is left. I tried my best to let it die this week but i have no control of my device since it broke and desperately need it to work again ASAP. Is it mandatory that it reboots? Please help!

Tyler -