Introduzione
Utilizza questa guida per sostituire un trackpad malfunzionante su un MacBook Air (M1) fine 2020.
-
-
Se il tuo MacBook ha installato Big Sur v11.1 o successive, potresti non riuscire a disabilitare l'Auto Boot. Puoi procedere normalmente, ma assicurati di scollegare la batteria non appeni riesci.
-
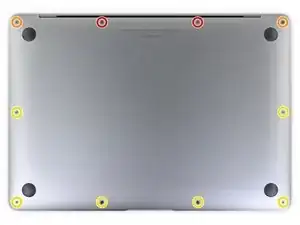
Usa un cacciavite Pentalobe P5 per svitare le seguenti viti:
-
Due viti da 7,9 mm
-
Due viti da 7,3 mm
-
Sei viti da 2,6 mm
-
-
-
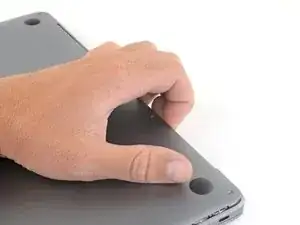
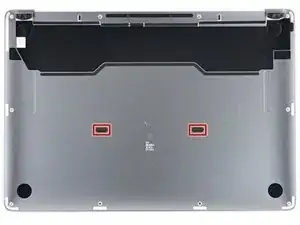
Infila le dita tra lo schermo e la copertura inferiore e tira verso l'alto per rilasciare la copertura inferiore
-
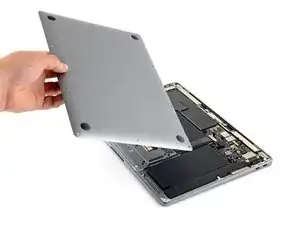
Rimuovi la copertura inferiore.
-
Appoggiala in posizione e premila con decisione per agganciare i ganci nascosti al di sotto. Dovresti sentirli scattare in posizione.
-
-
-
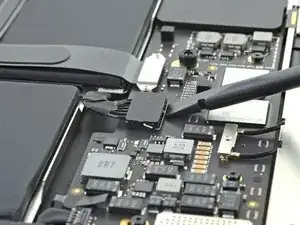
Usa la parte piatta di uno spudger per sollevare e sganciare il braccio di bloccaggio in metallo sul connettore della batteria.
-
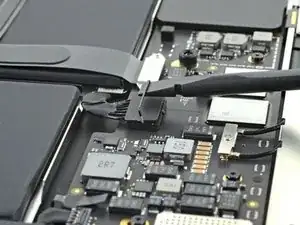
Tira verso l'alto il braccio di bloccaggio in metallo per scollegare il connettore della batteria dalla sua presa sulla scheda madre.
-
Se necessario, spingi prima il lato posteriore del connettore, quello con i fili, nella posizione iniziale, quindi fai oscillare la parte anteriore del connettore nella posizione corretta.
-
-
-
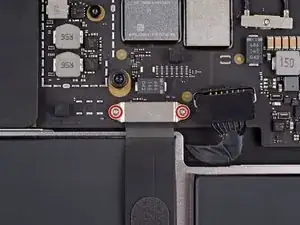
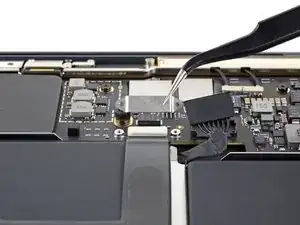
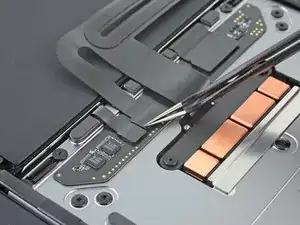
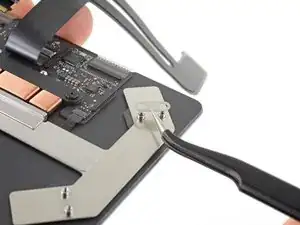
Utilizza un cacciavite Torx T3 per rimuovere le due viti da 1,4 mm che tengono in posizione la copertura del cavo del trackpad
-
-
-
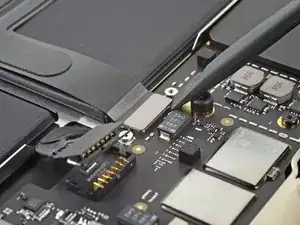
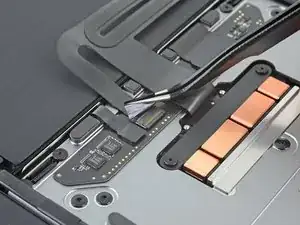
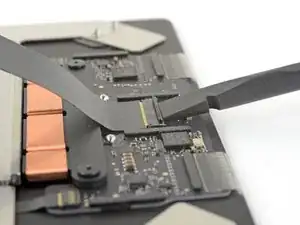
Utilizza la porzione piatta di uno spudger per far leva verso l'alto sul connettore del cavo del trackpad e farlo uscire dalla sua presa.
-
-
-
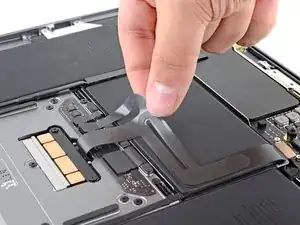
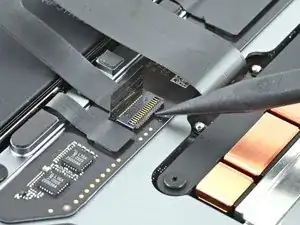
Utilizza un paio di pinzette per staccare il nastro che copre il connettore del cavo del trackpad.
-
-
-
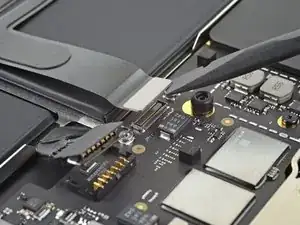
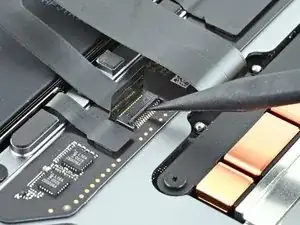
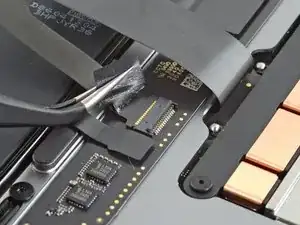
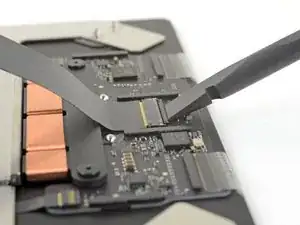
Utilizza l'estremità appuntita di uno spudger per alzare la piccola aletta di bloccaggio sul connettore ZIF del cavo del trackpad.
-
-
-
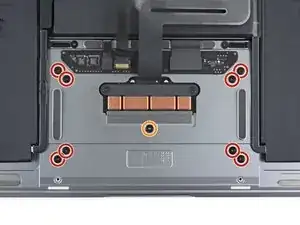
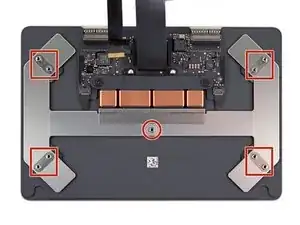
Utilizza un cacciavite Torx T5 per rimuovere le nove viti che tengono in posizione il trackpad:
-
Otto viti completamente coperte da 3,1 mm
-
Una vite parzialmente coperta da 3,1 mm
-
-
-
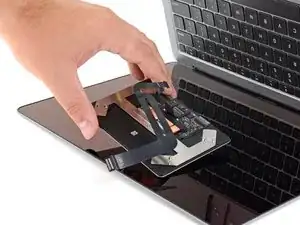
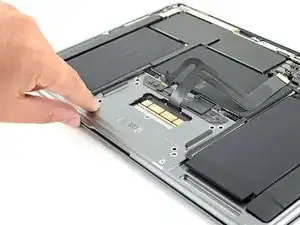
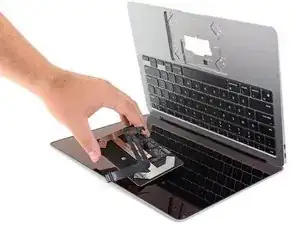
Mentre tieni il portatile con lo schermo verso il basso, apri il portatile con cautela. Il trackpad rimarrà sul display.
-
-
-
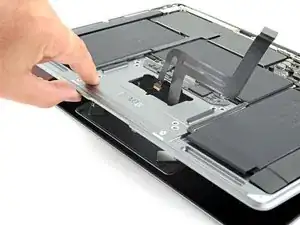
Mentre rimuovi l'assemblaggio del trackpad, fai attenzione a non perdere i cinque distanziatori di metallo che poggiano sull'alloggiamento delle viti, voleranno via e si perderanno con la minima provocazione.
-
Rimuovi il trackpad.
-
-
-
Utilizza la porzione piatta di uno spudger per alzare la piccola aletta di bloccaggio sul connettore ZIF del trackpad.
-
Fai scorrere il cavo del trackpad direttamente verso l'esterno via dal connettore ZIF.
-


Confronta il tuo pezzo di ricambio con quello originale: potresti aver bisogno di trasferire componenti rimanenti o rimuovere i supporti adesivi dal pezzo nuovo prima dell'istallazione.
Per riassemblare il tuo dispositivo, segui i passi in ordine inverso.
Una volta completata la riparazione, il tuo laptop potrebbe non accendersi fino a quando non è collegato all'alimentazione.
Porta i tuoi rifiuti tecnologici a un riciclatore certificato R2 o e-Stewards.
La riparazione non è andata come previsto? Dai un'occhiata alla nostra comunità Risposte per un aiuto nella risoluzione dei tuoi problemi.

12 commenti
Hi! So I successfully replaced my trackpad (the center screw got stripped so I had to use the superglue technique and threw it away), and the trackpad works perfectly well but without haptics. My replacement didn’t come with a new cable so used the old one after cleaning of the end (it had some blackening on the portion connected to the trackpad). Is my trackpad a bad unit or should I try replacing the cable first?
Hi! Considering the blackening on the old cable, I’d recommend thoroughly cleaning its contacts with high concentration (90%+) isopropyl alcohol and a Q-tip. Let it dry before reinstalling it. If that cleaning doesn’t help, replace the old cable before considering your replacement trackpad a bad unit. Good luck on your repair!
Hi Carsten! I tried cleaning it but didn’t work. Picked up a new cable from here, and now works flawlessly. Highly recommend anyone reading this to just buy a replacement cable too when you do the repair to rule out a faulty part. Thanks!
Hi, I replaced trackpad following the guide and trackpad seems to work but very slow and lagging. and when I log in, mac is showing message waiting for bluetooth trackpad to be discovered. Could this be cable issue?
Hi team,
I follow this guide to replace my trackpad and now strangely my “a” and “d” keys no longer work on my keyboard. Any thoughts on how this could have happened?
Cheers
Zac Lew -
Zac,
Check that the cables you disconnected during the repair are fully seated in their ZIF connectors. You could also check surrounding cables to ensure all look normal, that none are inserted at odd angles, etc.
Good luck!
I am having the exact same issue. Were you able to figure it out?
ESD safe mat, plugged into ground, with a wrist strap, also grounded, are the best best to protect the logic board.
Robin Ray -
Re-Assembly Tip: Before putting the screws back in, snap the lower case on and test to make sure the MacBook powers up. When I first re-assembled, I became very nervous I did something wrong because it would not power on. It turns out I just needed to plug the laptop into a power source for it to power up (despite having a good charge before disassembly). It was the perfect way to test the new USB-C ports!
Austin -
Big points to this one, especially for mentioning needing to plug the laptop in. The bottom case needs to be screwed in and laptop needs to be plugged in before it will boot.
Bayden Yazalina -
Wiha 4PL driver for these screws.
Greg Worrel -
Printing out all the images from this Ifixit guide prior to starting and using duct tape help me keep track of screws.
raju midjdeya -