Introduzione

Segui questa guida per rimuovere o sostituire la barra dell'antenna in un MacBook Air da 13" di fine 2020.

  1. VPEGroiLj2rq1TsX
    • Prima di iniziare questa procedura, dovrai disattivare la funzione Auto Boot del tuo Mac. L'Auto Boot accende il tuo Mac quando lo apri e potrebbe attivarsi accidentalmente durante lo smontaggio. Segui questa guida per disabilitare l'Auto Boot.

    • Se il tuo MacBook ha installato Big Sur v11.1 o successive, potresti non riuscire a disabilitare l'Auto Boot. Puoi procedere normalmente, ma assicurati di scollegare la batteria non appeni riesci.

    • Spengi completamente e stacca dalla corrente il tuo MacBook prima di iniziare. Chiudi lo schermo e giralo a faccia in giù.

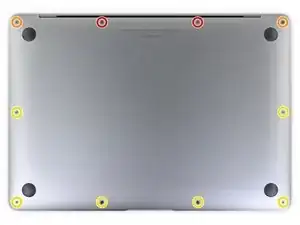
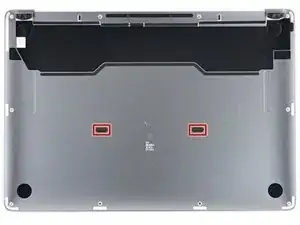
    • Usa un cacciavite Pentalobe P5 per svitare le seguenti viti:

    • Due viti da 7,9 mm

    • Due viti da 7,3 mm

    • Sei viti da 2,6 mm

    • Durante questa riparazione, tieni traccia di ogni vite ed assicurati di riavvitarla nella sua posizione originale per evitare di danneggiare il tuo MacBook.

    ESD safe mat, plugged into ground, with a wrist strap, also grounded, are the best best to protect the logic board.

    Robin Ray -

    Re-Assembly Tip: Before putting the screws back in, snap the lower case on and test to make sure the MacBook powers up. When I first re-assembled, I became very nervous I did something wrong because it would not power on. It turns out I just needed to plug the laptop into a power source for it to power up (despite having a good charge before disassembly). It was the perfect way to test the new USB-C ports!

    Austin -

    Big points to this one, especially for mentioning needing to plug the laptop in. The bottom case needs to be screwed in and laptop needs to be plugged in before it will boot.

    Bayden Yazalina -

    Wiha 4PL driver for these screws.

    Greg Worrel -

    Printing out all the images from this Ifixit guide prior to starting and using duct tape help me keep track of screws.

    raju midjdeya -

  2. JM2r2fTloLj1HGHv
    JM2r2fTloLj1HGHv
    qWKL1OR1c1CmZJKh
    qfGXhnWu5SInbUHj
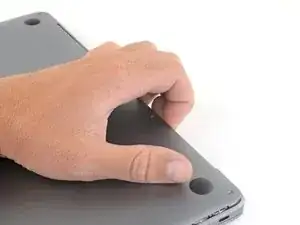
    • Infila le dita tra lo schermo e la copertura inferiore e tira verso l'alto per rilasciare la copertura inferiore

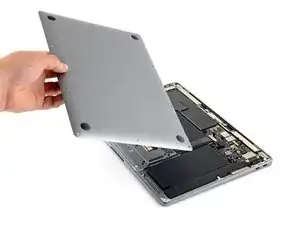
    • Rimuovi la copertura inferiore.

    • Per reinstallare la copertura inferiore:

    • Appoggiala in posizione e premila con decisione per agganciare i ganci nascosti al di sotto. Dovresti sentirli scattare in posizione.

    Los tornillos se ruedan fácilmente :(

    Mishelle Cerón -

  3. NWhygZ3NuFfSLrCC
    NWhygZ3NuFfSLrCC
    kRYFRljHKcJHQMni
    VevmEYadgKPXgXRH
    • Usa la parte piatta di uno spudger per sollevare e sganciare il braccio di bloccaggio in metallo sul connettore della batteria.

    • Assicurati che il braccio in metallo sia completamente libero dall'aletta di bloccaggio prima di sollevare il connettore della batteria. Il braccio di bloccaggio in metallo dovrebbe sganciarsi facilmente.

    • Tira verso l'alto il braccio di bloccaggio in metallo per scollegare il connettore della batteria dalla sua presa sulla scheda madre.

    • Durante il rimontaggio, spingi il connettore della batteria verso il basso nella sua presa, assicurandoti che sia piatto nella presa.

    • Se necessario, spingi prima il lato posteriore del connettore, quello con i fili, nella posizione iniziale, quindi fai oscillare la parte anteriore del connettore nella posizione corretta.

    Reassembly: I had difficulty going straight down. The connector has some angled edges that made it difficult. Instead, I slotted the wire side in first, then rocked it forward towards the hinge into position.

    Sean K -

    If having difficulty in flipping the bar up, place the machine vertical and not that there is a small “locking nib” that the bar has to clear. You may have to give the bar honest persuasion to clear the nib.

    Harry Dulcamara -

  4. pMA6bFPjPuCcCuXw
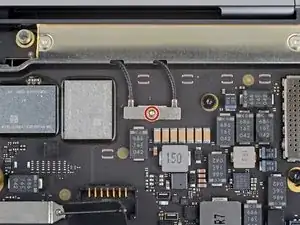
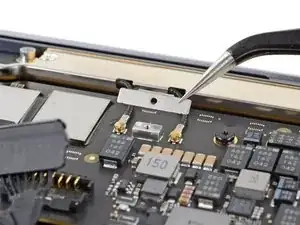
    • Usa un cacciavite Torx T3 per svitare la vite da 1,4 mm che tiene ferma la copertura dei cavi dell'antenna.

    • Se ti sembra che il tuo cacciavite T3 balli troppo, potresti dover usare un T4.

    I needed a T4 for this

    MaFt Morley -

    Wiha tools T3 fit perfectly.

    Robin Ray -

    I found this screw difficult to reinstall. Very small and fiddly. 15-20 minutes on this step.

    Harry Dulcamara -

    The T3/T4 screws are tiny!!!

    raju midjdeya -

    To reinstall a tiny screw first turn it counterclockwise until you feel it engage the tread, then turn them clockwise to tighten it.

    Patrick Langvardt -

  5. DolxfCVyMJbuVaYK
    • Rimuovi la copertura dei cavi dell'antenna.

    Make sure the 90 degree bend on the cover is towards the hinge when reassembling. It will fit in backwards, but will cause problems.

    Robin Ray -

  6. YjXHvrYawVQGdCsF
    YjXHvrYawVQGdCsF
    ghAw1ida5JywpKYy
    Gei2HaBBD4QLOChH
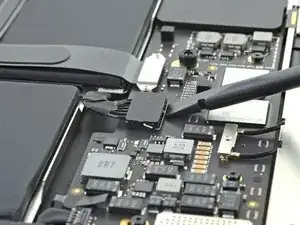
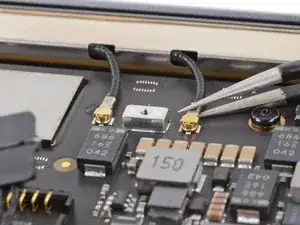
    • Usa un paio di pinzette per prendere i connettori dell'antenna vicino alla loro base.

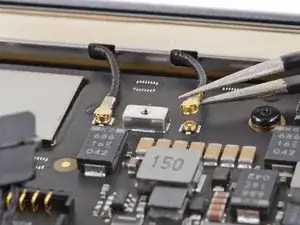
    • Tira verso l'alto il connettore per scollegarlo.

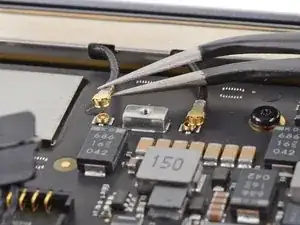
    • Ripeti per il secondo cavo dell'antenna.

    These are tiny, and hard to reconnect. The key was to position the cables so their ends are very close to the posts on the board.

    dexter -

    Yep. Good call. Me too folks.

    Harry Dulcamara -

    So anyone that’s had experience with keyboard and antenna, connectors, or previous Apple iPhone products, knows that these antenna connectors go on from front to back so you kind of have to position the noncable end of the antenna cable first and then push it towards the back I’m not sure if that makes sense, but try from the front to the back connecting Put pressure on the front first and then put pressure towards the cable in if you do it wrong and put too much pressure in it, you can ruin the cables. Be careful with it.

    babs martin -

  7. 1VJvIwAxTOJogU5w
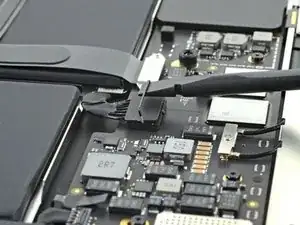
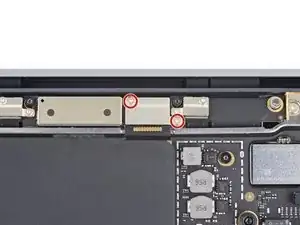
    • Usa un cacciavite Torx T3 per svitare le due viti da 1,5 mm che tengono ferma la copertura del connettore del cavo dello schermo.

    None of the screws in this repair are T3. All the smaller ones are T4. Which is good, ‘cause my (cheap) repair tool kit doesn’t have a T3.

    dexter -

    The T3 screws called out were indeed T3, not T4 on the MacBook Air I replaced the display on.

    --Mac Ace, Inc.

    Robin Ray -

    I dropped one of these - can they be purchased? Or is there a matching screw in an older MacBook Air? I have a ton of those for parts... :-)

    Jimmy Anderson -

    weird, for my model A2337 it is even T2 screws. tested it two times and I have the ifixit mako precision bit set.

    Otto Klassen -

    On my MacBook Air M1 Early 2020, I had to use a T4 bit on one of the screws. The other one came out with a T3. I am using a HyperTough 77-piece precision repair set.

    Raj Venkat -

  8. 4LyTebwNMFNoFqJf
    • Rimuovi la copertura del connettore del cavo dello schermo.

  9. yGHHGP6i2yHfUM4N
    yGHHGP6i2yHfUM4N
    NCZ4EGyX5OgOcx4R
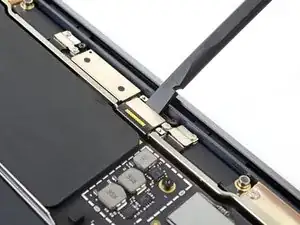
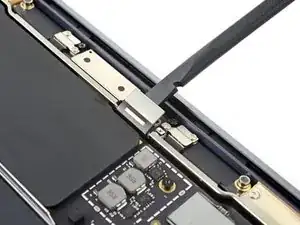
    • Usa la parte piatta di uno spudger per sollevare il connettore del cavo dello schermo dalla scheda dell'antenna per scollegarlo.

    • Per ricollegare i connettori a pressione come questo, allinea attentamente e premi su un lato, quindi ripeti per l'altro lato. Non premere nel centro. Se il connettore non è allineato correttamente, i contatti si possono piegare, causando danni permanenti.

    Since this step is the most crucial in the reassembly process I suggest connecting the flat cable to the board BEFORE placing the board in to its cavity in the antenna bar. MUCH easier and SAFER to do.

    J Patrick Dowling -

  10. 2b1wYIiFCJDuN2s5
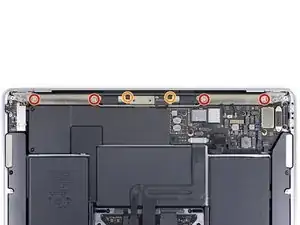
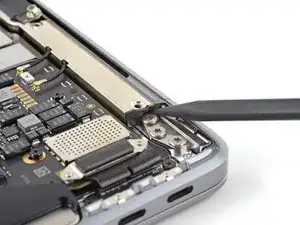
    • Usa un cacciavite Torx T5 per svitare le sei viti che tengono ferma la barra dell'antenna:

    • Quattro viti argento da 7,4 mm

    • Due viti nere da 4,7 mm

    Mine here is T6 Torx not T5.

    David Jones -

    When putting it back together, make sure to get the display cable connector out from under the antenna board before screwing the antenna bar back down. The connector has to go behind the bar in the little notch as the board goes through the opening in the bar.

    Matthew Granger -

    Mine here were Torx T4. Came with the kit.

    Jace Sheppard -

    My 4.7 mm screw is stripped.

    Any suggestions to get it removed?

    B S -

    B S,

    Darn, sorry that happened! Here's a guide with five different methods you can try to get it loose: Come rimuovere una vite danneggiata

    Best of luck!

    Carsten Frauenheim -

    These are T5. A T4 might work but you might strip it.

    A T6 shouldn't fit at all; if it does, your driver is either worn or just poor quality.

    maccentric -

  11. SAEGGdfncZdeZYYm
    SAEGGdfncZdeZYYm
    BAsqqhw4iQ4CWtpH
    qeEvDZBflVmW4Nlw
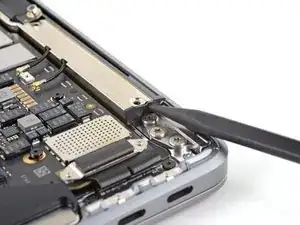
    • Infila la punta di uno spudger nella fessura tra la barra dell'antenna e la cerniera dello schermo.

    • Fai perno con lo spudger contro la cerniera peer fare leva e sollevare l'estremità della barra dell'antenna.

    • Ripeti per l'altra estremità della barra dell'antenna.

  12. Iokx4fkJ45pYlhlf
    Iokx4fkJ45pYlhlf
    TFAUPiYpoxIFaihc
    AanhCNNBiMLVkvFG
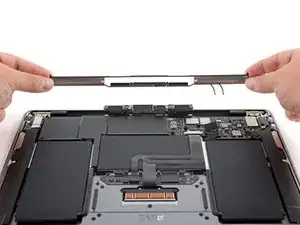
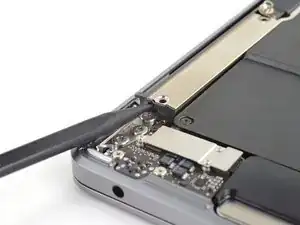
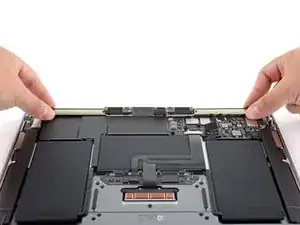
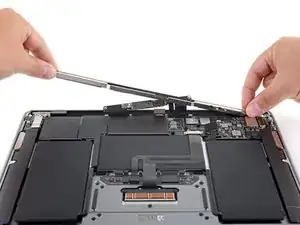
    • Usa le dita per tirare la barra dell'antenna verso l'alto e fuori dalla copertura.

    • La barra dell'antenna è incollata con dell'adesivo e potrebbe richiedere un po' di forza per rimuoverla.

    • Fai passare la scheda dell'antenna nell'apertura nel centro della barra dell'antenna.

    • Stai attento non tirare in alcun modo i cavi a nastro dell'antenna.

    • Rimuovi la barra dell'antenna.

    Separating antennae bar from case after removing screws is challenging. Author’s directions are good but what needs to be addressed is a thin strip of adhesive on both sides of the bar that needs to be separated. the strips are located on the hinge edge of the logic board mount area. I used a metal, razor thin, wide, blade type spudger to gently “wedge” underneath the bar along both adhesive strips to loosen the bar and lift it up. Careful!

    Macrepair SF -

    Thanks for this hint!!

    Benjamin Bradshaw -

    Before removing the antenna bar see if the right side is slightly elevated than the left. Upon replacement I could not get the right side to sit as flush as the left. However it may be intentional to protect the wifi wires.

    Harry Dulcamara -

    I was stuck on this step (removing the antenna bar) but this video helped me: https://www.youtube.com/watch?v=tHhHNjzO...

    Matthias -

Conclusione

Confronta la tua parte di ricambio con quella originale: potrebbe essere necessario il trasferimento di alcuni componenti o la rimozione di protezioni adesive dalla nuova parte prima di installarla.

Per rimontare il tuo dispositivo, segui le istruzioni in ordine inverso.

Dopo aver completato la riparazione, il tuo portatile potrebbe non accendersi finché non lo colleghi alla corrente.

Porta i tuoi rifiuti elettronici a un riciclatore certificato R2 o e-Stewards.

La riparazione non è andata come previsto? Prova delle soluzioni di base ai problemi, oppure rivolgiti alla nostra comunità Risposte per trovare aiuto.

Carsten Frauenheim

Membro da: 10/03/20

110750 Reputazione

0 commenti