Introduzione

Questa guida di riparazione è stata redatta dallo staff di iFixit ma non è stata approvata da Google. Leggi di più sulle nostre guide qui.

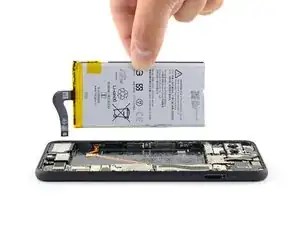
Segui questa guida per rimuovere o sostituire la batteria del Google Pixel 4 XL. Se la tua batteria è gonfia, prendi le precauzioni appropriate.

Per la tua sicurezza, scarica la tua batteria sotto il 25% prima di smontare il tuo telefono. Questo riduce il rischio di un evento termico pericoloso se la batteria viene danneggiata accidentalmente durante la riparazione.

Nota: Alcune immagini in questa guida mostrano il vassoio della scheda SIM rimosso dal telefono. Per questa procedura non ne è necessaria la rimozione.

Attenzione: Google avvisa che smontare il gruppo del laser anteriore può risultare in una pericolosa esposizione a delle emissioni laser invisibili ad infrarossi. Leggi le avvertenze sulla sicurezza qui.

  1. Hvp1kuHwJo1AClCp
    • Prepara un iOpener e appoggialo al bordo inferiore del vetro posteriore per un minuto.

    • Puoi usare anche un asciugacapelli, una pistola termica o una piastra scaldante, ma stai attento a non surriscaldare il telefono: lo schermo e la batteria possono essere danneggiate dal calore eccessivo.

    I found 2 minutes works best per side. Great Guide btw, thank you for being a strong leader in the fight for right to repair.

    Dennis -

  2. VK4rWKHPMxSBgjeI
    VK4rWKHPMxSBgjeI
    GS4NhjEZM3SCXJcR
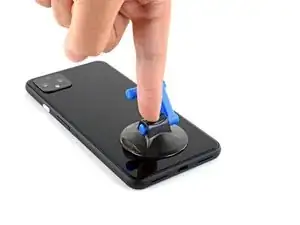
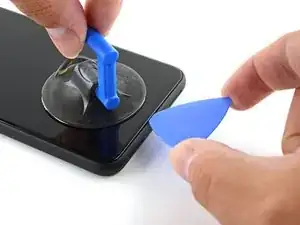
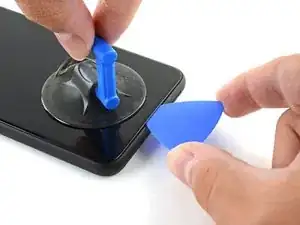
    • Applica una ventosa al bordo appena riscaldato premendola sul vetro il più vicino possibile al bordo.

    • Se il vetro è rotto, puoi coprirlo con del nastro adesivo da pacchi trasparente per aiutare la ventosa a fare presa. In alternativa puoi usare del nastro adesivo molto tenace al posto della ventosa. Se niente di ciò funziona, puoi usare della super colla per incollare la ventosa al vetro.

  3. mkgNQMFVCGsIjSWI
    mkgNQMFVCGsIjSWI
    ZcuoIwCBSbZQv1Jp
    • Tira la ventosa verso l'alto con forza elevata e costante per creare una fessura tra il pannello posteriore e il telaio.

    • A seconda dell'età del tuo telefono, questo può essere più o meno difficile. Se stai avendo problemi, scalda ancora il bordo e riprova.

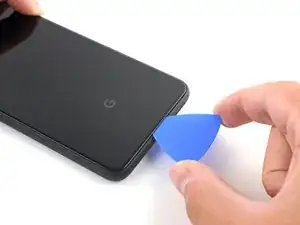
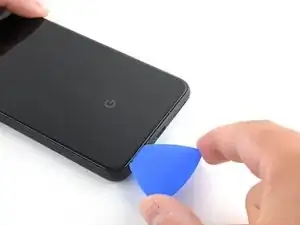
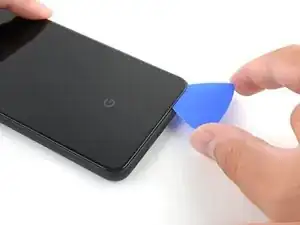
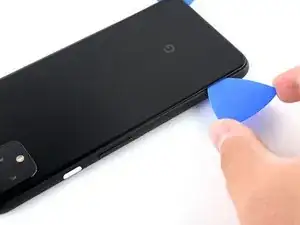
    • Infila la punta di un plettro nella fessura.

  4. JPn1p4UL3KeHgTlm
    JPn1p4UL3KeHgTlm
    rerDsh5OJUS5DXft
    pq3vfvBe5v5htEJY
    • Fai scorrere il plettro sotto il bordo inferiore verso l'angolo sinistro per tagliare l'adesivo.

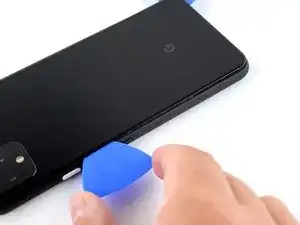
    • Ora fai scorrere il plettro sotto il vetro dall'angolo sinistro a quello destro per tagliare completamente l'adesivo sotto il bordo inferiore.

    • Lascia il plettro sotto l'angolo in basso a destra per evitare che l'adesivo si reincolli.

  5. bmjILIENBtpPcpxn
    • Prepara un iOpener e appoggialo al bordo sinistro del telefono per un minuto.

  6. GQ32GFimDFPnCaIN
    GQ32GFimDFPnCaIN
    KwMHik5nQYlWV3HD
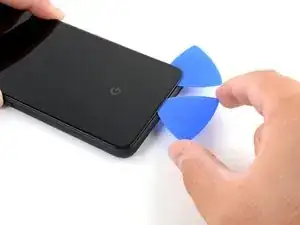
    • Infila un secondo plettro sotto il vetro sopra la porta di ricarica.

    • Fai scorrere il plettro verso l'angolo in basso a sinistra del telefono.

  7. 3wRXCsDVIiReHwDt
    3wRXCsDVIiReHwDt
    TsAtoOUWx5OUtfJw
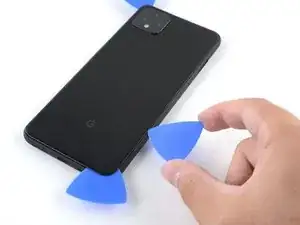
    • Fai scorrere il plettro attorno all'angolo in basso a sinistra e lungo il bordo sinistro del telefono per tagliare l'adesivo.

    • L'adesivo può essere molto gommoso. Muovi il plettro dentro e fuori dal telefono come fosse una sega per tagliare meglio l'adesivo.

    • Fermati quando raggiungi l'angolo in alto a sinistra vicino alla camera e lascia il plettro infilato sotto il vetro.

  8. qPt1cI1qIYhrYhrk
    • Prepara un iOpener e appoggialo al bordo destro del telefono per un minuto.

  9. 3MaLYKdcXwMGfmHm
    3MaLYKdcXwMGfmHm
    nNHbQECIIHKXCkeA
    dgKAYchvRQfbG4ZJ
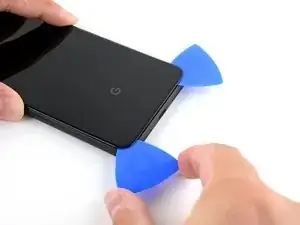
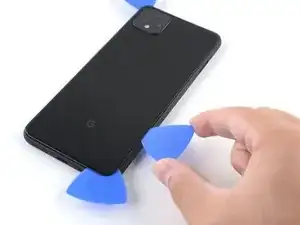
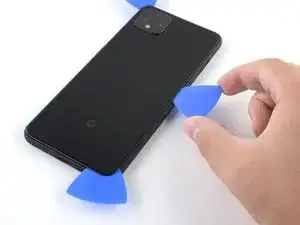
    • Con i primi due plettri ancora inseriti, infila un terzo plettro sotto la parte inferiore del bordo destro del vetro.

    • Fai scorrere il plettro verso l'angolo in alto a destra, tagliando l'adesivo sotto il bordo destro.

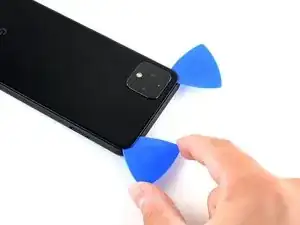
    • Fermati quando raggiungi l'angolo in alto a destra e lascia il plettro infilato sotto il vetro.

    Be careful when slicing the right side's adhesive. The contacts for the wireless charging pad are close to the edge and can easily be bent with the opening pick.

    John G -

  10. pdXuWBOPnOHID4vo
    pdXuWBOPnOHID4vo
    I1Y2GTUYJV4tftII
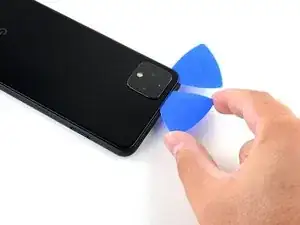
    • Fai scorrere il terzo plettro attorno all'angolo in alto a destra e lungo il bordo superiore, tagliando l'adesivo rimasto sotto il vetro.

  11. OMcDBjHL2YjtAAYG
    OMcDBjHL2YjtAAYG
    R6ddvSVjuedNBCHd
    ILBFbo2bfDKEJJGy
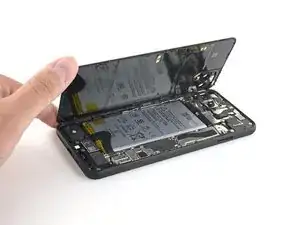
    • Una volta tagliato l'adesivo lungo tutto il perimetro del telefono, solleva attentamente il bordo destro del pannello posteriore in vetro, aprendolo come un libro.

    • Non cercare ancora di rimuovere del tutto il pannello: è ancora collegato al telefono.

  12. NijixQFNhSKKTdcI
    NijixQFNhSKKTdcI
    UxwAwwrw1KYD2pTe
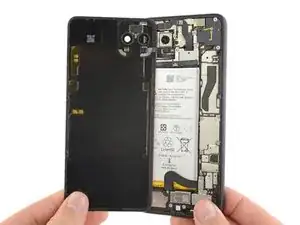
    • Continua ad aprire il pannello posteriore finché riesci ad appoggiarlo al bordo sinistro del telefono, stando attento a tirare troppo i cavi a nastro ancora collegati.

    • Durante il rimontaggio questo è un buon momento per accendere il telefono e provare se tutto funziona correttamente prima di reincollare il pannello di vetro. Assicurati di spegnere il telefono prima di continuare.

    “and test all functions before sealing it up.”

    Pretty sure I wont be sealing this up for a few hours, might be worth removing this part of the sentence as it’s confusing…

    Geoff B -

    Geoff B: These are good instructions. Any technician worth his or her salt will test the device for functionality before sealing it up. That’s why it reads, “During reassembly…and test all functions before sealing it up.” Not confusing if you read and comprehend the full pin.

    Jeana Morales -

    No instructions on how to fit new sticky gasket before assembly. Removing old adhesive was a messy business, I used IPA on a cotton bud and removed as much as possible with flat end of spudger and kitchen paper.

    Malcolm Hall -

  13. CbLvKfMPLSOIPeZj
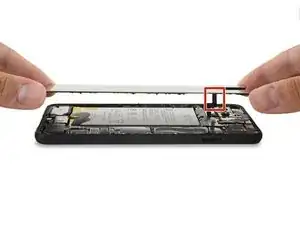
    • Svita le quattro viti Torx T3 che tengono fermo la copertura del connettore della batteria:

    • Una vite da 1,8 mm

    • Una vite da 4,1 mm

    • Una vite da 4,4 mm

    • Una vite da 4,0 mm

    • Durante questa procedura tieni traccia di ogni vite e assicurati di riavvitarla nella posizione originale.

    Anyone know the thread size of the 1.8mm screw mentioned here? Mine went missing, and I need to get a replacement. I've got a bunch of tiny screw kits, but none of them have fit!

    Joseph Sctbunio -

  14. hMmMYeCZjYcTckiS
    hMmMYeCZjYcTckiS
    TbLkCgwKGB3CkFsh
    • Usa un paio di pinzette per rimuovere la copertura del connettore della batteria.

  15. vjiUuPc6ra4hSELD
    vjiUuPc6ra4hSELD
    1FGTf5VCS2ELOc6N
    • Ogni volta che usi uno spudger vicino alla batteria, stai molto attento a non forarla.

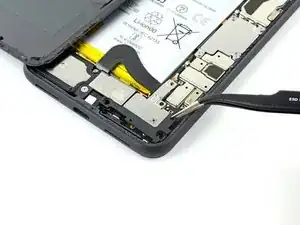
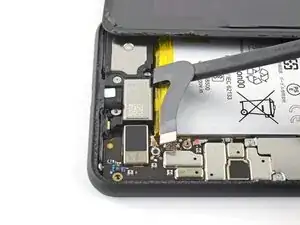
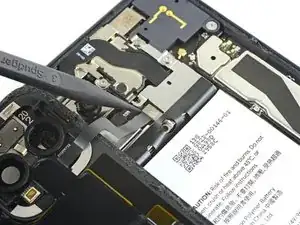
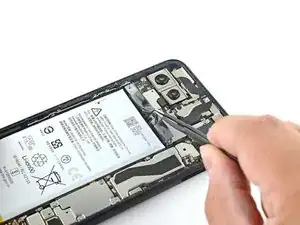
    • Usando la punta di uno spudger, fai leva sul connettore della batteria per sollevarlo e scollegarlo dalla sua presa sulla scheda madre.

    • Per ricollegare i connettori a pressione come questo, allineali correttamente quindi premi su un lato finché non scatta in posizione, quindi fai lo stesso per l'altro lato. Non premere nel centro: se il connettore non è posizionato correttamente i contatti si possono piegare, causando danni permanenti.

    I had the piece from the cable break off inside the connector. How would I go about getting it out

    Dylan DVP -

    What are the 5 copper dots under the battery connector for.

    Brian Davis -

    When you reattach the connector to the motherboard this is a good time to power up and check basic functionality temporarily. Even though it had appeared it was correctly lined, my camera was not functional, in particular the switch button from the rear to the front camera, I was stuck in selfie mode. Then I was getting a message on the screen, possible hardware or software issues. Once I reattached the connecter (several times) until it was correctly inlined, the error went away and I was able to switch from the rear and front cameras.

    bonita pauley -

    That was a good call! Thanks!

    Esther -

  16. jPpHHrKTJhDOLRAB
    jPpHHrKTJhDOLRAB
    35eGEb6Yerdr1akU
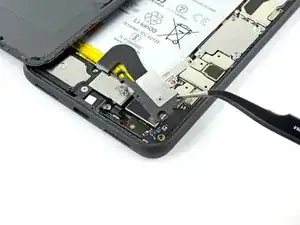
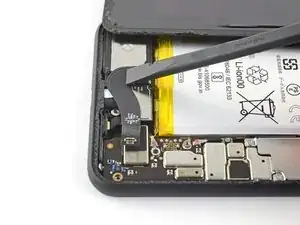
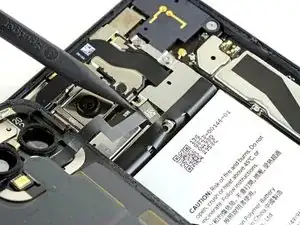
    • Usa la parte piatta di uno spudger per piegare all'indietro il cavo a nastro della batteria in modo che non faccia contatto durante la procedura.

  17. pW6WYwrosLkYWaER
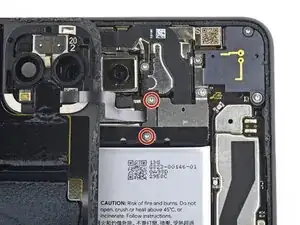
    • Usa un cacciavite Torx T3 per svitare le due viti da 4,1 mm che tengono ferma la copertura del connettore del pannello posteriore.

    Wouldn’t it make more sense to use the same (orange) color circles as the other 4.1mm screw?

    Mark Kanzler -

    Maybe Google did it to avoid exchange in the models where they differ

    Daniele Carminati -

  18. XYAjcLAoBQJMddZM
    XYAjcLAoBQJMddZM
    LhAReXLOg44Cb1wP
    • Usa un paio di pinzette per rimuovere la copertura del connettore del pannello posteriore.

  19. laE2TsjjIUOFpHUR
    laE2TsjjIUOFpHUR
    6GAPsQ54pk1QgKgK
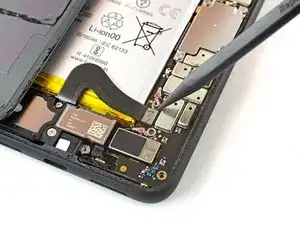
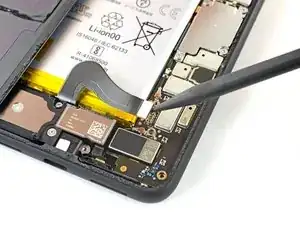
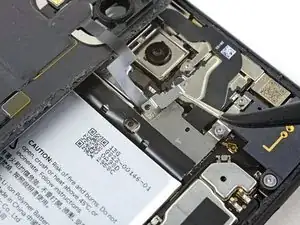
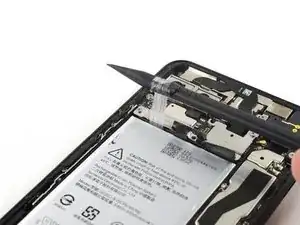
    • Usa la punta di uno spudger per sollevare e scollegare il connettore del pannello posteriore.

    During reassembly, make sure to firmly connect this back panel connector.

    I had to hold the back panel close to the phone so that the connector stays connected, while putting back all the screws.

    Esther -

  20. CafjDv5LWBPJIgAZ
    • Rimuovi il pannello posteriore.

    • Prima di installare un vetro di ricambio, assicurati di aver rimosso tutto l'adesivo presente sul telaio. Usa uno strumento di apertura e dell'alcool isopropilico ad alta concentrazione per pulire tutte le superfici interessate.

    • Se vuoi riusare il pannello posteriore, assicurati di pulire tutto l'adesivo anche e applicarne del nuovo sul vetro.

    • Se stai installando un nuovo vetro, assicurati di confrontarlo con quello originale.

    REASSEMBLY ADHESIVE: This is the step during reassembly that you'll want to set the back glass adhesive strip on (before you reattach ribbons). Set the adhesive strip into the body of the phone with the red tabs down (toward the body of the phone, it will simply rest inside the lip of the phone body). Press the back glass onto the adhesive strip to set the strip onto the back glass, lift the back glass back out of the body of the phone. Next reattach the ribbons, test functions, reattach connector covers, peel red adhesive cover off of the adhesive (on the back glass) then set the back glass into the phone lip. This could have been explained far better but was skipped over and the generic adhesive instructions posted in the comments are useless for this.

    Michael A. Mascaro -

    There are also detailed instructions at answer 742532, "How do I apply new back panel adhesive on a Pixel 4xl?" (sorry it doesn't let me link directly). But it advises adhering the adhesive to the main frame first before the glass. I do notice a slight lip on the main frame on both sides, which seems less forgiving to align with than the glass, so I would imagine doing the frame first would be easier? I haven't done this yet myself, so would be interested in opinions.

    AySz88 -

    Update: it appears the discrepancy is due to a difference between the third-party adhesives and the iFixit "genuine" one. The iFixit one is not mirror symmetric and must be adhered to the glass back first, though it has cutouts that avoid protrusions and facilitate this. The third-party one (I believe) has no such cutouts and thus must go on the frame first.

    However, in trying to follow Michael's instructions, I could not get the adhesive and red tabs off the blue plastic without distorting the adhesive, and had to take the clear side off first. I ended up directly placing the adhesive onto the glass back, without the frame to help align (I posted my method in the above-mentioned answer 742532). The cutouts in the blue plastic seem to have been made with this in mind.

    AySz88 -

  21. RUKtbVcDJKDJ4vyf
    RUKtbVcDJKDJ4vyf
    2RjKl1PhERlca45d
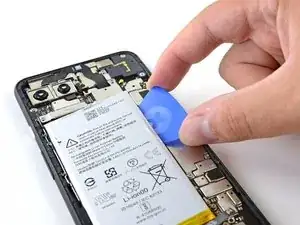
    • Usa un paio di pinzette a punta arrotondata per sollevare la linguetta di estrazione delle strisce adesive in modo da poterla afferrare più facilmente con le dita.

    • La batteria è tenuta ferma da tre strisce adesive collegate ad una sola linguetta di estrazione nera. Puoi provare a rimuovere tutte le strisce insieme, ma è più semplice tagliare la linguetta dove è traforata e tirare ogni striscia singolarmente.

    Yellow tab instead of black in my oh so orange Pixel 4XL

    Geoff B -

  22. gyvHQRuRPmvIYwU5
    gyvHQRuRPmvIYwU5
    vNX3QG5sNNajeA51
    • Tira l'aletta di estrazione nera ad un angolo quasi parallelo al telefono con forza costante. Quando l'adesivo si allunga troppo, arrotolalo su uno spudger e continua a tirare.

    • Continua a tirare con forza costante la striscia adesiva, continuando ad arrotolarla sullo spudger man mano in modo da tenere l'adesivo esposto il più corto possibile.

    • Questo passaggio può richiedere parecchia forza.

    • Queste strisce adesive si strappano facilmente durante questa procedura. Cerca di tirarle il più lentamente possibile.

    • Se le linguette non si allungano puoi applicare qualche goccia di alcool isopropilico ad alta concentrazione sotto il bordo sinistro della batteria. Lascia agire l'alcool un minuto per ammorbidire l'adesivo della batteria.

    • Ripeti questa procedura per ogni striscia finché non sono state rimosse o si sono strappate.

  23. abLR2s31SrdIrv4a
    abLR2s31SrdIrv4a
    EQ3AijgERgpSRHZr
    6QChvAyEewmetqtH
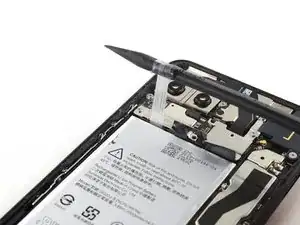
    • Se le strisce adesive si sono strappate durante la rimozione, infila un plettro sotto il bordo superiore destro della batteria per tagliare l'adesivo sottostante.

    • Anche se hai rimosso con successo tutte le strisce adesive, usare un plettro per rimuovere la batteria può essere utile.

    • Non infilare il plettro contro o sotto il cavo del sensore di pressione, in quanto il plettro può danneggiare il cavo flessibile della porta di ricarica sotto la batteria.

    Strip of glue is only on the top part, only 3 stripes. Becareful passing the gold strip

    Jairon Lopez -

    I wouldn't risk going across the topside of the battery either. the thin cable connecting the side buttons to the board is exposed and is easy to break. Learned from experience.

    Rancid -

    Also broke this grip sensor cable but now what where to get one?

    David Johnson -

    I carefully pulled up the battery from the bottom using the opening pick because my adhesive pull tabs snapped. The battery was so strongly glued to the bottom. I needed to use the other tools in the box to really push the battery out. Could not do it that gently. But anyway succeeded! v

    Esther -

  24. ap4VF3pgdfg1m2OS
    ap4VF3pgdfg1m2OS
    MgqEJbJx3PEN6rIo
    • Non riutilizzare la batteria una volta rimossa, poiché è un potenziale pericolo per la sicurezza. Sostituiscila con una nuova batteria.

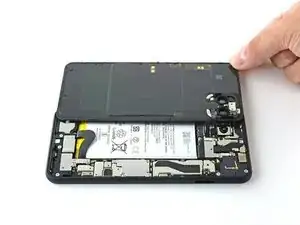
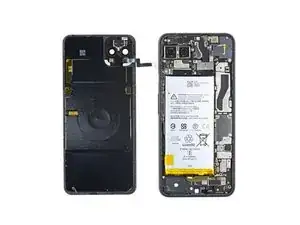
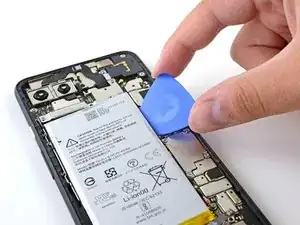
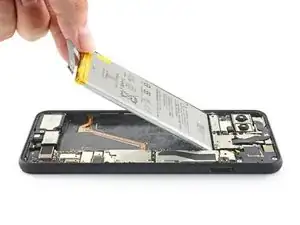
    • Solleva la batteria dal telefono per rimuoverla.

    • Per installare una nuova batteria:

    • Rimuovi tutto l'adesivo rimanente nell'alloggio della batteria.

    • Se stai usando delle strisce adesive estensibili, applicale alla batteria. Altrimenti, applica del nastro biadesivo o un foglio di adesivo pretagliato nell'alloggio della batteria, stando attento a non coprire il cavo a nastro della porta di ricarica. Rimuovi la protezione dell'adesivo per esporre la parte adesiva.

    • Collega temporaneamente il connettore della batteria alla sua presa sulla scheda madre. Questo ti assicura che la batteria sia posizionata correttamente.

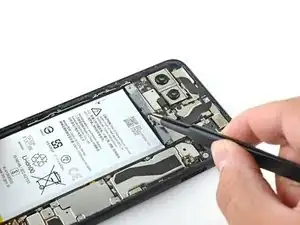
    • Appoggia la batteria in posizione e premila con decisione.

    • Scollega il connettore della batteria dalla sua presa sulla scheda madre e continua a rimontare.

    The kit comes with a replacement glue strip for the back cover. I would like to have seen some guidance on putting that on. I’m not exactly a beginner at repairing things in general, but this is the first time I’ve worked on a phone. Figuring it out wasn’t too bad, but getting the old glue off enough to make it work added 15-30 minutes to the process.

    Jason Ridenour -

    This is what I’m sitting at now. probably 90% of the original glue off. did you put the replacement strip on the cover first or the body of the phone?

    david janzen -

    For this, I peeled off the white strip and placed the new adhesive (with blue template still on) onto the inside of the back cover, making sure it aligned. I then peeled off the blue sheet and applied pressure and a mostly-cooled iOpener to help it adhere. Worked very well for me.

    Zaeda June -

    You can follow this adhesive guide for installing new battery adhesive!

    Carsten Frauenheim -

    I decided to give up on getting all of the original adhesive stuff. I removed maybe 30% of it and then placed the replacement strip. It seems to be okay, and the back closed all the way.

    Chem -

    FYI the kit includes a new adhesive tapes for the battery. I only found out because I looked inside the kit.

    Esther -

Conclusione

Per avere prestazioni ottimali, calibra la tua nuova batteria appena installata dopo aver completato la procedura.

Confronta la tua parte di ricambio con quella originale: potrebbe essere necessario il trasferimento di alcuni componenti o la rimozione di protezioni adesive dalla nuova parte prima di installarla.

Per rimontare il dispositivo, segui le istruzioni in ordine inverso.

Porta i tuoi rifiuti elettronici a un riciclatore certificato R2 o e-Stewards.

La riparazione non è andata come previsto? Prova delle soluzioni di base ai problemi, oppure rivolgiti alla nostra comunità Risposte per trovare aiuto.

Carsten Frauenheim

Membro da: 10/03/20

110750 Reputazione

36 commenti

Worked great, was tough pulling up the battery but other than that went super smoothly. thanks!!

Kader Belbina -

Really comprehensive, helpful and well-written guide. I prefer to learn to fix things on my own, so this was immensely helpful and just what I needed. Thank you so much!

Zaeda June -

the adhesive pull tabs? there was no way to get them out as the hardware prevents you from pulling at the right angle. i went with softening the glue with a couple drops of alcohol and prying the battery up enough to get a guitar pick in and cut the rest.

Camilo Santana -

Just finished changing the battery to my Pixel 4XL. Battery was slightly bloated (about 1mm) but still running great, at 104% after one year and a half. However, it suddenly stopped charging wirelessly, even from the original Pixel charger.

The kit was great, everything happened according to the instructions. Carefully cleaning the old adhesive took most of the time. I used lint-free wipes and a small syringe filled with Isopropyl alcohol 99.9% to drop the liquid over the adhesive strips in small sections, with the phone positioned vertically, so the alcohol didn’t get inside. Same for the rear cover [Regular rubbing alcohol does not work at all for this purpose] The alcohol really helped removing the old stretch release strips really fast. The connector of the new battery was slightly out of alignment, so I had to plug it first, with the battery leaning at a small angle, then seat the battery on the glue strips. Thank you, that was fun! :)

Radu O. -

Great tutorial. I followed all the steps. And, even with the new battery, it's still stuck in 50%.

My phone took a dive in the pool. I love in Brazil, do I don't have Google technical support available, and due to battery mailing restrictions it took 6 months until I managed to receive a spare one.

Do you guys know what could I do?

Thanks

r.duarte -

it is stuck both while turned on and while off? does the battery life is decreased? or is it only a broken report of battery %age? while you tore down the phone, did you see any corrosion aroud?

Daniele Carminati -

Same problem here, but the Pixel turns on and work.. just don't recognize the level of battery.. it shows a "?" icon in the battery's icon...

Some times turns off or on without any sense.. so i don't know if its a problem of battery (the original one, i didn't change it yet) or the weird"Battery FPC Connector"... Just because i can change a battery, nut i can't do a "Damaged Battery FPC Connector Replacement". So if someone knows please tell me if i need a battery replacement or a FPC Connector replacement :c

Antonio Saturno -

Wow. I’ve fixed about 10 phones now and I’ve always had issues getting new adhesive tape delivered without being mangled into an unusable crumpled ball. They packaged it between two thin pieces of plastic and it arrived in perfect condition. They also don’t use plastic bubble wrap as their insulating material which is a refreshing change.

Thanks for the informative guide, competitive price and quality service!

Jake Graveldinger -

Thank you so much, @carsten and the entire iFixit team! <3

Chem -

Hi, I'm having issues with my Pixel's battery and I wanted to buy the kit for battery replacement, but I'm from Mexico.

Do you know if there's a place with international shipping? I would like to buy that kit.

Juan Carlos Garibay -

Sorry to hear about the trouble! Please contact iFixit Customer Support and they would be happy to assist you.

Carsten Frauenheim -

Great guide. I only wish there was a bit more details in the application of the adhesive in the re-assembly.

That said, my 17-year old son was able to follow the instructions and resurrect his Pixel 4XL that had been destined for the trash bin.

Thank you!

Byron Todd -

We have a couple of adhesive installation guides, here and here. You can reference those the next time you tackle a repair!

Carsten Frauenheim -

I ordered a new battery kit from iFixIt for my Pixel 4 XL ([prodotto collegato mancante o disabilitato: IF356-158]) with the intent to use this guide.

From what I've seen elsewhere on the internet, I expected the battery to say either "Huizhou Desay Battery Co., Ltd" or "Sunwoda Electronic Co., Ltd". However, that portion of the label is blank -- there is no company name listed.

It also has 3700 mAh on the front label but the rear has a QR code and some text printed including "3740 mAh".

I'm concerned about the legitimacy of this battery.

nukem2k5 -

Changed the battery to the second Pixel 4XL. Obviously, it went faster. Having some highly concentrated isopropyl alcohol (>99% by volume) makes your life a lot easier when clearing the gunk and dislodging the battery.

What I want to mention is: please DO NOT RUSH. Take your time, do it elegantly. For the first time changing a battery, 30 minutes estimated time is a little too optimistic. Scrapping off the old gunk from the phone and the back cover took more than I thought, but it’s a cheap price to pay for a job done well. It was fun!

IFixit rocks!

Radu O. -

Overall this is a really well made guide, instructions for disassembly are clear and the pictures are definitely helpful. I do wish the guide actually showed the best ways to apply new adhesive though. It’s not hard to figure out but just taking out the battery and doing the steps backwards again isn’t really a complete reflection of the job.

Tom Vieira -

We have a couple of adhesive installation guides, here and here. You can reference those the next time you tackle a repair!

Carsten Frauenheim -

Thanks @carsten this repair guide mostly worked for me. My only issue is that my phone now doesn’t display the battery % and has a warning message “Problem reading your battery meter”. Does anyone have any ideas?

Adam -

I was getting this warning from my Pixel 4XL “problem reading your battery meter”. Ordered the battery and repair kit. Works great now, error message is gone. The glue ring around the back plate is definitely the most annoying thing. I doubt the phone is water resistant now, but I’m still very happy with this repair.

Marc Gagnon -

This is totally my fault that this happened, because I didn’t read both guides thoroughly before starting, but there needs to be a big red “STOP” symbol at the top of this guide that says “Stop! If you intend to replace your screen, start there first. Do not replace the battery and replace the rear cover prior to replacing the screen.” I am out 2 hours of my life and have to wait for another back adhesive piece. But the bright side is the battery works great and combined with a fresh factory reset the phone is running like new.

Cabel Gray -

Just did it. It was tough to get passed the glue thing on both the back cover and the battery, but I did it successfully. Now I have the phone as new, apart from the fact that the phone is not water resistent. I would add new steps to describe how to reseal with new glue and where to buy it. However, I just used the iOpener to reheat the glue so that it attaches again. Taking into account that I use the pixel cover, that shouldnt be a problem.

Iñaki Paz -

After replacing the battery my phone charged to 88% then stopped. The charging icon flickers when a charger is plugged in but it hasn't gone further.any idea what could cause this?

Kelley -

Help me battery

Baljinder Singh -

Thank you for this very GREAT GUIDE. My Pixel 4XL stopped wireless charging due to the internal battery being "bloated". It was of great help also because you have mentioned the tools needed; i.e. T3 driver, removing the battery adhesive was a pain though as all three of them broke at the very moment it was pulled. Nonetheless the entire replacement process took about 40 minutes following this guide, now it is sleek and thin and wireless charging is back.

Raymond Tan -

I followed the guide exactly and somehow my display has been damaged. The haptics still work so I know its on and the touch screen works but the display doesn't power on. Please help.

Parker Oria -

The lack of explanation for the back glass adhesive is pretty bad. It's a major reassembly step that is just completely skipped over with completely no mention and kind of complicated in comparison to the rest of the process IMO. It really needed to be in here so I've added a comment with regards to it. The generic adhesive instructions that have been posted in the comments aren't helpful for this at all either. Outside of this major instruction flaw the rest was solid and spot on. The phone has been fixed and Is working properly once again for way less than having someone else fix it.

Michael A. Mascaro -

I have assembled the battery but it is not charging: connected but not charging. Can anyone help me solve this problem?

Saoud Alanezi -

mine didnt charge at first aswell mb try reconnecting the battery

took me 5 tries of reconnecting

corni -

my phone battery started getting worse and worse and didnt display % so i decided to try my luck on replacing it. some small tips from me:

-things u need(from ifixit store): the battery replacement, adhesive strips for battery and back, the iOpener kit and a torx t3 4mm precision bit which is sold separately...

-hardest things when repairing: battery was very hard to get out... i had a friend help me and gently nudged some plectrums under it to make it easier... other hard thing was reconnecting the battery for me... i reconnected it 5 times and on the last try i finally got it right and the phone worked again. that little connector can be tough but still try to be gentle.

corni -

Honestly I would not recommend, as the pins on the battery connector broke off after a month of installation. I opened my phone back up to see why my phone would no longer charge and I see that the battery pins got stuck on the phone and that the battery connector on the battery itself was missing. I wish I could post pictures, but bottomline is that this product's build quality is inferior.

joshuagonzales1995 -

Great tutorial and excellent kit! My 3-year old Pixel 4XL could not read the battery meter with a '?' on the battery icon. The adhesive part was pretty fiddly. Apart from that, instructions worked like a charm and my phone has a new lease of life!!!

Thanks!

Subbarao Manchala -

Why do you remove the battery connector before removing the back cover?

Esp Ghia -

Hey! For the safest repair possible, we like to disconnect the battery as soon as we're able. In this case, it's accessible right after the back cover lifts away.

Carsten Frauenheim -

Hi Carsten, thanks for the reply. I made the repair today using this guide. Because my battery was replaced under warranty some time ago, things looked a bit different inside. The battery was installed with kapton tape, which made it very easy to remove. I found the hardest part of the process was to create a gap to begin removal of the glass back. The trickiest part was putting the battery and sensor connectors back in place. The battery is definitely charging. Fingers crossed, I haven't ruined the top sensor.

Esp Ghia -

I spent about 2 hours and 40 minutes to replace the battery and reassemble the back panel.

Taking out the battery and removing the adhesive took the longest. Also, keeping the back panel connector secured while putting the screws was hard. I had to hold the cover from closing while putting the screws on with the other hand.

Overall, this guide helped a lot and I couldn't have done without it.

It was fun and nerve-racking at the same time. I'm glad I tried to change my own battery and it's working great! I added a few of my comments in the guide and hope it helps.

Esther -

Good tutorial, fiddly to reassemble connectors and no instruction for fitting new back gasket. Apart from that it went well. I do have experience in mechanical and electronic assembly however.

Malcolm Hall -