
Introduzione
Segui questa guida per rimuovere e sostituire in sicurezza la batteria del tuo MacBook Air di fine 2018.
Per minimizzare il rischio di danneggiamenti, accendi il tuo MacBook e consenti alla batteria di scaricarsi completamente prima di iniziare questa procedura. Una batteria agli ioni di litio carica può creare un incendio pericoloso e incontrollabile se viene forata accidentalmente. Se la tua batteria sembra gonfia o ingrossata, prendi adeguate precauzioni.
-
-
Se il tuo MacBook funziona con Big Sur v11.1 o successive, disattivare l'Auto Boot potrebbe non funzionare. Puoi procedere normalmente, ma assicurati di scollegare la batteria appena sei dentro.
-
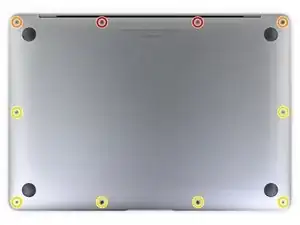
Usa un cacciavite pentalobe P5 per rimuovere le viti seguenti:
-
Due viti da 7,9 mm
-
Due viti da 7,1 mm
-
Sei viti da 2,6 mm
-
-
-
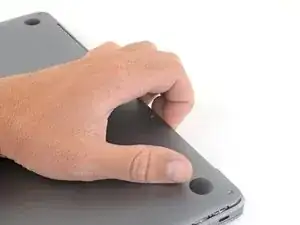
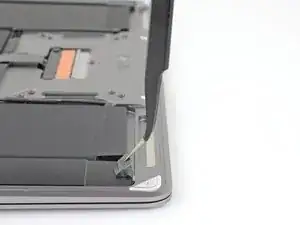
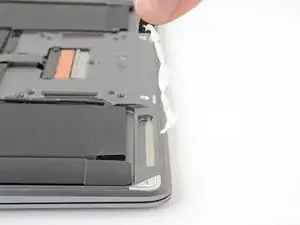
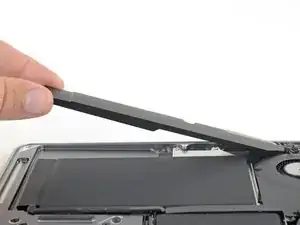
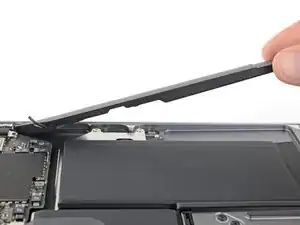
Infila le dita tra lo schermo e il case inferiore per sollevare dall'Air la cover stessa.
-
Rimuovi il case inferiore.
-
-
-
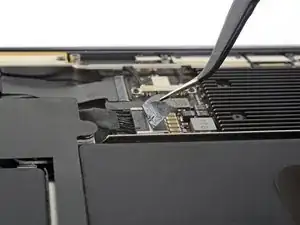
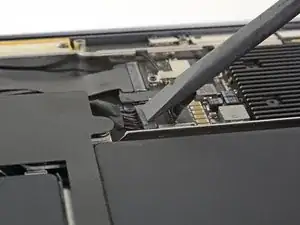
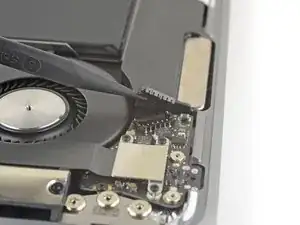
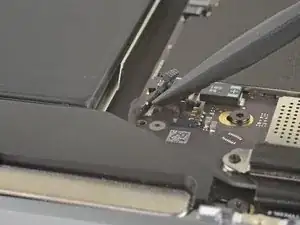
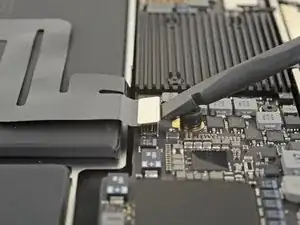
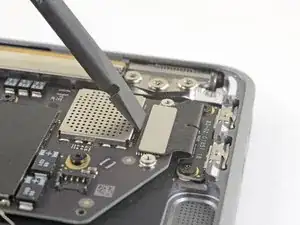
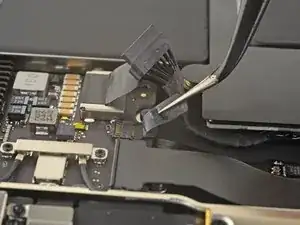
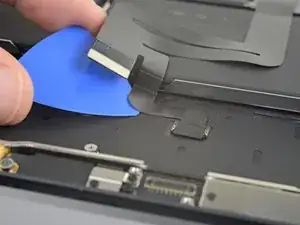
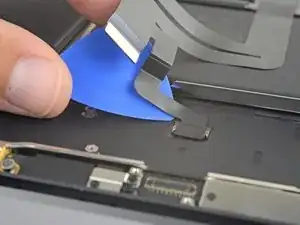
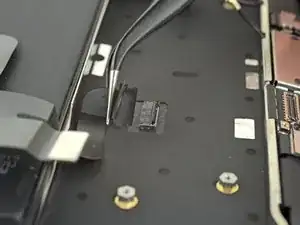
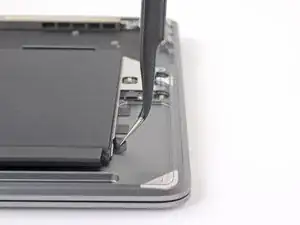
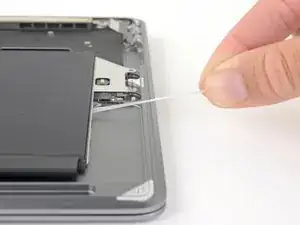
Stacca il nastro adesivo che copre il connettore della batteria quanto basta per scoprire lo stesso connettore.
-
-
-
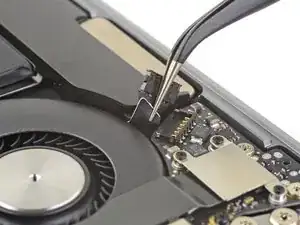
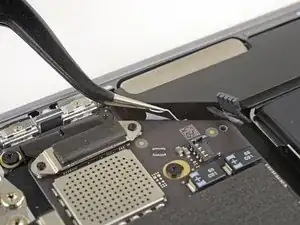
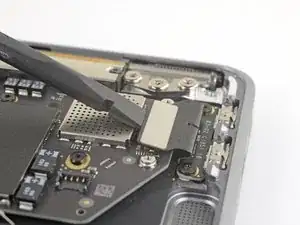
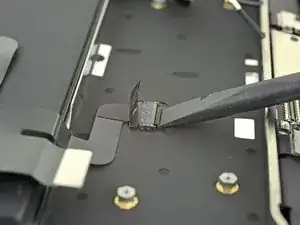
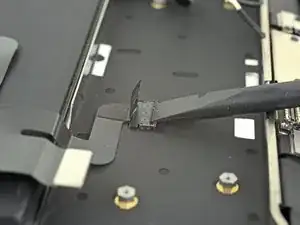
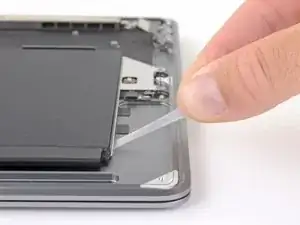
Usa uno spudger per far scorrere il connettore della batteria parallelamente alla scheda logica, tirandolo fuori dal suo zoccolo sulla scheda.
-
-
-
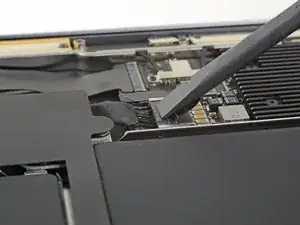
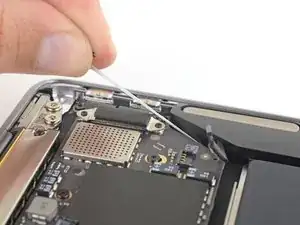
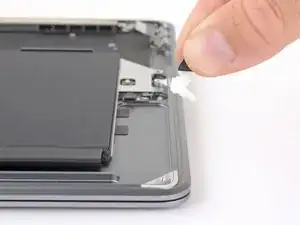
Usa delle pinzette per sollevare la linguetta dell'adesivo nero sulla parte inferiore dell'altoparlante destro, quanto basta a poterla afferrare con le dita.
-
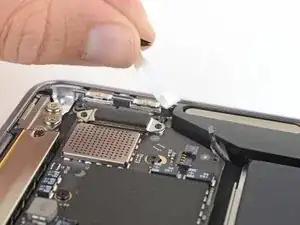
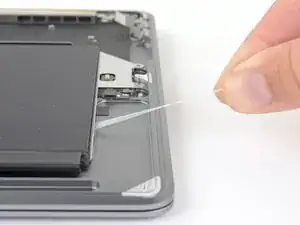
Afferra la linguetta della striscia adesiva e, lentamente e con cautela, tira fuori la striscia adesiva da sotto l'altoparlante.
-
Se la striscia adesiva si rompe, lasciala dov'è e procedi con il passo successivo.
-
-
-
Fai scorrere la punta di uno spudger sotto il cavo dell'altoparlante destro e fai leva verso l'alto per scollegare lo speaker.
-
-
-
Usa delle pinzette per sollevare la linguetta della striscia adesiva sopra dell'altoparlante destro, quanto basta per poterla afferrare con le dita.
-
Afferra la linguetta della striscia adesiva e, lentamente e con cautela, tira fuori la striscia adesiva da sotto l'altoparlante.
-
Applica del calore sull'altoparlante per ammorbidire l'adesivo sottostante.
-
Fai scorrere con delicatezza uno spudger o un plettro di apertura sotto l'altoparlante per staccare l'adesivo.
-
-
-
Usa delle pinzette per sollevare la linguetta dell'adesivo nero sulla parte inferiore dell'altoparlante sinistro, quanto basta a poterla afferrare con le dita.
-
Afferra la linguetta della striscia adesiva e, lentamente e con cautela, tira fuori la striscia adesiva da sotto l'altoparlante.
-
Se la striscia adesiva si rompe, lasciala dov'è e procedi con il passo successivo.
-
-
-
Fai scorrere la punta di uno spudger sotto il cavo dell'altoparlante destro e fai leva verso l'alto per scollegare lo speaker.
-
Una volta scollegato il connettore, fai scorrere l'estremità piatta di uno spudger sotto il cavo per staccare l'adesivo che fissa il cavo alla scheda logica.
-
-
-
Usa delle pinzette per sollevare la linguetta della striscia adesiva sopra dell'altoparlante sinistro, quanto basta per poterla afferrare con le dita.
-
Afferra la linguetta della striscia adesiva e, lentamente e con cautela, tira fuori la striscia adesiva da sotto l'altoparlante.
-
Applica del calore sull'altoparlante per ammorbidire l'adesivo sottostante.
-
Fai scorrere con delicatezza uno spudger o un plettro di apertura sotto l'altoparlante per staccare l'adesivo.
-
-
-
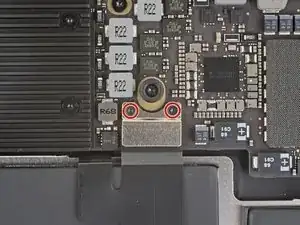
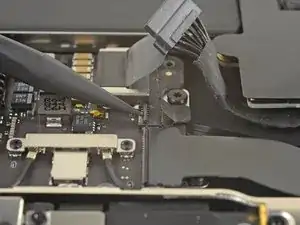
Usa un cacciavite Torx T3 per rimuovere le due viti da 1,4 millimetri che fissano la staffa del connettore del trackpad.
-
Rimuovi la staffa del connettore del trackpad.
-
-
-
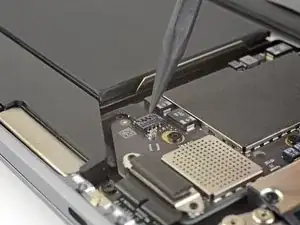
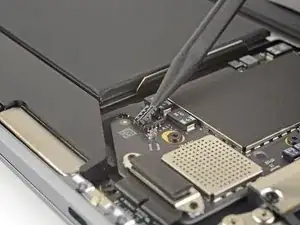
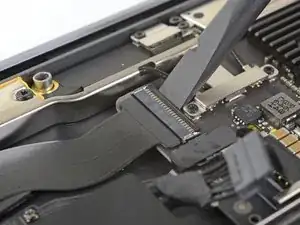
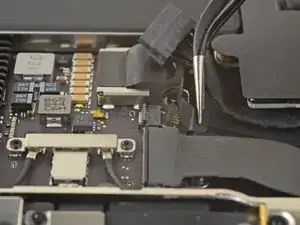
Usa l'estremità piatta di uno spudger per far leva sul connettore del cavo del trackpad per sollevarlo dal suo zoccolo.
-
-
-
Fai scorrere l'estremità di uno spudger sotto il cavo dell'altoparlante e fai leva per sollevare il cavo stesso e scollegare l'altoparlante.
-
Con il connettore scollegato, fai scorrere l'estremità piatta di uno spudger sotto il cavo per staccare l'adesivo che fissa il cavo alla scheda logica.
-
-
-
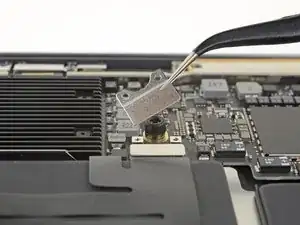
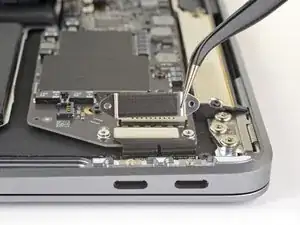
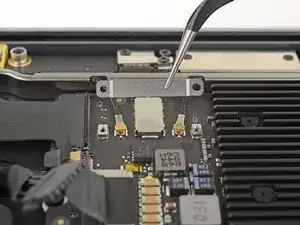
Usa un cacciavite Torx T3 per rimuovere le due viti da 1,3 mm che fissano la staffa del connettore della porta USB-C.
-
Rimuovi la staffa del connettore USB-C.
-
-
-
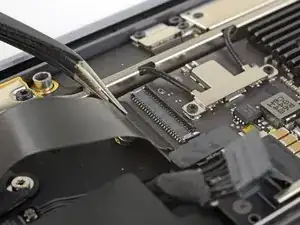
Usa l'estremità piatta di uno spudger per sollevare il connettore del cavo USB-C fuori dal suo zoccolo sulla scheda logica.
-
-
-
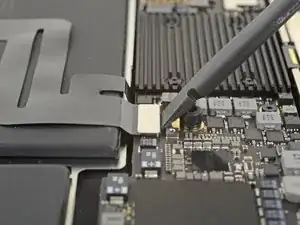
Usa uno spudger per sollevare la piccola aletta di bloccaggio del connettore ZIF del cavo della scheda audio.
-
Fai scorrere il cavo della scheda audio fuori dal connettore ZIF.
-
-
-
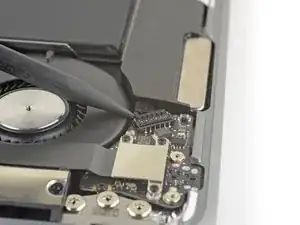
Usa l'estremità a punta di uno spudger per sollevare l'aletta di bloccaggio del connettore ZIF del cavo della ventola.
-
Fai scorrere il cavo della ventola fuori dal connettore ZIF.
-
-
-
Usa un cacciavite Torx T3 per rimuovere le due viti da 1,4 mm che bloccano la staffa del cavo di antenna.
-
Rimuovi la staffa del cavo di antenna.
-
-
-
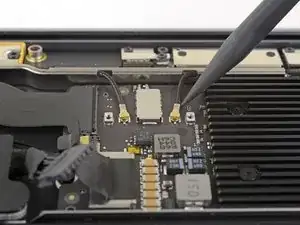
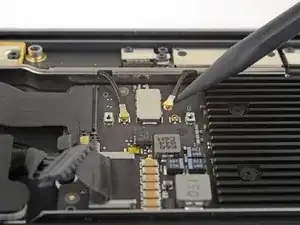
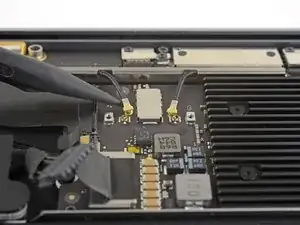
Inserisci l'estremità punta di uno spudger sotto uno dei cavi di antenna vicini al connettore. Fai leva per alzare e scollegare il cavo.
-
Ripeti l'operazione per l'altro cavo di antenna.
-
-
-
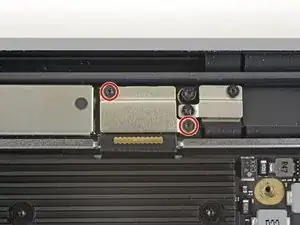
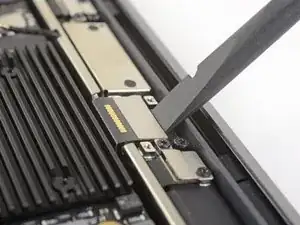
Usa un cacciavite Torx T3 per rimuovere le due viti da 1,5 mm che fissano la staffa del connettore del cavo dello schermo.
-
Rimuovi la staffa del connettore del cavo dello schermo.
-
-
-
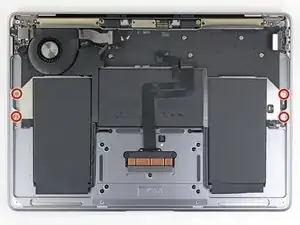
Usa un cacciavite Torx T5 per rimuovere le viti seguenti:
-
Una vite da 5,5 mm
-
Tre viti da 2,6 mm
-
Due viti da 1,9 mm
-
-
-
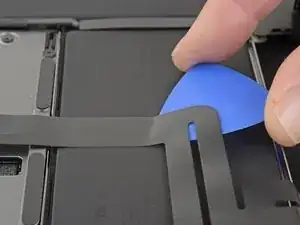
Fai scorrere con delicatezza un plettro di apertura sotto il cavo del trackpad per staccare l'adesivo che lo fissa al case superiore.
-
-
-
Usa l'estremità piatta di uno spudger per sollevare la piccola aletta di blocco sul connettore ZIF del trackpad.
-
Fai scorrere il cavo del trackpad fuori dal suo connettore.
-
-
-
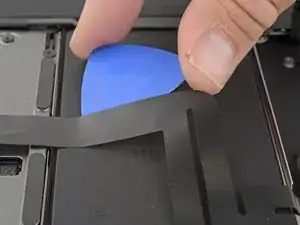
Fai scorrere con delicatezza un plettro di apertura sotto il cavo del trackpad per staccare l'adesivo che lo fissa al case superiore.
-
-
-
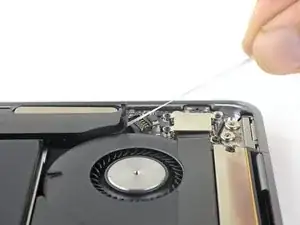
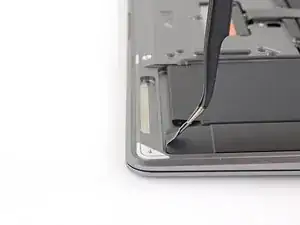
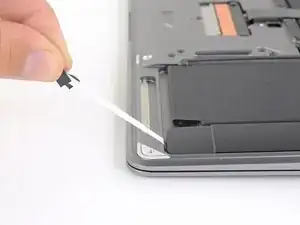
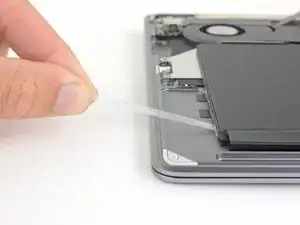
Usa delle pinzette per sollevare la linguetta di estrazione nera dell'adesivo sul lato della batteria, quanto basta per poterla afferrare con le dita.
-
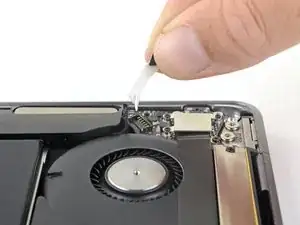
Afferra la linguetta di estrazione e tira fuori la striscia adesiva, lentamente e con delicatezza, da sotto la batteria.
-
Se la striscia adesiva si rompe, lasciala dov'è e procedi con il passo successivo.
-
-
-
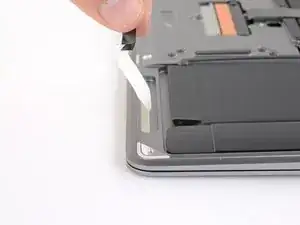
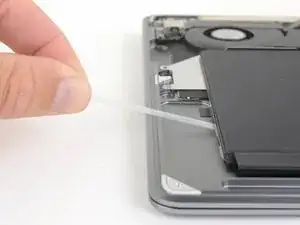
Ripeti il passo precedente per rimuovere le successive due strisce adesive dallo stesso lato della batteria.
-
Se una o entrambe le strisce adesive si rompono, lasciale dove sono e procedi con il passo successivo.
-
-
-
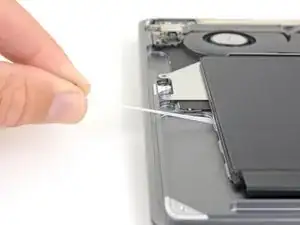
Ripeti i due passi precedenti per rimuovere le tre strisce adesive dal lato opposto della batteria.
-
Con cautela, metti alcune gocce di alcol isopropilico su ciascun bordo della batteria, nelle parti incavate del case superiore dove si trovavano le strisce adesive estensibili.
-
Lascia che l'alcol imbeva l'adesivo per uno o due minuti.
-
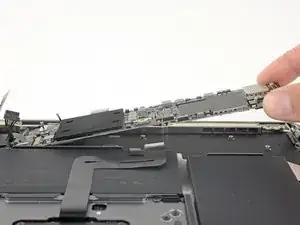
Usa con delicatezza dei plettri di apertura per staccare la batteria dal case superiore.
-
-
-
Rimuovi la batteria.
-
Calibra la nuova batteria: caricala al 100% e poi tienila in carica almeno altre 2 ore. Quindi stacca l'alimentazione e usa il laptop normalmente per farlo scaricare. All'avviso di batteria in esaurimento, salva il tuo lavoro e tieni acceso il MacBook finché non si iberna perché è scarico. Aspetta almeno altre 5 ore, poi carica ininterrottamente al 100%.
-


Confronta la tua parte di ricambio con quella originale: potrebbe essere necessario il trasferimento di alcuni componenti o la rimozione di protezioni adesive dalla nuova parte prima di installarla.
Per riassemblare il tuo dispositivo, segui queste istruuzioni in ordine inverso.
Porta i tuoi rifiuti elettronici a un riciclatore certificato R2 o e-Stewards.
La riparazione non è andata secondo i piani? Vai sulla nostra comunità Risposte per trovare aiuto nella risoluzione dei problemi.

9 commenti
Well done article and I acheived my goal of changing out my very puffy old battery for the new one (still need to recycle the old… ASAP). Curiously, I had to open it again as I, somehow, didn’t get the battery cable pushed in far enough and it wasn’t working. Now, all is well. Strangely, even after a couple of attempts at resetting the SMC, my fan is running almost constantly. I’m kind of not sure what to do about that at this point (yes, I used the iFixIt guide to clean my fan as well). Anyway, thanks for the help.
great article, havent used it as yet, but just wanted to check the complexity before I purchased the battery
New battery is in and on 1st round of charging! Thank you very much!!!
As a note, I also purchased some Tesa tape with the battery as the shopping cart recommended it. I used that under the speakers before replacing them. The left & right sides of the batteries are kind of loose, but I’m not overly worried about that as it’s attached to metal backing.
If the first thing you do is disconnect the battery, is it really an issue if you don’t (or can’t) disable auto-boot?
maccentric -
I agree, why disable Auto-Boot when the lid is closed and the battery is disconnected immediately? – I've never had an issue since 2016 when the feature was introduced.
stevebsiegel -
On my machine, the longest two screws were in the corners, while the other two long screws were in the middle. Perhaps previous service in the past had them replaced into the wrong place? In any case, the longest screws do seem to fit in either place. I guess 0.8mm is not very much of a difference. Seems like poor design if they could have used one size of screw.
johann beda -
Just did one, and it also had longest screws in the corners.
maccentric -
Just did another, and the long ones were in the middle. Definitely poor design and quality control.
maccentric -