
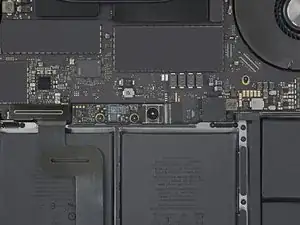
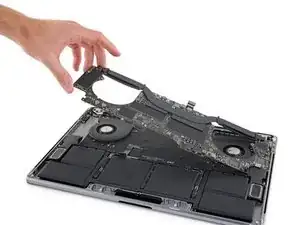
Introduzione
Segui questa guida per rimuovere con sicurezza la batteria incollata del tuo MacBook Pro con l'aiuto di un kit iFixit dotato di liquido antiadesivo. Il solvente è studiato per ammorbidire la colla che tiene ferma la batteria, permettendoti di toglierla con maggiore facilità.
L'antiadesivo iFixit è infiammabile. Usalo in un'area ben ventilata, non fumare e non lavorare vicino a una fiamma libera.
Per minimizzare il rischio di danneggiamenti, accendi il tuo MacBook e consenti alla batteria di scaricarsi completamente prima di iniziare questa procedura. Una batteria agli ioni di litio carica può creare un incendio pericoloso e incontrollabile se viene forata accidentalmente. Se la tua batteria sembra gonfia o ingrossata, prendi adeguate precauzioni.
Nota: il solvente usato per sciogliere l'adesivo della batteria può danneggiare alcuni tipi di plastica. Segui con cura le istruzioni e stai molto attento quando applichi l'antiadesivo.
Strumenti
-
-
Accendi il tuo Mac e apri Terminal.
-
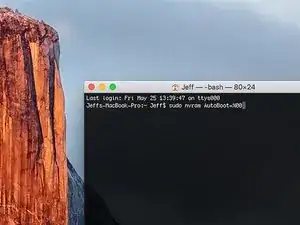
Copia e incolla il seguente comando (oppure digitalo esattamente) in Terminal:
-
sudo nvram AutoBoot=%00
-
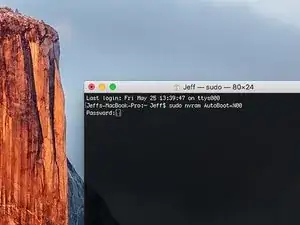
Premi [return]. Se richiesta, inserisci la tua password di amministratore e premi di nuovo [return]. Nota: il tuo tasto return può essere etichettato anche come ⏎ o "enter."
-
sudo nvram AutoBoot=%03
-
-
-
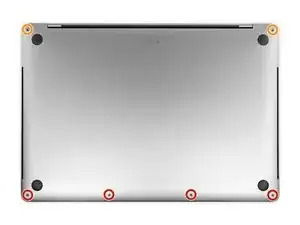
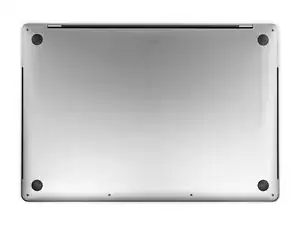
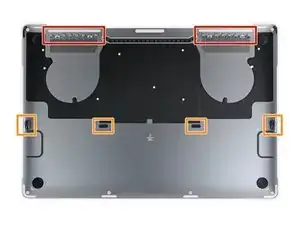
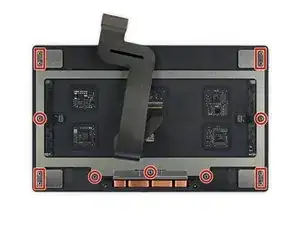
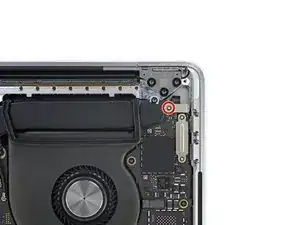
Usa un cacciavite pentalobe P5 per rimuovere le sei viti che fissano la cover inferiore, delle seguenti lunghezze:
-
Quattro viti da 4,7 mm
-
Due viti da 6,6 mm
-
-
-
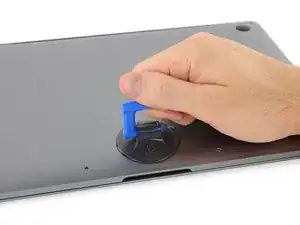
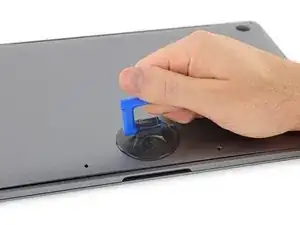
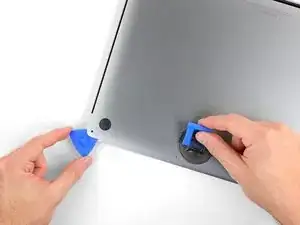
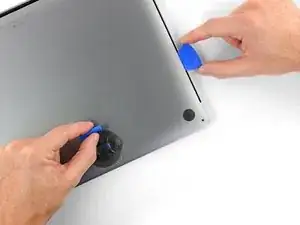
Posiziona e quindi premi una ventosa vicino al bordo anteriore della cover inferiore, tra i fori delle viti.
-
Tira la ventosa giusto quanto basta per aprire una piccola fessura sotto la cover inferiore.
-
-
-
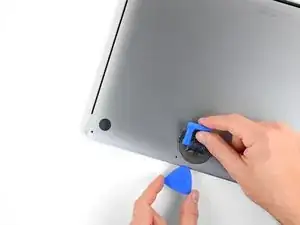
Fai scorrere la punta di un plettro di apertura nella fessura che hai appena creato sotto la cover inferiore.
-
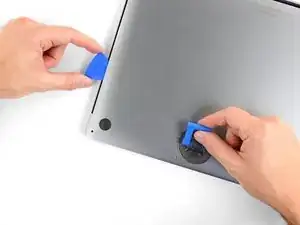
Fai scorrere il plettro di apertura attorno all'angolo più vicino e quindi fino a metà del lato del MacBook Pro.
-
-
-
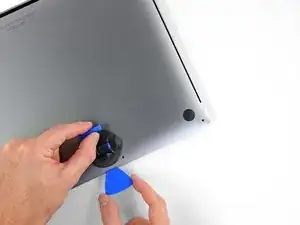
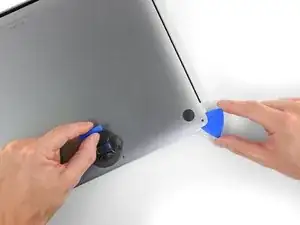
Ripeti il passo precedente dal lato opposto, usando il tuo plettro di apertura per sganciare la seconda clip.
-
-
-
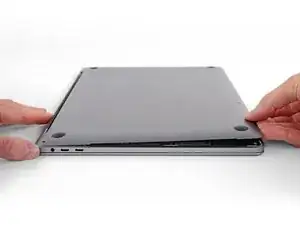
Solleva il bordo anteriore della cover (il lato opposto alla cerniera del display) giusto quanto basta per poter infilare la punta delle dita e avere una buona presa.
-
-
-
Tira la cover inferiore con decisione per farla scorrere verso la parte anteriore del MacBook (allontanandola dal lato con le cerniere) per separare l'ultima delle clip che trattiene il case.
-
Tira prima da un angolo e poi dall'altro.
-
-
-
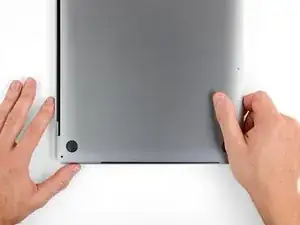
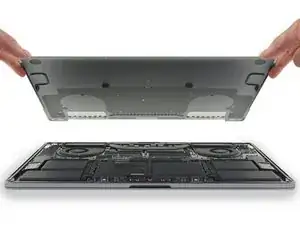
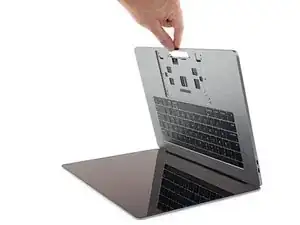
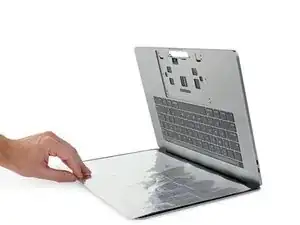
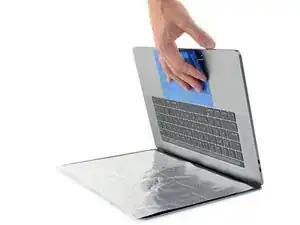
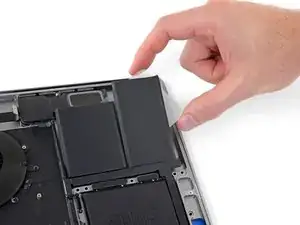
Rimuovi la cover inferiore.
-
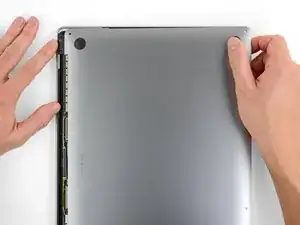
Disponilo in posizione e allinea le clip a scorrimento vicino alla cerniera del display. Premi verso il basso e fai scorrere la cover verso la cerniera. Lo scorrimento si dovrebbe arrestare non appena le clip si agganciano.
-
Quando le clip a scorrimento sono perfettamente agganciate e la cover sembra correttamente allineata, premi con decisione la cover stessa per agganciare le quattro clip nascoste. Dovresti sentire lo scatto quando le clip si bloccano.
-
-
-
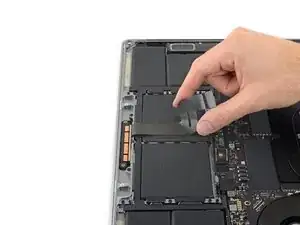
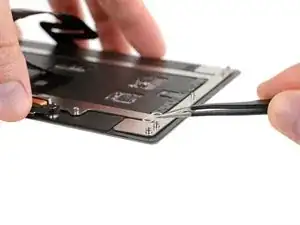
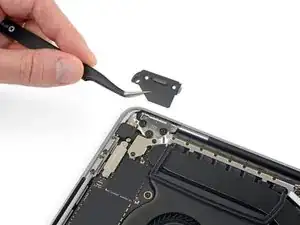
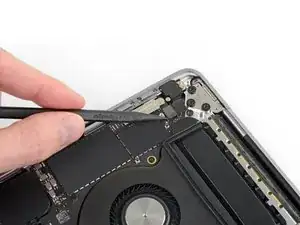
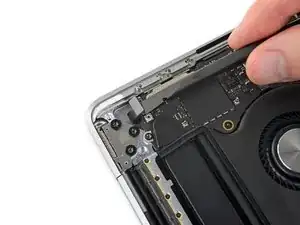
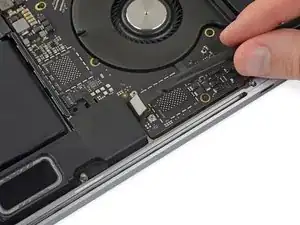
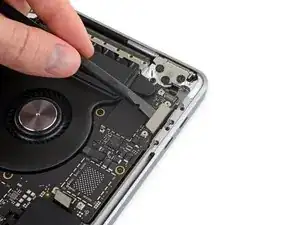
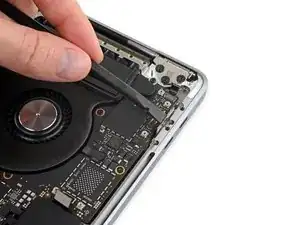
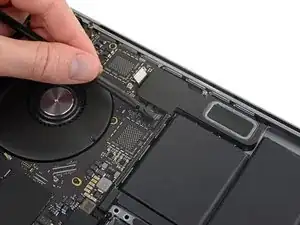
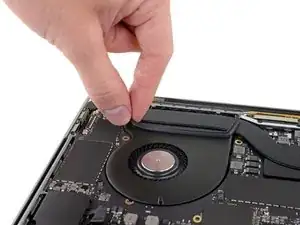
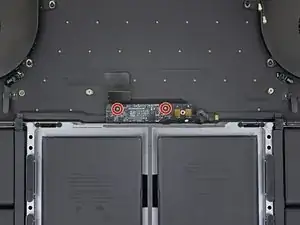
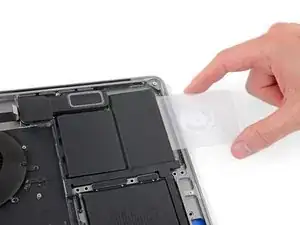
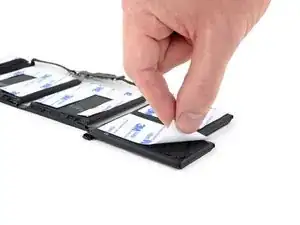
Solleva e rimuovi lo sticker isolante che copre la scheda della batteria, sul bordo della scheda logica dalla parte più vicina alla batteria.
-
Se la cover non si stacca facilmente, applica una modesta quantità di calore con un iOpener, un asciugacapelli o una pistola termica per ammorbidire l'adesivo sottostante e prova di nuovo.
-
-
-
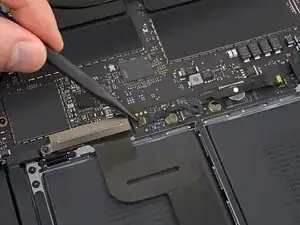
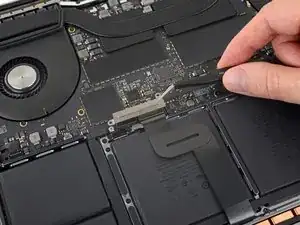
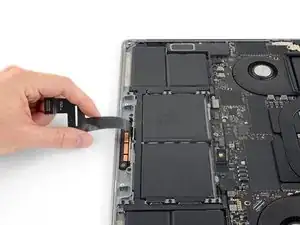
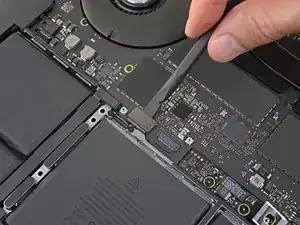
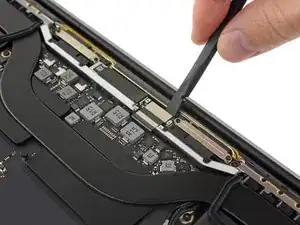
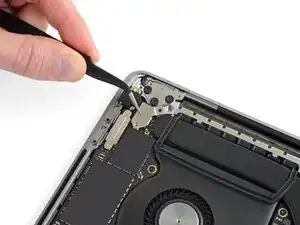
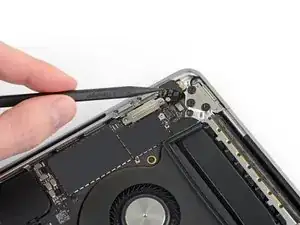
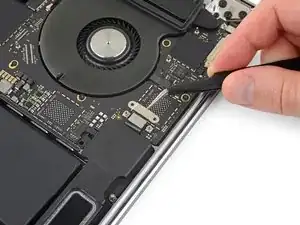
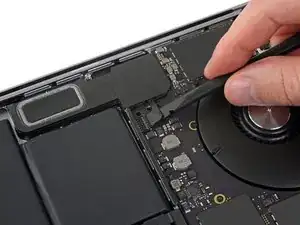
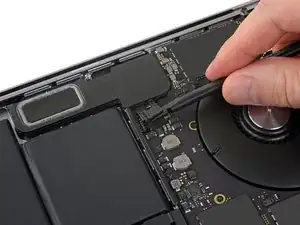
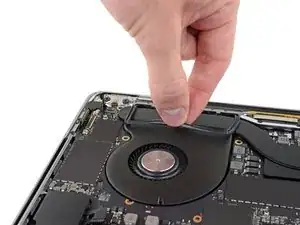
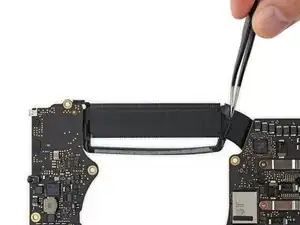
Stacca il nastro adesivo che copre il connettore del cavo dati della scheda della batteria.
-
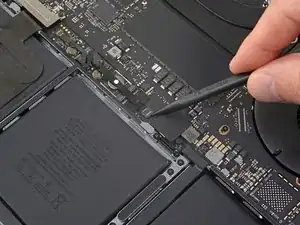
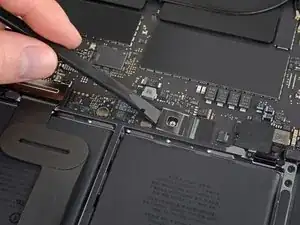
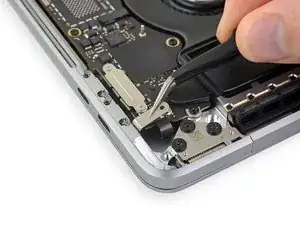
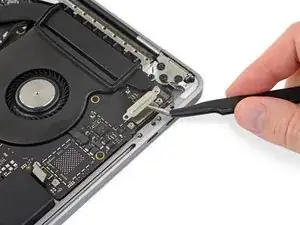
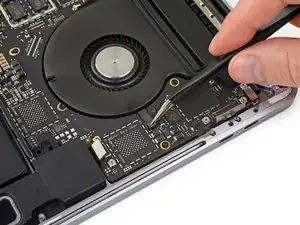
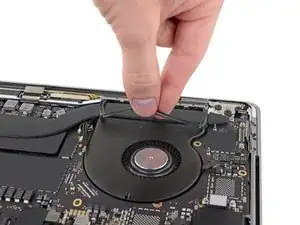
Usa uno spudger per alzare delicatamente la linguetta di bloccaggio del connettore ZIF del cavo dati della scheda della batteria.
-
-
-
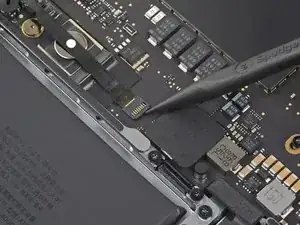
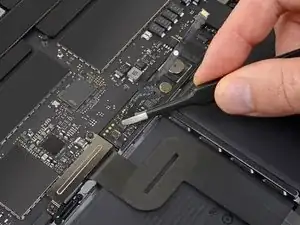
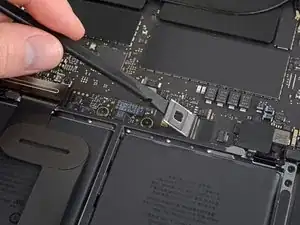
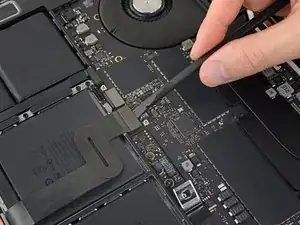
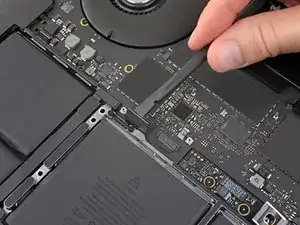
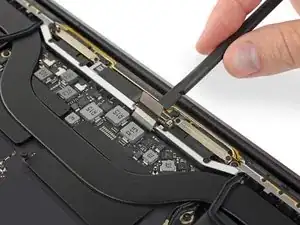
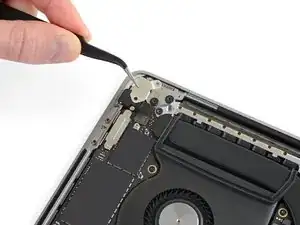
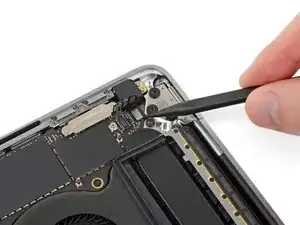
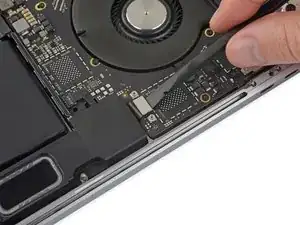
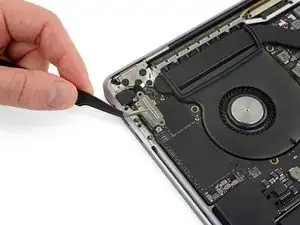
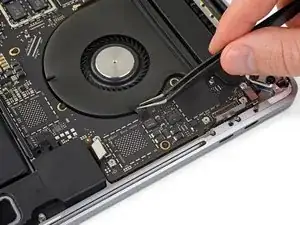
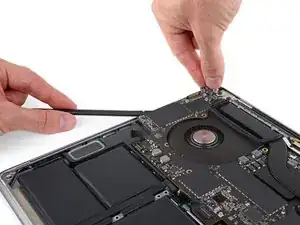
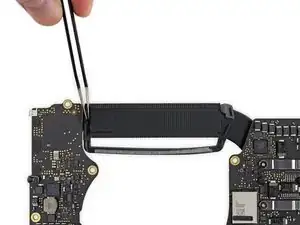
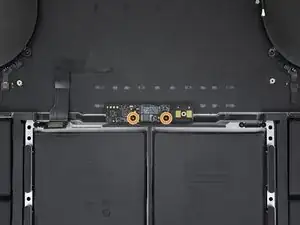
Scollega il cavo dati della scheda della batteria facendolo scorrere fuori dal suo zoccolo sulla scheda logica.
-
Tira rimanendo parallelo alla scheda logica, in direzione del cavo.
-
-
-
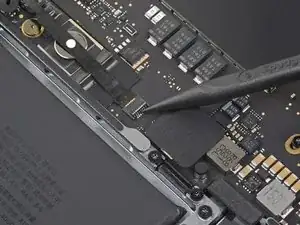
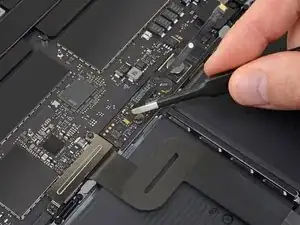
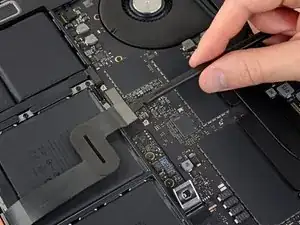
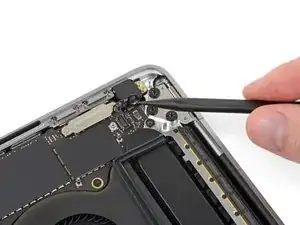
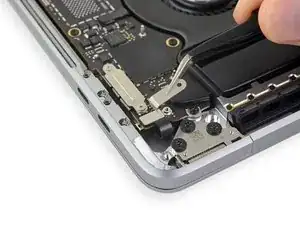
Blocca, sollevandola, la linguetta di blocco del connettore al lato opposto del cavo dati della scheda della batteria.
-
-
-
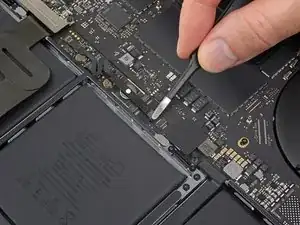
Fai scorrere lateralmente il cavo della scheda dati della batteria fuori dal suo zoccolo e rimuovi del tutto il cavo.
-
-
-
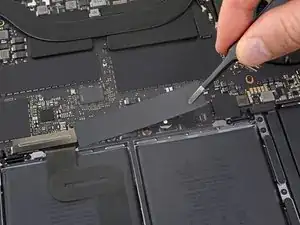
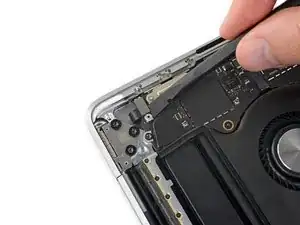
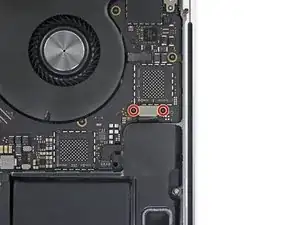
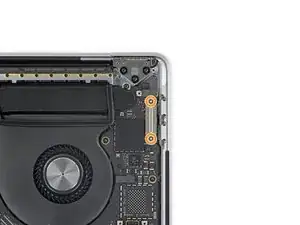
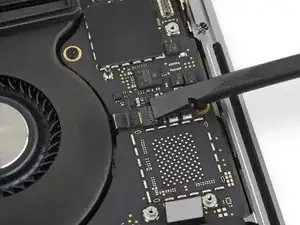
Usa un cacciavite Torx T5 per rimuovere la vite a testa piana che fissa il connettore di alimentazione della batteria.
-
-
-
Usa uno spudger per sollevare il connettore dell'alimentazione della batteria, scollegando la batteria stessa.
-
-
-
Usa un cacciavite Torx T3 per rimuovere le due viti da 1,9 mm che fissano la cover di supporto di connettori del cavo del trackpad e della tastiera.
-
Rimuovi la cover.
-
-
-
Usa uno spudger per scollegare il cavo del trackpad sollevando il suo connettore dalla scheda logica.
-
-
-
Applica una modesta quantità di calore al cavo a nastro del trackpad per ammorbidire l'adesivo che lo tiene fissato alla batteria.
-
-
-
Usa un cacciavite Torx T5 per rimuovere le 13 viti che fissano il gruppo del trackpad:
-
Nove viti da 5,8 mm
-
Quattro viti da 4,9 mm
-
-
-
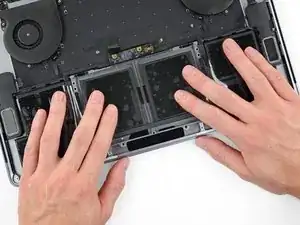
Fai ruotare lievemente il display per aprirlo, ma lascia capovolto il MacBook. Il gruppo trackpad dovrebbe separarsi e rimanere di piatto sul display.
-
Sfila delicatamente il cavo a nastro del trackpad attraverso la sua feritoia nello chassis.
-
-
-
Mentre rimuovi il gruppo del trackpad, stai molto attento a non perdere le nove piccole rondelle metalliche sopra gli alloggiamenti delle viti. Non ci vuole davvero molto a farle volare via e a perderle.
-
Rimuovi il gruppo del trackpad.
-
-
-
Usa uno spudger per scollegare la tastiera sollevando il suo connettore dalla scheda logica.
-
-
-
Usa un cacciavite Torx T3 per rimuovere le due viti da 3,5 mm che fissano la cover disposta sopra il cavo flessibile della scheda dello schermo.
-
Rimuovi la cover del cavo flessibile della scheda display.
-
-
-
Usando un cacciavite Torx T3, rimuovi le due viti da 1,7 mm che fissano la staffa del connettore del cavo della scheda dello schermo.
-
Rimuovi la staffa del connettore del cavo della scheda del display.
-
-
-
Fai leva con lo spudger per sollevare e disconnettere il cavo flessibile della scheda dello schermo dal suo zoccolo sulla scheda stessa.
-
-
-
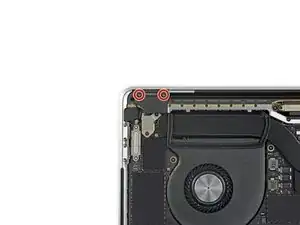
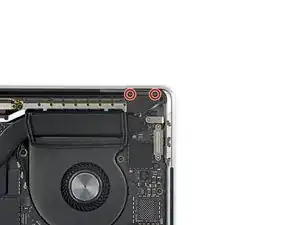
Usa un cacciavite Torx T3 per rimuovere le quattro viti da 2,0 mm che fissano ciascuna delle cover delle due cerniere (due viti per ognuna).
-
-
-
Usa un cacciavite Torx T3 per rimuovere le due viti da 2,4 mm che bloccano la piastrina di copertura dei connettori del Touch ID e del jack cuffie.
-
Rimuovi la piastrina.
-
-
-
Scollega il pulsante di accensione e il sensore Touch ID sollevando il relativo connettore dalla scheda logica.
-
-
-
Usando un cacciavite Torx T3, rimuovi la vite da 1,3 mm che fissa la staffa che copre il connettore del digitizer Touch Bar.
-
-
-
Con delle pinzette, fai scorrere la staffa verso il bordo laterale del MacBook Pro finché non è libera dalla linguetta dotata di fessura sulla scheda logica.
-
Rimuovi la staffa.
-
-
-
Disconnetti il cavo del digitizer Touch Bar sollevando il suo connettore dalla scheda logica.
-
-
-
Usa un cacciavite Torx T3 per rimuovere le due viti da 1,9 mm che fissano la staffa del connettore del cavo del display del Touch Bar.
-
Rimuovi la staffa.
-
-
-
Scollega il cavo del display del Touch Bar facendo leva per sollevare il suo connettore dalla scheda logica.
-
-
-
Usando un cacciavite Torx T3:
-
Rimuovi le due viti da 1,3 mm che fissano a sinistra la cover del cavo flessibile Thunderbolt.
-
Rimuovi altre due viti da 1,3 mm che fissano a destra la cover del cavo flessibile Thunderbolt.
-
-
-
Usa uno spudger per disconnettere il cavo flessibile Thunderbolt di sinistra sollevandolo dalla scheda logica.
-
Fai leva dal lato interno, quello più vicino alla ventola.
-
Spingi delicatamente il connettore del cavo flessibile sul lato, in modo che non possa interferire nel corso della successiva rimozione della scheda logica.
-
-
-
Ripeti l'operazione per staccare il connettore del cavo flessibile Thunderbolt sul lato opposto.
-
Piega delicatamente sul lato il connettore del cavo flessibile in modo che ci sia spazio per estrarre la scheda logica senza che questa si impigli.
-
-
-
Scollega i due connettori degli altoparlanti infilando l'estremità piatta di uno spudger sotto ciascun cavo, in corrispondenza del suo connettore.
-
Torci l'attrezzo oppure usalo per far leva per disconnettere entrambi gli altoparlanti.
-
-
-
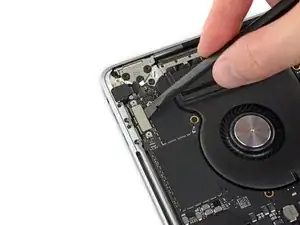
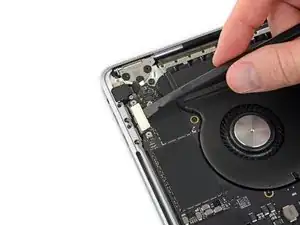
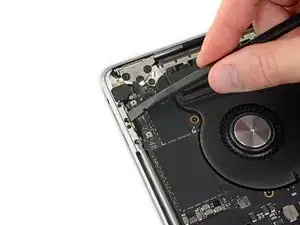
Stacca l'eventuale nastro adesivo di copertura dello zoccolo del connettore del cavo del microfono.
-
-
-
Apri la linguetta di bloccaggio del connettore ZIF del cavo del microfono facendo leva per sollevarla dalla scheda logica.
-
-
-
Disconnetti il microfono tirando il suo cavo in direzione della ventola finché non è libero dal suo alloggiamento.
-
Se possibile, tira sul nastro attaccato al cavo invece che sul cavo stesso, riducendo così il rischio di danneggiamento.
-
-
-
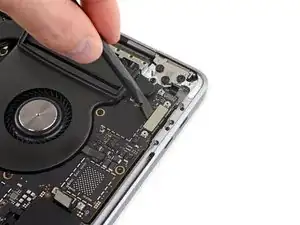
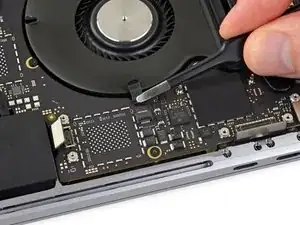
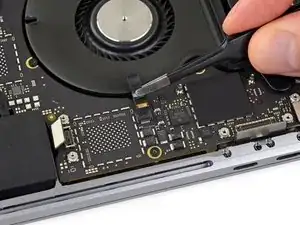
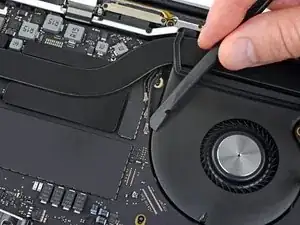
Usa un cacciavite Torx T5 per rimuovere la singola vite da 2,9 mm che fissa l'insieme del cavo di antenna.
-
-
-
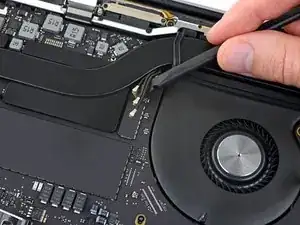
Stacca tutti tre i cavi di antenna sollevandoli uno alla volta dal proprio zoccolo.
-
Fai scorrere le pinzette oppure l'estremità piatta dello spudger sotto ciascun cavo finché questo non è vicino allo zoccolo e quindi torci l'attrezzo oppure fai leva per scollegare il cavo stesso.
-
-
-
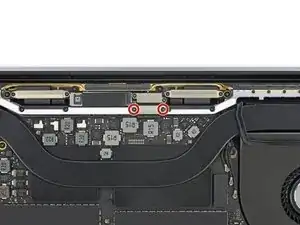
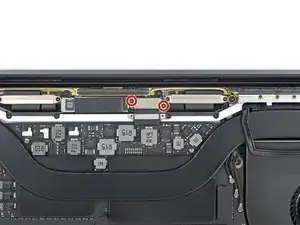
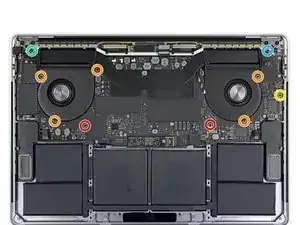
Rimuovi le dieci viti che fissano il gruppo della scheda logica:
-
Due viti Torx T3 da 2,6 mm
-
Cinque viti Torx T5 da 2,9 mm
-
Una vite Torx T5 da 3,7 mm
-
Una vite Torx T8 (a testa larga) da 3,9 mm
-
Una vite Torx T8 da 4,0 mm
-
-
-
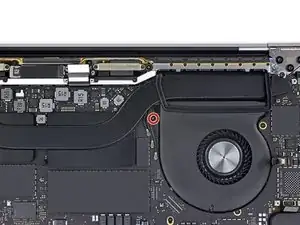
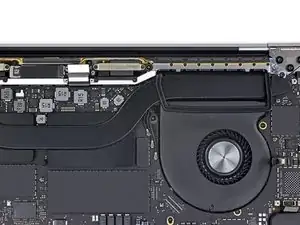
Stacca (ma non rimuovere) dall'adesivo che le tiene sopra le ventole le due strisce antivibrazione in gomma.
-
Se necessario, applica una modesta quantità di calore con un iOpener, un asciugacapelli o una pistola termica per ammorbidire l'adesivo e staccare più facilmente le strisce.
-
-
-
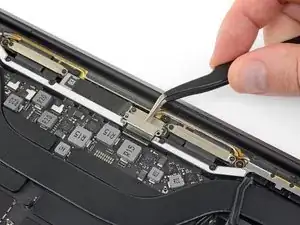
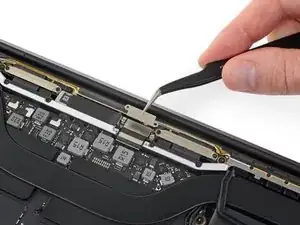
Verifica l'allineamento delle strisce antivibrazione in gomma e riposizionale se necessario.
-
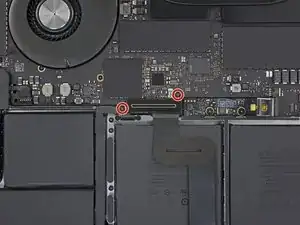
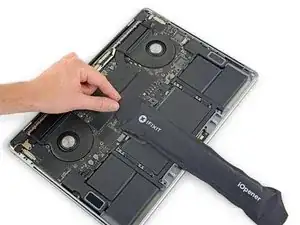
Fai passare il gruppo del cavo di antenna attraverso la fessura tra la scheda logica e il dissipatore di calore, facendo in modo che si allinei correttamente mentre cali dall'alto la scheda logica per rimetterla nella sua posizione.
-
Verifica che non restino cavi intrappolati sotto la scheda mentre la riposizioni. Controlla con attenzione tutti i punti evidenziati.
-
-
-
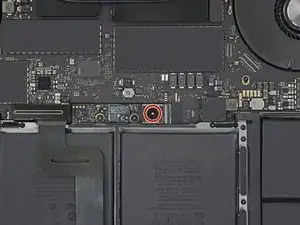
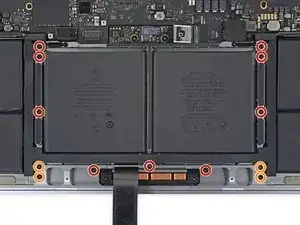
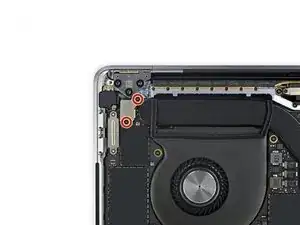
Rimuovi le due viti che bloccano la scheda della batteria:
-
Modelli 2016-2017: usa un cacciavite Torx T5 per rimuovere le due viti da 3,5 mm.
-
Modelli 2018-2019: usa un cacciavite pentalobe P2 per rimuovere le viti da 3,2 mm.
-
-
-
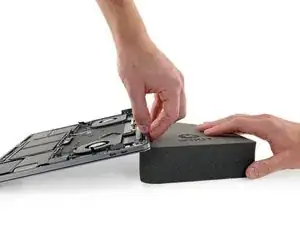
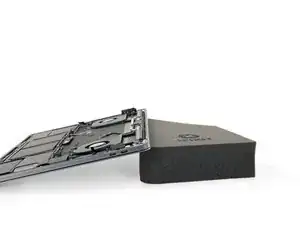
Per proteggere lo schermo, disponi un pezzo di foglio di alluminio tra lo schermo e la tastiera e lascialo lì mentre continui a lavorare.
-
Inoltre, puoi anche aggiungere del nastro di carta per sigillare per quanto possibile l'area sotto il trackpad. In alternativa puoi disporre un panno assorbente direttamente sotto la zona del trackpad per assorbire un eventuale eccesso di antiadesivo.
-
-
-
Per controllare il flusso di antiadesivo, solleva di qualche centimetro il bordo inferiore (lato cerniere) del tuo MacBook Pro con un libro o un pezzo di espanso.
-
-
-
Ora che il tuo MacBook Pro è preparato l'intervento, è ora che ti prepari tu stesso.
-
Quando maneggi e applichi l'antiadesivo, indossa occhiali protettivi (sono inclusi nel kit).
-
Non portare lenti a contatto senza occhiali protettivi.
-
Nel kit sono compresi anche i guanti protettivi. Se temi l'irritazione della pelle, comincia a indossarli già ora.
-
-
-
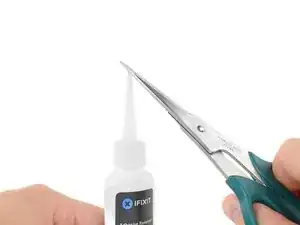
Tira via dalla tua bottiglia di antiadesivo il tappo di gomma nera.
-
Usa delle forbici per tagliare la punta ancora sigillata dell'applicatore.
-
-
-
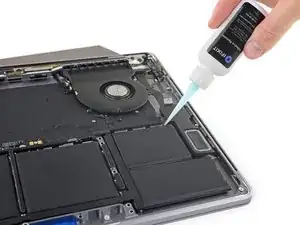
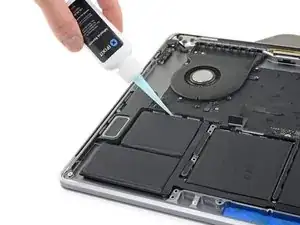
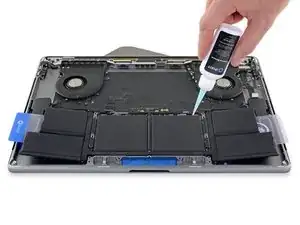
Applica poche gocce di antiadesivo sotto le due celle di destra della batteria, iniziando dal bordo più vicino alla ventola.
-
-
-
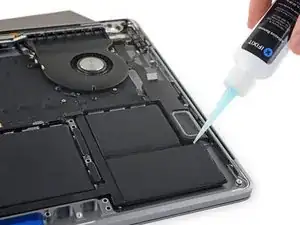
Aggiungi qualche altra goccia di antiadesivo tra le due celle di destra della batteria, in modo che possa scorrere sotto la cella inferiore.
-
Prima di procedere con il passo successivo, lascia passare un paio di minuti per consentire al solvente di penetrare ed indebolire la colla della batteria.
-
-
-
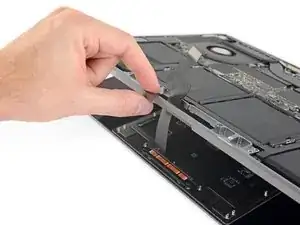
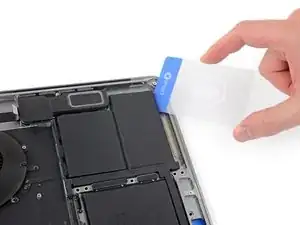
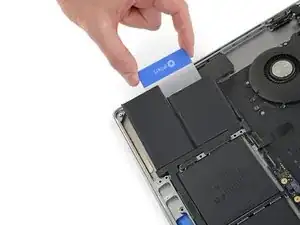
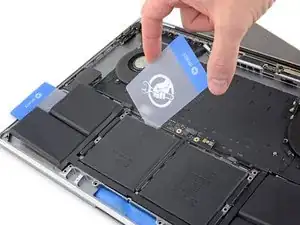
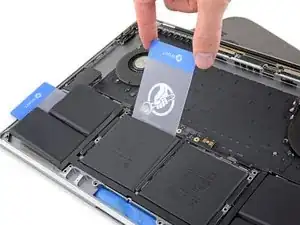
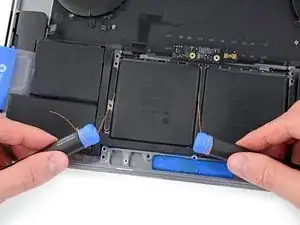
Dopo un paio di minuti, inserisci l'angolo di una scheda di plastica sotto la batteria, iniziando dal bordo inferiore della cella in basso a destra.
-
Muovi la scheda da un lato all'altro e falla scorrere interamente sotto entrambe le celle della batteria.
-
Solleva le celle per staccare completamente la colla, ma non cercare di rimuoverle già ora dal MacBook.
-
Lascia temporaneamente la scheda di plastica sotto le celle per impedire che l'adesivo possa incollarsi nuovamente mentre procedi con il passo successivo.
-
-
-
Passa al lato sinistro del MacBook Pro e ripeti il passo precedente per staccare altre due celle della batteria.
-
Lascia temporaneamente in posizione la seconda scheda di plastica.
-
-
-
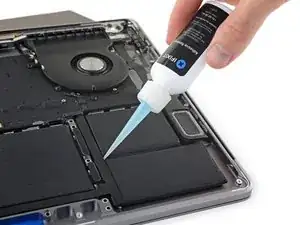
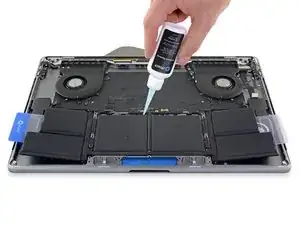
Applica alcune gocce di antiadesivo lungo i bordi superiori delle due celle centrali della batteria.
-
Stai attento al solvente che cola e, se necessario, applica dell'altro antiadesivo lungo i bordi laterali.
-
-
-
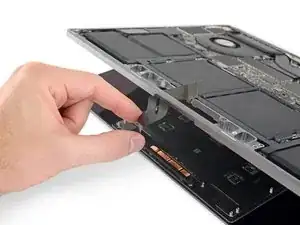
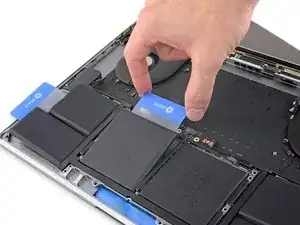
Dopo un paio di minuti, recupera la tua prima scheda di plastica e inserisci un angolo di essa sotto il bordo superiore di una delle celle centrali della batteria.
-
Muovi la scheda da un lato all'altro e infilala sotto la cella della batteria finché non si stacca tutto l'adesivo.
-
-
-
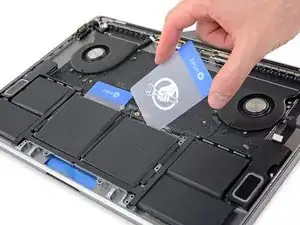
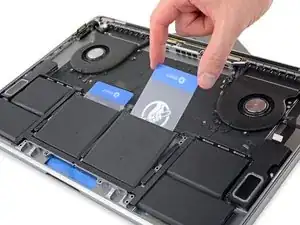
Recupera la seconda scheda di plastica e ripeti il passo precedente per staccare la cella centrale della batteria rimanente.
-
-
-
Se hai delle difficoltà a infilare la scheda sotto una qualunque delle celle, prova a far passare un pezzo di filo interdentale o di cavo elettrico sotto la cella della batteria e tiralo da un lato all'altro in modo alternato per staccare la colla.
-
-
-
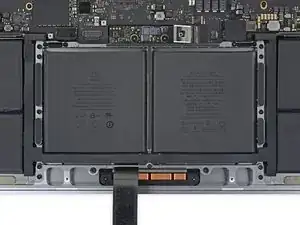
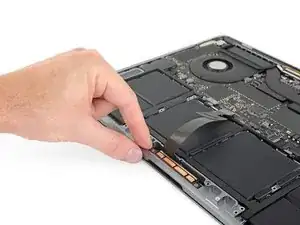
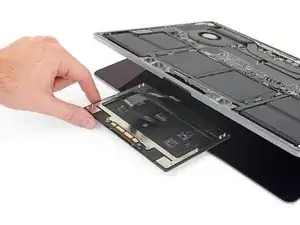
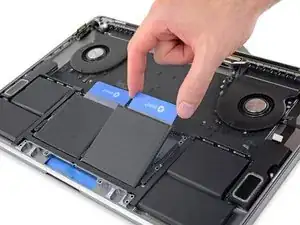
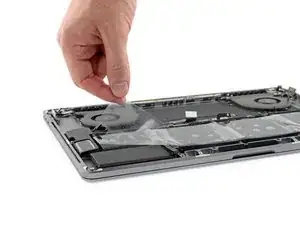
Solleva e rimuovi la batteria.
-
I pezzi più grandi di adesivo li puoi rimuovere usando delle pinzette o le dita, protette da guanti.
-
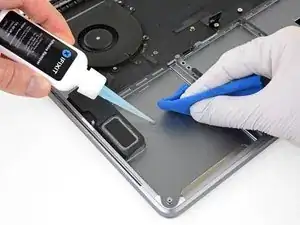
Raschia ogni altro pezzo di colla con uno strumento di plastica e pulisci le aree sottostanti con antiadesivo o alcol isopropilico. Sfrega in una sola direzione (non avanti e indietro) finché la scocca non sarà pulita e quindi pronta per accogliere la nuova batteria.
-
-
-
Se la tua batteria è dotata di adesivo preinstallato nella parte inferiore, rovesciala e stacca con attenzione la protezione per esporre l'adesivo. In caso contrario, per bloccare in posizione la batteria applica un sottile nastro biadesivo come il Tesa 61395.
-
Posiziona con cura la batteria e disponila in posizione.
-
Premi e tieni premuta con fermezza ogni cella per 5-10 secondi per fissarla bene al case inferiore.
-
-
-
Dopo che la tua batteria è stata correttamente posizionata e installata, stacca e butta via la protezione in plastica trasparente sulla faccia superiore.
-
Calibra la nuova batteria: caricala al 100% e poi tienila in carica almeno altre 2 ore. Quindi stacca l'alimentazione e usa il laptop normalmente per farlo scaricare. All'avviso di batteria in esaurimento, salva il tuo lavoro e tieni acceso il MacBook finché non si iberna perché è scarico. Aspetta almeno altre 5 ore, poi carica ininterrottamente al 100%.
-


Per rimontare il dispositivo, segui queste istruzioni in ordine inverso.
Porta i tuoi rifiuti elettronici a un riciclatore certificato R2 o e-Stewards.
La riparazione non è andata secondo i piani? Vai sulla nostra comunità Risposte per trovare aiuto nella risoluzione dei problemi.

9 commenti
Hey, is it possible to replace battery without removing a logic board? It was possible on 2017 models.
avxkim -
@webcoder It’s similar to the 2017 design. I’m not sure how you’d replace the battery in either model without removing the board first, since the battery cables are routed underneath the board.
Yes, it is doable if you are very careful. I’ve done it numerous times on 2017 -2019 MBP’s. See my comment one step 24. I own a one-man Mac repair business in SF. Anything to save time. This method has been tried and successfully completed at least 10 times.
Where can I buy the battery? It is not available for iFixit?
Hello,
Is it the same procedure for a Macbook pro 13’’ Touch Bar 2019 ?
Thank you
PGCD -
Is this step necessary? I can’t perform this step as I am attempting to repair water damage and need to remove logic board & most likely replace the battery.
Macrepair SF -
@mac_medic You definitely don’t want the power coming on while the board is wet. In your case, I think powering on the machine to disable Auto Boot would do more damage than it prevents. I agree, skip this step and be prepared to disconnect the battery quickly if the laptop automatically powers on. Good luck!
Jeff Suovanen -
Thats right! You don't want power running while working on your logic board.
Dan -
This did not work when running High Sierra.
Kyle B -
Tried this on a 2018 MBP 13” Touchbar (there’s no iFixit guide for this model yet). Need to replace a broken screen.
Luckily I managed to connect to an external screen (Cmd-Down Brightness to switch displays) and enter above command. Seems to work, but there’s another problem with this model - it powers up as soon as any key is pressed……. ffs <gnashes teeth>
Cool_Breeze -
I unscrew the battery first and wrap electrical tape over the logic board battery connector before attempting any repairs to the board. Haven’t had any problems yet and I’ve worked on about 10 of these models already. Also when you open the bottom case use a suction cup at the bottom and pull up then run a plastic spudger along the edges to disconnect the clips. Also only use a plastic spudger on the board. Saw a youtube video from a repair shop and he did not disconnect the power and used all metal tools during the entire process of removing the board. His last step was to disconnect the battery terminal.
Brian -
Is this step necessary if my mac can turn on? Battery fully dead(
Nursat b -
BEFORE YOU START: The included torx head stripped off before I was done (and you might need an additional T4) so stop now and go buy a good one. Also they fail to warn you above to get some blue threadlocker ahead of time.
Jason Sherron -
This command did not work for me and I read that sometime in later 2020 Apple stopped this command from working…any ideas on a work around?
Patrick Machacek -
Not able to do that with damaged screen
richardjgreen -
If you have a damaged screen you can still use a converter from thunderbolt (USB 3) to HDMI and plug your Macbook Pro to your TV as monitor display. Just make sure to chose the right Source (HDMI IN) in your TV. I did it and to make it work I unplug and plug again in my Macbook and so I could disable the Auto boot
Roberto Sanchez Bustos -
Hi. This does not work on 2018 13” MacBook Pro with Touch Bar. I did exactly this to disable auto boot. But when I check by using nvram -p it says: auto-boot true. Am I doing something incorrectly? I did everything step by step. Copied and pasted the sudo command, pressed enter and then entered my password. I have Big Sur 11.1 installed. Is there any other way since I need to replace the screen. Thank you. Adrian
Adrian Vizik -
Hi everyone. This is also a little pointless if you can’t see anything on the screen, and you don’t have a display adapter to USB C to display it. I agree with Brian about removing the back and disconnecting the battery cable before you even think about opening the lid of the MacBook. Applying the insulation tape is also a handy little tip that just makes sure there is no way to discharge from either the board or battery.
Roberto Enrieu -
running `nvram -p | grep 'AutoBoot'` in terminal verifies that it was accepted
result: `AutoBoot %00`
Marek Polák -
Running Big Sur 11.6.7 on a 2019 16" MBP, it's "auto-boot". So it's:
nvram -p | grep 'auto-boot'to display the current state, the default istrue- and then to change it,sudo nvram auto-boot=falsewhich turns it off.Ed Mechem -
This step is completely unnecessary if you follow the guide to disconnect the battery properly. Just put some tape between the battery and logic board connection to prevent it from accidentally touching and therefore powering on the laptop.
Grant Ormsby -
It took me a few tries to make this command work, as I was able to copy and paste the command into Terminal, but could not type in my laptop’s password. I finally typed my password into a text document, copied it (command C), and then pasted it into Terminal and it worked.
tommy404 -
I didn’t do this. Mine never auto-booted before I replaced the battery. Now it does.
hatuxka -
BEFORE YOU DO ANYTHING - CHECK THE BATTERY!
I-fixit sent me a bad battery, which I didn’t realize until it was already install. They sent me a new one, but I wasted hours uninstalling and reinstalled.
Get a volt meter and measure the voltage on the output of the battery pack. If it reads 0 V, SEND IT BACK. It should read over 2 V.
bcardanha -
I've just received my replacement battery and it reads 0,042V between the two main connectors. Do you think it's dead?
peter sussex -
When I did this from Terminal.app within Recovery Mode, the “sudo” was not recognized but I could invoke it without the sudo part. It seems to have been accepted when looking at “nvram -p”
johann beda -
When in Recovery Mode, you already have superuser powers. So you don't need to prefix commands with the sudo command to invoke them with root privileges; you already have them. Do a
pwd(print working directory) after opening Terminal in Recovery Mode, and you'll see that you're in the root user's directory.Ed Mechem -
I received the battery kit for my 2018 MacBook Pro and as per the above comment from bcardanha - Oct 12, 2021, I checked the voltage on the pads marked + and - . It was zero volts so I panicked a bit.
I sent a message on the iFixiT Facebook page and I got no reply. I finally found the customer service email for Ifixit Europe and sent them an email voicing my concern as I was not keen to work for couple of hours just to discover that the battery is faulty. I had an almost instant reply on the email (kudos to them) and they adviced me to go ahead and install the new battery as the voltage measured when battery is not connected is not relevant.
I took a leap of faith and after two hours… the new battery showed 50% charge and everything seems to be working just fine. I am happy it worked.
Mircea Comanici -
After removing the old battery and installing the new battery I powered up the MBP before screwing the bottom on. I discovered the my keyboard would not function. It took a few hours of investigation and frustration that I discovered the track pad power ribbon had become partially dislodged from the trackpad. I was able to see that this through the little machined slot where the battery sat. I had to remove the trackpad to reinsert the power ribbon back into the connector in the trackpad. after reassembling and reinstalling the battery etc the keyboard worked. Just food for thought if your run into the keyboard issue.
Ed Mease -
This should be the default. IMO I tell you to power on - not the lid.
G Sena -
Est ce que cela fonctionne sur un macbook pro 2017 sans touchbar ?
maël muzelet -
Bonjour Maël, oui, ce tutoriel concerne "les MacBook Pro 2016 (et plus récents) et les MacBook Retina 12" 2017 (et plus récents)"
Claire Miesch -
Excellent instructions. I was able to follow and install the new screen. I recommend that you get a good set of tools before you begin. I started with an inexpensive repair kit bought online. The Penta and torx bits failed. I bought an IFIXIT kit with quality bits and I was able to do everything I needed.
Tom Markham -
If you're not running an admin account the sudo command won't work (which honestly, you should not be running admin). Rather than logging in to your admin amount via the OS, in the terminal type "login [admin username]," then the password and you'll be able to do the sudo command as described above. Once you're complete, type "logout [admin username]" and you'll be good to go. Obviously replace [admin username] with whatever the account name for your admin user is.
arichard2401 -
For those unable to complete this step because the screen is too damaged I recommend leaving your macbook on until the battery dies.
Nicholas R Licato -
Just replaced my 2018 15" MBP battery. Running Sonoma.
I found no way to disable AutoBoot (The status can be checked in the Power section of system report).
Anyway, i left my battery completely drain before opening the MBP, and had no issues during the process.
Cédric Bontems -
After sending this command in terminal when I checked what happens if I now open the lid, instead the screen lit slightly up (still black) then a battery symbol showing the charging state showed up.
Now, after replacement of the battery, this is all I get to see.
No reset of NVRAM nor PRAM helped.
Currently the new battery charges (58% atm) and it feels like it‘s mocking me.
webrockers -
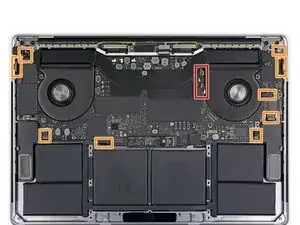
I suspected the keyboard or TouchID sensor wouldn’t work, so I went on and checked every connector.
I missed connecting the left TouchID sensor from step 31.
webrockers -