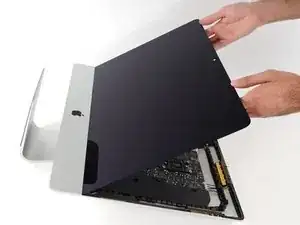
Introduzione

Segui questa guida per sostituire la batteria PRAM in un iMac 21.5" con display Retina 4K del 2017. La batteria PRAM si trova sul retro della scheda logica, quindi richiede prima la rimozione della scheda logica.

Alcune foto in questa guida sono di un iMac del 2015 con delle leggere differenze visive, che però non influiscono sulla procedura della guida.

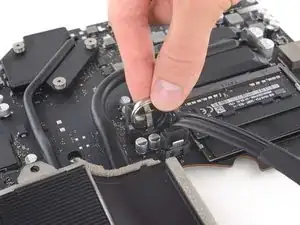
Questa guida è contrassegnata come "potenzialmente pericolosa" perché richiede di maneggiare un alimentatore che contiene dei grandi condensatori. Scollega l'iMac e tieni premuto il pulsante di accensione per almeno 10 secondi per aiutare a scaricare i condensatori. Tocca la scheda solo dai bordi e non toccare i componenti in superficie.

  1. SrDNTSYqyhGMRNDC
    • Con il cardine libero di muoversi, l'iMac sarà sbilanciato e la lavorazione risulterà difficoltosa. Le riparazioni saranno più rapide e facili con un cuneo di supporto per iMac, ma potranno essere completate anche senza di esso.

    • Se intendi usare il Cuneo di cartone di supporto dell'iMac di iFixit, segui queste istruzioni di assemblaggio per montarlo.

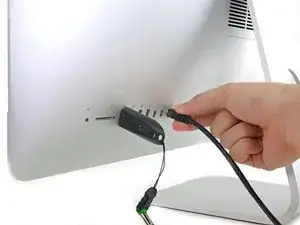
    • Prima di iniziare a lavorare sull'iMac, scollega il computer dall'alimentazione e tieni premuto il pulsante di alimentazione per 10 secondi per scaricare i condensatori dell'alimentatore.

    • Fai molta attenzione a non toccare i contatti dei condensatori o qualsiasi punto di saldatura esposto sulla parte posteriore dell'alimentatore. Maneggia la scheda tenendola solo dai bordi.

    The wedge is an extremely tight fit for this model. I was worried that the amount of force needed to use it as shown might damage the stand, so I used it with the long side down instead. It worked fine that way and didn’t need anywhere near as much force to insert.

    roberttrevellyan -

    Here’s a good YouTube vid on upgrading the RAM: Can a Normal Person Upgrade the RAM in the 2017 21.5" iMac?

    Dan -

    Here are a couple tips from me:

    1) Expose the adhesive to extreme temperatures. I did this by transporting my iMac in my car, screen-down on a piece of cardboard on a cold February morning (in Chicago). When I went to pick up the iMac, the screen practically fell off the chassis. I would have been distraught by this if I hadn’t already planned this replacement. So it was a happy accident.

    2) Remember to expell the residual power from the power supply by pushing the power button while the iMac is unplugged. This does NOT guarantee it’s safe to touch, but when I accidentally brushed the solder and exposed capacitors, I didn’t get shocked.

    jerrid_foiles -

    Instead of using the wedge, I placed the iMac faced up with the top side (web cam) facing me while I ran the pizza roller around. It worked out great!

    Sam Fung -

    “All iMacs also come with a traditional hard drive” mine doesn’t!! it’s HDD bay is completely empty, no SATA cable or anything. I guess I’ll have to upgrade the PCIe SSD instead.

    Chris Hughes -

    There is no replacement glass for this model, it is part of the LCD and impossible to remove or replace- the entire LCD has to be replaced unfortunately if the glass is cracked or damaged. You will have to Google search for a replacement. Also be careful with some of the lock tight tork screws as I broke one of my screw mounts taking one out.

    Phil Tesone -

    I used this service wedge but also found it a very tight fit. The same stabilization can be achieved by using a big rolled up towel.

    Ernst -

    While this is a good instruction guide, I recommend to also look at OWC’s instruction video about drive installation, before starting the exercise. Those install videos are very detailed and useful.

    Ernst -

    Main advice: TAKE YOUR TIME with the pizza roller.

    Make several passes, until you really feel like there's no more sticker in the way. Stay away from the camera though (approx. 1inch / 2.5cm on both sides). This will reduce the work left with the plastic card. Adhesive is really on the edge of the screen so there is absolutely no need to go any further than the recommended 1cm / 3/8inch depth.

    Where are the sensitive parts?

    Facing your iMac, imagine you're looking at a watch. There are antennas on 1, 2 and 4 o'clock. Do not insert any metal piece there (nor anywhere else, btw). Other than that AND the screen cables underneath the camera, not much danger.

    Froggy Manny -

  2. QPZ14vf5mNSObPx1
    QPZ14vf5mNSObPx1
    1KAQXZNy65Y1ferW
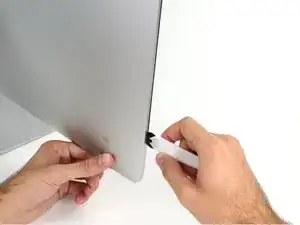
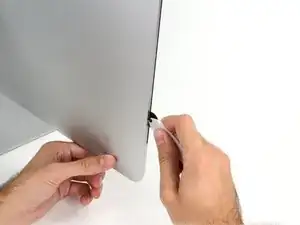
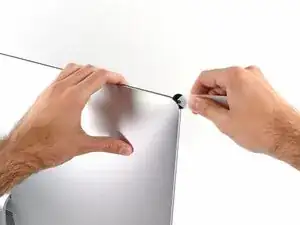
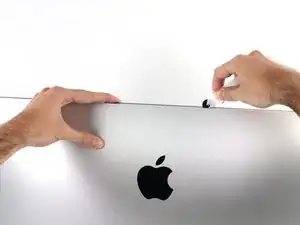
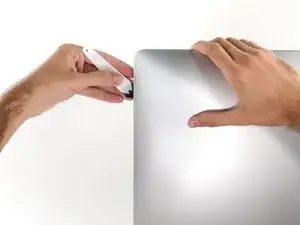
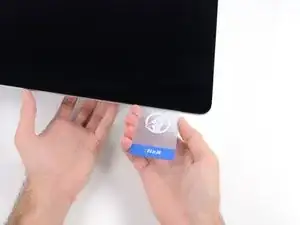
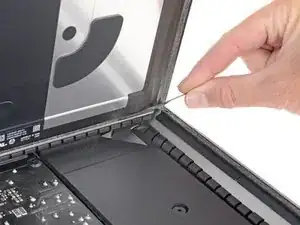
    • Iniziare sulla parte sinistra del display, accanto al pulsante di alimentazione, inserire l'attrezzo per l'apertura dell'iMac nello spazio fra il pannello di vetro e il case posteriore.

    • Il perno sull'attrezzo per l'apertura dell'iMac impedisce di inserire la ruota troppo a fondo. Nel caso di utilizzo di un altro attrezzo, non inserirlo nel display per più di 0,95 cm, In caso contrario, si rischia di tranciare i cavi dell'antenna e provocare danni gravi.

    Don’t get too worried about starting exactly where the picture says. The glue is stronger in some parts so just start wherever is easier and then work slowly and patiently around in the direction shown.

    Richard Cook -

    As this guide doesn’t cover replacing the adhesive strips, I found referring to the following was useful (noting that it’s not for the same model of iMac, so the modification they mention wasn’t necessary): Sostituzione strisce adesive iMac Intel 21.5" EMC 2544

    Alan Digby -

    It is very easy to crack the glass in front of the LCD during this step. I used the guitar pick, maybe it was too thick… crack is just on the frame but anyway it is disappointing :(

    Nikolay -

    This part of the exercise should be done with extreme patience. I took my sweet time with the opening tool, rolling it through the entire panel and enclosure gap over and over again, until I was very sure no parts were sticking together anymore. And when I thought I was I done, I decided to do it over again.

    Ernst -

    You can "warm up" the adhesive before try to cut it with the tool using a hair dryer. Heat the edges for about a minute, keep moving it so you don't cause stress in the glass. Also the above note.. use the tool and then the cards. Do not use a guitar pick or other objects as the thickness will cause you to break the front glass, which is a bonded part of the display (expensive).

    Carl Schultz -

    Merci pour ce conseil

    bry nicolas -

  3. SdaoaCo1EmiD4NqV
    SdaoaCo1EmiD4NqV
    eOsvYmvle2iDrZvZ
    LS2Bi6uDXDmSSIOJ
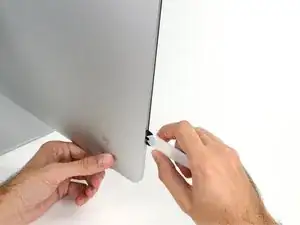
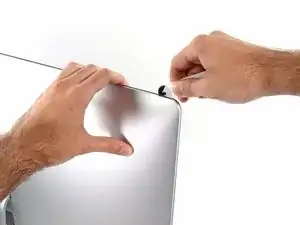
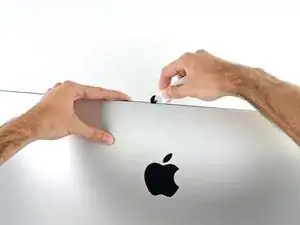
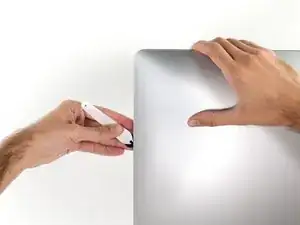
    • Utilizzare l'attrezzo come una taglierina per la pizza: ruotarlo lungo lo spazio per tagliare la schiuma adesiva al centro.

    • Effettuare sempre una pressione con l'impugnatura dietro il disco tagliente. Tirando, il disco potrebbe uscire dall'impugnatura.

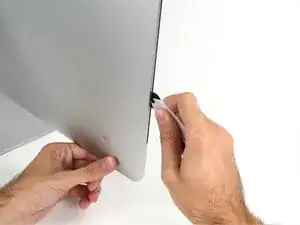
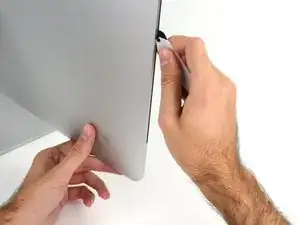
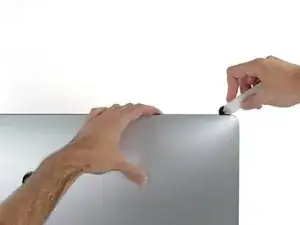
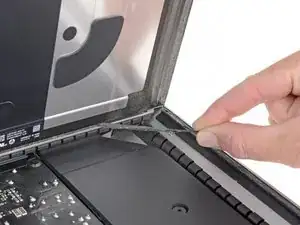
    • Far scorrere l'attrezzo lungo il lato sinistro del display.

    Erreur de traduction: "de bas en haut" et non de" haut en bas" sur le côté gauche de l'écran

    Moreau -

    If re-opening a screen that was opened and re-attached using iFixit’s adhesive strips, I would strongly recommend heating it first with an iOpener, heat gun or hair dryer. 20 minutes after attaching with the iFixit adhesive I tried to open it again with the pizza slicer to fix something and cracked the screen on the left-hand side.

    plasticpool -

  4. r1eMkSSjJdpmWr1B
    r1eMkSSjJdpmWr1B
    d6iAMVdqVUdnvYnD
    PsnDnjYNWucTLycx
    • Continuare a far scorrere l'attrezzo attorno all'angolo superiore sinistro.

    Ne pincez pas l’écran avec l’autre main. Vous exercez une pression inutile sur le verre et empêchez la roulette de couper le joint.

    phfoglia -

  5. sZNVaGR3f2vruyLS
    sZNVaGR3f2vruyLS
    HDO3QbYuc4krqwHX
    • Tagliare l'adesivo lungo il lato sinistro del display.

  6. vSKcLcMFSZoPp6Gp
    vSKcLcMFSZoPp6Gp
    uiuQPD3lViaQODlB
    • Continuare lungo la parte superiore del display.

    • È consigliabile far scorrere ripetutamente l'attrezzo avanti e indietro lungo la parte già tagliata, per fare in modo di separare il più possibile l'adesivo.

    In this step can I cut along the display without make any damage to the front camera?

    arisnordico -

    Hi! Actually - there is no need to cut the tape around the camera area - there is no tape to cut at all! And so, the way go is easy - just pass 10 mm to the left and to the right from camera and start cutting!

    P.S. Just did the whole procedure to replace a RAM and to add SSD on PSIe an hour ago! Seems to be different reading the instructions... you know - 2/10 and so on. But it's really not that hard, trust me. I'll give it 5/10.

    P.P.S. By the way there is one trick to pass the difficult steps. Any action which requires pulling smth (motherboard, speaker, power supply unit) from the narrow crack (or should i say - slit?) at the bottom of your Imac is really not so easy.

    And the trick is to first remove a thin metal stripe with some kind of insulation on it which held by 5 small (very small!!) screws at the bottom of your Imac. After you done it - it's easy to pull everything! Pay attention to the fact that one of this 5 screws at the center are more shortly than others.

    dv1977 -

    I did all steps like this manuell but now the Display wont work only some colered strips are to see! Whats happend??

    Can anybody help me ? Maybe the connector cable is broken?

    djfanta -

    Check both connectors, probably one of them not seated well

    pzhivulin -

    You can add a SATA SSD if you already have a PCIe SSD Factory?

    kaserlik -

    If you're changing cracked EMC 2638 display to new assembly, there's two more steps:

    Step 24: Use the tip of a spudger to flip up the metal retaining bracket on the display data cable.

    Carefully pull the display data cable from its socket on the display assembly.

    Step 25: Use the tip of a spudger to unplug bracket of the thermal sensor small cable near display data cable.

    Carefully remove scotch tape covering thermal sensor. Using iSesamo or flat tip of the spudger carefully peel the thermal sensor away.

    pzhivulin -

    omg - forgot to switch the termal sensor from the old display...

    now fan runs like crazy...

    Andrei Balotescu -

    The key thing is to never put any force on the opening tool when working through the tape. Just roll it back and forth with ease.

    Ernst -

  7. eDPbRqQfKjS4oUnZ
    eDPbRqQfKjS4oUnZ
    qm5g46NqRXJjxaVm
    krs4wdofACqDD6Ju
    • Premere l'attrezzo attorno all'angolo superiore destro del display.

  8. 3c3b2XusJDWQekW6
    3c3b2XusJDWQekW6
    NGOHPeVZ52OQCRWQ
    • Far scorrere l'attrezzo verso il basso, lungo il lato destro del display.

  9. SAgRGwk3lGGO3ZCH
    SAgRGwk3lGGO3ZCH
    1DLPSpBELT2mxJok
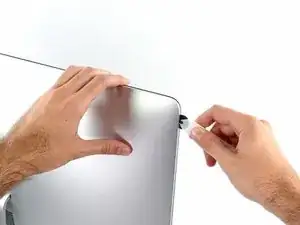
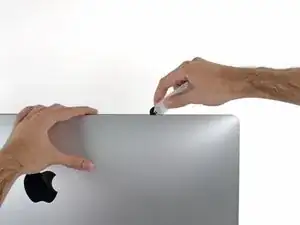
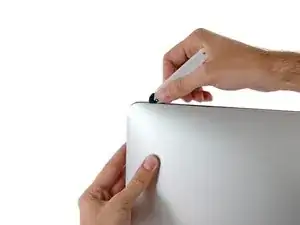
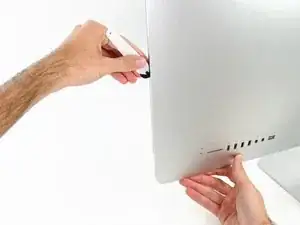
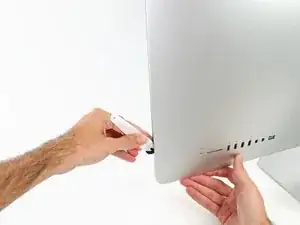
    • Terminare l'applicazione dell'attrezzo per l'apertura nella parte inferiore del lato destro del display.

    • A questo punto, si consiglia di ripassare nuovamente l'attrezzo lungo tutto il display, per fare in modo di tagliare il più possibile l'adesivo.

    Yes, do it many times to loosen the adhesive.

    Noah Ralston -

    Would be good data to show the 3 areas (wifi antennas where the "tape" is larger and covers them. The rest of the "tape" is 1.4" and easy. Also after removing the display, be sure to remove the old "tape" from both the display and the rubber parts of the case. Use the spudger to start an end and it should pull off easily. Careful on the baackside of the display as you can scratch off the black paint/covering.

    Carl Schultz -

  10. HVK2HNgts1D53wOs
    HVK2HNgts1D53wOs
    QrZMXcap4the5yXk
    hZXQgXJhIoKTxBwH
    • Sebbene l'attrezzo per l'apertura tagli la maggior parte dell'adesivo, il display sarà ancora leggermente attaccato al case. Occorre una scheda di plastica per liberare la parte restante dell'adesivo.

    • Poggiare l'iMac su un tavolo, rivolto verso l'alto.

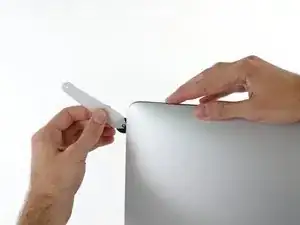
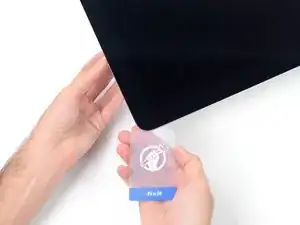
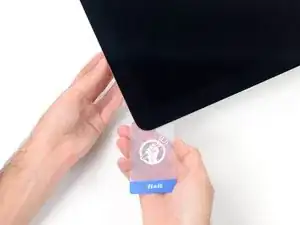
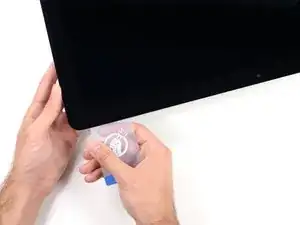
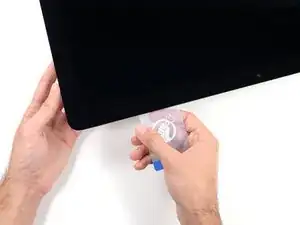
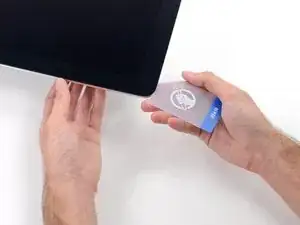
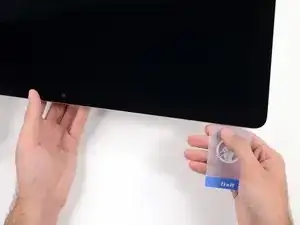
    • A partire dall'angolo superiore destro dell'iMac, inserire una scheda di plastica fra il display e il telaio.

    • Fare attenzione a non inserire la scheda di plastica per più di 0,95 cm, in caso contrario si rischia di danneggiare i componenti interni.

    this step is extremely important NOT to stick in the cards too far….. doing so, you risk a 600 euro replacement as I experienced………

    Edgar Broekema -

    I drew a 3/8” line on my cards with a marker first.

    Max Romano -

    I’m reading this on the EU store, please change all measurements to cm/mm.

    Morgana Devina -

    @ifixit The next batch of cards you create should have a line printed on the card 3/8” in from the edges. Would make a nice reference.

    Richard Giratd -

    Here’s where OWC provides glass removal suction cups, which is a better solution than plastic cards.

    The suction cups help to easily lift the glass panel, without risking the damaging of any internal wiring that the plastic cards could cause.

    Ernst -

    Better to remove stand wedge at this point? Can’t see from pics

    derekrobinson -

  11. wUjiMGtv2IpkNB5p
    wUjiMGtv2IpkNB5p
    LncJQeQQOAvg3CMA
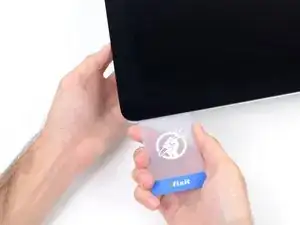
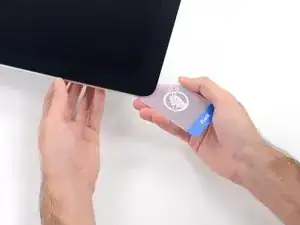
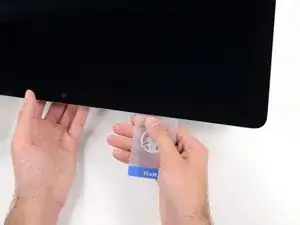
    • Ruotare delicatamente la scheda di plastica lateralmente per creare uno spazio fra il display e il telaio.

    • Eseguire movimenti lenti, facendo attenzione a non fare troppa pressione sul vetro del display, poiché occorre solo uno spazio di circa 0,63 cm.

    This part must be done very carefully or you can damage the flat cable from display, despite it was under a iron cover.

    Cassio Machado -

  12. qmVJHqIxctiuCbE5
    qmVJHqIxctiuCbE5
    6PF3COgq44osRMSX
    1nZLqZWsCa1xRTOR
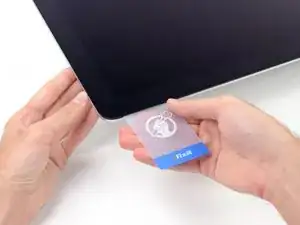
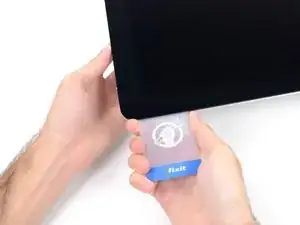
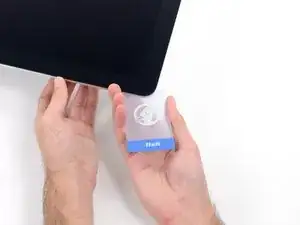
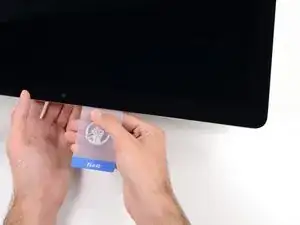
    • Far scorrere la scheda verso il centro del display per tagliare il resto dell'adesivo lungo l'angolo destro dell'iMac.

    • Occorre fermarsi prima della fotocamera iSight per non danneggiarla.

    You don't need to do it like this, simply open the iMac bendidng the LCD completely and use the pizza cutter to remove the adhesive.

    Felix -

    Using glass removal suction cups will avoid running this risk of damaging the camera (or any wiring).

    Ernst -

  13. pwG3JFqqfxxQXLID
    pwG3JFqqfxxQXLID
    wKv4nNrdklsj61AD
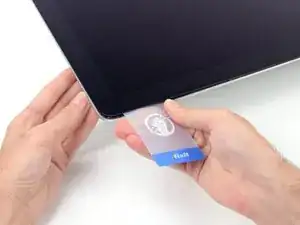
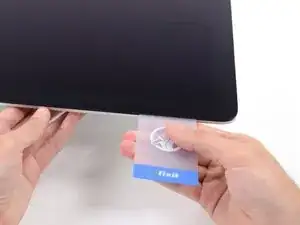
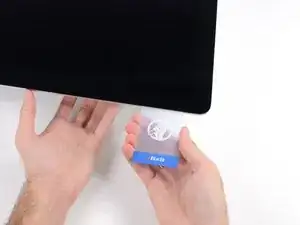
    • Inserire la scheda di plastica nell'angolo superiore destro nuovamente e lasciarla in sede per evitare che l'adesivo si riattacchi.

  14. B1l4C4H1WK3CwfsH
    B1l4C4H1WK3CwfsH
    5gnKwfWW1K2gnkAY
    dU3V1S5PiPpZoiRX
    • Inserire una seconda scheda di plastica nello spazio fra il display e il telaio, vicino all'angolo superiore sinistro dell'iMac.

  15. 1eeYyLOXUgoVdMcU
    1eeYyLOXUgoVdMcU
    XNwnBG1I3otkGVaj
    • Ruotare delicatamente la scheda verso l'alto per aumentare leggermente lo spazio fra il display e il telaio.

    • Come sulla parte opposta, ruotare lentamente la scheda, per consentire la separazione dell'adesivo, senza esercitare una pressione eccessiva sul vetro del display.

  16. 1AtMSKY35dfSoyov
    1AtMSKY35dfSoyov
    eYI56QJhkhMLdtyx
    oVDneBvJQXNCvQpC
    • Far scorrere la scheda di plastica verso il centro, fermandosi nuovamente prima della fotocamera iSight.

  17. KlhOFUANthUfPZrW
    KlhOFUANthUfPZrW
    KGDDBwLWXguRGlso
    • Reinserire la scheda di plastica nell'angolo superiore sinistro.

  18. xXVPepFcNBfFlYLm
    xXVPepFcNBfFlYLm
    mJWDXXcMCnL6OwqX
    lGcKi3n1DVFdANJw
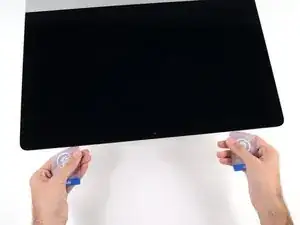
    • Mantenendo entrambe le schede di plastica inserite vicino agli angoli come indicato, ruotarle delicatamente sui lati per aumentare lo spazio fra il display e il case.

    • In presenza di sezioni ancora incollate che non si separano, fermare la rotazione e utilizzare una delle schede per tagliare l'adesivo restante.

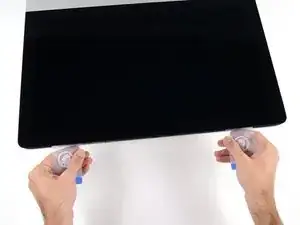
    • Iniziare a sollevare la parte superiore del display dal telaio.

    • Sollevare il display di pochi centimetri, poiché i cavi di alimentazione e dei dati sono ancora collegati alla scheda logica.

  19. 2CYaRvZMKD1MHJWF
    2CYaRvZMKD1MHJWF
    fHCLPYQIpP4EVOLZ
    • Solleva lo schermo abbastanza in alto da avere un accesso facile al connettore, ma non tanto da strappare i cavi e forzare i rispettivi connettori (alzalo di circa 20 cm).

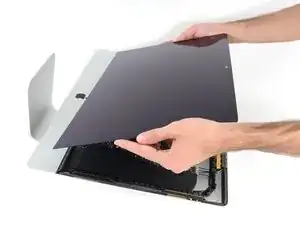
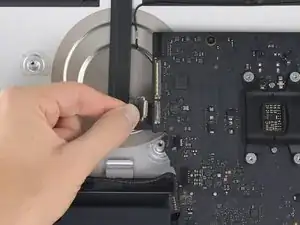
    • Mantieni lo schermo con uno mano mentre con l'altra stacchi il cavo di alimentazione dello schermo .

    It was difficult to remove this connection. I ended up having to gently pull-up vertically a little on the wire side to unsnap it about 1mm and then horizontally wiggle it out.

    delacrj2 -

    I had a difficult time removing this connection. I had to lift the wire-side about 1mm before it unsnapped and then carefully wiggle it out horizontally.

    delacrj2 -

    Can this cable be replaced? I am worried mine is damaged. I have no display after the screen fell and stressed the display flex cables following an SSD upgrade.

    Jeremy Brainard -

    This step should be done with extreme caution and care, as this step 19 is not described in great detail (sorry, author).

    The first (most outward) cable will slide out by gently pulling it by its tabs. The second (inner) cable is more tricky, as the locking lever must be moved backward first, before gently pulling backward on the cable connector. The angled tweezers are useful here, to help lift that locking lever, because fingers are too big for this.

    Ernst -

    be VERY careful and SLOW...take your time. These displays crack VERY easily when removing and they'll spider web on you. I've done probably 20 or so of these and cracked 3 being super careful.....ugh.

    Faslane -

    I found the best way to unplug this display power cable was to use my right hand, and the fingernails of my index finger and thumb to grab the ends of the tabs on either side of the connector, squeeze, and pull the connector out gently.

    Phil McInnis -

    i think the cable nearest the case edge is held in by friction and can be gently pulled, maybe with fingernails or a spudger. The next cable is held by a wire lever clip as described above it unlocks so the cable can be removed. These cables are also fiddly to re-insert, I didn't get one of them home and had no display after power-up, so at the end, don't re-seal the screen until tested.

    Peter Taffs -

  20. Zh56FQPLtH1qJkBF
    Zh56FQPLtH1qJkBF
    RuoSZ5iXxQqvKfcF
    MuEuntgC4FjFNuDJ
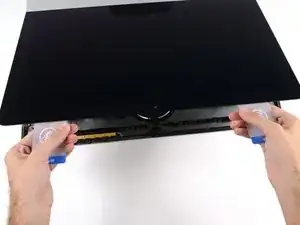
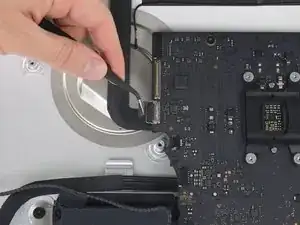
    • Continua a tenere lo schermo con una mano, sblocca la staffa metallica di ritenuta del cavo dati dello schermo.

    • Stacca con cautela il cavo dati dello schermo dalla sua presa nella scheda madre.

    • Assicurati di tirare il cavo dati dello schermo direttamente fuori della sua presa, mantenendolo parallelo alla scheda madre, per evitare di danneggiarlo.

    Cannot seem to find a replacement cable for this, as I suspect mine is damaged. Can’t even find a part number. Anyone know what it might be?

    Jeremy Brainard -

    https://www.amazon.com/gp/product/B08TTL...

    That's the part I ordered for mine and it seems to work ok. I did make a point of contacting the seller and advising them of my requirement and they ensured I got the right part and it matches the description of the link. Bear in mind I bear no responsibility if yours does not work since I am just sharing what I did and what I ordered. Thanks.

    Jim Stanford -

    I also need that cable.

    cameronjpu -

    It's a little difficult to tell... but looking at the connection to the logic board on the video data cable, are the pins faced up or down?

    On the display, same question since it appears you have to "twist" the cable during the reconnection step.

    Jim Stanford -

    For this particular cable, take a good look before pulling on anything. Plug is locked on its socket with a bracket. You can lift this bracket by holding the small, flat black plastic handle that is attached to it. If you're struggling to grab it, use the end of the pizza roller handle to lift it, or the tweezers. Cable then comes off by pulling parallel to the main board.

    Froggy Manny -

    How can I tell if either of this cable is bad? My iMac display won't turn on after reconnecting it. I'm using an external display and everything is working except for the iMac display. If I go to settings - display the built-in display is recognize. But again nothing shows up in the screen - not even the apple logo when turning it on.

    Carlos Sosa -

  21. faYLZCcUqNgfLImh
    faYLZCcUqNgfLImh
    fTsCL5NUphoD5vbV
    • Solleva il display in posizione quasi verticale.

    • A questo punto ci sarà sempre una striscia di adesivo nella parte inferiore del display che lo terrà incollato alla scocca come una cerniera. Puoi allentare questo adesivo muovendo il display su e giù per alcune volte.

    The best way to remove the chin adhesive is to use the tabs at either end (there are two strips that run from each outside corner to near the centre). Carefully pull the tabs up and the strips should peel off.

    Advance Technical Service -

  22. EyrkeRmWKhVr6PQL
    EyrkeRmWKhVr6PQL
    V3KWORppGRpxkZl5
    EEJDoH3W6oKg6nHd
    • Fa' molta attenzione a non toccare i conduttori del condensatore o le saldature esposte sul retro dell'alimentatore (riquadrati in rosso).

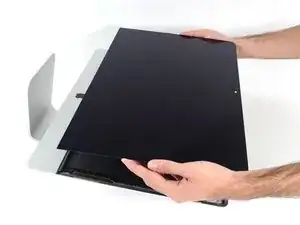
    • Afferra la linguetta alle estremità di una delle strisce adesive sul bordo inferiore dello schermo e tira l'adesivo verso la parte superiore dell'iMac per rimuoverla.

    • Ripeti questo passo con l'altra striscia adesiva e rimuovila.

    • Se una delle strisce adesive si rompe prima di essere rimossa, usa una scheda di plastica per tagliare l'adesivo rimanente.

    At step 21-22, releasing the adhesive strips from the bottom of the display, I noticed a tab on the outer end of each strip. Pull the tab to remove the whole strip, no need to mess around with the plastic cards!

    roberttrevellyan -

    Instead of the plastic cards, use the flat end of a spudger. Use it as scraper. Be careful as there are antennas mounted on the inside edge of the frame on the right side (facing you), and the top right (facing you). The original adhesive strips are on those as well. - ECJ

    ECJohansen -

    A little bit of hot air (eg. hair dryer) will help soften the adhesive. Use a piece of cardboard or equivalent if you want to avoid blowing hot air towards the electronics.

    Be careful to remove absolutely everything - any remainder will create a bump and prevent your screen from sticking back to the frame when reassembling.

    Froggy Manny -

  23. W11PURO2LYnqVMEL
    W11PURO2LYnqVMEL
    4x45fNhvlBjfqU3f
    WstuEbNDdOlFKIns
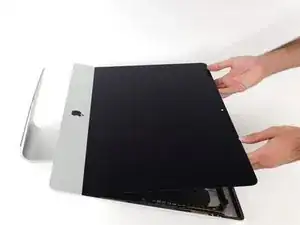
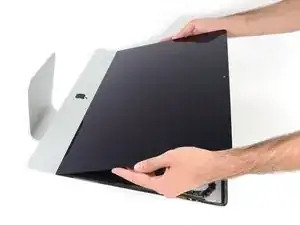
    • Solleva il display dalla scocca e rimuovilo dall'iMac.

    • Potrebbe essere necessario sollevare lentamente lo schermo da una parte per staccare l'adesivo rimanente.

    • Fai molta attenzione a maneggiare il display - è grande, pesante e fatto di vetro.

    • Dopo che l'adesivo è stato tagliato, non può essere riutilizzato per riattaccare il display. segui questa guida quando la tua riparazione sarà completa per sostituire le strisce adesive e assicurare il display alla scocca.

    Après l'étape 23, j'ai suivi les instructions de la vidéo intitulée: Upgrade RAM in a mid-2017 21-inch iMac without complete disassembly.

    Lien: https://www.youtube.com/watch?v=_k9I7N9B...

    J'ai pu upgrader la RAM en enlevant juste le ventilateur.

    Koala -

  24. NcuxI1qtaekXpOl6
    NcuxI1qtaekXpOl6
    mphdji2lKIR3CwWS
    • Svita le seguenti viti a croce Phillips che tengono ferma la staffa di supporto inferiore:

    • Quattro viti da 3,2 mm

    • Una vite da 1,7 mm

    • Potresti dover rimuovere l'adesivo sul bordo inferiore dell'iMac per aver accesso alle viti.

    I would recommend that those trying this have the project tray to contain all of the screws.

    Mikkif -

    2 notes for reassembly, carful with screws not to strip the heads as they are really really small, make note to cut a gap in the the adhesive over the whole for the microphone.

    I managed to strip the head of one of the screws when putting it back in. So be carful with them when putting in / taking out. If you strip it on the way out you will need to take a fine drill and rill it out. Going back in, well as long as you never need to strip it down again not a problem.

    The second problem is a real pain, you need to make sure to cut a gap in the adhesive just to the right of Center at the button to allow for the microphone opening. If you don’t, the adhesive tape will stop any real pick up on the Mic, so you just need to cut a small gap in it before putting on the screen. Unfortunately I didn’t find this out (or do my checked before sticking it all back down, so have to pull screen back off and reapply new adhesive with a cut out in it at an other time.

    Andrew Taylor -

    Refer her for more info on the mic / adhesive work around —> Muffled Microphone - iMac 21.5" (mid 2017) - Following Adhesive Strips

    Andrew Taylor -

  25. JXwmPAMGvia4gxmW
    • Rimuovi la staffa di supporto inferiore dalla scocca dell'iMac.

    Keep this long, aluminium part very straight when pulling it away or you might bend it

    Froggy Manny -

    que pasa si no coloca esta pieza?

    CARLOS -

  26. vnCZOVJAfQMkCXVO
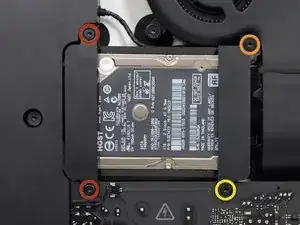
    • Rimuovi le seguenti viti Torx T10 che tengono ancorato il supporto del'hard drive sull'iMac:

    • Due viti da 21 mm

    • Una vite da 9 mm

    • Una vite da 27 mm

    At step 26, when reassembling, it's super easy to over-tighten the 9mm screw and strip the brass ferrule out of its hole in the plastic bracket (%#*@).

    roberttrevellyan -

    Mine has 4 different length screws, the two red colored 21mm screws in this guide are actually two differ lengths

    anonymous 523 -

    Mi imac does not have a HDrive whats the steps to follow?

    Charlie -

    buongiorno, l'imac del 2019, non monta alcuna ssd, ma monta una m2 direttamente sulla scheda madre!

    pertanto nella guida andrebbe aggiunto il cavo sata con sensore temperatura da aggiungere sulla scheda madre, per poter collegare un nuovo hd ssd altrimenti rimarrete come me bloccati con un imac aperto e non assemblato, in attesa di ricevere il cavo acquistato su internet da amazon o terze parti.

    vi consiglio inoltre di aggiungere una foto reale del ò'imac 2019 nella guida in cui manca l'ssd, renderà subito la problematica che avranno in molti!

    Donato Altomare -

    Hi, mine doesn’t HAVE an HD/SSD to remove, the bay is empty (yes it was fully working yesterday. So what do we do ? I see someone else with the sane issue above….

    Jeroen Speak -

  27. MFEFhp6PYNe1LMei
    MFEFhp6PYNe1LMei
    YOZ6AmbKs2AlGURG
    • Rimuovi i supporti sinistro e destro dell'hard drive dell'iMac.

  28. mvMdQktTba6hAHXt
    mvMdQktTba6hAHXt
    Xrb5HKoQvsB3M1aL
    ngWQxHCLD5HUmXC1
    • I prossimi passi ti faranno avvicinare le mani alla faccia esposta dell'alimentatore. Non toccare la faccia dell'alimentatore o qualsiasi saldatura esposta. Toccandole rischi di prendere una scossa ad alta tensione dai grandi condensatori collegati alla scheda.

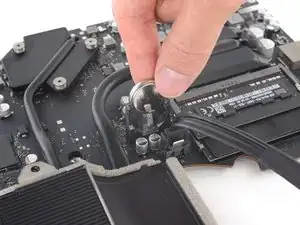
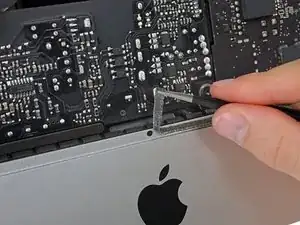
    • Usa la punta di uno spudger per spingere entrambi i lati del connettore del cavo del tasto di accensione e guidarlo delicatamente fuori dalla sua presa.

  29. FRyHHB3eYim1Mlap
    FRyHHB3eYim1Mlap
    QYTUyMIUOCpNBKj3
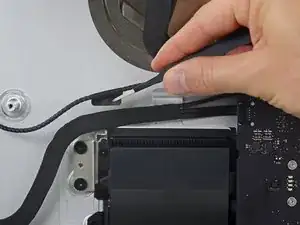
    • Usa la punta di uno spudger per spingere entrambi i lati del connettore del cavo di controllo dell'alimentatore e guidarlo delicatamente fuori dalla sua presa.

  30. CH3APYFIpiKhphHv
    • Svita le due viti Torx T8 da 7,2 mm che fissano l'alimentatore alla copertura posteriore.

  31. ydiE3k5Fa2YpKhyx
    ydiE3k5Fa2YpKhyx
    2WOoukeWyEZYOdGS
    • Mentre lavori sull'alimentatore, stai molto attento a non toccare le gambe dei condensatori o qualsiasi saldatura esposta sul retro dell'alimentatore. Tocca la scheda solo sui suoi bordi.

    • Inclina l'alimentatore in avanti.

  32. PKvyIF2PGHKLVC2I
    PKvyIF2PGHKLVC2I
    QS1usHIbpanvhs6M
    mWlTKHdQmhbCG6Sm
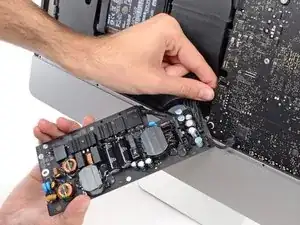
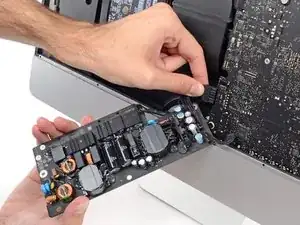
    • Tira l'alimentatore leggermente verso l'alto e fori dalla copertura inferiore.

    • Ruota l'alimentatore in senso antiorario, sollevando il lato destro di un paio di centimetri rispetto al sinistro.

  33. wWakaG6mtCcwjET3
    wWakaG6mtCcwjET3
    yOSa1on1CEscZMhj
    • Fai scorrere l'alimentatore verso destra per superare i supporti delle viti sulla copertura posteriore.

  34. jLV1p6yQHGorKX6J
    jLV1p6yQHGorKX6J
    RXTvMCHuVc2YG6Bw
    AhUBHxjjc4AVbOIJ
    • Tira in avanti l'alimentatore e rimuovilo dal suo alloggio nella copertura posteriore.

    • Non cercare ancora di rimuovere completamente l'alimentatore dall'iMac: è ancora collegato alla scheda madre.

  35. cbv6FeSmQ2uPUJLi
    cbv6FeSmQ2uPUJLi
    2TTX1JBYPKyJJDpy
    DpV1XSNW6lES4k6h
    • Stai molto attento a non toccare le gambe dei condensatori o qualsiasi saldatura esposta sul retro dell'alimentatore. Tocca la scheda solo sui suoi bordi.

    • Non lasciar toccare nessuna saldatura esposta con una superficie in metallo, in quanto potrebbe causare un corto circuito.

    • Gira l'alimentatore a faccia in giù per accedere al cavo di alimentazione DC collegato dietro la scheda madre.

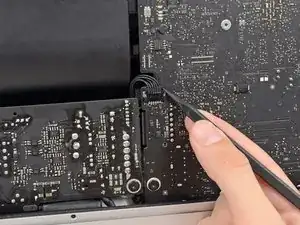
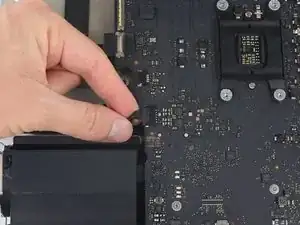
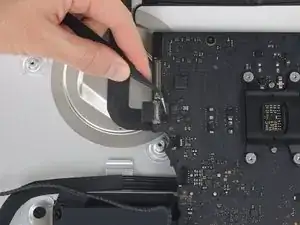
    • Per scollegare il cavo, schiaccia il gancio di rilascio sul retro del connettore, dietro la scheda madre e sfila il connettore.

  36. X1O2EONkUfMWVDIU
    X1O2EONkUfMWVDIU
    afj3FkjCDfAuRAC3
    IpAy5PoZ5NsXFekL
    • Potresti trovare utile appoggiare l'iMac sul suo retro per i prossimi passi.

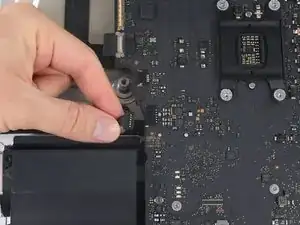
    • Usa la parte piatta di uno spudger per premere all'interno il gancio di rilascio sul lato del connettore del cavo d'ingresso AC.

    • Mentre premi il gancio di rilascio con lo spudger, prendi il cavo d'ingresso AC e sfila il connettore dalla sua presa.

    I didn't bother to remover the power supply lead in this stage but simply flippedthe circuit board over onto the lower body of the iMac (NOT placing it directly onto the metal but onto a sheet of plastic)

    Fettler -

  37. 2VMnTxjOOO1L43of
    • Rimuovi l'alimentatore dall'iMac.

  38. ZjTdOuevFThSNaSi
    ZjTdOuevFThSNaSi
    S4meAekVQZkISUTE
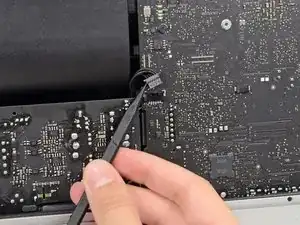
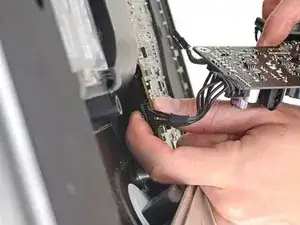
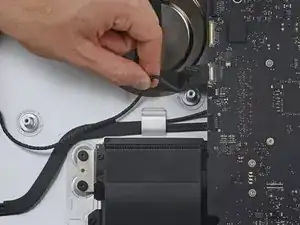
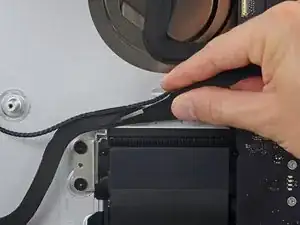
    • Estrai delicatamente il connettore del cavo della ventola dal connettore presente sulla scheda logica.

  39. MrmKPSuUCopatoYl
    • Rimuovi le tre viti Torx T10 da 10 mm che fissano la ventola all'involucro posteriore.

    • La vite più in alto ha una guarnizione in gomma per aderire meglio e supportare lo schermo: lascia la guarnizione dov'è.

  40. NDv2oOiGvHmIAG6I
    NDv2oOiGvHmIAG6I
    igO3bWrtnsJMJ5QJ
    • Rimuovi la ventola dall'iMac

  41. rAirT1GHZP1qpIqC
    rAirT1GHZP1qpIqC
    FI1BVEajFcTkxyGe
    fH3KYDKkVeWLdH2L
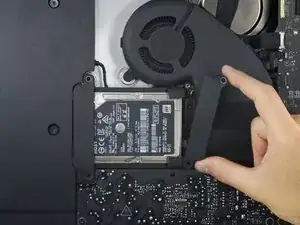
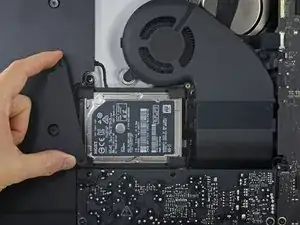
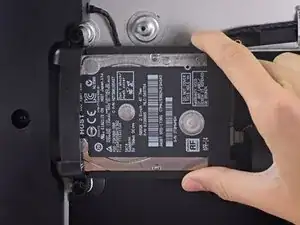
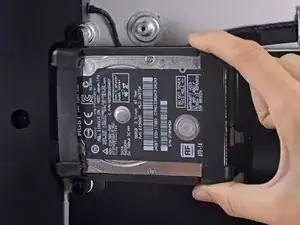
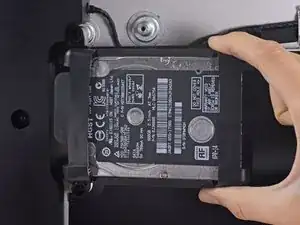
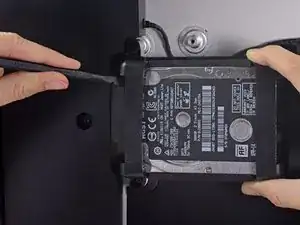
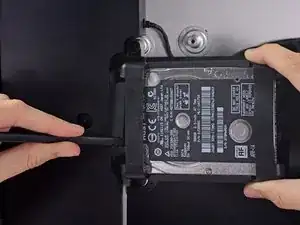
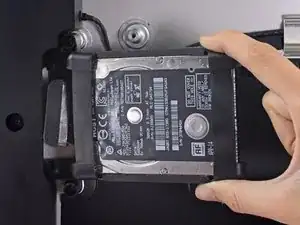
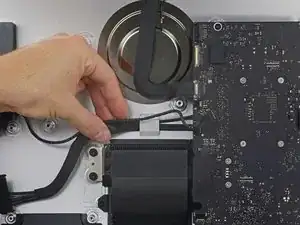
    • Solleva l'hard drive dal lato più vicino alla scheda madre e tiralo leggermente fuori dal suo alloggio.

    • Il disco rigido è ancora collegato all'iMac con un cavo dati/alimentazione SATA: non cercare di rimuoverlo ora.

    The newer drives have rubber ends and an adhesive side, be careful removing them if replacing the drive and be sure they are securely pushed back into the holder

    Carl Schultz -

  42. xAT4mnLlMEmZaE1l
    xAT4mnLlMEmZaE1l
    nUVTcTkKjNk2phCg
    • Usa uno spudger per scollegare il cavo dati/alimentazione SATA facendo leva delicatamente su entrambi i lati del connettore per farlo scorrere lontano dall'unità.

    When reconnecting the SATA cable, there is nothing to make the connector hold still, and it is hard to reach, so it took several tries. I ended up taking off the rubber baby buggy bumpers to get more room, and then jamming them back on after getting the SATA connector snugged up.

    bstaud -

    If by rubber baby buggy bumper, you mean left speaker, then yes, I agree. Reinstall the hard drive before the left speaker.

    jerrid_foiles -

    Kudo to @jerrid_foiles! I was going crazy trying to attach the SATA cable until I took the two screws out of the left speaker and slid the top end of it aside by about 3/4 inch. Make the whole process SO MUCH easier!!

    jiclark -

    We solved this by removing the hard drive tray screw, then inserting the cable into the SATA hard drive. Then hold the hard drive a bit out of the way to insert the 7.3mm hard drive tray screw.

    Marjie -

    Agree with this method, found it an impossible task to reconnect the SATA connector until removed the tray screw, then it was relatively easy to reconnect and then replace the tray screw.

    daveedwards -

    Also agree with this method!

    jmorphett5 -

  43. gPY6hXsOGJ1vn6ij
    • Rimuovi il gruppo dell'hard drive dall'iMac.

    When reassembling, I found it easier to loosen the HD tray screw from Step 48 and pull the tray outwards from the left side in order to plug the SATA cable in more easily.

    Cool_Breeze -

    Thanks! I, too, had a hard time reconnecting the SATA cable.

    boboswell -

    I found this helpful too!

    Anwar -

    And DON’T do what I did, which is to remove the left speaker - which can easily lead to breaking the cable between the power on button and the power supply. The cable is routed through a hidden slot at the very bottom of the left speaker

    bsmith1 -

    I did loosen the speaker so I could get a tool behind the SATA cable to push it on to the SSD drive. Otherwise hard to align cable.

    Noah Ralston -

    I found the easiest way to connect the SATA cable was to not screw the plastic hard drive tray down until you plug the drive in. That way you can easily push the connector in and due to the cable you’ve got some wiggle room. You can position the tray then just lift one end of the drive up and secure the screw. Then just push the drive down.

    Chris Caldwell -

    This was the step that I had the most trouble with. I’m used to replacing a hard drive in a MacBook Pro, where the “plug” that you plug the drive into is a rigid thing that you can firmly press the hard drive into.

    With the iMac, the plug is situated on the end of a non-rigid cord, so the plug moves back when you try to snap a drive into it. Also, those two rubber gasket things that you adhere to the side of the drive really make it difficult to maneuver the now-overly-chubby drive towards the plug.

    After must frustration/concern, what I ended up doing was temporarily removing the rubber gasket things, using the “spudger” as kind of a lever behind the “plug on a cord” so that it didn’t move as much, and then pushed the gasket-less SSD into the plug.

    Once I got it connected, I put the rubber gaskets back on the sides of the SSD and kind of coaxed it down into place, using the pointy end of the spudger to get the chubby corner pieces to “sit” correctly in the rigid plastic tray that the SSD kind of rests in.

    Jack OnFlickr -

    From another comment elsewhere on this repair, I *highly* recommend removing the two screws holding the left speaker in place, then sliding it just a tad out of the way to be able to easily attach the SATA cable. You don’t have to move it much to make the whole process so much easier!

    jiclark -

  44. jWXmBog4lKr4HqkV
    • Svita la vite Torx T8 da 7,3 mm che fissa il supporto dell'unità alla scocca posteriore.

    it`s a t10 screw..! ;)

    happymac venezuela -

    I found it easier to connect SATA cable before fixing tray.

    Mārtiņš Jansons -

  45. qUxSodfw5NxJMghA
    • Rimuovi il supporto del disco rigido.

    I am following these procedures for the following: iMac Retina 4K - 21.5" - 3GHz Quad Core - Radeon Pro 555 2GB - 4GB/4GB (8GB total - 2 slots) 2400MHz DDR4 SO-DIMM - Mid 2017 - Model: MNDY2LL/A - iMac18,2 - A1418 - 3069. In my case, the SATA cable is clipped into the bottom of the hard drive tray. Pull the hard drive tray up slightly and angle to reveal clips. SATA cable pops out from the side of each clip.

    iannai29 -

    Better yet, after reading Step 49 - no need to remove SATA cable from the bottom of the hard drive tray.

    iannai29 -

  46. EVkS45CkS3Iu2YNC
    EVkS45CkS3Iu2YNC
    ZuQBSSUCOuYQLd2f
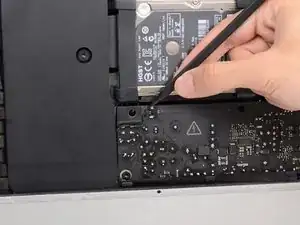
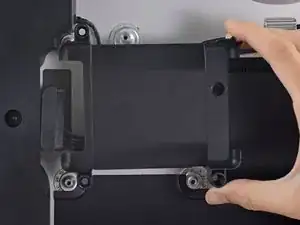
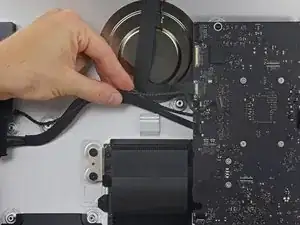
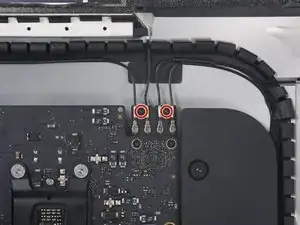
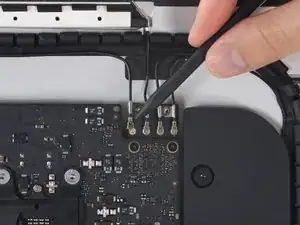
    • Tira delicatamente il cavo dell'altoparlante sinistro via dalla sua presa sulla scheda logica.

  47. TtGDfsaQYGANmgGx
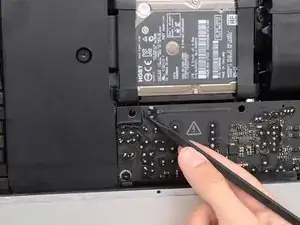
    • Sposta il cavo dell'altoparlante sinistro, tirandolo fuori dal gancio di bloccaggio sul retro dell'involucro posteriore.

  48. wEDdKtKTxmGuxDDe
    wEDdKtKTxmGuxDDe
    LhH4UTiMVnoWq1cU
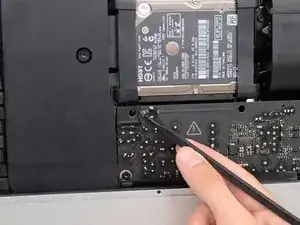
    • Come nel passo precedente, sposta i cavi SATA e di alimentazione, liberandoli dal gancio di bloccaggio.

  49. cGGPcPVZPPf1I1gP
    cGGPcPVZPPf1I1gP
    yAhJLP1k6kZTKoKU
    • Rimuovi il pezzo di nastro adesivo che collega il connettore dell'altoparlante sinistro ai cavi SATA e di alimentazione.

  50. VrbphVEAwWZ3NNVM
    VrbphVEAwWZ3NNVM
    Hi2DlRHisyTvoi3i
    L5GnIYiW3ZgYpm5j
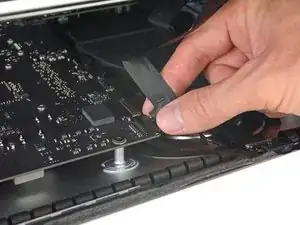
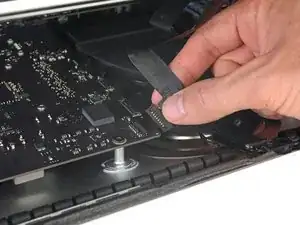
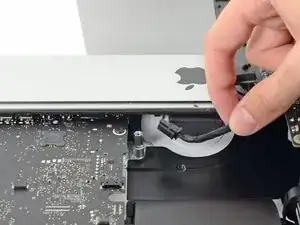
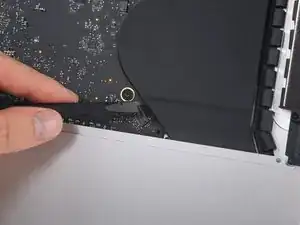
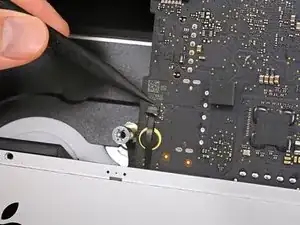
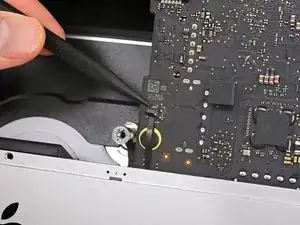
    • Capovolgi la staffa di bloccaggio in metallo sul connettore del cavo della fotocamera FaceTime.

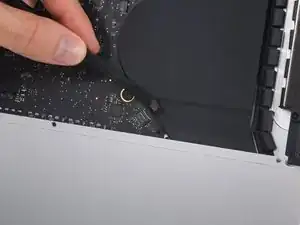
    • Rimuovi il cavo della fotocamera FaceTime dalla sua presa sulla scheda logica.

    • Questo è un connettore delicato che può danneggiarsi facilmente.

  51. NMwtLbwURqmiS1Hd
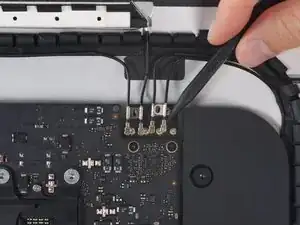
    • Rimuovi le due viti Torx T5 da 4,0 mm che fissano i quattro connettori dell'antenna alla scheda AirPort/Bluetooth.

  52. XW6dGXe3rUDVpHTU
    XW6dGXe3rUDVpHTU
    gBm6OrrXMZBEI4RV
    Gf5TshqSeHY1uE1Q
    • Scollega tutti e quattro i connettori dell'antenna, sollevandoli direttamente dalle loro prese sulla scheda AirPort/Bluetooth.

  53. VjRAN1ZSm2PTQFw2
    VjRAN1ZSm2PTQFw2
    etMu3QOg1kFDRrsO
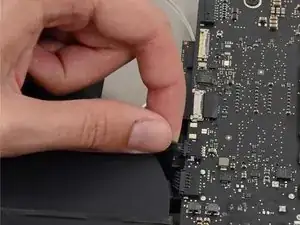
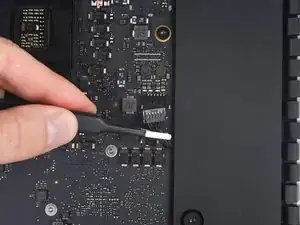
    • Tira delicatamente il connettore del cavo dell'altoparlante destro verso il basso e fuori dalla sua presa sulla scheda logica.

  54. 31WuMhdQcAf5APg3
    31WuMhdQcAf5APg3
    dCl6CHaWFVXjjCLA
    N4GNGjHeFoe3MXIP
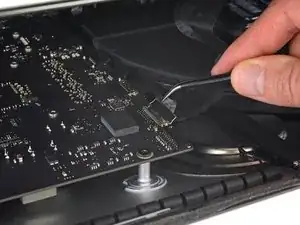
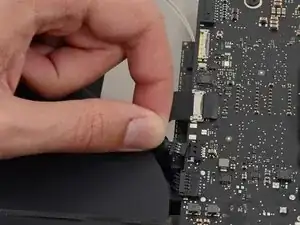
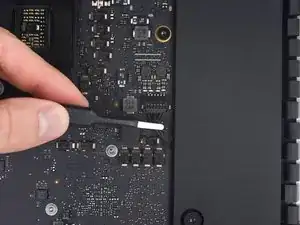
    • Usa la parte piatta di uno spudger per sollevare il connettore del cavo del jack cuffie dalla sua presa sulla scheda logica.

    • Spingi il cavo leggermente a destra.

  55. 6PJQlAZBpAr2tOWS
    • Rimuovi il nastro adesivo che copre il condotto di raffreddamento.

  56. rFBrptATbIgcfcFT
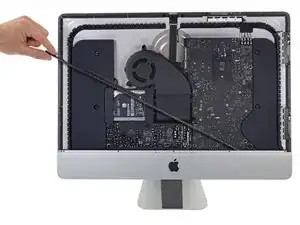
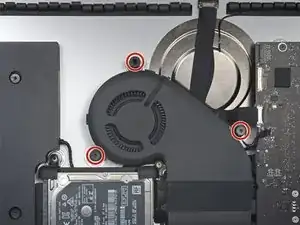
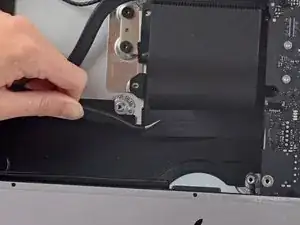
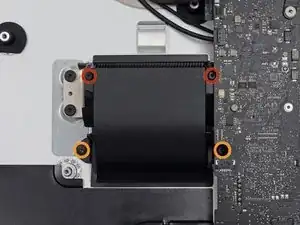
    • Rimuovi le seguenti viti Torx T8 che fissano il condotto di raffreddamento all'involucro posteriore.

    • Due viti da 6,2 mm

    • Due viti da 4,7 mm

  57. A6CN4kk2Qb3xm2d2
    A6CN4kk2Qb3xm2d2
    NQjsgCaEhcs4JNUf
    axtbr4ZFFH2Dapl1
    • Usa la punta di uno spudger per aprire l'aletta di bloccaggio sulla presa ZIF del cavo a nastro del microfono.

    • Accertati di stare facendo leva sull'aletta incernierata e non sulla presa.

    • Rimuovi delicatamente il cavo a nastro del microfono dalla presa.

  58. OEFFfMmlYkoJFsIW
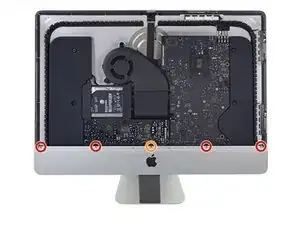
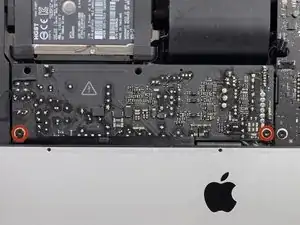
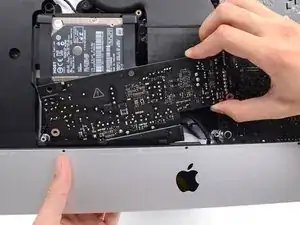
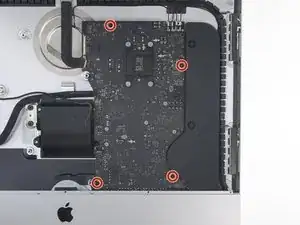
    • Rimuovi le quattro viti Torx T8 da 7,3 mm che fissano la scheda logica all'involucro posteriore.

  59. PINibihZhYFctKKx
    PINibihZhYFctKKx
    WSFDY3xp5IlAHndQ
    5RW2UJpNmpORTns1
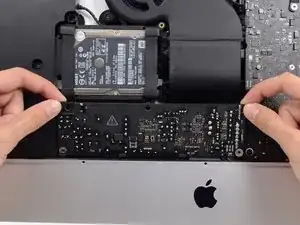
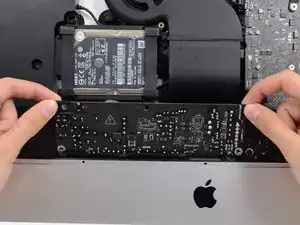
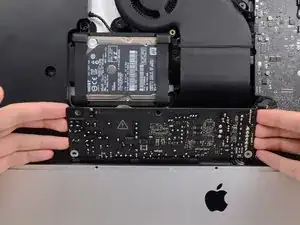
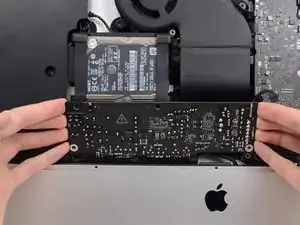
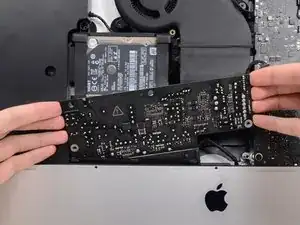
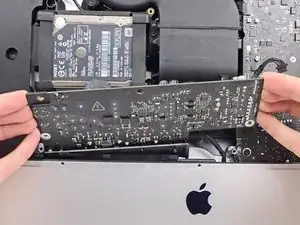
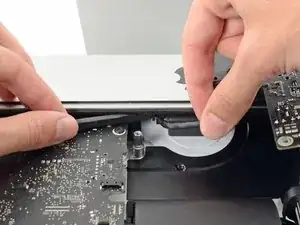
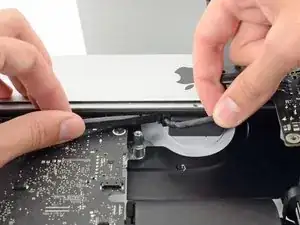
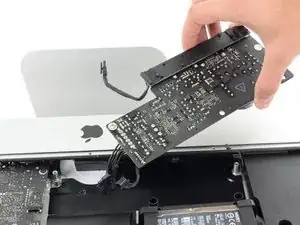
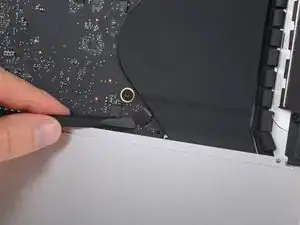
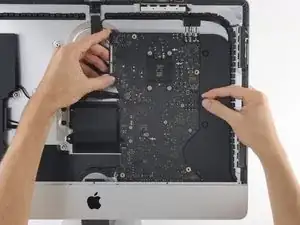
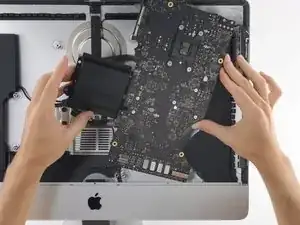
    • Inclina la parte superiore della scheda logica, allontanandola dall'involucro posteriore.

    • Mentre inclini la scheda logica, sposta il connettore dell'altoparlante destro verso destra per liberare la scheda.

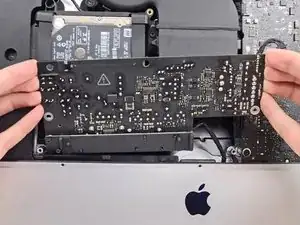
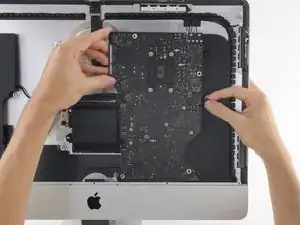
    • Solleva la scheda logica dall'iMac.

    • Fa' attenzione che la scheda logica non si impigli in nessuno dei perni delle viti dell'involucro posteriore.

    When repairing, I accidentally broke a small piece of what it seems to be a resistor. Mac still works fine and diagnostics reports no errors. Be careful when removing the mother carefully so it doesn’t hit the aluminium cover.

    Andres Urena -

  60. RqyaGT5MCfOASZyQ
    RqyaGT5MCfOASZyQ
    m2Rw1kh5RHbuF4JV
    • Quando riassembli l'iMac, fai attenzione ad allineare le porte I/O esterne correttamente. La scheda logica potrebbe essere storta anche quando è fissata con tutte le viti.

    • Usa una chiavetta USB o un cavo ethernet per mantenere la scheda logica nella posizione corretta mentre stringi le viti.

  61. gZCAADGScH3PlPGo
    gZCAADGScH3PlPGo
    yRhKwBeWrE1ypUdr
    • Rimuovi la batteria PRAM direttamente dal suo alloggiamento.

Conclusione

Per rimontare il dispositivo, segui queste istruzioni in ordine inverso.

Adam O'Camb

Membro da: 11/04/15

195052 Reputazione

0 commenti