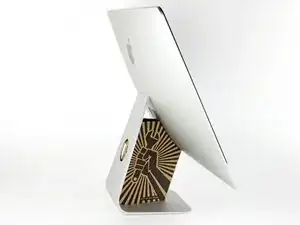
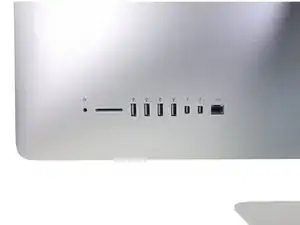
Introduzione

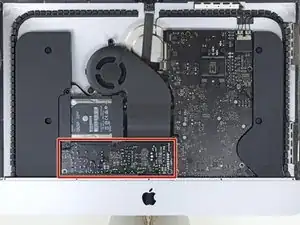
Segui questa guida per sostituire la batteria PRAM in un iMac 21.5" Retina 4K del 2019. La batteria PRAM si trova sul retro della scheda logica, quindi sostituirla richiede prima di rimuovere la scheda logica.

Alcune immagini in questa guida mostrano un iMac più vecchio, con delle minime discrepanze visive. Queste differenze non influiscono sulla procedura della guida.

***Questa guida richiede di maneggiare un alimentatore che contiene dei grandi condensatori. Scollega l'iMac e tieni premuto il pulsante di accensione per almeno 10 secondi per aiutare a scaricare i dissipatori. Prendi la scheda solo dai bordi e non toccare i componenti in superficie.'''

  1. xew1BWp2BZwFMbWh
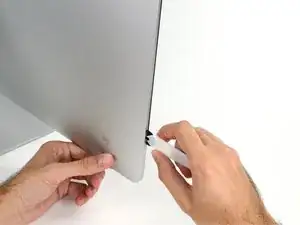
    • Se la cerniera è libera di muoversi, l'iMac si può sbilanciare e rendere difficile il lavoro. Sistema sotto lo stand un supporto di riparazione iMac per rendere stabile il dispositivo.

    • Se stai usando il supporto in cartone iFixit, segui queste istruzioni per montarlo.

    • Prima di iniziare qualsiasi intervento sul tuo iMac: scollega il computer dall'alimentazione e tieni premuto il pulsante di accensione per dieci secondi per scaricare i condensatori dell'alimentatore.

    • Stai molto attento a non toccare i capi del condensatore o qualsiasi saldatura esposta nella parte posteriore dell'alimentatore. Maneggia il pannello tenendolo soltanto dai bordi.

    Maybe your directions should suggest fixers to buy RAM cards in pairs. I wanted 32 Gig of RAM, and I bought and installed one 32 G RAM and while it seems fine, one source told me it would be 5-10% faster if I had put in two 16 RAM cards. Is that accurate?

    BRUCE CLARKE -

    it would at least be that much faster, in theory some applications should run twice as fast

    blakebest -

  2. M42hmSlBUbk6PbHC
    M42hmSlBUbk6PbHC
    YmEFhp4dqiXysxIN
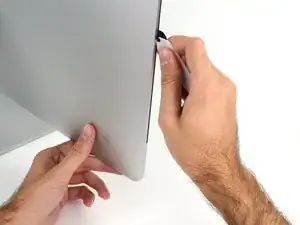
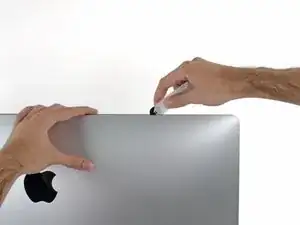
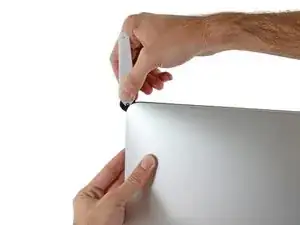
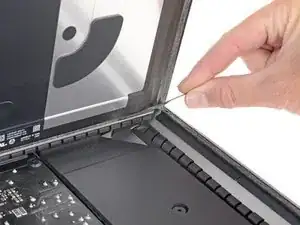
    • Iniziando dal lato sinistro dello schermo, vicino al pulsante di alimentazione, inserisci lo Strumento di apertura iMac nella fessura tra il pannello di vetro e la cover posteriore.

    • La sporgenza sullo Strumento di apertura iMac impedisce alla rotellina di entrare troppo in profondità. Se usi un attrezzo diverso, non inserirlo per più di 9,5 mm nello schermo. In caso contrario, rischieresti di tagliare dei cavi di antenna e di causare seri danni al dispositivo.

  3. cOVEfbnXgUttrW2b
    cOVEfbnXgUttrW2b
    FlMUC3pRXZOFhcoB
    tKQWoCGakrogQTPD
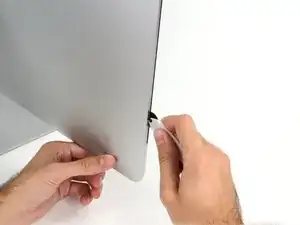
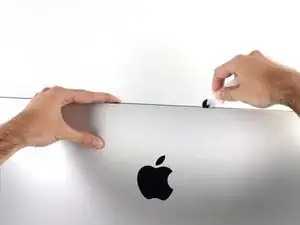
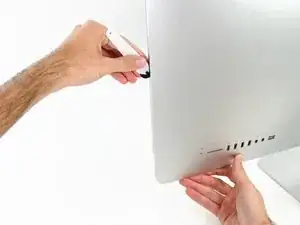
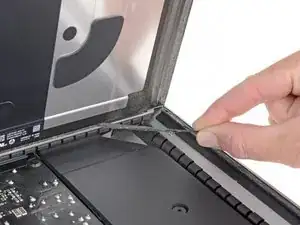
    • Usa l'attrezzo come se fosse una rotella per tagliare la pizza: fallo girare lungo la fessura, tagliando così l'adesivo in schiuma tra la scocca e lo schermo.

    • Stai attento a mantenere premuta la rotella verso l'interno. Se la tiri, la rotella potrebbe uscire dall'impugnatura.

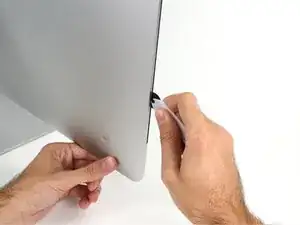
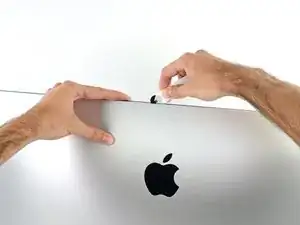
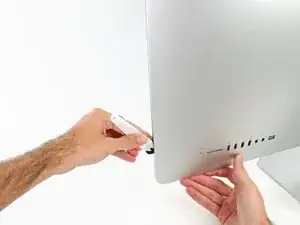
    • Passa l'attrezzo attorno al lato sinistro dello schermo.

  4. tSAS3Jn3qghgZJDe
    tSAS3Jn3qghgZJDe
    KCyqluPop5fjDYAE
    IqxfhhMDuT5ibx1P
    • Continua a far scorrere l'attrezzo attorno all'angolo superiore sinistro.

  5. Gr5frklRP5SSCfcs
    Gr5frklRP5SSCfcs
    ja4mM4JMGPU2UVrV
    • Taglia l'adesivo lungo l'angolo superiore sinistro del display.

  6. NZSSQT4P2YuyMtAf
    NZSSQT4P2YuyMtAf
    BudRMK2UCrSCEYOO
    • Continua a lavorare lungo la parte superiore dello schermo.

    • Puoi far andare l'attrezzo avanti e indietro un po' di volte per essere sicuro di avere completamente tagliato l'adesivo.

  7. AFpWIRNam5smLYMl
    AFpWIRNam5smLYMl
    RXhs3VgToDNZiJpM
    gxF3JYbbkAp4VTJN
    • Spingi l'attrezzo attorno all'angolo superiore destro dello schermo.

  8. RZ6ybv2fcA12MLAL
    RZ6ybv2fcA12MLAL
    yfJAyWOQtfxUkTCE
    • Spingi lo strumento lungo il lato destro dello schermo.

  9. MbfslBJoWVDXS5kR
    MbfslBJoWVDXS5kR
    NoNsLWkB1JuDpsvo
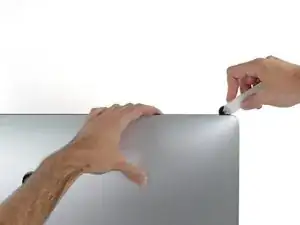
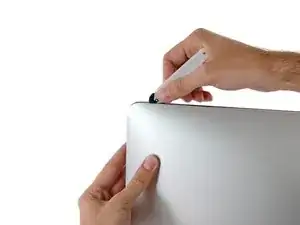
    • Finisci di lavorare con lo strumento di apertura sul perimetro arrivando all'angolo inferiore destro del display.

    • A questo punto, puoi far scorrere l'attrezzo di nuovo lungo l'intero perimetro per essere certo di avere tagliato tutto l'adesivo possibile.

  10. 1OOl3uQ3SUHBD5XD
    1OOl3uQ3SUHBD5XD
    65vvKRUNKxVKGOwY
    lPpjVUkv1sMMaSav
    • Anche se lo strumento di apertura ha tagliato la maggior parte dell'adesivo, lo schermo rimarrà ancora un po' aderente al case. Servirà una scheda di plastica per staccare l'adesivo rimanente.

    • Disponi l'iMac in piano a faccia in su.

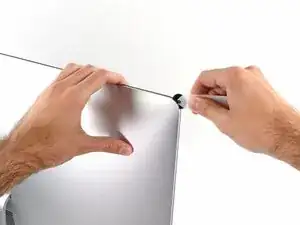
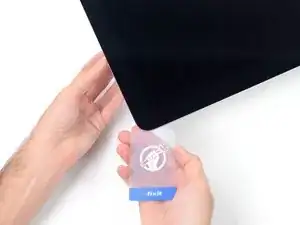
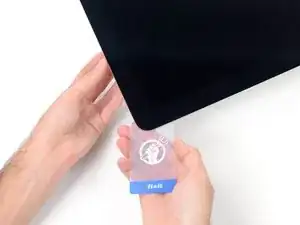
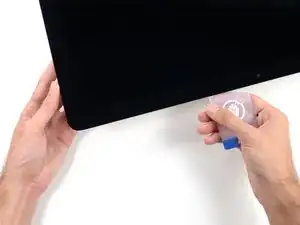
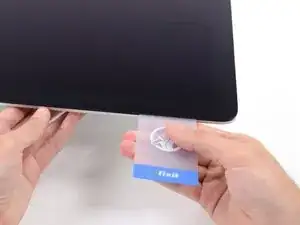
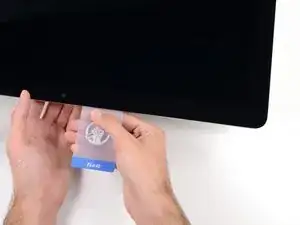
    • Iniziando dall'angolo superiore destro dell'iMac, infila una scheda di plastica tra lo schermo e la scocca.

    • Stai attento a non inserire la scheda di plastica più di 9,5 millimetri per non danneggiare i componenti interni.

    9.5mm in the rest of the world

    Tal Glazer -

  11. TwUkxBqp3WUU5SQM
    TwUkxBqp3WUU5SQM
    nMscaGHNZwiXWGTU
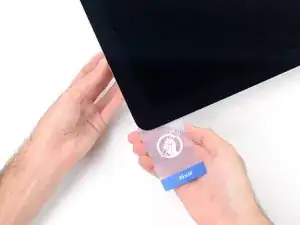
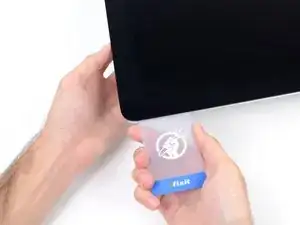
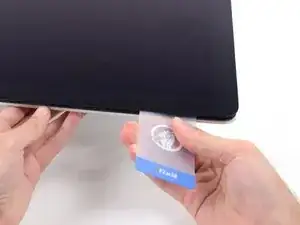
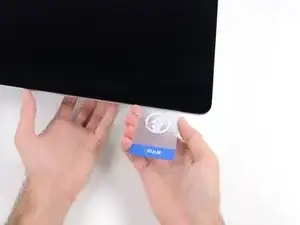
    • Torci delicatamente la scheda di plastica per creare una fessura tra il display e la scocca.

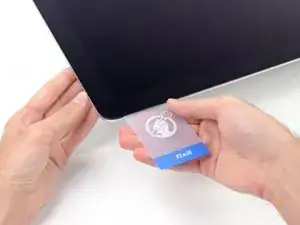
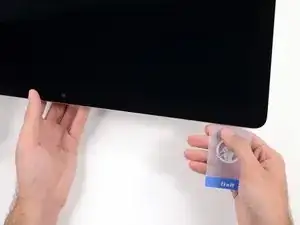
    • Agisci lentamente stai attento a non stressare troppo il vetro dello schermo: ti basta creare una fessura di circa sei mm.

    Which is around 6.5mm

    Tal Glazer -

  12. 5H2mrXvL1GqHCbMH
    5H2mrXvL1GqHCbMH
    JAkiWZj5Ho4yNTYo
    EskKkKR4VOrJcuhl
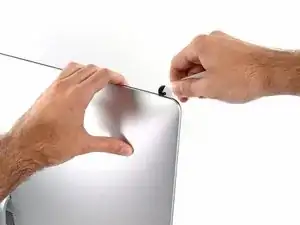
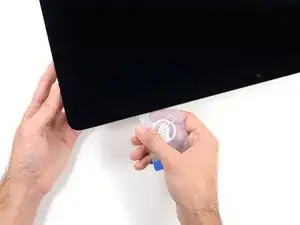
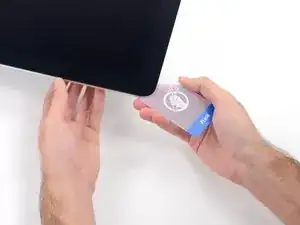
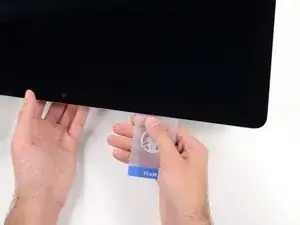
    • Fai scorrere la scheda verso il centro dello schermo per tagliare tutto l'adesivo rimasto lungo l'angolo superiore destro dell'iMac.

    • Devi fermarti prima della fotocamera iSight, altrimenti potresti danneggiarla.

  13. QVKUQYp4K6pmbyjX
    QVKUQYp4K6pmbyjX
    OgKJPO6IXFXkEDtt
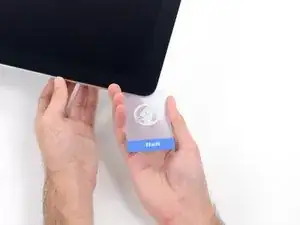
    • Infila di nuovo la scheda di plastica nell'angolo superiore destro e lasciala in posizione per evitare che la colla possa riattaccarsi.

  14. YLlxXZGUiVKXEPX1
    YLlxXZGUiVKXEPX1
    d2mHEVkqOtcoxt62
    aybCLgwrfPOFlWjR
    • Inserisci una seconda scheda di plastica nella fessura tra lo schermo e la scocca vicino all'angolo superiore sinistro dell'iMac.

  15. WfyVK51oSKrP4Zmm
    WfyVK51oSKrP4Zmm
    Hcaw4qZgJJXva4Ls
    • Inclina delicatamente la scheda per aumentare lievemente lo spazio libero tra il display e la scocca.

    • Come già fatto sull'altro lato, applica molto lentamente la torsione alla scheda per dar tempo all'adesivo di staccarsi e presta una particolare cura a non forzare troppo il vetro dello schermo.

  16. yXDZaJkjPkEAcVep
    yXDZaJkjPkEAcVep
    iGsPuW6mkoqZTeWO
    YFQAcDZXTypgc4kn
    • Fai scorrere la scheda di plastica verso il centro.

    • Interrompi lo scorrimento appena prima della fotocamera iSight per evitare di danneggiarla.

  17. 6eIbW1PCSMq6Bers
    6eIbW1PCSMq6Bers
    pd3AFHwUgYpc4dtt
    • Infila di nuovo la scheda di plastica nell'angolo superiore sinistro.

  18. GOUrhY1NeK1fcLaC
    GOUrhY1NeK1fcLaC
    QRPTMuatYNuyUKMD
    NfjmyRMmXDIgiVec
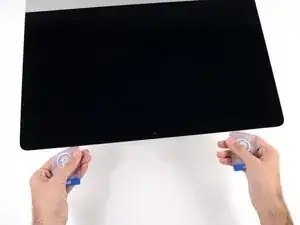
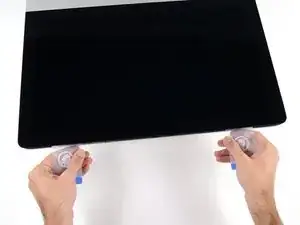
    • Con le schede di plastica inserite come in figura vicino agli angoli, applica ad entrambe una torsione per allargare la fessura tra lo schermo e il case.

    • Se ci sono delle parti che sembrano rimanere attaccate e non intendano separarsi, interrompi la torsione e usa una delle schede per tagliare l'adesivo rimasto.

    • Inizia a sollevare la parte superiore dello schermo dalla scocca.

    • Solleva lo schermo solo di qualche centimetro: i cavi dei dati e dell'alimentazione dello schermo sono ancora connessi alla scheda logica.

    Ich habe den unteren Klebestreifen gar nicht gelöst! --> Monitor (Glasscheibe) nach vorne auf ein dickes Kissen gelegt - so dass das Glas nur ca. 80° Winkel nach vorne zu liegen kommt und dann habe ich die Festplatte getauscht! So konnte ich die untere Klebeleiste wieder verwenden und hatte genügend Platz um die senkrechten und oberen Leisten zu verkleben!
    Tip: Klebestreifen zuerst auf dem Alugehäuse befestigen......

    Fridtjof Schüssler -

  19. 2CYaRvZMKD1MHJWF
    2CYaRvZMKD1MHJWF
    fHCLPYQIpP4EVOLZ
    • Solleva lo schermo abbastanza in alto da avere un accesso facile al connettore, ma non tanto da strappare i cavi e forzare i rispettivi connettori (alzalo di circa 20 cm).

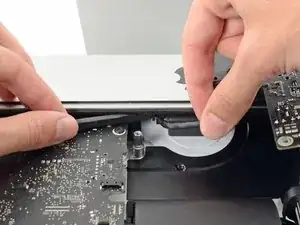
    • Mantieni lo schermo con uno mano mentre con l'altra stacchi il cavo di alimentazione dello schermo .

    It was difficult to remove this connection. I ended up having to gently pull-up vertically a little on the wire side to unsnap it about 1mm and then horizontally wiggle it out.

    delacrj2 -

    I had a difficult time removing this connection. I had to lift the wire-side about 1mm before it unsnapped and then carefully wiggle it out horizontally.

    delacrj2 -

    Can this cable be replaced? I am worried mine is damaged. I have no display after the screen fell and stressed the display flex cables following an SSD upgrade.

    Jeremy Brainard -

    This step should be done with extreme caution and care, as this step 19 is not described in great detail (sorry, author).

    The first (most outward) cable will slide out by gently pulling it by its tabs. The second (inner) cable is more tricky, as the locking lever must be moved backward first, before gently pulling backward on the cable connector. The angled tweezers are useful here, to help lift that locking lever, because fingers are too big for this.

    Ernst -

    be VERY careful and SLOW...take your time. These displays crack VERY easily when removing and they'll spider web on you. I've done probably 20 or so of these and cracked 3 being super careful.....ugh.

    Faslane -

    I found the best way to unplug this display power cable was to use my right hand, and the fingernails of my index finger and thumb to grab the ends of the tabs on either side of the connector, squeeze, and pull the connector out gently.

    Phil McInnis -

    i think the cable nearest the case edge is held in by friction and can be gently pulled, maybe with fingernails or a spudger. The next cable is held by a wire lever clip as described above it unlocks so the cable can be removed. These cables are also fiddly to re-insert, I didn't get one of them home and had no display after power-up, so at the end, don't re-seal the screen until tested.

    Peter Taffs -

  20. Zh56FQPLtH1qJkBF
    Zh56FQPLtH1qJkBF
    RuoSZ5iXxQqvKfcF
    MuEuntgC4FjFNuDJ
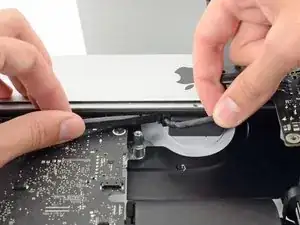
    • Continua a tenere lo schermo con una mano, sblocca la staffa metallica di ritenuta del cavo dati dello schermo.

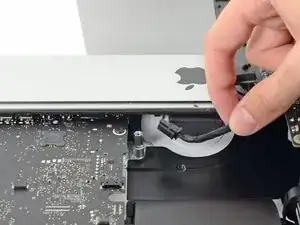
    • Stacca con cautela il cavo dati dello schermo dalla sua presa nella scheda madre.

    • Assicurati di tirare il cavo dati dello schermo direttamente fuori della sua presa, mantenendolo parallelo alla scheda madre, per evitare di danneggiarlo.

    Cannot seem to find a replacement cable for this, as I suspect mine is damaged. Can’t even find a part number. Anyone know what it might be?

    Jeremy Brainard -

    https://www.amazon.com/gp/product/B08TTL...

    That's the part I ordered for mine and it seems to work ok. I did make a point of contacting the seller and advising them of my requirement and they ensured I got the right part and it matches the description of the link. Bear in mind I bear no responsibility if yours does not work since I am just sharing what I did and what I ordered. Thanks.

    Jim Stanford -

    I also need that cable.

    cameronjpu -

    It's a little difficult to tell... but looking at the connection to the logic board on the video data cable, are the pins faced up or down?

    On the display, same question since it appears you have to "twist" the cable during the reconnection step.

    Jim Stanford -

    For this particular cable, take a good look before pulling on anything. Plug is locked on its socket with a bracket. You can lift this bracket by holding the small, flat black plastic handle that is attached to it. If you're struggling to grab it, use the end of the pizza roller handle to lift it, or the tweezers. Cable then comes off by pulling parallel to the main board.

    Froggy Manny -

    How can I tell if either of this cable is bad? My iMac display won't turn on after reconnecting it. I'm using an external display and everything is working except for the iMac display. If I go to settings - display the built-in display is recognize. But again nothing shows up in the screen - not even the apple logo when turning it on.

    Carlos Sosa -

  21. m3V4TQFe6DgIXYuF
    m3V4TQFe6DgIXYuF
    yZM3Md1BCHXDXXZn
    • Solleva lo schermo in posizione all'incirca verticale.

    • A questo punto c'è ancora una striscia di adesivo lungo il bordo inferiore dello schermo che tiene ancorato il display alla scocca come se fosse una cerniera. Puoi indebolire questo adesivo muovendo lo schermo su e giù per alcune volte di seguito.

    I was fretting that i would break my screen, it's really hard to see what is holding the screen in place and i was ready for it to snap the last 1/2 inch or 12mm of the glass I worked slowly and as you say, keep lifting and working it gently until you can see and cut the remaining adhesive.

    Peter Taffs -

  22. NXHcDMt52ENK4HPi
    NXHcDMt52ENK4HPi
    b6qImCFu2OHQHfip
    xMgGXmp4o3Pik4Y1
    • Se necessario, puoi usare una scheda di plastica per tagliare eventuali porzioni rimaste della striscia adesiva inferiore.

    The bottom adhesive strips have small tags at a 90 degree angle that can be used as handles to strip them out at this point. https://d3nevzfk7ii3be.cloudfront.net/ig...

    Dom -

  23. V4PqOetM2FuNQDNf
    V4PqOetM2FuNQDNf
    5GW2KD3C4FYXniog
    FuOZoIpxcQjjpXrW
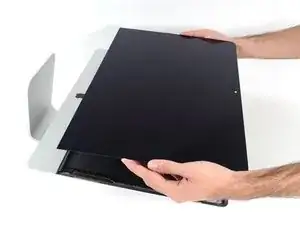
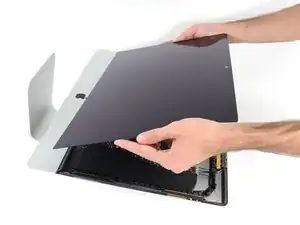
    • Solleva lo schermo dalla scocca e rimuovilo dall'iMac.

    • Può rendersi necessario sollevare lentamente il display da uno dei bordi laterali per staccare l'adesivo rimasto.

    • Stai molto attento nel maneggiare lo schermo: è grande, pesante e di vetro.

    • Dopo aver tagliato l'adesivo, non può essere più riutilizzato per rimettere al suo posto il display. Segui questa guida per sostituire le strisce adesive che fissano lo schermo alla scocca.

  24. Y6rgiDSintoHTbSh
    Y6rgiDSintoHTbSh
    TQY6Rva3IOMgdCPo
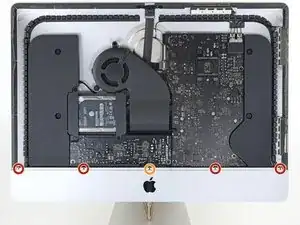
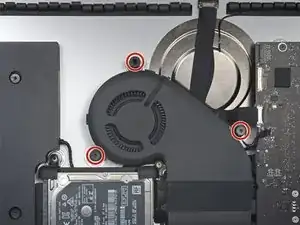
    • Svita le cinque seguenti viti a croce Phillips che tengono ferma la staffa di supporto inferiore:

    • Quattro viti da 3,2 mm

    • Una vite da 1,7 mm

    • Potresti dover rimuovere l'adesivo dello schermo dal bordo inferiore dell'iMac per accedere alle viti.

    These screws are VERY small and very easy to lose. Ideally you use a magnetized screw driver to help here.

    Charlie Nancarrow -

  25. bMsILZASiLpPMxXI
    • Rimuovi la staffa di supporto inferiore dall'iMac.

    The 'chin strap' is very easily bent, which makes it difficult to put the very small screws back in place.

    Charlie Nancarrow -

    Questa staffa a cosa serve ?

    Nicola Demetrio -

    Non rimetterlo che cosa comporta?

    Nicola Demetrio -

  26. vnCZOVJAfQMkCXVO
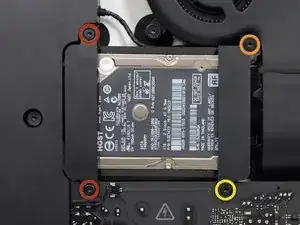
    • Rimuovi le seguenti viti Torx T10 che tengono ancorato il supporto del'hard drive sull'iMac:

    • Due viti da 21 mm

    • Una vite da 9 mm

    • Una vite da 27 mm

    At step 26, when reassembling, it's super easy to over-tighten the 9mm screw and strip the brass ferrule out of its hole in the plastic bracket (%#*@).

    roberttrevellyan -

    Mine has 4 different length screws, the two red colored 21mm screws in this guide are actually two differ lengths

    anonymous 523 -

    Mi imac does not have a HDrive whats the steps to follow?

    Charlie -

    buongiorno, l'imac del 2019, non monta alcuna ssd, ma monta una m2 direttamente sulla scheda madre!

    pertanto nella guida andrebbe aggiunto il cavo sata con sensore temperatura da aggiungere sulla scheda madre, per poter collegare un nuovo hd ssd altrimenti rimarrete come me bloccati con un imac aperto e non assemblato, in attesa di ricevere il cavo acquistato su internet da amazon o terze parti.

    vi consiglio inoltre di aggiungere una foto reale del ò'imac 2019 nella guida in cui manca l'ssd, renderà subito la problematica che avranno in molti!

    Donato Altomare -

    Hi, mine doesn’t HAVE an HD/SSD to remove, the bay is empty (yes it was fully working yesterday. So what do we do ? I see someone else with the sane issue above….

    Jeroen Speak -

  27. MFEFhp6PYNe1LMei
    MFEFhp6PYNe1LMei
    YOZ6AmbKs2AlGURG
    • Rimuovi i supporti sinistro e destro dell'hard drive dell'iMac.

  28. mvMdQktTba6hAHXt
    mvMdQktTba6hAHXt
    Xrb5HKoQvsB3M1aL
    ngWQxHCLD5HUmXC1
    • I prossimi passi ti faranno avvicinare le mani alla faccia esposta dell'alimentatore. Non toccare la faccia dell'alimentatore o qualsiasi saldatura esposta. Toccandole rischi di prendere una scossa ad alta tensione dai grandi condensatori collegati alla scheda.

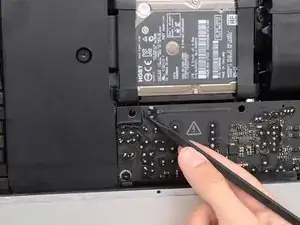
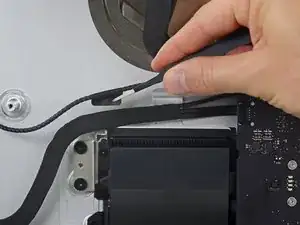
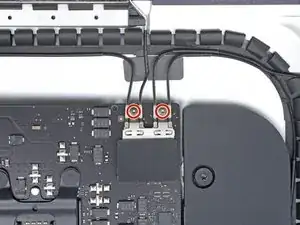
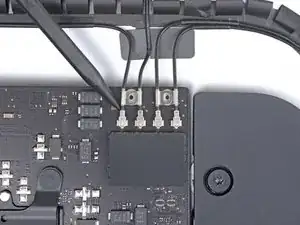
    • Usa la punta di uno spudger per spingere entrambi i lati del connettore del cavo del tasto di accensione e guidarlo delicatamente fuori dalla sua presa.

  29. FRyHHB3eYim1Mlap
    FRyHHB3eYim1Mlap
    QYTUyMIUOCpNBKj3
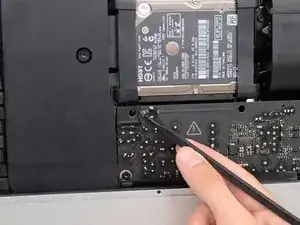
    • Usa la punta di uno spudger per spingere entrambi i lati del connettore del cavo di controllo dell'alimentatore e guidarlo delicatamente fuori dalla sua presa.

  30. CH3APYFIpiKhphHv
    • Svita le due viti Torx T8 da 7,2 mm che fissano l'alimentatore alla copertura posteriore.

  31. ydiE3k5Fa2YpKhyx
    ydiE3k5Fa2YpKhyx
    2WOoukeWyEZYOdGS
    • Mentre lavori sull'alimentatore, stai molto attento a non toccare le gambe dei condensatori o qualsiasi saldatura esposta sul retro dell'alimentatore. Tocca la scheda solo sui suoi bordi.

    • Inclina l'alimentatore in avanti.

  32. PKvyIF2PGHKLVC2I
    PKvyIF2PGHKLVC2I
    QS1usHIbpanvhs6M
    mWlTKHdQmhbCG6Sm
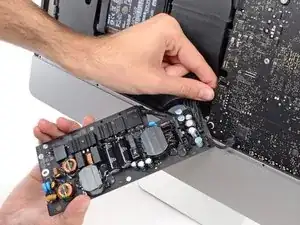
    • Tira l'alimentatore leggermente verso l'alto e fori dalla copertura inferiore.

    • Ruota l'alimentatore in senso antiorario, sollevando il lato destro di un paio di centimetri rispetto al sinistro.

  33. wWakaG6mtCcwjET3
    wWakaG6mtCcwjET3
    yOSa1on1CEscZMhj
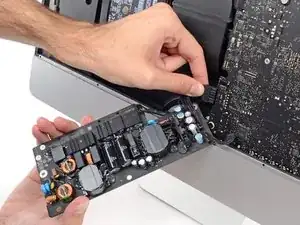
    • Fai scorrere l'alimentatore verso destra per superare i supporti delle viti sulla copertura posteriore.

  34. jLV1p6yQHGorKX6J
    jLV1p6yQHGorKX6J
    RXTvMCHuVc2YG6Bw
    AhUBHxjjc4AVbOIJ
    • Tira in avanti l'alimentatore e rimuovilo dal suo alloggio nella copertura posteriore.

    • Non cercare ancora di rimuovere completamente l'alimentatore dall'iMac: è ancora collegato alla scheda madre.

  35. cbv6FeSmQ2uPUJLi
    cbv6FeSmQ2uPUJLi
    2TTX1JBYPKyJJDpy
    DpV1XSNW6lES4k6h
    • Stai molto attento a non toccare le gambe dei condensatori o qualsiasi saldatura esposta sul retro dell'alimentatore. Tocca la scheda solo sui suoi bordi.

    • Non lasciar toccare nessuna saldatura esposta con una superficie in metallo, in quanto potrebbe causare un corto circuito.

    • Gira l'alimentatore a faccia in giù per accedere al cavo di alimentazione DC collegato dietro la scheda madre.

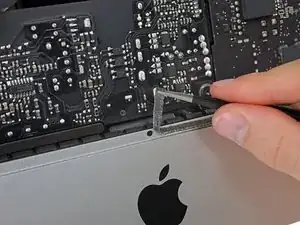
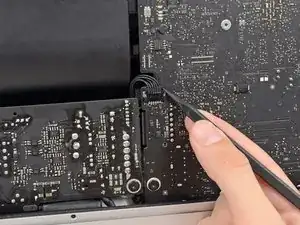
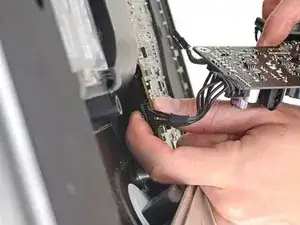
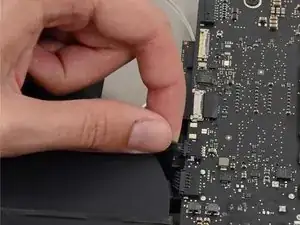
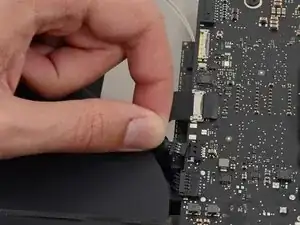
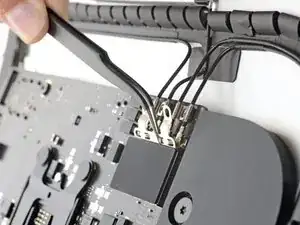
    • Per scollegare il cavo, schiaccia il gancio di rilascio sul retro del connettore, dietro la scheda madre e sfila il connettore.

  36. X1O2EONkUfMWVDIU
    X1O2EONkUfMWVDIU
    afj3FkjCDfAuRAC3
    IpAy5PoZ5NsXFekL
    • Potresti trovare utile appoggiare l'iMac sul suo retro per i prossimi passi.

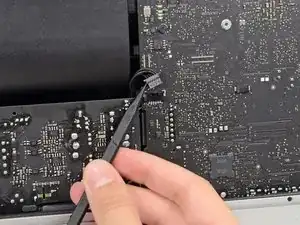
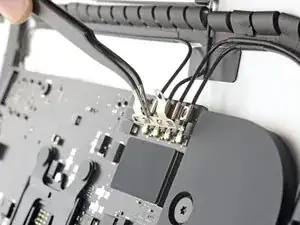
    • Usa la parte piatta di uno spudger per premere all'interno il gancio di rilascio sul lato del connettore del cavo d'ingresso AC.

    • Mentre premi il gancio di rilascio con lo spudger, prendi il cavo d'ingresso AC e sfila il connettore dalla sua presa.

    I didn't bother to remover the power supply lead in this stage but simply flippedthe circuit board over onto the lower body of the iMac (NOT placing it directly onto the metal but onto a sheet of plastic)

    Fettler -

  37. 2VMnTxjOOO1L43of
    • Rimuovi l'alimentatore dall'iMac.

  38. ZjTdOuevFThSNaSi
    ZjTdOuevFThSNaSi
    S4meAekVQZkISUTE
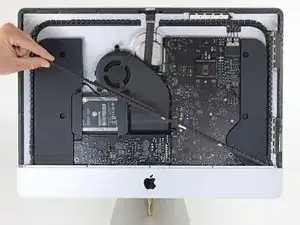
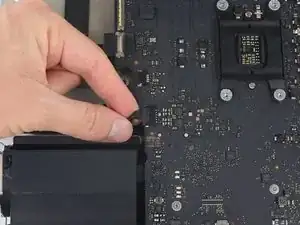
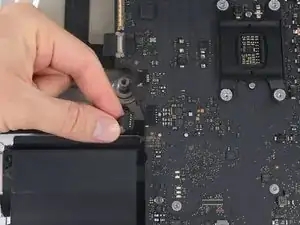
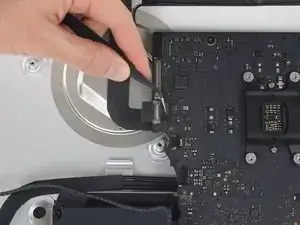
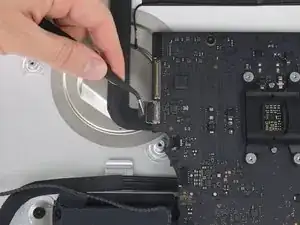
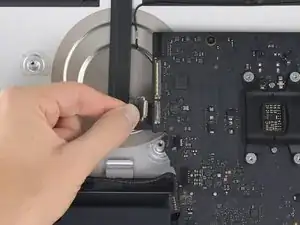
    • Estrai delicatamente il connettore del cavo della ventola dal connettore presente sulla scheda logica.

  39. MrmKPSuUCopatoYl
    • Rimuovi le tre viti Torx T10 da 10 mm che fissano la ventola all'involucro posteriore.

    • La vite più in alto ha una guarnizione in gomma per aderire meglio e supportare lo schermo: lascia la guarnizione dov'è.

  40. NDv2oOiGvHmIAG6I
    NDv2oOiGvHmIAG6I
    igO3bWrtnsJMJ5QJ
    • Rimuovi la ventola dall'iMac

  41. rAirT1GHZP1qpIqC
    rAirT1GHZP1qpIqC
    FI1BVEajFcTkxyGe
    fH3KYDKkVeWLdH2L
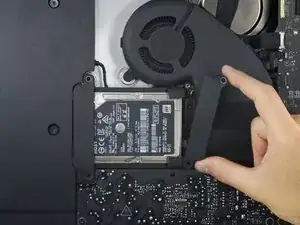
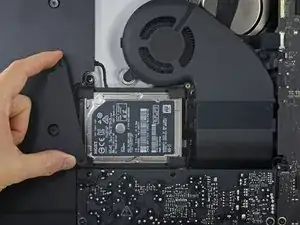
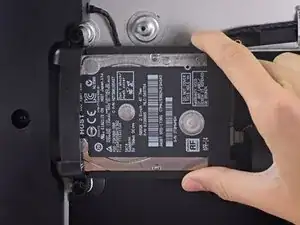
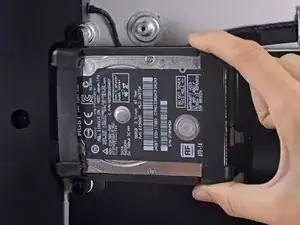
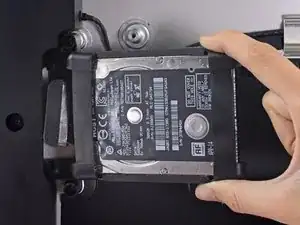
    • Solleva l'hard drive dal lato più vicino alla scheda madre e tiralo leggermente fuori dal suo alloggio.

    • Il disco rigido è ancora collegato all'iMac con un cavo dati/alimentazione SATA: non cercare di rimuoverlo ora.

    The newer drives have rubber ends and an adhesive side, be careful removing them if replacing the drive and be sure they are securely pushed back into the holder

    Carl Schultz -

  42. xAT4mnLlMEmZaE1l
    xAT4mnLlMEmZaE1l
    nUVTcTkKjNk2phCg
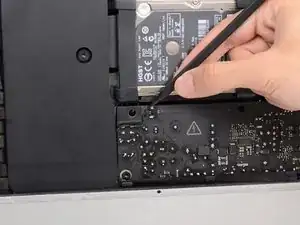
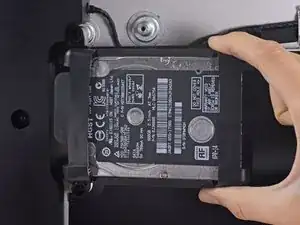
    • Usa uno spudger per scollegare il cavo dati/alimentazione SATA facendo leva delicatamente su entrambi i lati del connettore per farlo scorrere lontano dall'unità.

    When reconnecting the SATA cable, there is nothing to make the connector hold still, and it is hard to reach, so it took several tries. I ended up taking off the rubber baby buggy bumpers to get more room, and then jamming them back on after getting the SATA connector snugged up.

    bstaud -

    If by rubber baby buggy bumper, you mean left speaker, then yes, I agree. Reinstall the hard drive before the left speaker.

    jerrid_foiles -

    Kudo to @jerrid_foiles! I was going crazy trying to attach the SATA cable until I took the two screws out of the left speaker and slid the top end of it aside by about 3/4 inch. Make the whole process SO MUCH easier!!

    jiclark -

    We solved this by removing the hard drive tray screw, then inserting the cable into the SATA hard drive. Then hold the hard drive a bit out of the way to insert the 7.3mm hard drive tray screw.

    Marjie -

    Agree with this method, found it an impossible task to reconnect the SATA connector until removed the tray screw, then it was relatively easy to reconnect and then replace the tray screw.

    daveedwards -

    Also agree with this method!

    jmorphett5 -

  43. gPY6hXsOGJ1vn6ij
    • Rimuovi il gruppo dell'hard drive dall'iMac.

    When reassembling, I found it easier to loosen the HD tray screw from Step 48 and pull the tray outwards from the left side in order to plug the SATA cable in more easily.

    Cool_Breeze -

    Thanks! I, too, had a hard time reconnecting the SATA cable.

    boboswell -

    I found this helpful too!

    Anwar -

    And DON’T do what I did, which is to remove the left speaker - which can easily lead to breaking the cable between the power on button and the power supply. The cable is routed through a hidden slot at the very bottom of the left speaker

    bsmith1 -

    I did loosen the speaker so I could get a tool behind the SATA cable to push it on to the SSD drive. Otherwise hard to align cable.

    Noah Ralston -

    I found the easiest way to connect the SATA cable was to not screw the plastic hard drive tray down until you plug the drive in. That way you can easily push the connector in and due to the cable you’ve got some wiggle room. You can position the tray then just lift one end of the drive up and secure the screw. Then just push the drive down.

    Chris Caldwell -

    This was the step that I had the most trouble with. I’m used to replacing a hard drive in a MacBook Pro, where the “plug” that you plug the drive into is a rigid thing that you can firmly press the hard drive into.

    With the iMac, the plug is situated on the end of a non-rigid cord, so the plug moves back when you try to snap a drive into it. Also, those two rubber gasket things that you adhere to the side of the drive really make it difficult to maneuver the now-overly-chubby drive towards the plug.

    After must frustration/concern, what I ended up doing was temporarily removing the rubber gasket things, using the “spudger” as kind of a lever behind the “plug on a cord” so that it didn’t move as much, and then pushed the gasket-less SSD into the plug.

    Once I got it connected, I put the rubber gaskets back on the sides of the SSD and kind of coaxed it down into place, using the pointy end of the spudger to get the chubby corner pieces to “sit” correctly in the rigid plastic tray that the SSD kind of rests in.

    Jack OnFlickr -

    From another comment elsewhere on this repair, I *highly* recommend removing the two screws holding the left speaker in place, then sliding it just a tad out of the way to be able to easily attach the SATA cable. You don’t have to move it much to make the whole process so much easier!

    jiclark -

  44. HlyFX1SKeB5XaS1A
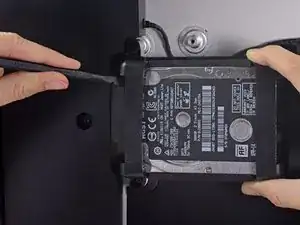
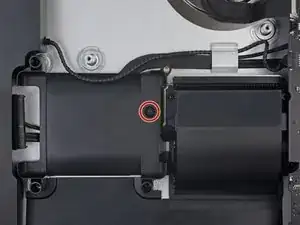
    • Svita la vite Torx T8 da 7,3 mm che fissa il carrello del disco rigido alla copertura posteriore.

  45. WHcOrWobQNNZeior
    WHcOrWobQNNZeior
    dPAqvkcXmGpQwMvq
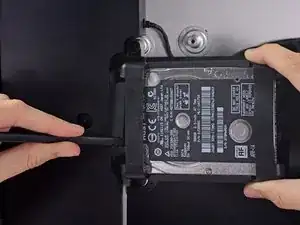
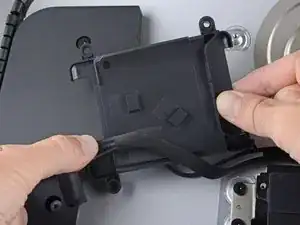
    • Rimuovi il cavo SATA dai ganci sul retro del carrello del disco rigido.

    • Rimuovi il carrello del disco rigido.

  46. JEsPRvPMFKPLp5OK
    JEsPRvPMFKPLp5OK
    TuZySaCUvfdXBXY1
    • Sfila delicatamente il cavo dello speaker sinistro dalla sua presa sulla scheda madre.

  47. D51gdUGxZ3AvIgCd
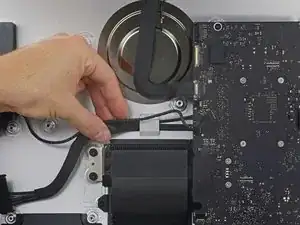
    • Sfila il cavo dello speaker sinistro tirandolo fuori dal gancio di bloccaggio sul retro della copertura posteriore.

  48. PPslOJpbNCYXfS1N
    PPslOJpbNCYXfS1N
    yRMteRIkDKWAU2gU
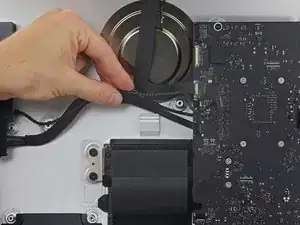
    • Similarmente al passaggio precedente, sfila i cavi SATA e di alimentazione tirando il cavo intrecciato fuori dal gancio di bloccaggio.

  49. aKOJpkAxPCMiXtPi
    aKOJpkAxPCMiXtPi
    hb4CjyEYjYej3Irf
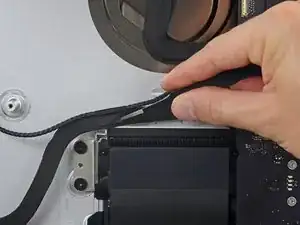
    • Rimuovi il pezzo di nastro che collega il connettore dello speaker sinistro ai cavi SATA e di alimentazione.

  50. TvUP2KJ35YILsJgX
    TvUP2KJ35YILsJgX
    KaLL2hJVHrY1xHMi
    ZcUTUiR4rWTEifIP
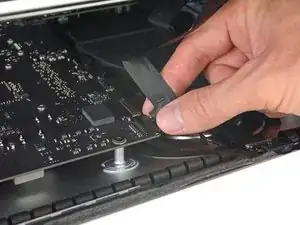
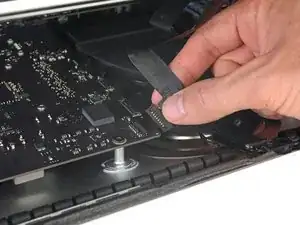
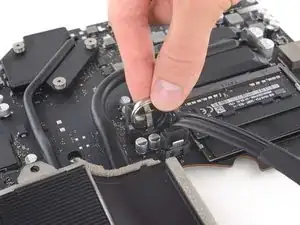
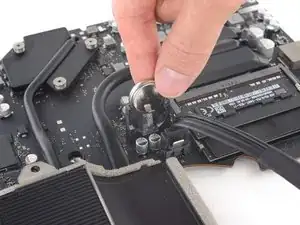
    • Ruota verso l'alto la staffa di bloccaggio in metallo sul connettore del cavo della fotocamera FaceTime.

    • Sfila il cavo della fotocamera iSight dalla sua presa sulla scheda madre.

    • Questo è un connettore delicato che può venire danneggiato facilmente.

  51. kKAkZISMtblWboHT
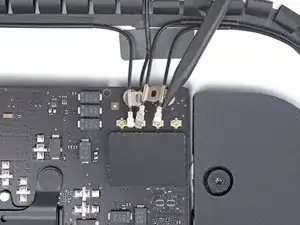
    • Svita le due viti Torx T5 da 4,0 mm che tengono fermi i quattro connettori dell'antenna AirPort/Bluetooth.

    On my A2116 iMac19,2 3.0 GHz i5, these two screws were T4 Torx (same as the T4s securing the RAM cover in step 62) not T5 Torx.

    Zarino Zappia -

  52. bfdQshviyZgEYxrd
    bfdQshviyZgEYxrd
    EuwZCQKBOC2xnBVJ
    wnZAsXrEMlcXyONZ
    • Ruota la parte superiore della staffa del connettore AirPort/Bluetooth lontano dalla scheda madre, quindi solleva la staffa e rimuovila.

    • Durante il rimontaggio, assicurati di allineare le alette sulla parte inferiore della staffa con i fori sulla schermatura EMI. Queste alette dovrebbero inserirsi completamente nei fori prima che la staffa venga installata.

  53. IUUbh6EhGejksWe2
    IUUbh6EhGejksWe2
    Cj5gtQFTaDDHp2DW
    WSJSGudM6HmUDn3l
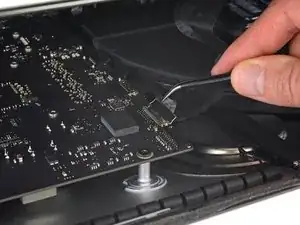
    • Usa la punta di uno spudger per sollevare tutti e quattro i connettori dell'antenna dalle loro prese e scollegarli dalla scheda AirPort/Blueetooth.

  54. vyFlNtaUT1yUH6HF
    vyFlNtaUT1yUH6HF
    QnEGWpLEVy3VSAEG
    • Usa un paio di pinzette o le dita per tirare il connettore del cavo dello speaker destro verso il basso e sfilarlo dalla sua presa sulla scheda madre.

  55. OdPVtlWK6TeqPEnm
    OdPVtlWK6TeqPEnm
    hZokClWNoRZmS4n5
    BPJt3yhuTEbv5dtR
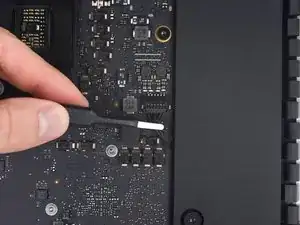
    • Usa la parte piatta di uno spudger per scollegare il connettore del cavo della presa jack dalla sua presa sulla scheda madre.

    • Spingi il cavo leggermente verso destra per liberare la strada alla scheda madre.

  56. H45gWVABEDbRphkK
    • Rimuovi il nastro che copre il condotto di scarico.

  57. kOqJZvEfAVJSGIfD
    • Rimuovi le seguenti viti Torx T8 che fissano il condotto di scarico alla copertura posteriore:

    • Due viti da 6,2 mm

    • Due viti da 4,7 mm

  58. tEpJYJjRc2ovFpSy
    tEpJYJjRc2ovFpSy
    VIqSSd2fW5tx6gsT
    TBVjjCqNGAvbSDC1
    • Usa la punta di uno spudger per aprire l'aletta di bloccaggio sulla presa ZIF del cavo a nastro del microfono.

    • Assicurati di fare leva sull'aletta di bloccaggio incernierata, e non sulla presa stessa.

    • Usa le pinzette per sfilare delicatamente il cavo a nastro del microfono dalla sua presa.

  59. aAw2er4tESOMM1Jk
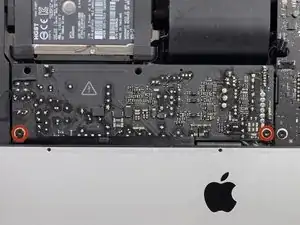
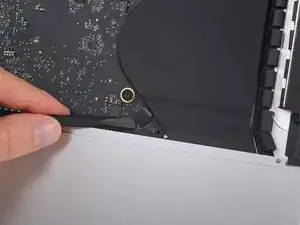
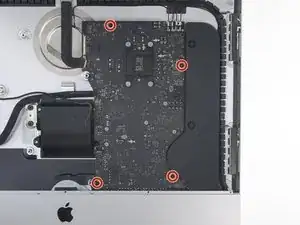
    • Svita le quattro viti Torx T8 da 7,3 mm che fissano la scheda madre alla copertura posteriore.

    On my 2019 A2116 (i3), there is a black vinyl sticker over the lower left screw, possibly a tamper-detection sticker like the ones on the CPU bracket on the 2013 Mac Pro.

    Rana Raychoudhury -

    I think that sticker is just to protect the microphone cable from possible shorting out on the screw, since it lays across it.

    jiclark -

  60. jJUoZKFgxHo6tgvk
    jJUoZKFgxHo6tgvk
    ZQPBTH1AFQCYFXBO
    HquXQeLPUxCSRbE5
    • Mentre rimuovi ed installi la scheda madre, stai attento a non danneggiare il delicato cavo a nastro del microfono in basso a sinistra della scheda.

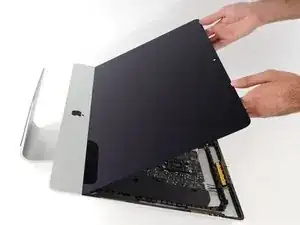
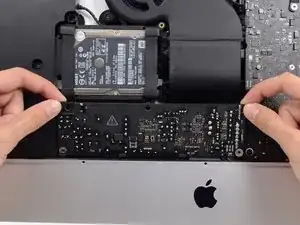
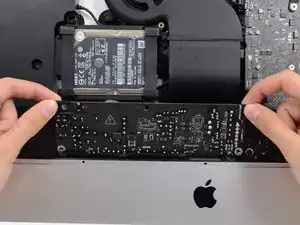
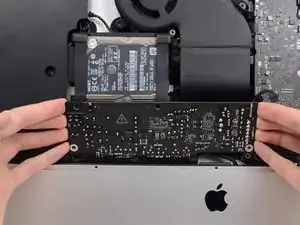
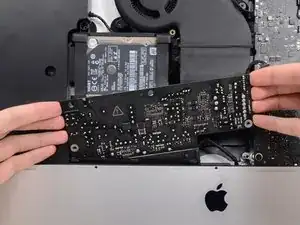
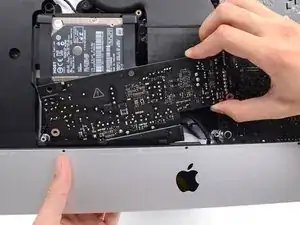
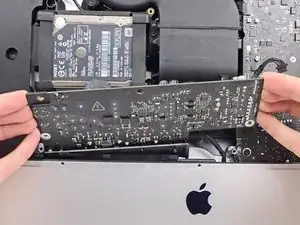
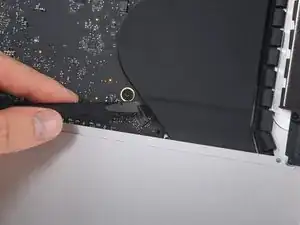
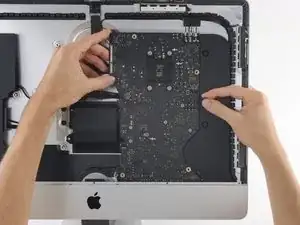
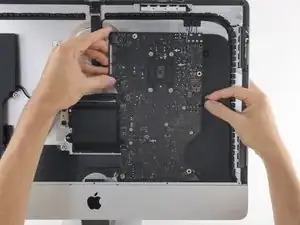
    • Inclina la parte superiore della scheda madre lontano dalla copertura posteriore.

    • Mentre inclini la scheda madre, tira il connettore dello speaker destro verso destra per liberare la strada alla scheda.

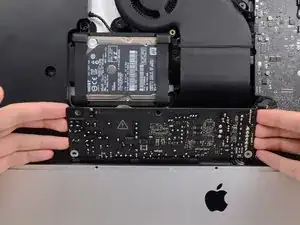
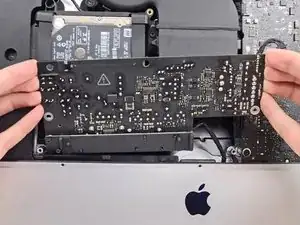
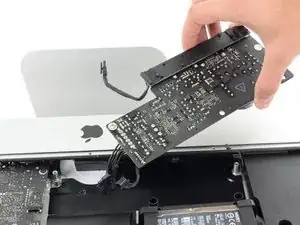
    • Solleva la scheda madre per rimuoverla dall'iMac.

    • Stai attento a non impigliare la scheda su nessuno dei supporti delle viti sulla copertura posteriore.

    this would have been a great place to include a picture of the other side of the motherboard. to see the PCIe slot, for instance.

    David -

  61. u2UPTHWR5gKyRruS
    u2UPTHWR5gKyRruS
    ARGpUPRDrd2Iwpdp
    • Durante il rimontaggio del tuo iMac, stai molto attento ad allineare le porte I/O esterne correttamente. La scheda madre può essere storta anche quando tutte le viti sono avvitate.

    • Usa una chiavetta USB e/o un cavo ethernet per tenere la scheda madre posizionata correttamente mentre avviti le viti.

  62. gZCAADGScH3PlPGo
    gZCAADGScH3PlPGo
    yRhKwBeWrE1ypUdr
    • Rimuovi la batteria PRAM direttamente dal suo alloggiamento.

Conclusione

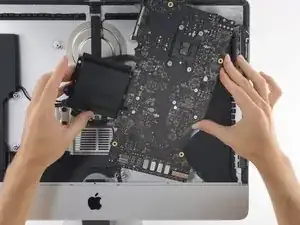
Confronta la tua parte di ricambio con quella originale: potrebbe essere necessario il trasferimento di alcuni componenti o la rimozione di protezioni adesive dalla parte nuova prima di installarla.

Per rimontare il dispositivo, segui queste istruzioni in ordine inverso.

Porta i tuoi rifiuti elettronici a un riciclatore certificato R2 o e-Stewards.

La riparazione non è andata come previsto? Prova delle soluzioni ai problemi di base o rivolgiti alla nostra comunità Risposte per trovare aiuto.

Adam O'Camb

Membro da: 11/04/15

195148 Reputazione

2 commenti

The Apple Repair Guide, 073-00161-A, shows a BR2032 battery but my iMAC was fitted with a BR1632 battery. As the BR1632 is smaller you can't fit a BR2032, so probably best to check before ordering the battery. The BR series aren't easy to find in the UK but RS stock them.

Eric Ramsay -

Great thank you

redman4 -