Introduzione

Questa guida di riparazione è stata redatta dallo staff di iFixit ma non è stata approvata da Google. Leggi di più sulle nostre guide qui.

Usa questa guida per sostituire uno schermo incrinato o rotto sul tuo Google Pixel 6 Pro.

Il tuo nuovo schermo sostitutivo avrà il lettore di impronte digitali già collegato. In caso contrario, sarà necessario reinstallare il lettore di impronte digitali originale sul nuovo schermo di sostituzione. Se stai sostituendo anche il lettore di impronte digitali, avrai bisogno di ricalibrare il lettore per mantenerne la funzionalità.

Se la cornice è deformata, è importante sostituirla per assicurarsi che il nuovo schermo si monti correttamente e non subisca danni da una pressione non uniforme.

Se la tua batteria è gonfia, prendi le dovute precauzioni. Prima di smontare il tuo dispositivo, scarica la batteria sotto il 25%. Questo riduce il rischio di un pericoloso evento termico se la batteria viene accidentalmente danneggiata durante la riparazione.

Attenzione: Il Pixel 6 Pro contiene laser di Classe 1. Smontare il dispositivo potrebbe risultare in una esposizione a laser infrarossi.

La resistenza all'acqua dopo la riparazione dipenderà da quanto bene è stato applicato il nuovo adesivo durante il riassemblaggio, il tuo dispositivo funzionera normalmente ma perderà la sua gradazione IP (Ingress Protection).

Prima di cominciare questa procedura, accertati di avere un set di adesivi di ricambio sia per il vetro posteriore che per lo schermo.

  1. xGqbgqkw2hRaUsBS
    xGqbgqkw2hRaUsBS
    Ao5wAxq1e3NqOvXb
    • Lascia che la batteria si scarichi al di sotto del 25% prima di iniziare questa riparazione. Una batteria carica può incendiarsi se danneggiata.

    • Spegni completamente il telefono e scollega tutti i cavi.

  2. pYtLJZEF5B2LvWeB
    pYtLJZEF5B2LvWeB
    ItQqxYGiYbWkJIa4
    xF2lQOYnyyUbHaO2
    • I prossimi tre passaggi dimostrano l'Anti-Clamp, uno strumento che abbiamo progettato per facilitare la procedura di apertura. Se non stai usando l'Anti-Clamp, salta tre passaggi per un metodo alternativo.

    • Per istruzioni complete su come utilizzare l'Anti-Clamp, consulta questa guida.

    • Se lo schermo è rotto, coprilo con uno strato di nastro adesivo trasparente per aiutare la ventosa ad aderire.

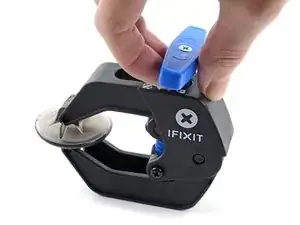
    • Tira indietro la maniglia blu per sbloccare i bracci dell'Anti-Clamp.

    • Fai scorrere le braccia oltre il bordo sinistro o destro del telefono.

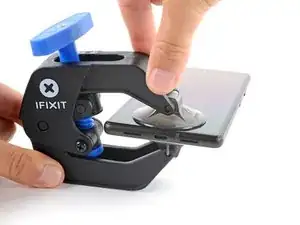
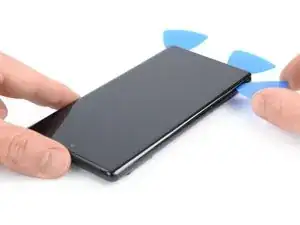
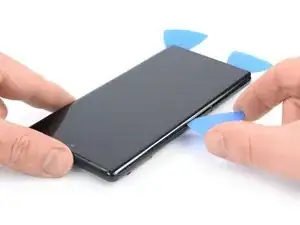
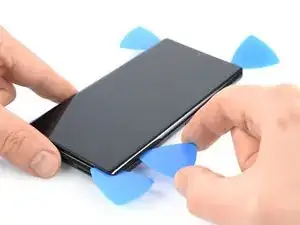
    • Posiziona le ventose vicino al bordo inferiore del telefono, una nella parte anteriore e una nella parte posteriore.

    • Premi le tazze insieme per fargli fare presa.

    • Se ritieni che la superficie del tuo telefono sia troppo scivolosa perché l'Anti-Clamp possa trattenerla, puoi utilizzare del nastro adesivo per creare una superficie più aderente.

  3. 2oNcHoB45uGaxEFB
    2oNcHoB45uGaxEFB
    Uk6q5idSq5oJrUgA
    I4KLIVS3OOLFsZCT
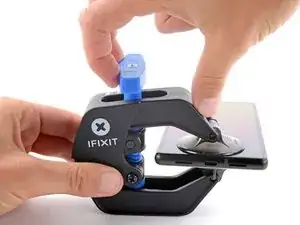
    • Tira in avanti la maniglia blu per bloccare i bracci.

    • Ruota la maniglia in senso orario di 360 gradi o fino a quando le ventose iniziano ad allungarsi.

    • Assicurati che le ventose rimangano allineate l'una con l'altra. Se iniziano a scivolare fuori allineamento, allenta leggermente le ventose e riallinea i bracci.

  4. ky3IJRvEhk2KGagK
    ky3IJRvEhk2KGagK
    UiBlY6aXuTlMcmtn
    d12VohF6CPjwXSB1
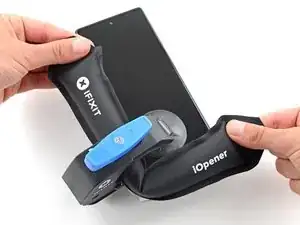
    • Riscalda un iOpener e fallo passare attraverso i bracci dell'Anti-Clamp.

    • Puoi anche usare un asciugacapelli o una pistola termica, ma il calore estremo può danneggiare il display e/o la batteria interna, quindi procedi con cautela.

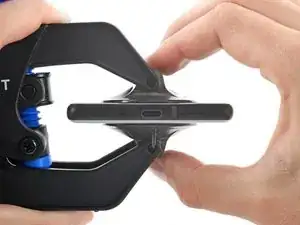
    • Piega l'iOpener in modo che poggi sul bordo inferiore del telefono.

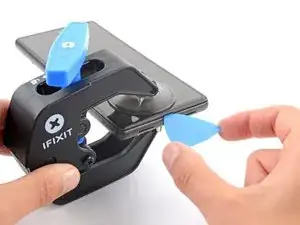
    • Attendi un minuto per dare all'adesivo la possibilità di staccarsi e presentare uno spazio di apertura.

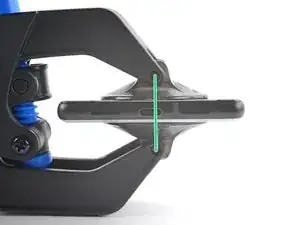
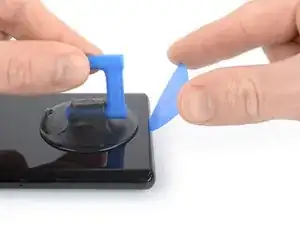
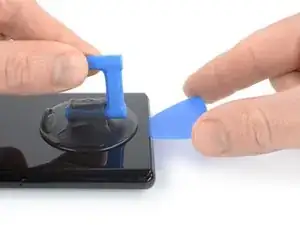
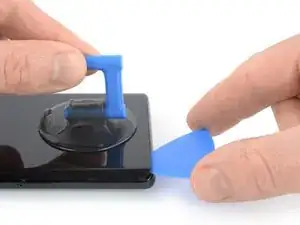
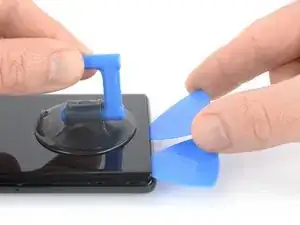
    • Inserisci un plettro di apertura sotto la cornice dello schermo quando l'Anti-Clamp crea uno spazio sufficientemente ampio.

    • Se l'Anti-Clamp non crea uno spazio sufficiente, applica più calore all'area e ruota la maniglia di mezzo giro in senso orario.

    • Non girare più di mezzo giro alla volta e attendi un minuto tra i giri. Lascia che l'Anti-Clamp e il tempo facciano il lavoro per te.

    • Salta i due passaggi successivi.

  5. AJglnb3TZlAVMd2O
    • Applica un iOpener riscaldato sullo schermo per ammorbidire l'adesivo sottostante. Applica l'iOpener per almeno 3 minuti.

    • Si può anche utilizzare un asciugacapelli, una pistola termica o una piastra elettrica, ma fai attenzione a non surriscaldare il dispositivo.

    Do you think that removing the SIM card, also will be a wise step? I'm pretty sure that heating the SIM card is not a good idea.

    Emil Teofanov -

    The SIM is probably no more sensitive than the rest of the phone.

    ScottMcNay -

    What does "be sure to have replacement adhesives for both the rear glass and the screen." I only had one it didn't mention another one?

    alberte -

    I didn't have the replacement adhesive for rear glass nor the 2 sided tape they talk about when putting it back together. It's Sunday, so I don't expect an answer. I decided to go ahead and work up until that point

    StlrFan -

  6. 5qT1kECvRkyOwMdj
    5qT1kECvRkyOwMdj
    yNlUPqlWLhUnqwEa
    622Y1IVXYBVVFD2s
    • Quando lo schermo è caldo al tatto, applica una ventosa sul lato inferiore dello schermo.

    • Se il tuo schermo presenta molte crepe, coprilo con uno strato di nastro adesivo per permettere alla ventosa di aderire. Oppure usa del nastro adesivo extra forte al posto della ventosa. Se tutto ciò non è sufficiente, puoi incollare con della supercolla la ventosa allo schermo.

    • Solleva lo schermo, compreso il suo telaio di sicurezza, con la ventosa per creare un piccolo spazio tra lo schermo e telefono.

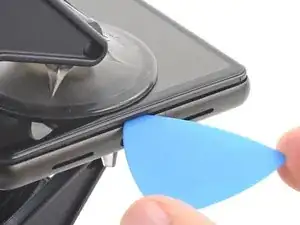
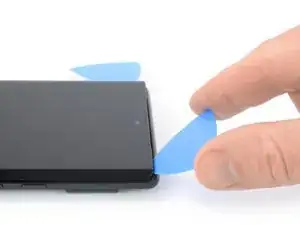
    • Inserisci un plettro nello spazio tra la cornice dello schermo e il telefono.

    • Assicurati di inserire il plettro nella posizione corretta per evitare di separare lo schermo dal suo telaio di sicurezza anziché dal telefono.

    • Fai scorrere il plettro verso l'angolo inferiore sinistro dello schermo per tagliare l'adesivo.

    • Lascia il plettro in posizione per evitare che l'adesivo si riattacchi.

  7. 3iBpMQeeYQZd1N6W
    3iBpMQeeYQZd1N6W
    EF4cafwMyVbQyFeA
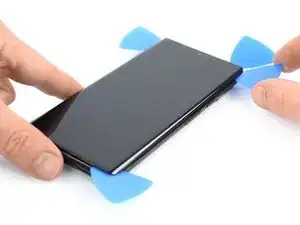
    • Inserisci un secondo plettro sul bordo in basso e fallo scorrere verso l'angolo inferiore destro dello schermo per tagliare l'adesivo.

    • Lascia il plettro in posizione per evitare che l'adesivo si riattacchi.

  8. H2V6FPgYSgyNiaXT
    H2V6FPgYSgyNiaXT
    3kcnIWolap1s53OI
    15PB5ccyfLlKWefn
    • Lo schermo del Google Pixel 6 Pro non è tenuto in posizione solamente da adesivi, ma anche da piccoli pin di plastica. Nel caso in cui il tuo plettro si bloccasse durante la procedura di rimozione del display, significa che lo hai inserito troppo in profondità. Inserisci solo la punta del plettro (circa 3-4 mm) per tagliare l'adesivo del display.

    • Inserisci un terzo plettro sotto l'angolo inferiore sinistro dello schermo.

    • Fai scorrere il plettro lungo il bordo sinistro dello schermo per tagliare l'adesivo.

    • Lascia il plettro nell'angolo in alto a sinistra per evitare che l'adesivo si riattacchi.

  9. qWybciuriiWRatwM
    qWybciuriiWRatwM
    jIYEmbfvICMX6LXF
    • Se l'adesivo diventa difficile da tagliare, molto probabilmente si è raffreddato. Usa il tuo iOpener o una pistola termica per 1-2 minuti per riscaldarlo.

    • Quando tagli vicino alla fotocamera frontale, inserisci solo la punta del plettro (circa 2-3 mm) per evitare di danneggiare o macchiare la fotocamera.

    • Inserisci un quarto plettro nell'angolo in alto a sinistra dello schermo.

    • Fai scorrere il plettro lungo il bordo superiore del telefono per tagliare l'adesivo.

    • Lascia il plettro nell'angolo in alto a destra per evitare che l'adesivo si riattacchi.

  10. 3u2GucwUJXcX36ik
    3u2GucwUJXcX36ik
    WSpdGRMJq215fHVl
    • Inserisci un quinto plettro e fallo scorrere lungo il bordo destro del telefono per tagliare l'adesivo rimanente.

    • Non provare ancora a rimuovere completamente il display, lo schermo è ancora collegato al telefono.

  11. kRiqlurRKwtCBmRE
    kRiqlurRKwtCBmRE
    PtmBApHIHu6ANKT3
    fJXI1KaKDwVhdnnH
    • Evita di tirare il cavo del display durante questo passaggio.

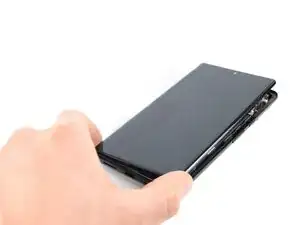
    • Piega con cautela lo schermo sul lato sinistro del telefono come se aprissi la copertina di un libro.

    I don't know if it's an earlier or later design, but I am combining 2 phones (1 crushed glass but operational into the casing of one that quit functioning but has good glass) and on both, the ribbon cable for the LCD is a tiny bit too short to fold out flat like this. If you are working on one like mine, extreme care must be taken while holding the LCD up while simultaneously trying to plug the cable back into that very small recessed socket. Almost like you need 3 hands or robot fingers...

    Stephen P. Thurman -

    I also felt that the cable was too short to fully open like a book, however it is possible that the hinge side of my screen was still pressed in to the adhesive and I did not properly open the screen or I was being overly cautious. Be careful on first approach either way.

    Nick Harris -

  12. aDmeySbuHVHuNPqR
    • Mentre Pixel 6 Pro utilizza viti Torx Plus, le punte Torx standard funzionano. Assicurati di applicare una forza costante verso il basso per evitare che si spani.

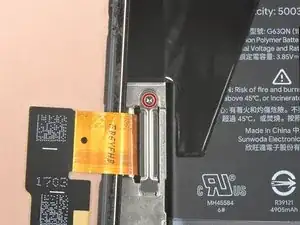
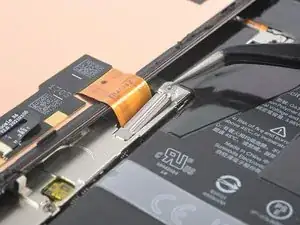
    • Usa un cacciavite Torx T3 per rimuovere la vite Torx Plus 3IP lunga 2,0 mm che fissa la staffa metallica del cavo del display.

    • Durante questa riparazione, tieni traccia di ogni vite e assicurati che torni esattamente da dove è venuta.

    I don't know if it's an earlier or later design, but I am combining 2 phones (1 crushed glass but operational into the casing of one that quit functioning but has good glass), and on both, the metal holder plate shown here is simply spring connected and that 2mm screw is instead slightly off to the side as part of the aluminum bracket's screws.

    Stephen P. Thurman -

  13. TXCDyVZdVyVArY4w
    TXCDyVZdVyVArY4w
    Wfb1v1Wns3GQc6eP
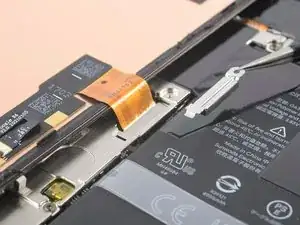
    • Usa un paio di pinzette per rimuovere la staffa metallica che si trova sopra il connettore del cavo del display.

    • Assicurati di tenere questo componente per reinstallarlo durante il rimontaggio.

  14. XAfcloCj3jgvnZXD
    XAfcloCj3jgvnZXD
    KmYqCLHysrBxjLya
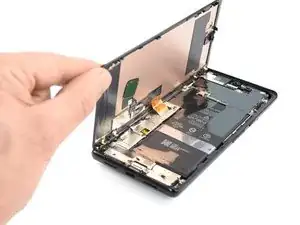
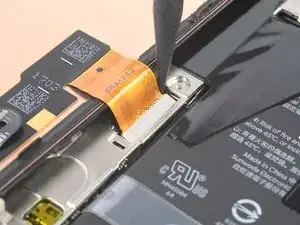
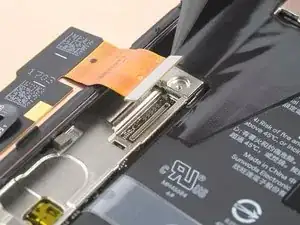
    • Usa uno spudger per scollegare il cavo a nastro del display sollevando il connettore dalla sua presa.
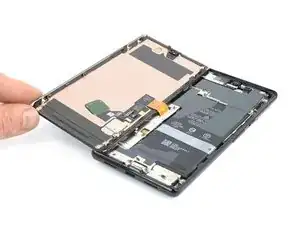
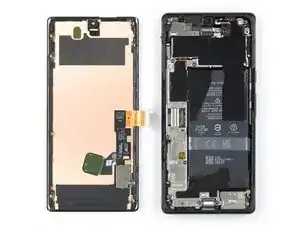
    Reconnecting the display port cable was the longest part of my first repair. It helped when I carefully folded the ribbon connector at each end to get the most length out of it and bent it into the proper shape to hover just right over the small port. I lightly bent the cable back at the base and at the connector end.

    This connector feels delicate, so it definitely made me take my time and be cautious. The snap is unmistakable, but be careful afterward as you're on a short leash again. I folded the new screen closed like a book and snapped it into place easily.

    Nick Harris -

  15. EuFbD1VbsDijAW6O
    EuFbD1VbsDijAW6O
    G5DD2VBjEP55pQSD
    • Rimuovi lo schermo.

    • Durante il rimontaggio:

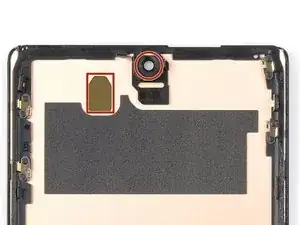
    • Se hai sostituito lo schermo, controlla il foro della fotocamera frontale e l'incavo del sensore sul tuo nuovo schermo di ricambio e rimuovi eventuali pellicole residue.

    • Ricorda di reinstallare la staffa del cavo del display.

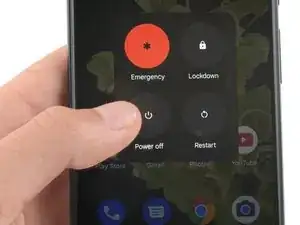
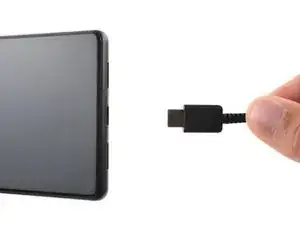
    • Questo è un buon momento per testare il tuo telefono prima di chiuderlo. Collega temporaneamente lo schermo, accendi il telefono e verifica che funzioni come previsto. Prima di continuare con il rimontaggio, spegni il telefono e scollega lo schermo.

    • Segui questa guida nel caso in cui stai utilizzando delle strisce adesive tagliate su misura.

    • Segui questa guida nel caso in cui stai utilizzando un foglio adesivo pretagliato.

    • Se stai installando uno schermo nuovo, segui questa guida per calibrare il sensore di impronte digitali.

    Before reassembly, clean around the edge of where the screen was, to remove any debris that may have been captured.

    ScottMcNay -

    After reassembly, the fingerprint sensor appears to be a common issue with new screens:

    * Go to https://pixelrepair.withgoogle.com/udfps on a computer.

    * If using Windows, click the help link to install the USB software. After installing, restart the computer and return to https://pixelrepair.withgoogle.com/udfps.

    * Follow the steps given to install the fingerprint calibration software.

    * Restart the phone.

    ScottMcNay -

    "Be sure to remove all adhesive liners from your replacement screen. Check the selfie camera recess and make sure you've removed the liner there."

    A photo with blue highlight square would've been helpful here...also it's very easy to miss this instruction as you'd be on the adhesive page...

    alberte -

    I did take the selfie camera liner this is a bad problem

    Austin Curtis -

    This is very true. I only realized after turning on my phone the next day that the film blocking the front camera is still there. I had to re-open the screen to remove that black film, which was not obvious at all. I only opened the upper half to remove the film, hopefully the adhesive is not compromised too much...

    Esmerando Escoto -

    All went well except for the adhesive. It was simply too small so when Iaid it down it was fine on one side as well as the top and bottom, but the other side required me to pull it over. As it is quite sticky, it bunched up. I cut out part of it and used my own double-sided tape to secure part of it. Otherwise, it was great. Thanks to those who made special note of the cover on the selfie camera window, and the procedure to set up the new fingerprint scanner.

    Arnold Bosman -

    They do not highlight the part that needs to be removed from the new screen, this should be added as the part looks and feels like it is a part of the new screen and removing it could break the new screen. So make sure you remove the selfie screen camera cover even if it looks and feels like there is not one there, it's there.

    Nick Harris -

    I ordered Google Pixel 6 pro- fix kit in IFIXIT. I followed the steps mentioned in the repair guide. During repair the finger print symbol is blinking in the screen. I thought it would get set when i do re calibration as mentioned in repair guide but it did not worked. It displays " Can´t use finger print sensor Visit a repair provider or g.co/pixel/fingerprintunlock". Does anyone have same problem??

    Surendra Reddy Velagala -

    You have to go to that link and you can re calibrate the new finger print scanner by logging into your account and approving it.

    dot Ducky -

    New Finger Print Reader

    Boot into fast boot and connect your pixel to your pc
    On your PC go to pixelrepair.withgoogle.com/udfps
    Follow the Prompts

    dot Ducky -

    Replacement process went smoothly. I reattached the screen after seating the connector. No sign its working. Just black blank screen. However text and notification sounds still coming through. Even receiving calls. etc on que. I know the phone works, just not the screen.

    I figure maybe I didnt seat the connector all the way so I break the adhesive liner (figuring I'll buy another and apply again) and this time I clip in the connector for sure. Still nothing on the screen.


    What can I do? Is the screen defective? 

    If phone is working should I see the display after the connector is seated but the phone still open? Or does the screen need to be seated all the way in the case to turn on? The screen does not display anything in either state by the way...

    As an aside, your instructions are so detailed until the point where the screen needs to connect and seat. It would helpful to get more pointers for this final step...

    Chobby -

    It's so frustrating that paper instructions are not included considering I'm about to pull the screen off my phone. It's also very frustrating that I have to load and read multiple sub instructions in the middle of the main instructions, just include all instructions in one booklet and include the booklet in the kit.

    Jeremiah Miller -

Conclusione

Se possibile, accendi il tuo dispositivo e prova la tua riparazione prima di installare il nuovo adesivo e risigillare.

Per riassemblare il tuo dispositivo, segui queste istruzioni in ordine inverso.

Per eseguire un test diagnostico con lo strumento diagnostico integrato di Pixel, clicca qui.

Il modo migliore per fissare il nuovo schermo è applicare un foglio di nastro biadesivo tagliato su misura sul retro dello schermo.

Porta i tuoi rifiuti elettronici a un riciclatore certificato R2 o e-Stewards.

La riparazione non è andata come previsto? Prova delle soluzioni ai problemi di base o chiedi aiuto alla nostra comunità Risposte.

Dominik Schnabelrauch

Membro da: 23/11/16

200708 Reputazione

61 commenti

Est-ce possible de changer que e verre brisé

Leroy -

Really wish this had instructions on how to put the screen back on. "reverse order" is not accurate.

Ed Word -

The fingerprint scanner doesn't work. I get a message that I need to visit, but the website doesn't exist. Google has a fingerprint repair tool where you connect your phone and boot into rescue mode, but the program says I can't use it as my phone's firmware is newer than the tool's firmware.


Do a google search to see, there are many others with this issue and a few Google support threads where google acknowledged the issue for over two years but doesn't address the issue other than to say it should be fixed in the future firmware update.


So, now I'm stuck without a fingerprint scanner that I used for all security and banking apps.

kimsballs -

Did you transfer your existing fingerprint scanner from your original screen to the new one ?

Alan Sears -

See my note below; I found a solution for this.

Matt Montero -

These instructions neglect a key point: there is a protective cover over the holepunch camera opening (with the OEM part), and if you don't remove that before installing the screen, you will not be able to take selfies. Some people will consider that a positive, but I'd prefer it not be there.

I was having the same problem that kimsballs mentioned above, but I've solved this for my Pixel 6 Pro, so here's a quick guide... or links to other people's solutions, really.

First, you need to go here, and download the Google USB driver: https://developer.android.com/studio/run...; just get the Zip file and extract it.

CRITICAL: do not use Device Manager to install the file. Locate the .inf file within the extracted folder (mine was titled android_winusb.inf), then right click and select Install. If the Install option is not listed (Win11 doesn't show it at first), click More Options at the bottom of the menu.

Then, go here (MUST use Chrome browser) and follow instructions: https://pixelrepair.withgoogle.com/udfps

Matt Montero -

I tried your method but the but the finger print repair tool doesn't connect to my phone when i enter fast boot mode. I have the USB driver installed, even downloaded Android Studio to make sure I had it, but still no luck.

Cyril Chen -

I also didn't get the finger print repair tool to connect with my phone in fast boot mode. I followed the trouble shooting guild and ended up at this link. I guess I didn't install the driver correctly.

https://developer.android.com/studio/run...

Thomas Elliott -

friends I need help, I bought the original screen that includes the fingerprint reader but when I try to see if it works I get a message saying that: The registration was not completed, the fingerprint sensor cannot be used, consult a repair provider

Diego Rueda -

Diego, I just did this repair. You'll have to download the Android USB driver to a computer https://developer.android.com/studio/run...

CRITICAL: do not use Device Manager to install the file. Locate the .inf file within the extracted folder (mine was titled android_winusb.inf), then right click and select Install. If the Install option is not listed (Win11 doesn't show it at first), click More Options at the bottom of the menu.

Then, go here (MUST use Chrome browser) and follow instructions: https://pixelrepair.withgoogle.com/udfps

I had to reboot my phone twice.

Hope this helps!

Ted Ostrowski -

(1/2) Hello everyone:

The instructions are great until they stop.

1st hurdle: Applying the adhesive. It is simply a thin ring around the entire device. Not patches. I placed it on the phone (not the screen and then carefully peeled back the plastic using the tweezers and then used the spudger to reapproximate any adhesive that got stretched or moved. I then reattached the screen via the cable and replaced the metal piece and screw, then folded the screen over the phone and ran something firm along the entire edge of the phone. I thought I was messing it up, but it all worked out...

Second hurdle: As discussed the fingerprint reader does not work when you first boot up the phone. However, as others mentioned there is a fix. At first I was worried as I only read about this after purchasing the replacement screen, but it was actually very painless. I am not saying anything new that was not mentioned by Matt Montero and Ted Ostrowski. Just confirming that this works.

Bryan Roller -

(2/2)

Download ZIP: https://developer.android.com/studio/run...

Extract All

locate the android_winusb.inf file

Right click --> Install

Then proceed to https://pixelrepair.withgoogle.com/udfps in chrome.

Follow instructions (very clear and fast).

And you will have to reboot the phone (not computer) twice.

The entire process was ~ 75 minutes.

Seems to be working great!

Bryan Roller -

I also want to add - I think my fingerprint reader is working better than originally. It may be a bias from sub-par operation while living with a very damaged screen for 2 weeks, but my biggest overall complaint with the pixel 6 pro is the fingerprint reader failing. I am not sure if it is the hardware, the calibration, or a combination, but I think it works better than it used to.

Bryan Roller -

Hi Everyone I just wanted to give my experience with the finger print sensor recalibration. I just replaced my screen. I was having zero luck on my windows computer even after installing USB driver and then tried on my old Macbook. Neither detected my phone. I then used the USB-C to USB-C cable (that came with my pixel 6 Pro) and connected to my wife's newer macbook (using Chrome - https://pixelrepair.withgoogle.com/udfps ) and it worked immediately, took like 10 seconds and no fussing with drivers. I spent like an hour before I thought to try using another device. If this is an option for you and you are having issues, i'd definitely recommend using a legit cable and attempting the process on an IOS device (using Chrome).

Best of luck.

arialz -

This one worked a treat! Thanks for posting :)

alberte -

A quick extra note about the adhesive. The precut adhesive was a bit of a confusing experience for me, i'd personally recommend ordering an extra or a small tube of adhesive in case you need to patch a spot. I found it was best to place the adhesive down on the phone itself before connecting the screen. I had a few spots where the adhesive didn't line up so I used the spudger to push it into place... So far no problems and everything is working fine now. I placed some books on it for about an hour with the phone off just to try to avoid any separation issues in the future. Overall the process was pretty easy and definitely worth the approx. $120 i saved not taking it into a ubreakifix.

arialz -

Followed these exact instructions with iFixit OEM screen replacement, and the front facing camera no longer works. @mattmontero explained the reason (above):

"These instructions neglect a key point: there is a protective cover over the holepunch camera opening (with the OEM part), and if you don't remove that before installing the screen, you will not be able to take selfies."

It sure would've been nice to have that detail included in the instructions. Now I've got a Pixel 6 Pro with no front-facing camera.

Capt@inKrunk -

I had the same issue...a photo with blue box highlight would be helpful - I have to order another adhesive and do it over :|

alberte -

I followed these instructions and now my phone will not even turn on.

Cheryl -

if I do the fingerprint sensor calibration I will lose my data??

ADEL -

Thank you Diego!!! Your instructions saved me hours of frustration. I would have never figured out the below step as I went right into device manager. Appreciate your help!!!

CRITICAL: do not use Device Manager to install the file. Locate the .inf file within the extracted folder (mine was titled android_winusb.inf), then right click and select Install.

I agree the install instructions should be included. If I didn't read the comments from users, I would be tearing the phone down to remove the cover on the selfie camera and would have wasted the cut out adhesive I paid for.

Jay -

The repair went quite well. Take your time and read the instructions a couple of times before you start AND most importantly the comments. The comments were most helpful in restoring the fingerprint sensor. Thank you @bryanroller

Make sure you take off the protective cover over the front facing camera hole! My kit did have a note on the screen to do that now thankfully.

I used a heat gun to heat up the adhesive. Seemed to work very well. Getting the first opening pick in is a bit tricky - I ended up cracking the screen even further. Once you get that first one started though it goes quite well.

The pre cut adhesive was intimidating at first. It's actually quite easy and forgiving. Set it in place on the phone and use your spudger to move it around and it's all good.

This is the first time I've attempted a repair like this and I must say the kit was well put together and the instructions were pretty good. Someone else mentioned that it would be nice to see the steps on how to put everything back together.

Thanks!

Benjaman Walter -

What do you do if the new screen doesn't turn on?

I can fell the phone vibrating when the power button is pressed, but the screen remains blank.

Christopher Turner -

same thing happened to me, and I had to reseat the cable connecting the screen to the phone. The first time, the phone vibrated but the screen stayed black.

The cover and screw went back in even though the cable was not fully seated in the socket, or was possibly off to the side. I was concerned b/c instructions said not to touch screen during first power on, and I thought the screen might turn on when the cable was reconnected, but it did not - maybe the phone turned itself back off since no screen was attached?

Once I reseated the cable the screen turned on when the phone vibrated, then I turned it off and sealed it back up. If you already closed up the phone, you might be able to warm it up, slice the adhesive, and pull the screen back off to get to the cable and reseat it. Not sure if the adhesive would restick, but it is pretty sticky, so worth a shot, or maybe someone can suggest something else besides ordering another OEM adhesive.

John Kalas -

I had the same problem. I then disconnected the battery and reconnected and the phone started.

danielbauer -

I was able to successfully change my screen, but I would not have been able to complete without reading others' comments.

The ribbon cable bounced out of the socket as soon as I removed the torx screw, so be careful not to lose the screw in the process. Be sure to snap the cable back into the socket securely before screwing the cover back on with the torx screw - I thought I had it in place the first time, and the cover and screw went back together, but the screen did not work until I reseated the cable.

I am sure my phone is no longer water resistant b/c I had issues with the adhesive stretching, sticking off center, the plastic getting underneath it, etc, but I still got enough of it in close enough to the right places to keep the screen on, and it looks fine.

Definitely remove the cover on the inside of the screen over the selfie camera before installing the screen. Install the driver to be able to complete the fingerprint calibration, then restart the phone a couple of times for it to start working.

John Kalas -

Thanks everyone for their comments! I've implemented your experiences with the selfie camera cover into the guide.

Arthur Shi -

help i downloaded the google zip file and extracted the usb driver but the android inf file isnt showing up what am i doing wrong

Alexandra Mayoral -

when you have trouble with your fingerprint reader use this https://piunikaweb.com/2022/10/04/pixel-... I spent 3 hours trying to figure this out and it is the only way that I was able to get my fingerprint sensor to work. also, you do not need to reset your phone if you do it this way just restart after installing the software.

David Hedoesit -

Any idea where to get the OEM parts for a reasonable price in EU? The replacemant parts havent been available for a long time here

Cagri Ürkmez -

Ok. So if I were to purchase only the actual screen for my 6 Pro, how do I remove the parts attached to the inner side of the screen? I'm guessing they are one or more of the following... Integrated Fingerprint Reader, Amoled Display, OLED Digitizer, and Display something- looks like I wrote dunes. Because I can buy the screen only, without anything attached to to it, like just a piece of curved glass that is the correct fit, but have zero idea how to remove all that from the old broken piece of glass that is my screen and then reattach all that to a new beautiful uncracked all the heck screen. Thanks!

Karen Holcomb -

After failing to do a battery replacement on my samsung s10+ from ifixit I was worried about trying again but I just did the screen from this guide as well as a battery while I was in there and it seems to have worked great! Thanks so much! The fingerprint reader worked by clicking the link in the last step in this article -- just realize that you have to restart the phone a couple times for it to work.

Sean Roth -

Btw, it sounds like my loadspeaker is malfunctioning after the repair. Has anyone else had this issue? I wonder if it's just some rubbing alcohol that needs to dry up.

Sean Roth -

I have just fixed my phone! I'm so excited about that! I always thought that phone fixing is extremely difficult and I won't manage this before. Well here I am. I'm just having problems with fingerprint scanner calibrating/ In the fast boot mode my phone is locked. Can it be the issue?

Ekaterina Astafeva -

Все вийшло! Набір супер, якість інструментів - топ! ***Step 13***- читайте все що вказано!

Pavel Sydorov -

Are the displays from ifixit original? I ordered one from another place and was sent an low quality oled instead of amoled screen that lags and stutters everywhere... Just wondered if the display from here are just like the original one..

Juan Ramos -

Thanks to all, everything went well. I repaired a screen on a samsung some years ago, successfully, but when the screen got wet in the rain, the phone died. Obviously, the waterproofing failed, so with this phone, I'm going to buy a waterproof case.

Peter Hutting -

after a while, I found out that the microphone doesn't work. I can't use duolingo, for example, and the phone app works only using speakerphone. There are apparently two microphones, the top one seems OK, I believe it is the bottom one which has the problem. I'm thinking that I may have got some adhesive in the wrong place down on the bottom left, and wondering whether I should reopen it and look, or just leave it alone and live with it.

Peter Hutting -

In principle, I liked everything, everything is easy. But unfortunately the screen is defective, there are spots on it that are inside the screen. I'm disappointed ((But everything changes, and setting up the print is easy.

Рагим Тагиев -

After rebooting in Fastboot Mode are you supposed to Start the OS or just connect and run the Pixel Repair? I tried several times with a USB-C to USB-C and USB-A to USB-C and no compatible devices are detected from the https://pixelrepair.withgoogle.com/udfps website

Jasper Mayzik -

I had to install the driver using Windows Device Manager. That was my issue...

Jasper Mayzik -

Do not forget the protective film on the front camera of the new display. We had to disesebly the phone once again to remove it...

Róbert Bartakovič -

Hello. On some websites i read that some replacement displays have written NO CHIP. what is this referring to? is there a chip to move from the old to the new display? greetings

Jacopo Canoa -

Hi

I replaced my screen, but the adhesive tape won't hold my screen in place on the left side. I have tried to put new adhesive tape twice now, without any luck is there anything that I'm doing wrong? Or is there anything else i can do beside changing frame? (It does not look like my frame is bend though). Will it work better with glue instead of tape?

Post

Stian Bakke -

Hat wunderbar funktioniert nach der Anleitung, würde mir aber etwas detailliertere Anweisungen für den Zusammenbau wünschen, habe ziemlich herumgefummelt beim Anschließen des flexkabels, das Wiederaufsetzen des Displays könnte auch etwas genauer beschrieben werden (wie Fest soll man es andrücken, eventuell anwärmen?)

Das Kalibrieren des Fingerprintsensors hat funktioniert, aber erst beim dritten Versuch, also nicht verzagen und mehrmals probieren 😉

Dietmar R. -

The installation went perfectly, although there was a lack of info on how to put it back together it's working fine. Now I can't connect my phone to my computer and I think it's a issue with the port not with the tool, so although I'm stuck without a fingerprint sensor and a bit of lag at the login, I'm glad to have my pixel

Logan T -

I replaced the screen of a Pixel 6 Pro using the ifixit part with a new sensor and got the Fingerprint error as well. When I did the https://pixelrepair.withgoogle.com/udfps reset and rebooted the phone, I still received the error when setting up the fingerprint (first reboot). Apparently there's a second reboot that is needed and then the fingerprint sensor was working normally again with the new sensor. Thank you all for the help here :)

The repair was done on this post date.

Zahir Mohammed -

Me han reemplazado la pantalla y no se ve igual, las imágenes se ven saturadas, es normal o es una pantalla no original ?

Valeria Campaña -

How important is it to turn off the phone before repairing? I can't turn off my phone with the buttons and the screen is not working. Letting the battery drain will take days.

Rick Uijens -

Hi Rick! Go ahead with the repair as best you can. Make sure not to use any metal or conductive tools to disconnect the screen to avoid shorting the socket on the board. After you get the new screen connected, go ahead and power off or restart the phone right away to mitigate any possible software issues.

Clay Eickemeyer -

Send to Mexico?

Luis Saucedo -

Hello! My Pixel 6 Pro multitouch only supports 2 touches instead of 10. But at the same time, the fingerprint works very well and the screen refresh rate is 120 Hz. What could be the problem? Is my display not original? Or is there a problem with the digitizer? How to check the screen for originality without disassembling the phone?

Ramil -

Most likely the screen was replaced with a screen from a different revision. How can I fix the problem with multitouch? Maybe I need to install a driver or replace the configuration file?

Ramil -

I am shocked - I managed to shear the head off the tiny 2.0 mm-long 3IP Torx Plus screw that holds the screen cable down. I really didn't put much force on it. I could have been more careful, but I'm shocked that it was this easy!!! I will have to take it to a professional now :/

Alexander Riccio -

Hmm, now I'm thinking, are there torque specs for screws on these devices?

Alexander Riccio -

Ok, a little bit of googling suggests it's somewhere between 30 and 60 inch ounces...

Alexander Riccio -

Hey, Would it be possible to do this without the picks and anti-clamp. Im thinking to get a suction cup and i have a really nice metal spudger tool?

Cardcraft -

I managed to get the glue stuck perfectly the whole way around the frame of the phone without ANY smudging or adjustment.

ADHESIVE PROCESS

1. Use tweezers to remove all of the old glue

2. Do a DRY alignment of the adhesive strip to SCREEN (not the phone frame) first to ensure you have the adhesive strip the right way around. The cutouts in the blue plastic will align with all of the small silver pins (7-8?) around the perimeter of the screen.

3. Now flip it over and align it to the phone frame.

4. Start peeling the CLEAR plastic away from the little tab that will be near the top of your phone. Only peel about 1 inch of the plastic back so that it is being uniformly pulled down from the top.

5. With only the top edge of the adhesive exposed, slowly align and push the entire width of the top edge into the frame edge at a 45deg angle.

6. Carefully peel the clear plastic and lower to frame sides, slowly working your way to the bottom of phone.

7. Carefully peel blue plastic away - use the tweezers and don't miss any.

Ryan Marr -

Hoping someone can help me. I'm replacing a cracked pixel 6 pro screen. Everything went well until I tried to seat the new screen. It absolutely would not sit right! the old and new screens look virtually identical - back and front, but upon closer inspection, the little seating clips have moved slightly - just enough that that couldn't possibly work.

I haven't been able to find anyone else mentioning it.

Has anyone else seen this change?

Thanks!

Jason Weiler -

Following up. This appears to be a packaging error. The screen was labeled for a Pixel 6 Pro, but it's a Pixel 7 Pro screen. They look very very similar except for the alignment pegs.

Jason Weiler -

I did follow all the steps and when I reboot the phone I got a google screen with weird colors that turn on and off in a endless loop an never reboot. Does anybody know what could be?

Everton The Da Silva -