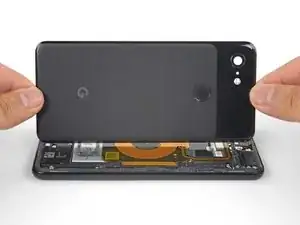
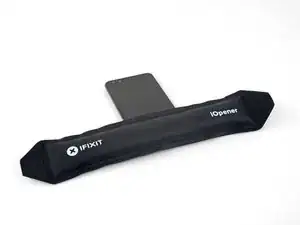
Introduzione

Questa guida di riparazione è stata redatta dallo staff di iFixit ma non è stata approvata da Google. Leggi di più sulle nostre guide qui.

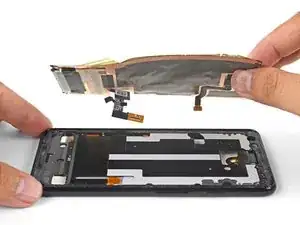
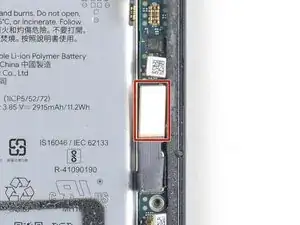
Segui questa guida per rimuovere e sostituire uno schermo rotto o guasto nel Pixel 3. Questa procedura serve per i display sostitutivi che non sono montati su un proprio telaio. A causa della struttura del Pixel, questo richiede di rimuovere la scheda madre per poter accedere ai connettori dello schermo.

Questa procedura rimuove in modo distruttivo lo schermo del Pixel 3. I display OLED smettono di funzionare se vengono esposti all'ossigeno o all'umidità e quindi sono incapsulati in un involucro a tenuta d'aria (per questo i pannelli OLED diventano neri sotto a un punto di rottura). È molto difficile sostituire il solo vetro frontale: gli strati OLED del Pixel 3 sono laminati sul vetro.

  1. ICaToYJK23pOBxYL

    Older devices may require 2 or more minutes with a very hot iOpener. Also note, the photo shows the opener on the FRONT of the phone. The heat needs to be applied to the back of the device!

    Rick Johnson -

    I just realized that I was trying to pry apart the front of my Pixel 3… and have separated the class from the display. ??‍♂️ Even though the rest of the directions show the back, it would be nice for the first picture to also show the back, just to be safe.

    JR Raith -

    Agreed, I’ve done exactly the same and completely broken my display. I probably should’ve paid more attention to the initial steps before diving in but the step could do with a new picture for sure.

    Daniel Fryer -

    Thanks for the comments! I’ll add a note in the step warning people to make sure to pry the back cover, not the screen.

    Arthur Shi -

    I prefer my favorite opening method with something like this. Dental floss. So thin it can slide in the gap. A little sawing to get it far enough past the edge to lift and get the first pick in.

    John Hoffstetter -

    I found another wonderful tool. I used something like medicine packaging which is aluminum foil with plastic. It’s thin and strong enough!

    Christie Lin -

    I also went for the hairdryer, dental floss, and then the provided picks and this worked. Not easy to get that initial seal broken but once that's done the rest is pretty easy.

    James -

    I needed 20 nerve wracking minutes with a hairdryer

    Amy schneider -

    My battery had bulged and opened the case for me!

    Warmed it up a bit with hairdryer

    Floss helped also.

    David Lincer -

    I found I wasn't able to get the edges hot enough. I ended up using my heat gun (for shrink tubing) instead.

    Kurt Nowak -

  2. AGwYiCF25kkvDbNo
    AGwYiCF25kkvDbNo
    cJ3kOqHhN6CuVoG4
    TxuLuEuAWgcNmLhU
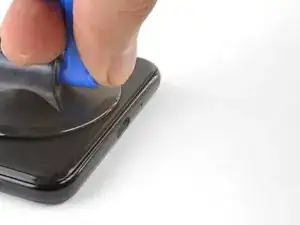
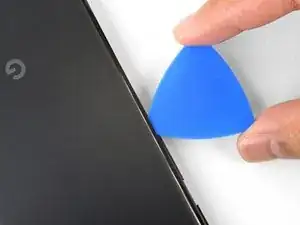
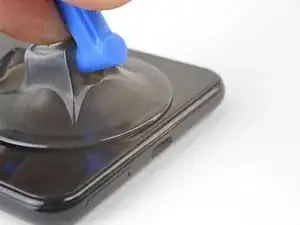
    • Applica una ventosa al bordo inferiore riscaldato del retro del telefono.

    • Assicurati di non confondere lo schermo con il retro del telefono.

    • Se la cover posteriore è seriamente crepata, puoi coprirla con uno strato di nastro da pacchi trasparente per consentire alla ventosa di aderire.

    • Tira sulla ventosa con una forza elevata e costante per creare una fessura.

    • A seconda dell'età del tuo telefono, può essere richiesta una forza notevole. Se incontri dei problemi, applica dell'altro calore e riprova.

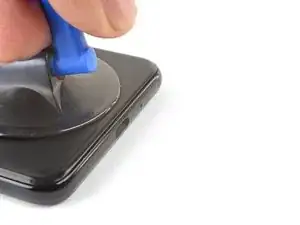
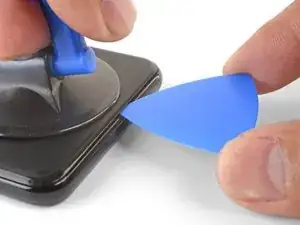
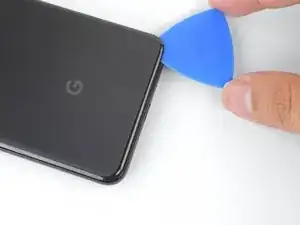
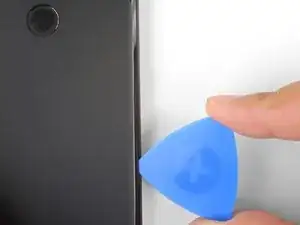
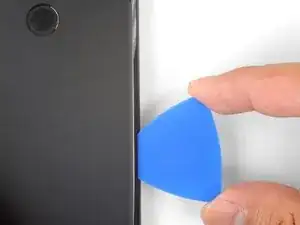
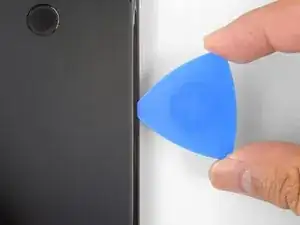
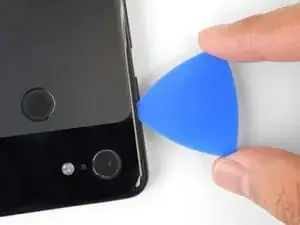
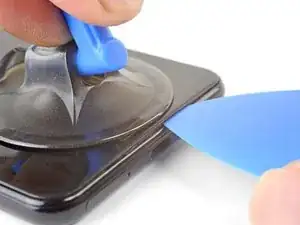
    • Inserisci un plettro di apertura nella fessura.

    • Non usare degli strumenti in metallo per fare leva, o potresti rompere il vetro posteriore. Se il pannello non si muove, scaldalo ulteriormente con un asciugacapelli o una pistola termica.

    The initial opening/insert is the hardest part of this repair, and if you end up having to use a flat-head screwdriver (etc) to get the first gap opened, you’ll scratch the phone. But it works.

    William Kew -

    I don’t recommend using a screwdriver. I tried this and it shattered the glass in that area. I replaced the battery on my Pixel 1 recently and noted that heating the FRONT glass on that phone enough to get a gap for one of the pics takes a considerable amount of time AND patience. I was one of the few who didn’t break or otherwise damage the glass in that process. I would say the same rule applies here. Allow for significant time and patiences to heat the old adhesive enough to get a pick inside the cover.

    kevlion88 -

    Definitely, this opening/insert is the hardest part of the procedure. I was unable to open even a slight separation with a suction cup and even with tons of heat from a hair dryer. What worked really well, and what I would highly recommend to others who experience really strong adhesive, is to use a small X-acto knife with a #16 blade. Make sure it’s a #16 (find on Amazon) because it differs greatly in angle and rigidity from the usual #11 blade. The sharpness of the blade makes it really easy to find the crack and open a gap, where you can then insert a pick with no problem.

    Andris Vizulis -

    I used a typical razor blade (like Matt and Rick and Greg) pressing the whole of the blade against the edge (blade parallel and flush against the back cover). The razor slipped under enough that I could get a pick in. (No damage, but when I first tried the corner of the razor, a small cut was immediately evident. Only use the whole blade.) Then, I used blue picks exclusively.

    I'm very curious about the dental floss method. I'll try that if I need to get back inside.

    pandam3ch4 -

    I gave up with the iOpener and pick, I tried >5 times for over an hour… After heating with theiOpener, I used and X-acto knife instead and that worked like a charm, except it did leave a few scuff marks unfortunatly. I used a size 22 blade.

    Manny -

    I really wanted to level off the back of the phone when pulling on the suction cup in this step, but found it was actually pretty easy once I used the opening tool to push down on the edge of the bezel, at the crack, barely putting any force on the back of the phone at all (just to keep it steady).

    Eugene Creswick -

    I have about a 2 year old Pixel 3. iOpener didn’t work at all on this step, but once I broke out the hair dryer, I was able to get the phone hot enough to insert the pick (no screwdriver or xacto knife needed)

    sliverdragon37 -

    I’m having trouble with the iOpener too. It is frustrating because I practiced on a bricked iPhone earlier this week and it was effortless. My Pixel 3 is also about 2 years old. Out of curiosity, were you replacing the charging assembly because of the charging cables fitting too loosely on the phone or for some other reason?

    Edwin -

    I used a stanley knive to get started and then a combo of opener and plektrums.

    All went well till I used to much force on the camera corner and broke the back into lots of small pieces. Be careful on that corner, people.

    But the new camera does focus, so for a first attempt at fixing a phone I am happy.

    clas ebeling -

    I heated the bottom up with the Iopener and then used a rectangular razor blade and the suction cup to lift the bottom. Place the entire blade edge into the crack and push/pry while lifting with the suction cup. As soon as you have a gap start to open, have a second person insert a pick into the corner. It was actually really easy. I had given up after a couple of tries without a blade. My Pixel 3 is 2 years old.

    Jeremy Stewart -

    Agreed with many other comments here. My Pixel 3 is two years old and neither the iopener nor a blow dryer were capable of loosening it enough. I ended up using a VERY hot iopener for a couple of minutes, the suction cup, and then a wide-bladed razer blade (about 80% width of bottom edge to spread out the stress and prevent risk of fracturing the rear glass panel). Once adding the razer blade I was able to get the pick in and follow the rest of the instructions as written.

    Matt Johnson -

    I also had to follow this process but resorted to a heat gun on its lowest setting as I couldn’t get the iOpener hot enough (I was afraid of overheating and bursting it). Other how-to videos also show using a thin piece of plastic or metal to slide into the corner, saving substantial time.

    Rick Johnson -

    So I didn’t use a blade, but I did get my fingernail in before the plectrum haha. Happened by accident as I was trying to push down on the bezel to counter the suction cup force.

    I also heated the sides and corners as well as the bottom, which may have helped it budge.

    Dmitriy -

    Helped me to notice that the focus here is to lift in the center (like right over the USB C connector). Was able to get it with just the iOpener and pushing down on the rest of the phone with the pry tool. My phone is over 2 years old though and it took about 50 minutes of working / reheating / repeating

    Tim Noack -

    Destroyed the glass back trying to take it off. This is not an easy phone to take apart.

    Andrew Richie -

    It would be nice if there was a heads up that the rear of the phone is glass….. Phone piping hot glass shattered and splintered

    John Gates -

    Hi John!

    Good suggestion! I'll add that into the step.

    Arthur Shi -

    The Jimmy tool from the iFixit toolkit worked like a freakin’ charm. Took me 10 mins to open the phone and it came out unscathed.

    adrianpauly -

    I used dental floss to cut the adhesive and slide it open. Just wiggle it back and forth from the corners until you cut enough that you can switch to a pick. Helps to have a extra hand to hold the phone.

    Javier Sullivan -

    Brother, dental floss was an absolute godsend!!! After 4 hours with the IOpener and attempting to use a heat gun which I balked from out of fear I came across this comment. Teased it around a corner and was then able to saw away at the adhesive. A lot of patience but no heat or potentially damaging tools needed. Thanks!

    Elijah Wilcox -

    With the floss, I wasn't getting enough "sawing" motion as it just slipped through my fingers too easily (my phone is about 4-5 years old I think, I bought it used). So I tied a few knots around a pen (the kind with a gripper, so the floss won't slide off) and it was a lifesaver. After about 3 hours trying other ways, the floss/pen saw got it open enough to stick the picks in and eventually open it up!! Thank you to everyone who commented these tips!!

    Rachel DeGouff -

    I have a 2-3 year old phone. The “heating pad” and blue picks did not work. I tried for two hours. Two weeks later I tried again using a hair dryer on high heat and low fan, and a rectangular utility razor blade. Start at the bottom of the phone, heat, and insert the razor blade into the gap and use it to cut the adhesive back a little at a time. Do not insert it more than about a 1/4 to 3/8 of an inch. Once you start getting a separation, use the blue picks to hold it open. Go up both sides an inch or two on both sides at a time. Do not pry the back open more than an 1/8 of an inch or so until you get it separated all the way around. Be patient. Work slowly. This took about 30 minutes once I got the hang of it. Do NOT pull the cover away from the phone after you separate it all the way around!! Read the instructions several times. There is a cable to the finger print sensor attached to the cover!

    Re-read these entire set of instructions and ALL of the comments TWICE before you start.

    Greg B -

    I used and iOpener and the iFixit tool (the one with the metal spatula). Ended up inserting about 10 picks, but it worked.

    Kevin Dick -

    I couldn’t get the pick in so I tried the sharper pry tool. Got it in and slid it sideways towards the corner —- BLAM, the back shattered. Not a good home repair experience.

    Roy Feague -

    Similar experience with others, iOpener would not heat up the phone enough to separate the adhesive. Had to use a hair dryer to finally insert the blue pick. After sliding the pick past the corner, the back glass scattered… Time to get a new phone and give up on this battery replacement i guess.

    John Wu -

    On a 3 years old Pixel 3 phone, after unsuccessfully trying iOpener and the suction cup, I used a piece of dental floss, and it worked perfectly.

    To make the process easier - tie little loops on both ends of the floss, put a finger or a screwdriver through the loop to help pulling the floss. Pull it through to one side and then to another, continue until you’re 1/2 inch in. At this point it should be possible to insert a pick

    Sergey Kiselev -

    This was the hardest step. I could not get the pick in at all. I tried dental floss and it slid in no problem. I eventually stuck the very tip of a razor blade in which allowed me to slide in a pick. Also be very careful when sliding the picks around as my wife broke the back glass of her phone, try to keep pressure as even as possible without bending the glass much.

    Adam Simmons -

    I like the dental floss idea. I set edges of the phone-back and also the blunt metal tool on an electric cooktop on low heat, and the adhesive softened enough to be workable. SAFETY TIP: the tool and phone were hot to touch, I wore cotton gloves throughout this task.

    Student4Life -

    Can confirm, with a 4-year-old Pixel 3, it was not possible to get the back cover off with any amount of force, heat, and the blue picks. I managed to get started by using single-edge box cutter razor blades and a hair dryer on high--got in just a bit under the left corner, then added a second blade along the bottom edge, and a third near the right corner, and that gave me enough space to get a blue pick in and start replacing the razors with blue picks one by one, and then proceeded as per the instructions. Dental floss is a neat idea; I wish I'd tried that--the razors didn't do any damage, but I was worried about the possibility.

    Adiv Paradise -

    Agreed; a 4cm section of utility knife was required along with heat/alcohol/patience to break the initial seal.

    Managed to do it without cracking anything, but sweated through this step quite prolifically.

    Mike -

    3.5 year old phone. Just wanted to confirm that dental floss, combined with the iOpener, does the trick to get the first pick in.

    I was able to slide the floss under the bottom right corner if you are looking at the phone. I alternated between sawing with the floss and applying heat with the iOpener. Eventually I was able to get a pick in that corner and was able to remove the rest of the adhesive by applying heat with the iOpener and sawing with additional picks around the perimeter of the phone.

    Matt Dubois -

    My Pixel 3 is 4 years old. I tried using the iOpener heat pad for 2 minutes. Didn't work. Then I tried using a heat gun on low for about 30 seconds. Didn't work. Then I used the heat gun on high for about a minute, then the suction pulled it off. I used the picks to peel the rest off. I thought about using the floss which would have work well. I also though about letting the phone sit in the car when it's hot outside. The key is to be patient and try not to use something besides the plastic tools. If I can do it then anyone can. Heat guns are very cheap and a good tool to have.

    Alex Schultz -

    After unsuccessfully trying all prying tools including metal ones - I finally hit the motherlode with the most inane thing possible-a stiff plastic collarbone-it has a slight angle at one end that gives it the required amount of rigidity and prying power.

    Yes, a heat gun is an absolute must!

    Jatinder Singh -

    I've ordered the battery replacement kit, it will arrive next week. I keep my house cool in fall/winter, so I'm a bit concerned about how well I'll be able to heat the adhesive. I'm considering heating the whole phone in my convection oven's "warm" function. Its thermostat compares well with a meat thermometer, I might try my lab grade thermometer too.

    I see "The phone is designed to work best in ambient temperatures between 32° and 95° F (0° and 35° C), and should be stored between ambient temperatures of -4° and 113° F (-20° and 45° C)." 113° F seems pretty low, perhaps that's when the adhesive begins to soften appreciably. I was considering starting at 120F. (And trying "toast" if it defeats me.)

    Experience, suggestions, good luck wishes welcome.

    reg -

    Hi reg!

    The temperatures you listed are operating temperatures—once the Pixel exceeds those temperatures, it will shut down and show a heat warning symbol. Ideally, you want to heat just the adhesive perimeter. The back cover should be slightly too hot to the touch—aim for about 80°C.

    Arthur Shi -

    3.5 year old phone. Thank the gods you guys recommended floss. I broke 2 nails trying the picks. Unfortunately I used extra slippy floss so I couldn't even tie it into loops to help. Even with the floss I couldn't saw my way through or get a pick in so I ended up just adding more and more floss (and more and more hairdryer) until I could get the pick in. After that it was just careful muscle.

    Amy schneider -

    Despite several frustrating tries across several days, I had zero success creating a molecule of seam gap to begin to remove back cover without breaking it! Suction cup ineffective (needs 3rd? hand to pull-and-insert pick); heated iOpener doesn't U-fold to cover perimeter (soon cools off in 63F room); hair dryer likewise too-brief heat; Exacto or utility knife blades useless. Dental floss no luck. But only! once I tried keeping the Px3 on my electric 1980s food warming tray (Lo heat ..hands resting on insulating hot pads ..it also! keeps iOpener hot) ..would dental floss fit into corners (No chance midpoint at charge port per foto); then blue pick. But! floss was too slippery to pull/grip strongly ..one must tie loops at each end, then use old-style 'peg' clothespins (or pen with clip) to roll-up floss length to enable pulling right at insertion point. With fingers/hands preoccupied manipulating floss, it was awkward to simultaneously tug suction cup upward effectively at all. Didn't break rear cover ;-)

    AdahS -

    I had no luck with just a suction cup and heat. Heat and a razor blade as others commented worked well; HOWEVER, while working the blue opening picks around the bottom I cracked the glass. The back glass is more delicate than I anticipated. :-( Be very careful/gentle with the back glass! If I attempt this with another glass-backed phone I will plan to work on an actively heated pad for this step.

    Jeff Selfa -

    The plastic opening pick was to thick to get into the (almost nonexisting) crack. I had to use a thin sharp metal knife, which scratched the paint a little bit but finally made the crack wide enough for the plastic pic to fit in and finish the job. Perhaps one thin metal pick would be helpfull in the kit for this first step.

    L. Hopmeier -

    As others have said, this step was by far the most difficult and time consuming. DO NOT RUSH THIS STEP THOUGH. Take it slow and do NOT bend the back glass to try and speed things up. Keep slicing your way though, patiently being aware of the fingerprint sensor cable. On my phone it required a lot of force and im not even sure the puller was able to make a gap.. I found that the plastic picks were too thick to get a crack started. I ended up using a piece of plastic from a clamshell plastic container to finally make it through the crack and through the adhesive. I tried the plastic backing of one of the adhesives but that wasn't rigid enough. Once though I made my way about half way through; and in haste I made the fatal mistake of bending the back glass to much and shattered it. Yes it is in fact made of glass! It will NOT BEND. I ended up getting a replacement back glass kit on Amazon for $16 which had a new sensor and the adhesive pre-installed which was very nice.

    Kurt Nowak -

  3. WjUyASPbLRNJLVff
    • Mentre infili un plettro sopra il tasto di accensione, stai attento a non infilarlo troppo a fondo, o danneggerai il cavo del sensore delle impronte digitali.

    While the text is accurate, I found this image to be misleading - it appears as if the finger print cable is attached to the right side (from a back-of-phone reference). Only upon close image inspection is it clear that the cable has already been disconnected from the connector that is positioned just inside and above the power button.

    Jeff Selfa -

  4. 61gmQoOoqlJlJLwG
    61gmQoOoqlJlJLwG
    sJydU1UFmfYrbCHS
    vtNLBaDBLOpynwbU
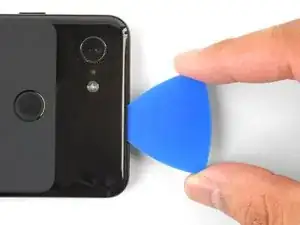
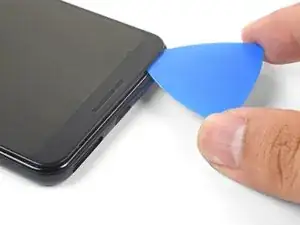
    • Taglia l'adesivo lungo il bordo inferiore del telefono e attorno all'angolo destro.

    • Lascia un plettro di apertura nel bordo inferiore per impedire che l'adesivo possa riattaccarsi.

    The back cover is glass! I was sure it was some kind of nice plastic. It's probably obvious to a lot of people, and it's very obvious in hindsight, after shattering it. But I'm writing this in case anyone else is oblivious to the last decade of smartphone design. I got impatient and flexed it out as I cut the glue. Don't do that. Carefully work your way around and avoid applying any significany bending forces to the cover.

    Dharman Gersch -

    Yup, shattered the back of my phone while trying to follow these instructions. You can’t flex the back cover much at all or it is toast.

    Roy Feague -

    Someone else had said to use floss to start the cutting I found this to be the most useful. After I heated the phone with a hairdryer I would cut some of the adhesive at the bottom corner after sawing away for a bit I was able to move it enough to fit one of these picks in then I slowly reheated around the edge as I slowly moved more picks and slowly cut away at the adhesive .

    Braden D -

    Didn't have guitar picks. I grabbed some plastic packaging from my recycle bin and cut it into a bunch of triangles to hold the gap open as I worked my way around.

    Student4Life -

    Leaving the pick in the bottom as described while using another to slide up for the next steps shattered the back cover - these instructions should be clear to only leave the pick in the bottom with as little inserted into the phone as possible as it does not take much flex at all to shatter. Also beware that there are no replacement back covers available from iFixit either :(

    Pixel3 Owner -

  5. 5CtnbKCFeX4K1YRv
    5CtnbKCFeX4K1YRv
    wgjh6irUyHNalXeU
    2PycD5BYQhchuif3
    • Scalda il lato destro con un iOpener e continua a tagliare l'adesivo con un plettro di apertura.

    • La colla può essere molto gommosa. Spingi il plettro dentro e fuori con un movimento a sega per favorire il taglio.

    What is the required temperature to soften the glue? Can I just use a small bag filled with boiling water or a heat gun.

    Wiley Sanders -

    The iOpener is a plastic bag filled with what appears to be water so probably, yes.

    Christopher St. John -

  6. JIKjA2NPfpHKYcwQ
    JIKjA2NPfpHKYcwQ
    lserWGodDwEEHuyV
    Mbm4tfHedOUNIELw
    • Continua a scaldare e a tagliare lungo il resto del perimetro del telefono. Lascia un plettro in ciascun bordo per impedire che la colla possa riattaccarsi.

    • Quando tagli al di sopra del pulsante di accensione, non inserire il plettro per più di metà per evitare di danneggiare il cavo del sensore impronte digitali.

  7. y4AEmIGVjjqYGMav
    y4AEmIGVjjqYGMav
    dtYqhFY5fPi3jZkC
    1XM3UZQNGmRVQqIK
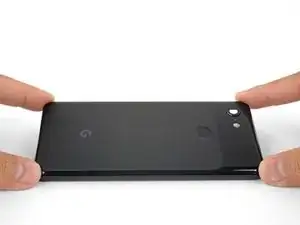
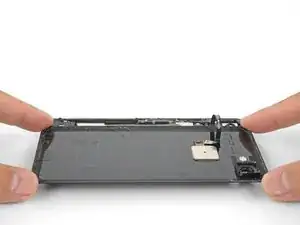
    • Una volta che hai tagliato l'adesivo lungo tutto il perimetro del telefono, solleva delicatamente il lato sinistro della cover posteriore.

    • Non cercare di rimuovere già ora la cover posteriore. È ancora attaccata al telefono dal cavo del sensore impronte digitali.

    • Rovescia la cover posteriore lungo il suo lato lungo e appoggiala in modo che il cavo del sensore impronte digitali non resti in tensione.

    Yes, per Step 7 foto, lift rear cover to vertical only! along the left edge (camera, power/volume) ..while also keeping the opposite long edge down (almost touching wireless coil) ..as left/camera edge rises (and right/lower edge slides leftward), take care to keep lower/right edge no further rightward than midway across coil (foto) ..then gently rotate now-lower right edge leftward 'clockwise', lay it flat without straining cable. [When my rear cover eventually suddenly released from the perimeter adhesive while still pulling on it, the upward force almost yanked the cover off cable; got lucky]

    [this updates my minutes-ago post ..apparently one can't edit after 5min? ..or delete/replace with this?]

    AdahS -

    Where is the guide on re-attaching the back cover with new adhesive?

    iuooip -

  8. X4RWUtXvhuOJ1ehl
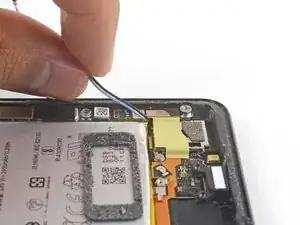
    • Rimuovi le due viti a croce Phillips lunghe 4,1 mm che fissano la staffa del connettore del sensore impronte digitali.

    • Durante questa riparazione, tieni traccia di ogni vite ed assicurati di riavvitarla esattamente dove era.

    • Durante il riassemblaggio, fai attenzione a non serrare troppo queste viti perché potresti danneggiare lo schermo.

    A magnetic screwdriver tip helped here.

    Ciprian Chelba -

    If you purchase iFixit’s kit for this replacement, their included driver is magnetic. Helped immensely!

    Rick Johnson -

    after replacing my camera, my screen had a big green/white vertical stripe. I didn’t see the disclaimer about overtightening these screws. I think it may be related.

    Ethan Berry -

    KEEP TRACK OF THE SCREWS - sketch a scale diagram of the open, inside of the phone on a piece of paper and mark the position of each screw as you remove it - lay the screws on your diagram to keep track of which screw goes where - they are NOT the same size.

    Greg B -

  9. FnoGAQilgdTCWVkL
    FnoGAQilgdTCWVkL
    wFiuBEcM4PkUkoF4
    kNOU2bFMFQbElmEd
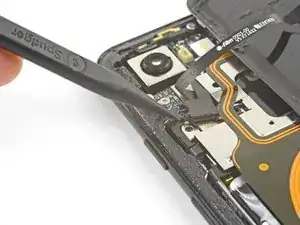
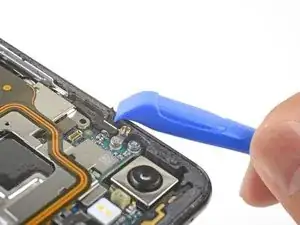
    • Usa la punta di uno spudger per far scorrere fuori da sotto la bobina NFC la staffa del connettore del sensore impronte digitali.

    • Rimuovi la staffa del connettore del sensore impronte digitali.

    Re-inserting this is tricky and requires pretty good dexterity. The shiny metal frame of the wireless charger is also not held down, so you may wish to gently apply pressure to it as you try to re-position the connector bracket.

    William Kew -

    I could use a whole tutorial on how to reinstall this

    Amy schneider -

  10. hwH2NEDSaeFcjhqM
    hwH2NEDSaeFcjhqM
    MdrVDEv2ncuNIetK
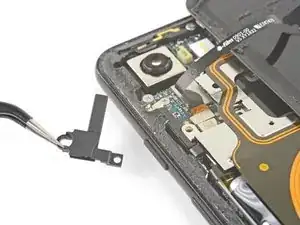
    • Usa la punta di uno spudger per sollevare e disconnettere dal suo zoccolo il connettore del sensore impronte digitali.

    • Quando scolleghi connettori come questo, stai attento a non smuovere i piccoli componenti disposti in superficie che circondano lo zoccolo.

    • Per riconnettere i connettori a pressione come questo, allineali con cura e premili da un lato finché non senti il clic di bloccaggio, quindi ripeti l'operazione dall'altro lato. Non premere in centro. Se il connettore non è perfettamente allineato, i pin possono piegarsi, provocando danni permanenti.

  11. mrKNjei1UgfkujYW
    mrKNjei1UgfkujYW
    Ij4uSFBCBC4y5q14
    SDUxhGDlLrwo31Cv
    • Rimuovi la cover posteriore.

    • Prima di installare una cover posteriore di ricambio, devi rimuovere tutti i residui di adesivo dalla scocca del telefono. Usa uno strumento di apertura per raschiare e alcol isopropilico ad alta concentrazione per ripulire la superficie.

    • Se devi riutilizzare la stessa cover posteriore, devi pulire tutto il vecchio adesivo e quindi applicarne di nuovo per fissare la cover stessa.

    • Se stai installando una cover posteriore di ricambio, ricordati di confrontarla con la parte originale. Trasferisci ogni componente rimasto (come diffusore del flex) sulla tua cover di ricambio.

    When reassembling is it better to first attach the new adhesive back gasket to the phone back or the phone chassis frame?

    Tom Burke -

    Hi Tom!

    It depends on the adhesive. Carefully align the adhesive to the phone by matching the contours. Note which adhesive side is backed by a clear liner, and which side is backed by a colored liner. The clear liner should be removed first. Whichever component the exposed adhesive faces should be the first surface to apply to.

    Hope that helps!

    Arthur Shi -

    Two things:

    1) I recommend attaching the adhesive to the Phone frame and not the back panel. As you attach, you can more easily see the gaps and guide the adhesive along the groove, leaving equal space all around.

    2) To transfer the fingerprint sensor, you will need double-sticky tape to make a new gasket. Put the tape on the back from the inside, and trim with a blade to make the sensor hole. To attach the sensor, place it on something small to raise it off your working surface, then lower the back over it. You’ll be able to see the sensor alignment as you lower the back, which helps get a good position.

    Gary Beardsley -

    Oh, and be prepared: Removing the old adhesive is teeeeedious!! It will take you some time. :-b Alcohol is not a strong solvent, so don’t expect it to remove much; it is mostly for cleaning afterward. In the end, I used one of iFixit’s flat metal tools from the big toolkit to remove the final remains. Its was blunt enough to not cut metal shavings as I cleaned.

    Gary Beardsley -

    I used “medicinal” 91% Isopropyl Alcohol and about 30 Qtips to do the final cleaning of the adhesive, that is, after using a razor blade and the supplied tweezers to remove most of the tape. Patience and many Qtips soaked in IPA removed most of the remaining glue and film.

    Greg B -

    I ended up reusing the original adhesive as it was in pretty good shape. So far, no problems.

    Dan Comiskey -

    Does your IF356-119-1, Google Pixel 3 Rear Cover Adhesive, template use 2 sided pressure sensitive tape? Do I simply align it on the back cover and then press it to the device to reassemble the unit? If so, how long til the back cover is “glued” to the unit?

    Martin Seffens -

    Hi Martin,

    The rear cover adhesive is indeed two-sided PSA (pressure sensitive adhesive). Apply firm even pressure for a minute to bond the adhesive to the unit.

    Arthur Shi -

    When scraping the adhesive off the back cover be careful and don’t apply too much pressure (and/or position the cover against the surface so that it’s supported against the tool used), especially in the corners, or the glass cover rounded edges could break.

    Bart Oleksiak -

    Agree. BEWARE of SCRATCHING off the PAINT from the BACK COVER when cleaning !

    The back cover is painted glass it seems - using a razor blade to scrape off adhesive also scratches off the paint on the inside of the back cover, under the adhesive, and the clear lines it creates are visible from the outside of the back case. If you are using a phone case, this won’t matter.

    Greg B -

    My battery swelled and did all the hard work getting started popping the back open so I didn’t need the iOpener to get the back off, but now the iOpener is handy to heat up the sticky foamy factory original adhesive.

    I found isopropanol ineffective. I found heat softens it considerably. Just very warm, like hot water warm, is effective. Use tweezers or a plastic blade to help pull it off. Metal blades will either gouge the plastic or, worse, create metal shavings that will wreak havoc.

    Are there any solvents other than isopropanol that work and won’t harm the plastic? How do pros speed up this step?

    wsanders -

    I think pros often use heating pads or special jigs. They’d set the temperature, set the phone on the pad, and let the phone heat up for a few minutes. Heat guns are also a popular choice.

    Arthur Shi -

    I found that an opening pick worked well to scrape the glue off the inside of the curved edges of the back cover

    Richard Elder -

    The adhesive on mine took some effort to clean off all the way. During reassembly I did notice that my replacement back panel adhesive was larger than I expected and based off of product photos it looks like I received the 3 XL adhesive instead of the 3. That ended up having me fiddle with the adhesive to try and get it to fit right and unfortunately the camera side now has a bit of a gap that I can still press down on without having it stick. I’ll see how it stays but I fear I might have to get another adhesive. The guide was very helpful though!

    Craig Mileham -

    Does the replacement back come with all the sticky bits I need to replace it, including the fingerprint sensor, led and camers cover?

    wsanders -

    I decided not to bother with new adhesive. The seal doesn't seem great but I tend not to drop my phone in toilets as often as other people.

    James -

    The actual back glass cover part is missing from the parts list and it appears iFixit doesn't sell it anymore.

    It used to be there, and I ordered one months ago and used this guide successfully then. I broke it again and the part is no more.

    Elijah Lynn -

  12. LXJ2AUVgcIT5KnMJ
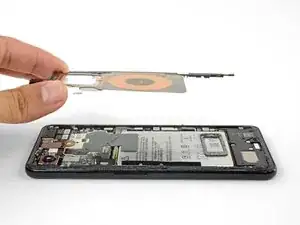
    • Rimuovi le cinque viti a croce Phillips che fissano la bobina di ricarica wireless:

    • Due viti da 1,9 mm

    • Due viti da 4,2 mm

    • Una vite da 4,3 mm

    The top 1.9 mm screw can’t be totally removed — it comes out with the coil once loosened

    Dmitriy -

    This was not true for me.

    Will Herrick -

    Can I leave the wireless charging coil out?

    This may also allow a bigger battery!

    Jex Webster -

    You may be able to! Note that this is not only the wireless charging coil, but also the NFC antenna (the upper loop).

    Arthur Shi -

    The 1.9 mm screws are actually screwed into the head of another screw beneath them. Sometimes the lower screw unscrews instead of the upper. That leaves both screws attached to the coil. If possible you should separate the two screws and screw the lower one back in first using a small flat blade screwdriver.

    Richard Elder -

    If you decide to clean the wireless coil assembly, be aware that IPA will completely remove the printed 2-D barcode on the lower right. (Hopefully that's not important.)

    Bitt Faulk -

    There were 7 screws!!! The last two were both near the power button.

    Emily Viehland -

    Yes, I have that to, and a little black plastic part covering I port.

    ekan97Kingen (ekan) -

    l won’t mother board google pixel3 contact on WhatsApp +250783996430

    Nhimimana Glibert -

  13. KeOYsWQrRmyDHHIf
    • Solleva e rimuovi la bobina di ricarica wireless.

    There seems to be a small amount of adhesive holding down the camera-side edge of the coil. Used a spudger to peel it off...and some of the black film on the back side of the coil was torn away.

    Jacob Dziubek -

    Had some adhesive tape holding down the camera side of the coil. Used the tweezers and the spudger to carefully peel it off.
    Also has some adhesive from the back cover edge that caught on the black film at the top of the phone (above NFC coil) - VERY carefully scraped it off with the point of the spudger while gently pulling the coil assembly away.

    Stuart Clark -

  14. 5nbnHUweyMs3FQ1i
    5nbnHUweyMs3FQ1i
    QARZFHIBW3iehj4K
    • Usa la punta di uno spudger per staccare e scollegare il connettore a pressione della batteria dalla sua presa vicino al bordo destro del telefono.

    The connecton board is quete flexible … be careful otherwise other connectors may get looze.

    This is also valid when re-assemble … pusing battery conector may cause other conectors to “pop“.

    Tsanko Tsolov -

    The square connector directly below the battery connector came undone and will not pop back into place.

    Curtis Redfield -

  15. RALKDhmcSwNrS1lt
    RALKDhmcSwNrS1lt
    mwwTpHkDciafN6yb
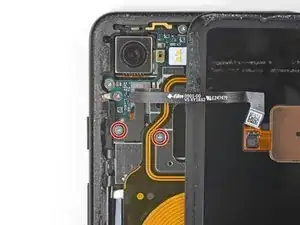
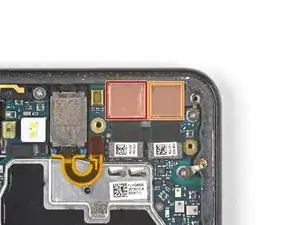
    • Rimuovi le due viti che fissano la staffa della fotocamera:

    • Una vite a croce Phillips da 4,1 mm

    • Un distanziale a vite da 4 mm

    • Per rimuovere distanziali a vite l'ideale è usare una punta per distanziali. In caso di emergenza, può bastare un piccolo cacciavite a taglio, ma è necessaria un'estrema cautela per evitare che scivolando possa danneggiare i componenti circostanti.

    • Rimuovi la staffa della fotocamera.

  16. bUgSXZmuSYUPV6yT
    • Se stai sostituendo una fotocamera anteriore, individua quella che devi sostituire:

    • Fotocamera con focale normale

    • Fotocamera grandangolare

    • Se stai eseguendo la procedura per la rimozione della scheda madre, devi rimuovere entrambe le fotocamere.

    I actually didn't have to remove the cameras to get my motherboard out and back in, just pushed the connectors out of the way. It's probably less hassle prying them up as directed than wiggling the board back under two extra connectors when re-assembling as I did :)

    elyze -

    Make sure that the cameras each go in exactly the same spots or not the phone will boot loop forever. The connectors on both of these cameras are the same, so they will easily connect on both sides. So be careful.

    Let's Talk Tech -

  17. pRv5Din4AW1EIkmY
    pRv5Din4AW1EIkmY
    iAIk6BcGbQ46ciVU
    NEsWXiYohhVT2QML
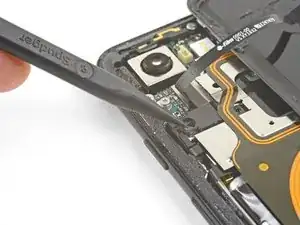
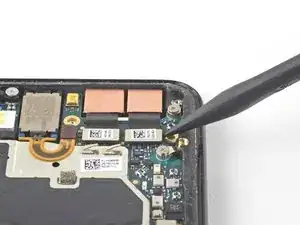
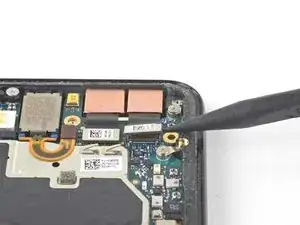
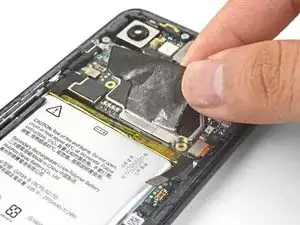
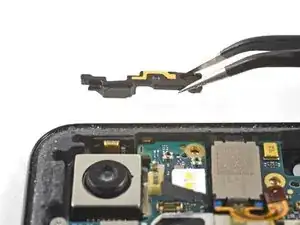
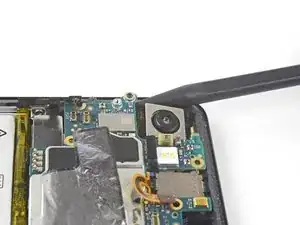
    • Usa la punta di uno spudger per sollevare e scollegare il connettore della fotocamera che stai sostituendo.

  18. rH4fBRUDOWpI4CEC
    rH4fBRUDOWpI4CEC
    nbTe42TdbpyCtOaS
    • Le fotocamere sono tenute in posizione con dell'adesivo.

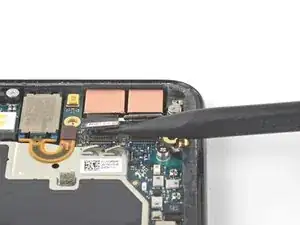
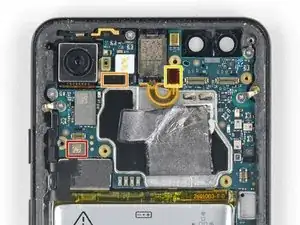
    • Inserisci la punta di uno spudger sotto il bordo del modulo della fotocamera e fai leva per staccarlo dal telaio.

  19. YTR22q6gmwTvISG1
    • Usa un paio di pinzette a punta arrotondata per rimuovere le fotocamere.

    • Se l'adesivo che teneva in posizione il modulo della fotocamera è ancora in buone condizioni, puoi riutilizzarlo. Altrimenti, sostituisci l'adesivo con nastro biadesivo Tesa.

    • Quando installi un modulo fotocamera sostitutivo, accertati che la lente del telaio del telefono sia priva di residui di colla o altri detriti.

  20. ecPfFsjOeCCvT1Fn
    ecPfFsjOeCCvT1Fn
    6UrKvi4XBCK5aiLP
    • Usa la punta di uno spudger per sollevare e scollegare il connettore dell'altoparlante dal suo zoccolo sulla scheda madre vicino al bordo destro del telefono.

    • Stai attento a non perforare la batteria con lo spudger.

  21. Kh5OBC6bEdHblSOP
    Kh5OBC6bEdHblSOP
    lwg2eIsNTYKrgALJ
    PoLIPTa5kNNOyPEZ
    • Rimuovi le seguenti quattro viti a croce Phillips:

    • Una vite da 1,9 mm

    • Una vite da 4,3 mm

    • Due viti da 4,3 mm più sottili.

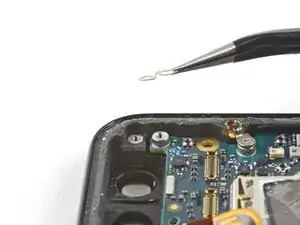
    • Rimuovi la piccola clip di messa a terra dal foro della vite di sinistra. Stai attento a non perderla.

    • La clip di messa a terra è posizionata in modo che il bordo allungato sia di fronte al lato sinistro del telefono.

    • Rimuovi il piccolo inserto in plastica a destra della porta USB-C

    • Assicurati di reinstallare questo inserto prima di riavvitare la scheda figlia.

    The three 4.3 mm screws highlighted in Orange are not all the same. The one closest to the battery is slightly different, a larger diameter. It would be good to note this for reassembly.

    genec123 -

    Thank you! I will adjust the guide to reflect this!

    Arthur Shi -

    Ah, all great and everything but this should be in big bold red letters: “Be sure to reinstall this insert before you screw down the daughterboard.“

    Screwed 4.3 thin screw without that small insert and penetrated new screen module behind…

    Maks -

    Noted and changed!

    Arthur Shi -

  22. xpFOLGJ4ftME3LuC
    xpFOLGJ4ftME3LuC
    hd2Zhrtl4eAGwLNH
    • L'altoparlante è ancora tenuto in posizione da una guarnizione adesiva molto tenace. Prima di cercare di rimuoverla, fai leva sotto di essa in alcuni punti diversi per rompere l'incollaggio.

    • Inserisci la punta di uno spudger sotto l'angolo inferiore destro dell'altoparlante.

    • Fai leva per iniziare a staccare dal telefono l'altoparlante.

  23. P6ybCGmRXRd1EUjl
    P6ybCGmRXRd1EUjl
    Crv1oI1IW1V52PZO
    • Inserisci la punta di uno spudger sotto l'angolo superiore sinistro dell'altoparlante.

    • Stai attento a non perforare la batteria con lo spudger.

    • Fai leva per allentare l'incollaggio.

  24. RKny2S2qOJlqQSpg
    RKny2S2qOJlqQSpg
    jBS6Vl1lQFokCV1w
    • Inserisci l'estremità piatta dello spudger sotto il bordo superiore dell'altoparlante, verso il bordo sinistro.

    • Fai leva per staccare l'altoparlante anche da questo lato.

  25. i3PUipoVD15CniCi
    i3PUipoVD15CniCi
    tjJqJseHme1WnBbx
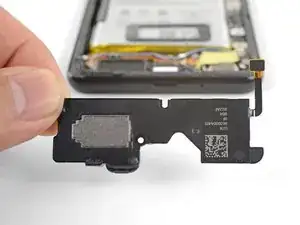
    • Rimuovi l'altoparlante.

    • Prima di installare un altoparlante sostitutivo, controlla la guarnizione adesiva.

    • Se la guarnizione è in buone condizioni, puoi riutilizzarla. Accertati che non copra il foro di uscita.

    • Se la guarnizione si è staccata, rimuovila e sostituiscila con una striscia adesiva pretagliata o del nastro biadesivo come il Tesa.

    tesa tape seems hard to come by in my town. Is there anything else I could use?

    Michael Schlimmer -

    Never mind. A bunch of tesa tape came with the kit

    Michael Schlimmer -

    Adhesive is VERY strong. Used the Ifixit opening tool on the uppder edge between battery and speaker to get better leverage without risking cable / board underneath or the battery.

    Stuart Clark -

  26. Jx4CQxxLKMrS4ThD
    Jx4CQxxLKMrS4ThD
    CAE3XvFBVRXtlEAf
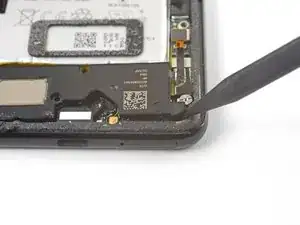
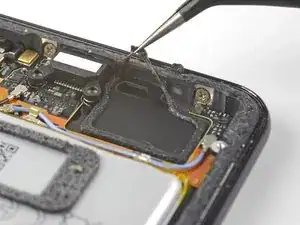
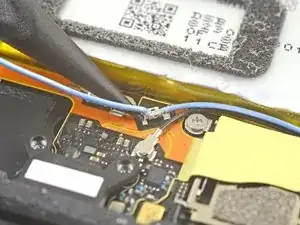
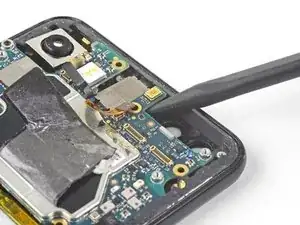
    • Usa la punta di uno spudger per sollevare e disconnettere il cavo di antenna blu dal suo zoccolo sul gruppo di ricarica.

  27. kNlHXXLitYhBFGgL
    kNlHXXLitYhBFGgL
    1bYZMyafWnuN5HrQ
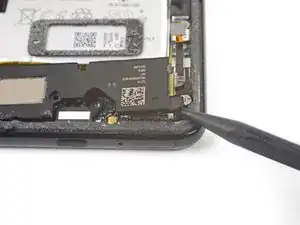
    • Usa la punta di uno spudger per sollevare delicatamente il cavo di antenna blu e liberarlo dalle sue clip di messa a terra.

    • Il cavo è fragile e si rompe facilmente. Se ti sembra che il cavo sia molto ben agganciato, spingi con la punta di uno spudger per aprire lievemente la clip e poi prova di nuovo.

  28. ZLN6sZXQeMWhgO4A
    ZLN6sZXQeMWhgO4A
    aWoo1Eji3oNZkiXe
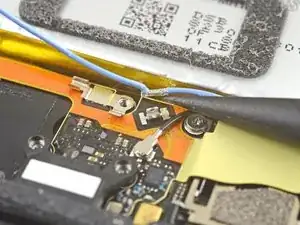
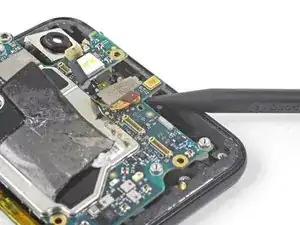
    • Usa la punta di uno spudger per sollevare e disconnettere il cavo di antenna nero dal suo zoccolo vicino alla porta USB-C.

  29. xxWMhlvYfveEKgYC
    • Sfila con delicatezza entrambi i cavi di antenna e quindi spostali lontano dal gruppo di ricarica.

  30. CU1DyiaxmpLCe4vc
    CU1DyiaxmpLCe4vc
    S6GShB4WQnAuSnMl
    OaWygm4FSwXmr4GU
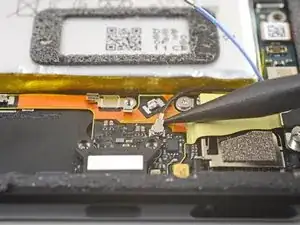
    • Usa la punta di uno spudger per sollevare e scollegare il connettore del gruppo di ricarica dal suo zoccolo sulla scheda madre, vicino al bordo destro del telefono.

    • Stacca con cautela il cavo flessibile dalla parte superiore del lettore della scheda SIM.

  31. OHE5nlAgs3hEydmv
    OHE5nlAgs3hEydmv
    NMCcmRUugMlkJLey
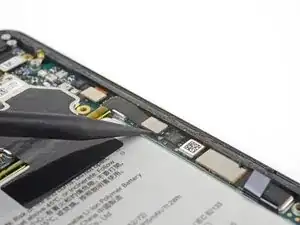
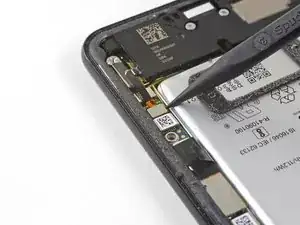
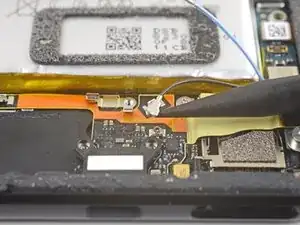
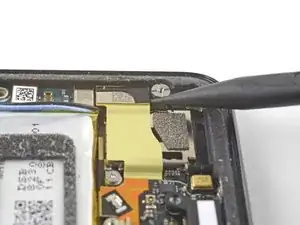
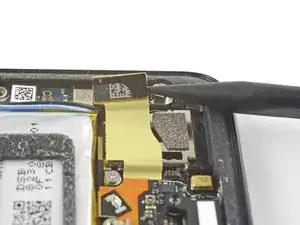
    • Usa l'estremità piatta di uno spudger per alzare delicatamente il nastro nero che tiene in posizione il cavo flex del display, vicino al bordo destro del telefono.

    • Non usare attrezzi metallici per far leva, perché potresti danneggiare il cavo flessibile.

    • Usa la parte piatta di uno spudger per sollevare e scollegare il connettore dello schermo dalla scheda madre.

  32. VFMWt62cW4m3WtvF
    VFMWt62cW4m3WtvF
    yTYDkJKdASG6jUvE
    ePTTci16dY15bOhP
    • Ogni volta che usi lo spudger vicino alla batteria, stai molto attento a non forarla.

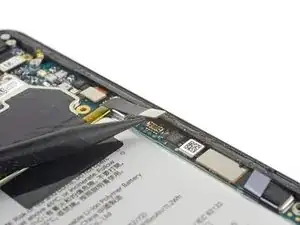
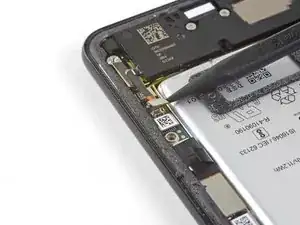
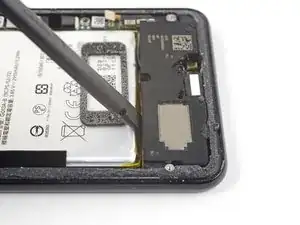
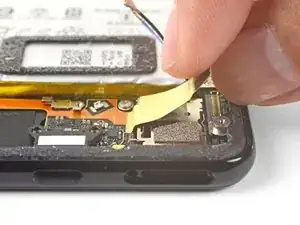
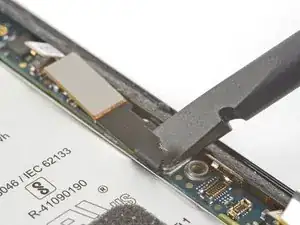
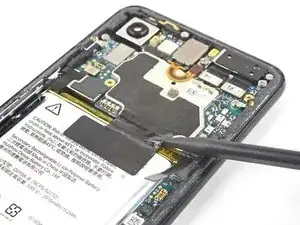
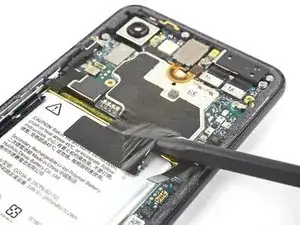
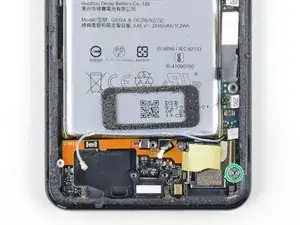
    • Infila la punta di uno spudger nella fessura sotto il nastro nero che collega la batteria e la scheda madre.

    • Fai scorrere lo spudger sotto la fessura per sollevare il nastro dal lato della batteria.

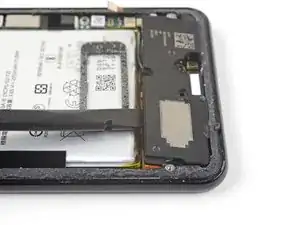
    • Rimuovi attentamente il nastro dalla batteria e piegalo da parte.

  33. 6BVdLRtdMaRNUDXW
    6BVdLRtdMaRNUDXW
    NfravwBaFgFZMSEN
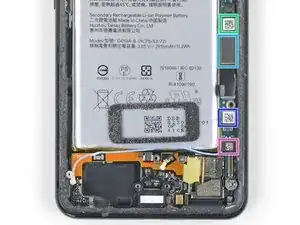
    • Usa uno spudger per sollevare e scollegare i seguenti sette connettori a pressione dai rispettivi alloggiamenti sulla scheda madre.

    • Connettore pulsanti esterni

    • Connettore microfono superiore

    • Connettore altoparlante voce

    • Connettore sensore di pressione sinistro

    • Connettore dello schermo

    • Connettore sensore di pressione destro

    • Connettore vassoio SIM

    Note the "screen connector" mentioned here SHOULD refer to the smaller, upper screen connector. The one indicated here was already disconnected in step 31.

    Ray Livingston -

  34. EUESVZSNikwncB5g
    • Usa l'estremità piatta di uno spudger per sollevare e piegare delicatamente verso l'alto il cavo flex dell'altoparlante voce, in modo che non interferisca con la scheda madre.

    I STRONGLY recommend simply REMOVING the phone speaker at this step. It is VERY easy to damage the flex cable when removing the motherboard if the speaker is left in place. Removing the speaker entirely takes only a few seconds. Just be sure to replace the adhesive when re-installing. TESA tape works fine here.

    Ray Livingston -

    When re-installing, make sure you remember this part when putting the motherboard back in. I followed the steps in reverse order, as suggested, and almost damaged the orange flex cable when I pushed it down.

    Alex Schultz -

  35. RpitikMnUipiDXgf
    RpitikMnUipiDXgf
    wG5oTJVHjJJ5Jlng
    • Alcune di queste viti bloccano in posizione delle clip di messa a terra molto piccole. Stai molto attento a non perdere queste clip mentre rimuovi le viti.

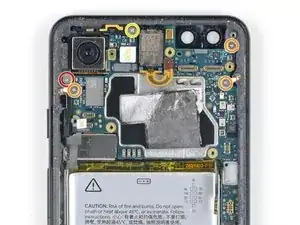
    • Rimuovi le sei viti che bloccano in posizione la scheda madre:

    • Una vite a croce Phillips da 4,2 mm

    • Tre viti a croce Phillips da 1,9 mm

    • Una vita croce Phillips da 4,3 mm

    • Un distanziale a vite da 3,83 mm

    • Per rimuovere distanziali a vite l'ideale è usare una punta cacciavite per distanziali. In caso di necessità, può bastare un piccolo cacciavite a taglio, ma è necessaria un'estrema cautela per evitare che scivolando possa danneggiare i componenti circostanti.

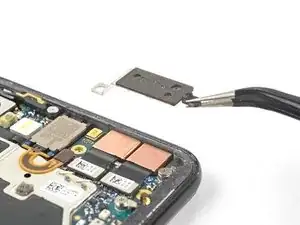
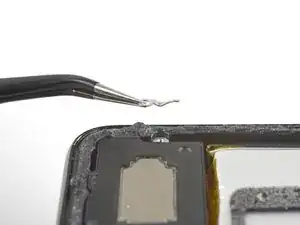
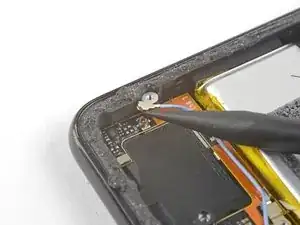
    • Rimuovi e tieni da parte le tre piccole clip metalliche di messa a terra.

    During reassembly, don’t forget to replace the plastic piece before placing the 4.3mm screw.

    William DeCook -

    be careful not to forgetto remove the bottom screw not to damage your motherboard

    Paul -

  36. d2ocsnqGVCs3NtAu
    d2ocsnqGVCs3NtAu
    Io4TMQVL6CWQbio1
    ogBFsKEQWp6BorZb
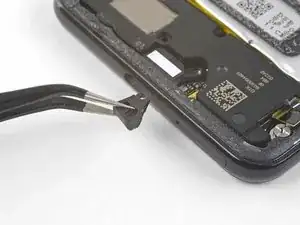
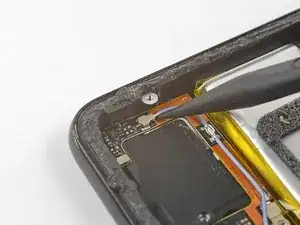
    • Rimuovi con cura la staffa dell'antenna dal bordo superiore sinistro del telefono.

    • Per rimontare le piccole clip metalliche di messa a terra:

    • Orienta le clip in modo che il lato argento sia rivolto verso l'alto.

    • Le clip a forma di goccia devono avere l'estremità a punta rivolta verso il bordo del telefono.

    • La clip con il doppio foro è disposta con la parte bassa verso il foro della vite più in alto a destra.

  37. j4PFLWgpOVmrHFL6
    j4PFLWgpOVmrHFL6
    sAQGsoaOx1TUtjxr
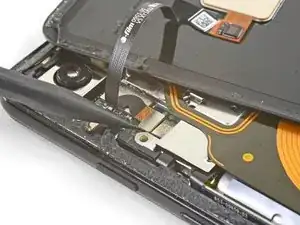
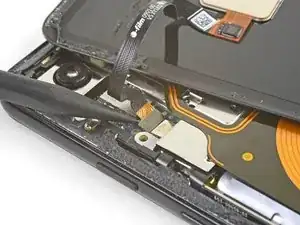
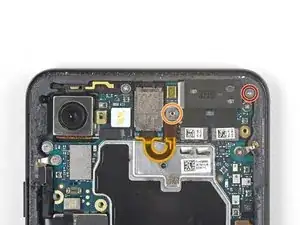
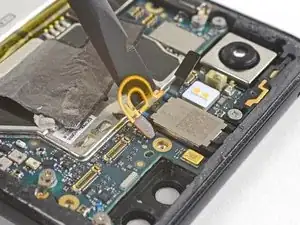
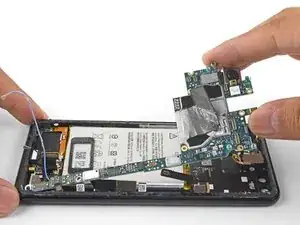
    • Inserisci la punta di uno spudger vicino all'angolo superiore sinistro della scheda madre, appena sotto la fotocamera posteriore.

    • Fai leva con delicatezza per alzare la scheda madre da questo lato, piegando da una parte tutti i cavi flessibili per assecondare il movimento.

    • Se la scheda madre oppone molta resistenza, controlla l'eventuale presenza di cavi flex ancora connessi o di viti da svitare.

  38. DBrW2GJA2djI6wgP
    DBrW2GJA2djI6wgP
    gOnMlFmMTIYWolEH
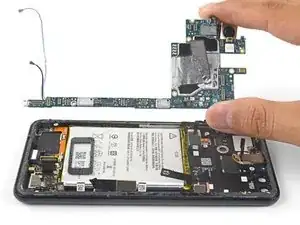
    • Inserisci lo spudger sotto il bordo superiore della scheda madre e fai leva delicatamente per liberare la scheda madre.

    • Il cavo flex dell'altoparlante voce preme sulla scheda madre con una forte pressione. Prenditi tutto il tempo necessario e guida con attenzione la scheda madre attorno al cavo flessibile.

    Make sure the ambient sensor is disconnected right underneath the flash!

    jrancanoarias -

  39. aMbYkHxXWr3cnKNC
    aMbYkHxXWr3cnKNC
    qYwmcUAyHj5v2HIf
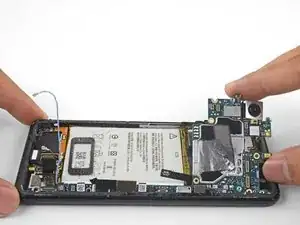
    • Solleva il bordo sinistro della scheda madre e, con delicatezza, inclinalo verso destra. Spingi con cura da una parte i connettori a pressione che potrebbero interferire con la scheda madre.

  40. TsTLDtqHvHtkWwZS
    TsTLDtqHvHtkWwZS
    ZLdQSOFYYBlNh5qG
    HPKXDnUJHDVZgpDU
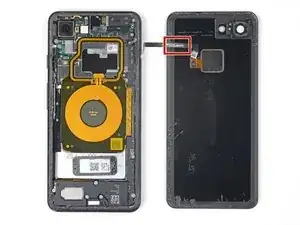
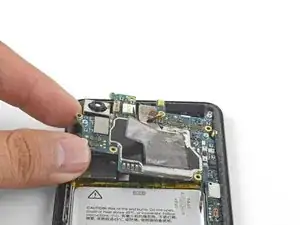
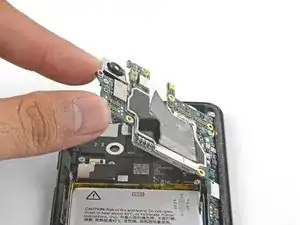
    • Solleva con delicatezza dalla scocca la parte superiore della scheda madre.

    • Rimuovi la scheda madre.

    • In fase di rimontaggio della scheda madre, stai attento a non intrappolare alcun connettore dei cavi flex sotto di essa.

    • Potrebbe essere difficile riposizionare la scheda madre attorno al cavo a nastro della capsula auricolare. Puoi sollevare delicatamente la capsula auricolare, installare la scheda madre, e reinstallare la capsula auricolare.

  41. UBn5GcRbfWdGYTDD
    UBn5GcRbfWdGYTDD
    IQTaQGgg2Se4RjyI
    E5IhAoEHh3fc1inu
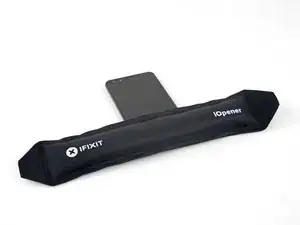
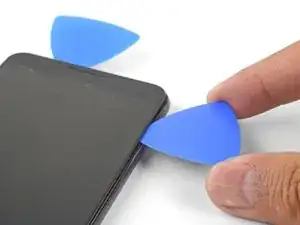
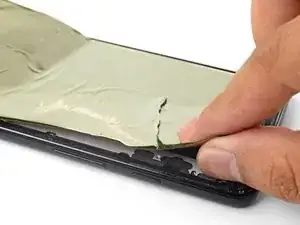
    • Disponi per un minuto un iOpener riscaldato sul bordo inferiore dello schermo.

    • Applica una ventosa vicino al bordo inferiore dello schermo, vicino alla porta USB-C.

    • Tira la ventosa con forza elevata e costante per creare una fessura.

    • A seconda dell'età del tuo telefono, questa azione può richiedere una notevole forza. Se hai dei problemi, applica dell'altro calore e prova di nuovo.

    • Per guadagnati l'accesso, puoi anche provare a riscaldare e tirare uno dei bordi lunghi del telefono.

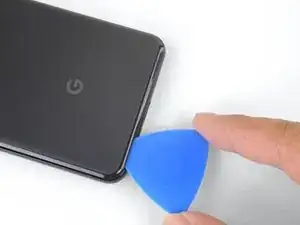
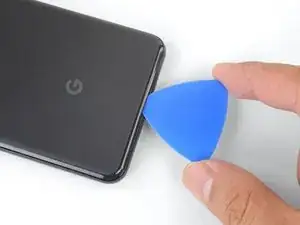
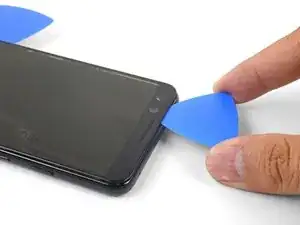
    • Inserisci nella fessura un plettro di apertura.

  42. xDEytCNYBOLF4EgS
    xDEytCNYBOLF4EgS
    TOcU3mEWQXqVglXt
    • Fai scorrere il plettro lungo la cornice per tagliare l'adesivo.

  43. ZhGBHSuRUdreNFfu
    ZhGBHSuRUdreNFfu
    WiXIyG2EGjZhLuyR
    • Continua a riscaldare i bordi con un iOpener e quindi a tagliare la colla con un plettro di apertura, finché non avrai tagliato tutto l'adesivo presente.

  44. JuFpZYMWqNprsie1
    JuFpZYMWqNprsie1
    bMuH2aVyclVvx6DZ
    • Solleva il vetro anteriore dal telefono e rimuovilo.

  45. wC6CW1kKLssmHJDC
    wC6CW1kKLssmHJDC
    lhFVi31PCgg2VAQZ
    vb4X5GBZKIuD6Gfa
    • La parte rimanente dello schermo è attaccata alla scocca del telefono da un grande pezzo di adesivo.

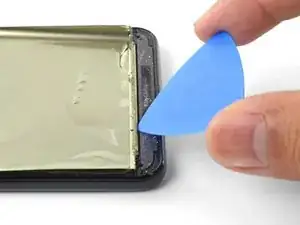
    • Inserisci un plettro di apertura nella giunzione tra la scocca del telefono e il bordo inferiore di ciò che è rimasto dello schermo.

    • Fai leva lungo il bordo per staccare il telefono dalla scocca.

    • Se hai dei problemi in questa operazione, applica un iOpener riscaldato sopra lo schermo per favorire l'ammorbidimento dell'adesivo.

  46. BGspwFKKHQvLJ6hh
    BGspwFKKHQvLJ6hh
    u44LyX2UVevqJpE6
    21XjTbBuNg64f6V2
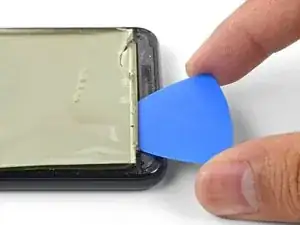
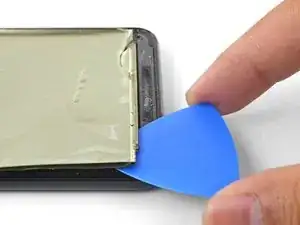
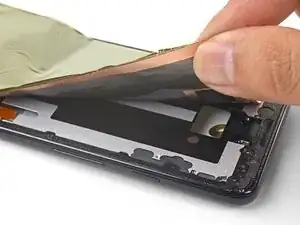
    • Continua ad applicare calore e a tagliare la colla lungo uno dei bordi dello schermo finché non avrai sollevato una parte quanto basta per afferrarla con le dita.

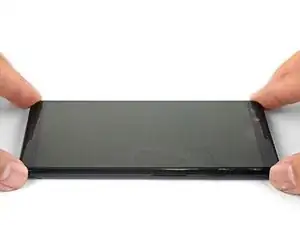
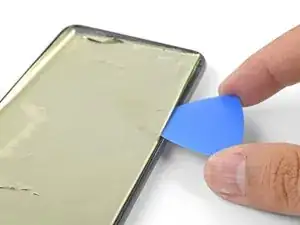
    • Afferra il bordo con le dita e, lentamente, tira via dalla scocca del telefono la parte rimasta del display.

  47. GhCyT5VvhVfeiViK
    GhCyT5VvhVfeiViK
    tXdOMfSWhS3xEgrT
    v3PkO6ADKCyYZ53l
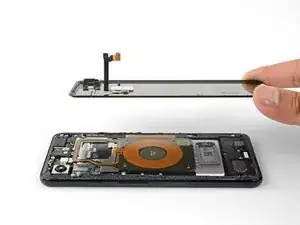
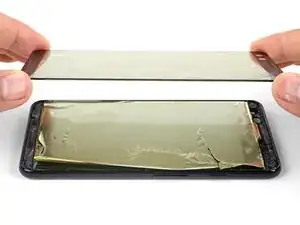
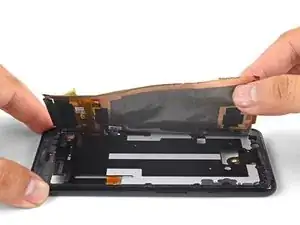
    • Fai passare il cavo dello schermo e quello del digitizer fuori dai rispettivi intagli, quindi rimuovi lo schermo

    • Per applicare un gruppo dello schermo sostitutivo:

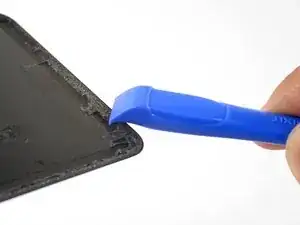
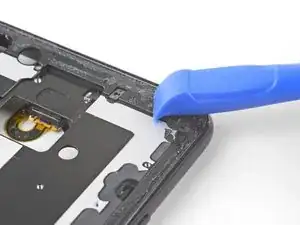
    • Pulisci ogni traccia di adesivo dalla scocca del telefono. La colla rimasta potrebbe portare a una pressione non uniforme sullo schermo sostitutivo, che quindi potrebbe danneggiarsi.

    • Applica sul perimetro della scocca del telefono dell'adesivo pretagliato o del nastro biadesivo.

    • Stacca eventuali protezioni dal retro dello schermo sostitutivo per esporre l'adesivo.

    • Fai passare con attenzione il cavo dello schermo e il cavo del digitizer attraverso i rispettivi passaggi nella scocca del telefono.

    • Disponi lo schermo sopra la scocca e sistema alcuni libri sopra di esso per un'ora per favorire l'incollaggio tra lo schermo e la scocca.

    • Durante la procedura di avvio dopo il rimontaggio, lo schermo attraverserà una fase di calibratura. Non toccare lo schermo durante questa fase, in quanto potrebbe causare una calibrazione errata del touch e generare problemi.

Conclusione

Per riassemblare il tuo dispositivo, segui queste istruzioni in ordine inverso.

Porta i tuoi rifiuti elettronici a un riciclatore certificato R2 o e-Stewards.

La riparazione non è andata secondo i piani? Vai sulla nostra comunità Risposte Google Pixel 3 per trovare aiuto nella risoluzione dei problemi.

Arthur Shi

Membro da: 03/01/18

248254 Reputazione

29 commenti

To change only the screen glass… Do you have to disassemble the whole phone or just steps 39 to 42?

Thanks

Adrián García Estaún -

Hi Adrián,

The OLED is bonded to the screen glass. Unlike LCDs, trying to remove the glass only will most likely destroy the OLED screen.

Arthur Shi -

How to differentiate between a pre-mounted and a non pre-mounted display? I don’t want to order the wrong part, hence the question.

Sid Mankad -

The pre-mounted part will come with the frame, which is the majority of the phone body. The screen is already stuck affixed to the frame, but you would have to transfer everything else onto it. The display only part looks like a thin panel with adhesive on the back. It would look like this part.

Arthur Shi -

When buying a replacement screen do I need to buy it with a frame?

Abby Andam -

This guide is meant to be used with replacement screens without frames. If you buy a screen with a frame, you will have to transfer many components from your existing frame onto the new one.

Arthur Shi -

My Pixel 3 has a broken screen and also the touchscreen is not working (well, only for half the screen; the top half works just fine, the bottom half does not). Will this guide and replacement parts also fix the touchscreen functionality?

Ball Dude -

This guide should resolve any issues with the screen, which includes touch functionality.

Arthur Shi -

Also, only because the part in iFixit is out of stock, is this the same part?

https://www.amazon.com/ePartSolution_-Di...

Ball Dude -

Unfortunately, this is not the same part we sell. Like many aftermarket screens for the Pixel, the linked part uses a cheaper LCD panel, while the original Pixel has an OLED. The part may install properly, but the image quality will be different.

Arthur Shi -

Hi again @arthurshi . Following up on my comment from Dec 2. I bought the tools and replacement screen, and performed the repair yesterday. Thanks for the guide!

Everything seemed to go alright… but sadly, the touchscreen functionality remains broken. I installed the new screen. The phone turns on and the screen turns on just fine, but it does not respond to my touch :(

Do you think then that the motherboard’s circuitry for the touchscreen is broken? Or is it more likely that I didn’t connect one of the two screen connectors (I believe the large one is for the display, and the small one for the touch)? Anything I can do to debug/test where the problem is?

Any help is much appreciated. And thanks again for the very useful guide! Even if things don’t end up working, I still learned a lot!

Ball Dude -

Hey @balldude,

You are right in that one connector is for the screen, and one is for the touch (digitizer). Both must be connected in order for both screen and digitizer to function. The press-fit connectors contain very small contacts. Any small amount of dirt/finger oils on the contacts may cause issues. You can clean them by wiping with lint-free cloth and isopropyl alcohol.

If the screen still won’t respond to touch after that, it may be that the circuitry responsible for the digitizer is broken on the logic board.

Arthur Shi -

Hey, did you try what arthurshi advise and if so did it work. I am also having the same issue and I would hate to buy a new motherboard. Thank in advance.

José Alberto Garcia -

Hi Jose.

I tried reattaching the connectors a few times and testing it out. I couldn’t get it to work, unfortunately. I ended up buying a new Pixel 4 and sending in the Pixel 3 to Google as a trade-in, for which I received $105.

Hope that helps, and good luck!

Ball Dude -

Can you buy just the bezel or do you need a new frame

S Lee -

Hi to be more in depth the problem I been having is that when I took the screen of my pixel 3 there was a piece of flashing(not sure the proper turn that came off with screen it was glued down to mid frame and the screen is supposed to sit in it. Can you buy this part or do you have to buy a whole new mid frame ? Thank you for your time and all your guides they have been very helpful to me.

S Lee -

Hi S Lee,

Are you speaking of the part shown in step 44? If so, that is part of the display panel. It should be fully removed before you install a replacement screen.

Arthur Shi -

Do NOT follow the author's advice to just “bend up the earpiece speaker flex”. This might work fine enough for board removal, but going backwards, you will likely rip the flex trying to jimmy it back in place. The flex is like plasticated paper ribbon. Just remove the earpiece speaker before you reassemble, and place it in its spot after you put the board back in.

Sarah Wreisner -

Ps. The plastic insert in step 19 should be given a bit more attention. If you forget to reinstall this plastic insert, the screw that you replace in that spot will instatly ruin your lcd - no matter how gently you screw it in. You'll be left with a green or pink line through your lcd. It seems worth mentioning, as I have seen this before.

Sarah Wreisner -

Hi Sarah!

Thanks for the suggestions! I will make a note of that and your comment above in the relevant steps.

Arthur Shi -

Followed the guide and was able to install the display in my Pixel 3. Adhesive removal is super frustrating though. But I have a current issue, the rear camera is vibrating like crazy. You could actually hear the camera move around (autofocus) when you open the app. Any ideas?

Levi Klein Marifosque -

Hi Levi,

It sounds like the adhesive holding the rear camera is not holding the modules in place. If possible, open the phone, pry the rear cameras up, and install some replacement adhesive.

Arthur Shi -

Hi Arthur, thanks for replying. I feel like I wasn't able to word my problem properly so I made this short video https://youtu.be/cnym7ROK6eU

Seems like an issue in OIS or focusing. Do I need to replace my camera module?

Levi Klein Marifosque -

I had major difficulty removing the back panel.

I’m unsure if there was a crack prior to removal of the back panel as the attempt to use the suction and pry tool had catastrophically failed. Huge cracks sprawled as the pry tool was inserted, quite a bit of force was necessary to have the pry tool inserted whilst awkwardly positioning my hands to hold the phone down whilst pulling up on the suction tool. I had used heat tools to ease the adhesive behind the panel but may have lost patience as the heat bags provided does not seem to have the same effect as a heat gun would. That being said, the heat bags, while they heat up I’m unsure if they heat up to the critical temperature of the adhesive for it to weaken.

further instruction for the temperature of the bags would help; what is the max temperature I can warm the bag up before it fails (explodes in the microwave) while meeting minimum temperature required to ease the adhesive. currently it said to warm it up for 30sec, 1 every 10 mins, doesn’t cut it.

John Quimson -

as the guide said, “The remaining part of the screen is affixed to the phone frame”. why we need to remove the motherboard?

Lei Liu -

You unfortunately can't release/reconnect the display flex cable and the digitizer cable without removing the motherboard. There isn't enough of a gap to thread the cable through the side.

Arthur Shi -

Need a big update. I order a new screen and it's not only the screen but the whole case. So, I have to transfer all the components to the new case. It is not explained here.

Decathlon Outdoor -

Just pay close attention when you take it apart.......... take pictures.

keep screws in order so they go back in the same place...

and im sure there are videos on youtube showing screen replacement in-frame

Alan Sears -

Sorry about that! We accidentally linked that part to this guide. We are in the process of writing a guide specifically for the screen and frame assembly replacement part.

Arthur Shi -