Introduzione

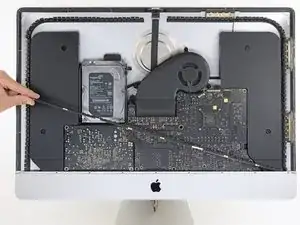
Segui questa guida per sostituire la scheda logica in un iMac 27" 5K del 2020.

Alcune foto in questa guida sono di un modello diverso e potrebbero contenere delle leggere differenze visive, che però non influiscono sulla procedura della guida.

Rimuovere il display del iMac Intel 27" con display Retina 5K del 2020 richiede il taglio dell'adesivo con uno strumento specializzato per iMac. Dopo aver completato la riparazione, dovrai seguire la nostra guida per le strisce adesive per grattare via il vecchio adesivo e sostituirlo con delle strisce biadesive nuove.

Prima di cominciare a lavorare sul tuo iMac: scollega il computer e tieni premuto il pulsante di accensione per dieci secondi per scaricare i condensatori dell'alimentatore.

Fa' molta attenzione a non toccare i contatti dei condensatori o le saldature esposte sul retro dell'alimentatore.
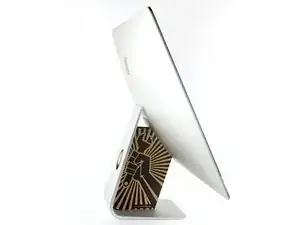
  1. osHwwTsVGOoGRyLD
  2. FkIZHINdYQaFYLVW
    FkIZHINdYQaFYLVW
    SaBSMhWoyPaOMStr
    b1vsQZmYLT5uGp1K
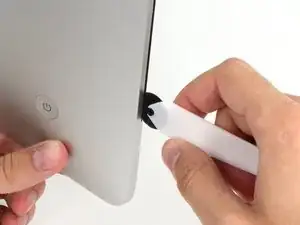
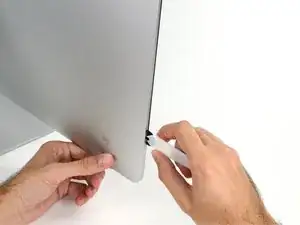
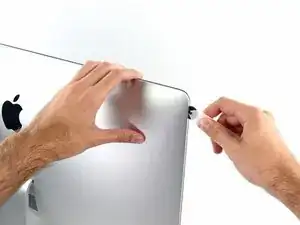
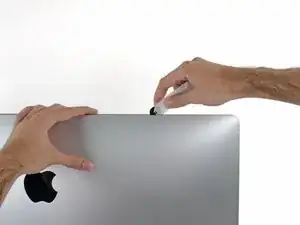
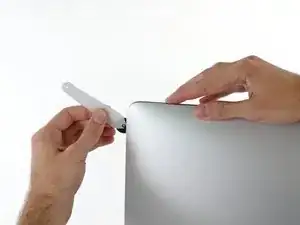
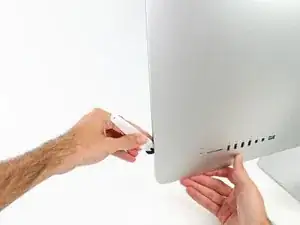
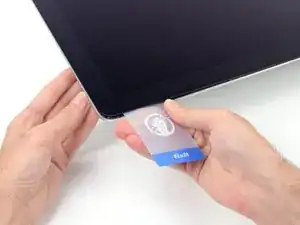
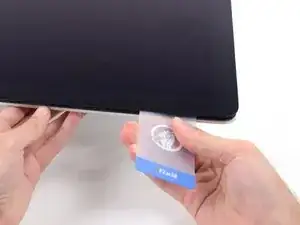
    • Iniziando dal lato sinistro dello schermo, vicino al pulsante di alimentazione, inserisci lo Strumento di apertura iMac nella fessura tra il pannello di vetro e la cover posteriore.

    • La sporgenza sullo Strumento di apertura iMac impedisce alla rotellina di entrare troppo in profondità. Se usi un attrezzo diverso, non inserirlo per più di 9,5 mm nello schermo. In caso contrario, rischieresti di tagliare dei cavi di antenna e di causare seri danni al dispositivo.

  3. YBXnnZvqvcCXc3Dh
    YBXnnZvqvcCXc3Dh
    LKTY6fnxuTkhOFEZ
    GplU2x5KlWXrhqPW
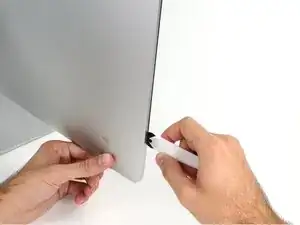
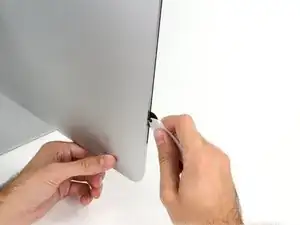
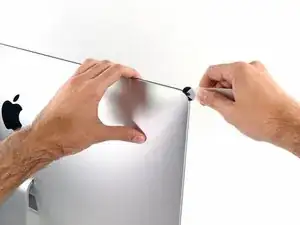
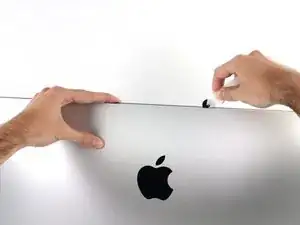
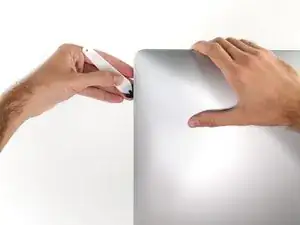
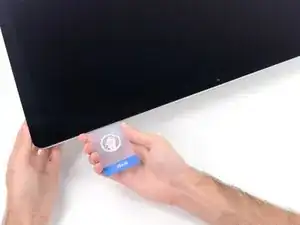
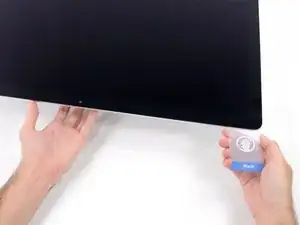
    • Usa l'attrezzo come se fosse una rotella per tagliare la pizza: fallo girare lungo la fessura, tagliando così l'adesivo in schiuma.

    • Stai attento a mantenere premuta l'impugnatura dietro la rotella. Se la tiri, la rotella potrebbe uscire dall'impugnatura.

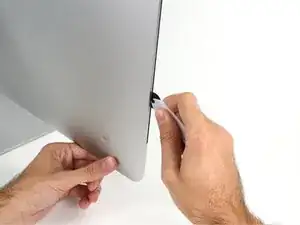
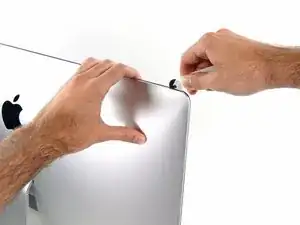
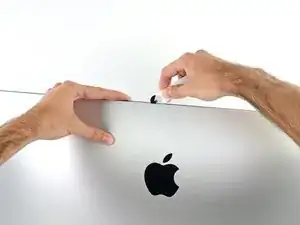
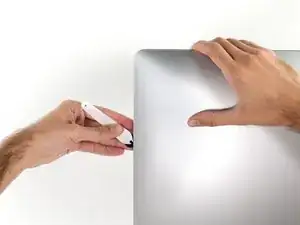
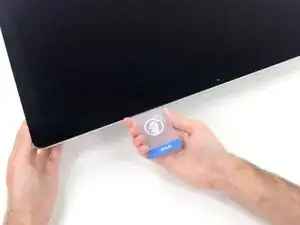
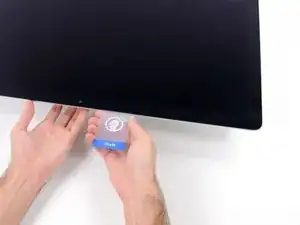
    • Passa l'attrezzo attorno al lato sinistro dello schermo.

  4. SqUGmWPNJAPDStKv
    SqUGmWPNJAPDStKv
    3R6TSjlIyerQQ2AX
    cOQGUrU1ekuPaBed
    • Continua a far scorrere l'attrezzo attorno all'angolo superiore sinistro.

  5. bfYMgtBPICJ4ROqy
    bfYMgtBPICJ4ROqy
    CXhC5LNJ6jdiHu4w
    • Taglia l'adesivo lungo l'angolo superiore sinistro del display.

  6. QVGwDDiKZB3UZvNN
    QVGwDDiKZB3UZvNN
    iBtbvCLPV2KZgoVd
    • Continua a lavorare lungo la parte superiore dello schermo.

    • Puoi far andare l'attrezzo avanti e indietro un po' di volte nei punti già trattati per essere sicuro di avere completamente tagliato l'adesivo.

  7. qpQxBHqvRfjvmcID
    qpQxBHqvRfjvmcID
    NNJxPC1uZ4wLkFiT
    ZTZAVaPN1NX5O4ps
    • Spingi l'attrezzo attorno all'angolo superiore destro dello schermo.

  8. BVZmfm5LTcwa1QrC
    BVZmfm5LTcwa1QrC
    qm3gY6CAvA1tKZEU
    • Spingi la rotella verso il basso lungo il lato destro dello schermo.

  9. oRxMayHO2sLbQc1s
    oRxMayHO2sLbQc1s
    o5OdKdGHEAt4Pty3
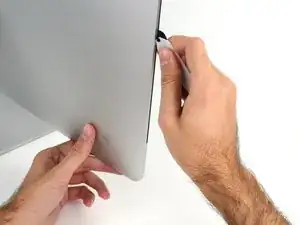
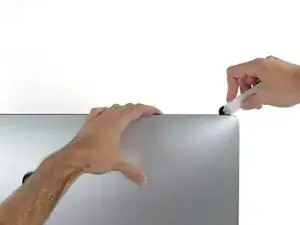
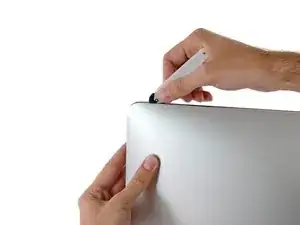
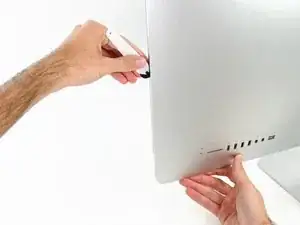
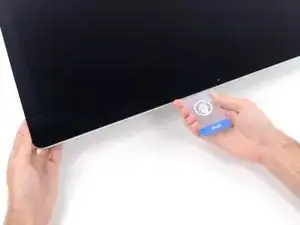
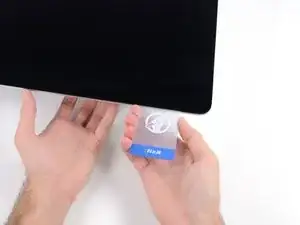
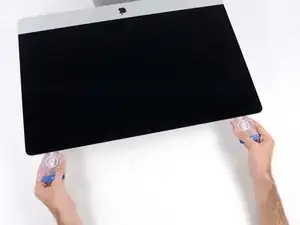
    • Finisci di lavorare con lo strumento di apertura sul perimetro arrivando all'angolo inferiore destro del display.

    • A questo punto, puoi far scorrere l'attrezzo di nuovo lungo l'intero perimetro per essere certo di avere tagliato tutto l'adesivo possibile.

  10. Muy6AIw1J2wEDPvF
    Muy6AIw1J2wEDPvF
    nbPL3P3VBylPcyhZ
    uJQxYDCVYwnx6Qbv
    • Anche se lo strumento di apertura ha fatto la maggior parte del lavoro necessario, lo schermo rimarrà ancora un po' aderente al case. Servirà una scheda di plastica per staccare l'adesivo rimanente.

    • Disponi l'iMac in piano a faccia in su.

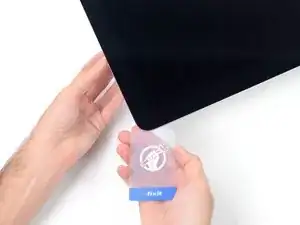
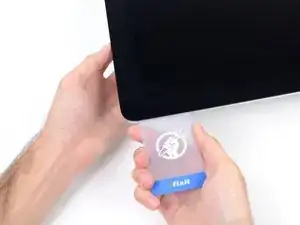
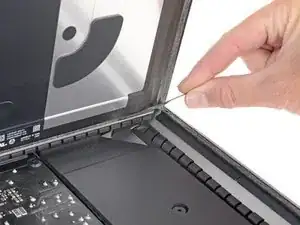
    • Iniziando dall'angolo superiore destro dell'iMac, infila una scheda di plastica tra lo schermo e la scocca.

    • Stai attento a non inserire la scheda di plastica più di 9,5 millimetri per non danneggiare i componenti interni.

  11. NjIxZSSHogTThAMd
    NjIxZSSHogTThAMd
    QRGOYnlsZyP6T5Py
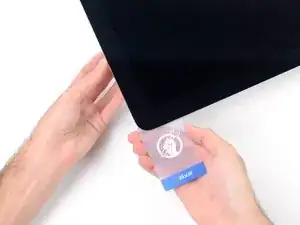
    • Torci delicatamente la scheda di plastica per creare una fessura tra il display e la scocca e per tagliare tutto l'adesivo rimasto vicino all'angolo.

    • Usando troppa forza, il vetro si romperà. Agisci delicatamente e non cercare di creare una fessura che sia più larga di circa 6 mm.

  12. jQAyIj6HrrdJJAJk
    jQAyIj6HrrdJJAJk
    xYIoQCXxGkKCZsDe
    uTgLtnrRgljTV3SV
    • Devi fermarti prima della fotocamera iSight, altrimenti potresti danneggiarla.

    • Fai scorrere la scheda verso il centro dello schermo per tagliare tutto l'adesivo rimasto.

  13. 3JgNS4JkPQitgWmT
    3JgNS4JkPQitgWmT
    oZxopX4GBdr2IZND
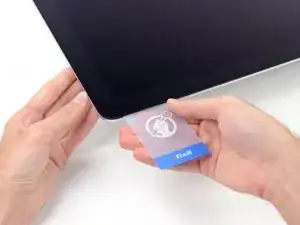
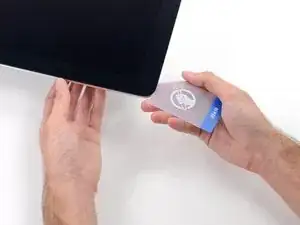
    • Infila di nuovo la scheda di plastica nell'angolo e lasciala in posizione per evitare che la colla possa riattaccarsi.

  14. CKqSXChbW1Q5J2Mj
    CKqSXChbW1Q5J2Mj
    M3mumpuHF6DuGG5d
    uZeaiM2Ss3Nhp6l1
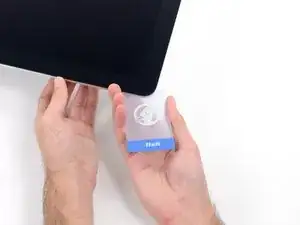
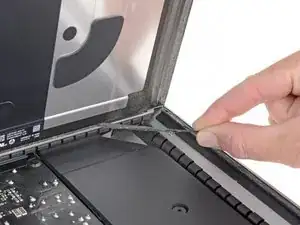
    • Inserisci una seconda scheda nella fessura tra lo schermo e la scocca nell'angolo superiore sinistro.

  15. WVS45JD1UFeUkafQ
    WVS45JD1UFeUkafQ
    tpW1SBUu3OVBWWFf
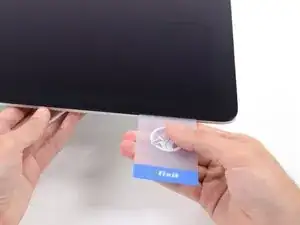
    • Inclina delicatamente la scheda per aumentare lievemente lo spazio libero tra il display e la scocca.

    • Come già fatto sull'altro lato, applica molto lentamente la torsione alla scheda per dar tempo all'adesivo di staccarsi e presta una particolare cura a non forzare troppo il vetro dello schermo.

  16. FRjlwMRyCnMiL5uI
    FRjlwMRyCnMiL5uI
    Bk1FEUAstoZL5kPG
    AkYFNYjFGlOHPpfP
    • Fai scorrere la scheda di plastica verso il centro, anche questa volta fermandoti appena prima della fotocamera iSight.

  17. IJOHHiD2GtNNew33
    IJOHHiD2GtNNew33
    mimwcClnvQR6kwT4
    • Infila di nuovo la scheda di plastica nell'angolo superiore sinistro.

  18. yXXU4PGlmjAVts3U
    yXXU4PGlmjAVts3U
    JwFEwvPQsHIaxQ6C
    JQV5vHS5gLW2hiCT
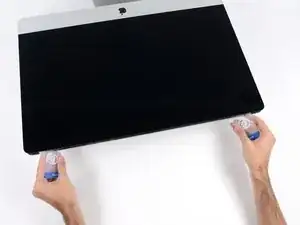
    • Con le schede di plastica inserite come in figura vicino agli angoli, applica ad entrambe una torsione per allargare la fessura tra lo schermo e il case.

    • Se ci sono delle parti che sembrano rimanere attaccate e non intendano separarsi, interrompi la torsione e usa una delle schede per tagliare l'adesivo rimasto nell'area interessata.

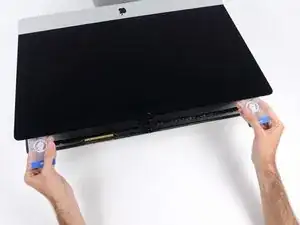
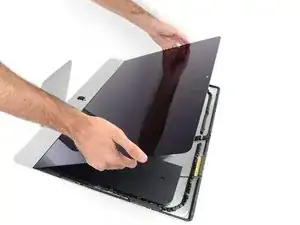
    • Inizia a sollevare la parte superiore dello schermo dalla scocca.

    • Solleva lo schermo solo di qualche centimetro: è ancora collegato all'iMac dai cavi dei dati e dell'alimentazione.

  19. wHjJRVLAFXewfnyp
    wHjJRVLAFXewfnyp
    CpBnbf1FNgAfIZn1
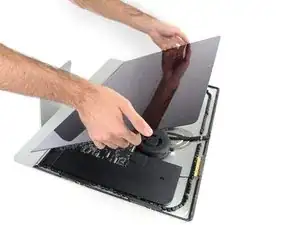
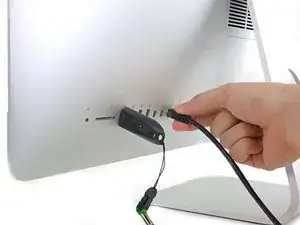
    • Mantieni lo schermo con uno mano mentre con l'altra stacchi il cavo di alimentazione dello schermo .

    • Solleva lo schermo abbastanza in alto da avere un accesso facile al connettore, ma non tanto da strappare i cavi e forzare i rispettivi connettori (alzalo di circa 20 cm).

    This is not a picture of the 2019 model. On the 2019, the cable is angled and very close to a metal part that looks like it could be a wireless card. This makes it difficult to squeeze in the edges required to release the cable. I was able to unfasten it using my fingernail, doing one side at a time.

    maccentric -

    Same issue. You can't just pull it out. I used a plastic "spudger" to push the clips in. The photo here shows where to press

    https://www.icloud.com/sharedalbum/#B0qG...

    See also my comment in step 20

    Bill4321 -

  20. VdsiAgtUyYorMen1
    VdsiAgtUyYorMen1
    KHHFi452QTQMTeBV
    CsKrEVrGRnpfrDwC
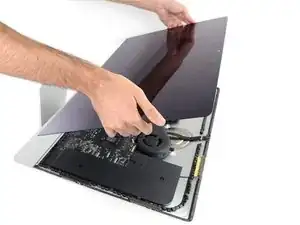
    • Sblocca la staffa metallica di ritenuta del cavo dati dello schermo.

    • Scollega il cavo dati del display.

    • Questa è una connessione delicata che si può rompere facilmente. Assicurati di tirare il cavo dati dello schermo direttamente fuori della sua presa, verso la parte superiore del M;ac.

    on the 2020 model there is also a connector from the camera that is connected ted to the screen.

    Erwin Biermans -

    This isn't the photo of my IMac 27 2019.

    To remove this clip, lift up the plastic tag sticking down & the metal clip will lift too

    https://www.icloud.com/sharedalbum/#B0qG...

    Bill4321 -

  21. eJ1ZlYNHPi6CWHyZ
    eJ1ZlYNHPi6CWHyZ
    iJ1harXteIPLEIKd
    • Solleva lo schermo in posizione all'incirca verticale.

    • A questo punto c'è ancora una striscia di adesivo lungo il bordo inferiore dello schermo che tiene ancorato il display alla scocca come se fosse una cerniera. Puoi indebolire questo adesivo muovendo lo schermo su e giù per alcune volte di seguito.

  22. lACpgXcvlGFyrLvA
    lACpgXcvlGFyrLvA
    ISMvuLCodAhiRMwB
    hpHSWgP6FbSE133b
    • Stai molto attento non toccare i capi del condensatore o qualsiasi saldatura esposta sul retro dell'alimentatore (evidenziato in rosso).

    • Afferra la piccola linguetta all'estremità di una delle strisce adesive nella parte inferiore dello schermo e tira la striscia verso la parte superiore dell'iMac per rimuoverla.

    • Ripeti questo passo con l'altra striscia adesiva e rimuovi anche questa.

    • Se una delle strisce adesive si rompe prima di essere rimossa, usa una scheda di plastica per tagliare la parte di adesivo rimasta.

  23. k6S2mPdemkHANTQd
    k6S2mPdemkHANTQd
    JZD2kebALoGllJpG
    gAqAXTZm1QxOsqZu
    • Stai molto attento nel maneggiare lo schermo: è grande, pesante e di vetro. Il display ha bordi fragili. Evita di sollevarlo dagli angoli.

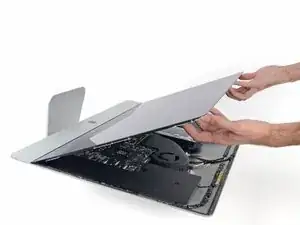
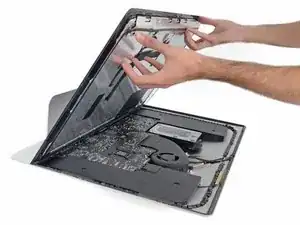
    • Solleva lo schermo dalla scocca e rimuovi lo dall'iMac. Disponi il display a faccia in giù su una superficie piatta e morbida.

    • Può rendersi necessario sollevare lentamente il display da uno dei bordi laterali per staccare l'adesivo rimasto.

    • Dopo aver tagliato l'adesivo, non può essere più riutilizzato per rimettere al suo posto il display. Segui la guida per la sostituzione dell'adesivo del tuo modello al termine della procedura per sostituire le strisce adesive che fissano lo schermo alla scocca.

  24. IkLPB52BKFCosy5l
    IkLPB52BKFCosy5l
    GWeQuJBpgU2XsRKa
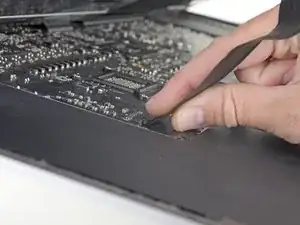
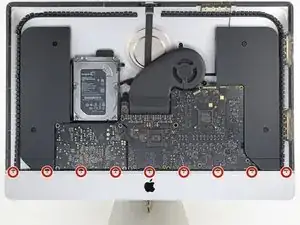
    • Usa un cacciavite a croce Phillips per svitare le nove viti da 3,2 mm che tengono ferma la staffa di supporto.

    • Potresti dover rimuovere l'adesivo dello schermo dal bordo inferiore dell'iMac per accedere alle viti.

    These are new steps from when I did this on my late 2015 retina iMac so I believe step 25 and 26 are optional (you can cope without doing it).

    Amuseme -

    I did not find it necessary to remove these screws and this bar

    James Orwin -

    I lost these 8 during the reassemble. The manual tells I need eight 3.2mm screws.

    Can anyone help to clarify what screws I need. I don't really understand this size. Is this M2x3mm?

    Daniel -

  25. wTfuMb3E45pGiUFT
    • Rimuovi la staffa di supporto inferiore dall'iMac.

    No comments on this ?

    It's quite possibly the most difficult part to put back in the entire process

    The screws are tiny and the there is no easy way to line up the holes on the bracket with the screws

    Having got this far - it wasn't even all that necessary to remove this part in the first place

    Severe pain in the neck

    Eoin -

    After an hour of painstaking mess - I managed to get 7 out of the 9 back in

    By that time I could care less about the remaining 2

    Eoin -

    With the right tools and technique, the bracket can easily be replaced in under a couple of minutes.

    Use a screwdriver with a magnetized tip which frees up one hand and place a screw on the tip first.

    Then line up the screw hole on just one end of the bracket and using a pair of tweezers from the side, hold the bracket in place while you put in the screw.

    Next, do the same on the other end of the bracket. After that, all of the screws in the middle are quick to replace. I didn't really have to touch the bracket again after the end screws were in place.

    Hope that helps someone else since removing this bracket does make later steps a bit easier.

    Max Z -

    I used Max Z tweezers technique but screwed one screw in at the end and then worked my way to the other end.

    Stephen B -

  26. wkCse3KNtGjp1S2R
    • Rimuovi due viti Torx T10 da 10 mm.

    I found i didn’t need to remove the speaker nor the hard drive. In fact I managed to remove the old PSU without even removing the chin strap. However, to install the replacement PSU, I had to remove the chin strap. So I would say, remove the chin strap, but you can optionally leave the speaker and hard drive in.

    Cool_Breeze -

    While you do not need to fully remove the screws as once you loosen them a few turns the speaker becomes free. I found that after the removal of the speaker, I turned it over and popped the screws out as this made it easier to replace it later as I could see the alignment before putting the screws back in. If not you may be off a little and you do not want to force the screw back in.

    James Orwin -

    I used a pill container that I got from Walgreens to hold all of the fasteners I removed during the disassembly process. The container has 14 compartments (individual compartments for each morning and evening of the week). I put a small piece of paper in the compartment with the fasteners to note the name and step of the procedure and the size of the tool I used. Hopefully this will be useful when I go to put it back together again.

    Dan Smith -

  27. 1BHDNUCqqNJOMFJJ
    1BHDNUCqqNJOMFJJ
    2DmDmH4EXPf2WqPV
    JWoI1fFugFXExalA
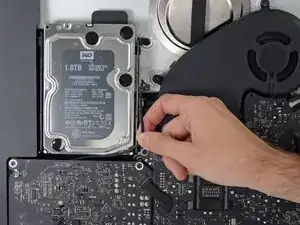
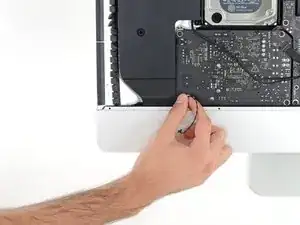
    • Disconnetti il cavo dello speaker tirandolo direttamente dalla sua porta sulla scheda madre. Stai attento a sfilare il cavo rimanendo in direzione dell'asse della presa.

    • Sfila il cavo dalla fessura tra l'hard drive e la scheda madre.

    • Se la fessura tra hard drive e scheda madre è troppo sottile per il cavo dell'altoparlante, disconnettilo e lascia il cavo dov'è.

    I didn’t unplug and de-route this cable. Later, Step 29, has you remove the left speaker. This isn’t necessary. If you can just move the speaker over to expose the hard drive mounting screws, so if you’re not going to remove the speaker, you don’t need to unplug it.

    Anthony Zimmerman -

    on the 2019 iMac, it is horizontal not vertical so pull it horizontally out.

    tarex7 -

  28. fuAXkHYrf16ILX3f
    fuAXkHYrf16ILX3f
    d5BxxgHkf55dopJJ
    lfIdrZLnvJ5AMHRm
    • Stai attento a non toccare nessuna saldatura sul retro dell'alimentatore. I condensatori potrebbero essere abbastanza carichi da darti uno shock elettrico pericoloso.

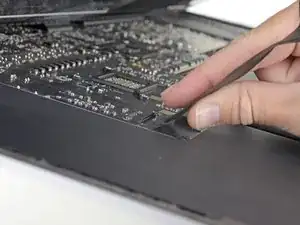
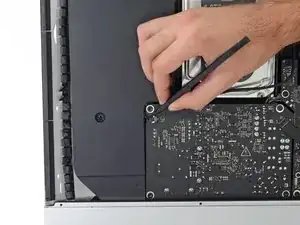
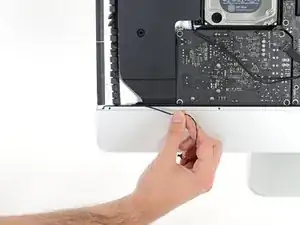
    • Usa uno spudger per disconnettere il connettore del pulsante di accensione dalla sua sede sulla scheda madre.

    Can someone explain what are the solder joint? Or tell me what it looks it?

    brianyu -

    The silver spots on the circuit boards. You may not want to tackle this alone. If you touch these areas, you can possible get a shock -- harming you and your computer.

    Robert -

    there is no need to disconnect the speaker, just unscrew it and move aside slightly to reach the HDD screws (about 5mm) - if you want to replace just the main HDD

    Thomas Webb -

    Take note of exactly what direction this tiny little wire was.

    Joseph Ashe -

    The connector has a plain black side and the other side you can see the 2 silver connectors.. the side you can see the 2 silver connectors faces the front.. the plain side is to the back/against the logic board.

    paul.lynch1 -

    If I leave my iMac unplugged for an extended period, say 24 or 48 hours, is it still possible to get an electric shock from the PSU? Do the capacitors eventually discharge?

    Dominic Pettifer -

    you can do this method, or just wear latex gloves.

    Philip Sedlmair -

    make sure you’ve actually unplugged the mac when running this cable, and not had it plugged in to test the diagnostic LEDs, because one of those wee silver spots is carrying 230v, and its 6mm away from the place the cable runs, So if you have fat fingers like mine, that’s a free wake up zap

    flow in -

  29. ie6MSPEJRdwhepLJ
    ie6MSPEJRdwhepLJ
    MUfv2MeEn4CXucIJ
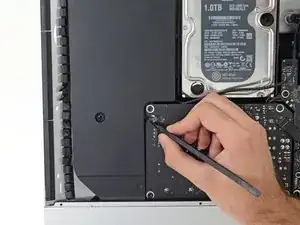
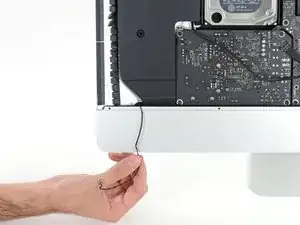
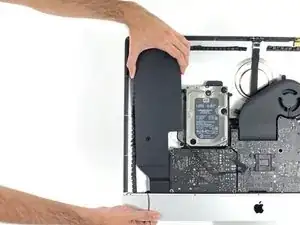
    • Solleva con attenzione l'altoparlante sinistro fino a quando il cavo del pulsante di accensione diventa visibile (1-2 cm).

    This is MUCH easier to do if the support bracket along the bottom is removed first. See Sostituzione scheda logica iMac Intel 21.5" Display Retina 4K (2017) step 25.

    Use a P00.

    To replace it, introduce it like in the photo at the link to be able to hold the right most holes of the chassis and bracket. Replace the first screw, align the bracket to the horizontal and add the screws from right to left. Each one will bring up the next hole in the bracket close enough to screw through. Reverse those directions if you are a leftie.

    Andrew Gough -

  30. qFoeMatHJxBDrads
    qFoeMatHJxBDrads
    yXTFPQCKixIiViER
    VISmV2ZSaU5Kr44U
    • Sfila delicatamente il cavo del pulsante di accensione dal suo incavo sull'altoparlante sinistro.

    Pay attention: if pulling out the loudspeaker tear off the wire of the power button, Apple have not any service parts except for the whole rear housing!

    Fabio Braga -

    This is MUCH easier to do if the support bracket along the bottom is removed first. See Sostituzione scheda logica iMac Intel 21.5" Display Retina 4K (2017) step 25.

    Use a P00.

    To replace it, introduce it like in the photo at the link to be able to hold the right most holes of the chassis and bracket. Replace the first screw, align the bracket to the horizontal and add the screws from right to left. Each one will bring up the next hole in the bracket close enough to screw through. Reverse those directions if you are a leftie.

    Andrew Gough -

  31. 4GZNmBvNCnIj3ZGl
    4GZNmBvNCnIj3ZGl
    rS6AH1KffrXtVXxQ
    ypSikGOvbqQJd1Zc
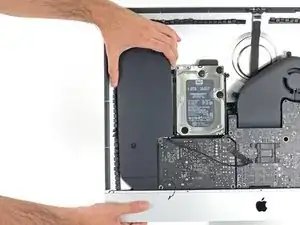
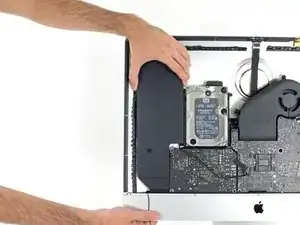
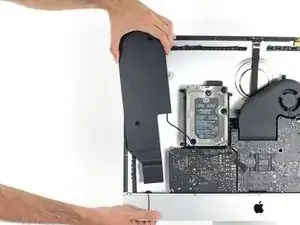
    • Solleva l'altoparlante sinistro e toglilo dall'iMac.

    • Se la fessura tra hard drive e scheda madre è troppo sottile per liberare il cavo dell'altoparlante, tira fuori il cavo mentre rimuovi l'altoparlante.

    • Spingi dalla parte terminale del connettore mentre tiri dalla parte terminale dell'altoparlante per infilare il cavo sotto il supporto destro dell'hard drive.

    I found it wasn't necessary to remove the speaker from the left side to remove the hard drive. You can remove the screws, and then slide it over to the left — giving more than enough room to access the hard drive.

    Robert -

    me too. don't need to remove it if you only want to change the hd

    Alber Einsten -

    Agreed, wast of time to fully remove the speaker.

    Matthew Gonzalez -

    It is difficult to remove the bottom of the speaker because it bends into the frame. Be careful to remove the power button cable, which also routes in a channel in the bottom of the speaker.

    Eric -

    easier to remove the speakers if you unscrew the front ‘chin strap’ - 6/9 phillips screws that you can see in the picture hold that aluminum piece in place

    flow in -

    Agree. This is MUCH easier to do if the support bracket along the bottom is removed first. See Sostituzione scheda logica iMac Intel 21.5" Display Retina 4K (2017) step 25.

    Use a P00.

    To replace it, introduce it like in the photo at the link to be able to hold the right most holes of the chassis and bracket. Replace the first screw, align the bracket to the horizontal and add the screws from right to left. Each one will bring up the next hole in the bracket close enough to screw through. Reverse those directions if you are a leftie.

    Andrew Gough -

    The trick with removing the left speaker is that you have to slide it up toward the top of the iMac (continuing to de-route the power button cable carefully as you go) to get it out from under the chin before you lift it up to remove it.

    ace -

  32. TSg5dgylJtKiwXv4
    TSg5dgylJtKiwXv4
    dsuFLXPV6d2jFrkP
    • Quando si lavora sull'alimentatore fai molta attenzione a non toccare i contatti dei condensatori o qualsiasi saldatura esposta sul retro dell'alimentatore. Maneggia la scheda solo dagli angoli.

    • Disconnetti il cavo di controllo dall'alimentatore.

    I found this cable very difficult to disconnect, be very careful because the cable is between a black tape and it's stuck very hard to the logic board and the cable is very short and you don't have space to move and separate it from the connection! Be patient and take the time you need

    MrSchaeffer -

    I found than putting the flat end of the spudger at the center of the cable, and tilting it got the cable out without an issue.

    jimboom006 -

    I was able to use the flat end of the spudger on the sides. You can see a tiny little clip on each side. Be very gentle!

    Joseph Ashe -

    I simultaneously used the fingernails on my 2 index fingers to dislodge the tabs and continue to pull the cable out. It took a couple seconds.

    Eric -

    ultimately the trick for me was to just pull hard enough, but that part is the scariest part. any tips welcome

    Boris -

    These connectors seem pretty tough to remove until one understands the latch. Each side of the plug are two little sprung tabs (the tab is part of the spring clip which runs down the side of the plug on each side - makes sense once you see the removed plug!). Squeeze them in towards each other and then gently pull the plug from the socket. No great force, or even the spudger, needed once that is done.

    Pete Mackenzie -

    One more tip, has worked on other cables for me. Fish the skinniest spudger tip you have under the cable, and with a finger of your other hand put opposite pressure on the cable against the spudger and gently work it out

    Mike Fleming -

    If u are right handed, i can recomend to use your index left nail to press de bottom sprung, and a flat spudger on the right hand, came off so easy

    Davo Montiel -

    Davo Montiel's tip worked for me. Use the fingernail on your left index finger to press in the tab on the bottom side of the connector and with the right hand use a flat spudger to press in the tab on the top side of the connector.

    Dan Smith -

    If you have a insulated long nose pliers along with a splugger and can get underneath the cable WITH the long nose pliers on the RIGHT side of the cable, towards the logic board, with the splugger on the LEFT Side of the cable doing the same, you can get the leverage to GENTLY pull this cable out very easily.

    George Martinez -

  33. OvYDOVkRThqL1veJ
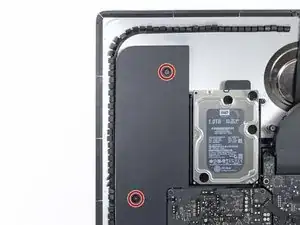
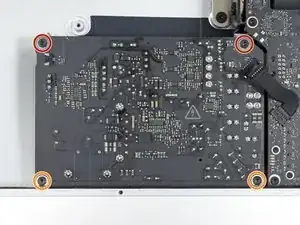
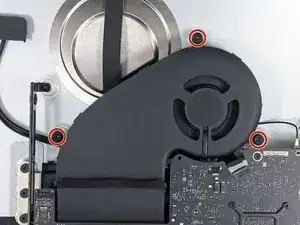
    • Rimuovi le seguenti 4 viti che fissano l'alimentatore al case (T8 o T10 a seconda del modello):

    • 2 viti Torx da 23,7 mm

    • 2 viti Torx da 7,3 mm

  34. SjJOCBs6tJnBVydL
    SjJOCBs6tJnBVydL
    GwZoykUUWlcU22J3
    xQRTX4MTgOYlNkkk
    • Non tentare di rimuovere l'alimentatore dal case; è ancora fissato alla scheda logica da due cavi.

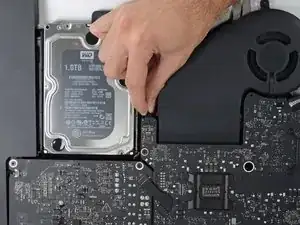
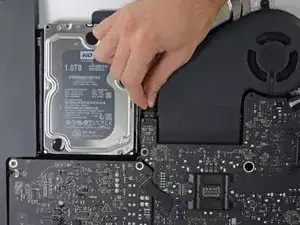
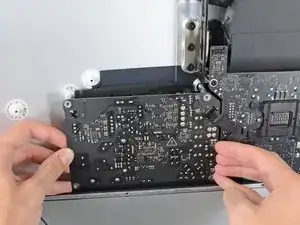
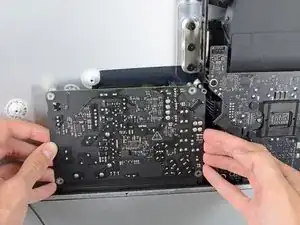
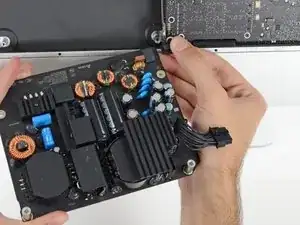
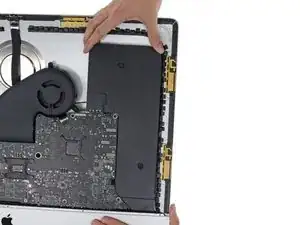
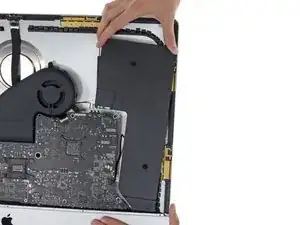
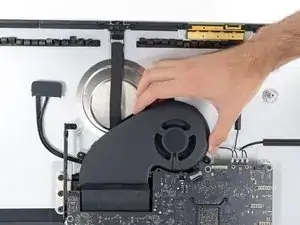
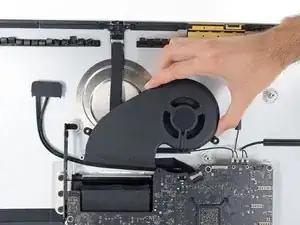
    • Sposta la scheda dell'alimentatore verso il bordo sinistro del case e verso l'alto per liberarla dall'incavo nella scheda logica.

    This is MUCH easier to do if the support bracket along the bottom is removed first. See Sostituzione scheda logica iMac Intel 21.5" Display Retina 4K (2017) step 25.

    Use a P00.

    To replace it, introduce it like in the photo at the link to be able to hold the right most holes of the chassis and bracket. Replace the first screw, align the bracket to the horizontal and add the screws from right to left. Each one will bring up the next hole in the bracket close enough to screw through. Reverse those directions if you are a leftie.

    Andrew Gough -

    The top right screw on the power supply actually screws into a stand-off screw connected to the back of the iMac case. Once you have removed the 4 x Torx 8 or 10 screws you can move the power supply enough to see the upper face of it.

    It has a Torx 25 slot in it and comes out easily. This will give you a lot more room for your fingers in Step 40, depressing the tab on the DC power cable connector to pull it out, and when replacing it on reassembly. You may find it won’t require you removing the support bracket as in the suggestion above.

    John Blagden -

  35. DSKnhJsHUNIEa3fQ
    DSKnhJsHUNIEa3fQ
    GJDaQ5WUgxmQ1lsh
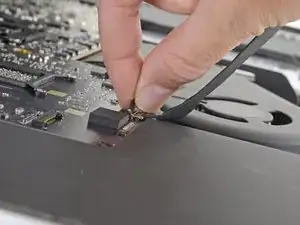
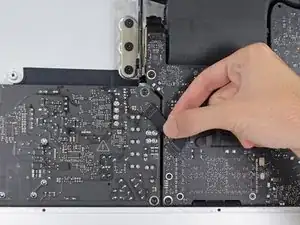
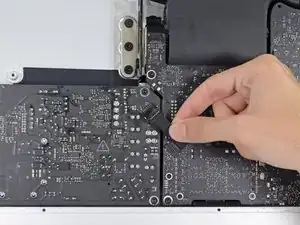
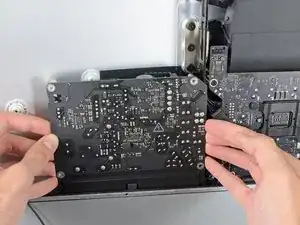
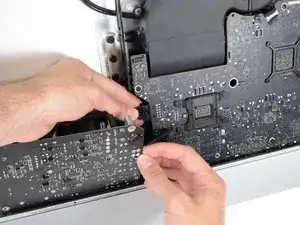
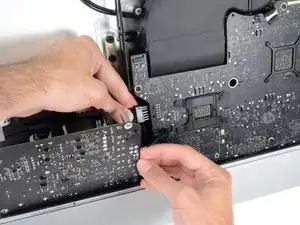
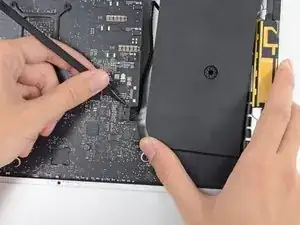
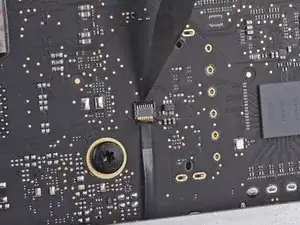
    • Premi la linguetta sul connettore del cavo di alimentazione DC, quindi estrai il connettore dalla sua presa sul retro della scheda logica.

    • Se il cavo è troppo difficile da scollegare, puoi rimuovere la scheda dell'alimentatore e la scheda madre insieme.

    Remember to push in the disconnect tab on the large connector. Carefully insert your finger and push on the tab before you pull on the connector.

    Manuel Collazo -

    Thank you Manuel, this was a tricky one.

    David Zemsky -

    Yes, I pulled the whole socket out because I didn’t know about the tab. Fortunately I was able to place it back in. Not sure if it was glued or how it was anchored but it seems to have a solid connection and I can’t easily pull it out by hand. Once I plug the power cable back in should be ok.

    P. Hisada -

    This connector was very difficult for me to remove (even after pushing the disconnect tab). Eventually I had to use a pair of needle nose pliers to wiggle it back and forth out of the socket. A lot of the cables on the my late 2015 model were very tight and a struggle to get out.

    Anthony Zimmerman -

    I'm struggling with this step. I presume that the tab to which you are referring is behind the connector. I can see a plastic protrusion there but it does not move when I push it. Just to get my finger behind it requires the power board to be moved quite a bit btw.

    Dave Sands -

    Pressing on the release on the back with my finger and at the same time using a needle nose pliers to wiggle the connector with my other hand worked for me.

    Kimbo M -

    i could not get it out by the force of my fingers, so what i did was slightly turn the imac 90 degrees so i could reach the area better, push up (so, vertically) the power control board, push in the tab on the bottom of the connector with my right hand, and slightly wiggle the connector out of its socket with a plier

    Boris -

    removing the chin strap (the front bit of metal running along the bottom of where the screen was) makes this much easier as you can rotate the board and get to the underside

    flow in -

    Left index finger pushing on the tab from behind the connector, using needle pliers in right hand to rock up & down did the trick thanks @starfleet_tone

    Frédérick Charette -

    Just be careful! I’ve seen two systems where the socket was pulled fully off! So the logic board then needs repairs or replacing being just a bit too aggressive!

    Dan -

    Needle nose and wiggling worked for us too. We were stuggling like heck with it when just using hands!

    Mike Manasewitsch -

    This is MUCH easier to do if the support bracket along the bottom is removed first - more space to angle the board upwards. See Sostituzione scheda logica iMac Intel 21.5" Display Retina 4K (2017) step 25.

    Use a P00.

    To replace it, introduce it like in the photo at the link to be able to hold the right most holes of the chassis and bracket. Replace the first screw, align the bracket to the horizontal and add the screws from right to left. Each one will bring up the next hole in the bracket close enough to screw through. Reverse those directions if you are a leftie.

    Andrew Gough -

    I did as Andrew Gough did, per other videos reviewed. Removed it right away. Just makes things easier, more space for just a few screws :)

    Mike Rehbein -

    The top right screw on the power supply actually screws into a stand-off screw connected to the back of the iMac case. Once you have removed the 4 x Torx 8 or 10 screws you can move the power supply enough to see the upper face of it.

    It has a Torx 25 slot in it and comes out easily. This will give you a lot more room for your fingers in Step 40, depressing the tab on the DC power cable connector to pull it out, and when replacing it on reassembly. You may find it won’t require you removing the support bracket as in the suggestion above.

    John Blagden -

    I used your suggestion to remove the stand-off and then used my left hand index finger to press the tab while rocking the connector side to side with a needle nose pliers. Plug came out easily.

    Dan Smith -

    The tab is a pain in the a$$$ to get your finger in there. I was so horrified at the size of the capacitors that I put on gloves to reduce any amount of shock :-) . To get it loose I would pull out carefully the power board as far as I could than I wedge my index finger under and press the tab and slowly pull until I saw a slight gap between the end of the socket and the plug. I than place the flat part of the black spudger or blue one into the gap and use as it as a wedge to help move the plug forward as I kept the tab pressed.

    Andrew Phillips -

  36. koSSEChiJ6RewCB2
    koSSEChiJ6RewCB2
    nIYKhI5tf6PslNSZ
    YPOgTmvfBWBeLHTl
    • Fai molta attenzione a non toccare i condensatori o qualsiasi saldatura esposta sul retro dell'alimentatore. Maneggia la scheda solo dagli angoli.

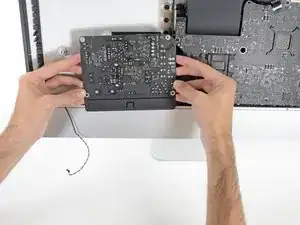
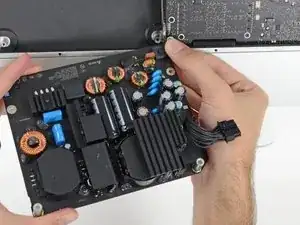
    • Capovolgi verso di te la parte superiore dell'alimentatore per rivelare il connettore del cavo di ingresso AC.

    • Scollega il connettore del cavo di ingresso CA.

    To reassemble, do the same in reverse but keep power supply board more upright than slanted down when re-inserting it in to the lower right corner. The lower right screw post has an protrusion under/behind it and the Power Supply's small 2 wire plug must fit between the front of your Mac and the obstruction. Then it just slides right in and then screw it down.

    Dan H -

    There is a small release tab on the cable.

    Eric -

    Wear gloves when doing this to reduce any shock. The size of those capacitors are very unnerving and scary. Also those solder joints.

    Andrew Phillips -

  37. XLZ6JAe5UQRMerFQ
    • Svita le due viti Torx T8 da 9,8 mm.

    These are T10's, not T8's

    loren -

    I had one shorter one screw, and one screw shorter than the other two equal size speaker screws, but longer than the stubby screw. :) And I can confirm that these are T10s.

    Patrick Vickers -

  38. fCTmYLw4UHHd5trB
    fCTmYLw4UHHd5trB
    3NTQk3425JfsVXY1
    • Fai ondeggiare leggermente lo speaker destro verso destra per riuscire ad accedere al connettore del suo cavo sulla scheda madre.

  39. foyuA2rUNRhfiYku
    foyuA2rUNRhfiYku
    Ml6ZR3hJmbB62Sb6
    PJS1CD2tUaRrZaqD
    • Usa uno spudger per rilasciare il connettore del cavo dello speaker destro dalla sua presa sulla scheda madre.

    • Tira il connettore verso destra per scollegarlo dalla sua presa.

  40. arkIaVcopUlXpfTM
    arkIaVcopUlXpfTM
    2b1lnbTTPXPmynPe
    d31WDKhGFGcmLy2e
    • Solleva lo speaker e rimuovilo dall'iMac.

  41. WXntIOVb5NEQugib
    WXntIOVb5NEQugib
    bWBlJvmSsjO2yfKK
    HvlkqipFULhkkLcp
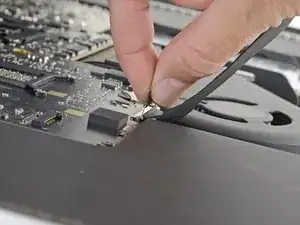
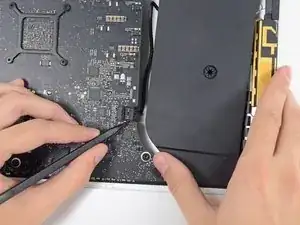
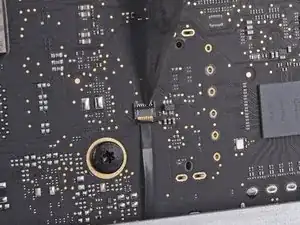
    • Usa l'estremità a punta di uno spudger per scollegare i connettori dei cavi dalla presa nella scheda logica.

  42. Z66SnPhtc1WsoMGO
    Z66SnPhtc1WsoMGO
    AhwZbYEBS1AGM1Wo
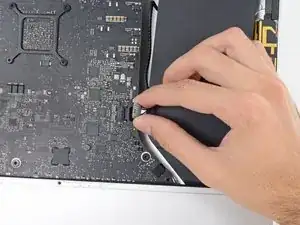
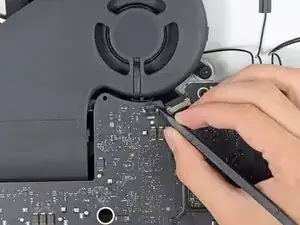
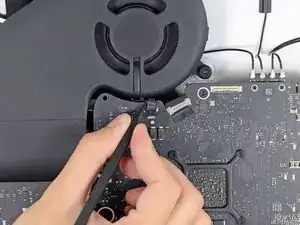
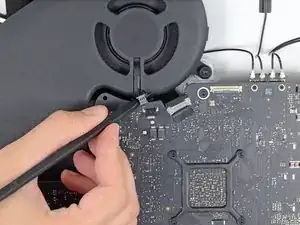
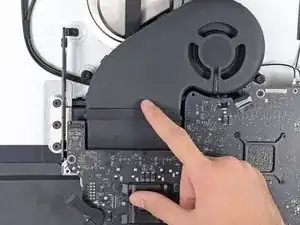
    • Distacca parzialmente il nastro adesivo nero che connette la ventola al condotto di scarico.

    • Lascia il nastro sul condotto di scarico: ti basta solo esporre la giunzione per liberare la ventola.

  43. hF2H1iMMxroidbUv
    • Rimuovi tre viti Torx T10 da 12,4 mm che fissano la ventola al case posteriore.

  44. ZwiHFeKlBBGMNqw3
    ZwiHFeKlBBGMNqw3
    D3khYG2esIDlKZMa
    • Rimuovi la ventola dall'iMac.

    Use a piece of tape around the antenna cables to keep them in the same order, makes reassembly a little easier.

    Walter Hayden -

    On reassembly, start the fan power connector into its socket while you slide the fan in.

    ebay -

    I left the antennas attached to the wifi card and removed the wifi card with wires attached. I accidentally broke one of the connectors on the wifi card and had to replace the entire card....

    S. Baxter -

  45. lFxpjvk1DULcCwSX
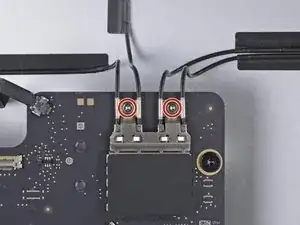
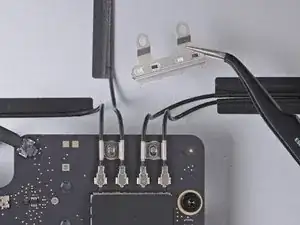
    • Usa un cacciavite Torx T5 per rimuovere le due viti da 4 mm che fissano i cavi dell'antenna AirPort/Bluetooth.

  46. FtyFUZvrDP5iCiYE
    • Rimuovi la staffa di metallo che fissa i cavi dell'antenna alla scheda logica.

  47. 3trWmZkyVfoWXXPC
    3trWmZkyVfoWXXPC
    JFsXKBTNGKAtSUFa
    6nolgTF6FL2ALxje
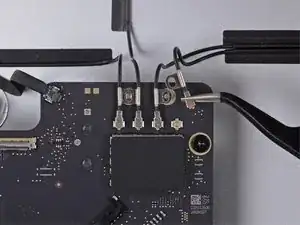
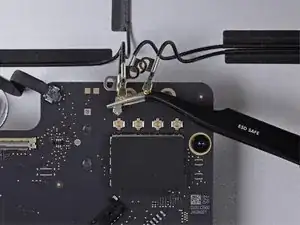
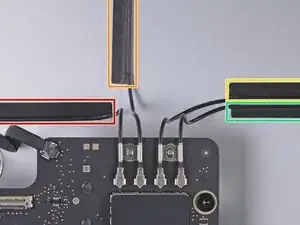
    • Usa delle pinzette per scollegare i quattro cavi dell'antenna dalla scheda madre.

    • Prendi nota della posizione originale di ogni cavo per quando li riconnetterai. Da sinistra a destra sulla scheda, le antenne sono connesse in quest'ordine:

    • Sinistra

    • Superiore

    • In alto a destra

    • In basso a destra

  48. bRJwQEVUlgpKqgPS
    bRJwQEVUlgpKqgPS
    wiciJtxVqRImmdse
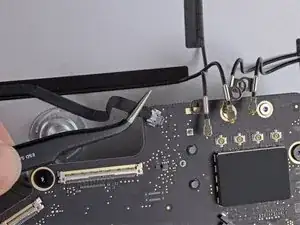
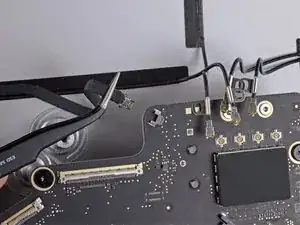
    • Usa delle pinzette o le dita per scollegare il cavo a nastro a sinistra dei cavi dell'antenna dalla scheda logica.

  49. SZfa3uSfxUx4JoWj
    SZfa3uSfxUx4JoWj
    LKEVAqHrIFFHIqqT
    p5v5NtIRhmGTKc42
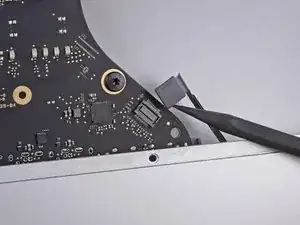
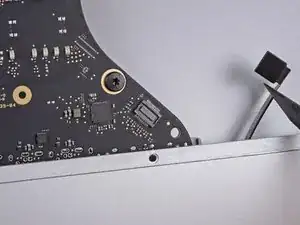
    • Usa la punta di uno spudger per scollegare il connettore del jack cuffie dalla sua presa sulla scheda logica.

    • Spingi delicatamente il cavo di lato.

  50. emHAFHOHQjSTvZs3
    emHAFHOHQjSTvZs3
    VmCeKj6TSgaXNFGv
    1bq3GOduDqE1YEVJ
    • Usa la punta di uno spudger per capovolgere e aprire l'aletta di bloccaggio della presa ZIF del cavo a nastro del microfono.

    • Accertati di stare facendo leva sull'aletta incernierata e non sulla presa.

    • Usa delle pinzette per tirare delicatamente il cavo a nastro del microfono fuori dalla sua presa.

  51. EKVqoidV5YygKFNS
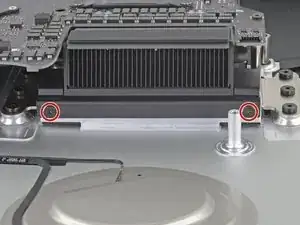
    • Usa un cacciavite Torx T8 per rimuovere le due viti da 5,6 mm dalla parte superiore del condotto di raffreddamento del dissipatore.

  52. pNBTBJPafbAKVNgs
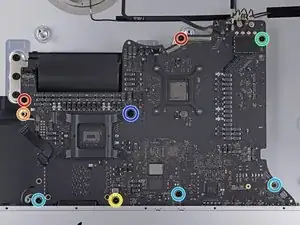
    • Rimuovi le seguenti viti che tengono ferma la scheda logica:

    • Due viti T8 da 23,7 mm

    • Una vite distanziale T25 da 20,1 mm

    • Una vite T8 da 17,6 mm

    • Una vite T8 da 7,2 mm

    • Tre viti T8 da 7,1 mm

    • Una vite imperdibile T8

    • Questa vite si trova sotto a un foro nella scheda logica. Se non stai usando un cacciavite iFixit, potresti aver bisogno di un'estensione o un cacciavite con un'asta più lunga.

    Where is the small SSD drive here?

    edo fuenzalida -

  53. NVfXXbXpn5iEG4fi
    NVfXXbXpn5iEG4fi
    OHEHoJ1sGBsDxPLb
    Ur416hGSrKdcOQKS
    • Quando rimuovi e installi la scheda logica, fa' attenzione a non danneggiare il delicato cavo a nastro del microfono in basso a sinistra sulla scheda logica.

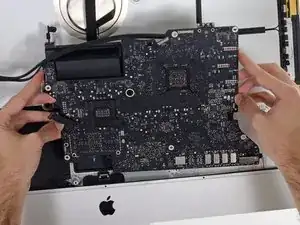
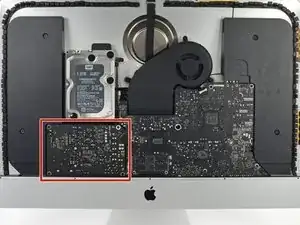
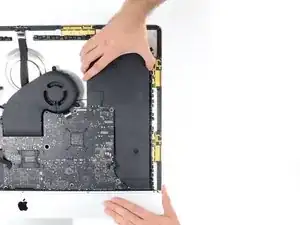
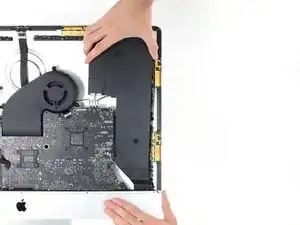
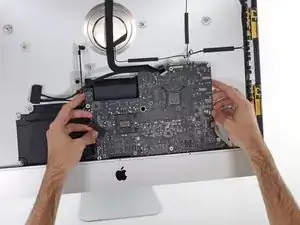
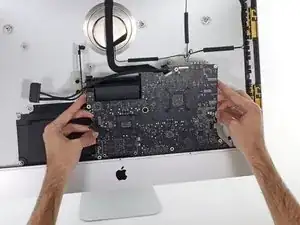
    • Inclina leggermente la scheda logica in avanti.

    • Solleva la scheda logica dall'iMac. Fa' attenzione che non si incastri nei perni delle viti all'interno del case posteriore.

  54. 4CmaPDEFIPkfU4TB
    4CmaPDEFIPkfU4TB
    QFoXIYwMGIjYgcMB
    • Quando riassembli l'iMac, fa' molta attenzione ad allineare correttamente le porte I/O. La scheda logica può essere storta anche quando viene fissata con tutte le viti.

    • Puoi usare una chiavetta USB o un cavo ethernet per accertarti che la scheda logica sia posizionata correttamente mentre la avviti.

Conclusione

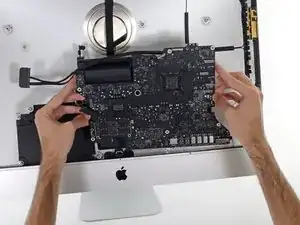
Confronta la tua parte di ricambio con quella originale: potrebbe essere necessario il trasferimento di alcuni componenti o la rimozione di protezioni adesive dalla parte nuova prima di installarla.

Per rimontare il dispositivo, segui queste istruzioni in ordine inverso.

Porta i tuoi rifiuti elettronici a un riciclatore certificato R2 o e-Stewards.

La riparazione non è andata come previsto? Prova delle soluzioni ai problemi di base o rivolgiti alla nostra comunità Risposte per trovare aiuto.

Sam Omiotek

Membro da: 25/02/19

71915 Reputazione

6 commenti

Are these really pictures of a 2020? I don’t think Apple ever sold any of the 2020 units with a rotational hard drive.

James Muir -

Correct, this is not a 2020 27-Inch iMac.

enoxseven -

I tested the procedure and found that these iMacs were similar enough that reshooting photos was not necessary. As noted in the introduction, some photos in this guide are from a different model and may contain slight visual discrepancies, but they won't affect the guide procedure.

Sam Omiotek -

Hi all,

Because my iMac A2115 with 512GB SSD has a broken logic board, I am searching for the schematics to be able to see which component needs to be replaced on the logic board.

Hopefully someone here can help me out! :-)

Best regards,

Flo

Flo -

Is this the same procedure for replacing the logic board on a Mid-2017 iMac? That page doesn't have a repair guide for logic board replacement.

Steve Remich -

Hi!

Thanks for the post.

Is memory slot only can be replaced? Or do I have to replace the whole logic board?
I own iMac 27-inch 5K Retina 2014. What's the latest logic board I can use, so that I can update the OS to the latest possible?

a a -