Introduzione

Questa guida di riparazione è stata redatta dallo staff di iFixit ma non è stata approvata da Google. Leggi di più sulle nostre guide qui.

Segui questa guida per sostituire lo schermo del tuo Google Pixel 4a 5G.

  1. BjHu3IQZrLUOOOfX
    BjHu3IQZrLUOOOfX
    whCVBCH5sAn2AjWX
    2jAVOXWTQEtatJHY
    • Dovrai far leva sullo schermo per rimuoverlo dal telefono. Leggi le seguenti note attentamente prima di procedere.

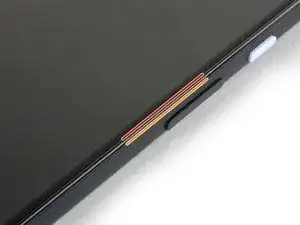
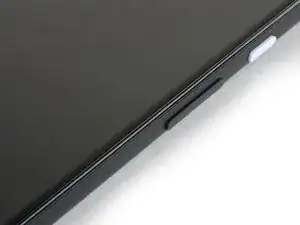
    • Nota sulle due giunzioni lungo i bordi del telefono:

    • Giunzione dello schermo: Questa fessura separa lo schermo dal resto del telefono. Qui è dove dovrai fare leva.

    • Giunzione del telaio: Questa è la fessura dove il telaio incontra la scocca. è fissata con delle viti. Non fare leva in questa fessura.

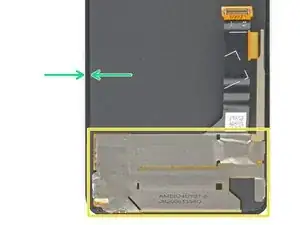
    • Nota sulle zone dello schermo:

    • Zona del cavo a a nastro dello schermo: In questa area non infilare il plettro più a fondo di quanto scritto o rischi di danneggiare il cavo.

    • Zona dell'adesivo perimetrale: Far leva oltre questo stretto perimetro senza angolare il plettro danneggerà il pannello OLED.

  2. 1shUoWThMUmcKsOP
    • Appoggia un iOpener scaldato sul bordo destro dello schermo per un minuto per ammorbidire l'adesivo.

    • Puoi usare anche un asciugacapelli, una pistola termica o una piastra scaldante, ma stai attento a non surriscaldare il telefono: lo schermo e la batteria sono facilmente danneggiabili dal calore eccessivo.

  3. 22sNsmCMdWrQj2dT
    22sNsmCMdWrQj2dT
    bGfHPsVOSiS6AIx2
    adhLllJ3twF4oWNB
    • Se il vetro dello schermo è rotto, coprirlo con uno strato di nastro adesivo da pacchi trasparente può aiutare la ventosa a fare presa. In alternativa puoi usare del nastro molto resistente al posto della ventosa. Se hai ancora problemi, puoi usare della super colla (cianoacrilica) per incollare la ventosa al vetro.

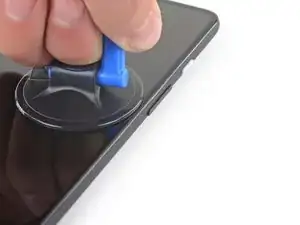
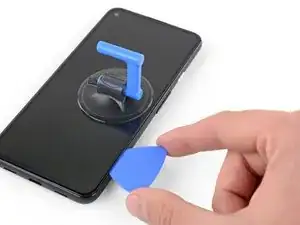
    • Fai aderire una ventosa al vetro il più vicino possibile al bordo destro dello schermo.

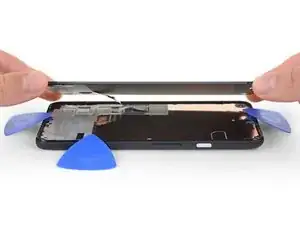
    • Tira verso l'alto la ventosa con forza costante.

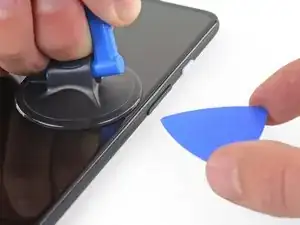
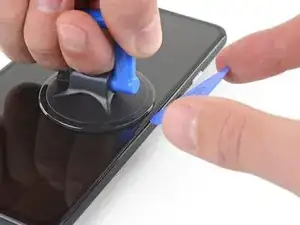
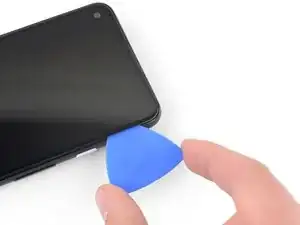
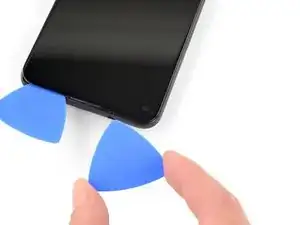
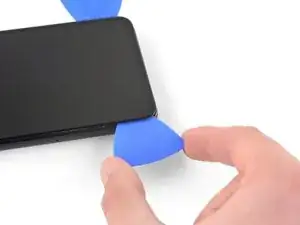
    • Infila la punta di un plettro nella giunzione dello schermo per al massimo 1 mm.

    When "lifting" the suction cup, press down while pivoting the handle away from the front/edge, as if opening a door.

    Soon-Hee -

    For a very cracked screen, I placed clear packing tape on top of the screen to use the suction cup at all. Also had to suction cup and pry/pick at multiple sides of the screen. Small fragments of broken glass won't pry up, so had to use tweezers to pull at glass fragments to release them from the adhesive underneath.

    Soon-Hee -

  4. EKWSEDUtR4UMD4kh
    EKWSEDUtR4UMD4kh
    Fn1sUW1B2NmQPv11
    sNcqGLdHL1lNTpbI
    • Questo passo ti mostra come infilare il plettro in modo da non danneggiare il pannello OLED. Devi farlo prima di tagliare l'adesivo.

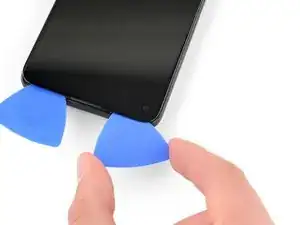
    • Con il plettro infilato per 1 mm nella fessura, ruota il plettro verso l'alto fino ad un angolo elevato.

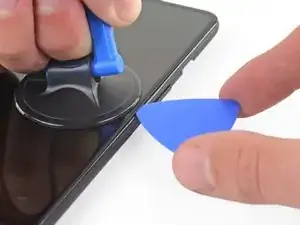
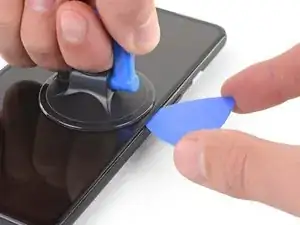
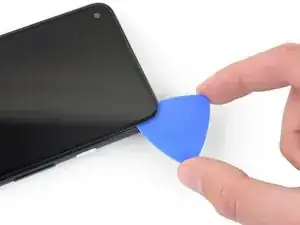
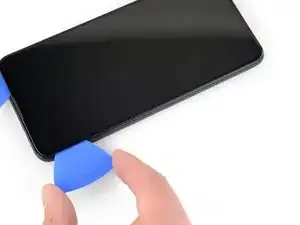
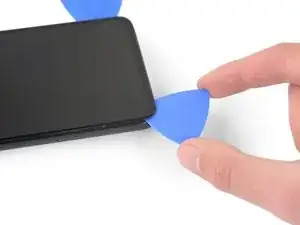
    • Tenendo il plettro a questo angolo elevato, spingilo attentamente nella fessura per circa 6 mm. Il plettro dovrebbe infilarsi sotto il pannello OLED.

    • Fermati se senti la punta del plettro contro una sporgenza. La punta potrebbe star premendo sul bordo del pannello OLED. Aumenta l'angolo del plettro e riprova.

    You don't exactly have to be utterly careful about damaging the panel. The glass+OLED screen as a whole is being replaced here. So it doesn't really matter if you accidentally damage the old OLED panel.

    Soon-Hee -

    If only the battery needs to be replaced, be sure to pay attention to the angle at which the pick is moved. Even the slightest deviation and the display is crap. I followed the instructions, but obviously I got to the display somewhere. Unfortunately the display now remains black and I have a flashing green bar at the top. So be careful.

    RiKER “MANiAC -NI-” -

  5. QWiugoSfJ62HsgtF
    QWiugoSfJ62HsgtF
    IDLicOJLOMeF4SGR
    qqjwfukS22qIkiPE
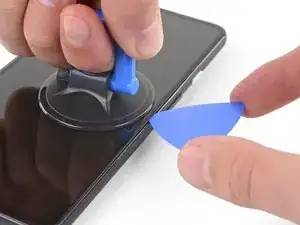
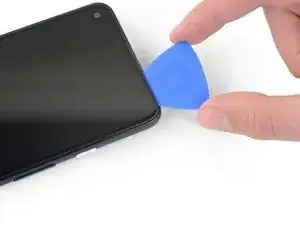
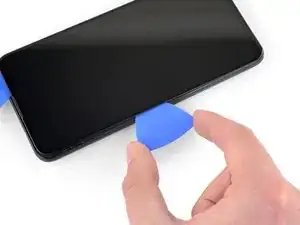
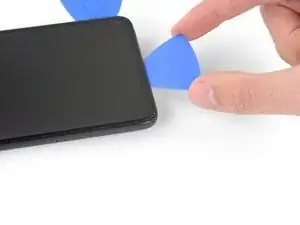
    • Fai scorrere il plettro sotto il bordo destro dello schermo per tagliare l'adesivo.

    • Non infilare il plettro per più di 6 mm o potresti danneggiare il cavo a nastro dello schermo.

    • Lascia il plettro sotto l'angolo in basso a destra per evitare che l'adesivo si reincolli.

  6. kc43OPZSOSOINTxD
    kc43OPZSOSOINTxD
    NQGH5UQSENiB6xJl
    KCRVSKDPmdIuAeAD
    • C'è una griglia che copre la capsula auricolare sotto il bordo superiore dello schermo. Se non hai una griglia di ricambio, stai attento a non danneggiarla o perderla.

    • L'adesivo dello schermo è abbastanza debole, quindi non dovresti riscaldare lo schermo. Comunque, se incontri una certa resistenza, scalda la zona interessata per un minuto e riprova.

    • Infila un altro plettro, tenendolo angolato, sotto il bordo superiore, dove hai già creato una fessura per evitare di danneggiare il pannello OLED.

    • Fai scorrere il plettro attorno all'angolo in alto a destra e sotto il bordo superiore per tagliare l'adesivo.

    • Lascia il plettro infilato sotto il bordo superiore per evitare che l'adesivo si reincolli.

    The replacement screen I purchased from iFixit Oceania in Sept 2022 included a new speaker mesh, already attached to the screen.

    Chris -

    The corners seems particularly tricky with the adhesive. Make sure to reapply heat in the corners. I cracked my screen while detaching the corners.

    Patrick Nantel -

  7. yRFEhejVGu2mS5YM
    yRFEhejVGu2mS5YM
    LyPSEqvXePhN1S1X
    l2NREA1KkHMXfF24
    • Infila un altro plettro, tenendolo angolato, sotto il bordo superiore, dove hai già creato una fessura per evitare di danneggiare il pannello OLED.

    • Fai scorrere il plettro attorno all'angolo in alto a sinistra dove c'è il foro per la camera frontale.

    • Se l'adesivo è troppo resistente, scalda la zona interessata per un minuto e riprova.

    • Lascia il plettro infilato sotto il bordo sinistro dello schermo per evitare che l'adesivo si reincolli.

  8. pDikbRxBHG5uQeSP
    pDikbRxBHG5uQeSP
    6MwZMZRBrFJivhZO
    T4qM4wocYcLLfWYD
    • Fai scorrere il plettro sotto il bordo sinistro dello schermo per tagliare l'adesivo.

    • Se l'adesivo è troppo resistente, scalda la zona interessata per un minuto e riprova.

    • Tieni a mente che ora stai tagliando l'adesivo vicino al cavo a nastro dello schermo e del digitizer.

  9. rBRGU4Pt26RKVkyF
    rBRGU4Pt26RKVkyF
    XxsCXeWkHfbPsNGn
    SeXRscJBBBGL4Bvk
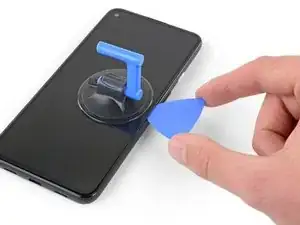
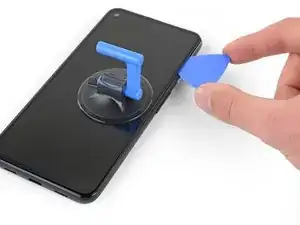
    • Fai scorrere il plettro attorno all'angolo in basso a sinistra e sotto il bordo inferiore dello schermo per tagliare l'adesivo restante.

    • Se l'adesivo è troppo resistente, scalda la zona interessata per un minuto e riprova.

    • Tieni a mente che ora stai tagliando l'adesivo vicino al cavo a nastro dello schermo e del digitizer.

  10. 6fD2WJPFoOK4akuO
    6fD2WJPFoOK4akuO
    tcSavu6p6KTwYkYv
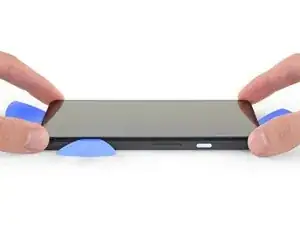
    • Dopo aver tagliato l'adesivo lungo il perimetro dello schermo, solleva leggermente il bordo destro dello schermo, aprendo parzialmente il telefono come un libro.

    • Non rimuovere ancora lo schermo.

    • Usa un plettro per tagliare l'adesivo rimasto, se necessario.

  11. aOUSRLAvkpRuPCkg
    aOUSRLAvkpRuPCkg
    4mkUQNpF1jiFBN2D
    tROQPeoMEqE2UVTu
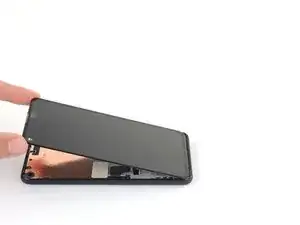
    • Solleva lo schermo dal bordo superiore e ruotalo attorno al bordo inferiore finché non riesci ad appoggiarlo con il vetro rivolto verso il basso.

    • Stai attento a non tirare troppo i cavi a nastro ancora collegati.

  12. 2LZI2wXoNHhEOebu
    2LZI2wXoNHhEOebu
    NO5L6wkKncYYGiSU
    UwcqyVs6gG1putuL
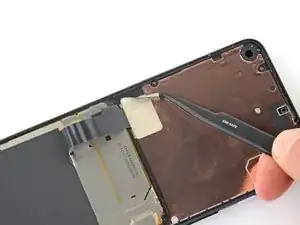
    • Usa le unghie o un paio di pinzette per rimuovere attentamente il nastro adesivo che copre il connettore dello schermo.

    • Se è in buone condizioni, puoi riusare questo nastro durante il rimontaggio. Altrimenti usa del nastro Kapton.

    The replacement screen I purchased from iFixit Oceania in Sept 2022 included a new piece of tape.

    Chris -

  13. KyEBG1F6liiXaYU2
    KyEBG1F6liiXaYU2
    MMC1UB5BKiEs4Y6L
    MSOrjLPXIuxOPqmU
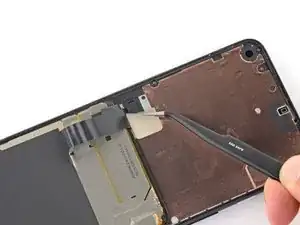
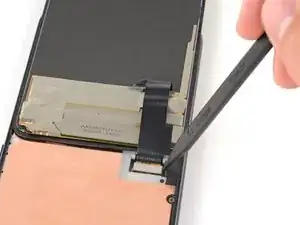
    • Infila la punta di uno spudger nell'apertura della copertura in plastica che tiene fermo il cavo a nastro dello schermo.

    • Fai leva sulla copertura in plastica per sollevarla finché non si sgancia.

    • La copertura in plastica potrebbe volare via.

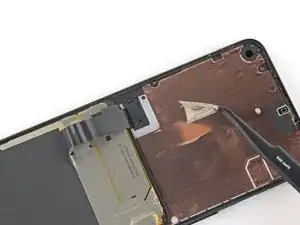
    • Rimuovi la copertura in plastica.

  14. 2DYGeYNekFXLSXaS
    2DYGeYNekFXLSXaS
    wDhTCYcdJViRdGb3
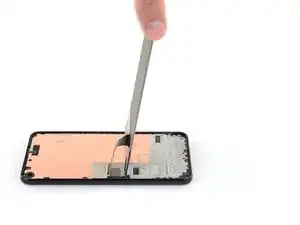
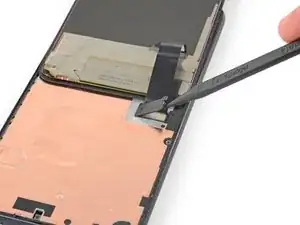
    • Usa la punta di uno spudger per fare leva e scollegare il connettore del cavo a nastro dello schermo.
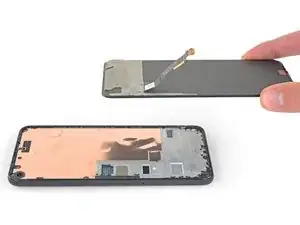
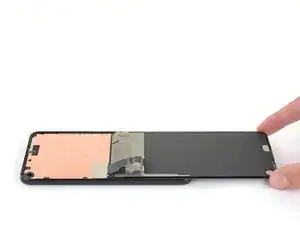
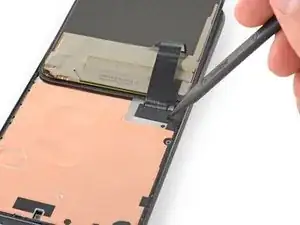
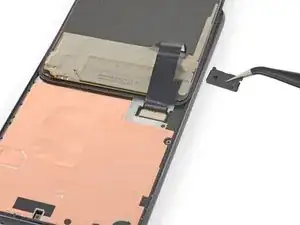
    • Per ricollegare i connettori a pressione come questo, allinealo attentamente e premilo su un lato finché non scatta in posizione, quindi ripeti la procedura per l'altro lato. Non premerlo nel centro. Se il connettore non è allineato correttamente i contatti si possono piegare, causando un danno irreparabile.

  15. DWFEe15Sga1wOdE1
    DWFEe15Sga1wOdE1
    tvMRDtG5fBofNPYN
    4PGalXujTnMKhxhI
    • Rimuovi lo schermo.

    • Per installare un nuovo schermo:

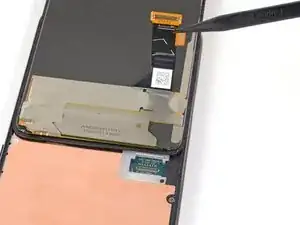
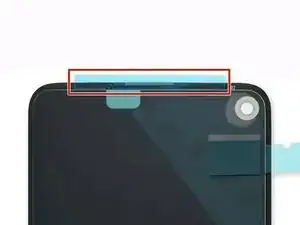
    • Verifica se il tuo nuovo schermo di ricambio ha già installata la griglia del diffusore e l'adesivo sul bordo superiore.

    • In tal caso, non avrai bisogno dell'adesivo sul bordo superiore.

    • Se non ce l'ha, rimuovi il liner trasparente più grande dall'adesivo sul bordo superiore e applicalo al display (non alla cornice). Assicurati che il taglio più grande combaci con la griglia del diffusore.

    • Segui questa guida se stai usando delle strisce adesive tagliate su misura.

    • Utilizza la terza foto come riferimento per posizionare i tuoi adesivi.

    • Durante la procedura di avvio dopo il rimontaggio, lo schermo attraverserà una fase di calibratura. Non toccare lo schermo durante questa fase, in quanto potrebbe causare una calibrazione errata del touch e generare problemi.

    There are four adhesives provided in the current kit provided by ifixit. They have a blue and clear backing with a thin black strip, as shown on here. The adhesives instructions provided in this general guide are not very clear and I messed up my first one, which made the other three useless leading me to just buy a b-7000 adhesive instead. However, for anyone wanting to correctly use the ifixit adhesives, first line up the black strip on the edge of your phone where the screen will rest and peel off the first clear portion. Then peel off the blue portion and you will be left with a thin black adhesive strip. Do this for all four pieces in the configuration shown on the page linked above and then place your screen on, press down gently, then turn the phone screen down and place some books on to provide stronger contact between the adhesive and the new screen. Good luck!

    Graduate Agriculture -

    thanks a lot!

    Zurdits -

Conclusione

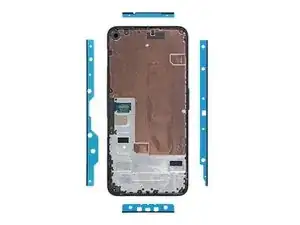
Confronta la tua parte di ricambio con quella originale: potrebbe essere necessario il trasferimento di alcuni componenti o la rimozione di protezioni adesive dalla nuova parte prima di installarla.

Per rimontare il dispositivo, segui le istruzioni in ordine inverso.

Porta i tuoi rifiuti elettronici a un riciclatore certificato R2 o e-Stewards.

La riparazione non è andata come previsto? Prova delle soluzioni di base ai problemi, oppure rivolgiti alla nostra comunità Risposte per trovare aiuto.

Sam Omiotek

Membro da: 25/02/19

71885 Reputazione

28 commenti

Where is the best place to purchase a replacement screen?

SoYouWantMoore -

I was just wondering the same thing and it seems everywhere is sold out, only place I can find it is on eBay…

Brandon Baggett -

This was an excellent tutorial. One thing I would add here that caught me in reassembly: the proximity sensor is built into the inner lip on the top of the screen about 3mm to the right of the speaker grill (if you shine a bright light in that location, you will see a little blue dot where this is locate through the screen). If you are putting new adhesive on make sure not to block this proximity sensor with the adhesive.

BvZ -

Great tutorial. I just used the new original google pixel parts and this guide worked great! Only thing i wish was that there was a bit more clarity on how to apply the adhesives

Quan Dao -

Same! I needed to order another set of adhesive because at first time I ruined. Specifically that part where speaker goes. We need to attach it on screen. and all other on Phone case itself.

Also noticed that after some time, screen bends and we see gaps. I need to press time to time so it stick again. Not sure why this is so.

Justas Markauskas -

Took me some time to realize the adhesives should be applied to the screen, not the body -- the shape of the earphone side didn't line up on the body.

To Justas' comment, I also noticed that the adhesives tutorial says to hold firmly for 20-30 seconds. (Tip: turn phone over onto flat surface and press on the back for more even pressure than trying to do that from the front.)

I've seen other tutorials that require long holds and 24 hour set time for this type of adhesive. I have also used a silicone pipe sealer tape that adheres to itself, not the pipe, and after a month (when I did the real repair) I could not unwrap the adhesive, and it adhered well to the uneven pipe surface anyway. So I think these types of silicone based adhesives have a certain flow rate to them, and they require pressure and time for them to adhere properly. This is different from regular old tape and other more antiquated adhesives.

Kiki -

This guide is let down by next to no steps on applying the adhesive. Expected better, you give everything and then go missing on the last steps!?

Shane Crawford -

No adhesive steps. Too bad!

cbdude -

Very sad to see what appears to be 2/3rds of a guide on how to replace a screen

Seb H Miller -

al in all 8/10 guide- the process was pretty simple and along with a few youtube videos to clarify a few points, I found the repair to be pretty smooth. The only thing I would have liked to see was instyructions on the double sided tape provided with the kit but I understand how varied these might be depending on the vendor. THANK YOU IFIXIT! You've allowed me a few more years with a device that is otherwise perfect and have prevented unecessary waste and purchase of a new device. I will definitely recommend and use your service again

Seb H Miller -

Update: The adhesive strips do not cut it and the screen keeps lifting. Also the multitouch does not work on the screen- still unsure if this is a hardware or software issue. Anyone getting the full kit from ifixit would do well to also get some B-7000 to re-glue the screen as the provided adhesive strips are not enough. I would recommend supplying a small tube of this stuff instead of these custom adhesive strips.

Seb H Miller -

Great guide and really helped me to install the genuine replacement part I bought from iFixit!

My recommendation would be to line the holes on the adhesive strips up with screws and indents on the device.

Also when you're reconnecting the screen flex cable, you need to use some force - don't be too scared like I was for a while :)

Jordan Keightley -

Got my replacement screen and tools today. Getting the screen off was the easy part since it was already broken. Getting it attached was a bit of a struggle but the trick is to connect the ribbon cable then insert the plastic part. Make sure to reboot when you do.

Jesse Earl -

This guide told me the tidbits I needed to know to do this successfully. I purchased the replacement screen and tool kit for this (mostly for the "iOpener" heat tool) and it worked like a champ. I did have one small issue with the pre-cut adhesive that came with the screen: the piece for the top of the screen was "mirrored" so I had to do a bit of fiddling to cut it into a couple smaller pieces and apply it that way to avoid blocking the proximity sensor. But if you're doing a repair like this odds are this isn't going to be a big deal for you if yours comes this way too.

Brian Trump -

I noticed this too, until I suddenly realized that it works perfectly if applied to the screen and not the body of the phone -- then it is aligned perfectly. The adhesive was quite confusing as the blue template was meaningless.

Kiki -

This guide was written for removing an intact screen. If your screen is shattered there are extra steps to take. A piece of packing tape on the screen will help the suction cup work over cracks as well as help to contain the many tiny glass fragments. If it's the right side that has the most cracks then start on the left side. If your screen was badly shattered you will have to spend some time removing all the tiny pieces that remain around the edge of the phone. Avoid getting the shards into the body of the phone. I temporarily covered the larger openings with small pieces of packing tape. The packing tape is also useful for collecting all the tiny shards from the surface of your work area.

Chris -

Even if your screen is in one piece, you'll still need to remove the glue remnants from the rim of the phone so that the new screen has a perfectly flat surface to be installed onto. A bit of isopropyl alcohol will aid in loosening the glue and preparing a clean surface for the new adhesive. A piece of tape over the rear cameras housing will help protect it from being scratched by any glass fragments on your work surface as you move the phone around cleaning up the old glue.

If your screen shattered from a drop, there will inevitably be some damage to the plastic frame. Ensure that any deformation is addressed, perhaps with a razor blade, so the new screen can sit flat.

Chris -

I didn't understand how the pre-cut adhesive strips worked until I used them. It's only the black goo that is the adhesive. Once you peel off the clear side, place the strip and then peel off the coloured side, all that's left is the black goo, hopefully exactly where it needs to be. Mine could be carefully re-aligned with tweezers as necessary before setting the screen into place.

I bought a tube of glue as a previous commenter recommended, so I can repair again if the screen lifts but I have faith in the adhesive supplied on the pre-cut strips, since the surfaces were clean and flat.

Chris -

Thank you for the explanations on the adhesive strips, they helped more than the actual guide above. One thing to mention would be order of operations: it's easier to clean the sides and apply the adhesive strips BEFORE plugging in the screen and having to fiddle around with the ribbon cable. The adhesive has cutouts and you see how they match with the screws in the board. Top adhesive is already applied to the screen so you have a backup piece in case something goes wrong. Also, when lowering the screen in place over the adhesive make sure to align the bottom first otherwise you'll get an uneven set with the top part having like a small gap and forcing you to lift it again and screwing the adhesive bands. Overall I would recommend getting the B-7000 or T-7000 glue that another poster mentioned, seems like a more easy installation. The corners are also better covered with liquid glue, since the strips don't actually go there.

Adrian -

Used this guide to replace a shattered screen using the iFixit kit. Heating the adhesive thoroughly was important, especially when having to reinsert the picks because the pick wasn't able to slide smoothly across the cracks. As others have said, the instructions about where to apply the adhesives wasn't super clear, but the success of the assembly doesn't seem to have been too dependent on precise placement as long as they were in the rails.

Brian Erly -

how important is the plastic cover in step 13?

yeah it went flying, she gone

sell replacements?

lukey -

After placing the screen back on the phone if you notice it is not aligned perfectly just heat up the glue with the iOpener and move the screen into place, this worked for me.

Harry -

I agree with the adhesives comments! However, it seems like the two long strips are interchangeable.

My new screen actually came with the top adhesive already in place. The blue protective plastic peeled away with the bubble wrap when I opened it. Apart from the strip coming off sooner than I wanted, it was actually very helpful to have the adhesive in place already. Especially since the bottom adhesive strip had rubbed against the package for the alcohol swab during shipping and was stuck firmly to the paper packaging. I was able to salvage some of it and then apply the extra strip from the top onto the bottom.

The ribbon cable was really tricky to re-attach. That took longer than any other step.

Prying the old screen off was made easier by inserting the pick underneath where the glass had already broken. If you are replacing the screen (and not just opening the phone for other repairs) there's not much point in worrying about damaging the edge of the OLED since you are replacing that too!

Lead Sheep -

"To reassemble your device, follow the above steps in reverse order."

So you want me to remove the screen, disconnect the display, flip the screen over, slice through the display adhesive, insert an opening pick, and then heat the edges. Got it. Should go perfectly.

Please update with specific instructions on reassembly.

Matt -

Tutorial is incomplete, only talks about disassembly. It needs to cover the assembly and the adhesive or glue part of the screen which is the hardest part of the job...

Adrian -

So grateful for the parts and excellent tutorials! This is my second replacement. I certainly couldn't afford a whole new phone each time.

Kiki -

After changing the screen, the touch screen is not working. The display works properly but no touch is detected. with a USB mouse I made a factory reset and still no luck. I cant test with the older screen since its torn to pieces and the phone wont boot with the old screen connected. Any suggestions?

Zurdits -

Tutorial parfait, merci !

Oui il faudrait un peu plus d'infos sur le collage des adhésifs.

Guy Om -