Introduzione

Questa guida è stata redatta dallo staff di iFixit e non è stata approvata da Google. Scopri di più sulle nostre guida di riparazione qui.

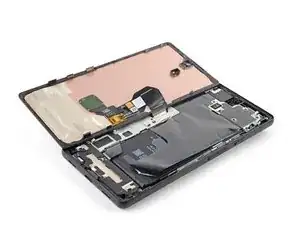
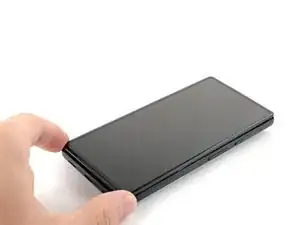
Segui questa guida per sostituire lo schermo del tuo Google Pixel 6a.

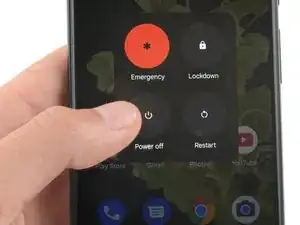
Per la tua incolumità, scarica la batteria al di sotto del 25% prima di smontare il telefono.

Questo riduce il rischio di incendio se la batteria viene danneggiata accidentalmente. Se la tua batteria è gonfia,

prendi le dovute precauzioni.

Il tuo nuovo schermo dovrebbe avere già un lettore di impronte integrato. Se così non fosse, dovrai reinstallare il lettore di impronte originale nel nuovo pezzo sostitutivo e ricalibrarlo per mantenere le sue funzionalità intatte.

Avrai bisogno di adesivo sostitutivo per completare la guida.

  1. 1ktaJWZciivZZEBB
    1ktaJWZciivZZEBB
    ZGrRFiNn42nPecSX
    • Lascia che la batteria si scarichi al di sotto del 25% prima di iniziare questa riparazione. Una batteria carica può incendiarsi se danneggiata.

    • Spegni completamente il telefono e scollega tutti i cavi.

  2. Ddj6QlmyySZgoW6a
    Ddj6QlmyySZgoW6a
    hUPVuKPNoCOJIqv2
    UhmIq1ec1LqlbRRu
    • Prima di iniziare la riparazione, prendi nota di quanto segue:

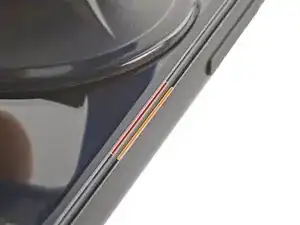
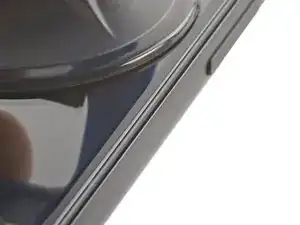
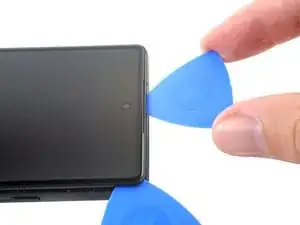
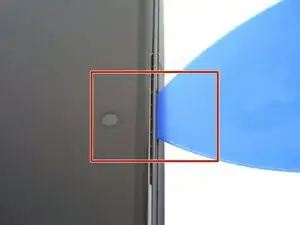
    • Fessura dello schermo: questa fessura separa lo schermo dal resto del telefono. Non fare leva su questa giuntura.

    • Fessura della cornice: è qui che la cornice in plastica progettata per proteggere lo schermo incontra il telaio. È tenuto in posizione da clip di plastica. È qui che dovresti fare leva.

  3. B4XmlLPKYSnV1PtM
    B4XmlLPKYSnV1PtM
    S4TQyeCDn3EskMeA
    OkUlPCHPR5ZCuiZ3
    • I prossimi tre passaggi dimostrano l'Anti-Clamp, uno strumento che abbiamo progettato per facilitare la procedura di apertura. Se non stai usando l'Anti-Clamp, salta tre passaggi per un metodo alternativo.

    • Per istruzioni complete su come utilizzare l'Anti-Clamp, consulta questa guida.

    • Se lo schermo è rotto, coprilo con uno strato di nastro adesivo trasparente per aiutare la ventosa ad aderire.

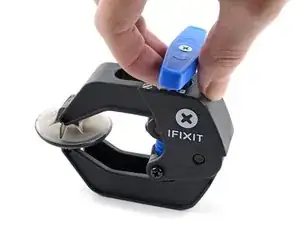
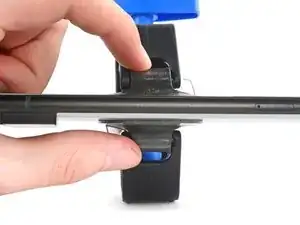
    • Tira indietro la maniglia blu per sbloccare i bracci dell'Anti-Clamp.

    • Fai scorrere braccia sul bordo destro del telefono.

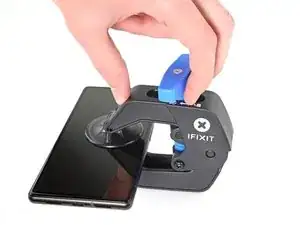
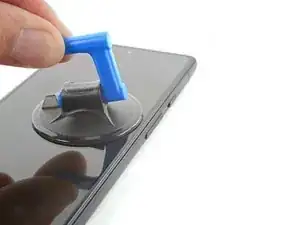
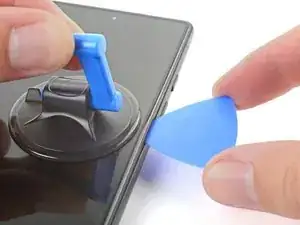
    • Posiziona le ventose vicino al centro del bordo destro del telefono, una nella parte anteriore e una nella parte posteriore.

    • Premi le ventose insieme per fargli fare presa.

    • Se ritieni che la superficie del tuo telefono sia troppo scivolosa perché l'Anti-Clamp possa fissarsi, puoi utilizzare del nastro adesivo per creare una superficie più aderente.

  4. avKhQOBuYNinwNTv
    avKhQOBuYNinwNTv
    OBC6ev4OGvLn5k3k
    dDP2GHbKtZABXswZ
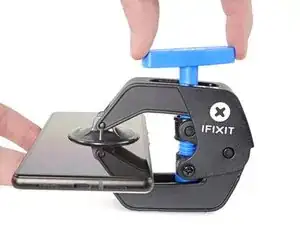
    • Tira in avanti la maniglia blu per bloccare i bracci.

    • Ruota la maniglia in senso orario di 360 gradi o fino a quando le ventose iniziano ad allungarsi.

    • Assicurati che le ventose rimangano allineate l'una con l'altra. Se iniziano a scivolare fuori allineamento, allenta leggermente le ventose e riallinea i bracci.

  5. ZOEgPTBuGCxVuDoi
    ZOEgPTBuGCxVuDoi
    XfTtNr3mYArPBsxZ
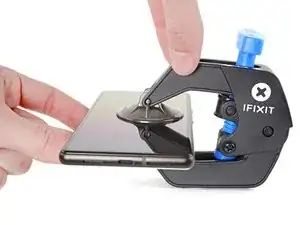
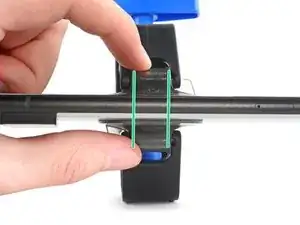
    • Riscalda un iOpenere fallo passare attraverso i bracci dell'Anti-Clamp in modo che aderisca al bordo destro del telefono.

    • Puoi anche usare un asciugacapelli, una pistola termica, ma il calore estremo può danneggiare il display e/o la batteria interna, quindi procedi con cautela.

    • Attendi un minuto per dare all'adesivo la possibilità di staccarsi e presentare uno spazio di apertura.

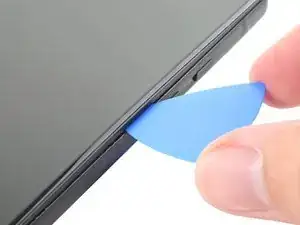
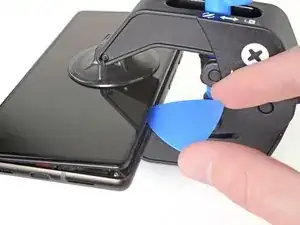
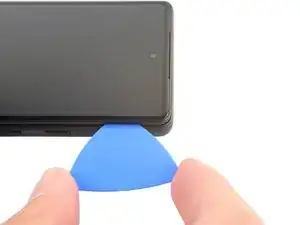
    • Inserisci un plettro di apertura sotto la cornice dello schermo quando l'Anti-Clamp crea uno spazio sufficientemente ampio.

    • Se l'Anti-Clamp non crea uno spazio sufficiente, applica più calore all'area e ruota la maniglia di mezzo giro in senso orario.

    • Non girare più di mezzo giro alla volta e attendi un minuto tra i giri. Lascia che l'Anti-Clamp e il tempo facciano il lavoro per te.

    • Salta i due passaggi successivi.

  6. XBVUE1Uv6VUMgXwN
    • Scalda un iOpener e appoggialo sul bordo destro dello schermo per due minuti.

    • Puoi usare anche un asciugacapelli, una pistola termica o una piastra calda, ma fai attenzione a non surriscaldare il telefono: lo schermo e la batteria interna sono entrambi suscettibili ai danni da calore.

    What's a good temperature to set to hotplate to for a repair like this?

    David -

    I used a hair dryer to heat up the adhesive. Unfortunatly the IOpener did not work for me. Even with the hair dryer, it was quiet difficult to soften the adhesive. It might have been due to the phone beeing only a few months old.

    It was quiet difficult to seperate the screen, but it eventuelly worked. I feel like it took the heat a while to move through the cover and heat up all of the adhesive. After almost giving up, I tried again after a few minutes without heating it again and it suddenly worked. So keep that in mind.

    LetsTryThisNext -

    Agree with LetsTryThisNext's comment -- it takes a while for the adhesive to loosen. Expect to be at it for 20, 30 minutes -- with the iOpener not working (for me either), re-microwaving the iOpener, then hair dryer, then suction cup not sticking, etc. Good idea to give it a few minutes between each heating attempt.

    Steve -

    The iOpener worked for me - once I got the expectation right that it was going to take a while.
    Went through about 5-6 cycles of:
    * Heating for 40 seconds (1100W microwave); applying to phone for 2 minutes; heating for 30 seconds; applying to phone for 2 minutes; allow to cool for 10 minutes

    Could probably have done with one more cycle to get glue even more sticky TBH but when it lifted it was obvious.

    Karl Laird -

    Took me 3 heat cycles with the iOpener. Basically I did 30 seconds in 1000W microwave and left to heat adhesive for 5 mins, then after stuggling to get the pick in for a few minutes, I did 10 seconds microwave then a couple of mins warming adhesive and a couple of mins failing to get the pick in. Then on 3rd attempt after anothe 10mseconds in the microwave, i got in easily. Seems like the adhesive really takes a while to melt. I also improved my technique with the suction cup which seemed to help lift the screen. Once you are in it is easy to release the remaining clips.

    Mark -

    Hair dryer on high for about 10 seconds did the trick. Had to blowdry it about 3 times. iOpener did not get hot enough

    Leon -

    iOpener did not work for me as well. The hairdryer approach, as Leon mentioned, worked for me, too. I used the Jimmy tool to get access for the picks.

    Alex -

    I started with a single edge razor blade and made 1-2 inch cuts to the bezel seam, then applied the opener with a hair dryer on low about 6 inches away. After no more than 2-3 minutes I applied the suction cup, and used a combination of the straight edge razor and picks to open the screen. It was very easy.

    SteveDK -

  7. XDaaq12ecnEIq4yD
    XDaaq12ecnEIq4yD
    alGoFZ4wLLdAvZAw
    BRy5TKDEcKNO3UDD
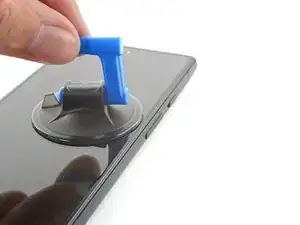
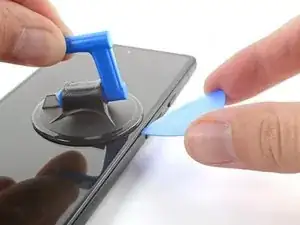
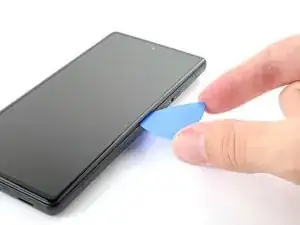
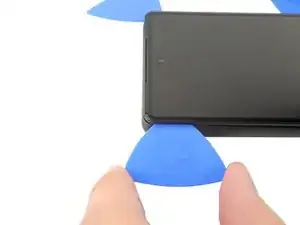
    • Applica una ventosa sullo schermo, il più vicino possibile al centro del bordo destro.

    • Tira la ventosa con una forza forte e costante per creare uno spazio tra la cornice e il telaio.

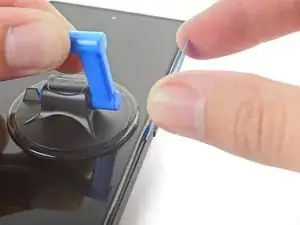
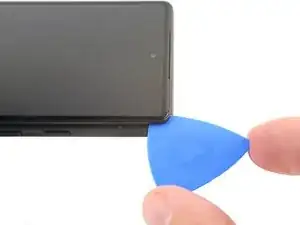
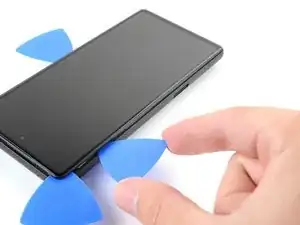
    • Inserisci un plettro di apertura nella fessura.

    • A seconda dell'età del tuo telefono, questo potrebbe essere difficile. Se riscontri problemi, applica più calore sul bordo e riprova.

    • Se il display è gravemente incrinato, coprirlo con uno strato di nastro adesivo trasparente può consentire alla ventosa di aderire. In alternativa, al posto della ventosa è possibile utilizzare un nastro molto resistente. Se tutto il resto fallisce, puoi incollare la ventosa allo schermo rotto con la supercolla.

    Would be helpful to have alternative solutions offered here for those with shattered screens, since suction cups don't work.

    Paul York -

    Hi Paul.

    Thank you for your comment! I have updated the step to provide an alternative solution for shattered screens.

    Alex Diaz-Kokaisl -

    Would just like to note that in my particular case even tape or super glue did not work, due to the screen being shattered right along the spot where you need to place the suction cup. I ended up resorting to inserting a razor blade into the seam to open it just enough to insert the pick.

    mkirwin -

    I'm in the same boat as mkirwin no amount of pulling with the suction cup worked, I had to use a razor blade to get the seam separated enough to insert a pick. Maybe I didn't heat up the adhesive enough but that stuff is super strong

    Tanner Davis -

    If your suction cup is not working properly: Heat it up a little bit and it will have a lot more suction.

    LetsTryThisNext -

    Ditto, needed to use a razor blade to get it started. Thank you mkirwin & Tanner D for posting that tip here.

    Steve -

    I'm having trouble pulling on the suction cup, keeping the phone down and inserting the pick all at the same time. The suction doesn't hold unless I use my other hand to keep the phone down, but then I can't use the pick. Is there a way Im supposed to keep the phone locked down?

    Jemay A Fassom -

    Would something like this suffice in lieu of a razor blade?

    I, too, cannot a gap with the suction cups.

    https://www.amazon.com/JerryRigEverythin...

    badlydrawnface -

    After hours of not getting any movement at all, I ended up putting a hot pack (like for a sore back) under the phone and the iOpener on top, on the right side, and that was enough to get through this step...

    Jessie -

    This is really misleading, the iOpener doesn't work very well to heat it up, I've spent hours on this, and the tabs are definitely not enough to get it started on their own.

    Stuck -

    Same as the above comments, got nowhere with the opener + pick, had to jam a razor blade in first, and then used picks.

    Lee -

  8. aKADaMwDF1Su2ytM
    aKADaMwDF1Su2ytM
    ojCAATkuclM4RkHa
    CNQEOHFpaOTP5Nlf
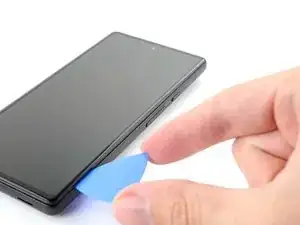
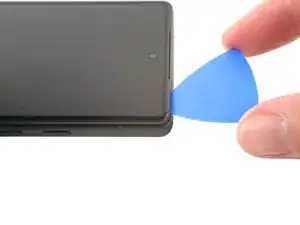
    • Mentre stai ancora facendo presa, ruota il plettro verso l'alto formando un angolo ripido.

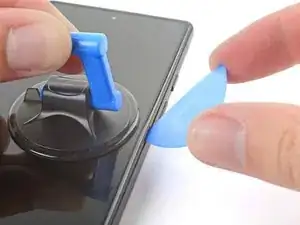
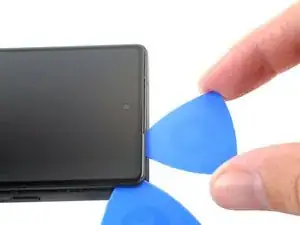
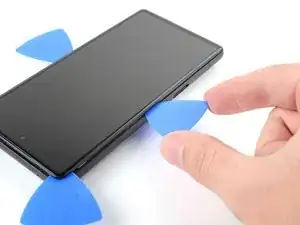
    • Spingi dentro il plettro con cautela mentre fai leva per riposizionare il plettro di apertura nella giuntura della cornice.

    • Inserisci il plettro solo di 3,5 mm per evitare di danneggiare le parti interne.

    Unfortunatly my plectrums I got with the pro tool kit bent way too easy to open up this first crack between screen and housing. But the reason might have been, that the adhesive was not soft enough yet

    LetsTryThisNext -

    I gave up with the suction cup. My screen was too cracked. Instead, after applying heat to loosen the glue, I used a very tiny flat head precision screwdriver to prise the screen open. Not recommended as it leaves a tiny scratch, but saves a lot of hassle. See also https://www.youtube.com/watch?v=vxdaaTd7....

    Robert Baker -

  9. fm3oG32vJ2EEBhuc
    fm3oG32vJ2EEBhuc
    gBarY33TTTBZCBZS
    T1RrWIEZYKqCKLue
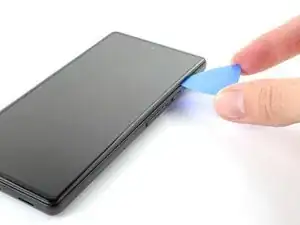
    • Fai scorrere il plettro lungo il bordo destro per rilasciare le clip di plastica che fissano la cornice al telaio.

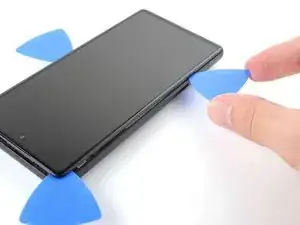
    • Posiziona il plettro sul bordo in alto a destra prima di passare al passaggio successivo.

  10. dfU45x4Vk5SuSwn1
    dfU45x4Vk5SuSwn1
    GEBiXPOdSYHlB2oP
    QbSiwkPDRt5wPR2F
    • Ruota il plettro di apertura intorno all'angolo in alto a destra del telefono per rilasciare le clip.

    • Lascia il plettro di apertura nell'angolo in alto a destra per evitare che le clip si blocchino nuovamente.

    • Inserisci il plettro solo per 4 mm per evitare di danneggiare le parti interne.

  11. MsjU6gcvUNhlBLuU
    MsjU6gcvUNhlBLuU
    LUT1jGbhZPrJ4FFO
    FL2DT6sQmAqd2TjO
    • Inserisci un nuovo plettro di apertura nello spazio appena creato.

    • Fai scorrere il plettro lungo il bordo superiore per rilasciare le clip.

    • Quando tagli l'adesivo attorno alla fotocamera anteriore, inserisci il plettro di solo 3 mm per evitare di danneggiare l'obiettivo.

  12. NkLX4XJsx4UEFs6e
    NkLX4XJsx4UEFs6e
    yHuNMCvi4SaACvqa
    odm622mGQ4Njy6KU
    • Ruota il plettro di apertura attorno all'angolo in alto a sinistra del telefono per rilasciare le clip.

    • Lascia il plettro di apertura nell'angolo in alto a sinistra per evitare che le clip si blocchino nuovamente.

    I found that using the side of the pick instead of the point made it easier to keep from over-inserting the pick and it provided more area to keep the glass separated from the frame. It was also easier to slide it around the edges this way. Still had to use the point to get under the frame initially.

    mark schneider -

  13. NLdAYs426UBCVRRt
    NLdAYs426UBCVRRt
    LKjkWexcYPlXuaoI
    rOTvEBRGLhXVPsqb
    • Inserisci un nuovo plettro di apertura nello spazio appena creato.

    • Fai scorrere il plettro lungo il bordo sinistro per rilasciare le clip.

    • Inserisci il plettro per solo 3 mm per evitare di danneggiare le parti interne.

    • Ripeti la procedura di rotazione e scorrimento per il bordo rimanente.

    • A questo punto, lo schermo dovrebbe essere separato dalla cornice. Se c'è ancora resistenza attorno ai bordi dello schermo, usa un plettro di apertura per rilasciare eventuali clip rimanenti.

  14. K4nbDrlDYXZWeYaD
    K4nbDrlDYXZWeYaD
    6thrOjZMdkmIPSey
    LNBsKTiIt5oiS4Td
    • Non provare ancora a rimuovere completamente lo schermo. È ancora collegato al telaio tramite un cavo flessibile.

    • Solleva il bordo destro dello schermo verso l'alto e verso il lato sinistro del dispositivo, come per aprire un libro.

    • Appoggia lo schermo capovolto e parallelo al telaio prima di continuare.

    • Non torcere lo schermo o allontanarlo troppo dal telaio per evitare di danneggiare il cavo flessibile.

  15. 4aDiGqShEoknkpOW
    4aDiGqShEoknkpOW
    OAULhXU5sTSSnHiC
    nUiacYiY3BDiH12K
    • La staffa del cavo del display è fissata con ganci metallici.

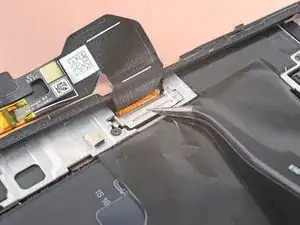
    • Usa delle pinzette per piegare il lato inferiore del coperchio verso l'alto, rilasciando la clip metallica

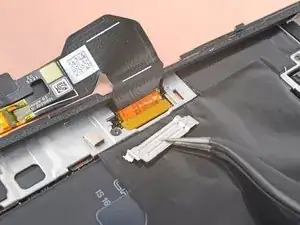
    • Rimuovi la staffa del cavo dello schermo.

    • Durante il riassemblaggio, inserisci per primo il lato superiore della staffa prima di premere sull'altro lato. La mancanza di questa precauzione potrebbe risultare in scintille e danni alla scheda logica.

    Does anyone know what happens if I lost the metal clip to secure the display cable?

    Emmanuel Medina Morales -

    Hi Emmanuel.

    Oh no! Unfortunately, this clip is pretty important for securing your screen's press connector, and we don't sell it separately. You should be fine as long as you don't drop your phone...but you may be able to tape it down with some masking tape as a rough fix. Another alternative would be to find a destroyed Pixel 6a and scavenge the clip.

    Alex Diaz-Kokaisl -

    I'm confused about the instructions and the pictures. The pictures imply that the clip should be bent, but the text may describe the method that I applied:

    I inserted tweezers at the left side of the clip (there where the springy part snaps under a metal tab). By carefully placing each 'tweeze' of the tweezer on both sides of the tab, it is possible to gently pushing the springy part to the right, and then it releases without having to deform that entire bracket.

    After re-reading the instructions, that may be what is implied, but if one were to look at only the pictures it could suggest something different.

    Hugo van Galen -

    Yes I did Hugo's method and it worked well. Using tweezers I directly pried the springy part from under the metal tab.

    Joe Rayner -

    Similar to above, struggled to pry this off based on the description+photos, needed to consult a separate video and a bit of trial and error to eventually release it.

    Lee -

    If you look right at the bottom end of the bracket there's a couple sets of holes right next to the screw. If you insert each end of the tweezers into those holes and tilt the tweezers the bracket pops right out.

    Danielle Cerisier -

  16. yeTt2M2MLgLnruM2
    yeTt2M2MLgLnruM2
    KJOLElfVnkARMy2c
    VbPvu4SwZAYmGtW2
    • Fai molta attenzione a eseguire questo passaggio, poiché rischi di danneggiare i minuscoli componenti attorno al connettore a pressione.

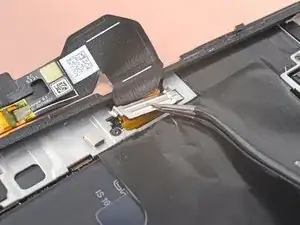
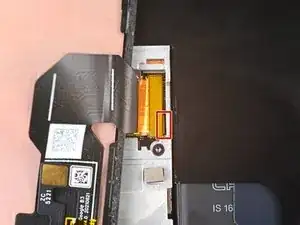
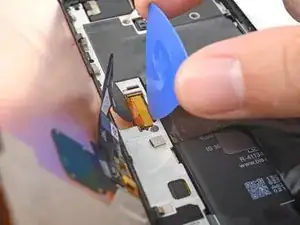
    • Inserisci la punta di un plettro sotto il bordo inferiore destro del connettore a pressione del cavo del display, vicino alla foro della vite.

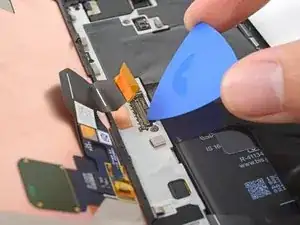
    • Solleva e scollega il connettore del cavo del display.
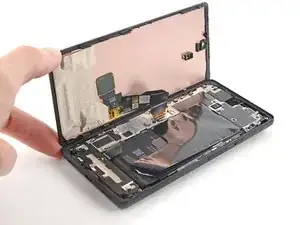
    • Per riattaccare i connettori a pressione come questo, allinea con cura e premi verso il basso su un lato finché non scatta in posizione, quindi ripeti sull'altro lato. Non premere verso il basso al centro. Se il connettore non è allineato, i pin possono piegarsi, causando danni permanenti.

    be incredibly careful when removing and installing the cable, the many tiny components along the edge and under the tab are incredibly fragile. This is one of, if not, the most important step.

    Jeffrey Leon -

    At this step I had some trouble to reattach the connector. When I pushed down one side the other would pop up again. I solved the issue by carefully pressing down both sides with the tweezers.

    LetsTryThisNext -

    silly me totally forgot to reattach "The display cable bracket is secured with metal clips." soooooo maybe tell silly people like me to do that at the end lol. phone will work, but i feel if i drop it the cable may disconnect.... oh well

    Aleksander Szadurski (Max209) -

    Don't put the ribbon back in until you have cleaned the old adhesive off and installed the new adhesive!

    Wesley Shippey -

    I'm struggling with the reattachment. I think I've got it and then when I try to test the screen I'm getting nothing. Even tried to attach my old cracked one and nothings happening.

    Does this mean I've damaged something?

    Jamie B -

    Obviously the most critical step.
    When reassembling 2 things helped me:
    1/ You can actually let the new screen rest on the phone at a 90+ degrees angle (thanks to the small plastic edges on the screen) , which leaves you both hand free

    2/ You can gently unfold the display cable to make it more flexible

    Paul Jacques -

    During reattachment, make sure you fully plug in the cable. I tested as indicated by turning on the screen and all seemed good. Closed down the screen and then realised it was not reacting to touch... Was very worried but reopening it, turns out I hadn't fully plugged in the screen connector. All good now

    Adrien C_v__l_es -

  17. HkIRbNrRqVJhQ45M
    HkIRbNrRqVJhQ45M
    KlF6VBcFsD4snGWQ
    • Rimuovi lo schermo.

    • Durante il riassemblaggio:

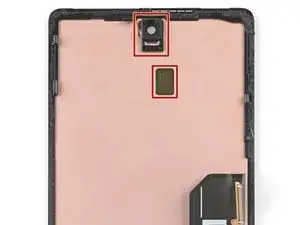
    • Se hai sostituito lo schermo, controlla il foro della fotocamera frontale e l'incavo del sensore sul tuo nuovo schermo, e rimuovi eventuali pellicole residue.

    • Questo è un buon momento per testare il tuo telefono prima di richiuderlo. Collega temporaneamente lo schermo, accendi il telefono e assicurati che funzioni come previsto. Prima di continuare con il rimontaggio, spegni il telefono e scollega lo schermo.

    • Ricorda di reinstallare la staffa del cavo del display.

    • Segui questa guida per riapplicare l'adesivo allo schermo.

    • Se stai installando un nuovo schermo, segui questa guida per calibrare il sensore di impronta.

    Don't forget the display cable bracket folks! This was my first at home repair and Im kicking myself forgetting the bracket.

    Tanner Davis -

    me too RIP so sad

    Drdynamite “Dr dynamite” - -

    I just did the same thing. I feel like I pressed the connector down well enough but I wonder how long this will last until it comes loose.

    This step should have been made more obvious in the guide.

    Boristhespider1995 -

    The fingerprint sensor calibration is impossible to complete in some cases. No matter what, I get an error "Your phone's current software version: TQ2A.230305.008.E1 is newer than this repair tool has." from the google software updater. This indicates it is a known issue "https://issuetracker.google.com/issues/2... not fixed for a year. The Google USB driver does not help if you're not on Windows and get this error. I tried on both mac and linux, no dice.

    I'm SOL without a fingerprint sensor. Screen works again though, and everything else went ok with the repair.

    Scott Carey -

    A couple of sweaty freaky steps in there - but was able to complete successfully as a first time repairer

    Karl Laird -

    For anyone with issues with the Fingerprint Calibration: just spent a few hours so I figured I should post my solution.

    I kept going to https://pixelrepair.withgoogle.com/udfps and being met with error messages.

    Here's what to do:

    1. Go to https://developer.android.com/studio/run... and choose "Download the Google USB Driver ZIP file (ZIP)." From there, ensure you know where the USB Driver is saved.

    2. Put your phone into Fastboot Mode by shutting the phone down and then starting it with both the bottom volume button and the power button.

    Do not have your phone all the way in Rescue Mode or it won't work

    3. Connect the phone to your PC via. USB

    4. Go to Device Manager and look under "Other devices" until you find your phone

    5. Right click and choose "Update Driver" and choose "Browse my computer for drivers"

    6. Click "Browse" and navigate to your downloaded driver from step 1, choosing "ok" and then "next." The driver update should go through.

    7. Go to https://pixelrepair.withgoogle.com/ and follow it!

    Miles Wyckoff -

    I followed this and worked perfectly, no more incompatibility issues of the software not working due to new os update.

    thanks

    kecher joshua -

    Thank you very much for posting this -- I was helping a friend replace his screen and we would have been stumped without these directions!

    zlsmith -

    This worked perfectly for me as well. First I was a little worried I didn't reattach the display properly because the error message said (German): "Fingerprintsensor kann nicht gefunden werden.". However, the calibration process fixed the problem! Yay!

    Laura Rahm -

    I have followed all the above steps but get the error:

    Couldn't find the unique calibration software for this device

    Can anyone help?

    Matthew Holtom -

    1. Go to https://developer.android.com/studio/run... and choose "Download the Google USB Driver ZIP file (ZIP)." From there, ensure you know where the USB Driver is saved.

    2. Put your phone into Fastboot Mode by shutting the phone down and then starting it with both the bottom volume button and the power button.

    Do not have your phone all the way in Rescue Mode or it won't work

    3. Connect the phone to your PC via. USB

    4. Go to Device Manager and look under "Other devices" until you find your phone

    5. Right click and choose "Update Driver" and choose "Browse my computer for drivers"

    6. Click "Browse" and navigate to your downloaded driver from step 1, choosing "ok" and then "next." The driver update should go through.

    7. Go to https://pixelrepair.withgoogle.com/ and follow it!

    kecher joshua -

    When doing the fingerprint calibration and putting the phone into Fastboot Mode: Keep it on the screen with the red triangle (i.e. don't press the "Start" button) when plugging it in to your computer.

    Matt Nesbitt -

    This was failing for me until I got it all the way into rescue mode. I had the fastboot screen up and rescue mode selected, but it would not connect at the website. Once I hit the button on 'rescue' and it went into rescue mode, then it connected. Then it told me my software was up to date and I didn't need a new install.

    Adrian Spidle -

    Is there a way to recalibrate the fingerprint without the equivalent of a factory reset?

    Adrian Spidle -

    I replaced the screen through a professional and purchased it from here. I calibrated the fingerprint sensor correctly, but the proximity sensor is not working! Anyone with the same problem? Any help?

    Fabry D -

    IMPORTANT NOTE - if you buy the screen "part only" it does not come with adhesive!

    If you already have the tools (and I have all the iFixIt stuff), ordering the "part only" means you'll have to get the adhesive separately, with another postage charge. Quite frustrating! Yes I suppose it's written down somewhere...

    Ben Scott -

    Hi, the repair guide tells to Check the "camera area" and the "Sensor area". My replacement Display only has the black plastic part in the camera area shown in the picture. The black plastic part in the Sensor area is not there. I also checked the packaging but it is not inside. Did anybody else have this issue?

    Thanks!

    Markus -

    Hi Markus!

    Thanks for pointing this out. It looks like the replacement screen didn't come with the black sensor bracket. We'll adjust the instructions shortly to cover this. Sorry for the inconvenience.

    If you still have your original screen, please transfer the bracket over. The bracket is adhered to the screen with light adhesive. Use an opening pick to pry it up. If it feels difficult, heat the bracket with an iOpener and try again.

    Arthur Shi -

    If you can't find the bracket on your original screen, it may actually still be attached to your phone. Check the motherboard as the bracket surrounds the sensor on it.

    Arthur Shi -

    Hi Arthur,

    You are right. The replacement does not come with the bracket. It was also not in my original display but your second hint to check the phone hit it. The bracket ist still attached to the sensor.

    Thanks for your Support!

    Markus

    Markus -

Conclusione

Confronta il nuovo componente con la parte originale. Potresti aver bisogno di trasferire i rimanenti componenti o rimuovere i supporti adesivi dalla nuova parte prima di installarla.

Per riassemblare il dispositivo, segui le istruzioni nell'ordine inverso.

Per eseguire un test diagnostico con lo strumento diagnostico integrato di Pixel, clicca qui.

La riparazione non è andata come previsto? Prova [[Troubleshooting Problems After a

Repair|soluzioni basi standard]], o prova a chiedere alla comunità Risposte Google Pixel 6a per dell'aiuto.

Alex Diaz-Kokaisl

Membro da: 16/01/22

117664 Reputazione

60 commenti

How do I glue the new screen to make it waterproof.

Brenda Holt -

My screen replacement of my 6a was a success. Thank you IFixit :) Very good kit with good tutorial :)

fpoulin1 -

Just replaced the screen and it is a GREAT REPLACEMENT. Only issue is the fingerprint reader isn't working. Issue is with google NOT this replacement screen. I haven't been able to find a solution. Even when trying to install google's "Install fingerprint calibration software". I have an appointment with "Ufixit" to see if they can resolve it. Google's tech said it isn't a common issue but just wanted to share my experience.

Also...Install steps only show how to take the screen off. Steps to install would be helpful because there are some tips to aligning/applying the adhesive that would be helpful to consumers.

Jon Holland -

the new display's fringer sensor must be replaced with the same(old screen's).

Rahilkhan Pathan -

Jon, the comment immediately above mine is incorrect. You do NOT need to replace the new fingerprint sensor with the old one. It's built into the screen. I don't know how you'd even do this. The iFixit page for the screen itself, as well as the instructions above, and so many commenters, all point out that the fingerprint sensor will need to be recalibrated after replacement. As others noted, make sure you've got the Pixel USB drivers installed and that Windows can see your phone. Do the screen replacement as described. Then go to the pixelrepair.withgoogle.com page, shut down the phone, reboot in fastboot mode and install the calibration software. It's all there on the Google page. Once connected, it took about 5 seconds for Google to update/calibrate my sensor. I booted the phone, logged in with a PIN and then tried several apps secured with fingerprint. They all opened like normal. I was able to fingerprint back into the phone. It works fine.

Trazodone -

In the end I was able to get everything working. BUT, there needs to be a reassembly process. I was finally able to make it work, but it isn't terribly intuitive. Just simple instructions for the adhesive like this side down and peel this first, etc. would be really useful. I ended up with incomplete adhesion (and thus incomplete water resistance) because the adhesive failed to easily remove from the backing. I'm sure it's because I did something wrong, but I was on my own for this part.

Likewise, the fingerprint reader recalibration is very poorly documented on Google's site, requiring that you hop around until you click the right places to download the right USB drivers, unzip them, navigate through Windows device manager, install new drivers, and then finally complete the process of resetting the fingerprint reader. Took me almost an hour of cursing to get this working (heck, took 15 minutes just to get it to the fastboot screen...very finicky).

Anyway, good first 15 steps. Just wish there were 30 or so.

Paul York -

Maybe iFixit has updated the page since you wrote this. But the answer to both of your questions is in step 17. The link to the page for applying new adhesive and screen installation. And the link directly to the Google USB driver. One-click, download. Unzip, right-click on the .inf file and you're installed. The link to the Google fingerprint page is there, with instructions on how to boot to fastboot mode.

Trazodone -

Replaced my screen successfully but as Jon and Paul pointed out there is a number of things I wish I knew / understood during the repair :

## Backup your phone (mandatory)

- Fingerprint calibration will require that you reset your phone so back it up now.

## Screen adhesive

- Buy some screen replacement glue (B7000 glue or B7010 adhesive)

## Fingerprint reset

- On first boot everything will be fine EXCEPT the fingerprint reader that need "unrollment"/calibration.

- A QRcode link is printed on the new screen but use the link provided by ifixit in the introduction of this repair (https://pixelrepair.withgoogle.com/udfps)

- Before you install the software on the pixel you will need a computer and the right USB driver : search "Google USB Driver" or go to https://developer.android.com/studio/run...

- Once you have completed the procedure on pixelrepair.withgoogle.com the fingerprint reader still won't work

- You need to reset your phone to factory settings (be sure to back it up before)

- Voilà

Laurent A. -

First, it is very upsetting to buy that screen and install it to finally discover that the fingerprint reader is not working.
I see that you got yours working, but i just can't get mine working. To resume: I can see my pixel 6a when i lunch the https://pixelrepair.withgoogle.com/udfps application in normal mode. But if, i put my pixel in FastBoot lunch the app, and plug the pixel to the usb port. It doesn't see it.
Any clue? The pc is a HP Envy.

daniel -

i cannot get my volume up rocker to work. I have cleaned out the phone with compressed air and inspected the button. I am not sure what to do.

nick peloquin -

For anyone wondering - you can replace the screen, "install" the fingerprint calibration software at https://pixelrepair.withgoogle.com/udfps and restore full functionality of the fingerprint reader in the replacement screen WITHOUT needing to wipe/reset your phone. The google tool even says as much, but I wanted to confirm that, for me, it indeed did not require a device data wipe.

Jason Harper -

I just received my repair kit this morning. Took me less than 30 minutes following the instructions you guys gave was spot on. I haven’t seen my wife smile so big in a long time. Thanks I fix it. Will be coming to you from now on 10 out of 10.❤️🙏👍

Kenneth Higgins -

I got the screen for PIxel 6A and I have no skills in replacing a phone screen. The instructions on this page were helpful. The suction cup was not helpful.

What I learned:

If you can't get under the screen, then a pocket knife works good to wedge under it and pry it up.

If your phone is on, but the screen it not lighting up/working, then you need to really push the connector into the phone. If it's loose, then it's not going to send a signal. You shouldn't be depending on the bracket to hold the connector in place.

The items I found useful in the tool kit were the tweezers, the picks, and the alcohol prep pad. I probably should have cleaned the old glue away better, but honestly my phone is in a case, I think it will be alright.

Amelia Richards -

The instructions should have contained reassembly instructions. And some more options for removing the screen, especially when it's shattered. The suction cup did not work, the packing tape I had wasn't strong enough. Eventually got it with duct tape. Also some instructions or video on how exactly to hold the phone while pulling with the suction cup would be helpful. That was rather tricky. I needed three or more hands which I was unable to sprout on short notice.

Saif Ahmed -

Make sure you remove the small protective film over the selfie-camera hole (if there is one) or your selfie camera will be waaay out of focurs.

Sam Robertson -

Comment to above: It's a small white piece of fabric tape about 1/2 inch long over the camera and onto the back of the display. Note that there is something that looks like a bigger neater piece of tape on the bottom and you shouldn't pull THAT off - its also on the back of the old display so you can just compare that two and pull the single piece of tape off over the camera on the new display as explained above to make them look similar.

Sam Robertson -

I can't complete this repair...I have two problems:

1. I can't get the bezel to come away from the screen enough to fit an opener in. I heated the screen for up to 10 minutes with the iOpener and it does not seem to get hot enough or I am not able to get enough leverage to pull the screen away from the bezel. The phone is only weeks old, not sure if newer or older is supposed to make this more difficult.

2. There should be specific instructions on applying the adhesive and replacing the screen, the "just do everything in reverse" doesn't seem very helpful here. This doesn't seem as straight forward as that.

Andrew Kulp -

Great tutorial, I have experience replacing other screens and doing such repairs so the tutorial was easy and t the point. I had the toolkit from a few years ago and it worked flawlessly, had to heat the adhesive a bit first to get the device to open, all went smooth after that. Thank you!

beriisrude -

Help! I dropped and shattered the screen and replaced it according to the guide, but the screen still isn't working! I can tell the phone is turning on because holding the power button gives the quick double-vibration from activating Google Assistant, and I can power-cycle it by pressing and holding power and volume up for 10-ish seconds (I know it's power cycling because the Google Assistant double-vibration stops working and then starts working again a minute later). I've tried reseating the display connector a few times now, and I don't see any bent pins so I'm sure I'm aligning it correctly. I haven't sealed it up yet because I wanted to test it first, but the display should work even if it's not glued in, right? What else could be going wrong? Is it most likely that I destroyed more than just the screen when I dropped it, or is there something else I can check?

Jordan Kizer -

I just got my Pixel 6a screen replacement and I noticed several plastic tabs around the perimeter. the removal instructions refer to these as well. my broken screen does not have these tabs. the new screen does turn on when I test it, but I do not see how I can get it to go back together without removing the tabs. I confirmed that my phone is a Google Pixel 6A under the system settings tab.

Russ Caldwell -

Thank you to Jerry. I forgot to follow the directions for removal of screen as mine was spidered in two spots and also at the Right side start point. Went back and got the plastic frame out.

Russ Caldwell -

This repair absolutely cannot be done without the Anti-Clamp. The screen is held in such a way there's no way to get it off without it, unless you want to fight it and risk the screen.

Nick -

I managed to do it without the anti-clamp, but my original screen wasn't too badly cracked (just one corner) and it took me 2 tries with the heat pad to get it. It really was a struggle, though, trying to figure out how to hold the phone down without pushing down on the screen too much at the same time. It took me around 15 minutes to remove the screen by pressing down at the very top and bottom while pulling up on the middle... probably worth buying the anti-clamp to skip the struggle.

Houston Searcy -

sorry auf deutsch ....... was bedeutet bei displaykauf ...... mit Rahmen? ...... ohne Rahmen? Ich muss nur das display bei meinem pixel 6a wechseln, weil kaputt. Es funktioniert alles, nur das Glas ist kaputt ...... danke für eine Antwort.

yala -

La partie deu recalibrage de L'appareil ne fonctionne tout simplement pas!
J'arrive à mettre mon téléphone en mode Fast Boot mais le téléphone n'apparait pas dans la liste dans ce mode. Si l'appareil est en mode normal, il apparait...

daniel -

I did it! I gotta say my behind was puckered pretty tight trying to figure out how to get that ribbon cable back on! In the end, I watched a couple of youtube videos of people doing it, and (like them) used my finger to push down one side instead of trying to use the spudger. It would be nice to give people some extra guidance or a really close up picture of the positioning of the cable for reassurance, because it was a struggle!

Good guide, though. I appreciate it! Fingerprint sensor is working after using the linked tool as well AFTER installing the USB driver, which was also linked 😄

Houston Searcy -

The adhesive was stubborn to clean off, but everything else went smoothly and everything works!

Mark Pruett -

My Pixel 6a screen replacement was a success thanks to this guide.

I followed all the instructions, including the adhesive replacement guide. My only issue was that the iOpener didn't provide enough heat to loosen the glue when opening the phone, however, the hair dryer did the job.

- With enough heat to soften the adhesive, screen removal was easy with zero damage to internal components or connectors.

- Adhesive reapplication guide was perfect (be sure to properly remove old adhesive)

- Fingerprint sensor calibration worked on first try (be sure to install Google USB Driver before attempting, and restart phone after calibration).

- I did not have to reset my phone.

- I did not have to re-register fingerprints

- I haven't experienced any screen discoloration or touch issues

NOTE

The included suction handle is functional, however the Anti-Clamp is the better tool for the job. Sadly, I didn't purchase a Anti-Clamp, so I substituted with a suction cupped wall hanger to be able to get suction and pull from both sides.

Randy Huntley -

Do this after the screen is installed to get the fingerprint reader to work again. Very easy. fingerprint reader not working after screen replacement

Jordan Fleuriet -

I just followed this guide for installing the screen, with the tools and adhesive. I am so impressed. It went so smooth and was very comprehensive. I was a little apprehensive about the iOpener, but it worked well, first try, for me.

Samuel Villarreal -

My pixel 6a was dropped, and while the screen displays just fine and shows no damage, it no longer responds to touch input. Is screen replacement the means to fix this? Or is that some other part?

Chris Ward -

Sounds like the same issue I had. No obvious damage to screen, but touch input did not work. I bought the screen, and I think I did the repair correctly because the screen powers on and looks fine, but still doesn't respond to touch input. :(

If anyone has any recommendations, I'd love to hear them, but at this point, I am wondering if there is some component within the phone itself (rather than the screen) that allows the touch input to work. If you only have a problem with touch input, be warned that the screen replacement may not be able to fix it.

A. R. M. -

The issues you're experiencing with touch on your new screens may be due to touch calibration. During the touch calibration process, even while your phone appears off, nothing should touch the screen at any point. If anything touches the screen during calibration, including screen protectors, tape, or debris, or if you're holding the device, the touch calibration can fail and cause problems.

Clay Eickemeyer -

Maybe iFixit has updated the page since you wrote this. But the answer to both of your questions is in step 17. The link to the page for applying new adhesive and screen installation. And the link directly to the Google USB driver. One-click, download. Unzip, right-click on the .inf file and you're installed. The link to the Google fingerprint page is there, with instructions on how to boot to fastboot mode.

Trazodone -

I searched and accessed this Japanese page on July 8th, 2023, but Google Pixel 6a Screen can only be shipped to the US and cannot be shipped to Japan.If so, I would like you to delete this Japanese page or delete the link to on the product page.

秀明増田 -

Is there also an instruction on only replacing the screen, but not the complete display? Considering the screen is like 15€ and the full display almost 100€, I'd like to try only the screen. But I don't find any instruction on it.

Friedemann Schäfer -

These guides, tools and adhesive kit made this a pleasurable screen replacement. Many thanks to all involved in making this a better alternative to using a phone shop.

Mark -

Great Kit! As a first timer I replaced the screen by following each step and I have to say the instructions are superb! After the new screen is installed I connected the phone to my computer. First installed the USB drivers then calibrated the fingerprint sensor as instructed. However the sensor did not work at first. I had to reboot my phone in Fast Boot mode again and follow the calibration steps one more time. Second time was the charm. It works flawlessly. I am very glad to have purchased the kit from ifixit. Thank you guys for guiding us to be able to repair our own devices. I am very surprised that the phone looks brand new, no one would be able to guess the screen was replaced. I greatly appreciate it guys, Thank you.

Oguzhan Ozturk -

I changed the screen, but the new one has a yellow hue. Could that be an issue with plugging the connector? Or something else?

Lucian Iuga -

The screen replacement worked great. But, I my fingerprint sensor did not work. I did a factory reset and restored my phone from my backup. I then tried to install the fingerprint calibration software. This is where I got stuck. Windows says I have the latest USB driver, I reboot into Fast Boot without an issue. The problem is that I can't connect to my pixel 6a, it does not appear in the compatible device list. It shows up in the list if I start the phone, I can select it, but then it says that it can't connect. I've repeated the steps many times, and I don't know what to do. Thank in advance for any suggestions.

John -

It was the Google USB driver update that tripped me up. Following the instructions to the letter was the fix.

John -

Fantastic instructions. Thank you. I had a challenge with the suction cup (see my comment for that bit of the instructions for workaround), but other than that the whole thing went smoothly. The final step of using the Google calibration software is essential.

Robert Baker -

Great guide! At a time when every penny counts as well as having some general tech knowledge and time to fix my screen, I saved a lot of money doing this, especially when someone else's asking price to replace the screen was quite close to the cost of the phone brand new. I didn't need to be a technician to do this, just confident enough to use some tools and having enough attention to detail to follow the guide thoroughly. Thanks for existing, will use these guides again when necessary, and I'm happy to get the parts off you instead of some shifty looking ebay business.

Paul Evgenidis -

Getting the old screen off kinda sucked, but everything else was a breeze. You're gonna have to calibrate the new screen with google's proprietary tool but that's pretty easy too

DingusLord -

You guys are awesome, you know that? After almost 2 hours of work, everything works again. Thanks a lot. Greetings from Belgium

DaMuf84 -

This worked really great. The only issue/annoyance I had was to do with recalibrating the fingerprint sensor - basically when I downloaded the driver Windows said it had the most up-to-date driver (it didn't). I then had to download Android Developer Studio to push the correct driver to Windows. Once I did this the fix worked perfectly. In hindsight it may have been easier to uninstall the driver in Windows, and then install the one found in the guide.

Jimmypeg Jets -

I can't even get the screen to start, no matter how much I use the heat pad or the blue tabs, nothing works.

Stuck -

Great kit and guide - screen repaired in about 2h.

I found getting the screen off a little difficult. The bottom pad of the Anti-Clamp kept coming off, and it was awkward to thread the (hot) iOpener through the clamp (I feared ripping it). In the end, the left-hand side of the screen came loose before the heated right-hand side! I had no problem opening it from there and making my way around.

Be prepared to spend a while getting the glue off the frame. Isopropyl alcohol is a must to do this well.

As others have said - take your time, particularly with the connector.

Colin -

Perfect guide, first time DIY repair an didn't break the phone 👍

Jorge Flores -

Congratulations, Jorge! We're glad it went smoothly.

Clay Eickemeyer -

Great great kit and explanation. the actual removing of the screen took 5 minutes. taking off the adhesive of the p[hone and applying t he new layer took about 30 minutes because its a delicate task. applying the new screen took 2 minutes. calibrating the fingerprint sensor took about 40 minutes because i needed to figure out and READ all instructions to be able to perform the calibration using Android Studio. but overall am happy to report that the phone is as good as new now and in fully working condition.

one note I have about the it is that it would've been great if we get a pouch or hard plastic kit bag since this kit is useful for many other things and maybe future screen replacements. the kit is sturdy and I am really happy with it and I intend on keeping it for a long long time. Thank you IFixit.

Metalman -

I was able to replace it perfectly. Took me about two hours, but don't have experience.

*** Removing the old screen. Using the heated iopener was more straightforward than I thought, however it took a bit of practice to pull with enough force on the suction cup

** Removing metal clip. It was slightly tricky to remove it. Used the flat pick. Be careful about it flicking up in the air from the force

* Removing the display connector. Very easy with the pick

**** Cleaning off the old glue. This was pretty tough. The small metal tweezers were quite helpful here. Also I ended up using a qtip in 90% isopropyl alcohol with most of the cotton removed

** Applying the new sticker. Wasn't so bad. It lines up well.

***** Reconnecting the display. The flex cable was isanely hard to connect. Starting with one side first is the key

* Applying metal clip. This was very straightforward.

*** Applying screen. It wasn't bad actually. Have to be a bit careful

*** Software fixing fingerprint. It took a few tries and some issues with driver

Kevin N -

Thank you for this wonderful guide. Worked flawlessly. Only problem was, my new Screen didnt have the black rubber near the proximity sensor and i didnt know how to transfer the old one. So sadly my proximity sensor doesnt work anymore. Other than that I am enjoying a smartphone just like new :)

hggdragon -

Does new screen comes with finger print sensor

mohamad shaar -

Yes, it does. At list mine did

Antonio Antunes -

I bought a new screen through you guys but the fingerprint doesn't work. I have done the reboot option and sadly factory reset my %#*@ phone for no reason at all. What's a way I can get this to be fixed because I would like to get back the fingerprint option?

Chantelle Johnson -

Is it possible to remove the screen without breaking it, if it's slightly cracked ?

Laurent Bakri -

I replaced the screen on my phone and everything seemed to be in order. About a day after some usage the screen got a yellow tint to it. Did I mess something up?

Andrew Brochtrup -

I was able to replace the screen of my Pixel 6a!

Advice:
- Take your time warming the screen with the iOpener

- Be gentle with the pics while opening the screen to make sure not to damage the internals

- Remember to place the display cable locker

- Don't panic if you get a message saying the new fingerprint sensor is not working

- In my case, I had to first update the Drivers on my Windows so that my Pixel 6a would be recognized

- Make sure to restart your Pixel after you are done with the fingerprint sensor calibration - only then the fingerprint sensor will work

I'm glad I can now use this device for another few years with guaranteed Google updates. This was the main reason for me to get this phone.

Antonio Antunes -

Thanks to this guide and a couple youtube vids I was able to get my good old pixel 6a back in action with just $100, can't beat that.
Everything went smooth and worked flawless asides from one super amateur mistake I made which I'll leave in case others read this and avoid it:
When removing the old screen, make sure the whole thing comes off, not just the glass, lest you end up wasting 20 minutes like me wondering why the new screen won't fit on the phone lol.

Cayde-6 -