Introduzione
Questa guida di riparazione è stata redatta dallo staff di iFixit ma non è stata approvata da Google. Leggi di più sulle nostre guide di riparazione qui.
Questa guida mostra come rimuovere e sostituire la batteria usurata del tuo Pixel 3 XL.
Per la tua sicurezza, scarica la batteria da sostituire sotto il 25% prima di smontare il telefono. In questo modo si riduce il rischio di un pericoloso incendio se la batteria viene danneggiata accidentalmente nel corso della riparazione. Se la tua batteria è gonfia, prendi adeguate precauzioni.
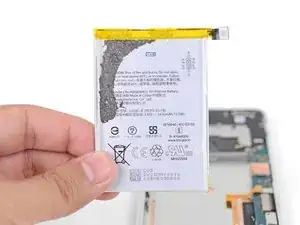
La sostituzione della batteria richiede lo scollamento della bobina di ricarica attaccata alla cella e il trasferimento della bobina stessa sulla batteria di ricambio.
-
-
Scalda un iOpener e applicalo sul bordo destro del pannello posteriore per un minuto.
-
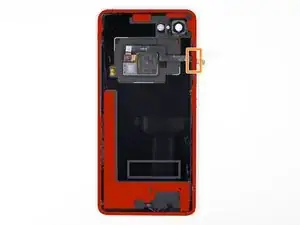
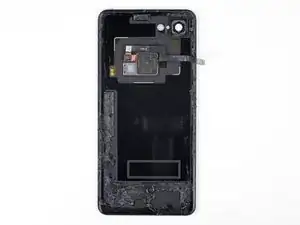
Mentre aspetti, prendi nota delle aree seguenti del pannello posteriore:
-
Adesivo tenace: ci sono aree di adesivo molto estese vicino alla parte inferiore del telefono.
-
Sensore cavo impronte digitali: stai attento a non tagliare il cavo mentre fai leva.
-
-
-
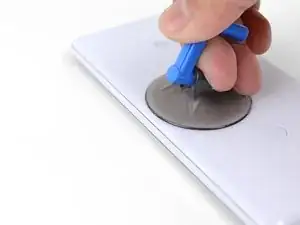
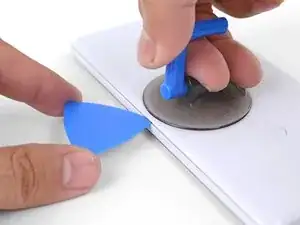
Applica una ventosa al lato riscaldato del pannello posteriore, il più vicino possibile al bordo.
-
Tira sulla ventosa con una forza elevata e costante per creare una fessura.
-
A seconda dell'età del tuo telefono, può essere richiesta una forza notevole. Se incontri dei problemi, applica dell'altro calore e riprova.
-
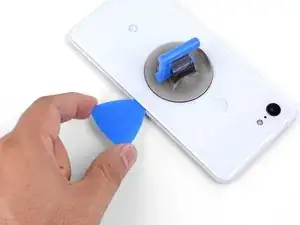
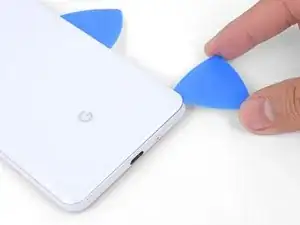
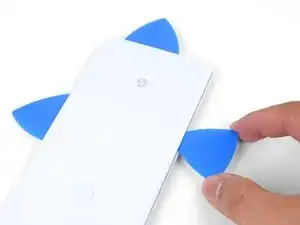
Inserisci un plettro di apertura nella fessura.
-
-
-
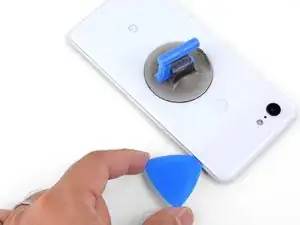
Fai scorrere il plettro di apertura lungo il bordo destro per tagliare l'adesivo.
-
Quando si raffredda, l'adesivo si indurisce e diventa difficile da tagliare.
-
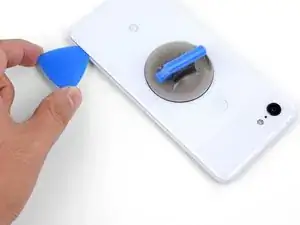
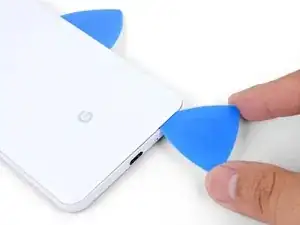
Una volta che hai tagliato l'adesivo lungo il bordo, lascia un plettro di apertura nella giunzione per impedire che la colla possa riattaccarsi.
-
-
-
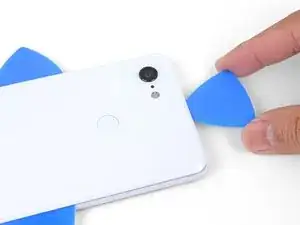
Usa un plettro di apertura per tagliare l'adesivo attorno all'angolo inferiore destro e continua lungo il bordo inferiore del telefono
-
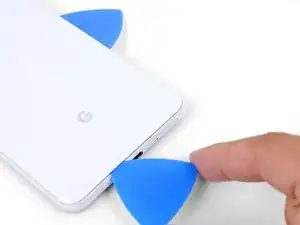
Lascia un plettro nel bordo per impedire che la colla possa riattaccarsi.
-
-
-
Continua le operazioni di riscaldamento e taglio lungo i bordi rimanenti del telefono.
-
Fai attenzione mentre tagli lungo il bordo sinistro del telefono. Se il plettro sembra bloccarsi vicino alla parte superiore, potresti aver incontrato il sensore impronte digitali. Tira lievemente in fuori il plettro e riprova a passare.
-
Accertati di aver tagliato bene le parti dove l'adesivo è più spesso, vicino ai bordi inferiore e destro del telefono.
-
-
-
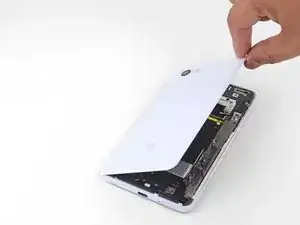
Solleva con delicatezza il bordo destro del pannello inferiore.
-
Usa un plettro di apertura per tagliare tutto l'adesivo rimasto attaccato lungo i bordi.
-
-
-
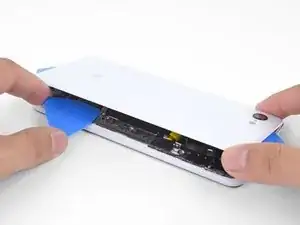
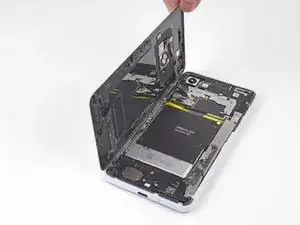
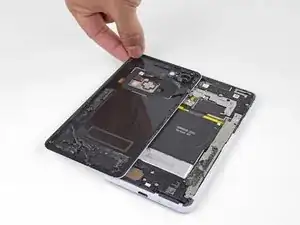
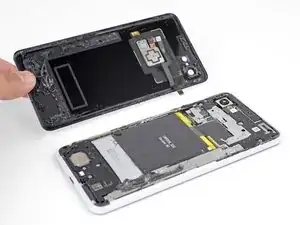
Solleva il bordo destro del pannello posteriore e ruotalo finché non si dispone sul lato sinistro del telefono, come se fosse un libro aperto.
-
-
-
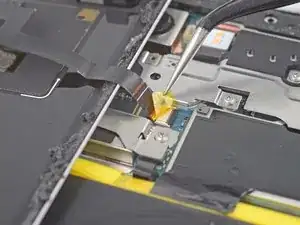
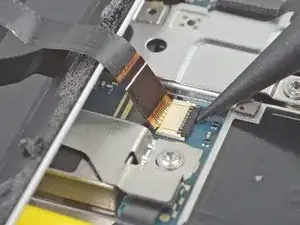
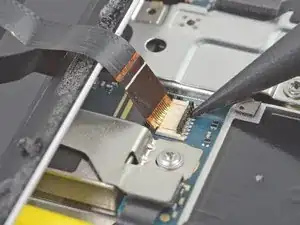
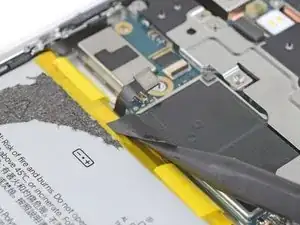
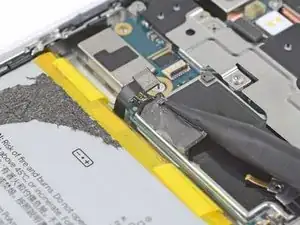
Usa con delicatezza delle pinzette per staccare il nastro giallo disposto sul connettore del sensore impronte digitali.
-
-
-
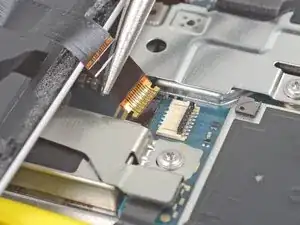
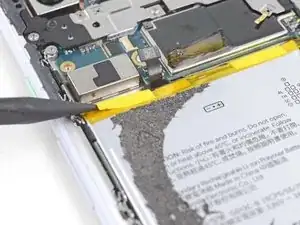
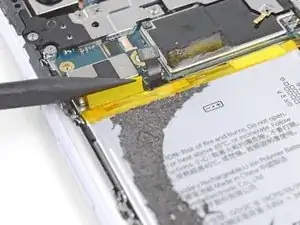
Usa l'estremità a punta di uno spudger per sganciare l'aletta di bloccaggio nera dello zoccolo ZIF del sensore impronte digitali.
-
Afferra la linguetta del cavo con delle pinzette o le dita ed estrai delicatamente il cavo flessibile dallo zoccolo.
-
-
-
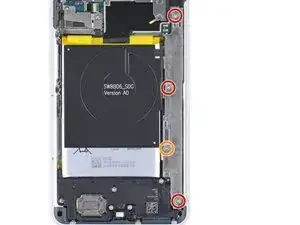
Rimuovi le seguenti quattro viti T3 che fissano la staffa della cover metallica:
-
Tre viti lunghe 4 mm
-
Una vite lunga 3 mm
-
-
-
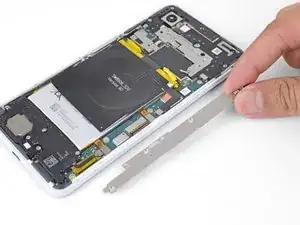
Inserisci l'estremità piatta di uno spudger sotto il bordo superiore destro della staffa della cover metallica e fai leva per liberarla.
-
Rimuovi la staffa della cover metallica.
-
-
-
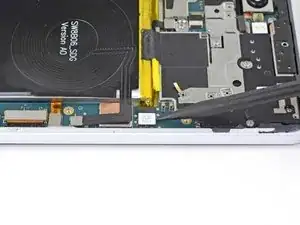
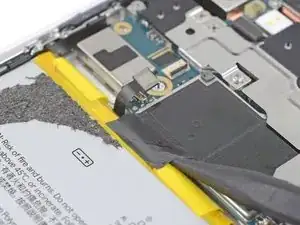
Usa l'estremità punta di uno spudger per sollevare dal suo zoccolo e scollegare il connettore della batteria.
-
Ripiega da una parte il cavo della batteria in modo che il connettore non possa accidentalmente toccare lo zoccolo.
-
-
-
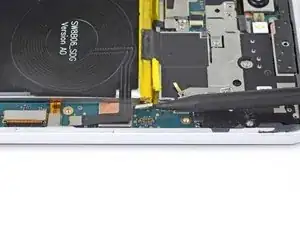
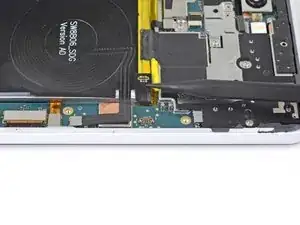
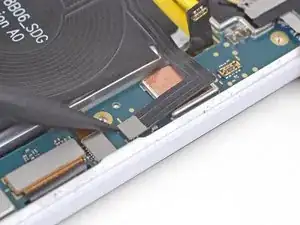
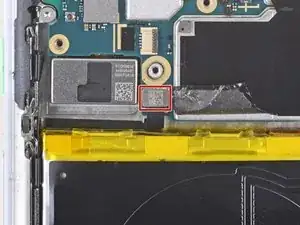
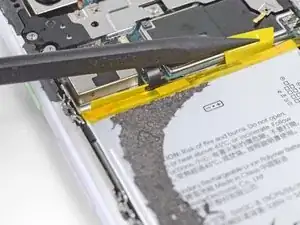
Usa l'estremità a punta di uno spudger per staccare dalla scheda madre e scollegare il connettore della bobina di ricarica, vicino al bordo destro del telefono.
-
-
-
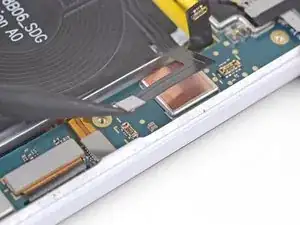
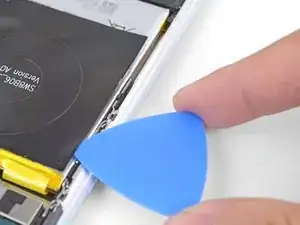
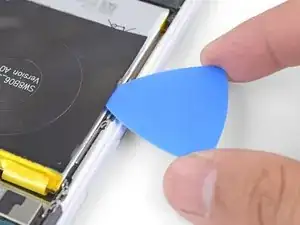
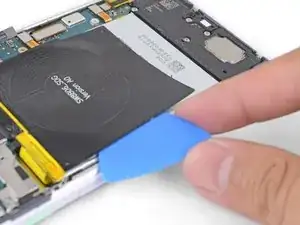
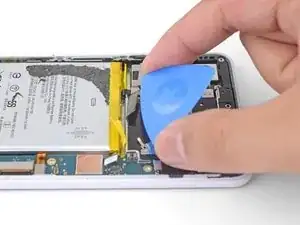
Inserisci la punta di un plettro di apertura sotto uno dei bordi della bobina di ricarica.
-
Fai scorrere il plettro lungo il bordo per tagliare l'adesivo.
-
-
-
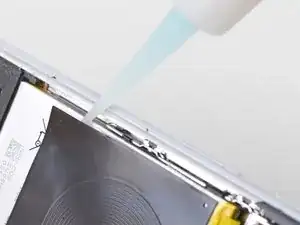
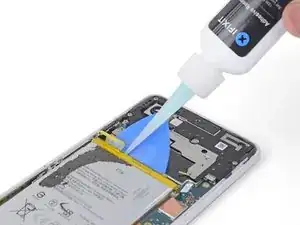
Gira il telefono in modo che il bordo che hai appena tagliato resti in alto.
-
Mentre tieni il telefono in questa posizione, applica poche gocce di antiadesivo oppure alcol isopropilico ad alta concentrazione lungo il bordo tagliato.
-
Mantieni il telefono in questa posizione per uno o due minuti, in modo che l'adesivo possa ammorbidirsi.
-
-
-
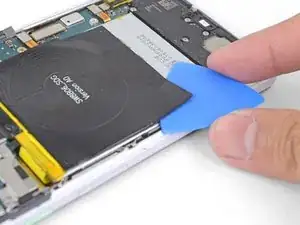
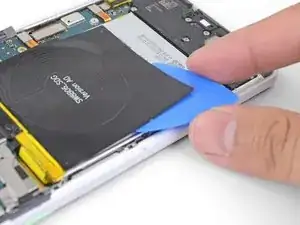
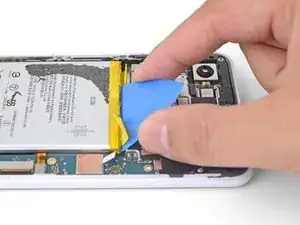
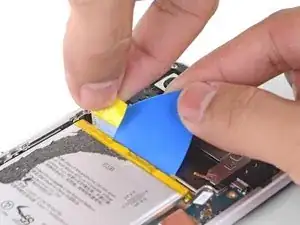
Inserisci l'estremità piatta di un plettro di apertura sotto uno degli angoli della bobina di ricarica.
-
Spingi il plettro lentamente e costantemente sotto la bobina per staccare l'adesivo.
-
La colla è disposta soprattutto lungo il perimetro della bobina di ricarica. Usa il plettro di apertura per tagliare lentamente l'adesivo.
-
-
-
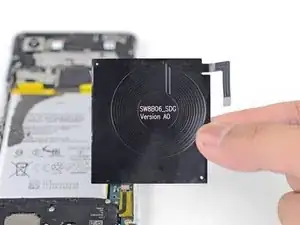
Rimuovi la bobina di ricarica wireless.
-
Vedi di ripulire perfettamente la superficie della batteria da ogni residuo di adesivo. Stai molto attento a non perforare la batteria.
-
Collega il connettore della bobina wireless al suo zoccolo sulla scheda madre. In questo modo sei sicuro che la bobina sarà perfettamente allineata.
-
Stacca qualsiasi protezione dell'adesivo dalla bobina di ricambio.
-
Disponi la bobina sopra la batteria e premilo con fermezza nella sua posizione.
-
-
-
Svita le due viti Torx T3 da 3 mm che tengono ferma la copertura del connettore del gruppo dei tasti.
-
Rimuovi la copertura del connettore.
-
-
-
Usa la punta di uno spudger per fare leva e scollegare il connettore del gruppo dei tasti dalla sua presa sulla scheda madre.
-
-
-
Inserisci l'estremità a punta di uno spudger nella fessura lungo il bordo superiore della batteria.
-
Fai scorrere lentamente la punta lungo la fessura per sollevare e staccare dalla batteria il nastro adesivo.
-
Ripiega il nastro in modo che resti lontano dalla batteria.
-
-
-
Fai scorrere con delicatezza la punta di uno spudger sotto le linguette gialle di estrazione della batteria che sono ripiegate lungo il bordo superiore della cella.
-
Separa dalla batteria le linguette di estrazione.
-
-
-
Inserisci il lato in plettro di apertura nella fessura sopra la batteria, sotto a una delle linguette gialle.
-
Incunea il plettro con decisione sotto la batteria. Il plettro fungerà da scivolo per la striscia adesiva e anche da leva.
-
-
-
Tira la linguetta di estrazione gialla con lentezza e costanza. Fai del tuo meglio per tirare secondo un angolo il più ridotto possibile rispetto all'orizzontale.
-
Mentre tiri la linguetta della striscia adesiva, mantieni una certa pressione sull'plettro di apertura per incunearlo il più possibile sotto la batteria.
-
Ripeti la procedura con la seconda linguetta di estrazione.
-
-
-
Rimuovi la batteria.
-
Rimuovi tutto l'adesivo rimasto nell'alloggiamento della batteria.
-
Riconnetti temporaneamente il connettore della batteria al suo zoccolo sulla scheda madre. In questo modo la batteria sarà perfettamente allineata.
-
Applica delle strisce adesive estensibili, dell'adesivo pretagliato o del nastro biadesivo nel vano della batteria.
-
Disponi la batteria all'interno del telefono e premila nella sua posizione esercitando una certa forza.
-
Scollega nuovamente il connettore della batteria dal suo zoccolo sulla scheda madre e riprendi il rimontaggio.
-


Per rimontare il tuo dispositivo, segui queste istruzioni in ordine inverso.
Per prestazioni ottimali, calibra la batteria appena installata: caricala al 100% e poi mantienila sotto carica per almeno altre due ore. Quindi usa il telefono finché non si spegne a causa della batteria esaurita. Per finire, carica la batteria ininterrottamente fino al 100%.
Porta i tuoi rifiuti elettronici a un riciclatore certificato R2 o e-Stewards.
La riparazione non è andata secondo i piani? Vai sulla nostra comunità Risposte Google Pixel 3 per trovare aiuto nella risoluzione dei problemi.

44 commenti
Very helpful, thank you! I was able to replace my battery pretty easily thanks to this guide.
Hey. After installing ney battery and new usb port my Pixel 3 has problems with microphones. Its only works with phoning via speakers. can you help me ?
Hi Kevin,
Assuming that you did not remove the motherboard (which houses a mic), it sounds like something may be off with the daughterboard, which surrounds the USB port and houses the other microphone. I would suggest carefully disconnecting and re-seating the daughterboard connectors, and making sure that the microphone is aligned to the port.
Thanks for these great instructions.
I followed them, and managed to replace my old Pixel 3 XL battery without any problems.