Introduzione
Utilizza questa guida per sostituire la batteria del tuo Google Pixel. Con l'uso quotidiano, una batteria standard dura circa 18-24 mesi prima di perdere una capacità significativa. Se il telefono deve essere ricaricato costantemente o si spegne improvvisamente, la sostituzione della batteria può essere una soluzione.
Attenzione: la tenacità dell'adesivo che fissa lo schermo, il minimo spazio per l'inserimento degli strumenti e l'elevato calore richiesto, 'rendono facile il danneggiamento accidentalmente del display durante questa procedura. A meno che non vogliate sostituire anche il display oltre alla batteria, procedi con molta cautela e preparati ad una sostituzione dello schermo. Segui attentamente le istruzioni e osserva tutti gli avvertimenti per aumentare le probabilità di successo.
Prima di smontare il telefono, scarica la batteria al di sotto del 25%. Una batteria agli ioni di litio carica può prendere fuoco e/o esplodere se forata accidentalmente. Se la batteria è gonfia, prendi le dovute precauzioni.
La batteria è fissata con un adesivo molto tenace. Potresti dover usare dell'alcool isopropilico ad alta concentrazione (90% o più) per riuscire ad ammorbidirlo per liberare la batteria.
Questa guida di riparazione è stata redatta dallo staff di iFixit ma non è stata approvata da Google. Leggi di più sulle nostre guide di riparazione qui.
-
-
Spegni il dispositivo.
-
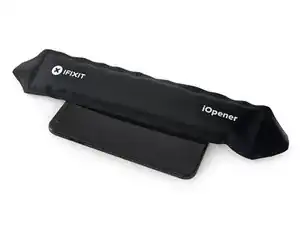
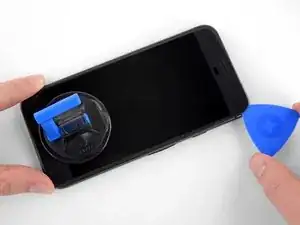
Prepara un iOpener per riscaldare i bordi del display e ammorbidire l'adesivo sottostante. In alternativa, puoi utilizzare una pistola termica o un asciugacapelli.
-
-
-
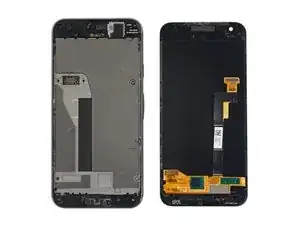
Per riferimento, la parte posteriore del pannello è mostrata a sinistra. Nota lo spazio ristretto tra il lato del display e il pannello OLED. (Le cornici indicano questa distanza sul davanti.)
-
-
-
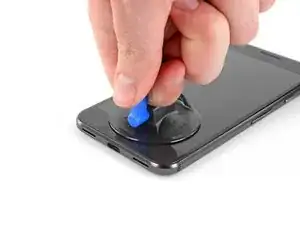
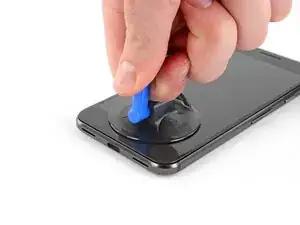
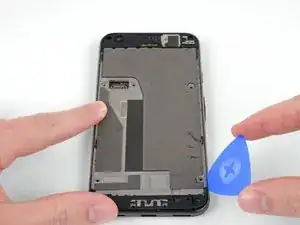
Una una ventosa per alzare il display e creare un sottile spazio tra il display e lo chassis del telefono.
-
Potrebbe essere necessario applicare più calore se lo schermo non viene via. Non essere impaziente, ci vuole tempo. Una volta che puoi inserire delicatamente uno strumento nella fessura, vai al passaggio successivo.
-
-
-
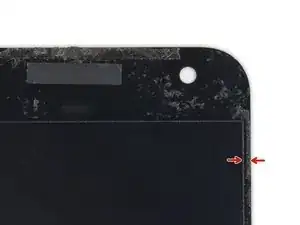
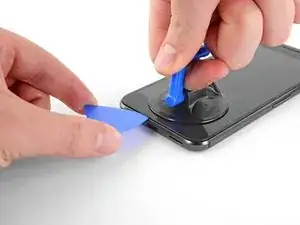
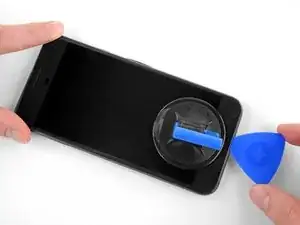
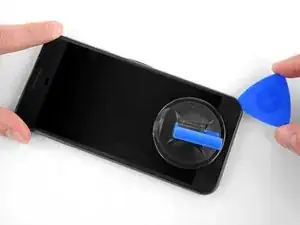
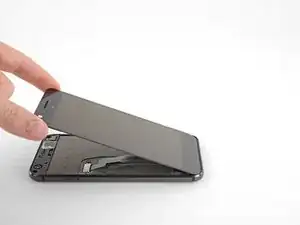
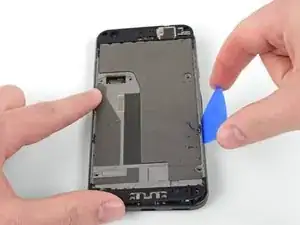
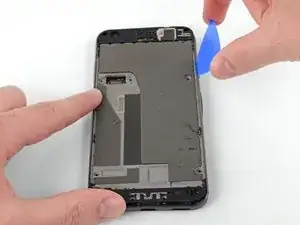
Inserisci un plettro o una carta da gioco nella fessura tra il telaio e il display.
-
Inizia a far scorrere il plettro attorno al bordo del display per separare l'adesivo che lo blocca.
-
-
-
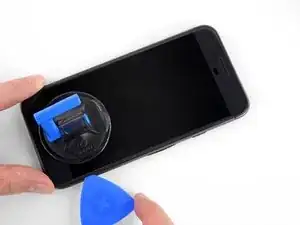
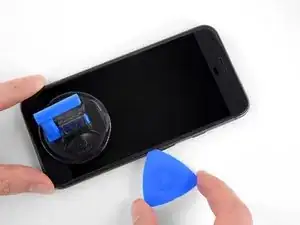
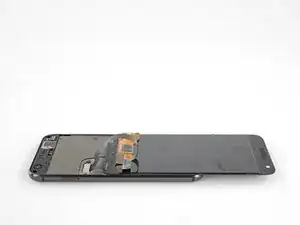
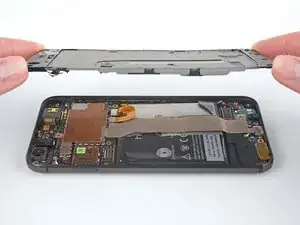
Una volta tagliato l'adesivo, solleva lentamente il display dalla parte superiore (quella con la griglia per gli altoparlanti), ruotalo delicatamente oltre la verticale e disponilo, come mostrato, con la superficie frontale posata sulla parte inferiore del dispositivo.
-
-
-
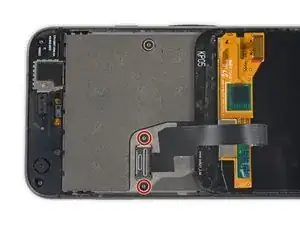
Usa un cacciavite Torx T5 per rimuovere le due viti T5 nere da 3,5 mm che fissano la staffa del connettore del cavo del display.
-
-
-
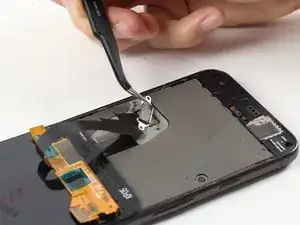
Usa delle pinzette per rimuovere la staffa che tiene in posizione il connettore del display.
-
Questo è solo un pezzo di metallo e dovrebbe venir via molto facilmente (il cavo viene rimosso nel passaggio successivo).
-
-
-
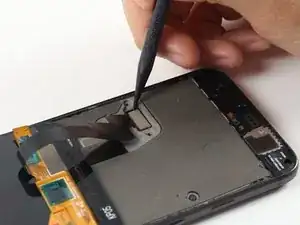
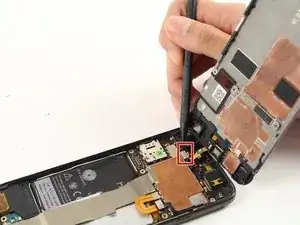
Utilizza uno spudger per sollevare il connettore del cavo del display, liberando il display.
-
-
-
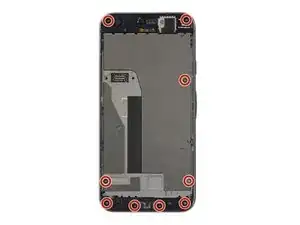
Il telaio centrale è tenuto fermo da cinque clips. Per sbloccare le clips, applicare una pressione verso l'interno con uno strumento di appertura come mostrato nei passi sucessivi
-
-
-
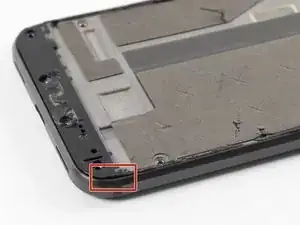
Inserisci uno strumento di apertura nell'incavo posizionato in basso a destra sull'angolo del telefono.
-
-
-
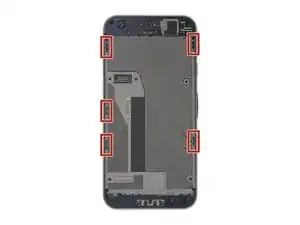
Fate scorrere lo strumento di apertura su entrambi i lati del dispositivo nel piccolo spazio tra il telaio centrale e la scocca posteriore per sbloccare le clips che tengono fermo il tutto.
-
-
-
Usa uno spudger per fare leva verso l'alto sul connettore collegato al cavo dell'altoparlante, disconnettendolo così dalla scheda madre.
-
Rimuovete il telaio centrale dal resto del dispositivo.
-
-
-
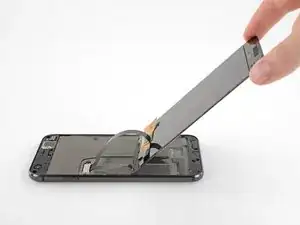
Usa uno spudger per sollevare il cavo a nastro della batteria, scollegandolo dalla scheda madre.
-
-
-
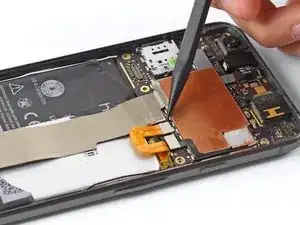
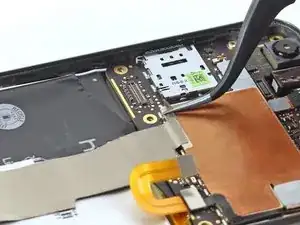
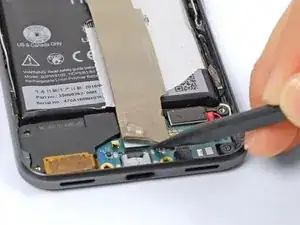
Usando una pinzetta, stacca il nastro argentato che copre il cavo che collega la scheda madre alla scheda figlia. Sbuccia quel tanto che basta per vedere il connettore sottostante.
-
Usa uno spudger per sollevare il connettore e scollegarlo dalla scheda madre.
-
-
-
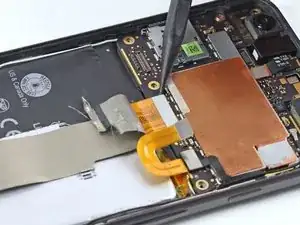
Stacca l'adesivo che copre il cavo di interconnessione sul lato scheda figlia.
-
Usa uno spudger per scollegare il cavo dalla scheda figlia.
-
Rimuovi il cavo dal dispositivo.
-
-
-
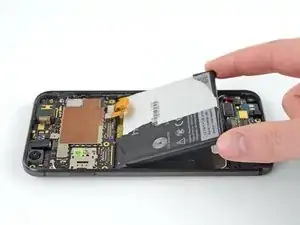
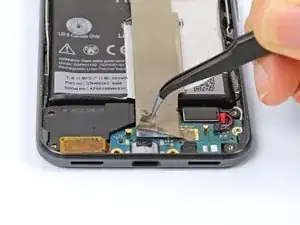
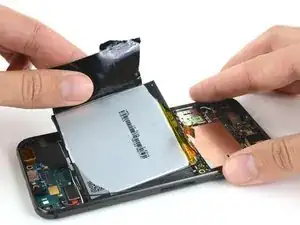
La batteria ha un rivestimento che può fungere anche da linguetta per la rimozione: tirala per estrarre la batteria. Se ciò non funziona, segui le istruzioni di seguito.
-
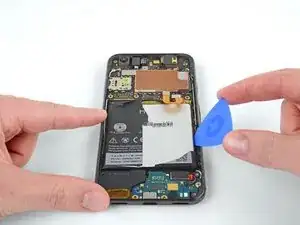
Facendo molta attenzione, infila uno strumento di apertura sotto la batteria per staccare l'adesivo.
-
Se la batteria non esce facilmente, non fare leva in modo aggressivo. Applica calore sul retro del telefono con un iOpener o una pistola termica per allentare l'adesivo.
-
-
-
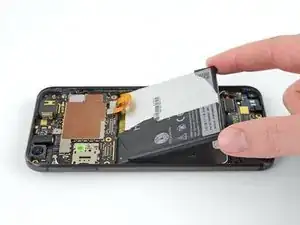
Rimuovi la batteria.
-
Rimuovi tutto l'adesivo rimasto dal telefono e pulisci le aree di incollaggio con alcol isopropilico e un panno privo di pelucchi.
-
Fissa la nuova batteria con nastro adesivo pretagliato o nastro biadesivo. Applica il nuovo adesivo sul telefono e non direttamente sulla batteria.
-
Premi fermamente in posizione la batteria per 5-10 secondi.
-
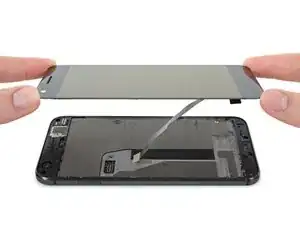

Confronta la nuova batteria con la batteria originale: potrebbe essere necessario trasferire i componenti rimanenti o rimuovere le protezioni dell'adesivo dalla nuova batteria prima dell'installazione.
Per riassemblare il dispositivo, segui i passaggi precedenti in ordine inverso.
Dopo aver completato questa guida, calibra la tua batteria appena installata .
Porta i tuoi rifiuti elettronici a un riciclatore certificato R2 o e-Stewards.
La riparazione non è andata secondo i piani? Vai sulla nostra comunità Risposte per trovare aiuto nella risoluzione dei problemi.

73 commenti
I doubt many people can get past step 1 without it being game over. Take special care, read the comments, and other guides as well.
I broke mine too. Not the glass but the display panel underneath.
For those who are going to try opening theirs: pay extreme attention to the fact that the display panel extends somewhat beyond the bottom edge of the visible part of the display where the cable connects and, if that wasn’t bad enough, the bottom bezel has a !&&* of a lot adhesive on it. Don’t insert plastic opening tools on the bottom corners - if you do that, you will damage one of the unprotected corners of the panel like I did. If I had to do that again, I’d probably start from the top edge instead.
The new screen ended up costing me the equivalent of $80, and I was surprised I was able to walk into a store and buy one at all in a country where Pixel was never officially available in the first place. They didn’t have white ones in stock so I went with a black one.
Same. Even when being warned and trying to be super careful.
Another trashed screen. This phone is a difficult one if you have not done one before. I would recommend not even bothering with prying under the sides and just concentrate on the top and bottom. The edges only allow about 2mm at most before you run into the LCD.
Tyler -
+1. Don’t bother trying to save the screen. Just save yourself the stress and buy a new screen on ebay for $35 before you begin. I have never botched a repair and I still managed to break my display on this. Yes, I was super careful, it took me like 45 minutes to finally get the display loose, and when I put it all back together, the display was totally dead.
At today’s pricing just buy a new screen and be done with it.
Jon -
I took mine apart again today because my second battery stopped holding a charge after 1.5 years (also I played too much Pokemon Go) and buying a new phone in 2020 feels like a downgrade. This time I was able to remove the display intact. Took my time, used a hair dryer for heat and pieces of thin cardboard to separate. Also the fact that I probably didn’t do a decent enough job of gluing it down the last time helped.
Success! I was able to replace the battery in my pixel although it took much longer than expected. I highly recommend using a playing card (or several) to cut through the adhesive as it can fairly easily bend around the fragile components. Patience is needed as it took me nearly an hour to get the screen off, reheating, gently prying and cutting with the card. Once past the screen it was fairly straightforward despite the pre cut adhesive being too long. The adhesive comes back into play during the reassembly prep as it took at least half an hour to remove the old adhesive and prep for the new. Be aware that the foam on the mid frame is alcohol soluble and will dissolve on contact. The new adhesive for the screen took some gentle massaging to line up but ultimately went on without much fight. All back together, it works (hopefully with renewed battery life). I would say allocate at least 2 hours unless you’ve done it before.
josh9623 -
This took me about 2 hours. I was very, very careful, and it was a success! No broken screen.
When reassembling, does the adhesive still hold the phone together when closed or do we need to apply more adhesive?
Jess Haddow -
Step 10 addresses this: there should be a plastic sheet that looks like your screen in the repair kit. This is the new adhesive for reassembly.
Peter Karski -
Unfortunately also cracked my display on the way in. You have to go pretty deep under the top and bottom of the screen but BARELY in around the sides, especially the corners. If I had to do it over again, I would have either tried a playing card or put some type of depth limit/mark on my pick so I didn’t go more than a few millimeters in.
Matthew Jastremski -
Use plenty of heat here and take your time. Start from the top, then the sides. use a gentle prying motion with the picks but don’t go too deep.
Richard Wood -
It’s EXTREMELY easy to crack the screen. Just buy a new display module before fixing it. The old screen will be disposable.
Buyi Yu -
Don’t even waste your time with the iOpener. I went straight for the hair dryer and opening picks took 30 mins to get the screen off with no issues.
eric duchene -
Hair dryer worked for me, thanks!
David Gault -
As others have said, the iOpeners didn't work for me at all. I tried microwaving, I tried boiling, but even when the iOpener was too hot to touch the phone didn't get that hot. A hair dryer eventually worked, but took a long time too, and I had to pull quite hard (similar to pulling on a really stuck LEGO brick, I was surprised my screen didn't crack). I also dripped some isopropyl along the edge where I could lift it a teeny bit but not get a pick in, which seemed to get the gap to widen. Once I had an edge up and could start sliding the pick along though everything went much more smoothly. Reading other comments, I bet a heat gun would have been a better tool.
Mark Fickett -
If you haven’t purchased this kit yet then stop right here. The difficulty, as stated, is very difficult. This was my first attempted repair. I spent a good hour heating the adhesive and felt good about getting the display off. I even paused to boot the phone to make sure I didn’t damage the screen before flipping it over - it worked fine still! Then I went to pull the display from the top using the picks. Shattered the corner of the screen. $129 for a new screen. At this point, the Pixel 3 is $499. I bought a new phone. Just be prepared to break the screen. Many people mention it in the comments. I felt confident I could do it. I couldn’t.
Michael Neil -
do yourself a favor and purchase a replacement screen when you order a battery. it’s impossible to remove the screen without damaging it no matter how careful you are.
Andrey Gerasenkov -
100% agree. So glad that I did. My new screen was only £20 from ebay - took ages to arrive as it came from China, but works perfectly.
Daniel Yeo -
I managed it - this was my first repair. It’s a lot harder than I was expecting, but totally doable! I recommend just sliding the very edge of the pick around first until you find a corner that starts to peel up. Once you can see under the screen (without bending it, of course!), you can go further in to break the stubborn adhesive globs. It took me just under 30 minutes to remove the screen.
Peter Karski -
My tip: Place a hot-water bottle on the screen for 2 minutes. Use the suction handle to lift one edge and insert an opening pick. Use an opening tool to cut through the adhesive at the bottom and place another opening pick in the second corner. Place the hot-water bottle on the phone again and wait 2 minutes. Cut through the sides with the opening tool (if you are focused it's nearly impossible to put this tool in too deep) and do the same on the top of the phone as on the bottom. I was afraid of the high difficulty, but it only took me 15 minutes to remove the screen with no problems. Medium difficulty.
Dorian -
I didn’t crack the screen, but somehow the thing wouldn’t power on after. Not sure if it was heat, or if I borked the cable somehow. New screen went in and it works great.
Chris Jones -
It IS possible to get the screen off without breaking it, just take your time. I spent about an hour using the included picks along with the iopener.
That said, the adhesive is a bear to fully remove from the screen without marring it up.
Kixwooder -
I didn’t fully remove the old glue; When I put it back together, I melted the old glue (and some new glue) to seal it all closed again.
David Gault -
Tip, use a gallon ziplock bag with some hot water (maybe 150 degrees). Place the phone on a towel and fold the towel over and shield the part you aren’t working on, then use the bag for ~30s to apply and re-apply heat as needed. I first heated up the entire phone and ended up separating the screen from the glass (thus breaking the screen). The second time I did it, I just heated up one section at a time and I succeeded in removing the screen without breaking it.
Daniel Beardsley -
Couldn’t get it open with anything, including dunking it (wrapped in a ziplock) in freshly boiled water for from 2 to 20 minutes. But then I managed to get it with only minor discolorations along top and bottom edges (which are noticeable when the screen is off or on dark backgrounds).
What did the trick was setting the heat gun to 100°C and heating it really up close for 2 minutes. 60°C didn’t do squat, but 80-90°C would probably work better, without damaging the screen.
With that done, the glass required a little bit of force to lift up, force of gravity on the rest of the phone wasn’t enough.
gelraenua -
I attempted this with an iOpener and gave up as it didn’t seem to heat it enough to lift the edge of the screen.
I remembered I had a heat gun at that point (duh, should’ve been what I started with). I had the gun at 350 initially and moved it around relatively quickly. But, discovered that if I lingered a little it discolored the screen (tested and the screen still works where it’s discolored, but it’s slightly off-color at one corner). I ended up using 200 deg (F) instead and moved more slowly. I put slight pressure on with the suction cup while heating the edges and finally got a corner up. Plopped a pick in there and used another pick to slowly cut along that edge while heating where cutting. I kept a pick plopped in each corner as I went. Once I got most of the screen free I grabbed the edges of the screen to keep upward pressure from the glue and heated any places that were still stuck with the heat gun and cut the last strands with another pick.
TL;DR - The iOpener doesn’t seem sufficient for this job.
Jonathan Stucklen -