Introduzione

Questa guida di riparazione è stata redatta dallo staff di iFixit ma non è stata approvata da Google. Leggi di più sulle nostre guide qui.

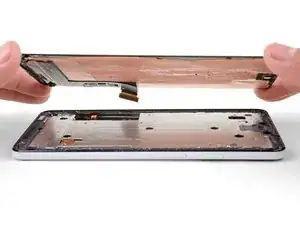
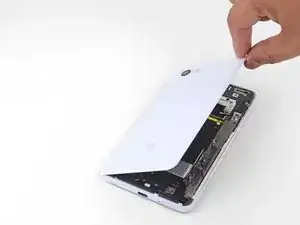
Segui questa guida per rimuovere e sostituire uno schermo rotto o guasto nel Google Pixel 3 XL. Questa procedura serve per i display sostitutivi che non sono montati su un proprio telaio. A causa della struttura del Pixel, questo richiede di rimuovere il pannello posteriore per poter scollegare i connettori dello schermo.

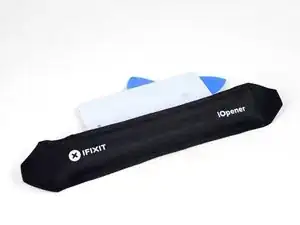
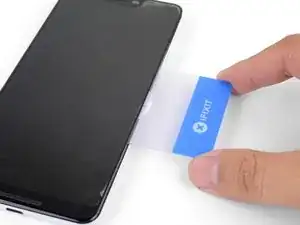
Prima di iniziare questa procedura, accertati di avere un set di adesivi di ricambio sia per il pannello posteriore sia per lo schermo.

Questa procedura rimuove in modo distruttivo lo schermo del Pixel 3 XL. I display OLED smettono di funzionare se vengono esposti all'ossigeno o all'umidità e quindi sono incapsulati in un involucro a tenuta d'aria (per questo i pannelli OLED diventano neri sotto a un punto di rottura). È molto difficile sostituire il solo vetro frontale: gli strati OLED del Pixel 3 sono laminati sul vetro.

  1. wIigbvaXNQ1gCfa2
    wIigbvaXNQ1gCfa2
    4f3uBiUqnYIwtpHk
    5fCoAkkaQhAC1YlB
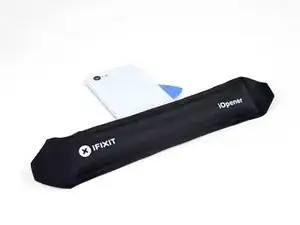
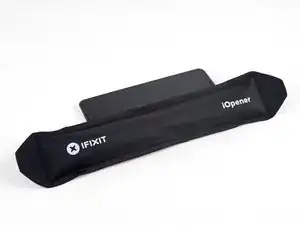
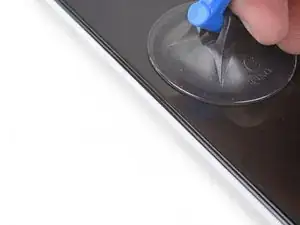
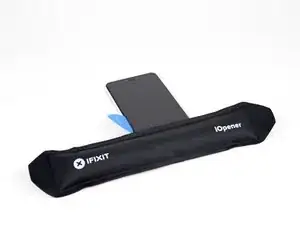
    • Scalda un iOpener e applicalo sul bordo destro del pannello posteriore per un minuto.

    • Puoi usare anche un asciugacapelli, una pistola termica o una piastra riscaldata, ma stai attento a non surriscaldare il telefono: sia lo schermo sia la batteria interna possono essere danneggiati da un eccesso di calore.

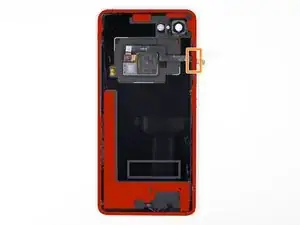
    • Mentre aspetti, prendi nota delle aree seguenti del pannello posteriore:

    • Adesivo tenace: ci sono aree di adesivo molto estese vicino alla parte inferiore del telefono.

    • Sensore cavo impronte digitali: stai attento a non tagliare il cavo mentre fai leva.

  2. cZhYNQPJKIpeBdUV
    cZhYNQPJKIpeBdUV
    O3ZtiUsIEYd1LOi5
    PdMr62SQHqkykS2M
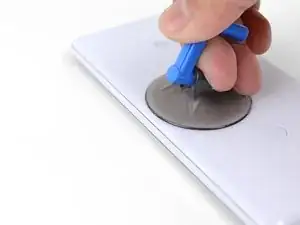
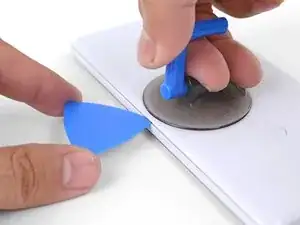
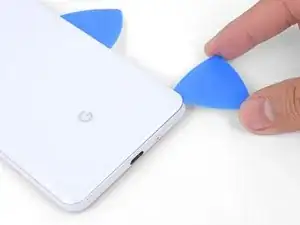
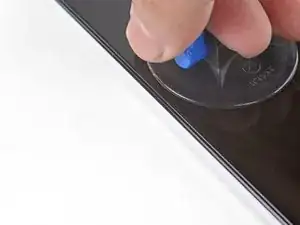
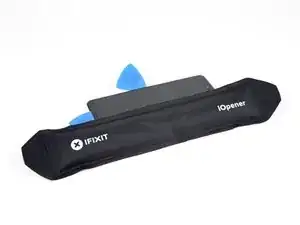
    • Applica una ventosa al lato riscaldato del pannello posteriore, il più vicino possibile al bordo.

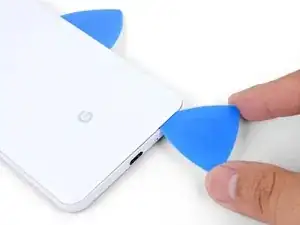
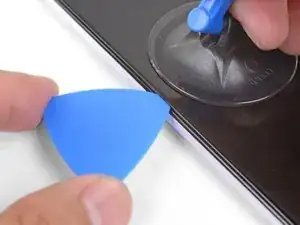
    • Tira sulla ventosa con una forza elevata e costante per creare una fessura.

    • A seconda dell'età del tuo telefono, può essere richiesta una forza notevole. Se incontri dei problemi, applica dell'altro calore e riprova.

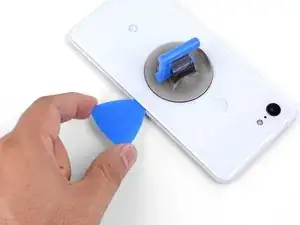
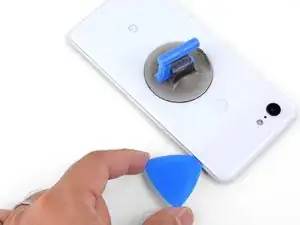
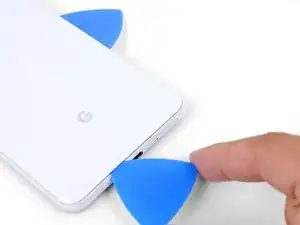
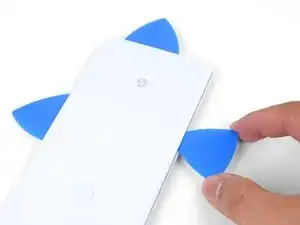
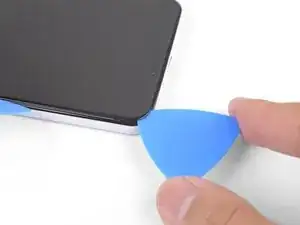
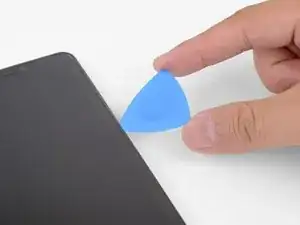
    • Inserisci un plettro di apertura nella fessura.

    Suction cup doesn’t work on severely cracked glass.

    Jeffrey Kongthong -

    Step 1 - 2 took me about 50 minutes. Back and forth with heat and trying with suction cup. I could get my finger nail in but not the pick. Took two people, but we finally got a pick in. 2 year old phone.

    Andrew Messier -

    Took about 15 minutes and three total attempts. On the third attempt, I also used a thinner, metal, pick to widen the gap just enough for the plastic pick to fit (Though be careful as you can easily break it with a metal pick). The phone is three years old.

    Hotohori -

    Could not get in with the pick or in from the side. Targeted the bottom of the phone with the iOpener and managed to gently create some space for the pick with the opener tool.

    Daniel R. -

    I also struggled here for a while. I ended up working my way around the entire edge of the phone until I found one spot where I could pry up the back panel. I used a jimmy instead of the opening pics. I also used a hairdryer on lower heat instead of the iopener. 3 year old phone.

    Bryan Wethington -

    Took 30 minutes + to get the back cover off. Used another suction cup to grip from the busted screen and the ifixit suction cup for the back. A thinner Acoustic guitar pick was required opposed to the standard Blues picks provided in the kit (har-har). Would HIGHLY suggest getting a pick into both the back and the front before removing the panels as it will give you more surfaces to pry from. Made that mistake...

    Brian Sommer -

    Over 2 hours of trying, I keep reheating the pouch and let it sit on the edge for sometimes up to 10 minutes since the directed 1 minute wasn't working. Physically cant get enough leverage on the back of the phone; picks are too thick to get under the crack, and the suction cup pops off before I can get enough force to see any gap open. Phone is 5 years old. I really need some help

    Grant Cooper -

    Hey Grant!
    I hear your pain—the adhesives on this phone are very strong. The initial gap is one of the hardest parts of the procedure. Here are some suggestions:
    * If you have a hair dryer, give that a shot. Heat the edge until it is slightly too hot to the touch.

    * These adhesives separate not with extreme force, but with constant steady force and time. Try heating the edge and pull on the suction cup with firm force for about a minute to let the adhesive separate.

    * If you have an opening tool, you can try this procedure to get the initial gap.

    Arthur Shi -

  3. ecDEBpnvfOTcMLZ2
    ecDEBpnvfOTcMLZ2
    2uOnUFqafrCYXyEN
    p51ClEsXXIXPIR4Z
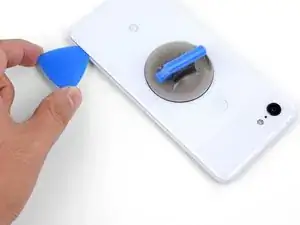
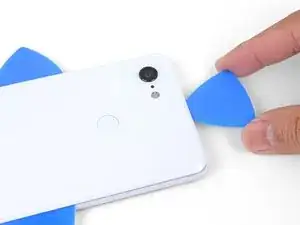
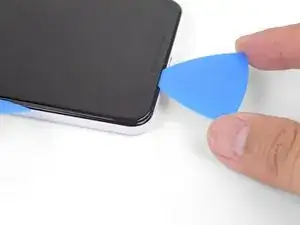
    • Fai scorrere il plettro di apertura lungo il bordo destro per tagliare l'adesivo.

    • Quando si raffredda, l'adesivo si indurisce e diventa difficile da tagliare.

    • Una volta che hai tagliato l'adesivo lungo il bordo, lascia un plettro di apertura nella giunzione per impedire che la colla possa riattaccarsi.

  4. KQZNiMIXEoEv3sQA
    • Applica un iOpener riscaldato sulla parte bassa del pannello posteriore per un minuto.

  5. gBLNTMRXodCAlNJR
    gBLNTMRXodCAlNJR
    Vbq4vFubRlSHJKRY
    4UK5LbKHwIXueBJp
    • Usa un plettro di apertura per tagliare l'adesivo attorno all'angolo inferiore destro e continua lungo il bordo inferiore del telefono

    • Lavora lentamente mentre tagli l'adesivo attorno all'angolo per evitare che il pannello possa rompersi. Se diventa difficile tagliare la colla, applica nuovamente del calore.

    • Lascia un plettro nel bordo per impedire che la colla possa riattaccarsi.

  6. K1DNALhsFYem6WuY
    K1DNALhsFYem6WuY
    2FCl2jg2ZVTGSvUm
    IXQXmHMoJGXm3PXr
    • Continua le operazioni di riscaldamento e taglio lungo i bordi rimanenti del telefono.

    • Fai attenzione mentre tagli lungo il bordo sinistro del telefono. Se il plettro sembra bloccarsi vicino alla parte superiore, potresti aver incontrato il sensore impronte digitali. Tira lievemente in fuori il plettro e riprova a passare.

    • Accertati di aver tagliato bene le parti dove l'adesivo è più spesso, vicino ai bordi inferiore e destro del telefono.

    The back cover is Glass!!!!. DO NOT PRY HARD, IT WILL BREAK!!!!!!!

    You must go slowly and let the heat do the work, if you force the cover off, it will shatter.

    Paul Bernstein -

  7. USkM2UJmmdDVnTmv
    • Solleva con delicatezza il bordo destro del pannello inferiore.

    • Usa un plettro di apertura per tagliare tutto l'adesivo rimasto attaccato lungo i bordi.

  8. 1nxmI4hs2Gymfag5
    1nxmI4hs2Gymfag5
    M4kcSI5plQnJtuT1
    MBJ2GPSSE3RnNtLF
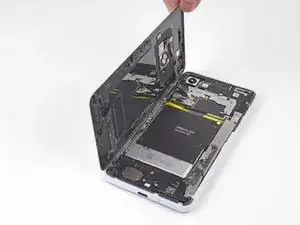
    • Solleva il bordo destro del pannello posteriore e ruotalo finché non si dispone sul lato sinistro del telefono, come se fosse un libro aperto.

    • Evita tensioni sul cavo del sensore impronte digitali e stai attento che non si impigli.

    • In fase di rimontaggio, questo è un buon momento per provare ad accendere il telefono e collaudare tutte le funzioni prima di sigillarlo nuovamente. Quindi ricordati di staccare completamente l'alimentazione prima di continuare a lavorare.

    • In fase di rimontaggio, segui questa guida per installare adesivo pretagliato e incollare nuovamente il pannello posteriore.

    Reassembly is way harder. The adhesive guide is generic and not super helpful, so don't be surprised if things went smoothly until you get to this step and then everything starts sticking to things its not supposed to.

    Christopher Trimby -

    This is great but how you address that fact that the phone is tied to a particular fingerprint sensor and after replacing, the new sensor is not recognized by the original phone?

    Dave -

    Hi Dave!

    There's a software calibration tool that you can use to calibrate your new fingerprint sensor. I've updated this step to include a link to the tool.

    Arthur Shi -

    I have a pixel 3 xl and I can't get the tool to work. I finally got the driver's installed after several hours and it says it's for pixel 6 and up basically. So I tried the other option and it's basically saying to do a factory reset? Did I mess something up on the install or what am I doing wrong here? Thanks

    Cody L Paulsell -

    Uhhh

    So, apparently the connector on the motherboard for the fingerprint sensor is just ridiculously fragile, because after plugging and screwing everything in (pretty much reassembled except for the adhesive), I closed up the phone and powered it on to test if everything was working, and when I opened it back up and let the top hang off to the side, it just snapped off. I didn't even have it tensioned that much, it was just hanging off to the side and snapped. So now I've traded a non-functional camera with a non-functional and irreparable (unless I get a new motherboard) fingerprint sensor.

    The guide really ought to emphasize how delicate that connector really is. I have a google drive link here to a photo of the remnants of my poor fingerprint sensor connector :( link

    Mindle -

    Wasted a ton of time and effort (and money) trying to use this guide to repair my Pixel 3XL. Then I get to the software calibration tool and find:

    Unsupported device

    This is not a compatible device. Only Pixel 6, 6 Pro, 6a, 7, 7 Pro, 7a devices can install this software.

    I cannot say how frustrating it is when a guide and website that tried to be so helpful ends up like this. Failure due to referencing tools not on the site and not suitable for the job.

    Ross Chesley -

  9. 66BxIa114CvPBDXF
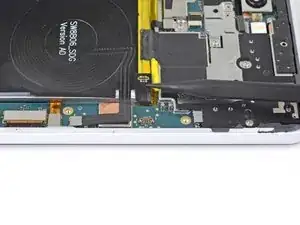
    • Usa con delicatezza delle pinzette per staccare il nastro giallo disposto sul connettore del sensore impronte digitali.

    This step is utterly unnecessary. It achieves nothing, and the tape is there for a reason (I'm not sure why, maybe to prevent short circuits). I didn't remove this tape while disassembling and it didn't change anything.

    Krzeszny -

    The Kapton tape should adhere to both the cable and the connector. It helps prevent the cable from slipping out of the ZIF connector. You're right in that you don't have to completely remove the tape—I've adjusted the step to reflect this.

    Arthur Shi -

    I just finished this guide, thank you. It would be nice to have a "before ribbon removed" reference picture that's also without the Kapton tape in place if possible. I was no longer certain how far back into the ZIF connector I had to place the ribbon cable as I simply forgot what it looked like before removing it. Basically, it "felt" like it was out too far, but since I had no reference I couldn't compare. Step 10 has good close up pics, but the ribbon cable is already out a bit so a bad reference.

    teknomedic -

  10. sIaa2bIVcTWtgVNZ
    sIaa2bIVcTWtgVNZ
    kljONWUpcx2eLE4p
    syrHkK1ndwxqPAh2
    • Usa l'estremità a punta di uno spudger per sganciare l'aletta di bloccaggio nera dello zoccolo ZIF del sensore impronte digitali.

    • Afferra la linguetta del cavo con delle pinzette o le dita ed estrai delicatamente il cavo flessibile dallo zoccolo.

    • Per evitare cortocircuiti, stai attento non toccare con le pinzette i contatti metallici sul cavo flessibile.

  11. KOLMNRDZQHXDXx2H
    • Rimuovi il pannello posteriore.

  12. ZRoNSKDIlMf5W2Yh
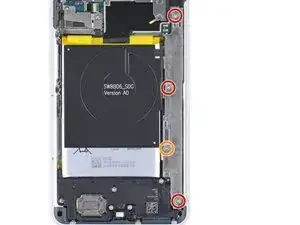
    • Rimuovi le seguenti quattro viti T3 che fissano la staffa della cover metallica:

    • Tre viti lunghe 4 mm

    • Una vite lunga 3 mm

    • Durante questa riparazione, tieni traccia di ogni vite ed assicurati di riavvitarla esattamente dove era.

    Be careful when putting the screws back in that you do not over tighten. This will cause you to destroy some pixels on your screen.

    Brian Retterer -

    The long screw on my disassembly was adjacent to the lettering for the Qi inductive receiver, and not close to the silver exposed part of the battery as indicated

    Andrew Munro -

    In my case, all the screws are the same length.

    Krzeszny -

  13. iMjRoXXfrrJG6TTj
    iMjRoXXfrrJG6TTj
    EbGvs3NuseOA34IT
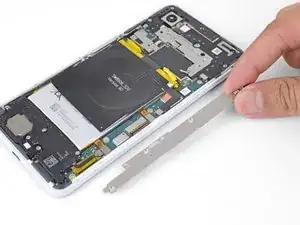
    • Inserisci l'estremità piatta di uno spudger sotto il bordo superiore destro della staffa della cover metallica e fai leva per liberarla.

    • Rimuovi la staffa della cover metallica.

    There is a small adhesive pad under the metal bracket, between the two middle screws that will provide some resistance when lifting the metal cover bracket

    Andrew Munro -

  14. 2FT5FhK5JAiFdDI6
    2FT5FhK5JAiFdDI6
    Ll1pjbf2FDCAQSUM
    Q2TwemRwJ1F5JGut
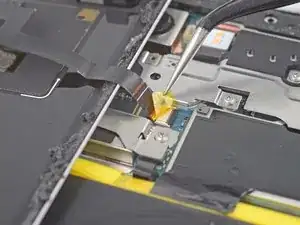
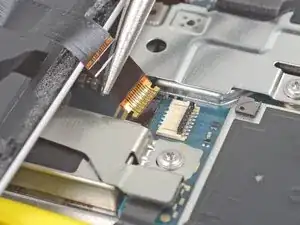
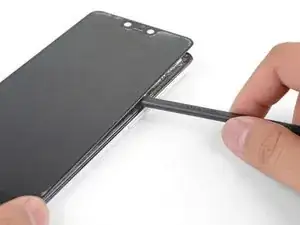
    • Usa l'estremità punta di uno spudger per sollevare dal suo zoccolo e scollegare il connettore della batteria.

    • Non usare attrezzi metallici per disconnettere la batteria, per evitare il rischio di cortocircuitare la batteria stessa.

    • Ripiega da una parte il cavo della batteria in modo che il connettore non possa accidentalmente toccare lo zoccolo.

  15. HpNsYVXTQaBNQNUq
    HpNsYVXTQaBNQNUq
    OvXBQjvAJHlidDXP
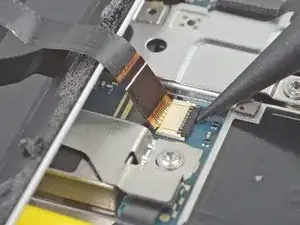
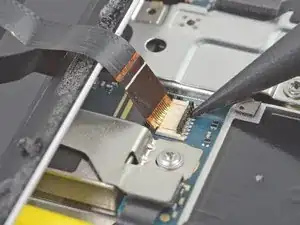
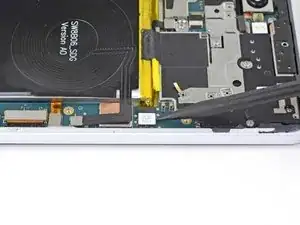
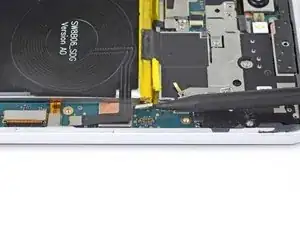
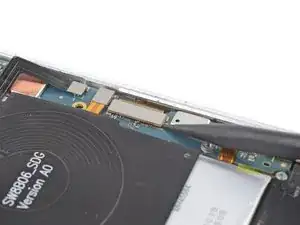
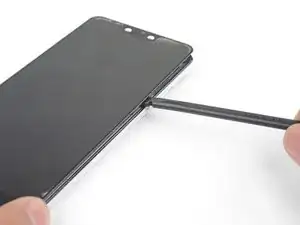
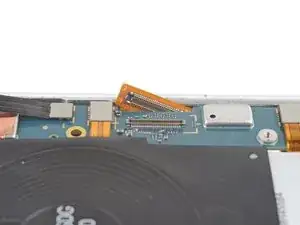
    • Usa l'estremità a punta di uno spudger per staccare e scollegare il cavo flessibile dal suo zoccolo sulla scheda madre disposto lungo il bordo destro del telefono.

  16. hpNdSwNcv2FCorRn
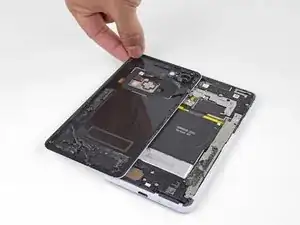
    • Disponi il telefono con lo schermo rivolto in alto.

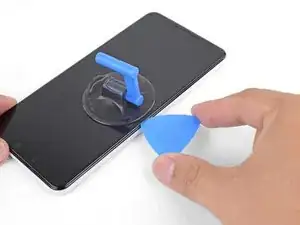
    • Scalda un iOpener e applicalo a uno dei bordi lunghi dello schermo per due minuti.

    • Potrà rivelarsi necessario scaldare di nuovo l'iOpener nel corso di questa procedura.

    • Puoi usare anche un asciugacapelli, una pistola termica o una piastra riscaldata, ma stai attento a non surriscaldare il telefono: la batteria interna può essere danneggiata da un eccesso di calore.

  17. yGxL6eROwEqOWiTV
    yGxL6eROwEqOWiTV
    HO3rC2BmgU1tXVaG
    15EIQuuULYbd4Ajc
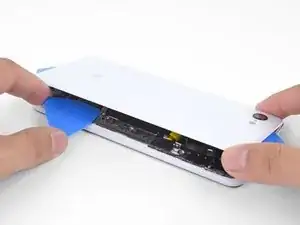
    • Applica una ventosa al lato riscaldato dello schermo, il più vicino possibile al bordo.

    • Se il tuo schermo è molto danneggiato, puoi ricoprirlo con uno strato di nastro da pacchi trasparente per far aderire la ventosa. In alternativa, puoi utilizzare del nastro adesivo molto tenace al posto della ventosa. Se niente di tutto questo è sufficiente, puoi incollare la ventosa allo schermo rotto con della supercolla (cianoacrilica).

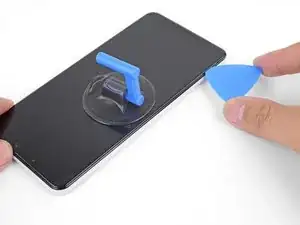
    • Tira la ventosa esercitando una forza costante per creare una fessura tra lo schermo e la scocca.

    • A seconda dell'età del tuo telefono, può essere richiesta una forza notevole. Se incontri dei problemi, applica dell'altro calore e riprova.

    • Inserisci la punta di un plettro di apertura nella fessura.

    So Im pulling up on the suction cup with enough force to pop it off and the screen is not budging. Ive heated the iOpener to max and let it sit for 2, 5, and 10 minutes. I cant seem to get the adhesive to release

    Alex Cartier -

    I actually managed to snap part of an opening pick off trying to work it in there

    Alex Cartier -

    Hey Alex,

    The adhesive holding the screen is really tough. You may need to repeat the heating and pulling procedure multiple times to weaken the adhesive, or use a heat gun or hair dryer to weaken it.

    Arthur Shi -

    Be sure to pry the top most layer only. there is a frame for the replacement kit that is meant to stay in tack that sits directly below the display. It cracks easily too if removed. Advise super glue...

    Brian Sommer -

  18. Sskn6ukwGsfBEfsJ
    Sskn6ukwGsfBEfsJ
    rvMhoEWmtaYZ2LFF
    ZTVPpRalNv6Lw2FQ
    • Fai scorrere il plettro di apertura lungo tutto il bordo dello schermo per tagliare l'adesivo.

    • Quando si raffredda, l'adesivo si secca e diventa difficile da tagliare. In questo caso applica di nuovo del calore sul bordo per facilitare il taglio.

    • Una volta che hai tagliato la colla lungo il bordo, lascia un plettro di apertura nella giunzione tra schermo e scocca per impedire che la colla possa riattaccarsi.

  19. g4FYDnaFoPkmGKTE
    g4FYDnaFoPkmGKTE
    NqI3fpILZXECgorO
    GMSLWuMhAtDONmlN
    • Applica un iOpener riscaldato al bordo inferiore dello schermo per un minuto.

    • Usa un plettro di apertura per tagliare l'adesivo.

    • Lascia un plettro di apertura nella fessura per impedire che la colla possa riattaccarsi.

  20. C2BtJpuOQikUM53p
    C2BtJpuOQikUM53p
    EaiiAbQGMdcqntPs
    ktI2CSDYvjFBjvhq
    • Continua a riscaldare e tagliare finché non avrai fatto passare i plettri lungo l'intero perimetro del telefono.

  21. ktn5V4YeuXGV5bHp
    ktn5V4YeuXGV5bHp
    LgG4ZOeVv2S5DkSf
    iEviIXDGDcbgLiUS
    • Lo schermo e ancora attaccato alla scocca tramite un'estesa area adesiva vicino al centro dello schermo.

    • Inserisci uno spudger o una scheda di apertura in plastica nel bordo e premili verso l'interno per tagliare l'adesivo in profondità.

    • Continua a tagliare finché lo schermo non è libero dalla scocca.

  22. FMNsVggKvUFobEVp
    • Gira il telefono in modo che la scheda madre sia rivolta verso l'altro.

    • Vinci il cavo del display attraverso la cavità nella scheda madre. Questa operazione sarà più facile se angolerai il cavo in modo che esca per prima una delle sue estremità.

    • Puoi sganciare e rimuovere parzialmente la scheda madre per allargare la fessura.

    • Se non hai intenzione di riutilizzare il display originale, puoi semplicemente tagliare il cavo per rendere più facile il recupero.

    I had to partially loosen the motherboard. That guide is a little confusing because its an extract from the full removal of the motherboard. I loosened the motherboard and connecters and gently lifted it with a spider to make space to the connector to pass between the midframe and the motherboard.

    Daniel R. -

  23. xZdVs13QoOyeLhZY
    xZdVs13QoOyeLhZY
    iZ2FFTSU6HIqIZRS
    • Gira il telefono in modo che lo schermo sia rivolto verso l'alto.

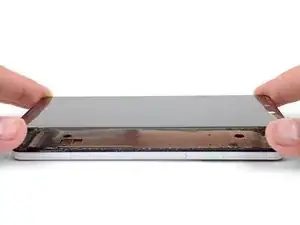
    • Solleva dal telefono il display, tagliando tutto l'adesivo rimasto.
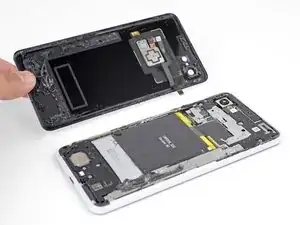
    • Rimuovi lo schermo.

    • Dovrai far passare con attenzione il cavo del display della parte di ricambio attraverso la cavità della scheda madre. Se hai dei problemi a eseguir questa operazione, puoi sempre allentare e rimuovere parzialmente la scheda madre.

    • Confronta la tua parte di ricambio con quella originale: potrebbe essere necessario il trasferimento di alcuni componenti (come la griglia della capsula auricolare) o la rimozione di protezioni adesive dalla nuova parte prima di installarla.

    • Segui questa guida per avere istruzioni su come applicare l'adesivo allo schermo di ricambio.

    • Ricordati di collaudare le tue riparazioni prima di riattaccare lo schermo con l'adesivo.

    • Durante la procedura di avvio dopo il rimontaggio, lo schermo attraverserà una fase di calibratura. Non toccare lo schermo durante questa fase, in quanto potrebbe causare una calibrazione errata del touch e generare problemi.

    The adhesive replacement for the screen has a small strip in the middle. I may have glazed over the "how to apply custom cut adhesive strips" section, but it wasn't obvious. That small strip is for the top of the screen just above the front facing camera.

    ryanralfs -

Conclusione

Se il tuo Pixel non si accende dopo aver sostituito lo schermo, c'è la possibilità che il telefono si sia silenziosamente riacceso mentre la batteria veniva connessa nuovamente. Tieni premuto il pulsante di accensione per alcuni secondi finché il telefono non vibra. Quindi, collega di nuovo lo schermo e prova di nuovo.

Per riassemblare il tuo dispositivo, segui queste istruzioni in ordine inverso.

Porta i tuoi rifiuti elettronici a un riciclatore certificato R2 o e-Stewards.

La riparazione non è andata secondo i piani? Vai sulla nostra comunità Risposte Google Pixel 3 XL per trovare aiuto nella risoluzione dei problemi.

Arthur Shi

Membro da: 03/01/18

248254 Reputazione

23 commenti

What adhesive do you recommend for the screen? This would be my first time doing repair on a smartphone. The guide says to have adhesive for the screen and back, but only has a recommendation for the back adhesive.

Vincent -

Hi Vincent,

The screen itself has a large adhesive pad—what’s missing is the thin perimeter adhesive. For that, I would suggest using some Tesa tape (here are general instructions on how to apply Tesa tape). Some repair techs use E6000 adhesive, but doing so complicates further repairs, and it can get messy. As a reminder, be sure to thoroughly test your repair before you glue the screen in place! Good luck with your repairs!

Arthur Shi -

Hi Arthur! Thanks a ton for putting this guide together, had no problem getting my old display out.

However, I’ve been having an issue I’m hoping you might be able to help with. When I plug the new display into the device, no amount of force-rebooting the device, or re-plugging the display and battery cables, will make the new display power on. I RMA’d the first display thinking it was the problem, but the replacement display I received is doing the same thing. The old display that was removed did work before removal, albeit with significant artifacting (due to the severely cracked display). Do you think there could be some step I’m missing? Perhaps the replacement display is also defective?

Thanks for your help!

Taylor -

Hey Taylor!

That is strange. I have heard scattered reports of other people having similar troubles over various Pixel models. I am assuming that you have the screen connected before you connect the battery. Did you purchase the screen from iFixit? If so, I can definitely check and test some of our screens to see if they are the culprit.

Arthur Shi -

Hi,

It is possible to know if a Pixel 3xl works, if I do not have screen?

I would like to be sure before to buy a screen.

Thanks for your help!

Modesto -

I replaced the screen but now I have 2 problems:

… wireless charging doesn't work

… fingerprint reader doesn't work

I am considering taking it apart again but don't know exactly what to look for.

Can anyone offer suggestions?

Bryan Phillips -

Hi Bryan,

The fingerprint reader is connected by a ZIF connector. Make sure that the fingerprint cable is fully inserted into the connector and properly locked down.

As for wireless charging, there is a chance that the connector was loosened during disassembly. Carefully pry up and re-seat the connector.

Arthur Shi -

Hi I tried to change my display and the touchscreen is not working ,I don't no what to

Danny Zmau -

Any help please

Danny Zmau -

Hi Danny,

Does the display light up?

Arthur Shi -

After completing this repair this past weekend I would like to comment on the removal of the back. I found it to be more difficult than expected. It worked better for me to use a blow dryer (hot) to heat the edges and then was able to pry the back off. I think I applied too little heat initially for fear of damaging the battery but found that I had to apply more than just the heat from an iOpener. Thanks for the great guidance! One other comment…The display connector is difficult to re-thread through the opening without moving the motherboard up to produce a bigger opening. Since I also replaced the USB connector at the same time I had loosened it and it was easier to thread it through.

Thanks again for all the pictures and the step by step!

markduenas -

Great tutorial, but I would definitely include (and not make it optional) motherboard removal as the display cable is extremely hard to slide out of that slot without doing that first. Luckily my display was shot so cutting the cable was the easiest way, but what if you wanted to save the part?

Stephane Polynice -

Hi Stephane,

Good point! I will adjust the step instructions. Situationally, I don’t think there is a reason to remove the display intact—the fragile nature of the Pixel displays usually results in damage when it is removed.

Arthur Shi -

I’m Having the same issues where i bought a screen and it didn’t work so I bought a new one and that one isn’t working either. What are the steps to counteract that. I feel its not the screen at this point.

michael_baldassari -

Very nice tutorial. After replacing the screen, I’m having an issue where the display doesn’t show anything, but the touchscreen portion is working as it provides haptic feedback on what I assume is the lock screen. The old sceen worked.

Alan Fast -

It’s possible the screen cable wasn’t seated properly. You could remove the back panel and reseat the cable. You can test whether it works without adding the rear panel.

Calvin Miner -

Hi, If I buy your screen replacement (Item code: IF356-051-1), and Back Panel Adhesive (Item code: IF356-086-1) - do I need any further adhessive or Tesa tape to complete a screen replacement?

Thanks for the tutorial!

Jason Meyer -

Hi Jason,

Unfortunately, you will still need some adhesive in order to reattach the screen to the frame. We currently don’t stock the custom adhesive for the screen, so a pre-cut adhesive card is the next best solution.

Arthur Shi -

What about transferring the speaker and microphone screens from the old screen to the new screen?

Glendon sowder -

Great tutorial. However, you missed a part about having to transfer speaker grilles to the new screen, as it does not come with them pre-installed. I did miss the step and realized that the speaker grilles are not installed after the screen was already glued back to the chassis.

Pawel Blizniuk -

Thanks for pointing that out! I’ll add a note in the last step.

Arthur Shi -

Hey,

thank you very much for tutorial, it is well made. After I closed the phone everything is normal, but first it said that finger print hardware is not available and after wards, it doesn’t show the error but finger print sensor still not working. I tried to fiddle with ribbon cable to see if it is actually inside the socket and it was ok. I’m out of ideas. Thank you in advance,

Kamyar Baghvand -

I did this directions fully. It took me closer to 3 hours. This was my third screen replacement after my Pixel 1 and Nexus 5. Everything works great! The only issue is that there is about a 1mm gap between the screen and the frame at the bottom. I bought the ifixit screen kit, but the screen tape included just had nothing for the bottom, so I wonder if I did something wrong. Generally though, the screen and back cover both stick out which makes it uncomfortable to hold because those sharp edges dig into my finger pads as I hold it. I thought i did enough to remove the leftover old glue, but it seems there was still enough to cause a gap. It would be nice to include tips or links on how to best remove glue to reduce the chances of this.

The hardest part was warming the glue enough to remove the screen and rear cover. I had to use my Heaterizer XL-3000 Heat Gun to fully remove it- the iOpener wasn’t enough, but it did help to warm up the phone and limit use of the hot air gun, which is always scary.

Calvin Miner -