Introduzione

Questa guida è stata scritta dallo staff di iFixit e non è stata approvata da Google. Scopri di più sulle nostre guide di riparazione qui.

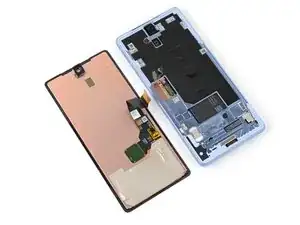
Segui questa guida per rimuovere o sostituire uno schermo rotto o mal funzionante sul tuo Google Pixel 7a.

Per calibrare il lettore di impronte del display, segui questa guida. Gli schermi sostitutivi originali di Google hanno il lettore di impronte già incluso. Se il tuo schermo di ricambio non lo ha, dovrai trasferire il lettore di impronte sul nuovo schermo e ricalibrarlo per continuare a farlo funzionare.

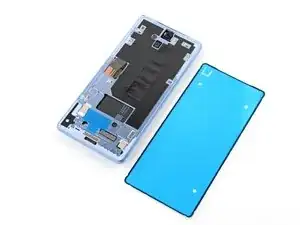
Ti servirà dell'adesivo di ricambio per rincollare i componenti quando riassembli il dispositivo.

Nota: tutte le riparazioni possono compromettere l'impermeabilità del tuo telefono. Mantenere l'impermeabilità dopo la riparazione dipenderà da quanto bene riapplichi l'adesivo.
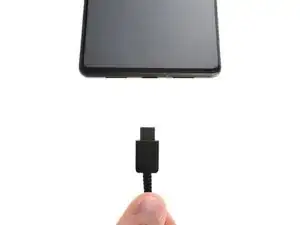
  1. oTvToevuIyEPXQJt
    oTvToevuIyEPXQJt
    DgiJJLhpPrIMBAmo
    • Lascia che la batteria scenda al di sotto del 25% prima di iniziare la riparazione. Una batteria agli ioni di litio carica è un potenziale pericolo per la tua sicurezza.

    • Scollega qualsiasi cavo dal tuo telefono e spegnilo completamente.

  2. HT1ZTxX1oNs4XryD
    HT1ZTxX1oNs4XryD
    eyuuYBXSLKEiVgUj
    • Le schegge di vetro possono complicare lo smontaggio, o peggio, causare ferite. Se il tuo telefono ha uno schermo crepato, segui questi passi:

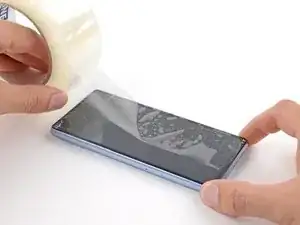
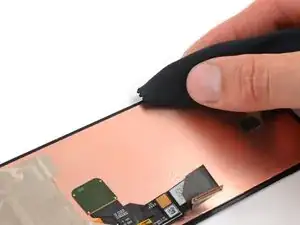
    • Applica strisce sovrapposte di nastro adesivo da pacchi sul vetro rotto, finché non avrai coperto l'intero schermo.

    • Copri solo il vetro, non incollare il nastro adesivo sul telaio.

    • Indossa occhiali protettivi per proteggere gli occhi dal vetro che potrebbe liberarsi durante la riparazione.

  3. 1TQDVgpOwJiqlSJO
    • Lo schermo è incollato saldamente alla cornice, non ha ganci e resiste alla flessione. Serve molto calore per ammorbidire l'adesivo sottostante.

    • Usa un asciugacapelli, una pistola termica o una piastra termica per scaldare il bordo superiore dello schermo finché è quasi troppo caldo al tatto.

    • Fa' attenzione a non surriscaldare il telefono: la batteria e i componenti di plastica sono suscettibili ai danni da calore. Smetti di scaldare se la cornice diventa troppo calda al tatto.

  4. L2GMNNVAAdPVjP2b
    L2GMNNVAAdPVjP2b
    VALpbABicsHrK1sy
    J2ZisEDANkEHpNKA
    • Inserire un plettro è molto difficile. Sii paziente e scalda di nuovo lo schermo ogni volta che ti senti bloccato.

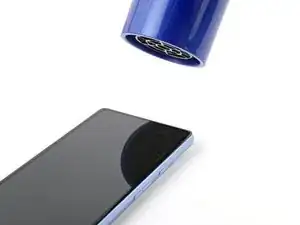
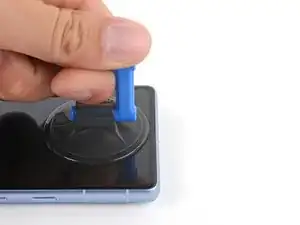
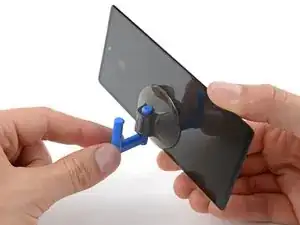
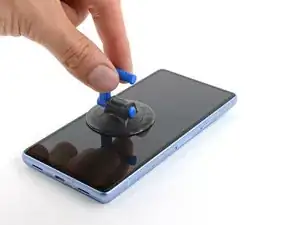
    • Applica una ventosa al centro del bordo superiore del telefono.

    • Se non riesci ad applicare la ventosa a uno schermo rotto o irregolare, prova a piegare un pezzo di nastro adesivo resistente a forma di maniglia.

    • Tira sul manico della ventosa con forza intensa e costante.

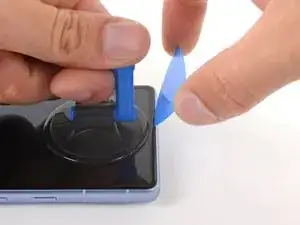
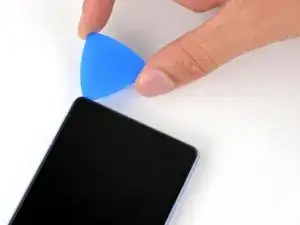
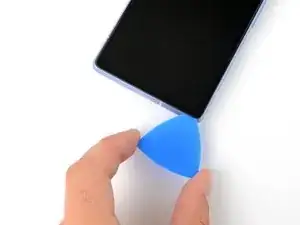
    • Inserisci la punta di un plettro di apertura nel bordo sinistro dell'intaglio dell'altoparlante voce.

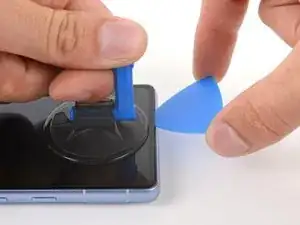
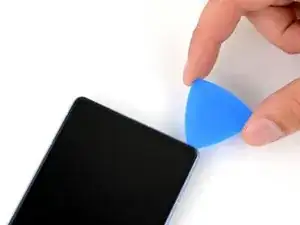
    • Premi con decisione il plettro nell'intaglio e abbassalo parallelamente allo schermo finché non scivola sotto il vetro.

    • Se il tuo plettro è troppo spesso per infilarsi sotto il vetro, prova con un oggetto più sottile come la parte piatta di un Jimmy.

    I was replacing a shattered screen and none of the methods worked:

    1. I couldn't get the suction cup to seal against the screen

    2. None of the tapes I used (packaging, duct, & gorilla) would adhere to the screen

    I ended up using a craft knife to pry open the seal. The opening picks worked great on the non-shattered portions of the screen. This step took me a few hours to troubleshoot

    Parker Kincaid -

    I second Parker's comment, if your screen is badly shattered like mine, a craft knife does the trick. You'll scratch the edge of the frame, but there's no avoiding that. Don't be scared to crack the screen more with the knife, you can take if off shard by shard if you have to. At some point you'll have enough leverage to remove the display part as one big piece and then just scrape off any leftover glass and adhesive once the Screen is removed.

    Gabriel Will -

    I third these comments. Enter through the earpiece speaker like the guide says and chip away the glass little by little. Put tape over the section you're cracking so glass doesn't fly everywhere. Rinse and repeat with more small sections of tape. It's a pain, but after you get the edge glass off, the lcd will be loose. I tried iso, I tried heat, but nothing moved this screen. It even broke my suction cup.

    Isaiah Kolesar -

  5. HvEeM3cpUJsmXJK2
    HvEeM3cpUJsmXJK2
    kA1CD6tOds5fAk2q
    jvZcZhEyEjJLH2dN
    • Non inserire il plettro per più di 2 mm o potresti danneggiare la fotocamera interna.

    • Fai scorrere il plettro avanti e indietro lungo il bordo superiore per separare l'adesivo.

  6. HmAuAqix4Q2Q5hBV
    HmAuAqix4Q2Q5hBV
    jxI2ARJECokoTfUP
    • Non inserire il plettro più di 3 mm o potresti danneggiare i distanziali lungo il bordo destro del telaio.

    • Per avere un riferimento visivo, puoi misurare 3 mm dalla punta e marcare il tuo plettro con un pennarello indelebile.

    • Fai scorrere il plettro lungo il bordo destro per separare l'adesivo.

  7. UvSmBQCmDPYavYZT
    UvSmBQCmDPYavYZT
    PIKIxRjvG3uGqm2b
    • Se vuoi riutilizzare i componenti sul tuo schermo, non inserire il plettro per più di 3 mm, potresti danneggiare il pannello LCD o dei connettori.

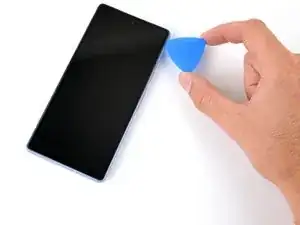
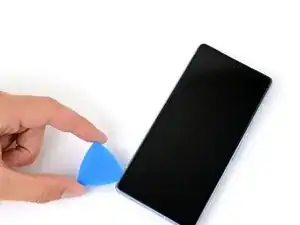
    • Fa' scorrere il plettro verso l'angolo in basso a sinistra per separare l'adesivo del bordo inferiore.

  8. T3dMF44q1KmBY3oX
    T3dMF44q1KmBY3oX
    uKfOQTeZCVpKql5w
    • Se vuoi riutilizzare i componenti dello schermo, non inserire il plettro più di 3 mm o potresti danneggiare i connettori.

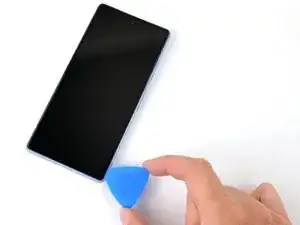
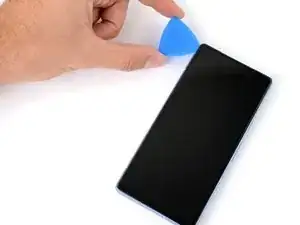
    • Fai scorrere il plettro fino all'angolo in alto a sinistra per separare l'adesivo del bordo sinistro.

  9. iVIHoUqtPpd62Og2
    iVIHoUqtPpd62Og2
    VfHEZTCkjMOquSWD
    GbUugky4p5MqNPbT
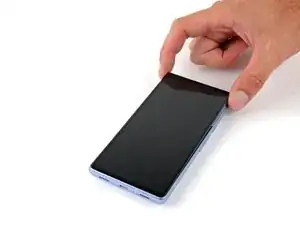
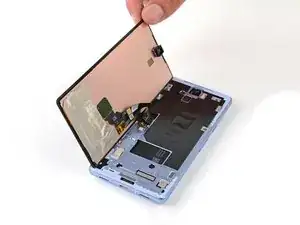
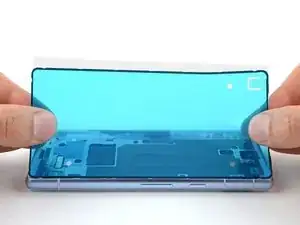
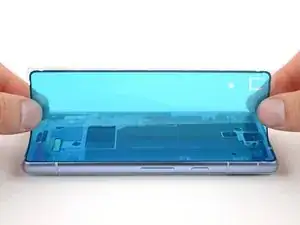
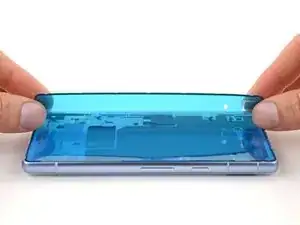
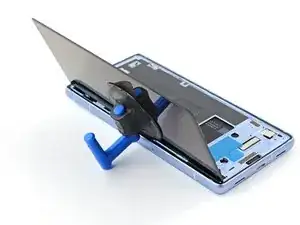
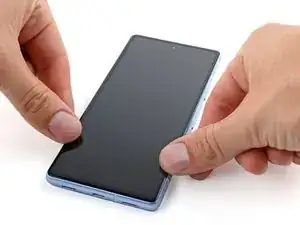
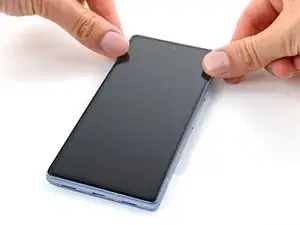
    • Apri il bordo destro dello schermo come se stessi girando pagina in un libro.

    • Fa' attenzione a non tirare il cavo dello schermo.

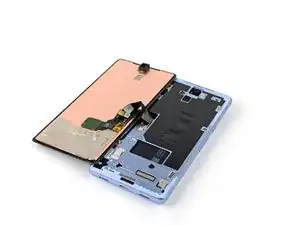
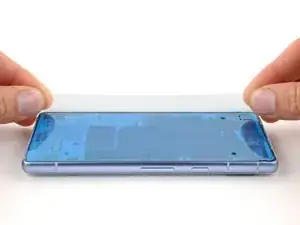
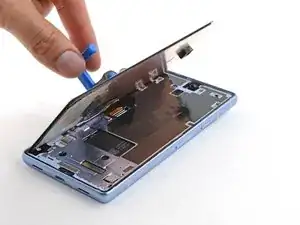
    • Appoggia lo schermo sul bordo sinistro della cornice.

    You also have to deal with the square adhesive strip (the one you replace in steps 14 and 17). I ended up forcing the phone open because I was throwing away the old screen.

    I'm not sure how you'd do it if you wanted to avoid damaging the screen

    Parker Kincaid -

  10. cx3lED4XMcYANCj4
    cx3lED4XMcYANCj4
    bATq4FBOiOiWQcvt
    • Sposta la pellicola di grafite dal connettore dello schermo.

  11. MVW1AG6inFVxvpwR
    MVW1AG6inFVxvpwR
    N5W2ZIVXv4UvOLS6
    trgjRwHGM5CmaYbD
    • Anche se il Pixel 7a usa viti Torx Plus, funzionano anche le punte Torx standard. Accertati di esercitare una pressione costante verso il basso per evitare che la vite si spani.

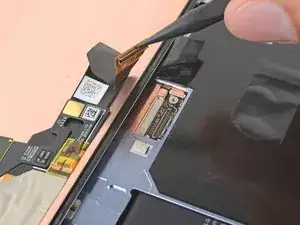
    • Usa un cacciavite Torx T3 per rimuovere la vite Torx Plus 3IP da 2 mm che tiene ferma la copertura del connettore dello schermo.

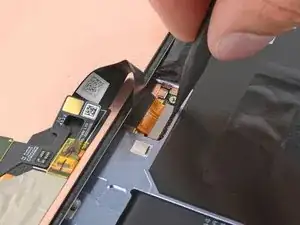
    • Rimuovi la copertura.

  12. GPQ4RSMISbSldgn5
    GPQ4RSMISbSldgn5
    DpoQkMiWCsIdthA3
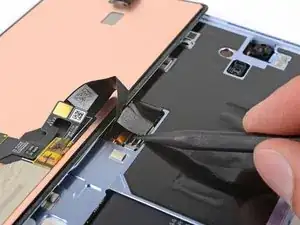
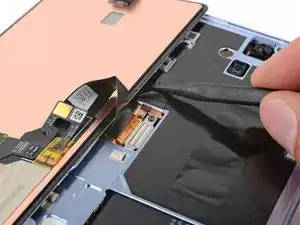
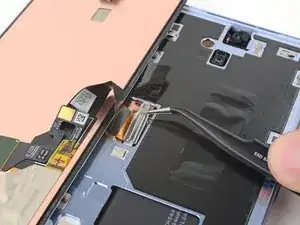
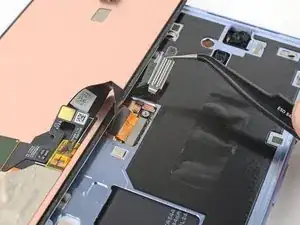
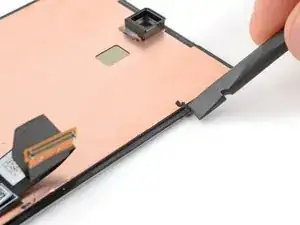
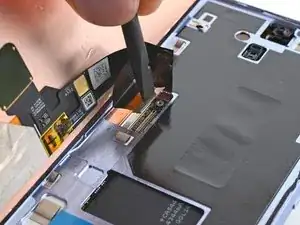
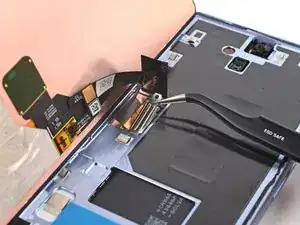
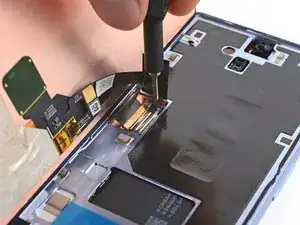
    • Usa la punta di uno spudger o un'unghia per sollevare e scollegare il connettore a pressione dello schermo.

    • Per ricollegare un connettore a pressione, allinealo sulla sua presa e premi leggermente su un lato finché non scatta in posizione, poi ripeti sull'altro lato. Potrebbero volerci più tentativi per allineare il connettore correttamente.

  13. YNymL1NwqPMqlHHZ
    • Rimuovi lo schermo.

    • Durante il rimontaggio, segui questa guida per calibrare il lettore di impronte digitali.

  14. wRmrA3qrHIS1UhjN
    wRmrA3qrHIS1UhjN
    RITgXtO5OgYjlJcl
    • Il lato inferiore della batteria è visibile tramite un piccolo intaglio nel telaio. Fa' attenzione a non danneggiarla con i tuoi attrezzi.

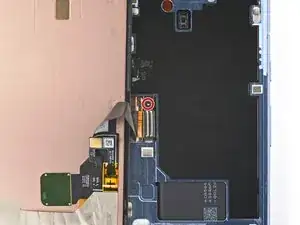
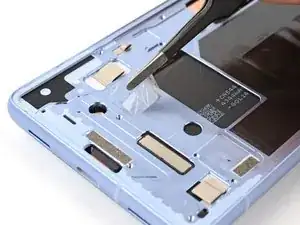
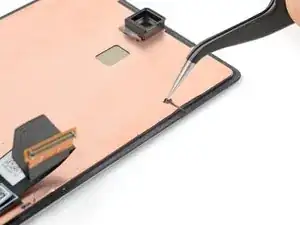
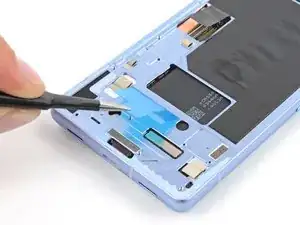
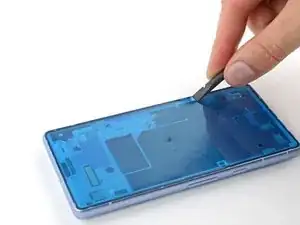
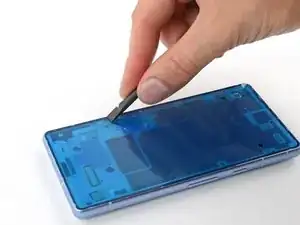
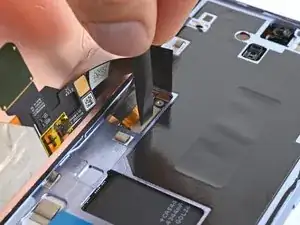
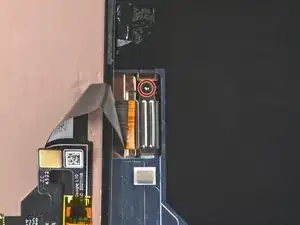
    • Usa delle pinzette con la punta arrotondata o le dita per rimuovere il pezzo quadrato di adesivo vicino all'intaglio della batteria.

  15. 2doFKClJsnfipSGj
    2doFKClJsnfipSGj
    l2qCdqgVRtORtmFq
    CEqSpsSZuxUYK2Y4
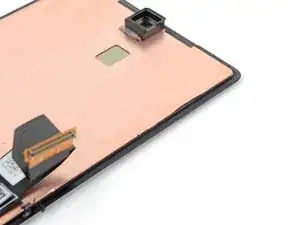
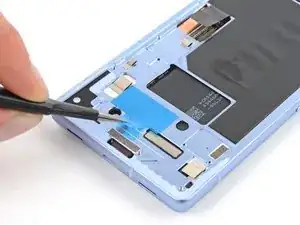
    • Se stai riusando lo schermo originale, rimuovi il vecchio adesivo dal perimetro dello schermo.

  16. baPe3v5oyQvAjqaY
    baPe3v5oyQvAjqaY
    yPQjiEpVkM3OpFef
    pWN1NAtOMPHCUAlC
    • Usa una pipetta o una siringa per applicare qualche goccia di alcool isopropilico ad alta concentrazione (oltre il 90%) al perimetro del telaio.

    • Pulisci i residui di alcool e adesivo con un panno senza lanuggine o in microfibra.

    • Se stai riusando lo schermo, ripeti questo passo lungo anche sul suo perimetro.

  17. ZKJxClGdCpgIyUwc
    ZKJxClGdCpgIyUwc
    biJbbQHUAUetAFDr
    HBaVQupOCbZFoXit
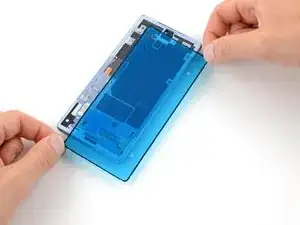
    • Rimuovi il quadrato di adesivo dalla sua pellicola protettiva più grande.

    • Incolla l'adesivo al telaio, nel punto in cui era posizionato quello vecchio, appena sotto l'intaglio della batteria.

  18. JKFS1PRUnIPupYFx
    JKFS1PRUnIPupYFx
    tH4ZC4Z42OxT3Cjq
    • Se lo schermo ha già dell'adesivo preinstallato, salta cinque passi per continuare il rimontaggio.

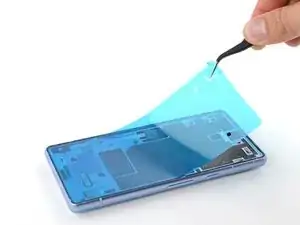
    • Prima di rimuovere le protezioni adesive dello schermo, appoggialo sopra il telaio per vedere se è orientato correttamente.

    • Accertati che le protezioni adesive blu siano rivolte verso l'alto e l'intaglio con la linguetta sia a sinistra della fotocamera interna.

    If you bought the "Fix Kit" version of this, the screen adhesive comes pre-installed on the replacement screen.

    Parker Kincaid -

  19. 3yOvlEFqCLyJ6V2P
    3yOvlEFqCLyJ6V2P
    xvPFJTMBlSTGJoR3
    yKp5caHnMXMh4qJN
    • Prenditi abbastanza tempo per allineare l'adesivo con il telaio. È molto appiccicoso e non potrai spostarlo dopo averlo appoggiato.

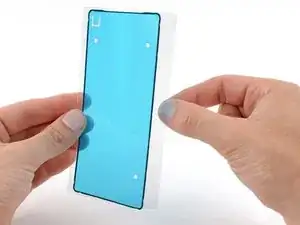
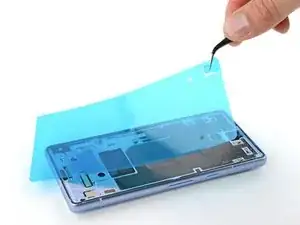
    • Rimuovi la metà destra della protezione dell'adesivo grande. Non rimuoverla ancora tutta.

    • Tieni l'adesivo dai bordi corti, con il bordo lungo destro della protezione piegato all'indietro per esporre l'adesivo.

    • Appoggia il lato destro dell'adesivo sul telaio.

  20. SK5PGPpMZo14eMEl
    SK5PGPpMZo14eMEl
    SJWUe6ovZgkxhMtZ
    DSwRKbFK5Lv5rIFs
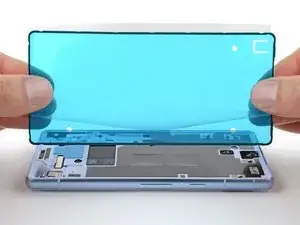
    • Appoggia lentamente il resto dell'adesivo sul telaio, rimuovendo la protezione mano a mano.

  21. 33wLHPmYqWve2tio
    33wLHPmYqWve2tio
    OTpOlxTIqcKMgPWG
    • Usa la parte piatta di uno spudger per premere lungo il perimetro dell'adesivo e fissarlo al telaio.

  22. bZlPyDWQkrnlmkJn
    bZlPyDWQkrnlmkJn
    rEpoqGk2mx4XU2Sf
    3TPTS2jh6iYB2IKc
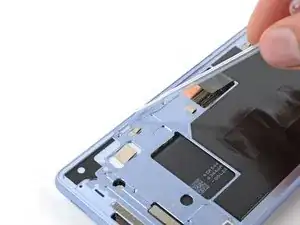
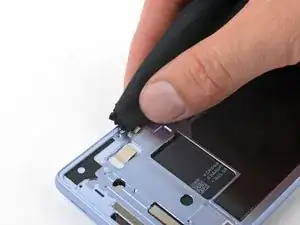
    • Afferra la linguetta blu nell'angolo in alto a sinistra.

    • Rimuovi lentamente la protezione blu dell'adesivo.

    • Se l'adesivo comincia a sollevarsi con la protezione, controlla di averlo premuto tutto in posizione con lo spudger. Se continua a sollevarsi, tienilo fermo con la punta dello spudger mentre lo rimuovi.

  23. ZaBMxLjcMQYjnvSr
    ZaBMxLjcMQYjnvSr
    VVOvqiQlrVUF5JdF
    • Applica una ventosa sul bordo sinistro dello schermo di ricambio, con il manico rivolto a sinistra.

    • Appoggia lo schermo dritto sul lato sinistro del telaio.

  24. RgYcA4HTWI6xvENl
    RgYcA4HTWI6xvENl
    DYJHuhJqGGTHQtc1
    • Collega il cavo dello schermo allineandolo sulla sua presa e premendo su un lato finché non scatta in posizione, prima di premerlo tutto verso il basso.

  25. aYykds1QtQtaE1CG
    aYykds1QtQtaE1CG
    VMvMfdjZ6pSRfkTV
    c2NxjOdHOuo4CXxo
    • Inserisci la copertura del connettore dello schermo nella sua fessura nella scheda logica.

    • Usa un cacciavite Torx T3 per installare le due viti Torx Plus 3IP e fissare la copertura del connettore dello schermo.

    Achtung! nicht zu feste anziehen - nach fest kommt bekanntlich locker. Man kann die Schraube allerdings ordentlich festziehen.

    Ich habe es allerdings zu gut gemeint und mir den Schraubenkopf abgebrochen.

    Jetzt kommt mein Displaystecker dann wohl ohne Schutzabdeckung aus....

    Gian-Marco -

  26. vAKD4Hbe4lrOr1X2
    • Rimuovi la protezione blu dall'adesivo quadrato sul telaio.

  27. IXsTZCBRqtDLTdvb
    IXsTZCBRqtDLTdvb
    AVkSJvplWCVbuJKo
    ZUJf2kc2JBHIsTF2
    • Tieni lo schermo appena sopra il telaio con il manico della ventosa.

    • Usa uno spudger per piegare l'aletta di pellicola di grafite sul cavo dello schermo.

    • Premi lo schermo in posizione.

  28. KUCRVKEiGuqbyhHC
    KUCRVKEiGuqbyhHC
    rkBBtfH26QkXBPOX
    • Rimuovi la ventosa.

    • Premi con decisione intorno al perimetro dello schermo per fissarlo al telaio.

    • Per chiuderlo meglio, scalda lo schermo con un iOpener scaldato, un asciugacapelli, una pistola termica o una piastra termica prima di premere sul perimetro.

    le joint est pré-collé sur l'écran.

    christophe fresco -

Conclusione

Per rimontare il dispositivo, segui queste istruzioni in ordine inverso.

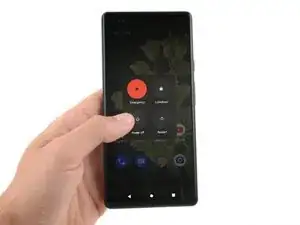
Per calibrare il lettore di impronte dello schermo usa lo strumento di aggiornamento e riparazione software di Google Pixel.

Porta i tuoi rifiuti elettronici a un riciclatore certificato R2 o e-Stewards.

Per eseguire un test diagnostico con lo strumento di diagnostica di Pixel, clicca qui.

La riparazione non è andata come previsto? Prova delle soluzioni ai problemi di base o rivolgiti alla nostra comunità Risposte per trovare aiuto.

Clay Eickemeyer

Membro da: 19/09/22

64976 Reputazione

14 commenti

This guide worked well for me and I was able to replace my screen despite it being severely cracked - expect a lot of screen breakage and glass pieces if that's the case! I set everything in a tray to minimize glass fragments going all over.
Once the screen was installed, the wrapper for the iFixit provided screen has a label that says "UDFPS calibration required" with a QR code.
This takes you to a Google site that tells you how to set up fingerprints on your phone. I don't think that link is helpful.

I needed to go to https://pixelrepair.withgoogle.com/udfps where Google has a tool that allows easy updating of the fingerprint sensor software on your phone, which is a requirement after a new screen is installed. Open that site on a computer (PC or Mac, no ChromeOS, no tablets) and follow the instructions, which include connecting your phone via USB cable.

Hans Chun -

I had trouble with the calibration step. I ended up having to install the Google USB driver. I downloaded it here and followed this guide, using the Windows 10 instructions for Windows 11

Parker Kincaid -

The guide worked very well. Although it was very hard to remove the old display (I have two left hands, all thumbs), I was able to exchange it. Thank you very much!

Martin Kinne -

Just replaced my phone 7a screen using the available kit. It was next to impossible to get the old screen off using the heat and pry tools. Would definitely recommend getting their jimmy tool. I ended up shattering the old screen on purpose using a punch tool and peeling the glass off the digitizer and frame. This was easiest for me without ordering another tool. Would NOT recommend doing it this way! The other deviation from these instructions is that the screen replacement version sent to me (10/2023) had the screen adhesive already applied to the screen. Made it much easier to install since there was no human error applying the screen adhesive to the phone frame first then lining up the screen. Definitely an improvement! Overall, took me way too long to complete, closer to 2+ hours due to the issues getting the old screen off. But certainly manageable by any DIYer. Would definitely buy from iFixIt again in the future if needed.

Harry -

You just described my experience exactly. Busting the old screen was awful but it worked. Without better tools, I can't imagine getting that screen off there!

Jeff -

The customers screen was Spider-Webbed pretty badly, and it was a brand new phone basically so the new adhesive was very sturdy. With a few attempts at reheating well under the point you couldn't touch it and finding the text that states to start at the left side of the top speaker, it broke free. The screen was sturdy enough to apply heat and use a jimmy to pull up while attempting to evenly distribute the weight and it worked. Took some force pulling up, somewhat effort commanding to do while making sure you aren't using any part of the internal organs or cosmetic exterior as leverage. With the brand new old spidered screen now out of the way, the rest of the clean up process was a breeze. I did not quite get though why I was provided with a T2 in the screen kit that didn't fit. I am glad I had the client spend the extra for the tool kit with the T2, T3, and T4! I do have them as well in another kit, but I would rather not use a toolset designated for different tasks. Great guide and genuine parts as always. Thanks again! 1.5 Hrs.

Tec Knows -

The absolutely hardest part was getting the old screen off. Everything else was relatively easy, a bit slow trying not to damage anything. But instructions were straight forward and because my phone had all the latest updates it worked straight away especially with the finger scanner.

Ultimately I had to use a steel butter knife at the top left where the speaker phone is to pry it open. I had gotten my phone so hot that the back glass cover's glue started to separate and yet the front was still locked in like a rock.

Im a first timer doing a self repair kit and yeah hopefully won't be anytime soon in the near future took me over 2.5 hours which most of the time spent was just on the glass cover.

Taroi Tofilau -

I bought my 7a as a discounted warranty return, and I am pretty sure the screen had already been replaced once! So I managed to crack the replacement... Repair went well total time just less than 2 hours.

Getting the screen off went easily with heat from a hairdryer and the iFixit picks. Hardest part for me was attaching the new cable and re-fitting the screen connector cover, then driving in the small screw. But I have shaky hands!

Two warnings for others:

1) I messed up by wiping alcohol onto the selfie camera while I cleaned the adhesive off the frame! Now my selfie camera is clouded around the bottom. Luckily I hardly ever use it...

2) I nearly accepted to wipe my phone while trying to re-activate the fingerprint reader. You don't need to do that! My mistake was putting the phone into "recovery mode" before plugging it into the computer. Just leave it in fastboot and the website detects that you need to re-install the fingerprint reader software. Then reboot two times and it will work.

Matthew MacLeod -

Worked great, thanks ifixit dudes and dudettes!

I forgot to reinstall the little bracket that holds the ribbon cable connector in place... but I'll keep it around in case i actually need it some day.

Tony Phipps -

We're glad your repair went well! That bracket is just responsible for keeping the screen connector in place. The only danger is that it may suddenly disconnect following the device hitting the ground or flexing a severe amount.

Clay Eickemeyer -

Merci beaucoup pour ce tutoriel grâce à laquelle la réparation n'était pas trop difficile.
J'ai mis 2 heures pour la réparation , dont 1,5heure pour enlever l'ancien écran car il était cassé en milles morceaux: j'ai doncdû chauffer au fur et à mesure et enlever les petits morceaux d'écran brisés un par un le long du contour.
Ensuite nétoyage des restes de la colle et des petits débris de verre avec le petit outils en plastique fourni.
Cette version d'écran venait déjà avec le pourtour adésif sur l'écran, donc beaucoup plus facile à installer que dans le tuto.
Seule petit problème: le software pour mettre à jour le lecteur d'emprunte digitale ne reconnaissait pas le 7a sur mon PC. J'ai du installer les drivers pour cela.
Un grand bravo à toute l'équipe de Ifixit pour cette super solution de remplacement d'écran.

Eric Le Leu -

Nous sommes heureux que votre Pixel fonctionne à nouveau ! Merci de partager votre expérience.

Clay Eickemeyer -

Just replaced the screen, the screen was shattered which made it complicated. Couldn't find a way in the screen on the top. Eventually after removing small pieces of glass it was possible. I used a Jimmy to open it more and get under the screen itself then I could remove it in a few tries. Did scratch the screen a little bit, but installing was easy. The steps do not mention peeling off the blue liner of the edges of the genuine replacement screen.

timvde -

Have the same experience as others with the not being able to use suction cup, and also I couldn't get the plastic pick or a craft knife further than the sides of the earpiece speaker cutout because of the shattering glass. Countinued to break the glass around the edges, ..absolutely excruciating(!) So after reading this guide I turned my phone off and started the repair at 19% battery. And when I restarted hours later (without any charging) my phone was at 100%. How, what, I really truly don't understand.. Didn't even connect a cable for the fingerprint sensor config as I don't use it. I accidentally made a scratch to the black tape/material covering the battery when removing glass, could this somehow have caused the 80% extra battery level?

Liz -